Z650 Restomod Build Thread
Discussion


I have been impressed how quickly the project builds on here get done, as mine usually take years rather than months. But here's the tale of my latest project, which is well on the way to completion after many problems
.
I needed another project like a hole in the head, but just before the first C19 lockdown I was offered the basics (very basic) start of a project as part of a swap, and since it was an old Kawasaki, I took it on board. This was going to be something to keep me busy through 2020 project, but its taking a lot longer than that.
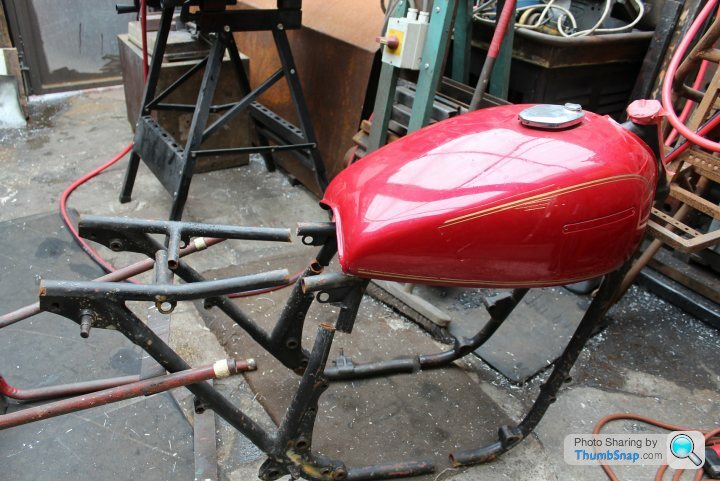
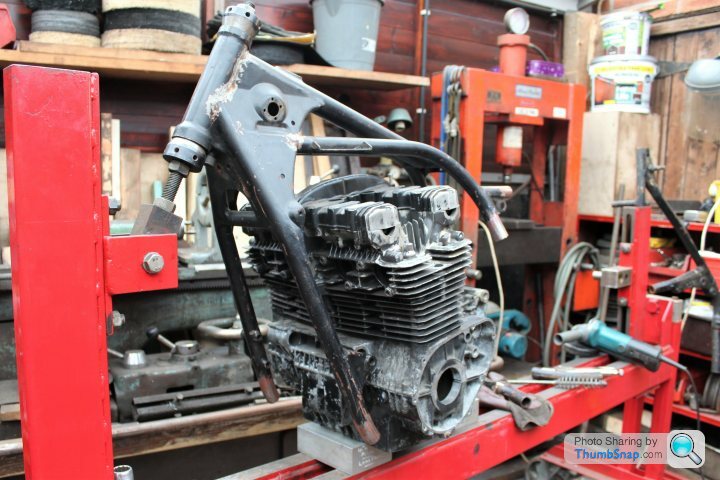
What I had was a 1978 Kawasaki Z650 frame, a Z1000 tank and cases / block / head of a worn out GPz1100B1 motor, in pieces.
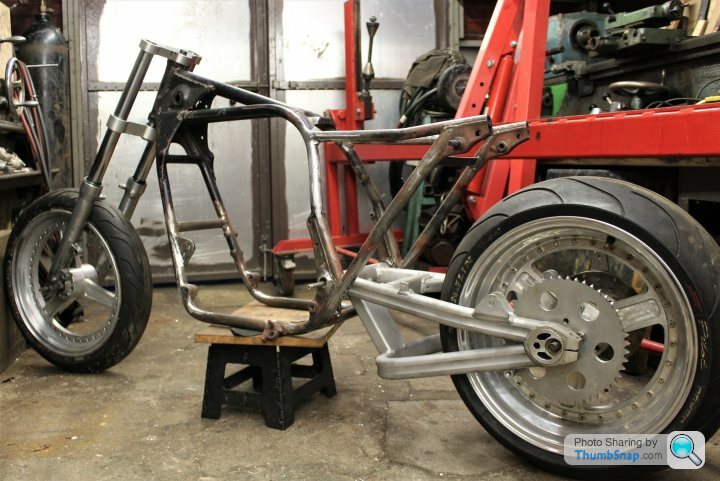
If you've checked out the pic below already, you'll have noticed the frame isn't quite as it left the factory. First it had been chopped up years ago as some kind of bobber, while it has now been cut up to widen it by about an inch and a half (35mm) to accommodate modern wheels/ swing arm and of course the GPz1100 motor.
It'll be having better suspension, but not USD forks. As for the wheels, I have a pair of homemade 17inch wheels which came off my old drag bike, not sure if they'll make the final build, but they'll do for now.
The end result I'm aiming for is a practical, comfy Zed, with modern brakes and suspension, since all my other bikes are neither practical or particularly comfortable. I have long admired the Sanctuary Zeds built in Japan, so something along those lines.. without the £50K price tag. My first 'big bike was a Z750 bought new in 1983, so always favoured Kawasaki of the big four, while I have a couple of mates who are real Zed heads who will be helping me with the build.
.
I needed another project like a hole in the head, but just before the first C19 lockdown I was offered the basics (very basic) start of a project as part of a swap, and since it was an old Kawasaki, I took it on board. This was going to be something to keep me busy through 2020 project, but its taking a lot longer than that.
What I had was a 1978 Kawasaki Z650 frame, a Z1000 tank and cases / block / head of a worn out GPz1100B1 motor, in pieces.
If you've checked out the pic below already, you'll have noticed the frame isn't quite as it left the factory. First it had been chopped up years ago as some kind of bobber, while it has now been cut up to widen it by about an inch and a half (35mm) to accommodate modern wheels/ swing arm and of course the GPz1100 motor.
It'll be having better suspension, but not USD forks. As for the wheels, I have a pair of homemade 17inch wheels which came off my old drag bike, not sure if they'll make the final build, but they'll do for now.
The end result I'm aiming for is a practical, comfy Zed, with modern brakes and suspension, since all my other bikes are neither practical or particularly comfortable. I have long admired the Sanctuary Zeds built in Japan, so something along those lines.. without the £50K price tag. My first 'big bike was a Z750 bought new in 1983, so always favoured Kawasaki of the big four, while I have a couple of mates who are real Zed heads who will be helping me with the build.
Edited by Merch131 on Friday 20th August 13:34
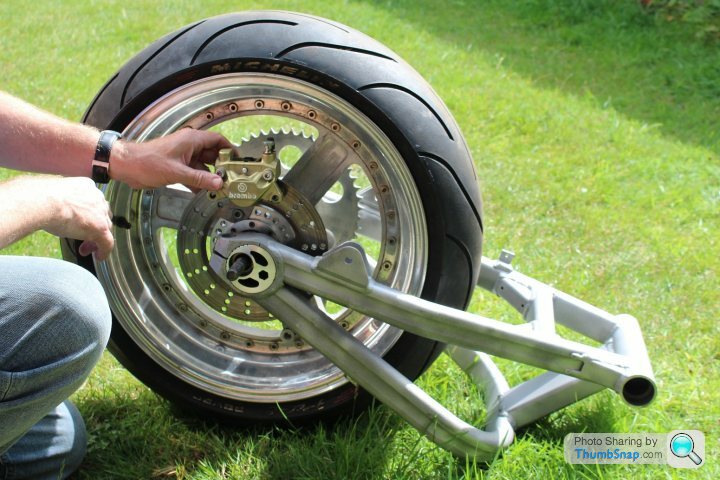
For the swingarm, the first idea was to use an old ZXR monoshock arm, modified to twin shock, with a pair of billet adjusters .. that happened to be going spare. But it needed a lot of work and the result was going to be too heavy. Luckily I was given the arm from a damaged ZRX1200, which was covered in melted plastic, had small hole in one of its braces and had been narrowed at the pivot... Not ideal, but it was free, so I took it home.
Had the damage welded up and then I cleaned it up in a mates blasting cabinet. My old drag bike donated an as new rear Brembo and a mount was machined up to fit it to the ZRX arm and billet rear wheel.. So far so good, and not a penny spent.
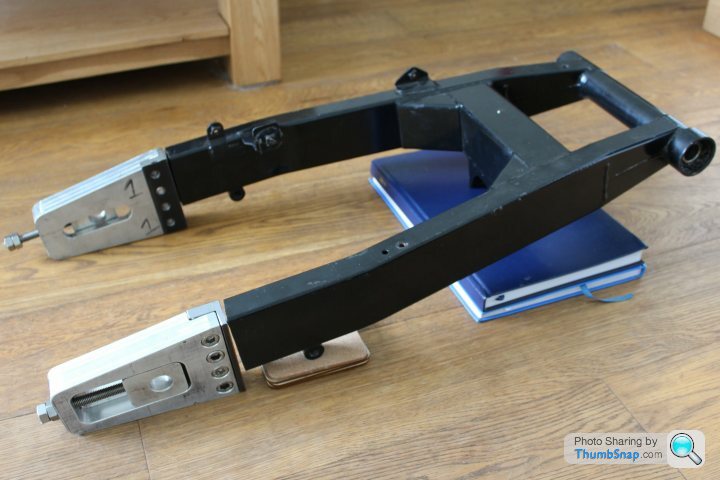
Had the damage welded up and then I cleaned it up in a mates blasting cabinet. My old drag bike donated an as new rear Brembo and a mount was machined up to fit it to the ZRX arm and billet rear wheel.. So far so good, and not a penny spent.
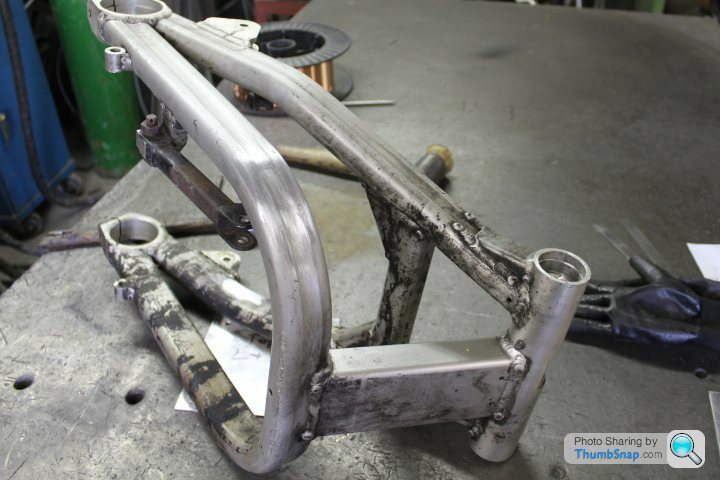
Once the front half of the old frame was mounted on my mates jig, the frame lowers were cut out and new tubing inserted along with new motor mounts. The rear half got a bigger 20mm pivot (to take the standard ZXR spindle), along with additional reinforcement.
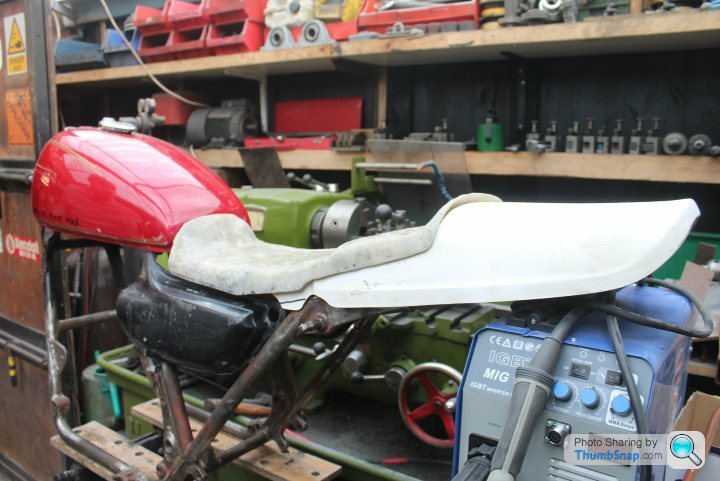
I've not quite committed to a particular seat unit / carbs / air box yet, so the final finishing touches on the frame will have to wait.
I've not quite committed to a particular seat unit / carbs / air box yet, so the final finishing touches on the frame will have to wait.
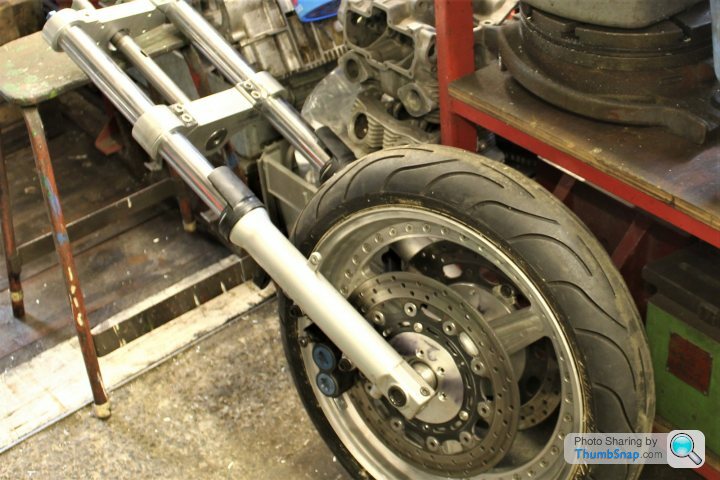
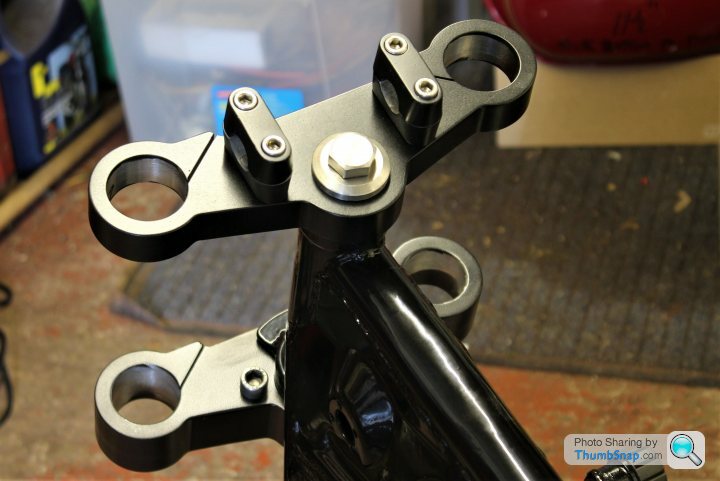
With the main welding of the frame done, I could mock up the rolling chassis, using a pair of 41mm forks of the right length (they need rechroming so weren't worth much). I found the billet yokes on my mates workshop shelf where they'd sat unused since he made them a decade ago. Waste not, want not...
Neither of which will be used in the final build, but they'll do for now to get it on its wheels.
Neither of which will be used in the final build, but they'll do for now to get it on its wheels.
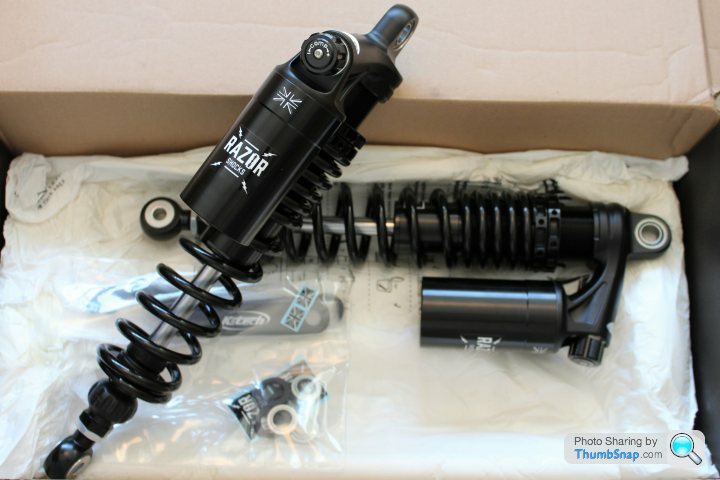
All the spacers and engine bolts/brackets were machined up, the OE rubber mounts of the engine being replaced with alloy top hat spacers.. stiffens the frame. While the engine mounting bolts were made from 316 stainless. I spent far too much on a pair of remote reservoir shocks by K-Tech. They are built to the spec of a ZRX1200 (365mm) but with slightly softer springs, as the bike should be lighter than a standard ZRX, while its unlikely it'll ever carry a pillion.
The white cardboard over the drive sprocket is just to give me an idea of the size of alloy plate needed to make the outrigger bearing support..
The white cardboard over the drive sprocket is just to give me an idea of the size of alloy plate needed to make the outrigger bearing support..
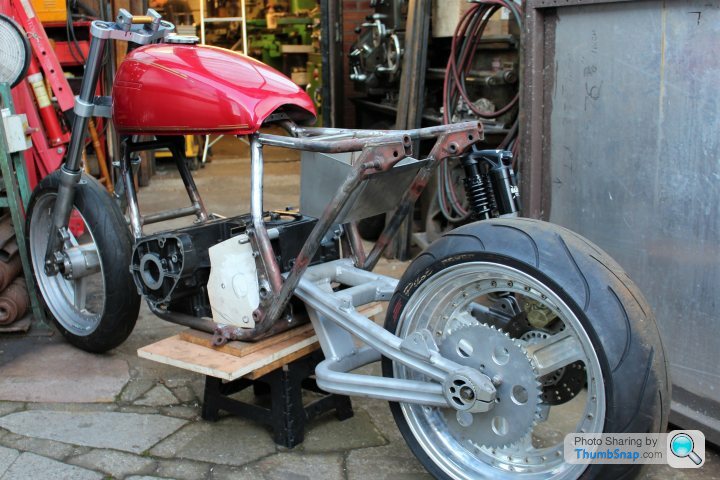
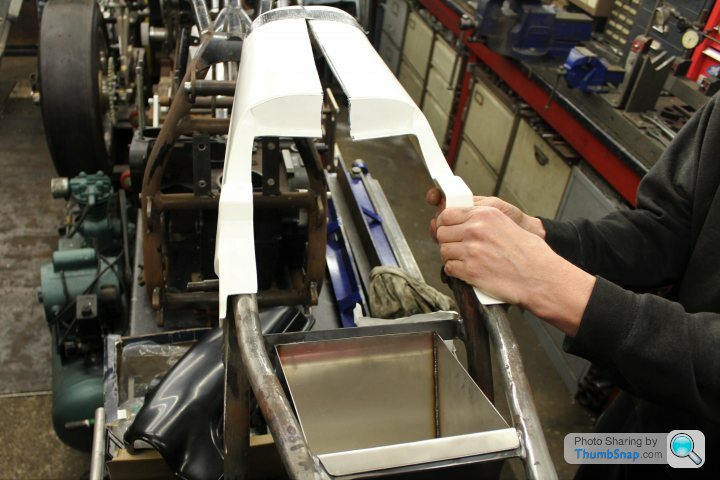
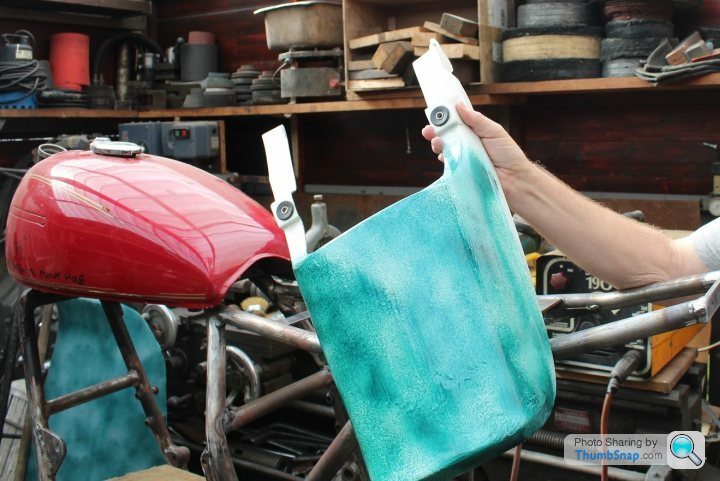
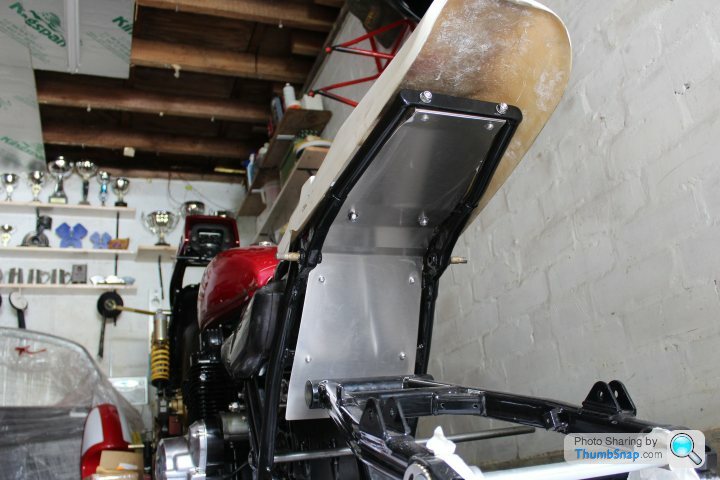
When the Z1 side panels and tail unit arrived, sadly and not unexpectedly the tail piece wont fit on the now widened frame. I was hoping the tail unit would have some flex so it'd go over the seat rails, but no chance. The frame has been widened from 10 to 12 inches.
If the tail piece had been made from fibreglass I'd have been tempted to cut it in half and widen it to fit, but its made from ABS and its too nice to cut up in any case. Instead I bought a cheaper fibreglass Z1 tail piece, and promptly cut it in half. It fits ok when the two halves are angled in the pic below, but not sure yet what the best looking option of positioning them before I fibreglass them back together.
There are a few unexpected problems with trying to fit early Z1 bodywork on a 650 frame, one of which is that the fuel tap will have to be moved forward as it hits the longer Z1 side panels. I thought the tank was from a Z1000, but it seems its from a Z900, which have a different petcock position. The other issue is that the Z650 frame is shorter than a Z1, so the Z1 side panels dont quite line up with the back of the tank. Something I will have to live with.
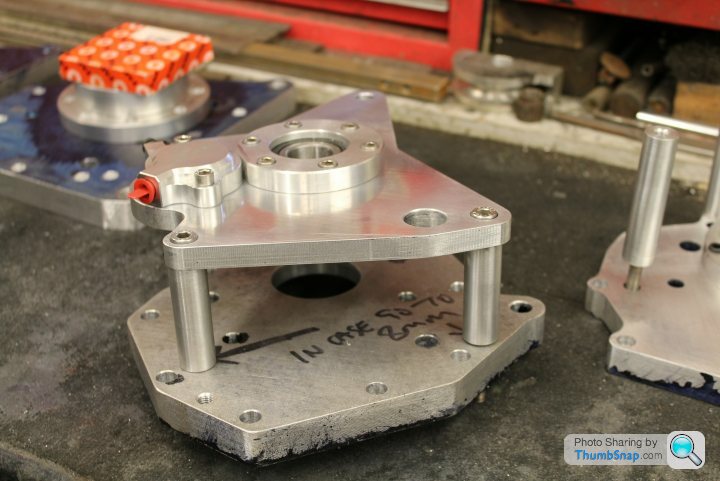
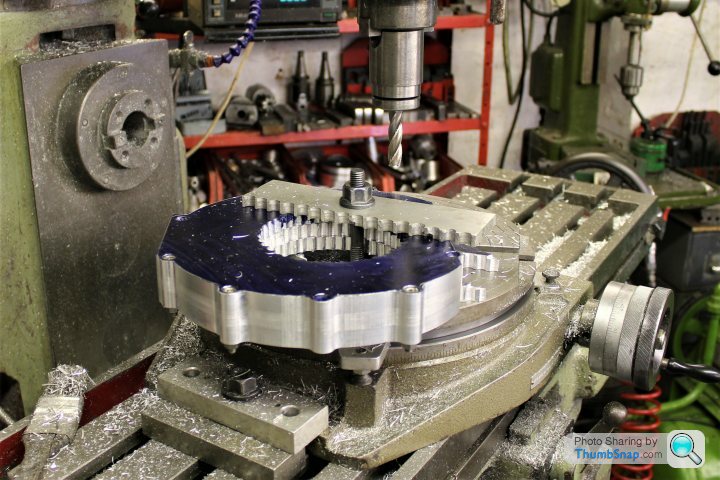
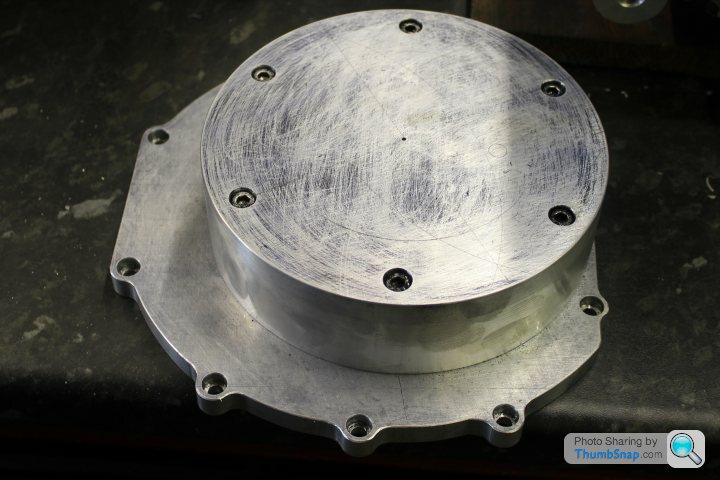
Meanwhile the inner plate for the outrigger bearing support is almost done, its from this plate that the outer plate (which carries the support bearing will be mounted from, via stand off spacers. This outer plate will also be used to mount a clutch slave cylinder to convert from cable to hydraulic clutch.
If the tail piece had been made from fibreglass I'd have been tempted to cut it in half and widen it to fit, but its made from ABS and its too nice to cut up in any case. Instead I bought a cheaper fibreglass Z1 tail piece, and promptly cut it in half. It fits ok when the two halves are angled in the pic below, but not sure yet what the best looking option of positioning them before I fibreglass them back together.
There are a few unexpected problems with trying to fit early Z1 bodywork on a 650 frame, one of which is that the fuel tap will have to be moved forward as it hits the longer Z1 side panels. I thought the tank was from a Z1000, but it seems its from a Z900, which have a different petcock position. The other issue is that the Z650 frame is shorter than a Z1, so the Z1 side panels dont quite line up with the back of the tank. Something I will have to live with.
Meanwhile the inner plate for the outrigger bearing support is almost done, its from this plate that the outer plate (which carries the support bearing will be mounted from, via stand off spacers. This outer plate will also be used to mount a clutch slave cylinder to convert from cable to hydraulic clutch.
The outrigger bearing support turned out ok. though the lovely Oberon clutch slave cylinder I bought wouldnt fit, pity as it cost £100. Since the engine originally had a cable clutch, I went for a ZRX1200 slave, as then I could fit ZRX master cylinders to match. Oh well, lesson learnt. Seems I should've gone for a ZXR750 unit, as its got a smaller 2 mounting bolt body rather than the ZRX 3 bolt body.
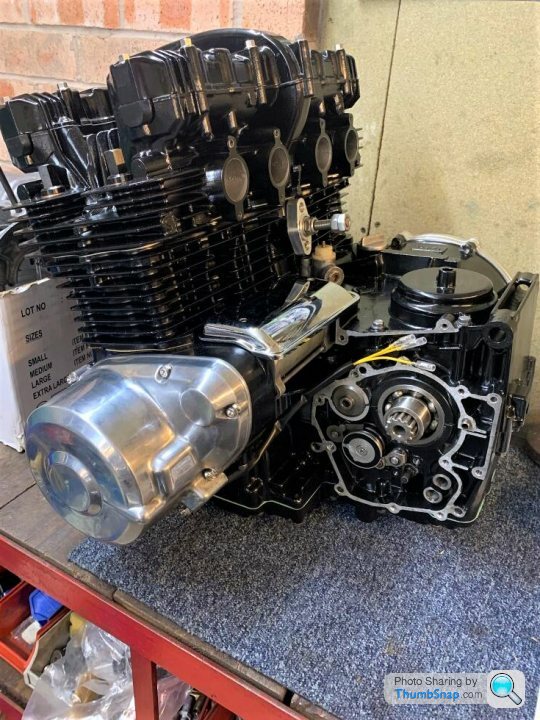
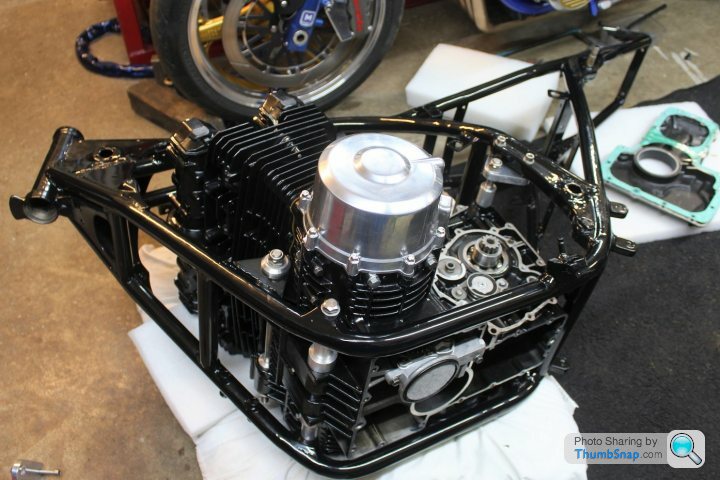
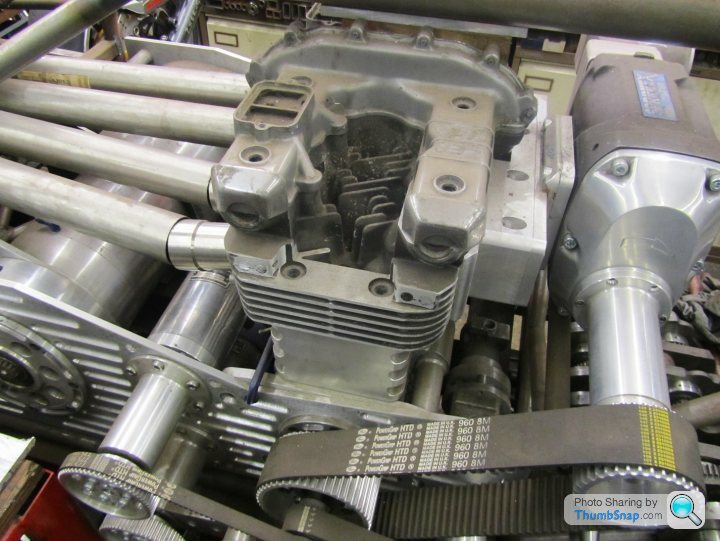
The engine came with a slightly used set of pistons, which would take the capacity to 1135cc. So I had the block rebored and then took it and the cases to Cam Coat, who gave them a high temp ceramic gloss black finish. The finish isn't as thick as paint or powder coat, but is supposed to be very tough. it ought to be for the cost.
Meanwhile I had painted the sump and cam cover myself, since they could be easily removed in the future if the paint doesn't prove to be durable in use. I originally wanted the engine to be satin black, but only gloss black was available in the ceramic finish, so I had to respray the covers gloss black to match the block and cases..
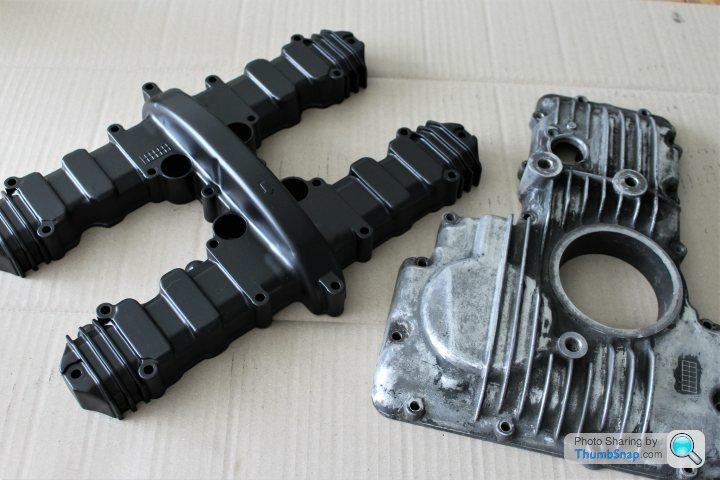
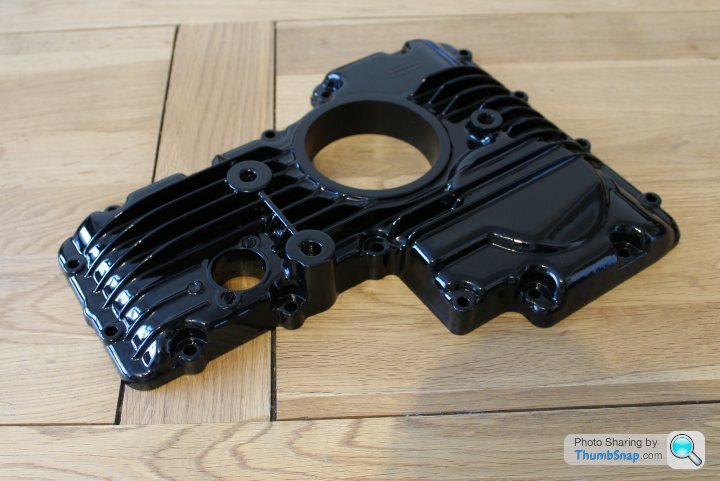
Meanwhile I had painted the sump and cam cover myself, since they could be easily removed in the future if the paint doesn't prove to be durable in use. I originally wanted the engine to be satin black, but only gloss black was available in the ceramic finish, so I had to respray the covers gloss black to match the block and cases..
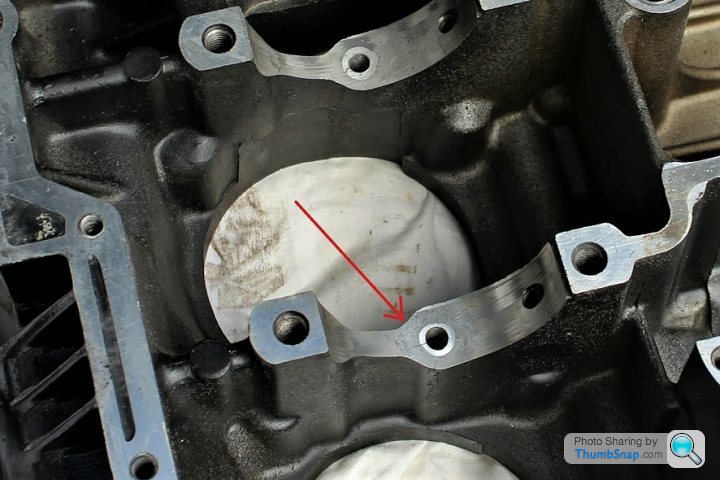
With the crank cases back from Cam Coat, I took them to my mate, who would build the engine. This is when the first of the many problems with the project appeared. Close inspection of the cases, showed one was cracked, around the peg of one of the journals.. This was after I'd spent £400 on their ceramic finish. Not a good day..
Edited by Merch131 on Friday 20th August 17:15
Seems such a crack is common in old Zeds, and with care it could be repaired.
I took the case to the local welder, who ground away the metal until he had removed the cracked alloy.
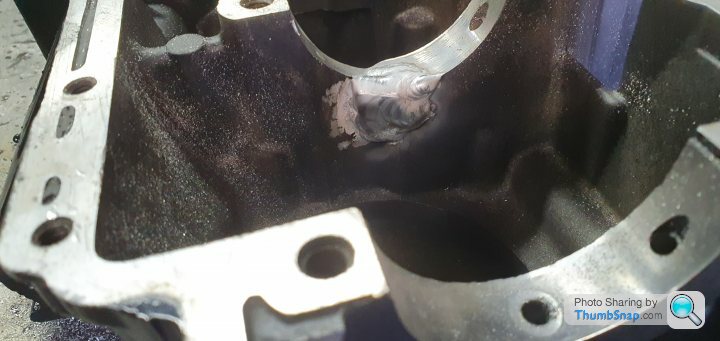
Then he built the alloy back up with weld.. due to C19 I couldn't see all this being done, but he did send me a few phone pics..
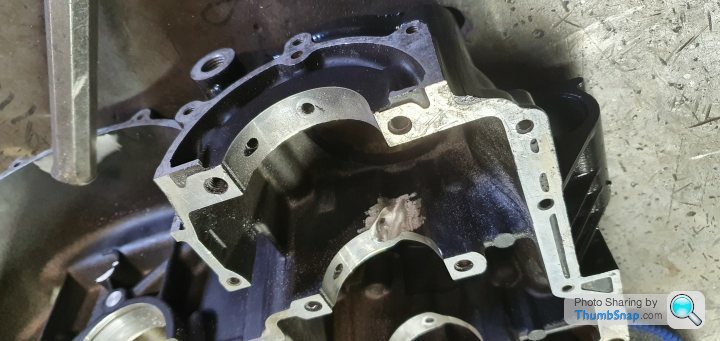
I took the case to the local welder, who ground away the metal until he had removed the cracked alloy.
Then he built the alloy back up with weld.. due to C19 I couldn't see all this being done, but he did send me a few phone pics..
The next step I also couldn't see, but my mate machined back the excess weld, then made a steel bar of the appropriate diameter which he wrapped in finer and finer wet and dry as he slowly rotated the bar in the case to make good the journal. Finally the peg hole was redrilled.. and the case was good again.
The engine was built using a rebuilt crank that had been welded for strength. Ditto the gearbox was made up from the best components of around seven gear clusters my mates had between them. What ever money I put into the bike at this point went into the engine, it got heavy duty APE studs, one off cam chain tensioner and a completely rebuilt head, with all new valves, guides, seals etc. The head was built by a nice chap in Leeds who has built countless drag race engines over the last 50 years.
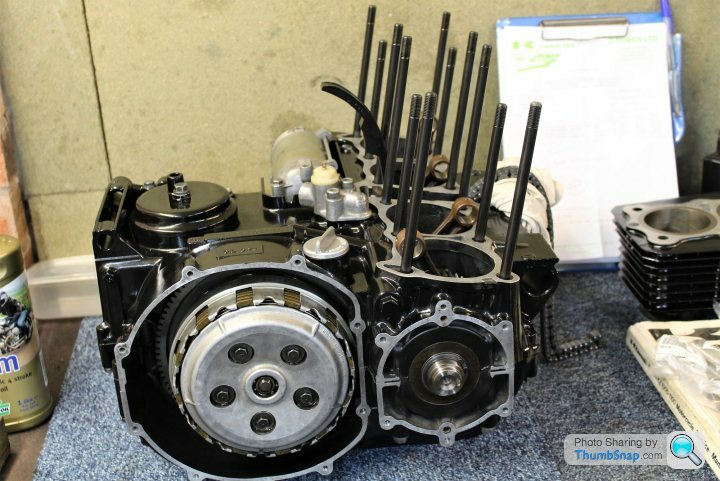
The engine was built using a rebuilt crank that had been welded for strength. Ditto the gearbox was made up from the best components of around seven gear clusters my mates had between them. What ever money I put into the bike at this point went into the engine, it got heavy duty APE studs, one off cam chain tensioner and a completely rebuilt head, with all new valves, guides, seals etc. The head was built by a nice chap in Leeds who has built countless drag race engines over the last 50 years.
The next problem then appeared, one of the rings of the 1135cc pistons somehow got damaged, and couldn't be used. No problem normally, just by another for a few quid. Except these pistons were unusual, and the only ring kit we could find was £280 from Germany.. sigh.
Oh well, I was never that happy about using used pistons.. so I opened my wallet and bought a new set of forged 75mm pistons from Wossner. These took the engine out to 1170cc, which meant the block needed to be rebored again.
That done, the engine build could continue..
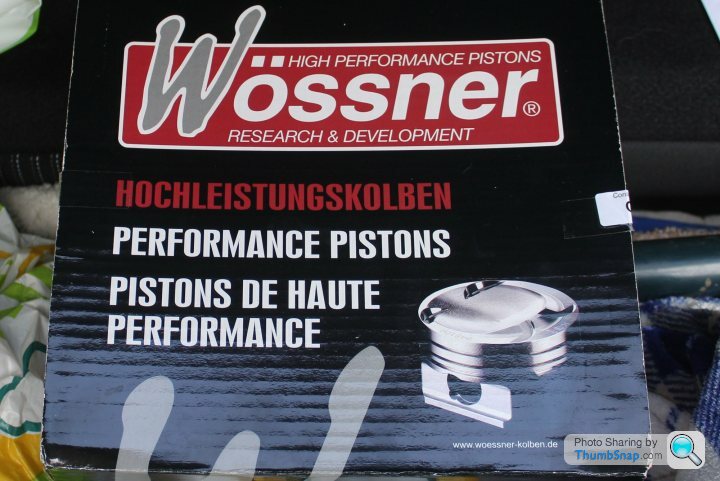
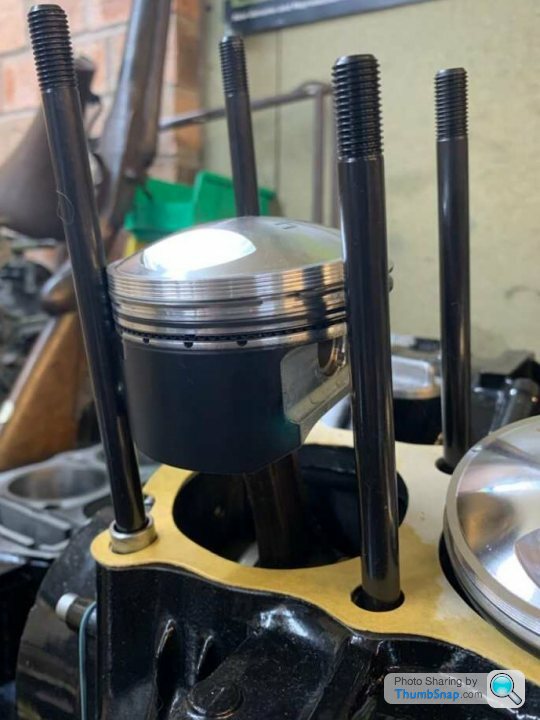
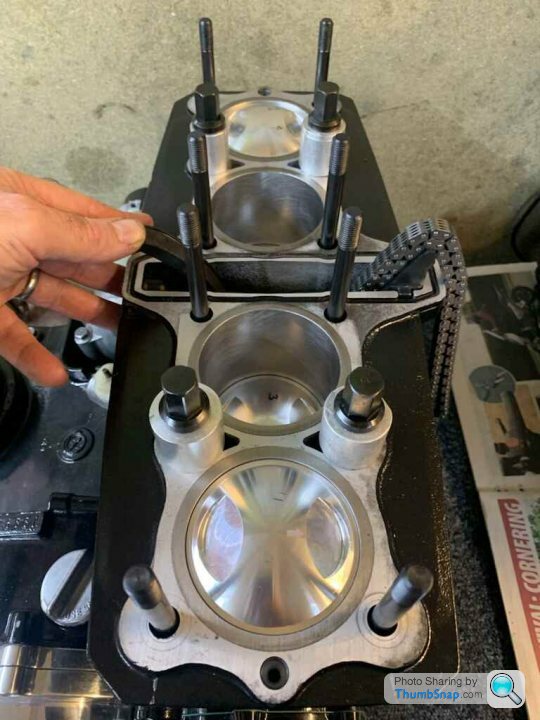
Oh well, I was never that happy about using used pistons.. so I opened my wallet and bought a new set of forged 75mm pistons from Wossner. These took the engine out to 1170cc, which meant the block needed to be rebored again.
That done, the engine build could continue..
In the meantime, I set about the tedious job of polishing the engine covers.. Only to find the points cover was cracked, and the clutch cover had a weird shallow dent in it. (Above the K in Kawasaki). No idea how it got there as there's no other damage on the cover. Someone thought the original bike had crash bars fitted and in a crash the bars bent and hit the cover.
I decided against using these covers, and instead of hitting Ebay for used covers, or buying some cool aftermarket version, I had my mate make them for me. I liked the one I'd seen on one of his projects, so mine would be similar, but not quite the same. I ordered the alloy plate to make them, cost £140.. but that was enough to make three.. so he did, as its not much more work than making just one. Once finished, I polished the clutch and points cover, at some point I may get them engraved to match the originals. Not sure yet.
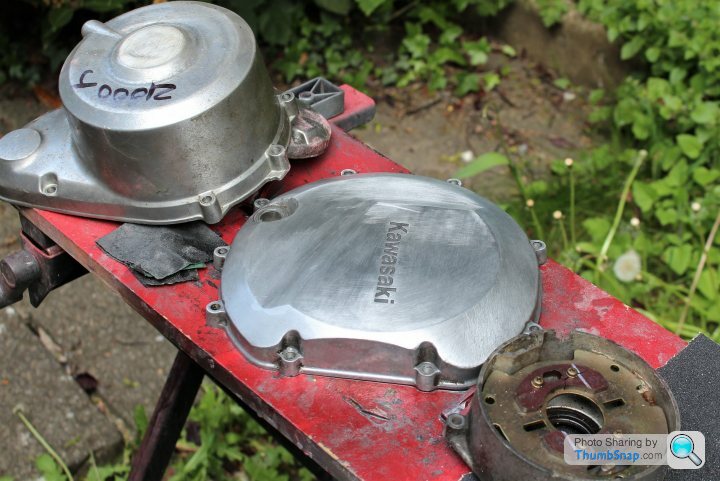
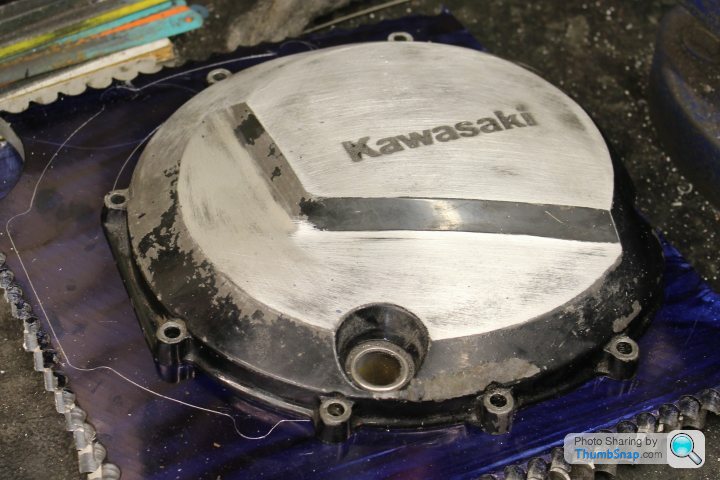
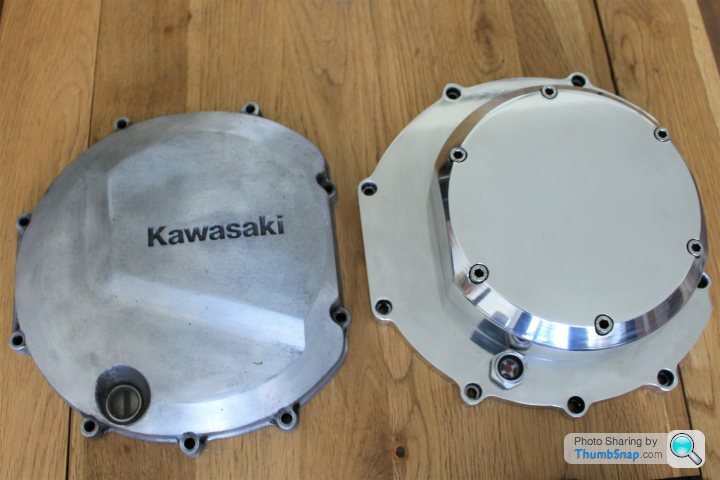
I decided against using these covers, and instead of hitting Ebay for used covers, or buying some cool aftermarket version, I had my mate make them for me. I liked the one I'd seen on one of his projects, so mine would be similar, but not quite the same. I ordered the alloy plate to make them, cost £140.. but that was enough to make three.. so he did, as its not much more work than making just one. Once finished, I polished the clutch and points cover, at some point I may get them engraved to match the originals. Not sure yet.
Edited by Merch131 on Friday 20th August 17:57
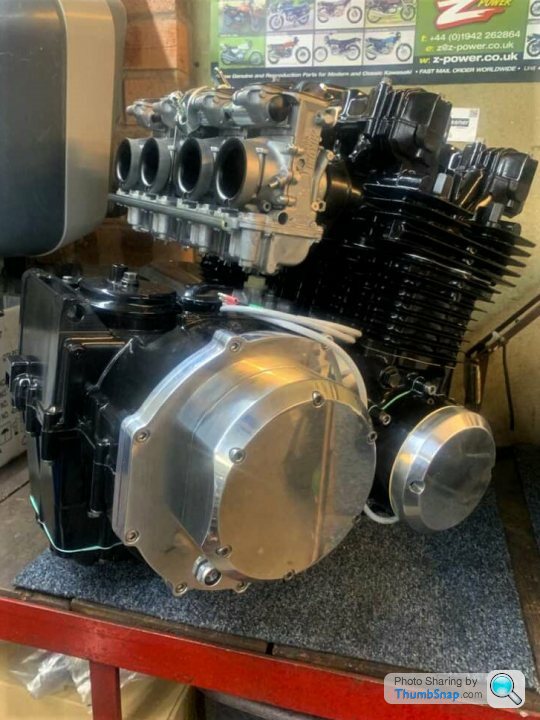
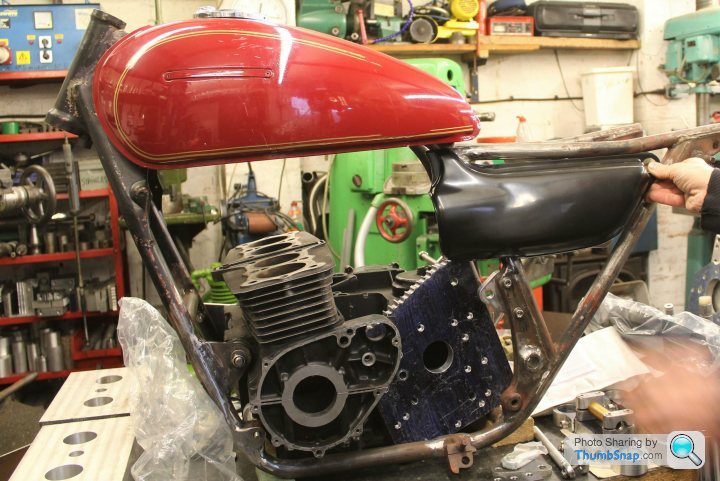
Once the frame had been powder coated by Triple S in Bingley, could finally put the Gpz1170 engine in the Z650 frame, though it put up a fight. We had to remove the sump and cut back a tab that had been added to mount the Z1 side panel. The latter being done after the engine had gone off to be rebuilt. There was enough left of the tab that I could drill and mount a replacement for the piece we had to hacksaw off. Thankfully its behind the side panel is hidden from view. Note that the front rubber engine mount has been replaced with a solid mount, using top hat spacers.
liner33 said:
Great project ! . An engine I know well as I used to dragrace them
You clutch cover looks pretty much like the one i ran to give quick access to clutch/lock up and the hat sealed with an o ring saving on gaskets

Yes that's what my clutch cover is based on, though without the lockup clutch, ditto the outer bearing support. My mates are into drag racing, here's one he has been building for years..You clutch cover looks pretty much like the one i ran to give quick access to clutch/lock up and the hat sealed with an o ring saving on gaskets
With the engine back in the frame, it came home to me in the back of my mates van, where at last I could begin the final assembly.
It didn't take long before the first of several problems were found. The recently upholstered seat didnt fit the frame anymore, its four mounting studs were way off the frames mounts. It took a few seconds to realise what had happened.. The seat had been upholstered back to front. I'd assumed it would be obvious which end was the front and which the back, but it seems not. The seat went back to the upholsterer, who managed to reuse the foam and cover he'd made. So not a problem, but it took another six weeks for the seat to be done.
Next the one off machined swing arm spindle couldn't be found anywhere. Not in my garage, not in my mates workshop, and we looked high and low for it. But no, it had vanished. Had to make another from EN24T steel bar in the end. No doubt it'll turn up in a year or two..
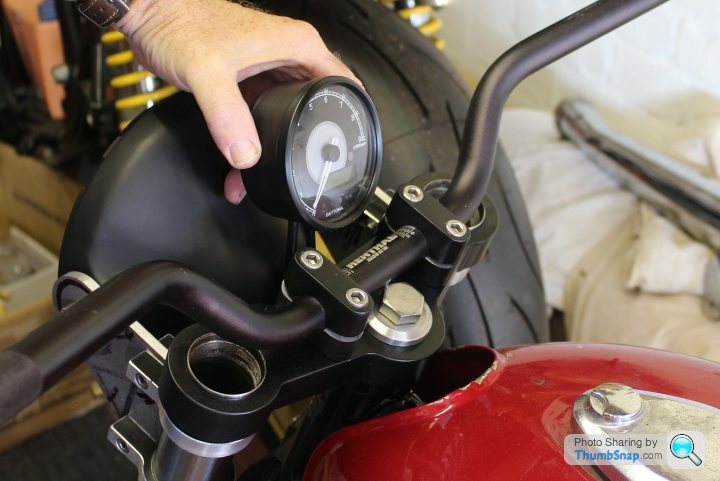
At least the Dyna Coils and leads went on ok, once I'd made them up, along with the stainless undertray and splash guard, while I decided to paint the yokes rather than polish them. Not sure how durable the finish will be, will have to see. Ditto the risers and alloy instrument pod which was made to use the bar mounts. The speedo/tacho uses a GPS speed sensor, which I haven't used before.
It didn't take long before the first of several problems were found. The recently upholstered seat didnt fit the frame anymore, its four mounting studs were way off the frames mounts. It took a few seconds to realise what had happened.. The seat had been upholstered back to front. I'd assumed it would be obvious which end was the front and which the back, but it seems not. The seat went back to the upholsterer, who managed to reuse the foam and cover he'd made. So not a problem, but it took another six weeks for the seat to be done.
Next the one off machined swing arm spindle couldn't be found anywhere. Not in my garage, not in my mates workshop, and we looked high and low for it. But no, it had vanished. Had to make another from EN24T steel bar in the end. No doubt it'll turn up in a year or two..
At least the Dyna Coils and leads went on ok, once I'd made them up, along with the stainless undertray and splash guard, while I decided to paint the yokes rather than polish them. Not sure how durable the finish will be, will have to see. Ditto the risers and alloy instrument pod which was made to use the bar mounts. The speedo/tacho uses a GPS speed sensor, which I haven't used before.
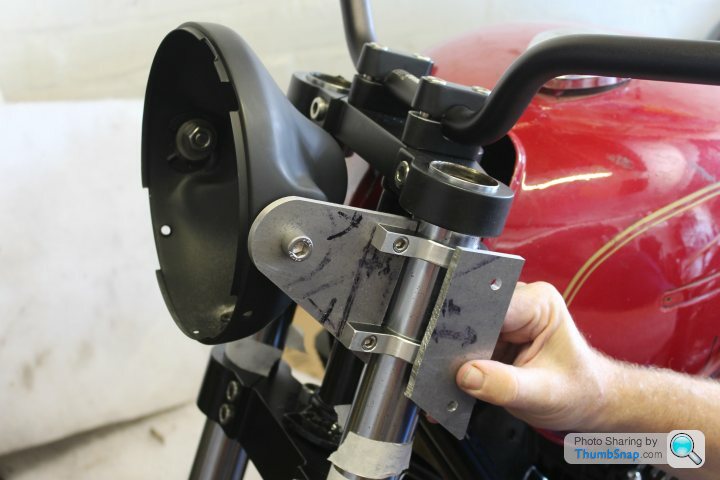
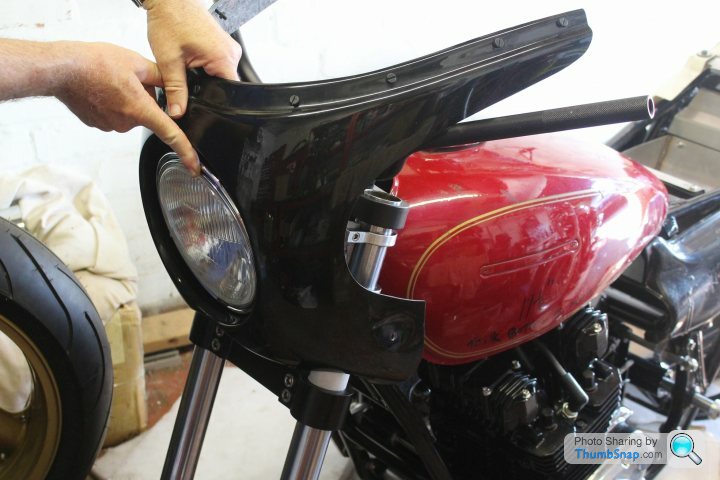
The fork clamps and light brackets were made by my mate, though we made the brackets extra long, as I wasnt sure how long they should be. Then I cut them down once I could try them on the bike. I'd also bought a R90S replica cockpit fairing, not sure if it would make the final build, but it did give the bike a slight Mad Max / Stone vibe.
He also made the foot controls, the levers of which pivot on sealed roller bearings. With a pair of Avon Storm tyres, for the first time it was a roller at last.
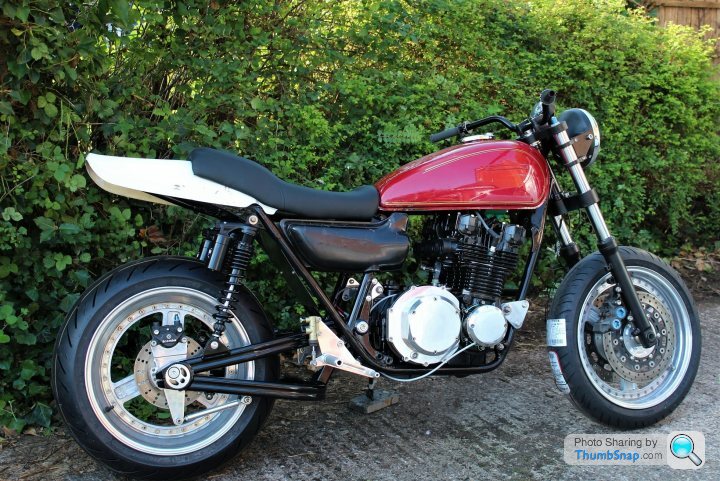
He also made the foot controls, the levers of which pivot on sealed roller bearings. With a pair of Avon Storm tyres, for the first time it was a roller at last.
Gassing Station | Biker Banter | Top of Page | What's New | My Stuff