Outrigger replacement blog
Discussion


Going to attempt a body lift (2 to 6" depending) and outrigger replacement over the next couple of weekends, but got some questions.
I've tried to read through every resource I could find, but lots of the links are dead and there's a few conflicting bits of information.
Part removal
A list of the parts that I've seen mentioned in body lift with notes.
Replacement metal
Considering ordering a full set of replacements just in case any shear.
I think I've got the process down in my head, but welcome any tips. Will decide whether to cut mid tube or at the main chassis once I see the state of the metal properly.
What do we recommend?
See lots of POR15 suggestions or EM121.
Planning to just do one product, a couple of layers, but no top coat?
Probably missed some bits, so may add more, but any help appreciated.
Cheers
I've tried to read through every resource I could find, but lots of the links are dead and there's a few conflicting bits of information.
Part removal
A list of the parts that I've seen mentioned in body lift with notes.
- Battery - Self explanatory
- Centre tunnel trim - Including door release, shift knob, hand brake cover
- Handbrake adjuster - And raise handbrake to vertical
- Seats - Can stay in place, but makes bolt access easier
- Seatbelts - The bolts go into the chassis, but the top bolt that holds the runner behind your shoulder can actually stay in place as that just goes into the body?
- Steering UJ - Not sure if this needs disconnecting or not?
- Fuel pump - Not sure if this needs disconnecting or not?
- Fuel tank - 4 bolts behind it. Does it need fully disconnecting and draining or can it just be pulled out of the way slightly to make space?
- Radiator - There's 2 bolts into the chassis underneath it. Can these be accessed from below without removing the rad? Or can it just be pulled to the side without even needing to disconnect / drain?
- Exhaust - Necessary for 6" lift? Including manifolds
- Brake lines = Just cut some cable ties to give slack?
- Air intake hose - Not sure if this needs disconnecting or not?
- Wiring - Don't need to disconnect anything?
- ARB / drop links - Not sure if these need disconnecting or not?
Replacement metal
- 8 metres of pipe. 38mm OD, 1.6mm wall (1.5" 16 gauge). Can use 2" wall instead.
- 1 metre of pipe. Matching ID to sleeve inside (if cutting outriggers mid pipe rather than at chassis)
- Suspension bolt crush sleeves. Not sure on OD / wall?
- Long nut for seatbelt mount. Not sure on OD / wall?
- 3mm plate. Not sure on dimensions needed? (Depends if cutting riggers mid pipe or at chassis)
Considering ordering a full set of replacements just in case any shear.
- Manifolds bolts - 16x ?
- Front (below rad) - 2x hex M10 35mm
- Interior (footwells) - 8x hex M10
- Interior (tunnel) - 2x hex 50mm
- Interior (under-seats) - 6x hex M10 30/35mm
- Interior (seatbelt outer) - 2x hex M10 30/35mm
- Interior (seatbelt inner [buckle]) - 2x hex M10 30/35mm
- Interior (seatbelt reel) - 2x hex M10 30/35mm
- Rear (behind fuel tank [upper]) - 2x allen M10 40mm
- Rear (behind fuel tank ([lower]) - 2x hex M10 35mm
I think I've got the process down in my head, but welcome any tips. Will decide whether to cut mid tube or at the main chassis once I see the state of the metal properly.
- What's the best way to drill the holes for the crush sleeves the suspension bolts go though? Metal hole saw?
What do we recommend?
See lots of POR15 suggestions or EM121.
Planning to just do one product, a couple of layers, but no top coat?
Probably missed some bits, so may add more, but any help appreciated.
Cheers
Edited by Strudul on Monday 12th October 09:01
Edited by Strudul on Monday 12th October 09:03
Edited by Strudul on Monday 12th October 09:05
Paulprior said:
You don’t need to remove the rad to access those bolts, yes to steering, I don’t remember having to disconnect any electrics, manifolds ok for 2”, not for 6, seats out is easy and gives good access, the back will maybe lift 3”, tank out as well as pump.
I lifted with one trolley jack and one bottle jack, a little at one end, fix with wooden spacers then go to the other end and so on, the manifolds will be your first stop point if still on
Brilliant. Very concise. Cheers.I lifted with one trolley jack and one bottle jack, a little at one end, fix with wooden spacers then go to the other end and so on, the manifolds will be your first stop point if still on
Badgerchim said:
I used rustbuster on chassis and wishbones etc which if you read cog's posts is pretty much the same stuff.
I believe the EM121 stuff is Jotun Smart Pack, which is not really any different from their Jotamastic stuff, but gives a slightly nicer finish with a brush and mixes 1:1 so you can't mess up ratios.Day 1

Calm before the storm

More earths than there should be(?), and not sure what the black / yellow connector is?

Even more earths.

Where did these even com from
- Seats / battery / battery mount all out
- All 22 chassis bolts removed
- Fuel pump disconnected + tank removed and drained
- Air intake disconnected
- Drivers outer seatbelt bolt sheered - will see what happens when i try lift
- Lower fuel tank mounting bolts had to be ground off
- On the centre tunnel bolts, the driver's side had an earth (for dash electrics), and passenger side had 3 different earth wires (1 for batt, not sure on other 2)
- Got 4 wires in the boot (2 green, 2 black) - not sure where they were supposed to go
- Arm / hand stings a bit and got a banging headache after some nightmares draining the fuel
- Standard scratched to f
 k hands / wrists
 - Rubber is cracked on the short 2" bit of hose that goes through the body from the fuel tank drain point
- There was a ridiculous amount of silicone around the above hose that took an hour to pick out before I could pull it through
- Loosen handbrake cable
- Disconnect lower steering UJ
- Lift car
- Start measuring / cutting / fabbing
Calm before the storm
More earths than there should be(?), and not sure what the black / yellow connector is?
Even more earths.
Where did these even com from
Edited by Strudul on Friday 16th October 22:59
MisterT said:
Strudul said:
not sure what the black / yellow connector is?
Edited by MisterT on Friday 16th October 23:32
Guessing the green / grey wires in the boot are for the rear speakers which i don't have too.
Classic Chim said:
What’s the condition of your top tubes around manifold area?
Most look worse than they are but those tubes can be very corroded and thin.
That’s the area you need to inspect, we know the riggers will likely be fked 
Seem to remember they looked pretty good, but will find out I guess.Most look worse than they are but those tubes can be very corroded and thin.
That’s the area you need to inspect, we know the riggers will likely be f
ked Day 2

Lil lift

Plan B

Unfortunately not ice cream, but all the bolts.

More bolt organising

Healthy pre-cat asking to be violated

£50 of steel ready to go
- Metal collected
- Hand brake cable loosened
- Steering rack and lower UJ disconnected
- Rad drained
- Ground off the sheered outer seatbelt bolt into the outrigger
- Snipped a lot of zip ties
- 2" body lift complete
- Decided 2" might not be enough to get in to weld the top of the pipes
- Starter removed
- Rear ARB loosened
- Exhaust removed
- 7/8 O/S manifold bolts removed. N/S soaked ready for tomorrow
- Rear upper O/S manifold bolt is the only one being a massive pain so far and a bit scared of it shearing
- Just in case manifolds don't go to plan, any tips on getting in to weld with a 2" lift (w/o cutting the floor out)?
- Exhaust U clamp bolt sheared - 75mm replacement?
- Manifold gasket replacements ordered
- Tempted to stick with same bolts, but slot the lower manifold bolt holes
- Pre-cats look in decent condition, but might hammer them out while I'm here
- Looking like I'll only need to replace the outer outriggers, rather than right up to the chassis.
- Couldn't get telescopic tube, so picked up 1 3/8" and will slot it then bash in
- Was initially planning to tack the outriggers together on the car then take off to weld up properly, but now realise the inner sleeves will prevent it being able to slide back off
- Finish removing manifolds
- Cut some inspection holes in the outriggers to confirm condition at different points
- Weld some supports to the main chassis rails to help support / line riggers up
- Measure up
- Cut riggers off
- Start fabbing
Lil lift
Plan B
Unfortunately not ice cream, but all the bolts.
More bolt organising
Healthy pre-cat asking to be violated
£50 of steel ready to go
Edited by Strudul on Saturday 17th October 22:25
Oh, and a question in case i can't get the manifolds off:
I believe the only thing stopping a further lift to 6" is the manifolds fouling on the body. Rather than remove the manifolds, would it be possible to just unbolt the engine mounts and use an engine hoist to lift the entire engine (with manifolds still attached) to get a couple more inches of clearance?
I believe the only thing stopping a further lift to 6" is the manifolds fouling on the body. Rather than remove the manifolds, would it be possible to just unbolt the engine mounts and use an engine hoist to lift the entire engine (with manifolds still attached) to get a couple more inches of clearance?
Day 3

Manifolds out

Car up

Supports in

Pipes cut and drilled
- Finished off the manifolds without any trouble
- Increased to 6" lift
- Got the support bars on the O/S (gives something to rest the pipe on and use as a ref)
- Chopped off O/S rigger part way (rest seems alright)
- Cut up and slotted 10x 20mm inner sleeves
- Drilled 4 holes in each O/S rigger stump to puddle weld sleeves in
- Riggers sprung out of shape slightly (upwards I think) when cut off
- Clean up the inside of the O/S rigger stumps and treat
- Mitre cut the long / lat pipes
- Notch the diagonals and centre lat pipe (using paper template)
- Remember to measure up and trim out for the seatbelt mount
- Start welding
Manifolds out
Car up
Supports in
Pipes cut and drilled
Day 4

Paper riggers. Probably still got more structural strength than some TVRs out there


The templates (40º one was off, but other 2 worked well)

Some chassis picks. Front and below manifolds.


Coming together

- Cleaned up and treated the O/S stump inners and prepped for welding
- Mitre cut both the longitudinal pipes as well as the front and rear O/S lateral ones
- O/S inner sleeves test fit and lateral ones puddle welded in
- Test fit O/S long pipe with front / rear lats
- Paper templates created and test fit for notches in centre pipe and front / rear diagonals
- Jacks and clamps used to hold riggers in place, ratchet straps may be needed
- Notch the O/S pipes with a grinder using the templates
- Finish welding O/S sleeves
- Jig up the N/S and start cutting
- Remember to measure up and trim out for the seatbelt mount(!!!)
- Get some drill bits and cavity wax spray ordered
Paper riggers. Probably still got more structural strength than some TVRs out there
The templates (40º one was off, but other 2 worked well)
Some chassis picks. Front and below manifolds.
Coming together
Steve_D said:
I see you have a straight edge across the underside of the main chassis rails with the outriggers sitting on that.
The outriggers normally sit about 6mm higher than that. They are not very consistent as I have seen them from 4mm through to 12mm but 6 is the most common.
Steve
Good eye, but not a straight edge.The outriggers normally sit about 6mm higher than that. They are not very consistent as I have seen them from 4mm through to 12mm but 6 is the most common.
Steve
These were welded on whilst clamped against the old riggers before they were chopped off, so they hold the new piping at the correct height and distance from the main chassis. Various measurements were taken to give reference points for verification of XYZ positioning of the longitudinal bars.
Day 5


O/S partially welded


N/S supports + cuts


- O/S pipes notched
- O/S sleeves welded in (except the centre)
- O/S diagonals welded in
- O/S long bar tacked
- Cav spray and drill bits collected
- N/S supports welded up
- N/S reference measurements taken
- N/S riggers chopped off and cleaned up
- Cav spray O/S
- Finish welding O/S pipes
- Drill out N/S stumps for puddle welds
- Treat N/S stumps
- Install N/S sleeves
- Start on N/S fabbing (notching and cutting)
- Remember to measure up and trim out for the seatbelt mount(!!!)
O/S partially welded
N/S supports + cuts
Day 6
- Cav sprayed O/S
- O/S tube all welded up
- N/S stumps drilled, cleaned up, and treated, then sleeves welded in
- N/S pipes notched, cut and drilled
- Re-ordered gaskets and the exhaust clamp as I selected the wrong address
- Ordered universal coolant
- Jiggle N/S about so it all fits properly
- Measure up and trim out for the O/S seatbelt mount
- Clean up welds
- Start prepping O/S for paint (stripping back old powercoat and any surface rust)
- Cut up plate for mounting points
- Clean up any bolts that are being reused
- De-pre-cat if I get chance
magpies said:
Those profiles look brilliant.
I'd dress up / relook at the welds though.
They aren’t the prettiest, but there’s good penetration and they’re strong.I'd dress up / relook at the welds though.
Welding is something I’ve not got round to learning yet, so got a mate helping out with that part. There’s a lot of colourful language - the access and positioning is making it quite difficult.
They are going to get rechecked once I’ve cleaned them up though and we’ll touch up any problem areas.
Day 7
Notes:
Next steps:
Bit of a slow day unfortunately as getting the N/S pipes properly lined up took forever and then lost a load of time later.
The O/S laterals just needed jacking up to get the height correct to match the reference points taken, but N/S turned out to be a pain, with the front and rear having sprung inwards as well as downwards. Ratchet straps round the pipe and suspension along with scissor jacks underneath pulled them into place, then a few tacks on the stumps and diagonals held it all, before quickly removing the straps so they didn't melt. As the diagonals weren't under any tension when tacked, they didn't move once released, and they hold the laterals solid so they can't move. Probably could have just welded in new pipe whilst everything was relaxed and the body would have still fit fine, but didn't want to risk fouling anywhere and the diagonals wouldn't have lined up properly with the centre line of the laterals, making notching it much more complex and they'd stick out a bit.
Paper templates
This was a suggestion from one of the guys in the FB group.
Here's the site
Welding
I just have to look at my toes and feel guilty when my mate complains about how awkward it is to weld. Luckily he didn't fully realise what he was getting into, but already committed
The welder kept playing up yesterday too, and then the wire ran out and we had to swap to new thicker wire that he had never used before, so took a fair bit to get it set right.
As I say, the welds are strong, some are just a bit cosmetically challenged. Plenty of nice ones though, and now it's all setup properly they are looking better.
Was going to photo the new ones and cleaned up ones, but got a bit preoccupied.
Plates will be welded in from the bottom initially. Not sure if they'll need it from the top too if it penetrates properly.? Just seam sealer on the inside edge?
Did consider pre-made riggers, but they're 10x the price, still require some ballache welds, and might need tweaking to fit properly anyway.
Plates
Had a question on method for these.
My thinking was:
Flap disc 1, finger 0

- Tweaked N/S about to get it lined up
- Cut out O/S rigger seatbelt mount hole (finally)
- Cleaned up O/S welds
- Stuck my knuckle in the flap disc
- Cleaned out my knuckle with TCP, superglued it together, scoffed a mince pie while it dried, then went back to the garage
- More N/S rigger tweaking
- Tacked all N/S sleeves and pipes
- Had steak for tea then spent the rest of the evening in A&E
Notes:
- Don't stick your fingers near the spinny bit of your grinder
- N/S front / rear lateral pipes needed ratchet straps to pull them longitudinally into position
Next steps:
- Measure up and trim out for the N/S rigger seatbelt mount
- Weld in both rigger seatbelt mounts
- Clean up welds
- Start prepping everything for paint (stripping back old powercoat and any surface rust)
- Cut up plate for mounting points
- Clean up any bolts that are being reused
- De-pre-cat if I get chance
Bit of a slow day unfortunately as getting the N/S pipes properly lined up took forever and then lost a load of time later.
The O/S laterals just needed jacking up to get the height correct to match the reference points taken, but N/S turned out to be a pain, with the front and rear having sprung inwards as well as downwards. Ratchet straps round the pipe and suspension along with scissor jacks underneath pulled them into place, then a few tacks on the stumps and diagonals held it all, before quickly removing the straps so they didn't melt. As the diagonals weren't under any tension when tacked, they didn't move once released, and they hold the laterals solid so they can't move. Probably could have just welded in new pipe whilst everything was relaxed and the body would have still fit fine, but didn't want to risk fouling anywhere and the diagonals wouldn't have lined up properly with the centre line of the laterals, making notching it much more complex and they'd stick out a bit.
Paper templates
This was a suggestion from one of the guys in the FB group.
Here's the site
Welding
I just have to look at my toes and feel guilty when my mate complains about how awkward it is to weld. Luckily he didn't fully realise what he was getting into, but already committed
The welder kept playing up yesterday too, and then the wire ran out and we had to swap to new thicker wire that he had never used before, so took a fair bit to get it set right.
As I say, the welds are strong, some are just a bit cosmetically challenged. Plenty of nice ones though, and now it's all setup properly they are looking better.
Was going to photo the new ones and cleaned up ones, but got a bit preoccupied.
Plates will be welded in from the bottom initially. Not sure if they'll need it from the top too if it penetrates properly.? Just seam sealer on the inside edge?
Did consider pre-made riggers, but they're 10x the price, still require some ballache welds, and might need tweaking to fit properly anyway.
Plates
Had a question on method for these.
My thinking was:
- Drop the body back onto the chassis
- Put the plates in place
- Mark where they fit on the riggers
- Mark the holes from inside the car
- Take em off and pillar drill the holes
- Raise car back up (so it doesn't melt)
- Put the plates back in place on the riggers using the marks
- Tack, then weld up
- Drop it back down and check bolts go in
Flap disc 1, finger 0
Day 8
Notes:
Next steps:
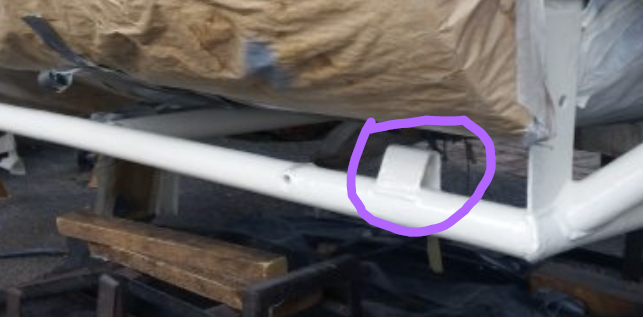
Racing Harness/Seat Belt Mounting Inserts, MSA Compliant 7/16" UNF x 50mm Pair
See, there are some nice looking welds

Seatbelt mount

O/S welds mostly cleaned up

N/S welded up, cleaned up, and some powercoat stripped


- All pipes (O/S and N/S) fully welded up
- Seatbelt mounts welded in
- Welds mostly cleaned up
- Started stripping old powdercoat from chassis
- Made some templates for gussets
Notes:
- Gonna wait til body dropped before cutting out gussets to check measurements
- Only partially repainting the chassis. Most of it looks alright, so just hitting any problem areas now (riggers, some engine bay bits, lower spine) as I'm on a deadline and will the sort all the suspension bits over winter hopefully
Next steps:
- Drop body
- Fab and markup gussets + rear seatbelt mounts
- Drill gussets + rear seatbelt mounts
- Lift body
- Weld in gussets + rear seatbelt mounts
- Finish powercoat / rust stripping and treat
- Prep and start painting?
- Clean up bolts and de-pre-cat while it dries?
rev-erend said:
Not sure how the seatbelts mount in the Chim / Griff but the wedge has a threaded nut on the central tube and I had to tap mine
to make sure the new bolt went in OK. Was not M10.
Yup, threaded tube (about the same width as the tube (1 1/2") into the outrigger with a 7/16" UNF (20 tpi). Had a pair machined, but you can buy them here and trim them down:to make sure the new bolt went in OK. Was not M10.
Racing Harness/Seat Belt Mounting Inserts, MSA Compliant 7/16" UNF x 50mm Pair
See, there are some nice looking welds
Seatbelt mount
O/S welds mostly cleaned up
N/S welded up, cleaned up, and some powercoat stripped
Gassing Station | Chimaera | Top of Page | What's New | My Stuff