1.2 TSI EPC Error (P334a)
Discussion
Hi All,
Odd one this, haven't been able to find much info on it either. The car sometimes starts with the EPC light on accompanied by a "Stop Start Error" message on the MFD and goes into uber limp mode (25mph is an acheivement). Once it was also accompanied by the check engine light too, although this cleared itself after a few runs. VCDS recorded this (which is also why I knew it would be safe to carry on driving):
1 Fault Found:
10478 - Charge Pressure Control Actuator
P334A 00 [173] - Electrical Malfunction
MIL ON - Confirmed - Tested Since Memory Clear
Freeze Frame:
Fault Status: 00000001
Fault Priority: 2
Fault Frequency: 5
Mileage: 73898 km
Date: 2016.01.07
Time: 10:17:20
I did have to unplug this actuator when I changed the air filter for better access not long before I got this error but I've checked it's in properly a fair few times and have also cleaned it with contact cleaner for good measure. So it's either I've some how managed to disturb the loom into the plug (unlikely I'd have thought), or it's just a coincidence.
I'm pretty sure it isn't due any software updates as it looks to have the actuator shim that was fitted during the 2012 recall. The really wierd part though is the car runs totally fine as long as it starts ok without the light..
Anyone else had this before? Is it new actuator or dare I say it, new turbo time?
Thanks in advance!
FIX FOR P334A ISSUE…
Having had a couple of 1.2 TSI cars that have demonstrated this fault and investigated further, it seems there’s a design flaw with the turbo actuators on this engine (located just to the right of the exhaust heatshield and mounted on the turbo). The internal position sensor’s plastic slides wear out and this extra slop allows the moving part of the sensor to become jammed at a self-locking angle to the fixed housing. To remedy this:
1. Purchase a 5 lobe security star drive set from Screwfix for about £20 to enable you to undo the 3 anti-tamper screws on the actuator. You'll also need some plastic grease (brake calliper grease will be fine) and spray on lube (must be high temperature & plastic compatible such as silicone or PTFE based - metal lubes may kill the plastics!!).
2. Undo the electrical connector on the actuator by pushing down on the jack whilst gently lifting the tab on the right (fingernails work best if you have them long enough but be careful as these connectors are notorious for becoming brittle and snapping. If this happens you’ll need a small zip tie to hold the connector together when you’re finished). When you see the clip release you can then lift off the jack.
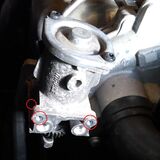
3. Undo the 3 anti-tamper screws (receiving holes circled in picture in picture - two at the top and one slightly hidden at the bottom towards the front of the car) being careful not to drop them.

4. Separate the two main halves of the actuator by sliding the black plastic housing to the right. It has runners to keep everything aligned so you'll need to slide it a good distance before it's fully separated but there should be room in the engine bay to do so.
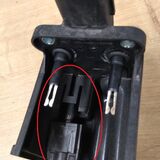
5. Using a small flathead screwdriver, lift the retaining tab up from the top of the position sensor (circled in image) and the moving part of the sensor should now spring away from the housing but still be retained by the spring.

6. Use your plastic compatible grease to lubricate the slides on either side of both the moving parts and housing of the sensor being very careful not to stress & deform the spring. Also grease the boss the spring sits on and then re-clip the moving part back into the housing.
7. Use your plastic compatible grease to lubricate the teeth on all the gears on the other half of the actuator (i.e. the sub-assembly remaining mounted on the car). Ask a friend to hold a small mirror and a torch and spray your plastic compatible lube around the metal slide and spring parts to the left of the gears as you won’t be able to get grease on there with it still being mounted in the car due to access.
8. Ensure the motor connector o-rings are clean and use your plastic compatible grease to lube them.
9. For good measure you can use some battery terminal grease on the motor connector prongs to ensure good conductivity.
10. Reassemble the actuator and reconnect the electrical jack.
11. Turn you ignition on full (no need to start engine) and check whether the actuator is making a high pitched tone. If it is, disconnect and reconnect the jack a few times until this stops to reset the motor.
12. Clear your fault codes as the car should now be fixed.
13. Enjoy not having to pay for a new turbo to be fitted which is the default procedure for this fault at a main dealer.
It should be noted this error is different to the closely related P334B error code which reflects a mechanical problem with the turbo bypass valve becoming obstructed.
Having had a couple of 1.2 TSI cars that have demonstrated this fault and investigated further, it seems there’s a design flaw with the turbo actuators on this engine (located just to the right of the exhaust heatshield and mounted on the turbo). The internal position sensor’s plastic slides wear out and this extra slop allows the moving part of the sensor to become jammed at a self-locking angle to the fixed housing. To remedy this:
1. Purchase a 5 lobe security star drive set from Screwfix for about £20 to enable you to undo the 3 anti-tamper screws on the actuator. You'll also need some plastic grease (brake calliper grease will be fine) and spray on lube (must be high temperature & plastic compatible such as silicone or PTFE based - metal lubes may kill the plastics!!).
2. Undo the electrical connector on the actuator by pushing down on the jack whilst gently lifting the tab on the right (fingernails work best if you have them long enough but be careful as these connectors are notorious for becoming brittle and snapping. If this happens you’ll need a small zip tie to hold the connector together when you’re finished). When you see the clip release you can then lift off the jack.
3. Undo the 3 anti-tamper screws (receiving holes circled in picture in picture - two at the top and one slightly hidden at the bottom towards the front of the car) being careful not to drop them.

4. Separate the two main halves of the actuator by sliding the black plastic housing to the right. It has runners to keep everything aligned so you'll need to slide it a good distance before it's fully separated but there should be room in the engine bay to do so.
5. Using a small flathead screwdriver, lift the retaining tab up from the top of the position sensor (circled in image) and the moving part of the sensor should now spring away from the housing but still be retained by the spring.

6. Use your plastic compatible grease to lubricate the slides on either side of both the moving parts and housing of the sensor being very careful not to stress & deform the spring. Also grease the boss the spring sits on and then re-clip the moving part back into the housing.
7. Use your plastic compatible grease to lubricate the teeth on all the gears on the other half of the actuator (i.e. the sub-assembly remaining mounted on the car). Ask a friend to hold a small mirror and a torch and spray your plastic compatible lube around the metal slide and spring parts to the left of the gears as you won’t be able to get grease on there with it still being mounted in the car due to access.
8. Ensure the motor connector o-rings are clean and use your plastic compatible grease to lube them.
9. For good measure you can use some battery terminal grease on the motor connector prongs to ensure good conductivity.
10. Reassemble the actuator and reconnect the electrical jack.
11. Turn you ignition on full (no need to start engine) and check whether the actuator is making a high pitched tone. If it is, disconnect and reconnect the jack a few times until this stops to reset the motor.
12. Clear your fault codes as the car should now be fixed.
13. Enjoy not having to pay for a new turbo to be fitted which is the default procedure for this fault at a main dealer.
It should be noted this error is different to the closely related P334B error code which reflects a mechanical problem with the turbo bypass valve becoming obstructed.
Gassing Station | Audi, Seat, Skoda & VW | Top of Page | What's New | My Stuff


