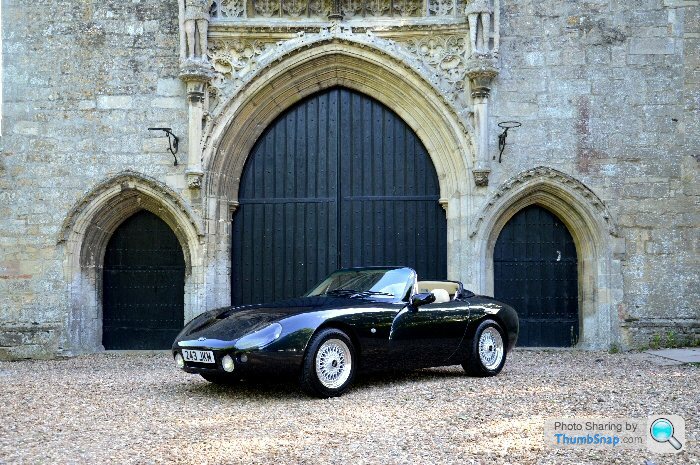
My 1992 Griffith 400 (250)
Discussion


Now the thing is on the road, I thought I would document the last 17 months of grief with my Griffith purchase!
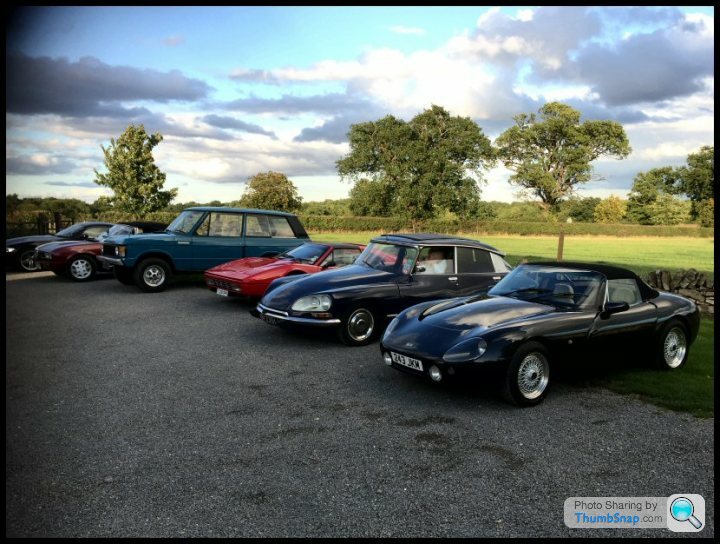
Lets spread a bit of pre-cat love shall we...!
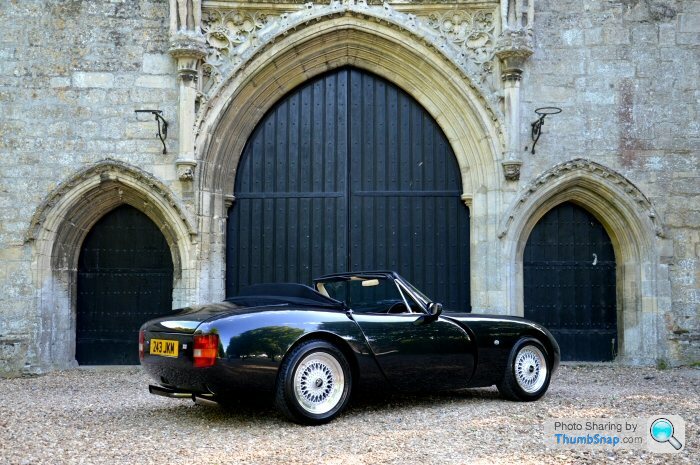
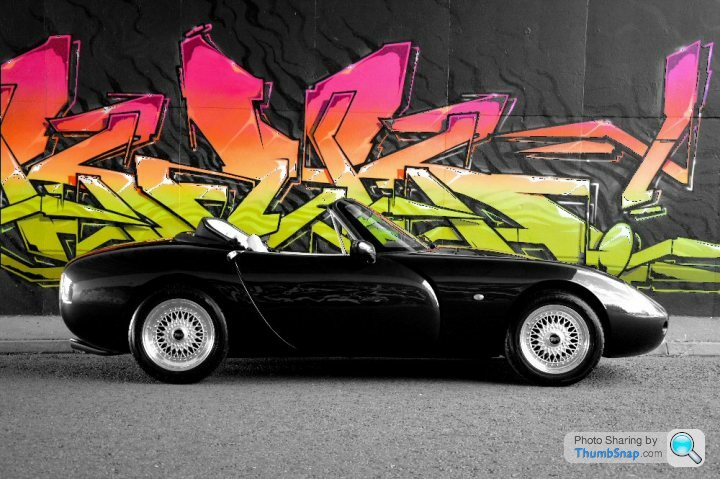
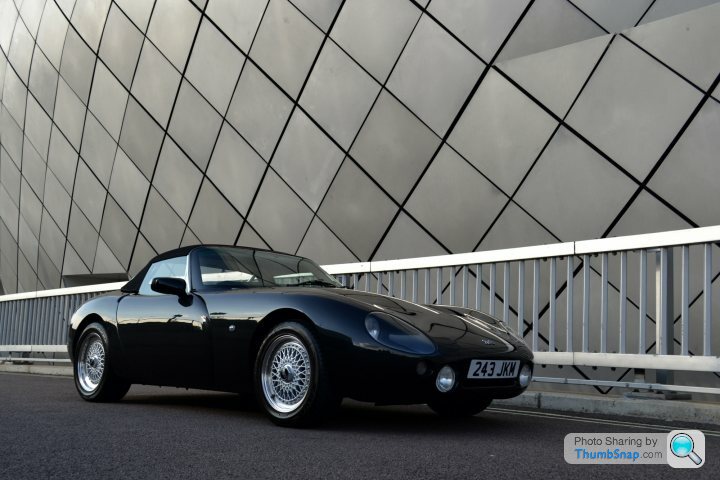
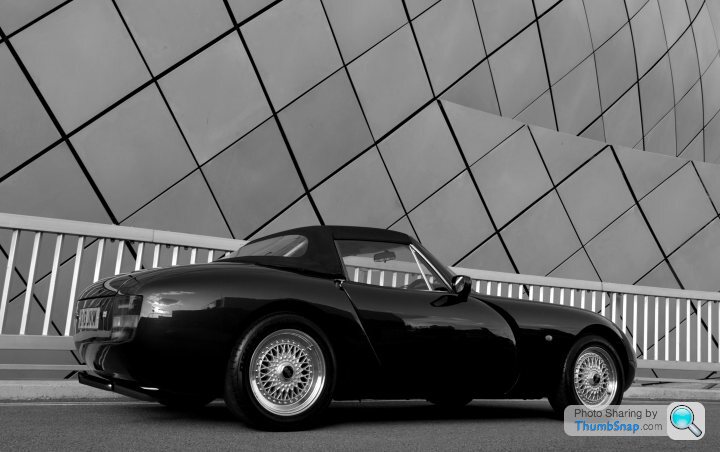
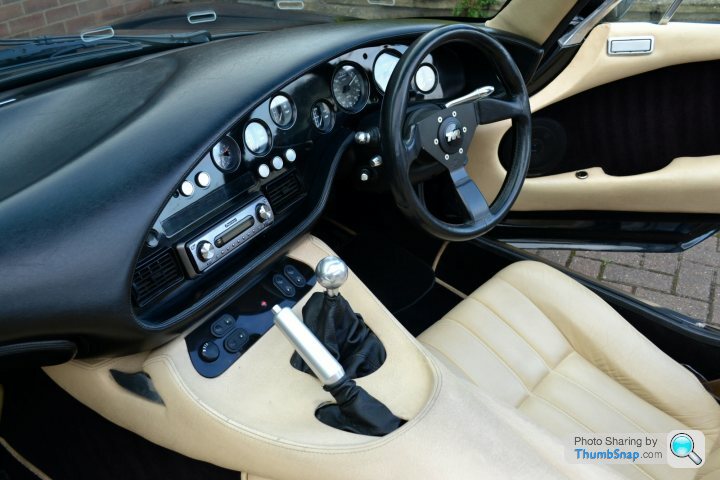
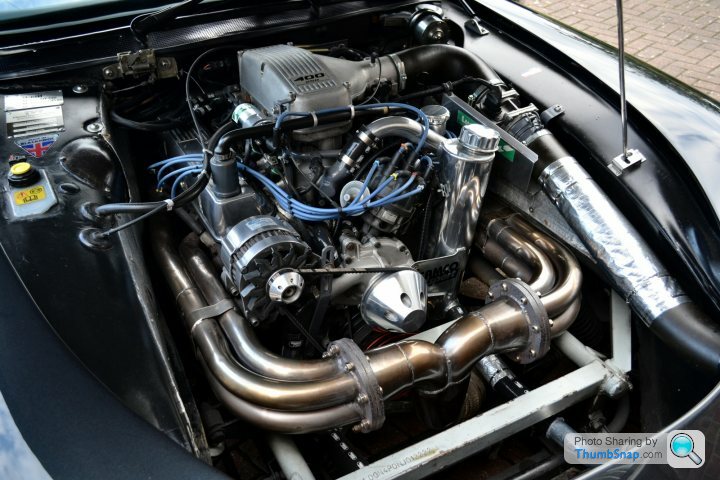
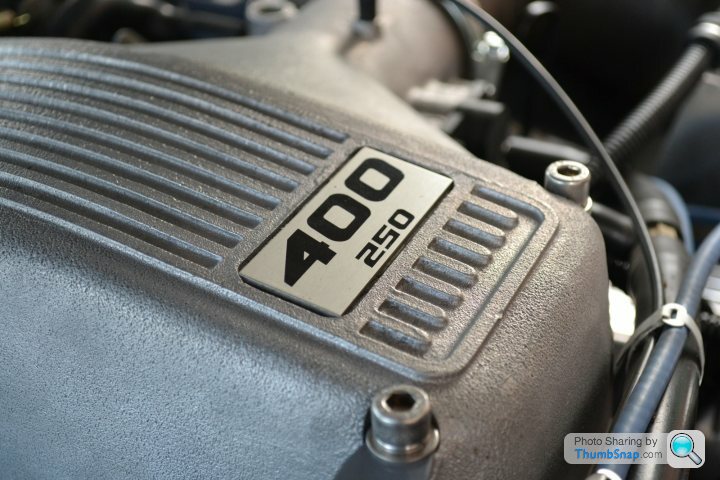
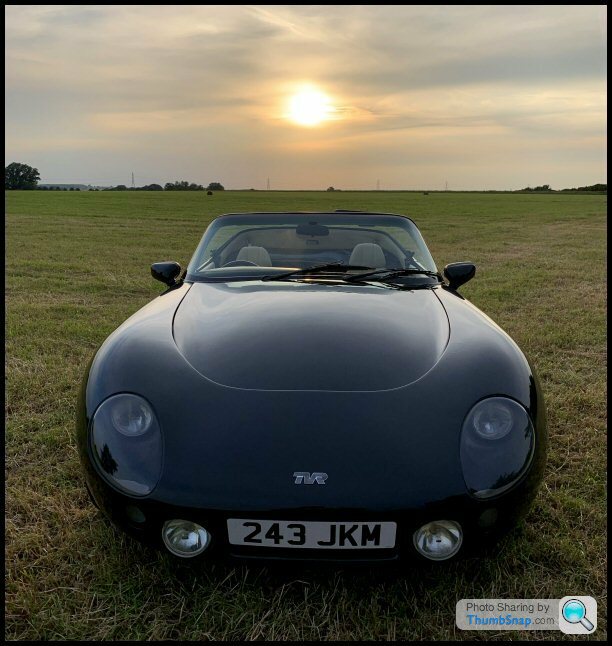
Mine is a Moonraker Black 400 with the optional 250 package. It has the optional O.Z. split rims and a carbon fibre targa panel. I believe this was optional for 1992. It was purchased by TVR Dealer Christopher Neil on 7th December 1992 as their demonstrator and had the plate "H1 TVR" at the start of their ownership. That plate has long gone but HPI says its on a Chimaera somewhere......
I'm a sucker for split-rims so it had to be a pre-cat. It was purchased by me in February 2014. I was taken with the history folder literally full of "TVR specialist" invoices. After the drive home, the rose tinted specs came off and all those invoices meant nothing.....
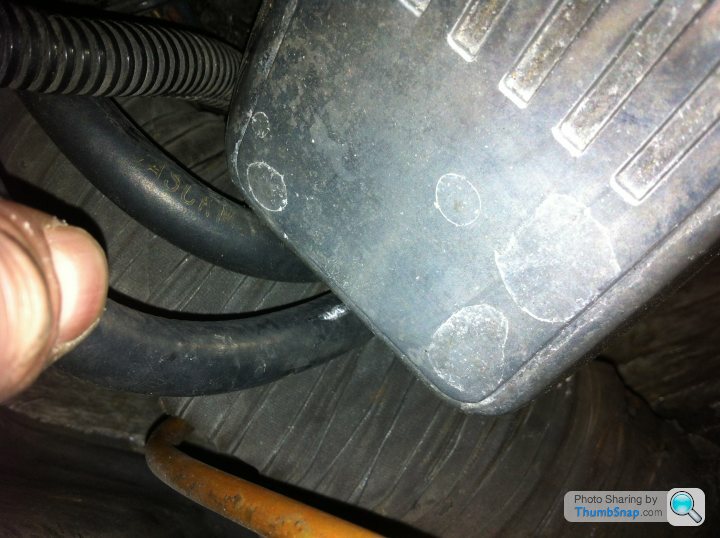
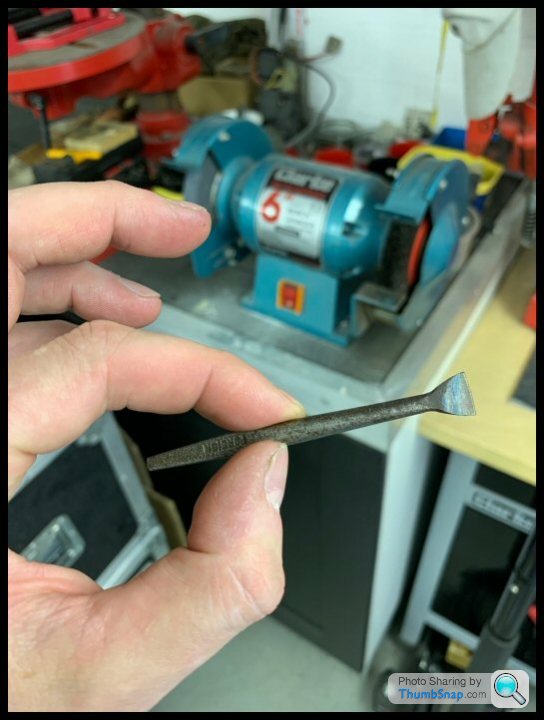
Fuel hoses chafing rocker covers :
Fuel hose condition :
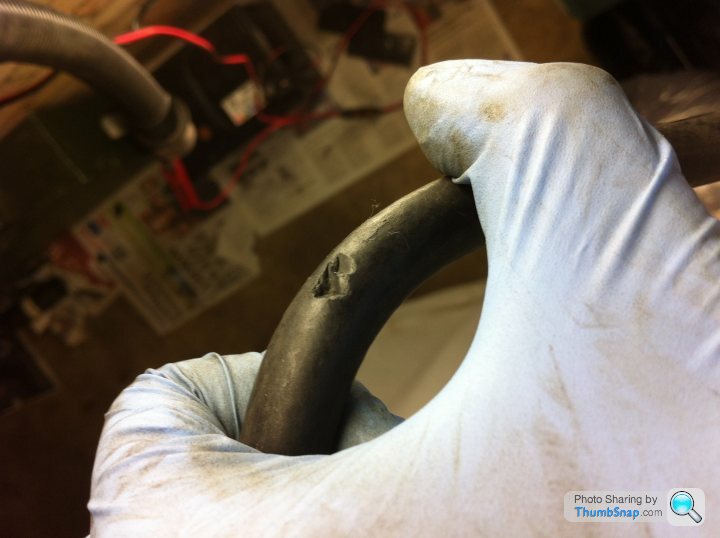
Fuel hose condition :
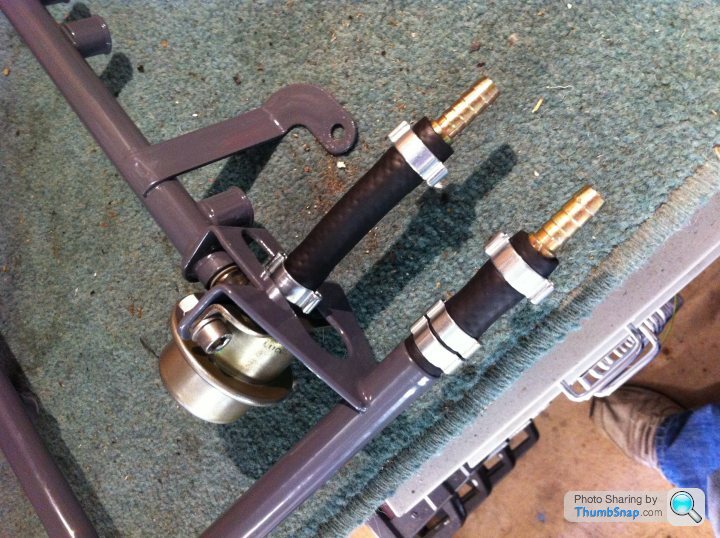
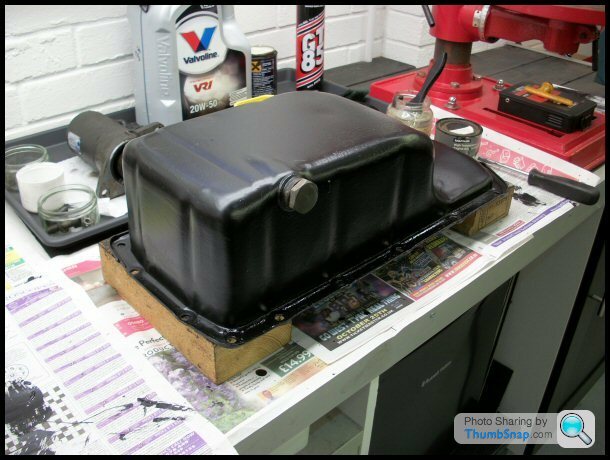
Fuel rail back from powder coating :
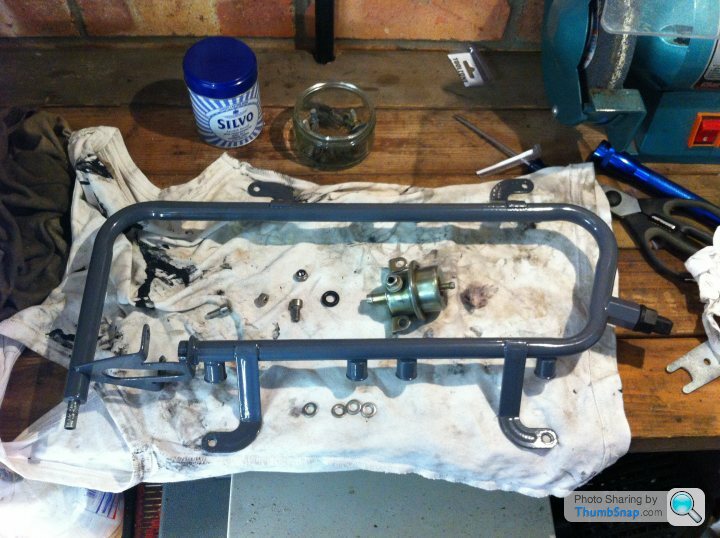
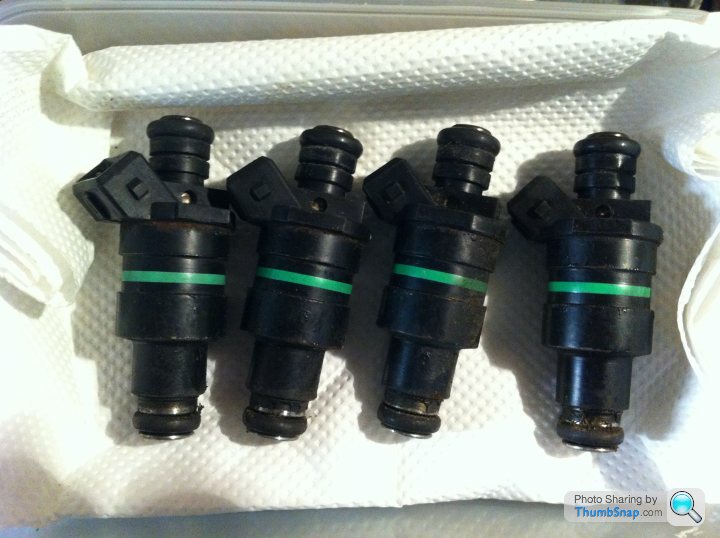
Injectors off for ASNU testing :
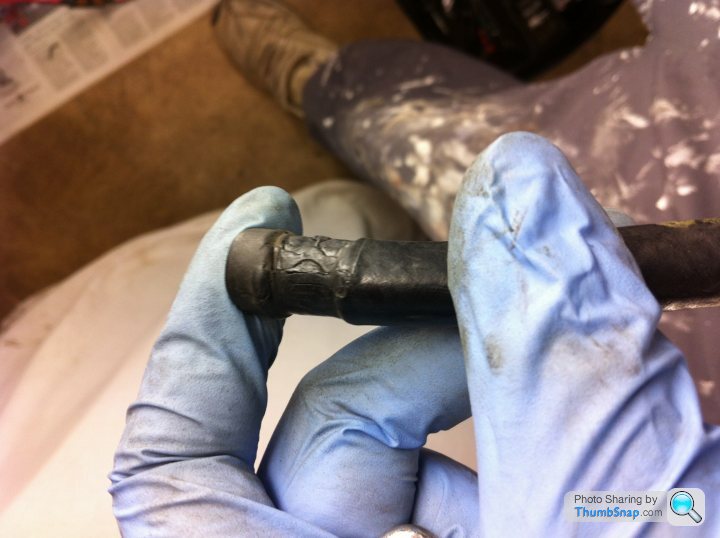
Assembling fuel rail :
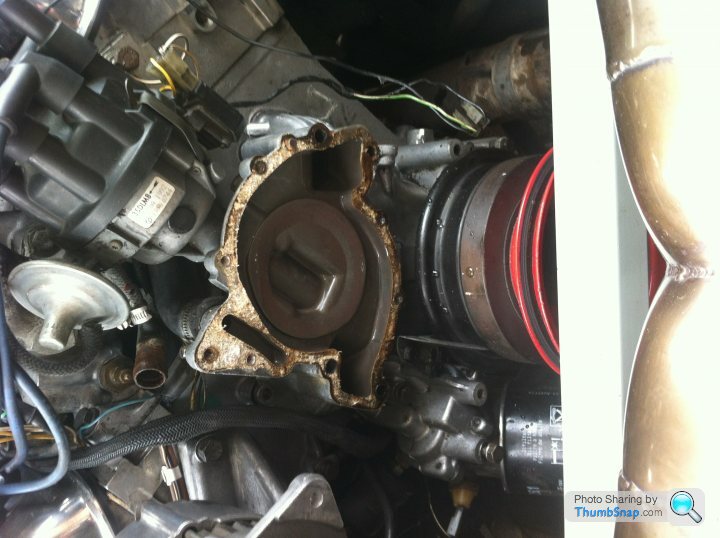
Water pump leaking :
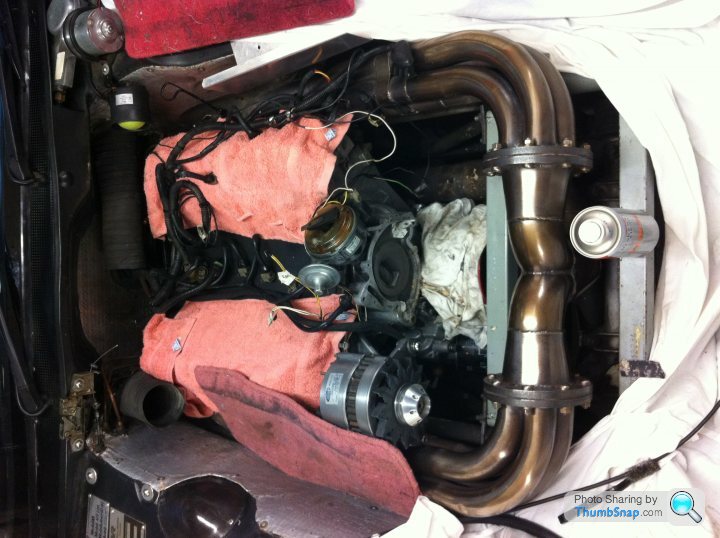
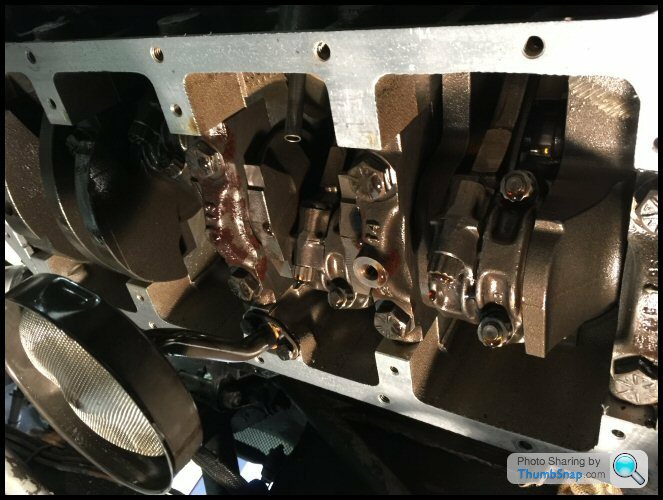
Valley gasket, new engine wiring harness, exhaust heat wrap :
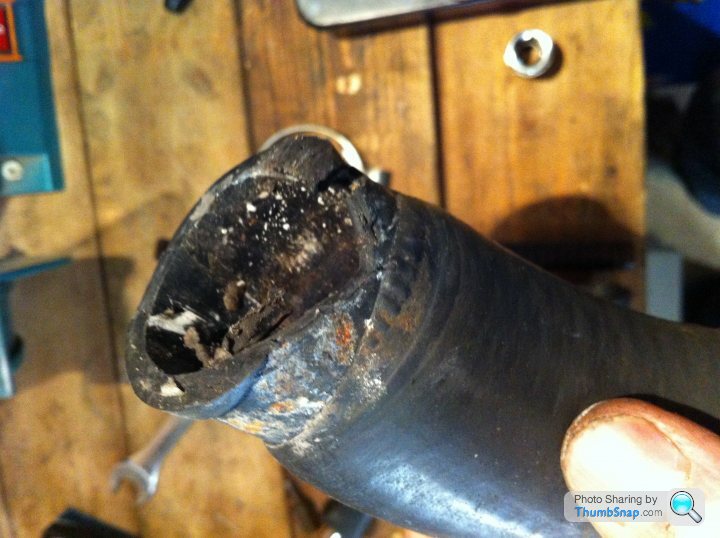
23 year old bottom hose recently refitted by a TVR specialist... :
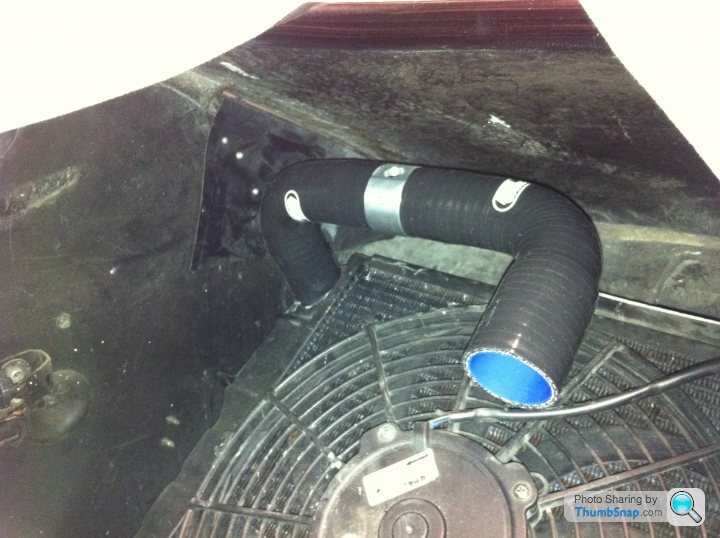
New SAMCO hoses with additional bleed points :
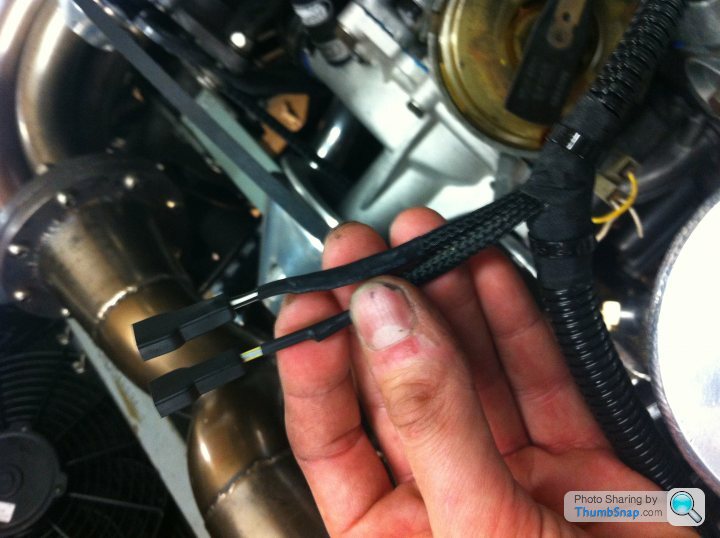
Engine harness coming along :
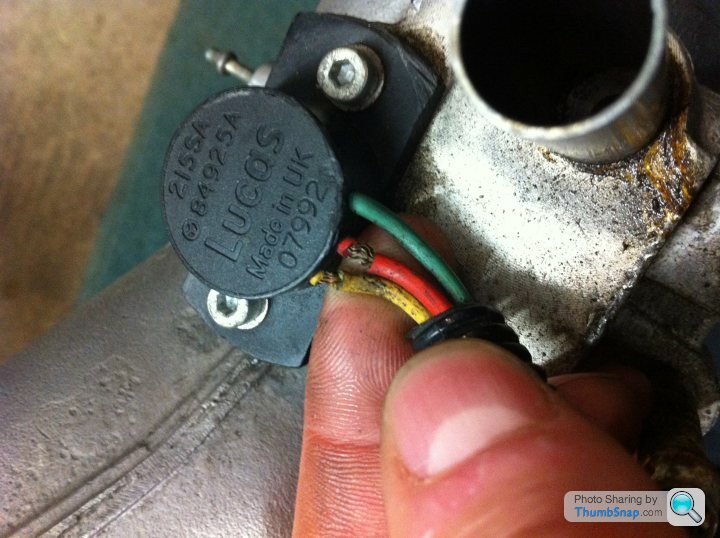
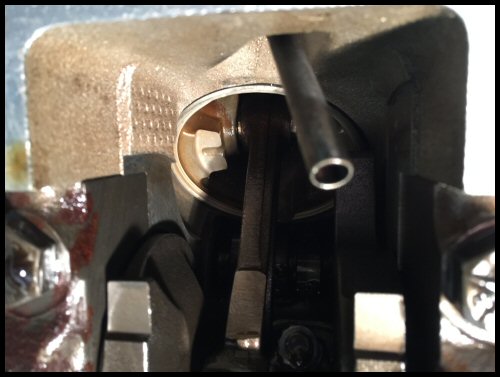
Throttle position sensor wiring. Vehicle recently given once over by a TVR specialist :
Swirl pot polished :

Rocker covers polished :

Assembling powder coat items :

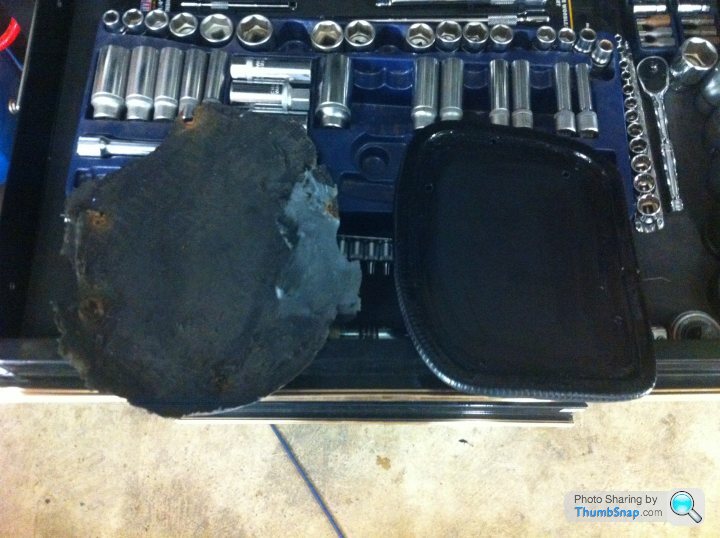
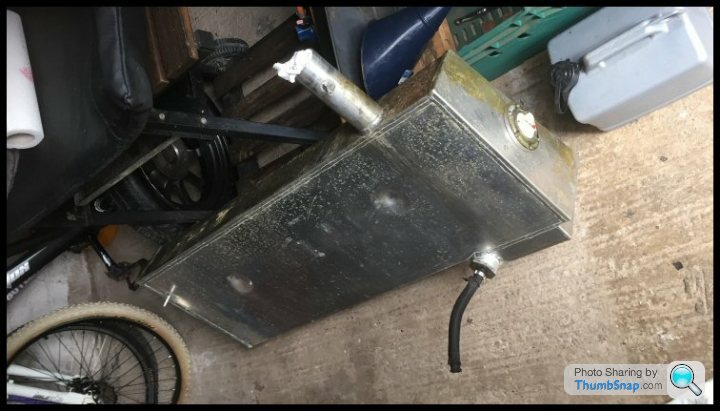
Tank fuel lines found to be damp :
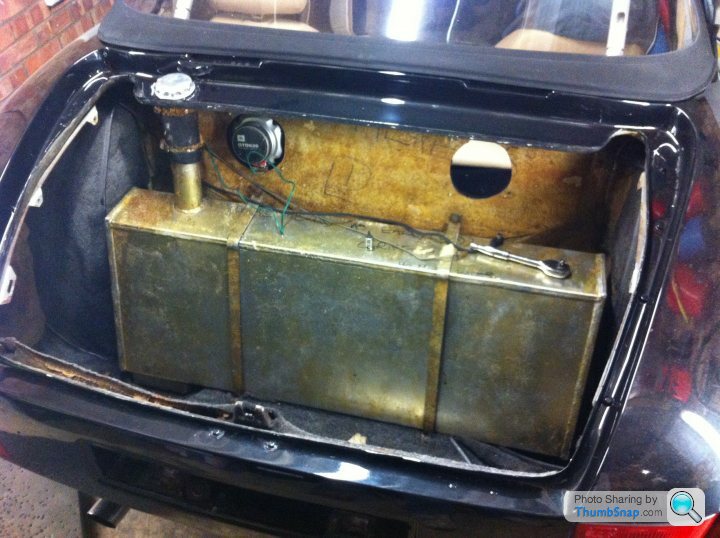
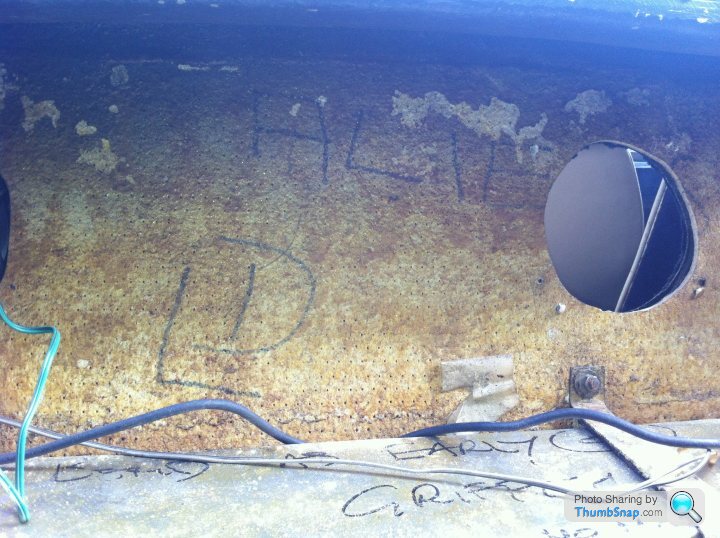
Customary boot signature! :
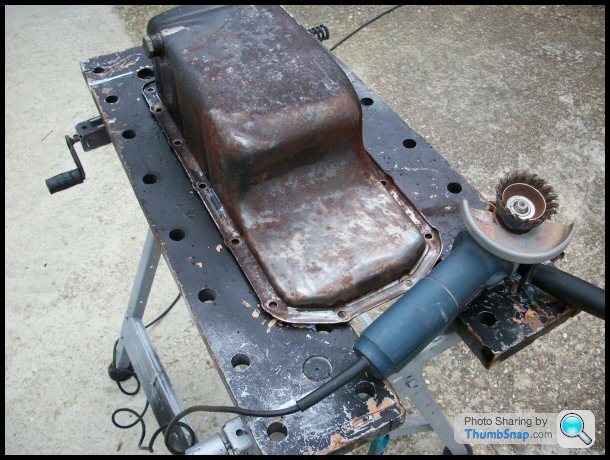
Draining the tank :
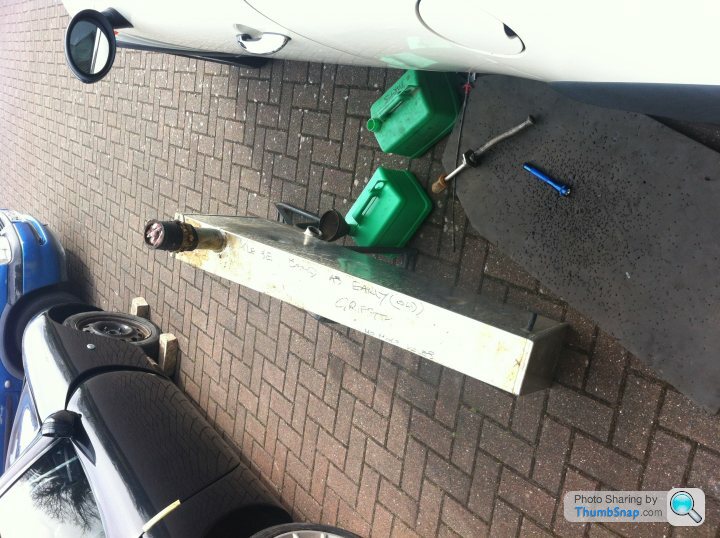
Tank outlet removed :

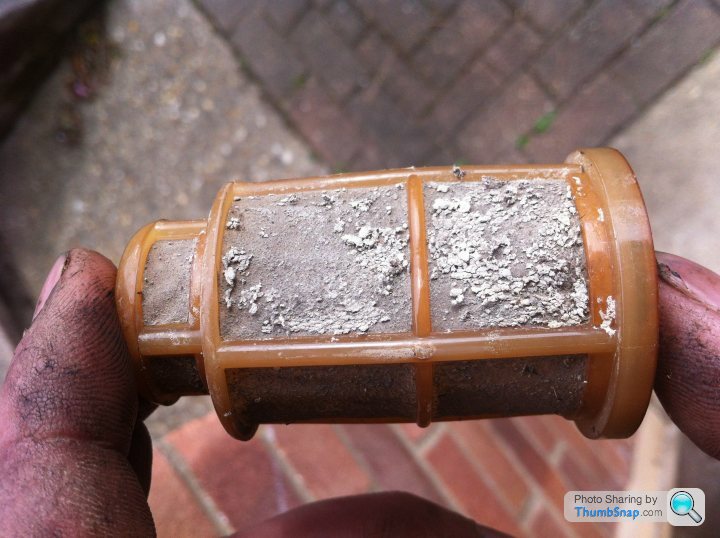
Blocked outlet gauze :
Neighbor relations being pushed.... :
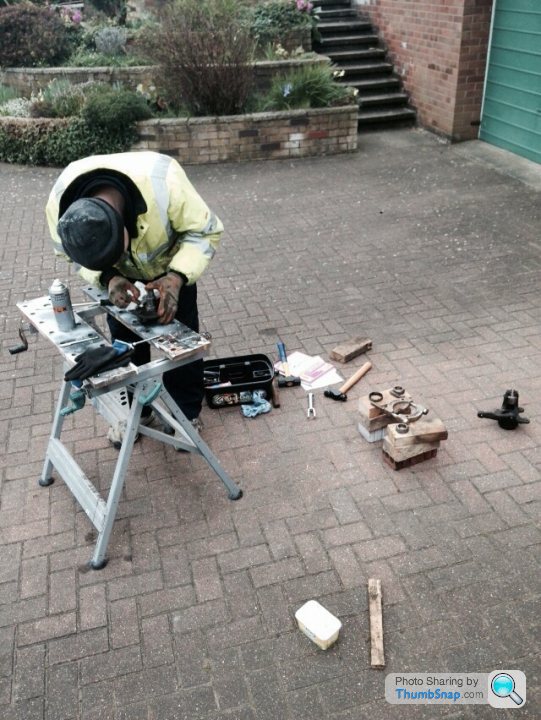
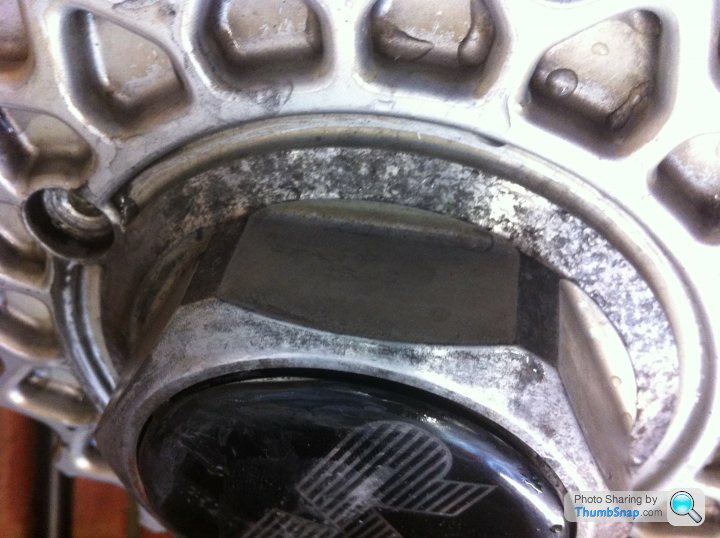
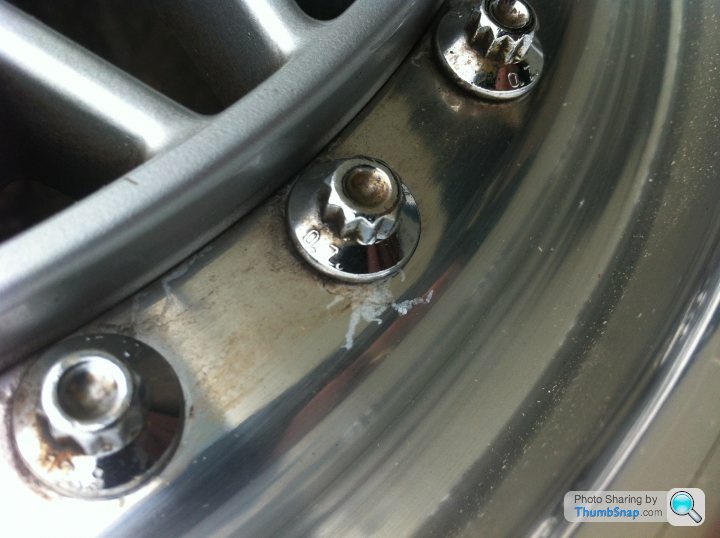
New wheel bearings, brakes, pads etc. This is a Sierra hub prior to bearing fitment :

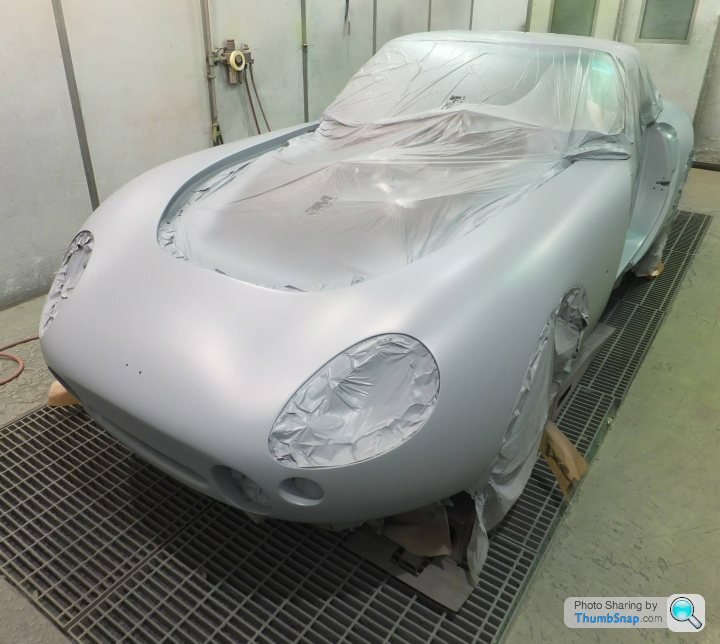
All mechanical items done, driving once again, off to the paintshop. Please excuse the Ford Scorpio donor wheels!! :
Pre-primer :
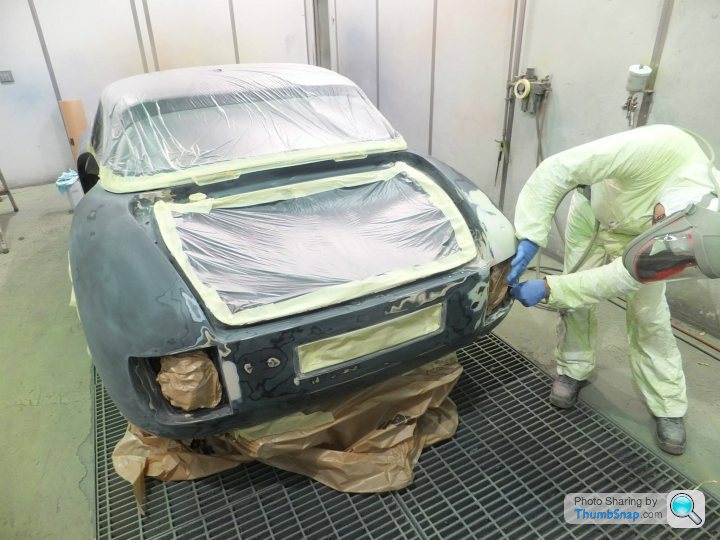
Primer :
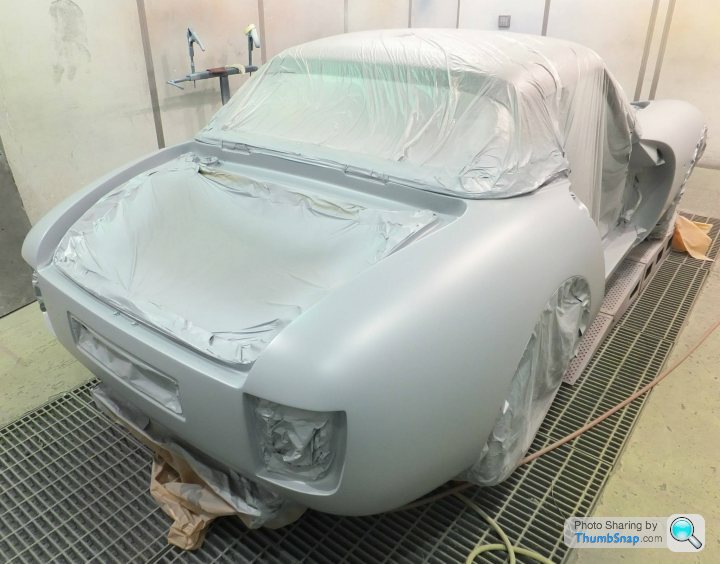
Primer :
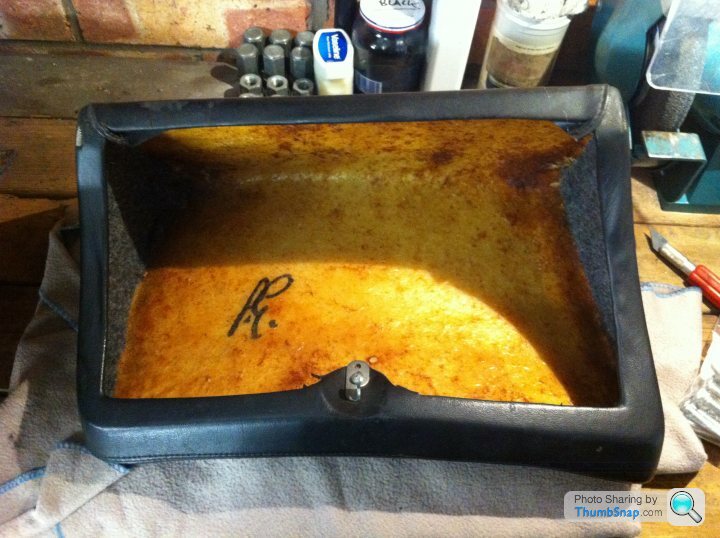
Bit of re-trimming now that the car is away. Another signature! :
Re-building the mirrors :
Polishing things is good. Cant scrape knuckles polishing things :
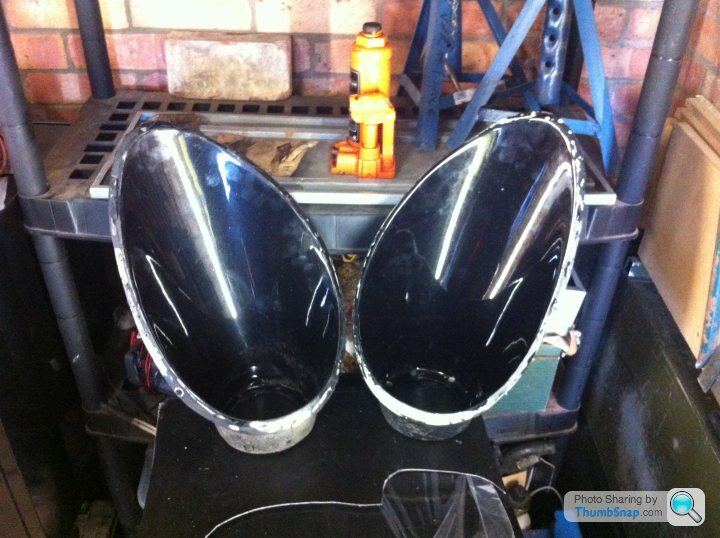
Headlamp pods dismantled, painted, rebuilt :
Silicone new indicators :

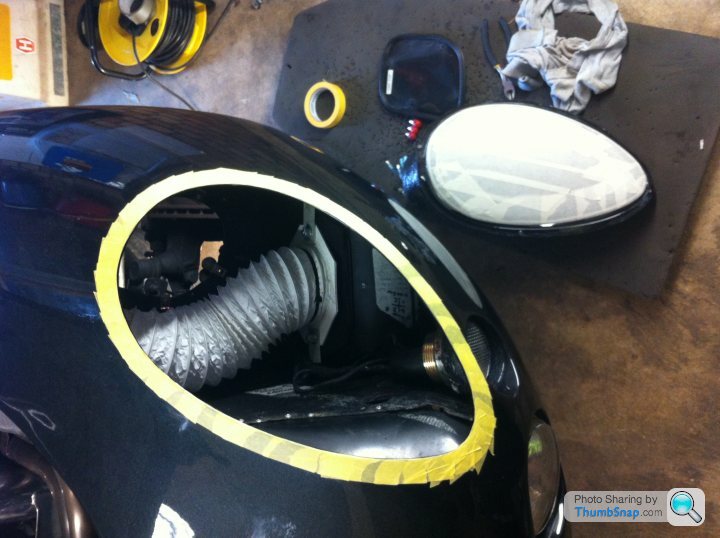
Fitting headlamps. Note my new heater motor ducting which has infinitely increased passenger compartment airflow :
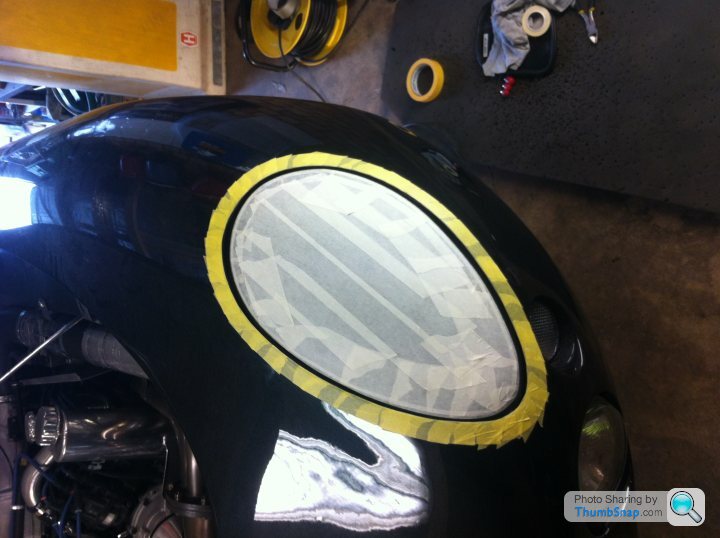
Ready for silicone; a horrible horrible task :
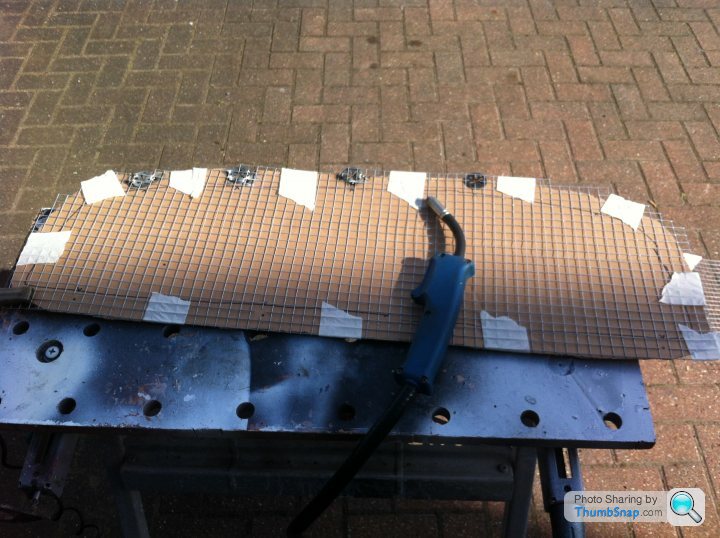
Making new grills :
Making new headlamp access panels :
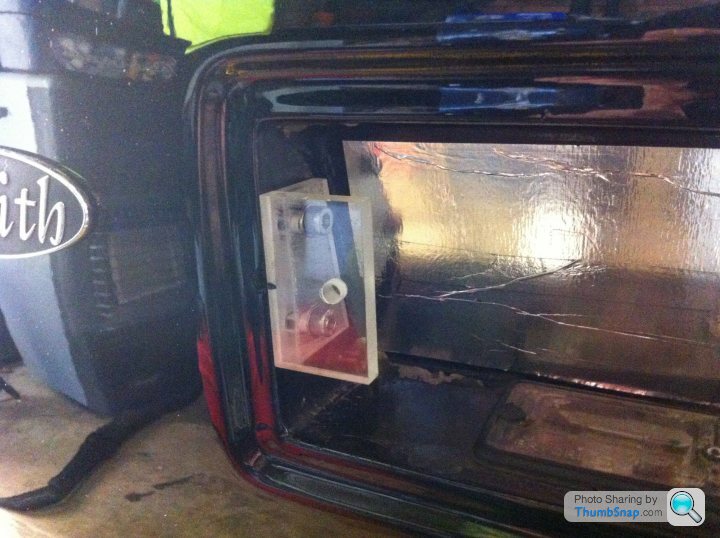
Making translucent number plate mounts :
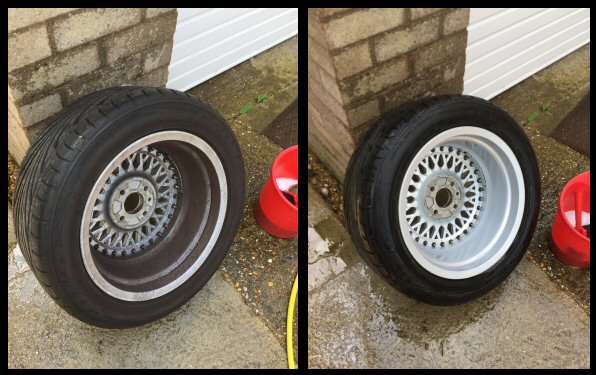
Wheels not making the grade :

More wheel issues :
Tidying the wheelhouses:

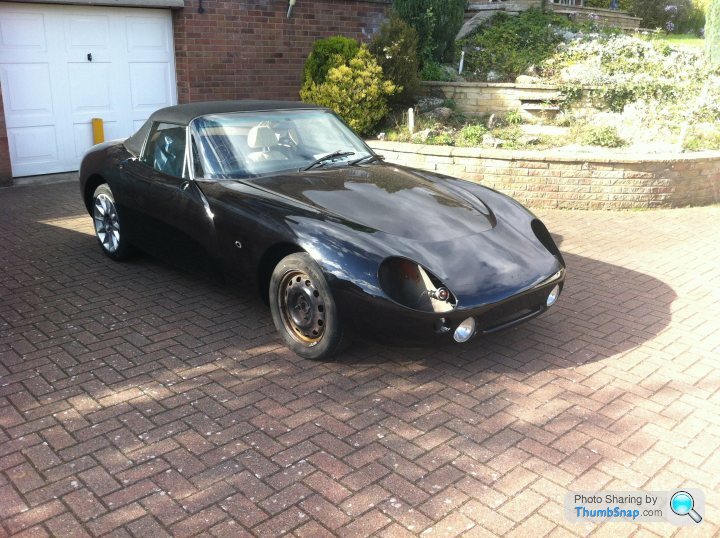
Wheels back from refurbishers and fitted. Car looking good, wallet looking empty :

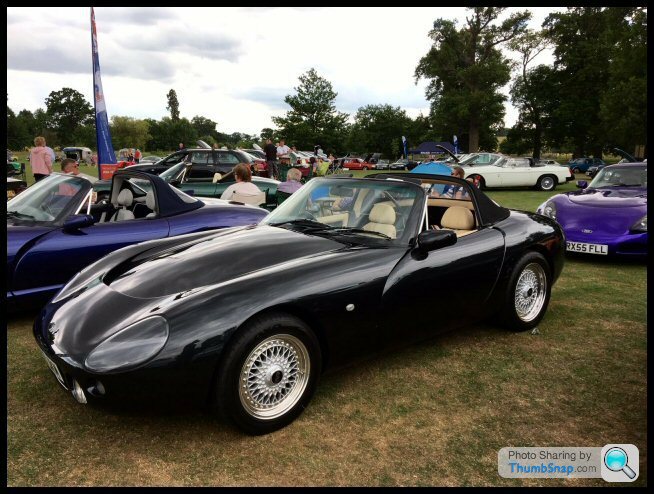
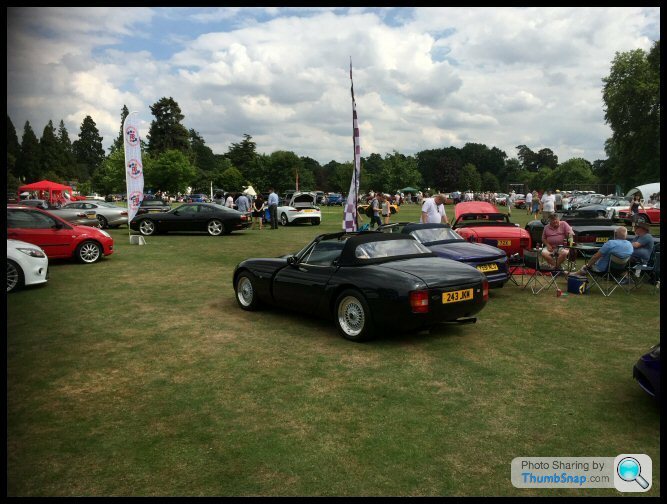
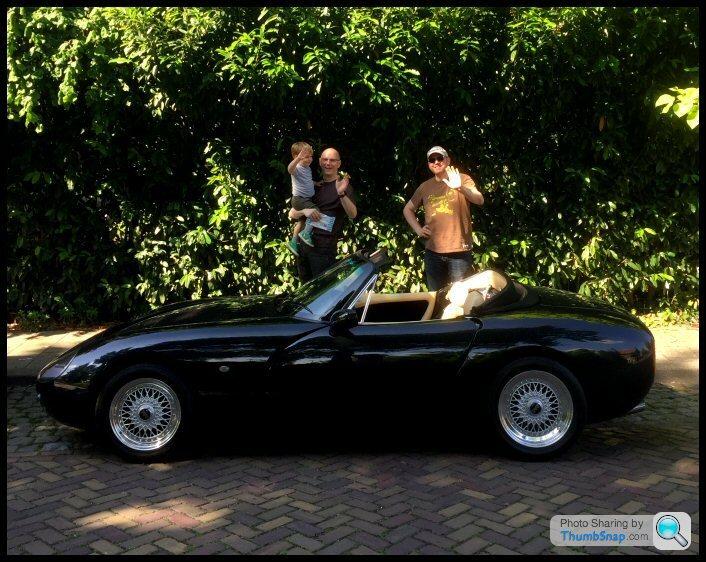
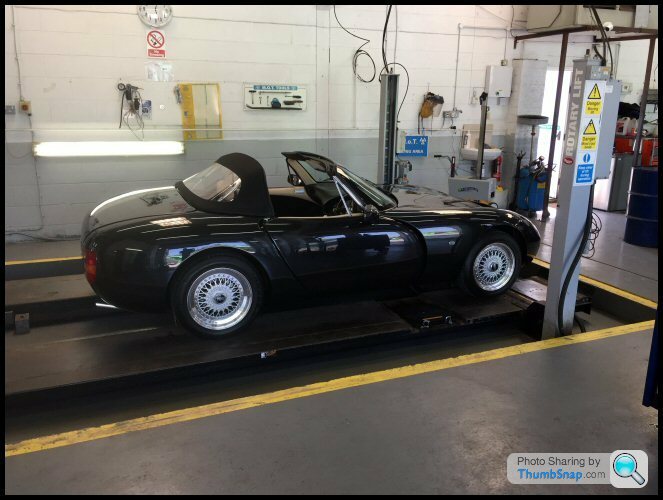
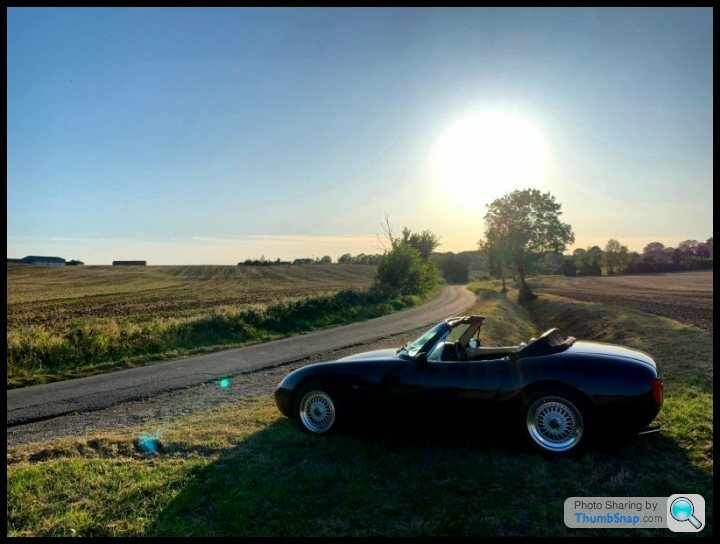
First photo shoot last week, vehicle running. Me happy.
Spent about 5x as much as what I had hoped. Need to keep for five years minimum to cover that damage. I'm still sorting little bits so I will just post updates here as I go along. This winter I plan to have the dash out but lets enjoy this summer.....
October 2015 Additional Photos :

Lets spread a bit of pre-cat love shall we...!
Mine is a Moonraker Black 400 with the optional 250 package. It has the optional O.Z. split rims and a carbon fibre targa panel. I believe this was optional for 1992. It was purchased by TVR Dealer Christopher Neil on 7th December 1992 as their demonstrator and had the plate "H1 TVR" at the start of their ownership. That plate has long gone but HPI says its on a Chimaera somewhere......
I'm a sucker for split-rims so it had to be a pre-cat. It was purchased by me in February 2014. I was taken with the history folder literally full of "TVR specialist" invoices. After the drive home, the rose tinted specs came off and all those invoices meant nothing.....
Fuel hoses chafing rocker covers :
Fuel hose condition :
Fuel hose condition :
Fuel rail back from powder coating :
Injectors off for ASNU testing :
Assembling fuel rail :
Water pump leaking :
Valley gasket, new engine wiring harness, exhaust heat wrap :
23 year old bottom hose recently refitted by a TVR specialist... :
New SAMCO hoses with additional bleed points :
Engine harness coming along :
Throttle position sensor wiring. Vehicle recently given once over by a TVR specialist :
Swirl pot polished :
Rocker covers polished :
Assembling powder coat items :
Tank fuel lines found to be damp :
Customary boot signature! :
Draining the tank :
Tank outlet removed :
Blocked outlet gauze :
Neighbor relations being pushed.... :
New wheel bearings, brakes, pads etc. This is a Sierra hub prior to bearing fitment :
All mechanical items done, driving once again, off to the paintshop. Please excuse the Ford Scorpio donor wheels!! :
Pre-primer :
Primer :
Primer :
Bit of re-trimming now that the car is away. Another signature! :
Re-building the mirrors :
Polishing things is good. Cant scrape knuckles polishing things :
Headlamp pods dismantled, painted, rebuilt :
Silicone new indicators :
Fitting headlamps. Note my new heater motor ducting which has infinitely increased passenger compartment airflow :
Ready for silicone; a horrible horrible task :
Making new grills :
Making new headlamp access panels :
Making translucent number plate mounts :
Wheels not making the grade :
More wheel issues :
Tidying the wheelhouses:
Wheels back from refurbishers and fitted. Car looking good, wallet looking empty :
First photo shoot last week, vehicle running. Me happy.
Spent about 5x as much as what I had hoped. Need to keep for five years minimum to cover that damage. I'm still sorting little bits so I will just post updates here as I go along. This winter I plan to have the dash out but lets enjoy this summer.....
October 2015 Additional Photos :
Edited by jay-kay-em on Friday 9th October 18:21
Edited by jay-kay-em on Tuesday 30th July 21:22
Cheers chaps 
a) 23 years of countless alarm installers have not been kind
b) some air vents are connected, some not
c) instrument illumination is comical. The clock is brighter than my actual headlamps, the other instruments are dim and the rev counter doesn't illuminate at all. A loose bulb does however illuminate my feet quite nicely!
d) I'm allergic to blue crimp connectors. Hate 'em. Solder is king.
Doesn't affect me burbling around right now, just one for the winter.
TV8 said:
What are you planning for the dash?
Well, the dash has multiple issues. I went to fit my preferred radio and what I found inside was nothing short of a birds nest of horror. I am still having sleepless nights.a) 23 years of countless alarm installers have not been kind
b) some air vents are connected, some not
c) instrument illumination is comical. The clock is brighter than my actual headlamps, the other instruments are dim and the rev counter doesn't illuminate at all. A loose bulb does however illuminate my feet quite nicely!
d) I'm allergic to blue crimp connectors. Hate 'em. Solder is king.
Doesn't affect me burbling around right now, just one for the winter.
cavebloke said:
jay-kay-em said:
Wheels back from refurbishers and fitted. Car looking good, wallet looking empty
I have the same wheels as you and have been looking for a good shop to refurbish them. Would you recommend the guys who did yours? I notice your wallet felt empty after this item - were they very expensive to refurb?Cheers,
Simon
Refurbing them are as expensive as you want to make it. You can choose to dissasemble or not to dissasemble. The non-dissasemble route is just spraying them all silver as one.
Dissasembly is the more thorough way and you can then properly polish the outer rims.
A lot of wheel refurbishers wont even touch split rims.
I took them round the houses locally to get a quote and everyone warned me about snapping the bolts upon dissasembly. Now the original bolts are very special to me as they have O.Z. cast into the bolt heads. I wanted to keep those markings for originality purposes. Needless to say, these bolts are no longer available from O.Z.. Yes, you can buy split rim bolts off ebay, but their source is unknown and they have anonymous heads. On the fear of breaking one of these bolts upon removal, I rang most refurbishers up and down the country to see if they carry these bolts in stock. Only one company did - albeit old bolts re-plated. Therefore I could only use him, and he knew that and charged accordingly.
I also wanted the big false central nut (that encompasses the TVR logo) to have a different finish - i.e. polished instead of silver. This too was labour intensive but it was the closest to OE I could get it.
Not trusting couriers, I drove them to London and drove back. Two weeks later I drove back to London, picked them up and drove home. The caps were painted and polished too, correctly, and supplied separately in a cardboard box. I was slightly unhappy because they had used silicone to seal bolted surfaces (between inner core and outer rim) and of course it had oozed out everywhere upon torquing up. I spent a good hour on each wheel with a toothbrush cleaning that expelled silicone.
The wheels sat about a bit and six months later I went to fit them to the car. Went to put the centre caps on and the bl**dy centre caps wouldn't fit!! The new paint was so thick the centre caps had become too large for the recess they fit in. I wasnt prepared to post them back and I wasnt prepared to drive to London again - end result - yet more hours spent sanding their circumference with 1200 wet/dry.
I chose a non-lacquered finish for the polished rims. This requires more maintenance (cleaning) but if you put the effort in, they last longer. Moisture has a habit of getting under any lacquer. Also, any lacquer on polished rims would have nothing to key to.
Admittedly, after some remedial work, they look stunning - but I was pretty pee'd off at the time. Lesson learnt - try your centre caps before you leave!!!!
The O.Z. racing stickers, one per rim, had to be re-made just like OE. For just stickers, these were expensive. I got a local graphics shop to make some up and had to pay for their time.
The old OE Stickers :
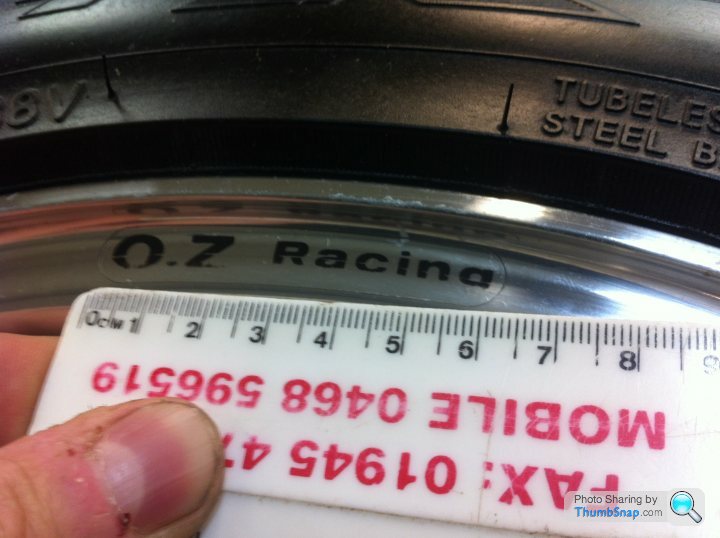
The old OE Bolts with O.Z. markings :
As I have moaned about certain things, I don't know if forum guidelines allow me to name the company!!
Edited by jay-kay-em on Monday 15th June 18:22
Edited by jay-kay-em on Monday 15th June 18:23
AlanW said:
Hi
Got myself a Griffith 400 / 250 with split rims recently.
Cracking engine, as good as the 5 litres I've had.
Can you let me know where you got your Oz Racing stickers from? I need one after getting a wheel resealed
Cheers
Hey Alan,Got myself a Griffith 400 / 250 with split rims recently.
Cracking engine, as good as the 5 litres I've had.
Can you let me know where you got your Oz Racing stickers from? I need one after getting a wheel resealed
Cheers
Well I had my first set of stickers made up by a local graphics shop but was never happy with them. Then, the wheel company that refurbed them rang me up and said he had found four new-old-stock stickers and do I want them. Naturally I said yes! This was http://www.splitrims.co.uk/ - chap named Zack; Heathrow way. Lovely bloke.
Also, its amazing how many people have positive comments for the driveability of the 400 '250'. I just cant fault it.
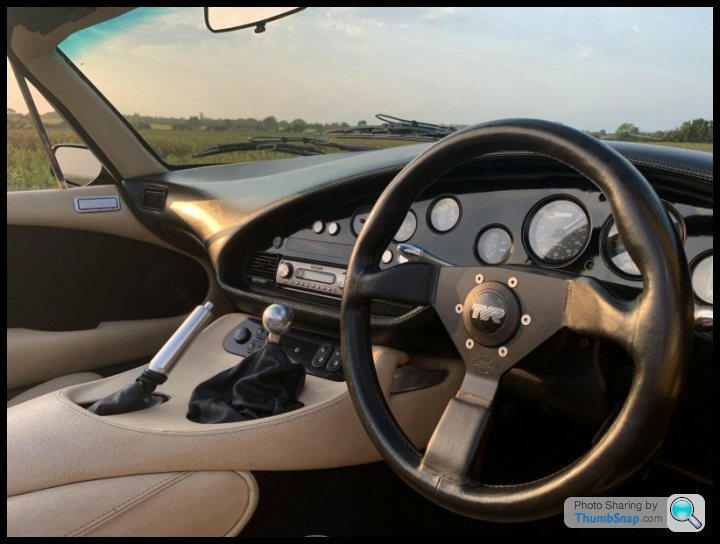
I have added some more pictures of mine to the original thread opener (engine bay and interior).
Would like to see some pictures vice versa. Seeing people spend money saving 400s makes me happy.
Edited by jay-kay-em on Friday 9th October 18:24
Hey Alan, lovely to see the pictures.
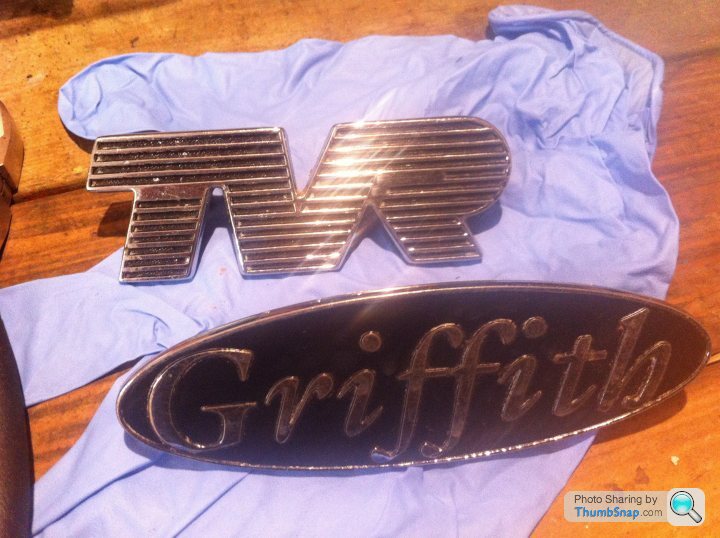
I love the period radio - the flip face in wood effect. I remember those. The sales invoice too is to be treasured. I see the 'gas flowed head' option there written down.
Apart from the typeface, which is the same, your 400-250 plenum badge is a different size to mine. How strange. Did the factory use any bit of metal they could find!?! My badge sits in the old 3.9 recess, yours seems to sit on top....
I would love to compare cars but mine is SORN now until April
I'll add you in my contact list and it will be a priority of mine when there is less chance of a gritter about!
Thanks for adding the pictures.
Jay.
Hi Folks,
Just a little update now the Griff is SORN.
I’d like to report woeful under-usage in 2016 I’m afraid. Multiple reasons, but I have two other mistresses that demand attention and the Mk2 has been really troublesome this year…

Griff drama started early in my first year. The battery light (not that you would know it’s a battery light as it’s just a random LED) illuminated one night in Bury St. Edmunds, about 45 miles from home. It was getting dusk and I didn’t want to risk being stranded on the A14 with no hazard lamps if I chose to drive on battery only. I had to call breakdown, sadly. Oh the shame!

I told the RAC service centre exactly what was up – “alternator bearings sound awful, nothing you can do, just get me home”.
1hr 30mins later a transit panel van arrives and the sub-contractor shouts out the window “I’m here for your jump start mate”. Great! I tell him to send a truck…
Another 1hr 30mins passes with multiple calls to the RAC service centre. What turns up next is a baliff-type truck. Basically, metal clamps bolt against the wheels and it lifts the car up. The protective rubber blocks were damaged. There was no way he was using those clamps against my freshly refurbished O.Z.’s. He radios-in and disappears.

It’s now midnight, 4.5 hours after my initial call. My mobile phone is dying. Its getting cold, and I ring the RAC call centre for the tenth time. Their advice is they don’t have a prestige recovery solution, lock the car, get the train home and they will recover in the morning. Get lost I said! I am not abandoning my car with a pram-roof in an unlit car park. I said I know a local company called Manchetts – a private company who contract to the AA that have a prestige solution. After much haggling with a manager, it was agreed I pay for Manchetts on my credit card and submit a claim to the RAC at a later date.
Needless to say, Manchetts came in 45 mins, ultra-low demountable bed, alloy wheel covers and a clean, presentable cab.


Oh the embarrassment...

Because of which I am no longer a member of the RAC after ten years and have joined AA. Shame really.
To remedy, I wanted to keep the alternator casing and pulley as they were special/polished.

So I stripped/swapped over the internals. It’s a generic Lucas A127 which, after a bit of research is fitted to an old Escort Diesel. Euro Car Parts had a genuine Lucas item for about £55. The A127 is either left/right handed – but as I wanted the internals it didn’t matter. You can trace that alternator back to 1970's tractors and all sorts. Incidentally, TVR Heritage want £90 for one that isn’t even branded.

More electrical gremlins next. Last year I brought her back on the road with a brand new Exide:

A month or so later, whilst rummaging around in the footwell, I noticed it was leaking. First of all, with an alternator I had just rebuilt, I feared an overcharging problem boiling the battery. Nothing of the sort. The top casing is plastic welded to the body. Tip the battery at the slightest angle, and acidic water leaks down the side…


It was a manufacturing defect and the top wasn’t fully sealed/plastic welded. Battery acid had gone everywhere. Destroyed some carpets and had started to attack the Engine ECU.


I cleaned everything up as best I could. I researched AGM batteries but finally settled for a traditional lead/acid battery – but with a leak proof guarantee. Again, like the Exide, I chose Euro Car Parts because any problems, you can just plonk it on the counter with no return postage hassles. This time it’s a Duracell. ECP gave me my money back on the Exide.

Before installation I tipped it at some aggressive angles and all is dry!
I disposed of the fibreglass box I’m afraid.

I purchased a new, open type battery tray which makes battery installation easier.

Unfortunately the poles are the wrong way round so I had to extend the positive lead. All good and no leaks thus far!
A few meets with Cambridgeshire TVR Car Club Region

More electrical problems next – its been a themed year! My headlights wouldn’t turn off!
Press the button off, still on. Keys out the ignition, still on. Close the door and lock it, still on! First it was a 10 sec delay, then a minute, gave it a few weeks and they stayed on indefinitely. Had to disconnect the battery!
Traced it back to the relay sticking.

The contacts were corroded with a white fur. Cleaned these up, cover back on, fault cured. That, and the headlamps are 10x brighter. For everone slagging off the original Cibie’s – check your relay!
2016 Events
Did supercar Sunday at the Sharnebrook Arms, Bedfordshire – always very busy and some interesting exotica.

Visiting my mates house. Two pieces of poorly built british rubbish!

Camping with mates...

Anything better? TVR, summer evening, sausages and beer.

Finally, met up with GriffLee in Peterbororugh. Top bloke.

2016 Photography
Bit of good news, won the TVRCC ‘picture this’ competition

Happy days! Bit of a boost after all the grief.
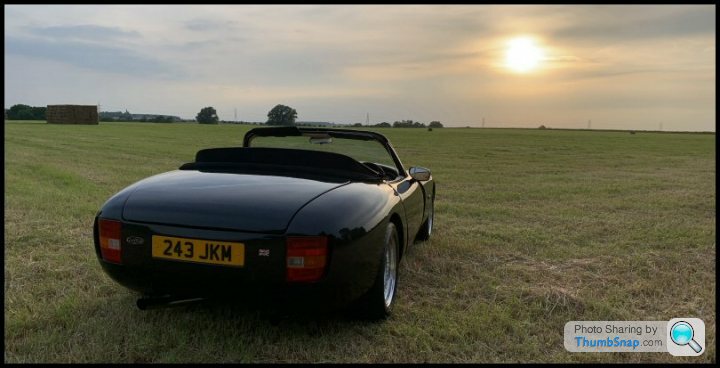
To me, this is what Griff ownership is all about. A late summers evening, warm, roof down, sun setting. Just ideal and the reason why we do it.

Same time next year chaps! Let’s get through this depressing winter.
Regards,
Jay.
Just a little update now the Griff is SORN.
I’d like to report woeful under-usage in 2016 I’m afraid. Multiple reasons, but I have two other mistresses that demand attention and the Mk2 has been really troublesome this year…
Griff drama started early in my first year. The battery light (not that you would know it’s a battery light as it’s just a random LED) illuminated one night in Bury St. Edmunds, about 45 miles from home. It was getting dusk and I didn’t want to risk being stranded on the A14 with no hazard lamps if I chose to drive on battery only. I had to call breakdown, sadly. Oh the shame!
I told the RAC service centre exactly what was up – “alternator bearings sound awful, nothing you can do, just get me home”.
1hr 30mins later a transit panel van arrives and the sub-contractor shouts out the window “I’m here for your jump start mate”. Great! I tell him to send a truck…
Another 1hr 30mins passes with multiple calls to the RAC service centre. What turns up next is a baliff-type truck. Basically, metal clamps bolt against the wheels and it lifts the car up. The protective rubber blocks were damaged. There was no way he was using those clamps against my freshly refurbished O.Z.’s. He radios-in and disappears.
It’s now midnight, 4.5 hours after my initial call. My mobile phone is dying. Its getting cold, and I ring the RAC call centre for the tenth time. Their advice is they don’t have a prestige recovery solution, lock the car, get the train home and they will recover in the morning. Get lost I said! I am not abandoning my car with a pram-roof in an unlit car park. I said I know a local company called Manchetts – a private company who contract to the AA that have a prestige solution. After much haggling with a manager, it was agreed I pay for Manchetts on my credit card and submit a claim to the RAC at a later date.
Needless to say, Manchetts came in 45 mins, ultra-low demountable bed, alloy wheel covers and a clean, presentable cab.
Oh the embarrassment...
Because of which I am no longer a member of the RAC after ten years and have joined AA. Shame really.
To remedy, I wanted to keep the alternator casing and pulley as they were special/polished.
So I stripped/swapped over the internals. It’s a generic Lucas A127 which, after a bit of research is fitted to an old Escort Diesel. Euro Car Parts had a genuine Lucas item for about £55. The A127 is either left/right handed – but as I wanted the internals it didn’t matter. You can trace that alternator back to 1970's tractors and all sorts. Incidentally, TVR Heritage want £90 for one that isn’t even branded.
More electrical gremlins next. Last year I brought her back on the road with a brand new Exide:
A month or so later, whilst rummaging around in the footwell, I noticed it was leaking. First of all, with an alternator I had just rebuilt, I feared an overcharging problem boiling the battery. Nothing of the sort. The top casing is plastic welded to the body. Tip the battery at the slightest angle, and acidic water leaks down the side…
It was a manufacturing defect and the top wasn’t fully sealed/plastic welded. Battery acid had gone everywhere. Destroyed some carpets and had started to attack the Engine ECU.
I cleaned everything up as best I could. I researched AGM batteries but finally settled for a traditional lead/acid battery – but with a leak proof guarantee. Again, like the Exide, I chose Euro Car Parts because any problems, you can just plonk it on the counter with no return postage hassles. This time it’s a Duracell. ECP gave me my money back on the Exide.
Before installation I tipped it at some aggressive angles and all is dry!
I disposed of the fibreglass box I’m afraid.
I purchased a new, open type battery tray which makes battery installation easier.
Unfortunately the poles are the wrong way round so I had to extend the positive lead. All good and no leaks thus far!
A few meets with Cambridgeshire TVR Car Club Region
More electrical problems next – its been a themed year! My headlights wouldn’t turn off!
Press the button off, still on. Keys out the ignition, still on. Close the door and lock it, still on! First it was a 10 sec delay, then a minute, gave it a few weeks and they stayed on indefinitely. Had to disconnect the battery!
Traced it back to the relay sticking.
The contacts were corroded with a white fur. Cleaned these up, cover back on, fault cured. That, and the headlamps are 10x brighter. For everone slagging off the original Cibie’s – check your relay!
2016 Events
Did supercar Sunday at the Sharnebrook Arms, Bedfordshire – always very busy and some interesting exotica.
Visiting my mates house. Two pieces of poorly built british rubbish!
Camping with mates...
Anything better? TVR, summer evening, sausages and beer.
Finally, met up with GriffLee in Peterbororugh. Top bloke.
2016 Photography
Bit of good news, won the TVRCC ‘picture this’ competition
Happy days! Bit of a boost after all the grief.
To me, this is what Griff ownership is all about. A late summers evening, warm, roof down, sun setting. Just ideal and the reason why we do it.
Same time next year chaps! Let’s get through this depressing winter.
Regards,
Jay.
Edited by jay-kay-em on Wednesday 27th December 22:12
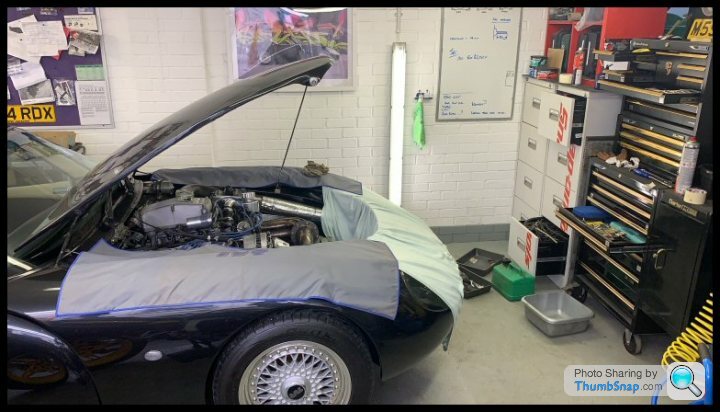
As its been 18 months, thought I'd do a little diary update.
Not long after the last update, my world fell apart. Lost my house and garage. All my tools went into a pay-to-rent storage container, and vehicles stashed with friends. The Griff did one last trip to Bury St. Edmunds...

Here it lived for 10 months... with me in debt to a close friend with garage space....
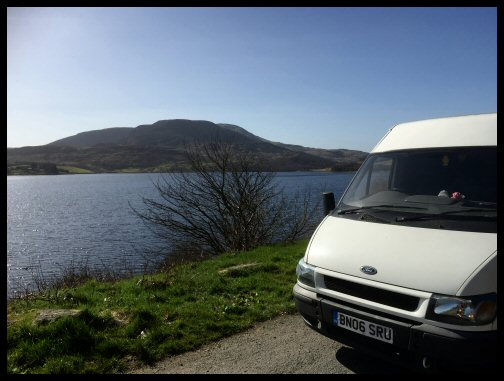
Bought a Transit, converted it to a no-frills motorhome and toured Wales...
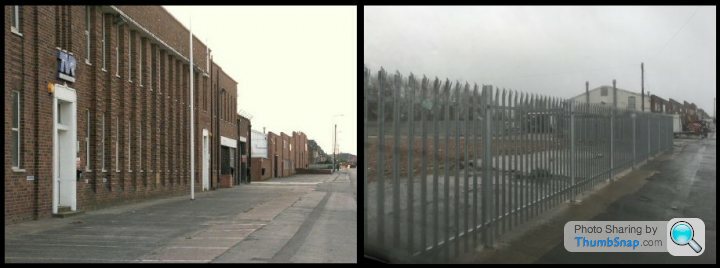
On the way back, visited the old TVR factory. Unfortunately, I was a little bit late. The main building had been flattened.
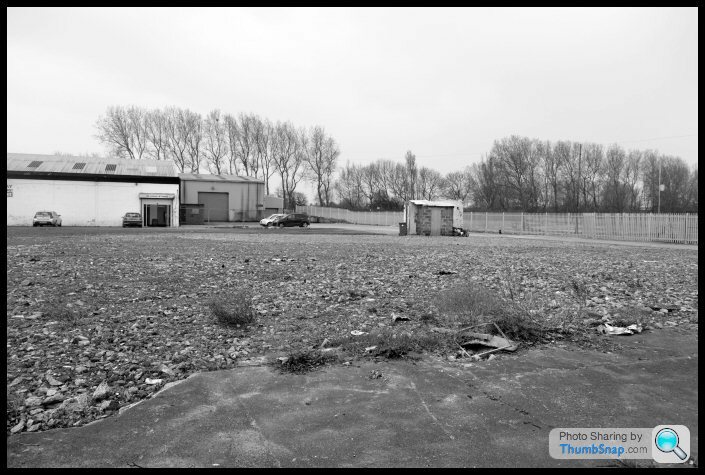
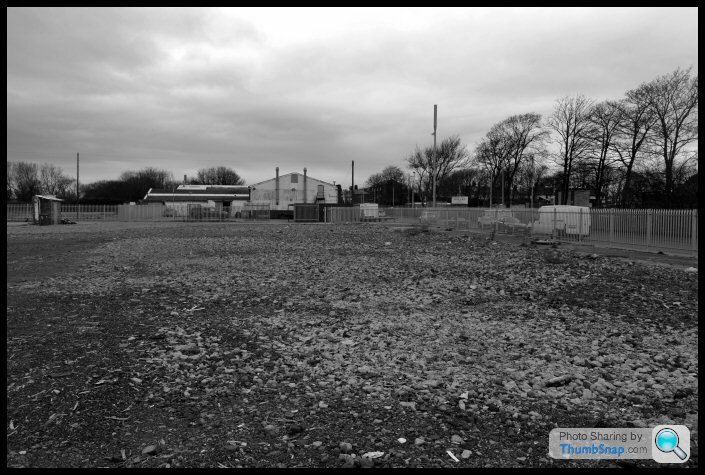
Here's my best comparison. Stock file photo left, my view on the right.
Only an ice rink remains - which will be part of the old buildings. Asked permission and had a walk around - the parts hanger still exists.
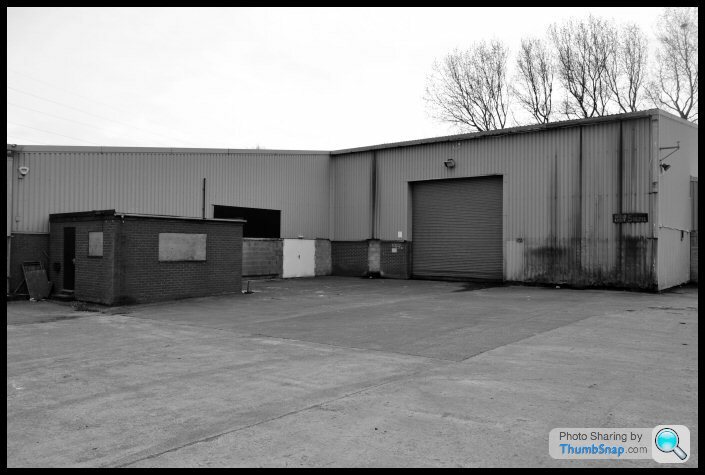
There is still evidence to be found...
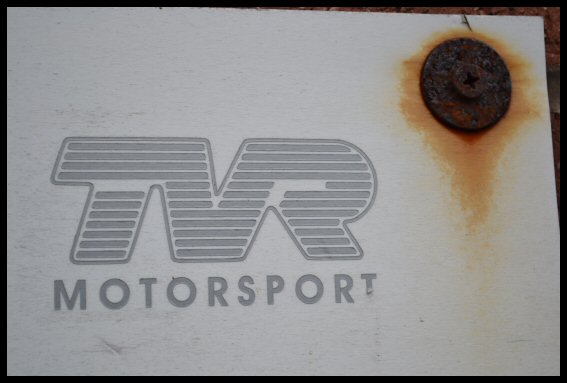
Left with a bit of the factory that my Griff rolled through 26 years ago... need to mount this on a wooden base
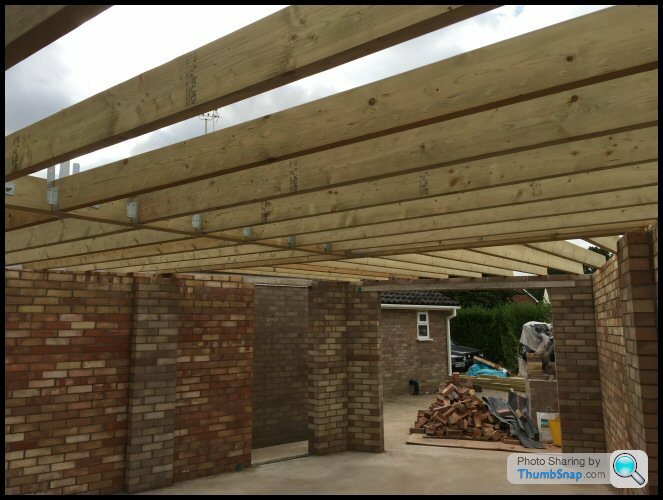
Anyways, back on the grid now, bought a house in Alconbury and now building a workshop for Trev.
Trev is currently in the garage to the right of that pic - so she made the return trip from Bury St. Edmunds and started doing the rounds again...
Went with the TVRCC to Kimbolton... a really good car show near St. Neots. Tremendous turn out. Will be doing it again in 2018.
Drove it home, parked it it in the garage. Next day, i'm in the garden and can smell petrol. I open the garage door to what can only be described as carnage. £50 of unleaded on the floor, still dripping out the boot drain hole.
I open the garage door to vent, and drain whats left.
I then activate the manual boot release, because i'm worried a spark from the solenoid boot release will blow the car up! The carpets were saturated with fuel, all the carpet glue now soggy and tacky.
Out comes the tank.
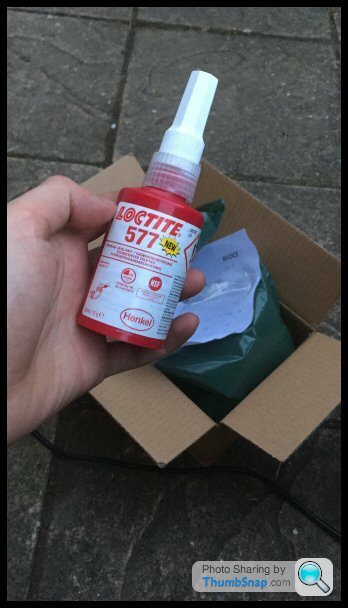
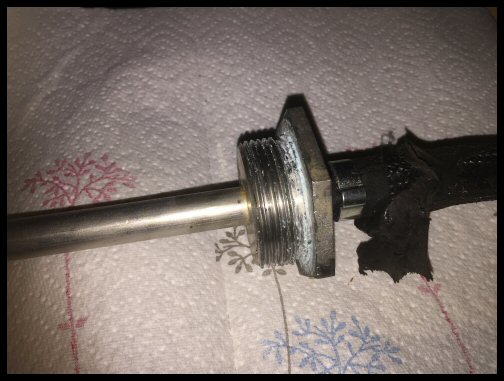
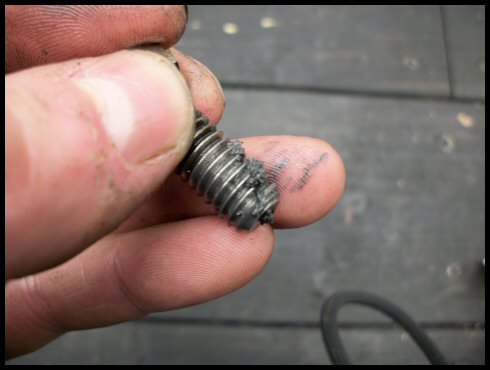
Page one of this thread shows me removing the in-tank gauze. The take-off point is a big threaded nut basically. Well, three years ago I made a gasket for that nut with gasket paper and supposedly petrol-proof Hylomar blue. You heard it here first - that method only lasts three years!
Back to the drawing board - and I found Loctite 577. Its sole purpose is a coarse thread sealant and guaranteed petrol proof. Only disadvantage... it bloomin' expensive for a little bottle!
Cleaned the threads up, and applied liberally...
Tank refitted (again!). 6 months later and all is still good - apart from my carpets still having an aroma of petrol no matter how much I clean them!
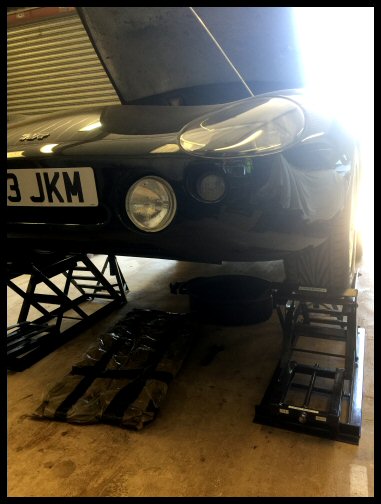
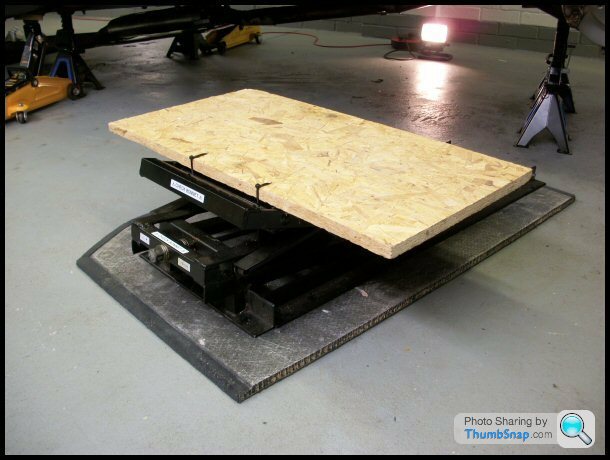
Full service next, no dramas. Here is a picture of my CJ Auto ramps that I'm very happy with. These often get mentioned on PH. They are the non-hydraulic ones and get tremendous height.
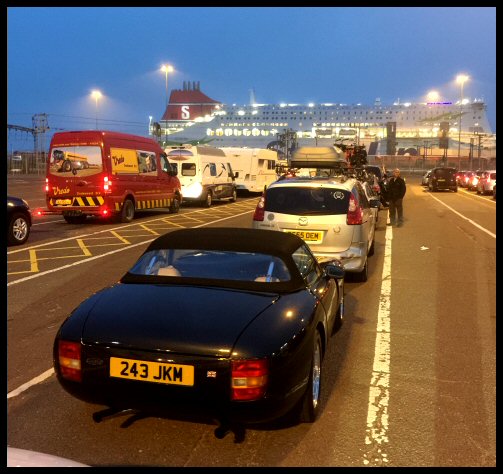
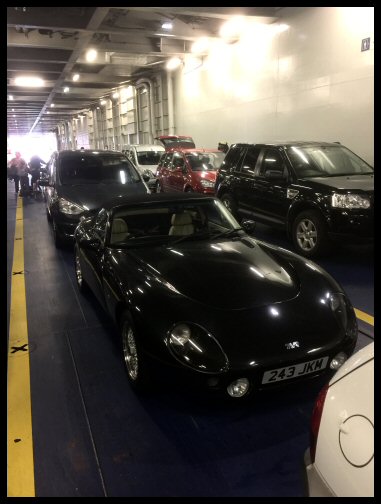
I was getting Trev ready for my mates wedding in Renesse; Netherlands. A proper road-trip ahead!
Waiting for the Ferry @ Harwich...
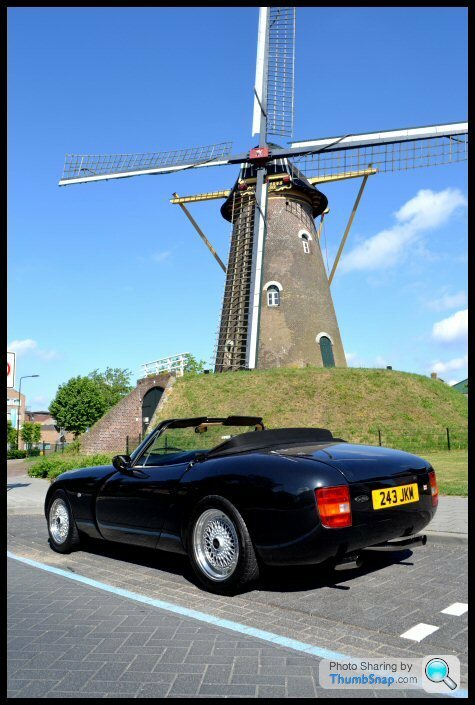
Obligatory wedding venue and windmill shots...
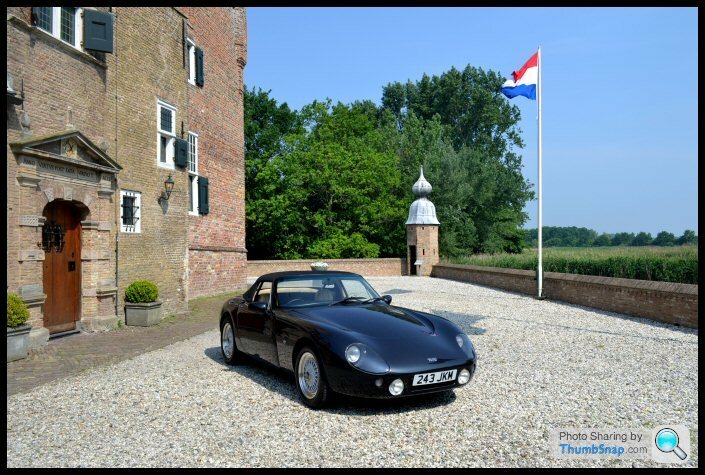
Another exclusive fibreglass hand-built English motor car.... LHD too!
Special thanks to my Dutch pals; Bas & Joep and junior pistonhead Tobias:
Safely making it home...
So... European road trip feedback :
Next update in 18 months... i'm not going anywhere else brand wise.... I just don't know what can replace it.
JKM
Not long after the last update, my world fell apart. Lost my house and garage. All my tools went into a pay-to-rent storage container, and vehicles stashed with friends. The Griff did one last trip to Bury St. Edmunds...
Here it lived for 10 months... with me in debt to a close friend with garage space....
Bought a Transit, converted it to a no-frills motorhome and toured Wales...
On the way back, visited the old TVR factory. Unfortunately, I was a little bit late. The main building had been flattened.
Here's my best comparison. Stock file photo left, my view on the right.
Only an ice rink remains - which will be part of the old buildings. Asked permission and had a walk around - the parts hanger still exists.
There is still evidence to be found...
Left with a bit of the factory that my Griff rolled through 26 years ago... need to mount this on a wooden base
Anyways, back on the grid now, bought a house in Alconbury and now building a workshop for Trev.
Trev is currently in the garage to the right of that pic - so she made the return trip from Bury St. Edmunds and started doing the rounds again...
Went with the TVRCC to Kimbolton... a really good car show near St. Neots. Tremendous turn out. Will be doing it again in 2018.
Drove it home, parked it it in the garage. Next day, i'm in the garden and can smell petrol. I open the garage door to what can only be described as carnage. £50 of unleaded on the floor, still dripping out the boot drain hole.
I open the garage door to vent, and drain whats left.
I then activate the manual boot release, because i'm worried a spark from the solenoid boot release will blow the car up! The carpets were saturated with fuel, all the carpet glue now soggy and tacky.
Out comes the tank.
Page one of this thread shows me removing the in-tank gauze. The take-off point is a big threaded nut basically. Well, three years ago I made a gasket for that nut with gasket paper and supposedly petrol-proof Hylomar blue. You heard it here first - that method only lasts three years!
Back to the drawing board - and I found Loctite 577. Its sole purpose is a coarse thread sealant and guaranteed petrol proof. Only disadvantage... it bloomin' expensive for a little bottle!
Cleaned the threads up, and applied liberally...
Tank refitted (again!). 6 months later and all is still good - apart from my carpets still having an aroma of petrol no matter how much I clean them!
Full service next, no dramas. Here is a picture of my CJ Auto ramps that I'm very happy with. These often get mentioned on PH. They are the non-hydraulic ones and get tremendous height.
I was getting Trev ready for my mates wedding in Renesse; Netherlands. A proper road-trip ahead!
Waiting for the Ferry @ Harwich...
Obligatory wedding venue and windmill shots...
Another exclusive fibreglass hand-built English motor car.... LHD too!
Special thanks to my Dutch pals; Bas & Joep and junior pistonhead Tobias:
Safely making it home...
So... European road trip feedback :
- No aircon and random ventilation means unbearably hot interior (thanks to the good weather)
- Terrible appetite for fuel
- You cant put the roof down with anything in the boot
- Visibility for dutch cyclists terrible
- Visibility for foreign overhead traffic lights terrible
- Km markings on the speedo too small (surprised it has them to be fair)
- Dutch kerbs at junctions destroyed my exhausts
- The wipers are terrible
- The roof/door window interaction leaks
- My suitcases and clothes stink of petrol (see above)
Next update in 18 months... i'm not going anywhere else brand wise.... I just don't know what can replace it.
JKM
Edited by jay-kay-em on Sunday 3rd June 19:12
Another year... another update... where does time go!?!
Everyone likes photos - and I always like activity in the Griffith section - so here we go!
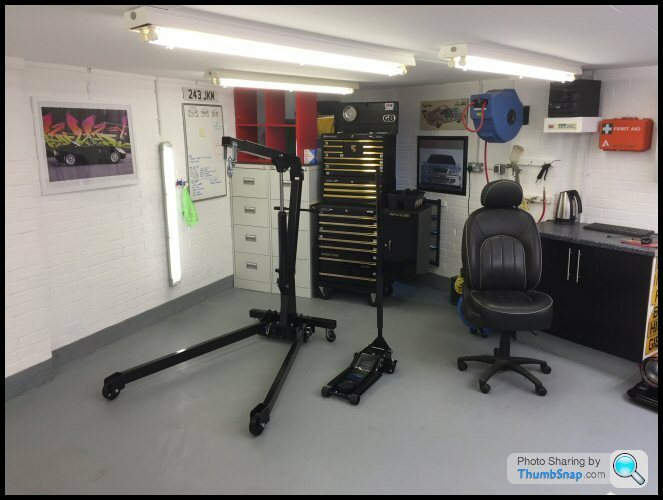
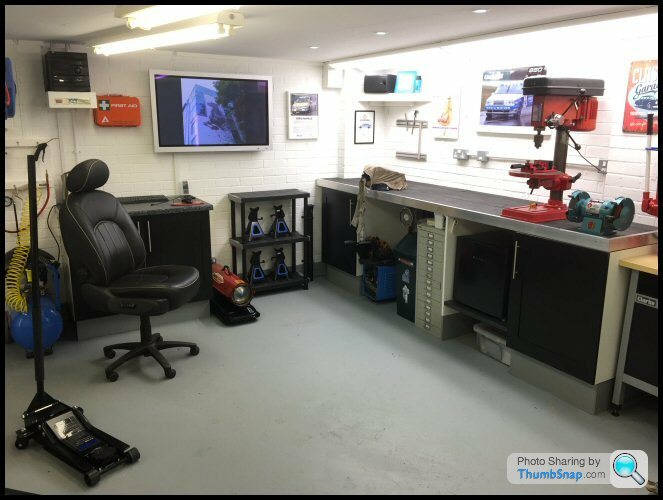
Firstly, garage done!
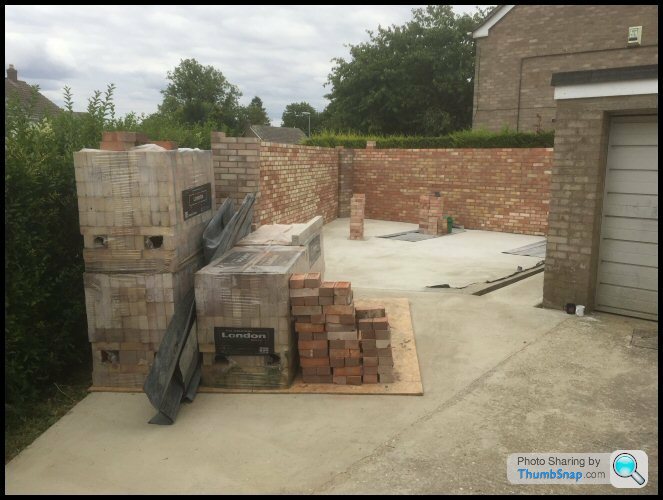
Over-budget, over-time and with snags. Like any building project then!
All kitted out January. All my stuff herded back from mates garages and storage containers.
Griff went up on axle stands April with quite a to-do list. Just at the start of the season annoyingly, but garage completion dictated my calendar.
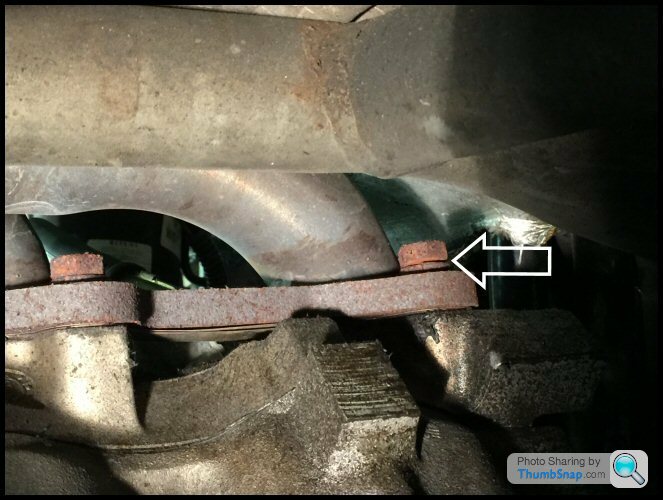
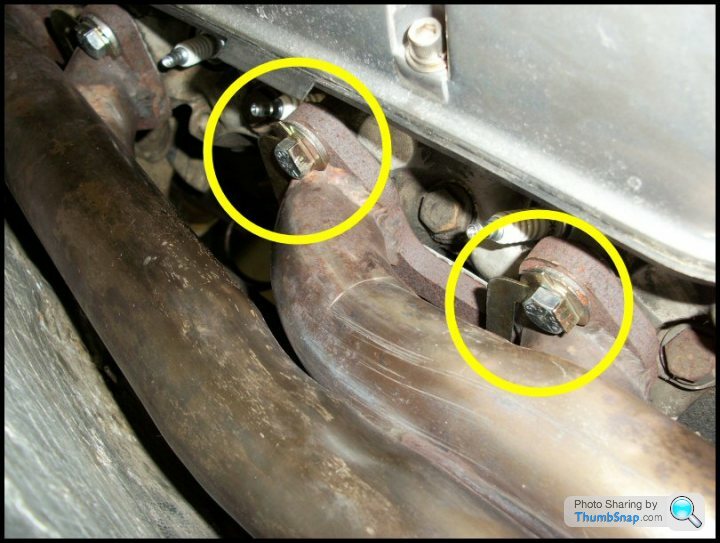
Primary reason was leaking exhaust manifolds... both left and right banks blowing.
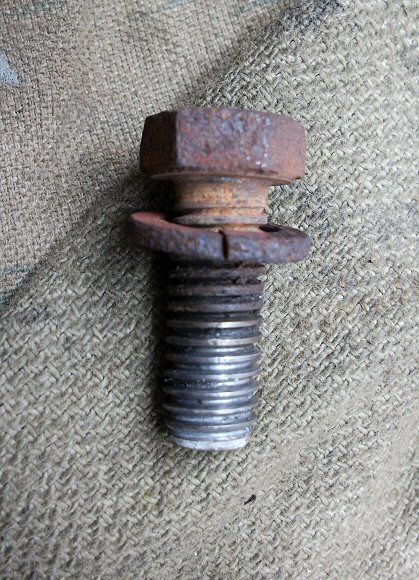
Examination from below revealed a handful of bolts backed out... red rust visible.
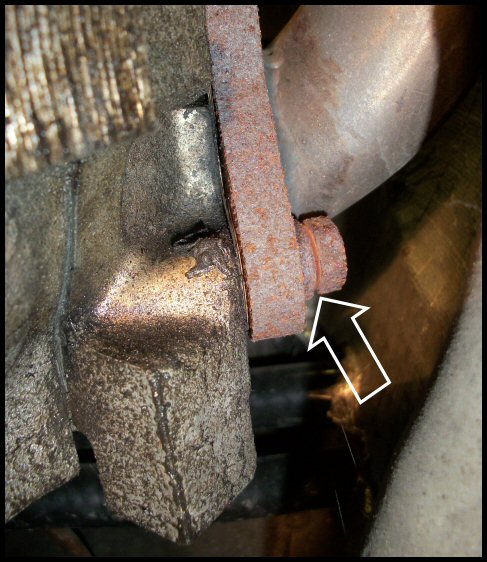
Starter removed for better access...
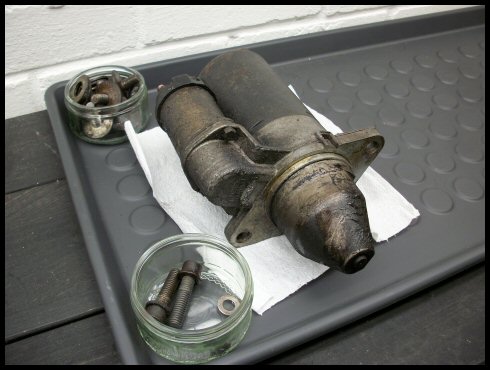
Starter fixings total junk... all now replaced. Top starter fixing a nuisance to get to, I must say.
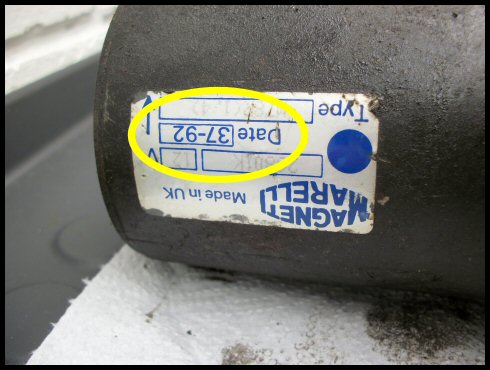
Slightly alarming.... the original 1992 Magnetti Marelli starter... dated 37th week of 1992! This starter is on borrowed time surely!?!
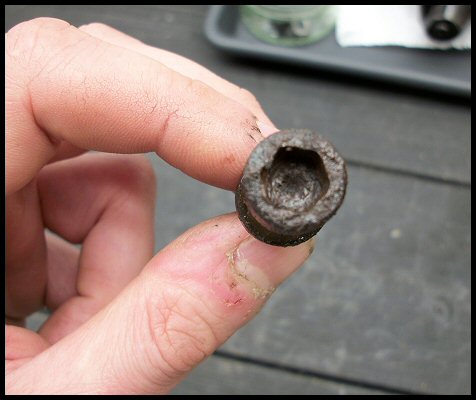
Manifold bolts coming out... some very awkward. Old spring washers absolutely useless....!
Hmmmm... proof if any was needed... blowing ever so slightly
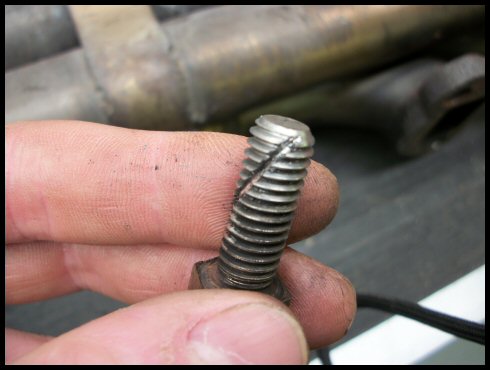
Cut an old bolt and cleaned the head bolt threads, plenty of GT85... loads of debris removed.
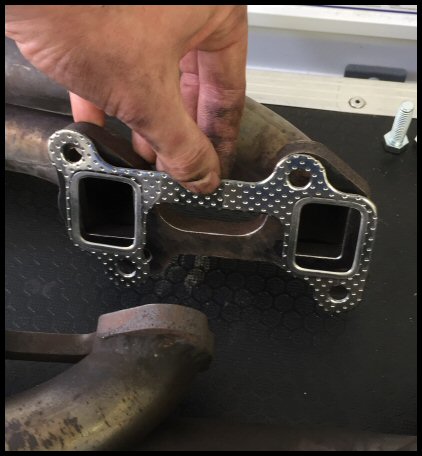
Cleaning up gasket surfaces...
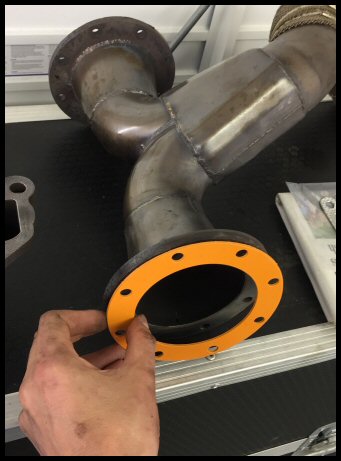
New gaskets from TVR Heritage (enlarged 500 ports)...
I spent hours on Pistonheads reading endless threads about this very problem... exhaust manifold bolts working loose. The opinions varied from a "c'est la vie" attitude, tightening them every now again as a service item, all the way through to aviation grade titanium fixings being wire-tied. Plus, every option between, trust me. I even read about the incompatibility between stainless steel bolts in an alloy head.
I don't think there is a *right* answer. In most situations I always try to go OEM+, good or bad. My strategy was everything out the Rimmer Bros catalogue for the SD1.... nothing fancy... spring washers and zinc plated steel bolts. Boring I know. The difference being I was going to use the lock-tabs fitted to Land Rovers.
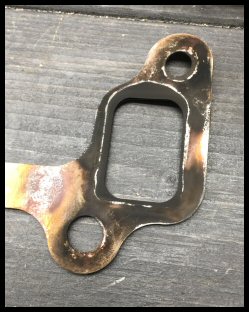
All was going well until I noticed the contact marks on the manifold left by the old fixings...
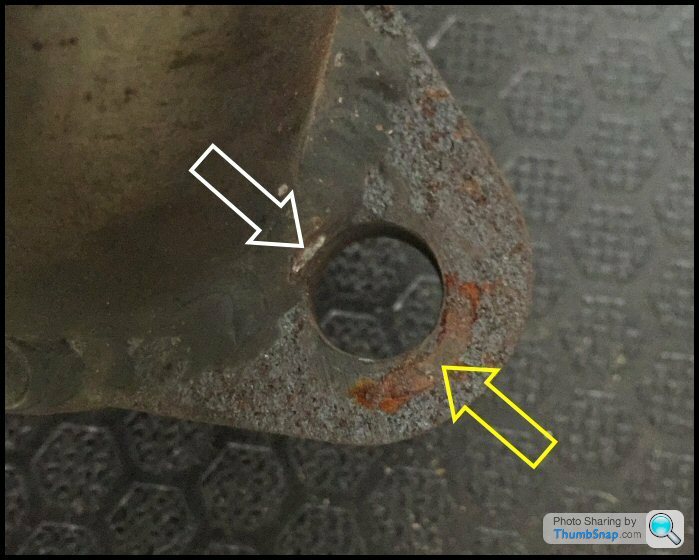
Basically, the weld encroaches on the space the fixings should tighten down on. The white arrow is the freshly marked weld, the orange stain (yellow arrow) is the rusty spring washer contact patch.
All this debate about the best fixings - its all irrelevant if they don't have a nice clean, flat and level surface to torque down on!

I don't know if anyone recognises the make of these manifolds... they were fitted when I bought the car, but that isn't great surely?
Anyway, my 'fix' was to cut down spacer washers to create a stable torque base. Washers fitted...
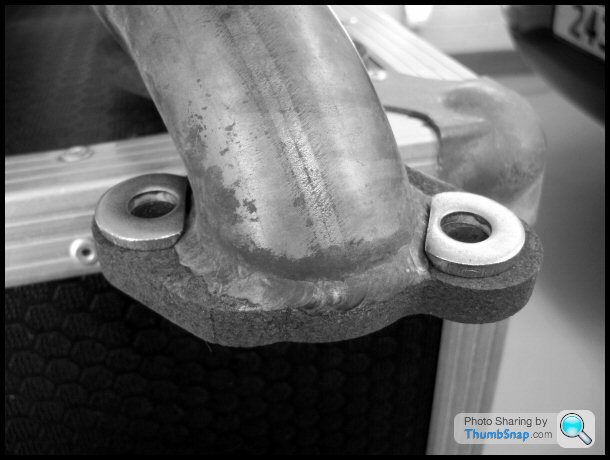
Note the 45' chamfer that clears the weld...
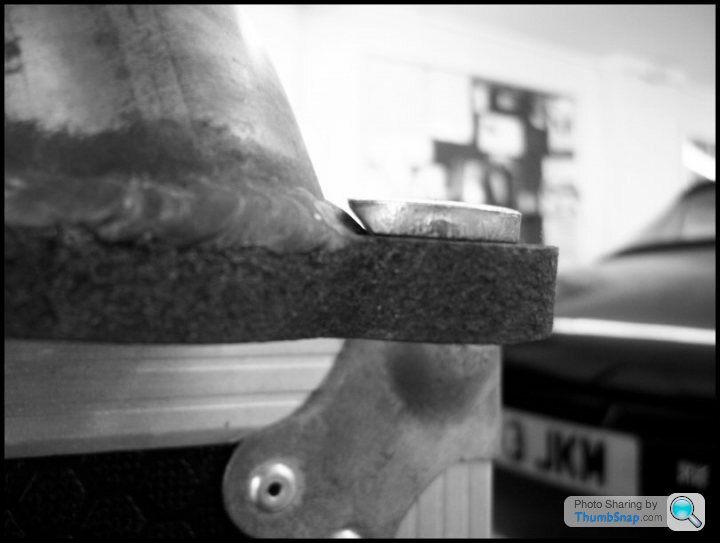
All fixings ready to go on - note the Land Rover lock-tabs...
Had to disregard the spring washers because we have less bolt thread in the head. My reasoning being, if they are being lock-tabbed, spring washers are not so critical. In fact, the Land Rover OE solution with the lock-tabs are washer free.
So all back together and lock-tabs bent over... see how we get on.
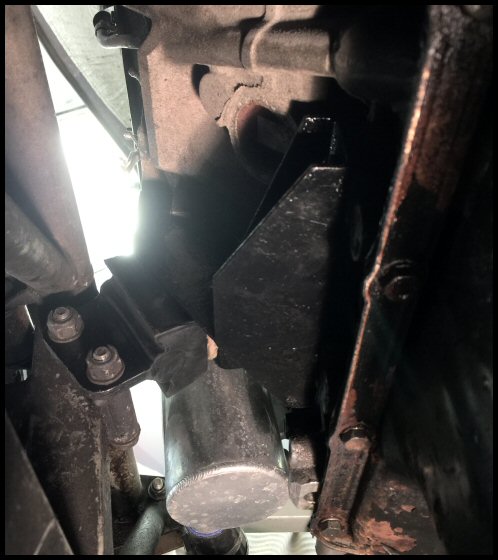
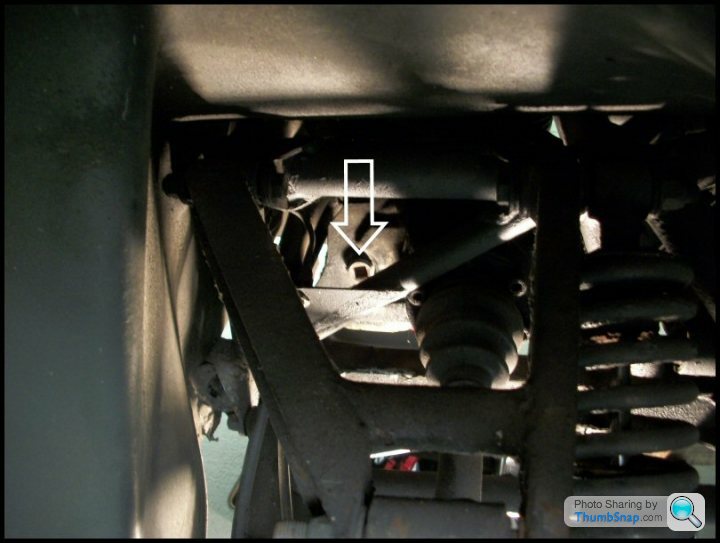
Obviously, with the exhaust manifolds off, you notice other things. First was engine mounts...
Took them off.... not in the best of shape! Admittedly, they had no noticeable symptoms.
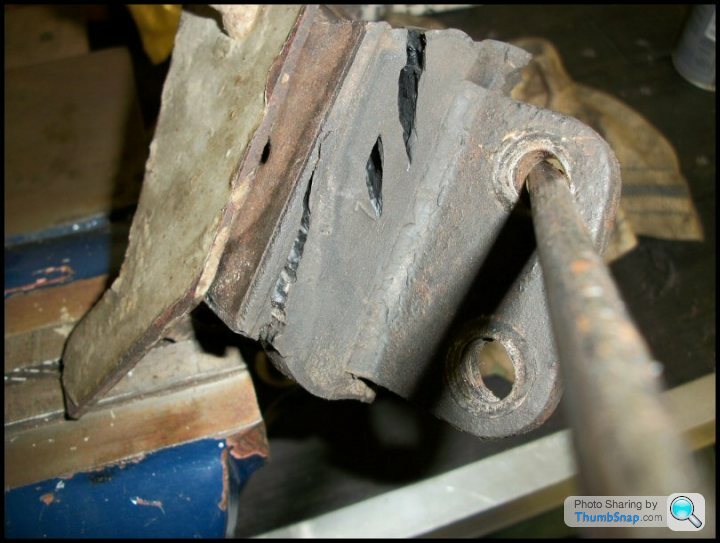
Cleaned and painted the brackets. What I love about TVR, is all parts have a 'history'. This bracket wasn't made by a german robot. It was probably welded together in a jig by a bloke called Colin. Further more, this bracket, and indeed the whole Griffith sales success in 1992 ensured families in Blackpool were fed. Crazy.
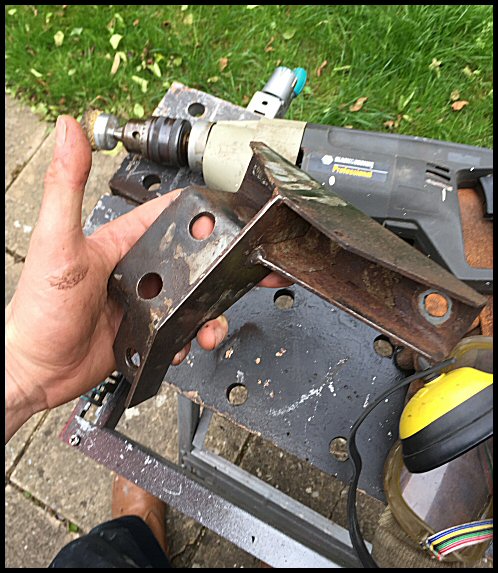
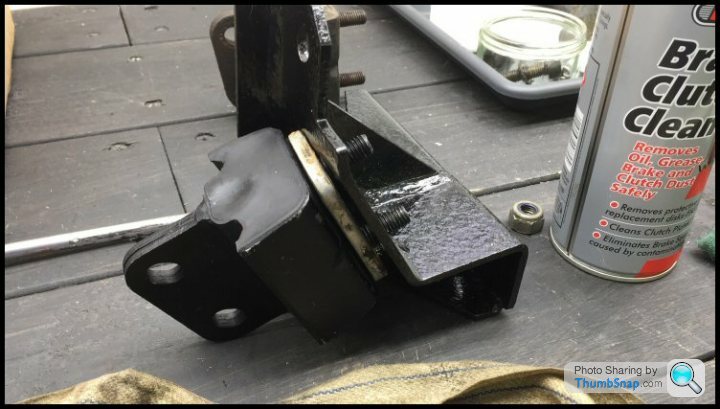
All back to together. Lots of jiggling, levering and jack tweaking required to get the bolts lined up. Engine sits noticeably higher when comparing before/after measurements.
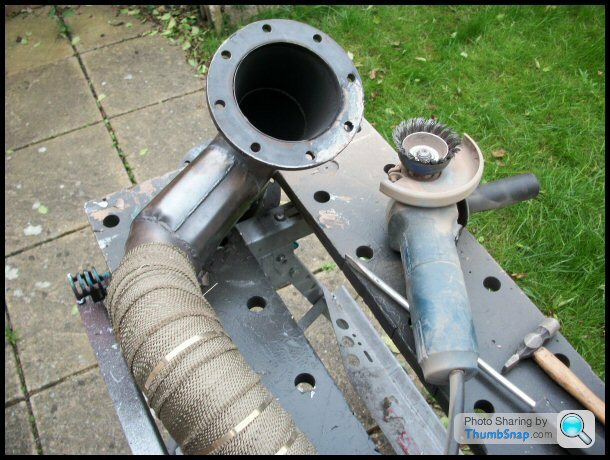
So, exhaust all off... time for a clean and strip down.
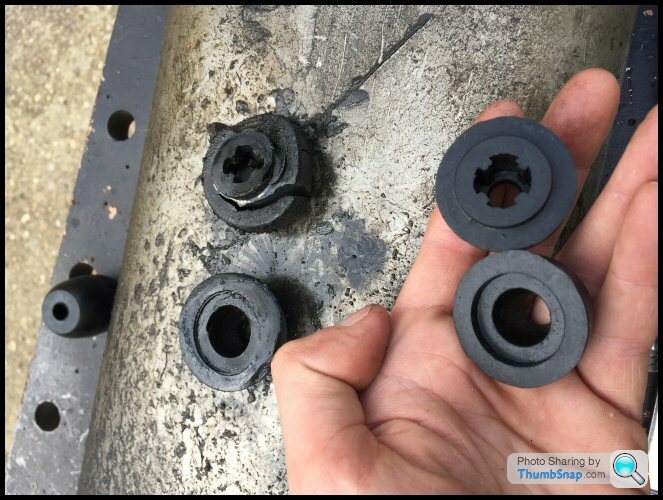
Exhaust 'bobbins' all torn and perished...
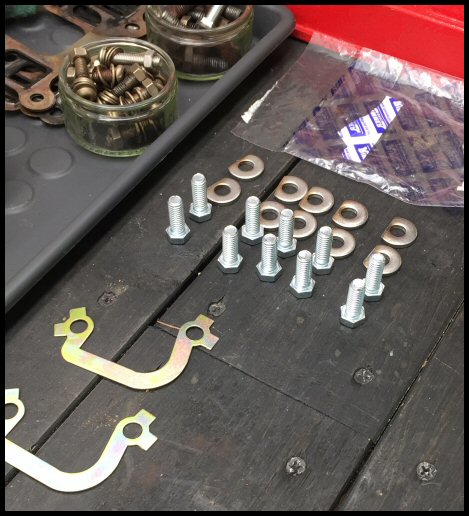
Available from TVR Heritage with new stainless fixings...

Exhaust going back on... two people ideal but didn't have the luxury, so...
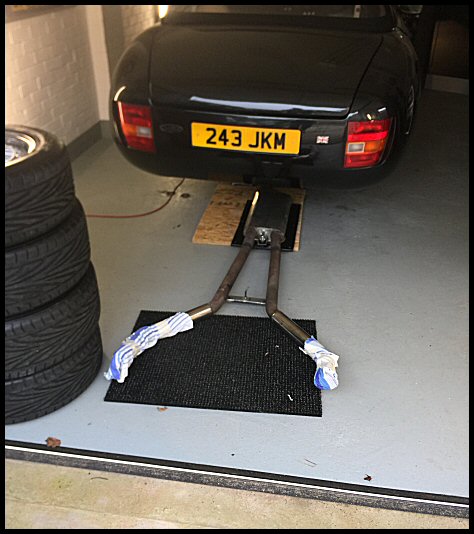
...I converted my adjustable height car ramps into a jacking platform for the centre silencer!
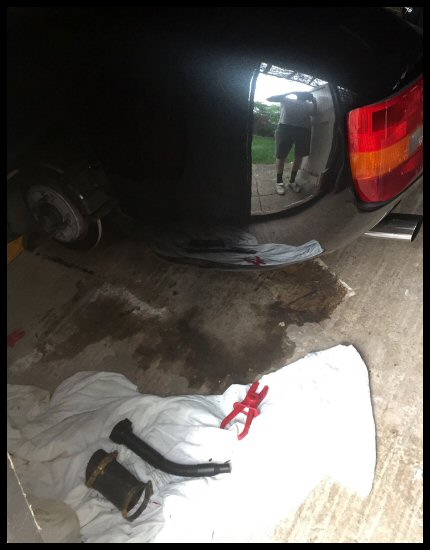
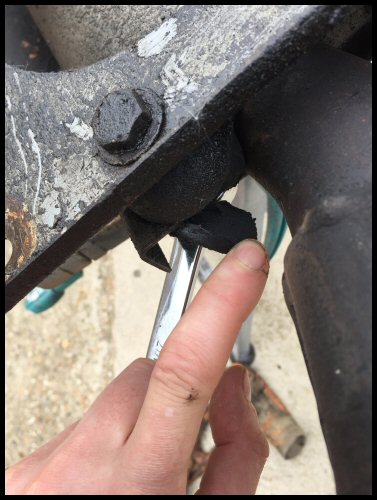
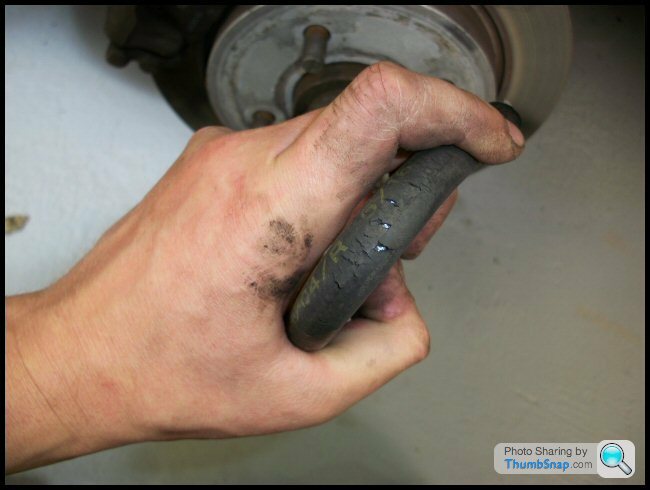
When I was under the vehicle, I noticed a slightly compromised fuel hose. Its the return line in the offside rear wheel arch. Someone had over tightened the cable-tie resulting in an almost crimped off hose!
What drew my attention was the smallest of cracks...

Took the hose off and it was way worse than what I thought. I have done all the pressure hoses and all hoses in the engine bay, but had forgot about this one.
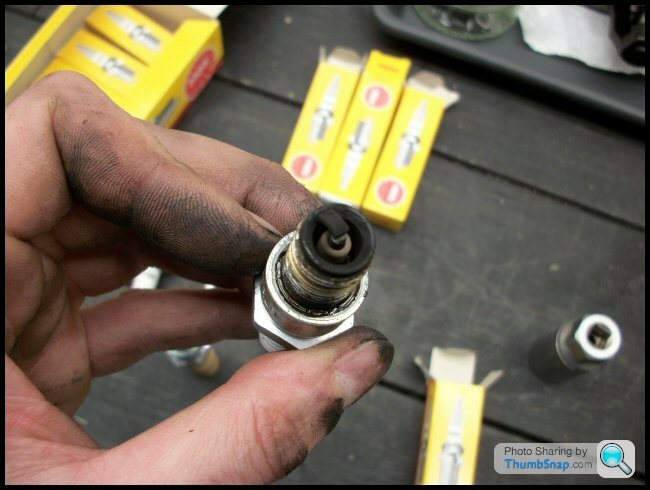
Spark plugs when the exhaust manifold were off... I know its cheating! All that room!!!!

Never used anything other than NGK for 25 years!
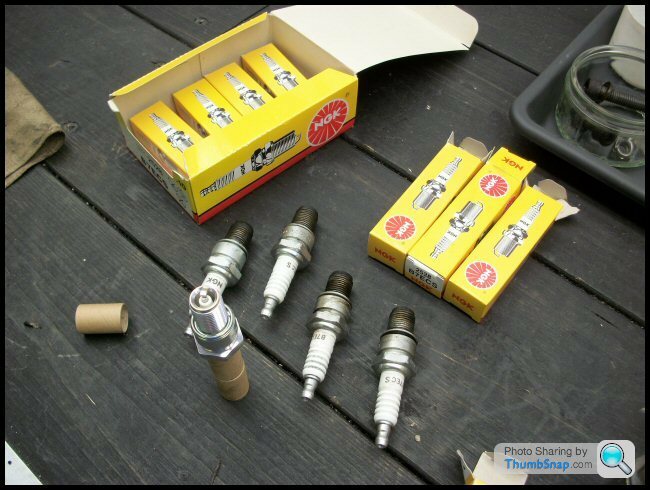
Really happy how the old plugs looked...
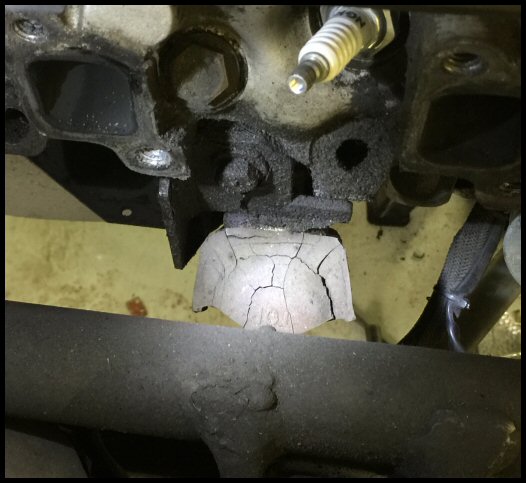
Sump next, and an oil leak that was getting worse...
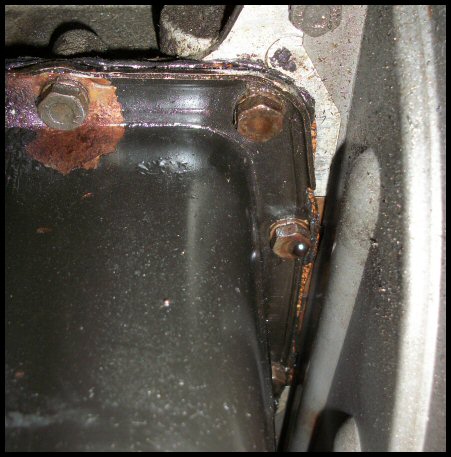
Cork gasket had given up.
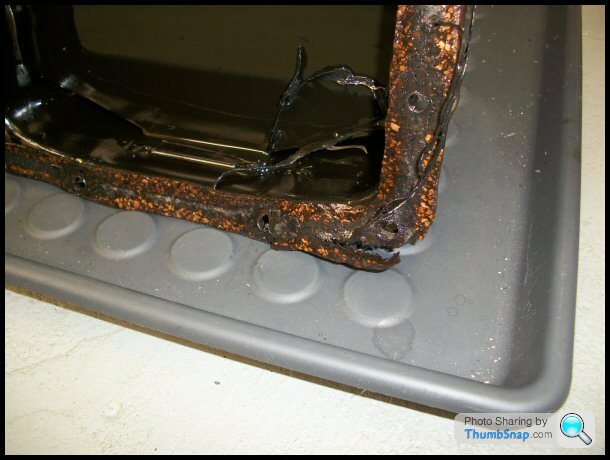
Sump off, not looking very pretty. Time for a spruce up...
Always nice to have a peek up inside the engine with the sump off. No debris/swarf in the sump so that's all good.
Engine is ridiculously clean inside... the benefit of the endless history of oil changes I guess...
New cork gasket...
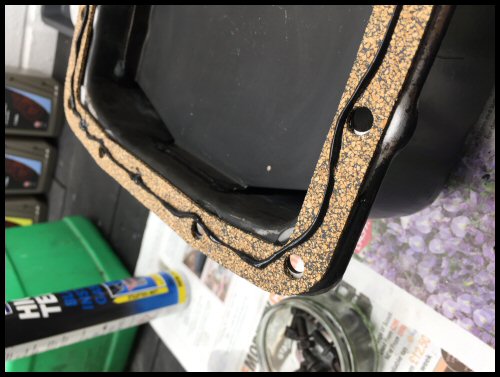
Slight admission here. Cork gaskets are rubbish. I knew this already and still fitted one. Did 100 miles and it started leaking again. It's impossible to torque the sump bolts to even 9Nm without destroying the cork. I am now running a 'no gasket method' with just VHT silicone. See how we got on.
Diff oil next... found the fill point.
Filled via silicone tube...
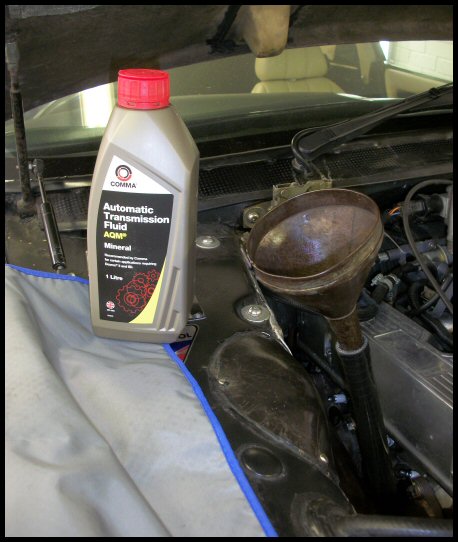
Trans oil...
Again, nothing special. LT 'box gets mineral ATF DII, filled from the engine bay via silicone tube.
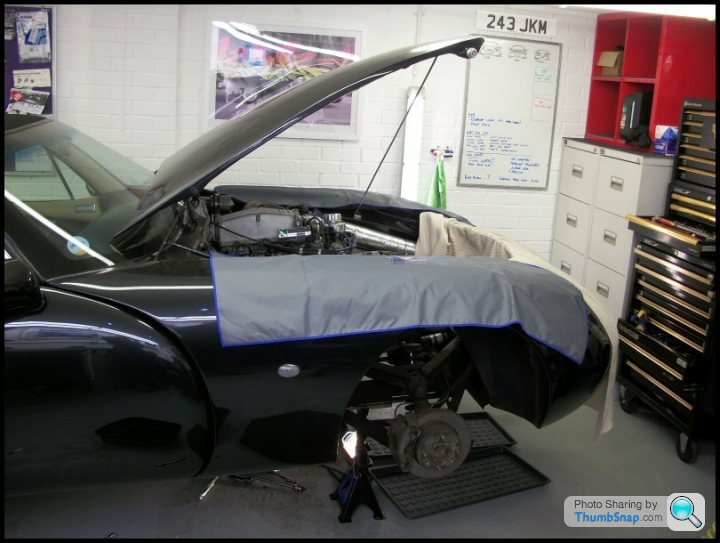
Next up, a front brake judder...
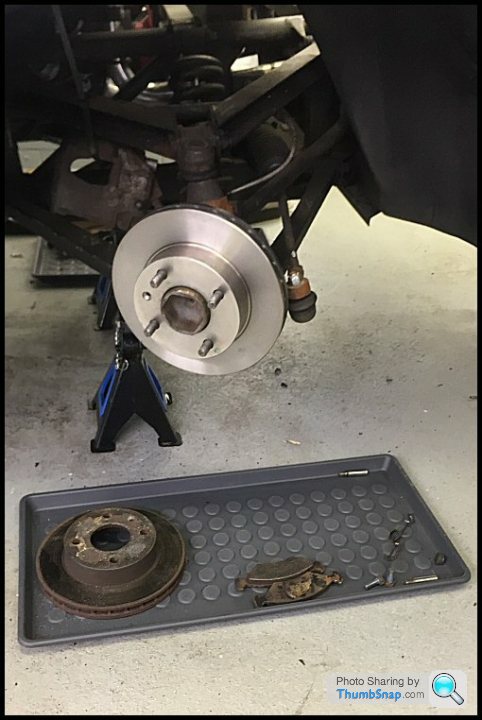
New Brembo discs up front from Euro Car Parts for a 2.0 Sierra.
You buy Brembo because you think they are the best. Two worrying things on the box...
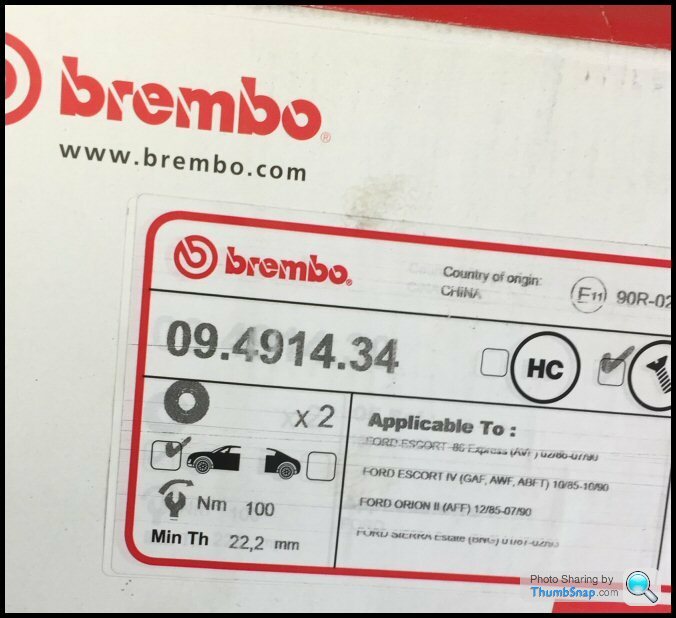
a) made in China
b) also suitable for an Escort van
We'll gloss over the Escort van, This is a premium sports car; they *are* correct, I promise!
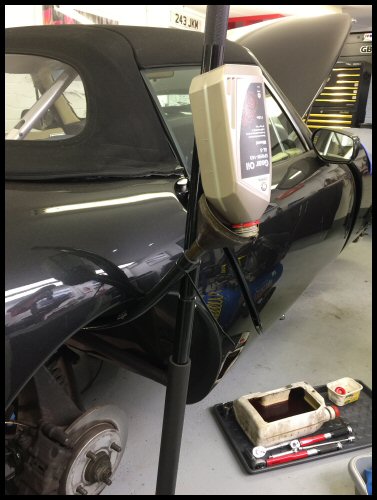
Next up, one man bleeding for a full fluid flush - using my excellent Gunsons Eazibleed. Fully recommend.
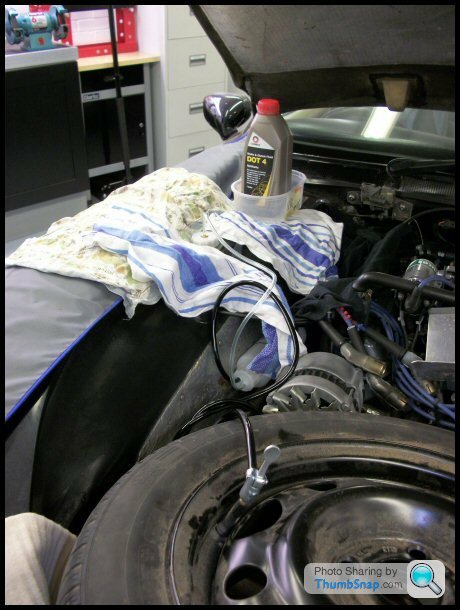
Really happy with brake pedal feel. Awesome pedal.
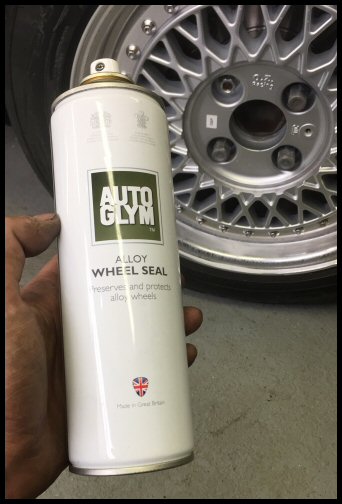
MoT prep next. Wheels are a few years after refurb now... having bare metal outer rims.
Still looking really good, perhaps this stuff does help after all...
Finally MoT time was end of June... no probs
Emissions passed, but much weaker CO than last year. I'm wondering if the crimped fuel return line actually increased fuel rail pressure. Now unrestricted = lower return pressure = lower rail pressure = less fuel injected? Need to go back to the garage and tweak the mixture to richen it up a bit. Idles differently so something has definitely changed.
Taxed 1st July and I have had a brilliant three weeks burbling about Cambs/Suffolk. Missed half my summer, but that's how these things go.
(Sorry to all the pedestrians I annoyed with this photo at Ipswich docks!)
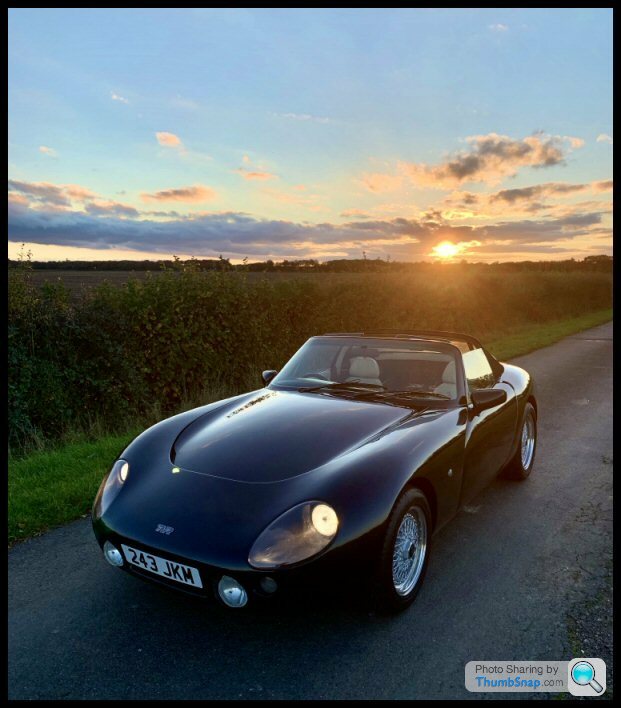
Sometimes its shape still blows me away.
That's it folks... update in 2020 with hopefully very little drama... and exhaust manifolds still gas-tight hopefully!
JKM
Everyone likes photos - and I always like activity in the Griffith section - so here we go!
Firstly, garage done!
Over-budget, over-time and with snags. Like any building project then!
All kitted out January. All my stuff herded back from mates garages and storage containers.
Griff went up on axle stands April with quite a to-do list. Just at the start of the season annoyingly, but garage completion dictated my calendar.
Primary reason was leaking exhaust manifolds... both left and right banks blowing.
Examination from below revealed a handful of bolts backed out... red rust visible.
Starter removed for better access...
Starter fixings total junk... all now replaced. Top starter fixing a nuisance to get to, I must say.
Slightly alarming.... the original 1992 Magnetti Marelli starter... dated 37th week of 1992! This starter is on borrowed time surely!?!
Manifold bolts coming out... some very awkward. Old spring washers absolutely useless....!
Hmmmm... proof if any was needed... blowing ever so slightly
Cut an old bolt and cleaned the head bolt threads, plenty of GT85... loads of debris removed.
Cleaning up gasket surfaces...
New gaskets from TVR Heritage (enlarged 500 ports)...
I spent hours on Pistonheads reading endless threads about this very problem... exhaust manifold bolts working loose. The opinions varied from a "c'est la vie" attitude, tightening them every now again as a service item, all the way through to aviation grade titanium fixings being wire-tied. Plus, every option between, trust me. I even read about the incompatibility between stainless steel bolts in an alloy head.
I don't think there is a *right* answer. In most situations I always try to go OEM+, good or bad. My strategy was everything out the Rimmer Bros catalogue for the SD1.... nothing fancy... spring washers and zinc plated steel bolts. Boring I know. The difference being I was going to use the lock-tabs fitted to Land Rovers.
All was going well until I noticed the contact marks on the manifold left by the old fixings...
Basically, the weld encroaches on the space the fixings should tighten down on. The white arrow is the freshly marked weld, the orange stain (yellow arrow) is the rusty spring washer contact patch.
All this debate about the best fixings - its all irrelevant if they don't have a nice clean, flat and level surface to torque down on!
I don't know if anyone recognises the make of these manifolds... they were fitted when I bought the car, but that isn't great surely?
Anyway, my 'fix' was to cut down spacer washers to create a stable torque base. Washers fitted...
Note the 45' chamfer that clears the weld...
All fixings ready to go on - note the Land Rover lock-tabs...
Had to disregard the spring washers because we have less bolt thread in the head. My reasoning being, if they are being lock-tabbed, spring washers are not so critical. In fact, the Land Rover OE solution with the lock-tabs are washer free.
So all back together and lock-tabs bent over... see how we get on.
Obviously, with the exhaust manifolds off, you notice other things. First was engine mounts...
Took them off.... not in the best of shape! Admittedly, they had no noticeable symptoms.
Cleaned and painted the brackets. What I love about TVR, is all parts have a 'history'. This bracket wasn't made by a german robot. It was probably welded together in a jig by a bloke called Colin. Further more, this bracket, and indeed the whole Griffith sales success in 1992 ensured families in Blackpool were fed. Crazy.
All back to together. Lots of jiggling, levering and jack tweaking required to get the bolts lined up. Engine sits noticeably higher when comparing before/after measurements.
So, exhaust all off... time for a clean and strip down.
Exhaust 'bobbins' all torn and perished...
Available from TVR Heritage with new stainless fixings...
Exhaust going back on... two people ideal but didn't have the luxury, so...
...I converted my adjustable height car ramps into a jacking platform for the centre silencer!
When I was under the vehicle, I noticed a slightly compromised fuel hose. Its the return line in the offside rear wheel arch. Someone had over tightened the cable-tie resulting in an almost crimped off hose!
What drew my attention was the smallest of cracks...
Took the hose off and it was way worse than what I thought. I have done all the pressure hoses and all hoses in the engine bay, but had forgot about this one.
Spark plugs when the exhaust manifold were off... I know its cheating! All that room!!!!
Never used anything other than NGK for 25 years!
Really happy how the old plugs looked...
Sump next, and an oil leak that was getting worse...
Cork gasket had given up.
Sump off, not looking very pretty. Time for a spruce up...
Always nice to have a peek up inside the engine with the sump off. No debris/swarf in the sump so that's all good.
Engine is ridiculously clean inside... the benefit of the endless history of oil changes I guess...
New cork gasket...
Slight admission here. Cork gaskets are rubbish. I knew this already and still fitted one. Did 100 miles and it started leaking again. It's impossible to torque the sump bolts to even 9Nm without destroying the cork. I am now running a 'no gasket method' with just VHT silicone. See how we got on.
Diff oil next... found the fill point.
Filled via silicone tube...
Trans oil...
Again, nothing special. LT 'box gets mineral ATF DII, filled from the engine bay via silicone tube.
Next up, a front brake judder...
New Brembo discs up front from Euro Car Parts for a 2.0 Sierra.
You buy Brembo because you think they are the best. Two worrying things on the box...
a) made in China
b) also suitable for an Escort van
We'll gloss over the Escort van, This is a premium sports car; they *are* correct, I promise!
Next up, one man bleeding for a full fluid flush - using my excellent Gunsons Eazibleed. Fully recommend.
Really happy with brake pedal feel. Awesome pedal.
MoT prep next. Wheels are a few years after refurb now... having bare metal outer rims.
Still looking really good, perhaps this stuff does help after all...
Finally MoT time was end of June... no probs
Emissions passed, but much weaker CO than last year. I'm wondering if the crimped fuel return line actually increased fuel rail pressure. Now unrestricted = lower return pressure = lower rail pressure = less fuel injected? Need to go back to the garage and tweak the mixture to richen it up a bit. Idles differently so something has definitely changed.
Taxed 1st July and I have had a brilliant three weeks burbling about Cambs/Suffolk. Missed half my summer, but that's how these things go.
(Sorry to all the pedestrians I annoyed with this photo at Ipswich docks!)
Sometimes its shape still blows me away.
That's it folks... update in 2020 with hopefully very little drama... and exhaust manifolds still gas-tight hopefully!
JKM
Kind words all, cheers.
Hope this helps.
stevesprint said:
thanks for the tip to clean the threads in the heads.
What I have noticed, and this especially goes for the sump too, when people have a used a silicone RTV gasket, sealant actually fills the bolt holes. When I was doing my sump gasket, the bolts were actually hydraulic-locking against the old sealant in the bore, before clamping the object down. Basically, dig what you can out with a spike first!stevesprint said:
Sorry, can I ask how far back did you rewire the your engine harness?
It was a bit of everything really. It was on a wire-by-wire basis on how it looked & felt. The positive cable got a total re-work with the addition of a master fuse as the pre-cats don't have one. Well, mine didn't anyway. A direct feed to the starter is asking for trouble! I purchased my big crimps especially for this. Otherwise, insulation, routing and termination were priorities. Fan wiring was water damaged and I detest those infamous blue AMP crimps!Hope this helps.
Edited by jay-kay-em on Tuesday 30th July 21:24
2021!
Nearly another two years, so thought I would do an update.
COVID changed everything without a doubt. A car with typically low use got even less use... and skipped an MoT due to the extension rules.
Back in the garage to cure the following faults...
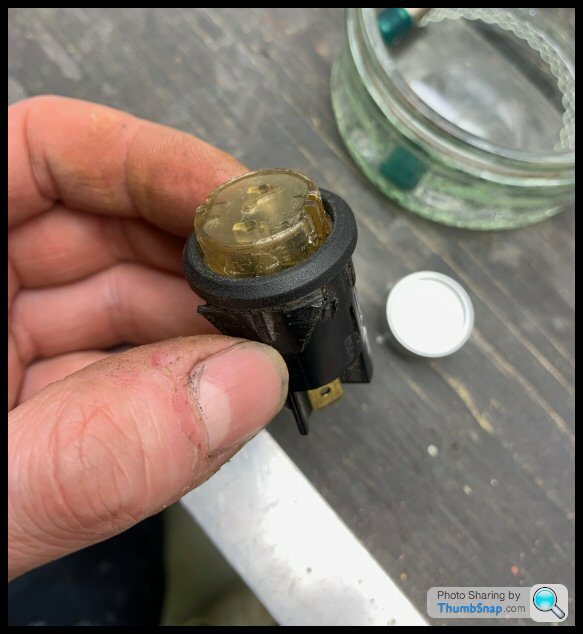
Sidelamp Switch
This has always been on the blink since the purchase of the car! It is a "push-to-latch" switch that didn't always latch. It would normally need a couple of attempts to latch. I lived with this, as it was easier than replacement by a long way.
The problem escalated to a higher level of concern, because headlamp operation is daisy-chained off sidelamps first. I was driving home one night and hit only the slightest of small pot holes, and lost all headlights. It was a total brown pants moment.
That memorable event triggered the following activity...

It was the job I didn't want to do, but ended up doing it anyway.
My car has aluminium covers on the switches... may be 'Leven', but i'm not sure as I didn't buy them.
Here is the defective switch and the Leven (?) cover removed...
This is where the fun started; trying to find an original switch that will accommodate these very trims. Otherwise, you have to replace ALL the switches for uniformity.
Thankfully, Racetech Direct list a replacement. It is 99% accurate to the original...
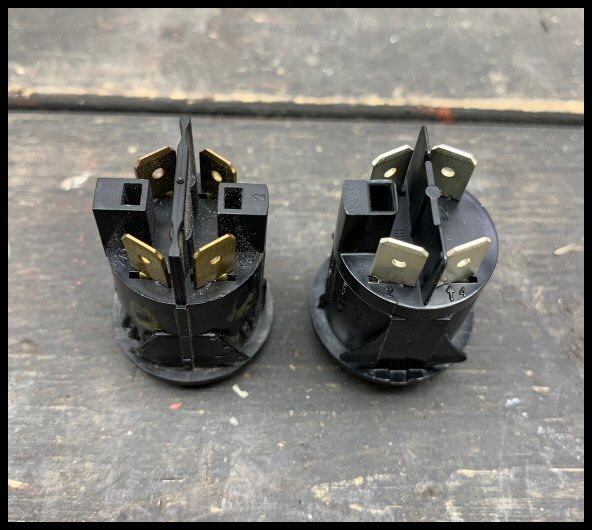
Amazingly, the black cover (as supplied) lifts off, and my aluminium trim can replace it, with the smallest dab of adhesive...

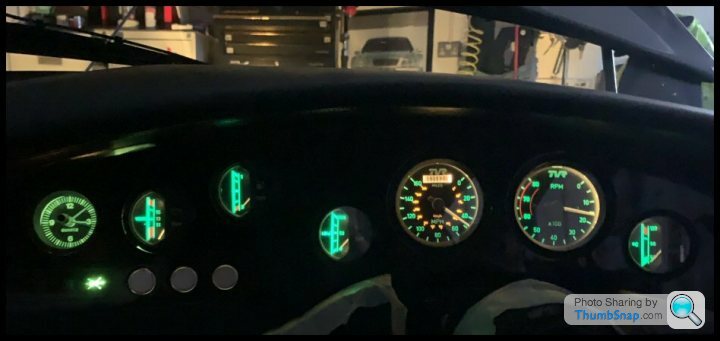
Dashboard Illumination
Whilst i'm here...

Dashboard illumination has always been a joke, some bright, some dark. One bulb had actully fallen out and was doing a better job of illuminating the footwell

The bulbs actually use a rubbery green cap that pushes over the glass. Of course, these were aged and burnt off mostly.
On top of that, not all the bulbs are the same base cap, or wattage....
The capless bulbs are actually 3W, which is different from normal sidelamp capless (5W). With a bit of hunting on ebay, all available though.

Anyway, bulbs purchased with a green tint to restore some uniformity to my night-time driving.
Thermostat
A rare problem on here... reports of running too cold!
Slightly annoyed as the 'old' thermostat, in terms of miles, is virtually new. But I guess age and lack of use are the problem here.
New thermostat fitted - of standard 82'c type - obtained from Racing Green. I purchased this blind over the phone and was slightly gutted it didn't have a jiggle-pin.

Anyway, all fitted, and it was noticeably slower to fill coolant without that jiggle pin. To make sure I had coolant up top, I whipped out the temp sensor as a bleed point...

All good now, temperature gauge more 90'c and solid as a rock.
Ignition
Not a breakdown, not even a misfire, but just the smallest of 'flutters' the other day. Really spooked me. Could of been absolutely anything. However, no messing about, I immediately paid attention to two key items:
Coil; my old coil was anonymous with no manufacturer markings whatsoever. New Bosch coil ordered and fitted...
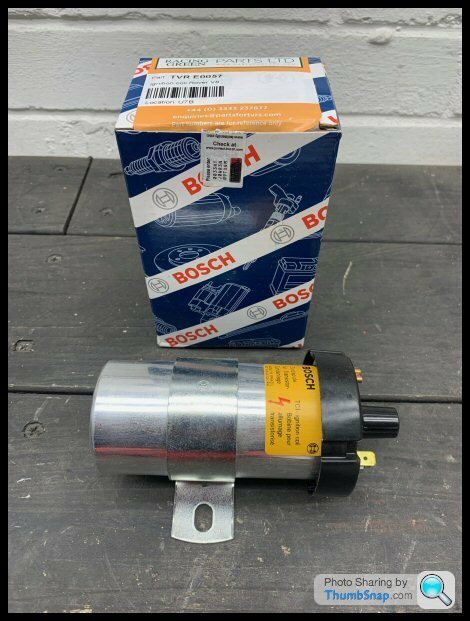
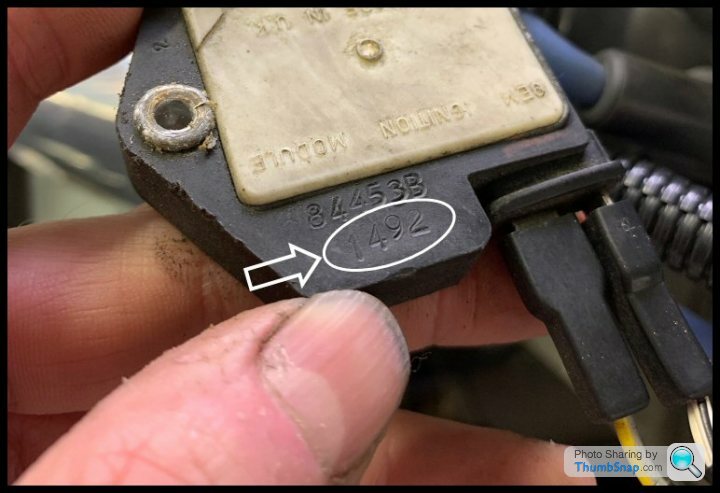
Ignition Module; I have always wondered the vintage of this...
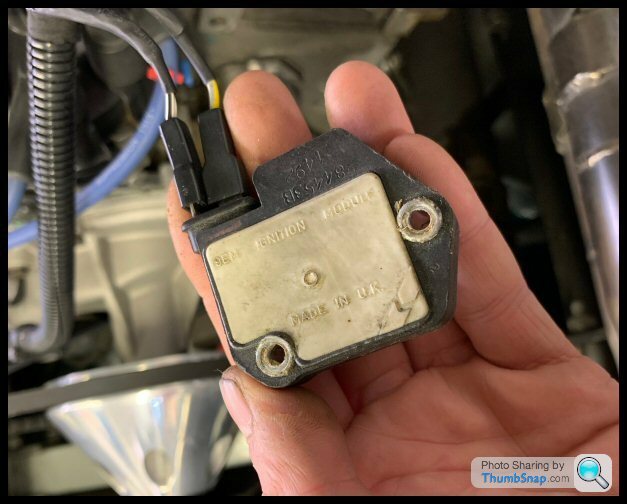
I thought it would be welded to the dizzy with old paste, but after removal of the corroded screws, it simply fell off...

I also believe it to be dated 14th week of 1992 so it has done more than its fair share of duty.... the whole life of the car no less....
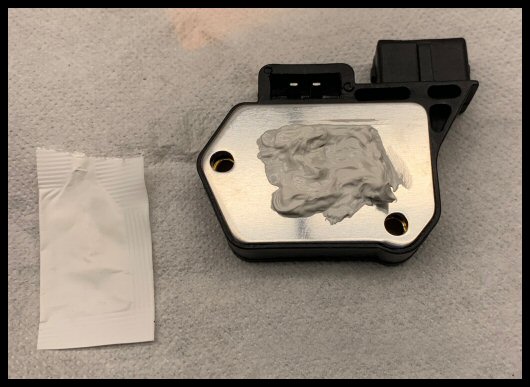
New ignition module kit from Racing Green with the conversion fly-lead....

...and the heat paste applied liberally....
No more 'hiccups' as yet. Who is to say what that was and i'm sure it's over cautious - but it can't be argued these two new items aren't for the best.
MoT 2021
I then took it for an MoT and the bu88er failed!
High CO..... my limit is 3.5% for a pre-cat 1992. I tipped the scales at 3.6% which is a total "computer-says-no" verdict by 0.1%!
Perhaps the stale petrol from COVID lockdown? Perhaps the new ignition module or coil affecting timing?
Anyway, I crafted an airflow meter adjustment tool...
Borrowed the MoT lane for ten mins - just a half turn at the AFM and CO fell to 2.7% which will do me just fine... better rich than lean...

Pastures New?
It has now been 7 years and it comes with a heavy heart that I might move on. I miss originality concours (yes, i'm a massive geek) and that is one thing missing with the TVR scene - originality. This is primarily because they have to be modified to survive!
I will never better that soundtrack or improve on those wheels.
I know most people reading this will already have a high maintenance, impractical, plastic toy car already... but it'll be for sale very soon.
Here's to a show season for 2021. I know my TVRCC event emails have started again.
All the best; JKM.
Gassing Station | Griffith | Top of Page | What's New | My Stuff