Heater blower on a Griff SE
Discussion


The Heater blower on my SE decided to throw in the towel at the weekend, it started off a bit intermittent, when touching the speed control it changed it's mind if it was on or off and then decided it preferred off.
As it's an SE does it have more in common with a Chimp (because of the Chimp dash controls) than an earlier Griff or were later Griff's/500's the same with control units etc? Does any of that matter?
I'm keen to work out where to start looking before I dive in at the weekend. I'm obviously hoping to avoid having to dismantle the dash but as the control seemed intermittent I not holding out much hope. What can I test before I have to start attacking the dash?
If it's relevant, over winter I swapped out the battery for an Odyssey, still in the footwell but just giving me a little extra leg room so I wonder if I have possibly dislodged something whilst poking around in the spacious footwell.
I will continue to search the archives but it will be helpful to narrow down what is not relevant to the SE.
Thanks
Mags
I should have mentioned it has AC as well, not sure if all SE cars had this.
Thanks for the input, I've been looking through a number of threads and will take a look at the weekend to try and understand what I have and where to start troubleshooting. The controller certainly looks top suspect at the moment but obviously I need to see if I can test the blower in situ initially.
Thanks for the input, I've been looking through a number of threads and will take a look at the weekend to try and understand what I have and where to start troubleshooting. The controller certainly looks top suspect at the moment but obviously I need to see if I can test the blower in situ initially.
QBee said:
If it’s like the Chim, the wires to it run under the carpet on the left hand wall of the passenger footwell. Expose them and you can apply 12 volts.
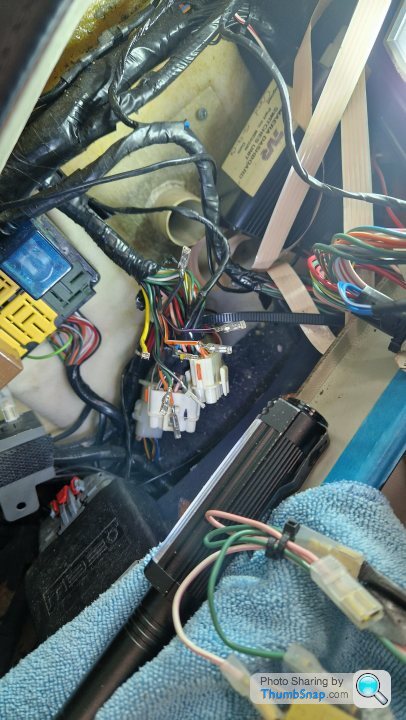
Thanks. There is definitely something in the left of the pass footwell, I recall seeing some sort small motor exposed when replacing the battery. My car was restored by Fernhurst a couple of owners ago so they may have made changes to the blower in terms of accessibility.I've done some investigation and adding some photo's for help.
My owners manual says fuse 16, 20A for fresh air and mirrors, mine is a 15A and does control the mirrors but it also seems to kill the dash as well so that doesn't seem right.
I'm assuming the setup matches a late Chim, the knurled metal wheels activate a water pipe valve and an airbox valve.
The cable with the black connector going into the left of the pass foot well looks like the blower motor?
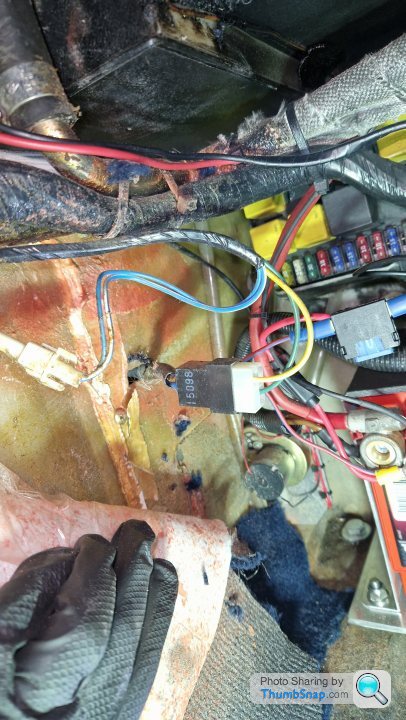
It has 4 wires but only 2 are being used from the white plug to the black one, yellow to brown and green to yellow, is this where I can apply 12v to test the blower? and if yes which wire is +ve/-ve?
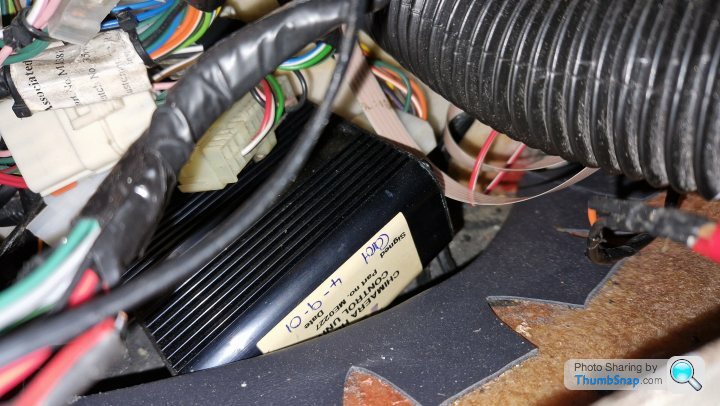
There is a Chim heater control box and it is annoyingly wedged just under the bottom of the dash so I can't fish it out.
The ribbon cable goes to the knurled round knob that controls the blower speed.
So if I test the blower and that works do I need to extract the control unit? That looks like a dash removal job.
My owners manual says fuse 16, 20A for fresh air and mirrors, mine is a 15A and does control the mirrors but it also seems to kill the dash as well so that doesn't seem right.
I'm assuming the setup matches a late Chim, the knurled metal wheels activate a water pipe valve and an airbox valve.
The cable with the black connector going into the left of the pass foot well looks like the blower motor?
It has 4 wires but only 2 are being used from the white plug to the black one, yellow to brown and green to yellow, is this where I can apply 12v to test the blower? and if yes which wire is +ve/-ve?
There is a Chim heater control box and it is annoyingly wedged just under the bottom of the dash so I can't fish it out.
The ribbon cable goes to the knurled round knob that controls the blower speed.
So if I test the blower and that works do I need to extract the control unit? That looks like a dash removal job.
Edited by Mags on Sunday 12th February 13:25
After searching more threads I think I have found the answer in here: https://www.pistonheads.com/gassing/topic.asp?h=0&...
It says:
Cable has 4 wires...
Brown = -12v
yellow = fast
Slate/grey = medium
Blue = slow
If the car has a controller then only the Brown and Yellow will be connected to the car loom.
Unplug and put power to that cable to see if the fan itself is working.
This is what I have so will try +ve 12v to the Yellow and -ve12v to the brown and hope she blows!
I will double check the other wires match the description above first.
Mags

Johno said:
They all do that sir .... Or at least many do.
Mine did and my Dad's Chimaera one did end of last year as well.
Python Racing did my Dad's one, I believe they had exchange units in stock as it's a common fault.
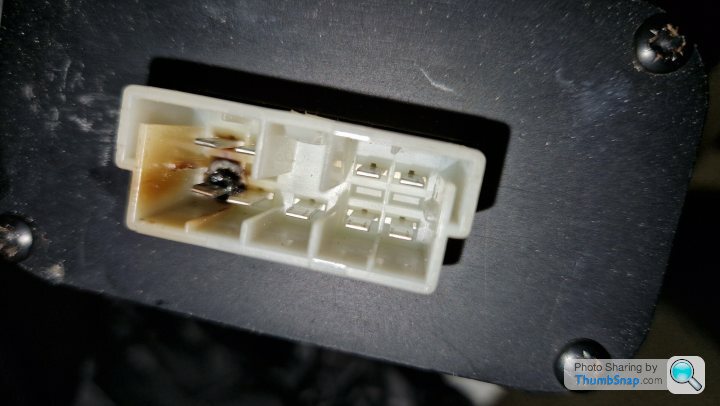
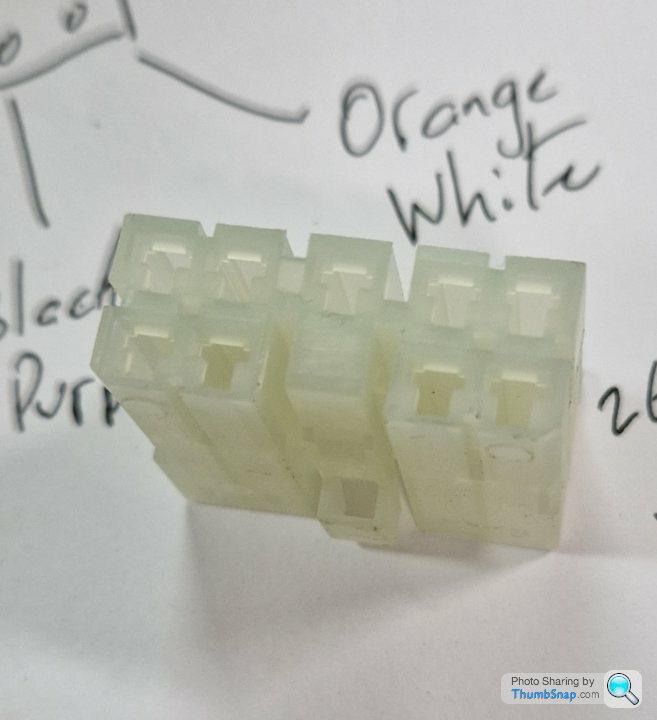
So is it sensible to replace as is or does the burned out connected need beefing up? I have seen comments of bypassing the connector.Mine did and my Dad's Chimaera one did end of last year as well.
Python Racing did my Dad's one, I believe they had exchange units in stock as it's a common fault.
I did call Python this morning and the helpful lady there said it's likely a component has gone faulty in the box and that leads to the burnout but it looks like I need to replace the loom side of the multiconnector which looks really challenging.
Johno said:
2mins in .... https://www.youtube.com/watch?v=gzf524fYAxE
In from the terminal side and compress the lock clip, slide out. Simples.
Except when it comes to the crispy one, may nlt be so simple or the ones near it.
Have you found a replacement connector yet?
Awesome! Thanks very much.In from the terminal side and compress the lock clip, slide out. Simples.
Except when it comes to the crispy one, may nlt be so simple or the ones near it.
Have you found a replacement connector yet?
Not yet, The lady I spoke to at Python said they can provide this but Jody is on holiday so I may have a few weeks wait, can I get one sooner? that will help speed up the refit if I can already get the loom back to shape.
Johno said:
Challenge is to find out which connector type it is, there are so many and I haven’t been able to identify it - 30mins googling
Plenty of auto electrical suppliers around, but you’ll need to find the right 9 pin connector type to order. Worth sending one or two of them a photo and they’ll likely be able to help, also try the TVR specialists.
Worth checking measurements to see if this would do it....
https://www.amazon.co.uk/CNLW-Automotive-rectangle...
Thanks, that looks close but not exact (some additional mouldings on the existing one) I will take some better pictures and measurements when I get the chance.Plenty of auto electrical suppliers around, but you’ll need to find the right 9 pin connector type to order. Worth sending one or two of them a photo and they’ll likely be able to help, also try the TVR specialists.
Worth checking measurements to see if this would do it....
https://www.amazon.co.uk/CNLW-Automotive-rectangle...
Edited by Johno on Wednesday 22 February 09:56
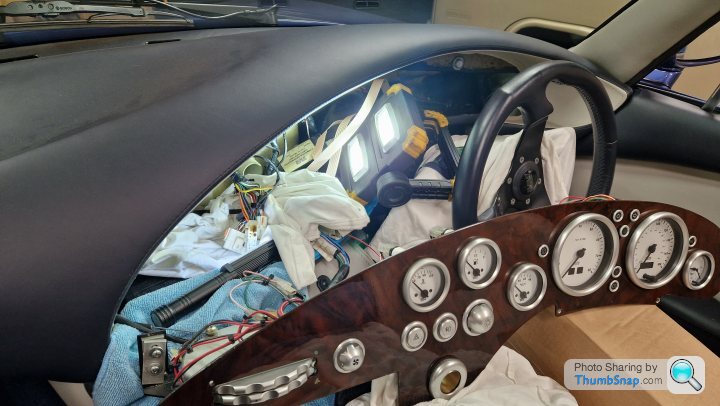
I did try to de-pin but with no luck and concerned I'm damaging the metal pins so left it alone until I speak to Jody. I did manage to make more space by disconnecting the heater cables which has allowed me to pull the dash further forward so I can now access the plug much better.

RobXjcoupe said:
Not sure if it helps but my 95 has a stripped interior including dash out. Heater and wiring still attached. If you would like specific pictures I’m happy to post on here.
Thanks but not necessary. Jody has repaired my ECU and its on its way back to me with a new uprated multi-plug that I have to fix to the loom. The only hard part is the limited space in the Griff dash. I'll take a couple of pics when done.All sorted and back on the road today. I managed to get the dash out of the way to give me enough room. If I removed the cables that connect to the knurled wheels I could have lifted the whole dash away but I had enough room.
Jody @ Python turned it around in a few days and supplied an uprated connector and pins for the loom side. I've attached a pic, it has a green tinge compared to the original. Jody also stated the pins should be soldered and not crimped.
Getting the dash back in was a pig, the flexi tubes for the vents are so difficult to connect but thankfully everything went back together and works as it should. A couple of pics below showing the room I had, all the new pins connected to the loom and the connecter.
Gassing Station | Griffith | Top of Page | What's New | My Stuff