Wheel arch refurb
Discussion


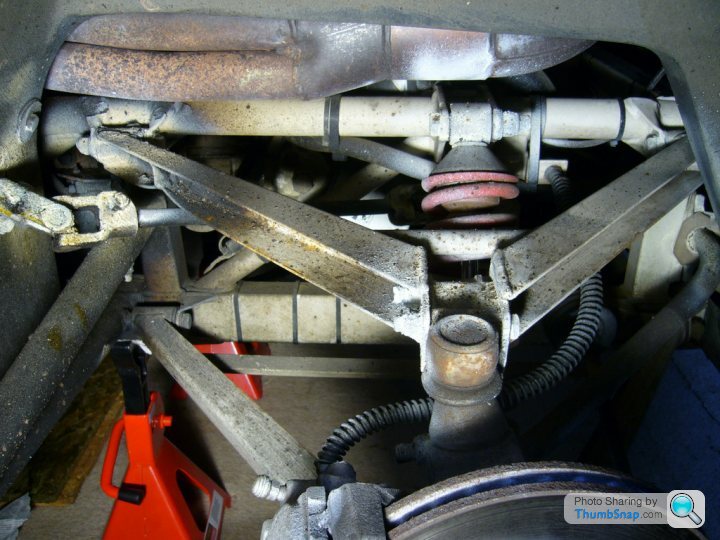
Just thought I would try and post a couple of before and after shots of my recent attempt at tidying up the chassis/brakes/wishbones etc:-


I know various people have carried out similar winter projects, and most people know much more than I will ever know about cars, but information is power as they say so I though I would share my experiences for those who are about to get their hands dirty!! I am no mechanic and these are only my observations, if in doubt speak to a professional.
- Get as much info, pictures, diagrams of the bits you will be taking off/dismantling as possible. Being able to understand and visualise what you are about to do made the whole process that little less daunting.
- Make sure you have all the required tools. I had to buy an extra set of axle stands, heavy duty mole grips, stub/short handled spanners, hack saw blades, ball joint splitter, flood light as well as all the paints, primers and lubes etc.
- Try to decide exactly what you are going to overhaul/replace. I was only intending on replacing the brake discs, pads and powder coat the suspension arms. It wasn't until I had started spending the time and effort taking bits off that it dawned on me I may as well replace the BJ's, rod ends, brake lines, bushes, new bolts/nuts etc. Trust me, you will also want to paint the arches, hubs and anything else you can reach.
- I had the suspension arms shot blasted and powder coated and left the original bushes in to see what they would come out like. They came out looking solid enough, but the baked powder coat was actually holding them firm. It was soon obvious that when this bond is broken, the rubber had baked and could never go back on the car (although leaving them in for the powder coating did make them soft and removing them a bit easier). In my opinion new bushes must be used. I went for heavy road use standard black poly bushes.
- I also spent time scraping back, treating, priming, under sealing and wax oiling the outriggers for piece of mind. The space within the suspension arm mounting brackets on the main chassis are very exact. I painted mine and had to scrape almost all of it off to get the arms back in. Putting them back in was probably harder than taking them out! Likewise, the powdercoat on the insides of the top suspension arm may well have enough thickness to make getting the top BJ's back in extremely tight (to say the least).
- I though sand paper and sanding blocks would be enough to scrape back the few rusting areas I had spotted. Save your self the hassle and buy some metal stripping wheel things you put on a drill - and go easy.
- The most useful thing I bought for my project were, I'm glad to say, the cheapest. A large bottle of panel wipe solvent and a family pack of kitchen towel. They were a life saver for removing old waxoil/chassis grime. If you can avoid freezing to death, open the garage door a bit when using it, apart from being toxic it will give you a hangover style headache the next day!
- The rear braided brake hoses are a real pig to undo because of the lack of access. The short handled spanners made the job 10x easier than trying to get a socket or normal spanner in. One of those multi punched bike spanners might also do the job.
- Don’t forget the nut-loc stuff when putting the brake carrier bolts back into the hubs. Enough said! Also when removing one of these hex-allun nuts, access is fouled by the rear upright hub and a socket will not undo it. A good set of mole grips will do the trick though.
- Order all the parts you need before hand, I found it very annoying having to waste/re-think a days fettling because I didn't have the parts/tools.
- The worst bit for me were the ball joints, they were a pig. Probably because I didn't want to hit the old girl hard enough! If you have never done them before (like me) I would maybe suggest getting a mate with a bit more experience to assist. Once you have hammered them a few times there is no going back and they have to come out.
- I had a full geo set-up for piece of mind. But notes and photos of the original positions of the ball joints/rod ends got me to within 2mm of an MOT pass! However the old rod ends took 12 turns each to take off and the new ones took 15 to go back on straight. I initially put them on with 12 turns but the front wheels were pointing at 5 to 1 o'clock. The extra 3 turns straightened the wheels.
- Have an understanding wife! I told her this was going to take over the next month or 2, and even though I did most of the work whilst she was at work she was on my case towards the end. I planned it to take about 50 hours in all but it must have taken around 100. I would also omit to tell her that it will cost between £600-£900 depending on what tools you need to buy and whether you have a full geo set-up.
Hope this is of use to some people, appologies if it's teaching the rest of you guys to suck eggs.
Edited by quattrophenia on Thursday 12th May 12:27
Edited by quattrophenia on Thursday 12th May 12:32


Its not teaching anyone to suck eggs. You shoud be  for all your effort. An excellent job. Do the rears next year
  then your ready for doing a full bodyoff job. Although your car doesnt need it. Once again congrats and as you stated in your post, it should encourage others who are not handy with the spanners to have a go.
Forgot to add, have you put some kind of heat protection on the top rear wishbone bush. It needs to be protected as the heat from the exhaust manifolds can melt the poly bush.
for all your effort. An excellent job. Do the rears next year then your ready for doing a full bodyoff job. Although your car doesnt need it. Once again congrats and as you stated in your post, it should encourage others who are not handy with the spanners to have a go.Forgot to add, have you put some kind of heat protection on the top rear wishbone bush. It needs to be protected as the heat from the exhaust manifolds can melt the poly bush.
Edited by TJC46 on Thursday 12th May 16:39

Gassing Station | Chimaera | Top of Page | What's New | My Stuff