Airfix 1:72 Gloster Gladiator
Discussion


I'm still waiting for a spare windscreen for the Curtiss Hawk, so I thought I'd make a start on the Airfix Gladiator I picked up from Modelzone yesterday. I've seen the actual example this kit is modelled on at Duxford several times, and have always been really impressed with its performance in the air. After one display a few years ago, I also managed to get up close to it for some reference photos, should I ever choose to build a model of it...
So here is that model: one of the Airfix "new tool" kits. Cost less than £7 with a bit of discount. Within reason, the cost of a kit is of little consequence to me - it's quality I'm after. If a kit could be judged on packagaing, instructions and decals, then this one would be hard to beat:
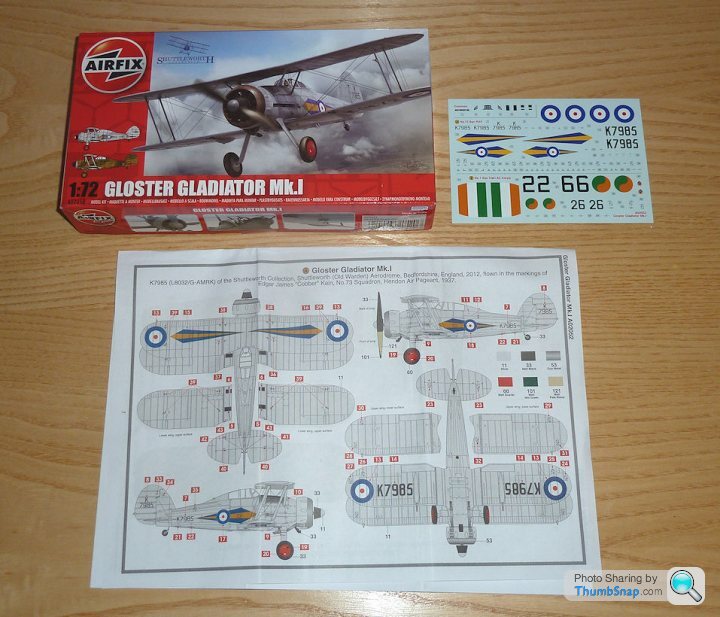
...but it can't be judged on those things alone: Surface quality makes or breaks a model for me; it's very, very difficult to correct surface defects such as oversized panel lines without a hell of a lot of time and effort. Gaps between parts don't concern me so much. This aircraft doesn't have as many panel lines as something like a Spitfire, due to the method of construction of the real thing, but even so the panel lines that are represented on this one do look good. They look very similar in depth and width to the the new tool Bf109E-4 I built recently, and much, much better than the Mk1 Spitfire. They also look significantly finer than the new tool Vampire and Typhoon, but difficult to tell since I don't have those models to compare directly. Not sure whether Lufbramatt would want to comment on the relatave provenance of these kits?

So I removed some of the main parts from the sprues. The plastic is fairly soft, and some of the gates are huge. Not a problem for me, but I can imagine some novices might damage the parts during removal. Some of the smaller details such as the footrest are dwarfed by the sprue gates, but again this is of little consequence to me becasue I think I'll deviate slightly from the OOB build and replace that with stretched sprue. The tailwheel and cockpit details (both sidewall mouldings and the floor/seat/column components) do look very wishy washy in terms of detail. There is the option of opening the access door, but I think I'll leave it shut with the canopy closed on this one.

Looking at the main parts in more detail - the surface detailing is very, very nice. Time will tell how it will look under a coat of very thin Alclad Aluminium, but from other builds I've seen it will look OK. Dry fit of the parts also looks pretty good, probably a bit of Mr.Surfacer will do the trick on what cracks there are, rather than the Milliput option this time.

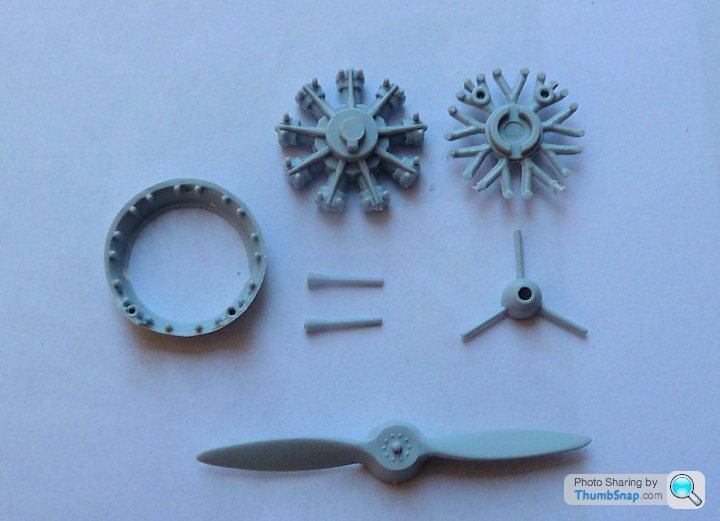
I'm also impressed with how the kit has been engineered and designed. One of my favourite parts of a model is the engine, and this one is a multi piece affair. I think OOB it will at least approach the look of the scratchbuilt one I've done for the Special Hobby Hawk (or a resin aftermarket job).
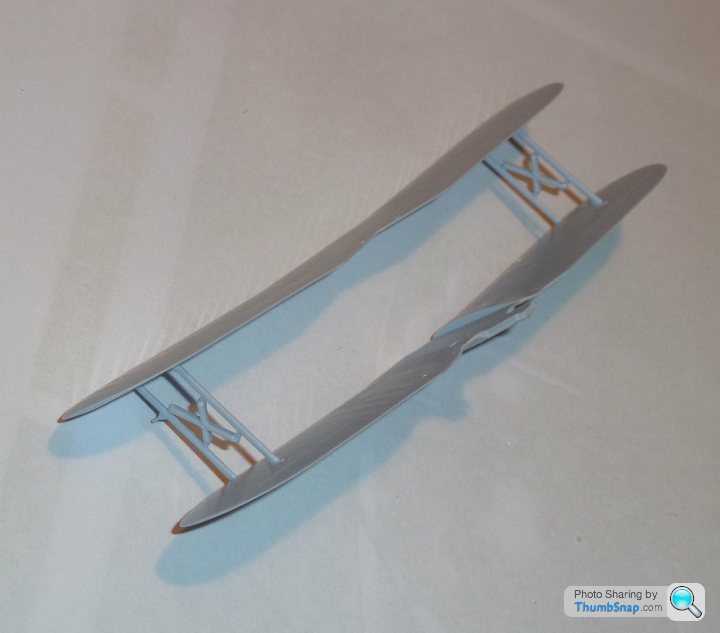
The transparent parts of the windscreen/canopy have also been well thought out. The open canopy version has a clever bit of design in that it's moulded as part of the rear deck cover thus eliminating thickness issues. It's good to see some thought has also been given to alignment of the interplane struts and cabane alignment. The struts have sacrificial sprue braces in this case which need cutting off at some stage. I'd have thought a snap-fit jig would have been better, to reduce the risk of damaging the thin struts once in place, but it shouldn't really be an issue. I'm sure this was considered and rejected for some good reason at the design stage.
Not bad at all so far. I'm intrigued to see how well it goes together now.
So here is that model: one of the Airfix "new tool" kits. Cost less than £7 with a bit of discount. Within reason, the cost of a kit is of little consequence to me - it's quality I'm after. If a kit could be judged on packagaing, instructions and decals, then this one would be hard to beat:
...but it can't be judged on those things alone: Surface quality makes or breaks a model for me; it's very, very difficult to correct surface defects such as oversized panel lines without a hell of a lot of time and effort. Gaps between parts don't concern me so much. This aircraft doesn't have as many panel lines as something like a Spitfire, due to the method of construction of the real thing, but even so the panel lines that are represented on this one do look good. They look very similar in depth and width to the the new tool Bf109E-4 I built recently, and much, much better than the Mk1 Spitfire. They also look significantly finer than the new tool Vampire and Typhoon, but difficult to tell since I don't have those models to compare directly. Not sure whether Lufbramatt would want to comment on the relatave provenance of these kits?
So I removed some of the main parts from the sprues. The plastic is fairly soft, and some of the gates are huge. Not a problem for me, but I can imagine some novices might damage the parts during removal. Some of the smaller details such as the footrest are dwarfed by the sprue gates, but again this is of little consequence to me becasue I think I'll deviate slightly from the OOB build and replace that with stretched sprue. The tailwheel and cockpit details (both sidewall mouldings and the floor/seat/column components) do look very wishy washy in terms of detail. There is the option of opening the access door, but I think I'll leave it shut with the canopy closed on this one.
Looking at the main parts in more detail - the surface detailing is very, very nice. Time will tell how it will look under a coat of very thin Alclad Aluminium, but from other builds I've seen it will look OK. Dry fit of the parts also looks pretty good, probably a bit of Mr.Surfacer will do the trick on what cracks there are, rather than the Milliput option this time.
I'm also impressed with how the kit has been engineered and designed. One of my favourite parts of a model is the engine, and this one is a multi piece affair. I think OOB it will at least approach the look of the scratchbuilt one I've done for the Special Hobby Hawk (or a resin aftermarket job).
The transparent parts of the windscreen/canopy have also been well thought out. The open canopy version has a clever bit of design in that it's moulded as part of the rear deck cover thus eliminating thickness issues. It's good to see some thought has also been given to alignment of the interplane struts and cabane alignment. The struts have sacrificial sprue braces in this case which need cutting off at some stage. I'd have thought a snap-fit jig would have been better, to reduce the risk of damaging the thin struts once in place, but it shouldn't really be an issue. I'm sure this was considered and rejected for some good reason at the design stage.
Not bad at all so far. I'm intrigued to see how well it goes together now.
Edited by dr_gn on Tuesday 30th July 16:08
Eric Mc said:
They also give you two windscreen types. I hadn't realised until I bought this model that the Gladiator actually HAD two windscreen options.
I fancy completing the Irish Air Corps version.
I was going to get the earth/green starter kit version (I really like that scheme), but I don't think the decal set is as comprehensive. I'll go with the silver one and hope for the best, even though I think it will be difficult to get anything other than a fairly bland finish at this scale.I fancy completing the Irish Air Corps version.

So all the parts are now de-flashed. Took an hour or so, and I'm a bit surprised at the amount of flash on the smaller components, especially for a new tool kit.

The strut end plugs needed some work to get them to fit in the wing pockets. It's well worth doing now - the last thing I want is to struggle with this kind of thing after painting. Once the flash was removed it all plugs together and aligns very nicely:
I was a bit alarmed to see on the instructions a very specific angle for the wheel mounting: 83.28 degrees to the horizontal. Presumably this angle is constant for the 'in flight' or 'weighted' wheel options, due to the sprung hubs of the prototype. A plasticard angle jig will soon get things aligned, assuming the wheels aren't self-jigging (which the do appear to be). Other thing is the fuselage mounted guns - these would have been better inserted from the outside, after fuselage painting rather than from the inside thereby making them impossible to mask and paint easily. I'm going to cut the breeches off, make some sockets for the barrels and and fit them last.
A nice little touch is the inclusion of an engine starting handle:
Again, so far so good. It's an enjoyable build - nothing wrong with a bit of traditional flash removal, although I wonder when these moulds will need re-furbing, and what state the production sprues will be in at that point?
Next job wil be to drill out the gun muzzles and intake trumpets.
I was thinking earlier: this kit isn't really for beginners, yet it's also sold as a 'starter kit'. I reckon Airfix could easily keep that version as the standard kit, and have a 'premium' version that could include the full decal set, a photo-etch fret for additional engine and cockpit details etc (Eduard is bound to release one anyway sooner or later) and maybe a vacform canopy. I bet there are modellers out there (me included) who would have paid considerably more for a premium version of this kit where everything you need to take it to the next level is there in the box.
Just a thought.
Just a thought.
Eric Mc said:
I'm tempted to build the Matchbox/Revell version at the moment. I could use the Irish decals from the Airfix kit.
You might as well just build this one. It must be at least 35 years since I built the Matchbox one, and I think its a nice enough model, but this Airfix version is better.IanMorewood said:
I recall making one of these many moons ago, Humbrol metallic effect enamel paint was a bu88er to get on thin enough that you could see detail but not the brush strokes. Mind I expect better results from you than a 9 year old me.
I think for silver colours you really need an airbrush at this scale. I'll be using Alclad, probably "Aluminium".Eric Mc said:
"Silver" on canvas is pretty dull. I like to see a slight shade contrast between the dull aluminium of the doped linen and the more metallic sheen of metal panels - usually those around the engine area.

So do I, but unfortunately there are no bare metal panels on this one - it's all painted silver on the Shuttleworth example, hence why I think it might look a bit flat.72twink said:
Couldn't you play around with finishes rather than silver tones to show how the paint sits on diferent materials, satin/matt on the fabric and more gloss on the ally panels?
TBH I'd rather just get a set of the "80 Squadron, RAF Amriya, Egypt, early 1940" decals and do that scheme instead. I've put a request on BM to see if anyone wants to swap, although I'd want to keep all the stencil details 
72twink said:
Is that the Starter Pack option? I've not seen one yet. My preference would be one of the Sea Gladiators that defended Malta.
Yes, starter pack.The Sea Gladiator is slightly different spec, but I agree - it's the scheme I like the best too. No doubt there will be a Sea Gladiator along soon enough.
72twink said:
I'm beginning to think I bought in haste and should have waited on a Sea Gladiator - neither of the kit options inspire me either tbh.
I reckon Airfix would send me the RAF version of the decasl for a couple of quid even though it's not a spare for my version. Can't see why not; might e-mail them. The only difference to the model appears to be a revised supercharger inlet, presumably with a filter, that's included in my version of the kit anyway.There's plenty of info on the differences between a Gladiator and Sea Gladiator online - the most obvious one being a 3 bladed propeller and arrester hook, so I don't think it would be a big job to convert.
Gassing Station | Scale Models | Top of Page | What's New | My Stuff