Handbrake Caliper Modification and Refurbishment.
Discussion


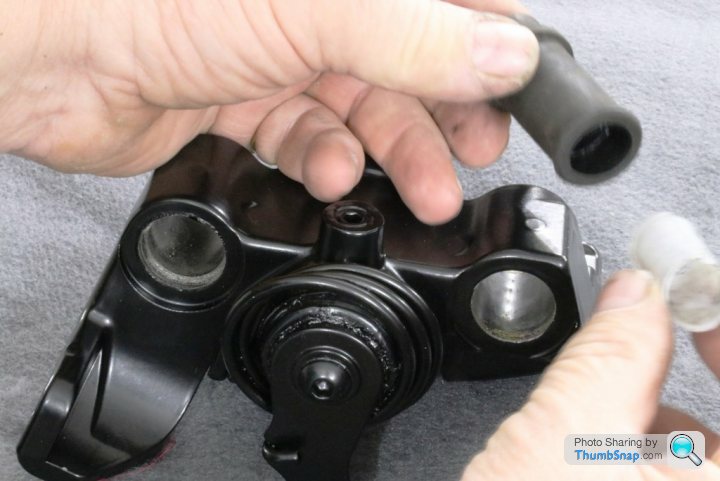
A short while ago I had in a V8 Vantage to replace front and rear discs and all 3 sets of brake pads. Whilst all was very straightforward on the front, the rear proved to be a major problem with the handbrake caliper pad retaining pins completely seized in the caliper.
As I needed to retract the piston to allow the pads to clear the wear lip on the disc, either to replace the disc or the handbrake pads, being unable to remove the pins meant I could not remove the old pads to access the piston and rewind it back into the caliper body.
As the pads were to be replaced anyway, I ended up having to use a lever bar to prise the caliper over the disc wear lip, seriously damaging the pads in the process.
With the caliper off, I used proper engineering quality drifts to try and drive out the pins but this bent one drift and bent the pad retaining pins during the attempt. After separating the 2 halves of the caliper by cutting the pins and removing the two M10 Torx bolts, I was still unable to remove the pin from the alloy caliper housing so unfortunately needed to replace the caliper.
After this experience, I decided to try and remove the handbrake pads on my own DB9 and clean and lubricate to prevent the same situation costing myself a pair of calipers.
I decided there and then that there must be a better way of retaining the pads, that only ever get used as a parking brake, and so set about modifying the design used by Brembo that is just not up to the rigours of weather and corrosion suffered by a road used car.
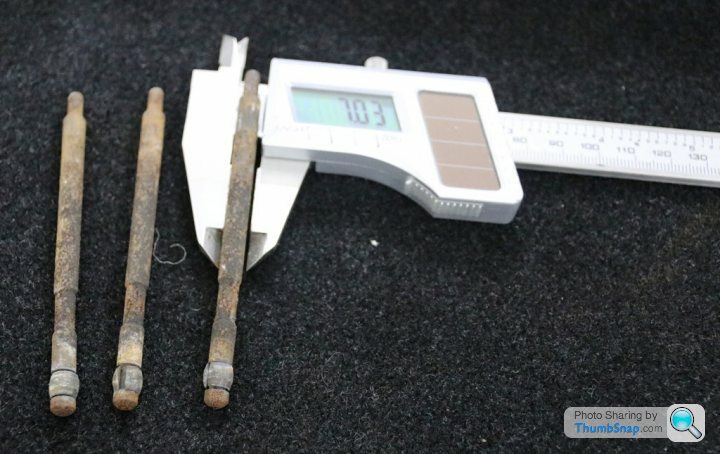
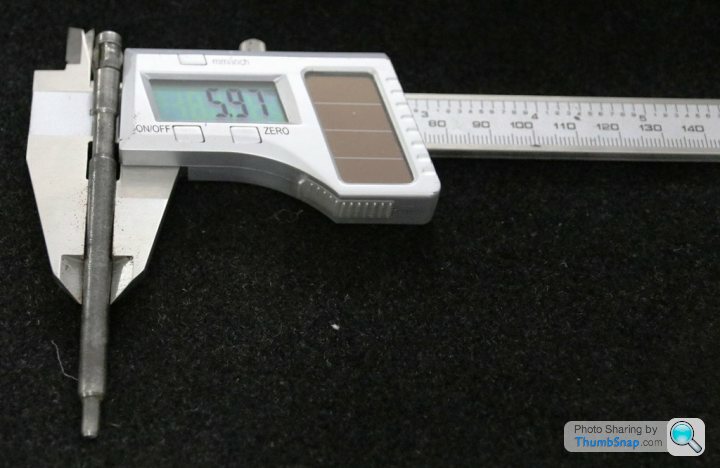
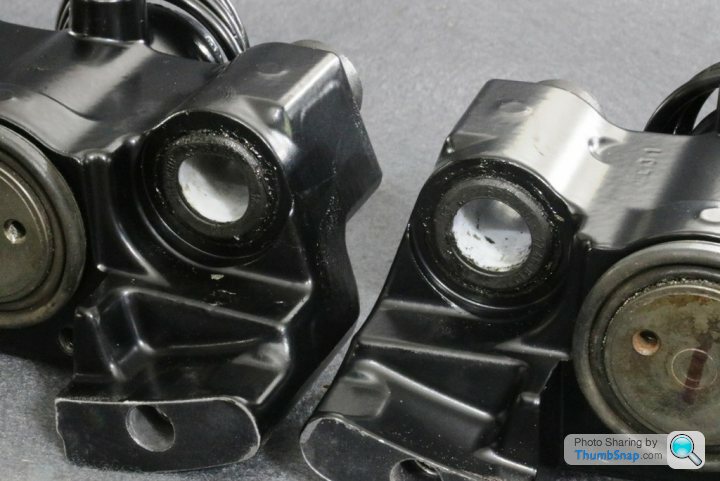
Although very tight, I did manage to drive out the pad guide pins but noticed the dreadful corrosion along the sliding area of the pin. After cleaning one pin, I measured over 1.0mm of rust build-up along the pin length, up from 5.97mm to 7.03mm.
Next, I removed the 2 rusty Torx bolts that held the two caliper halves together.
Finally, I removed the two caliper to hub carrier bolts, again, very rusty along the length.
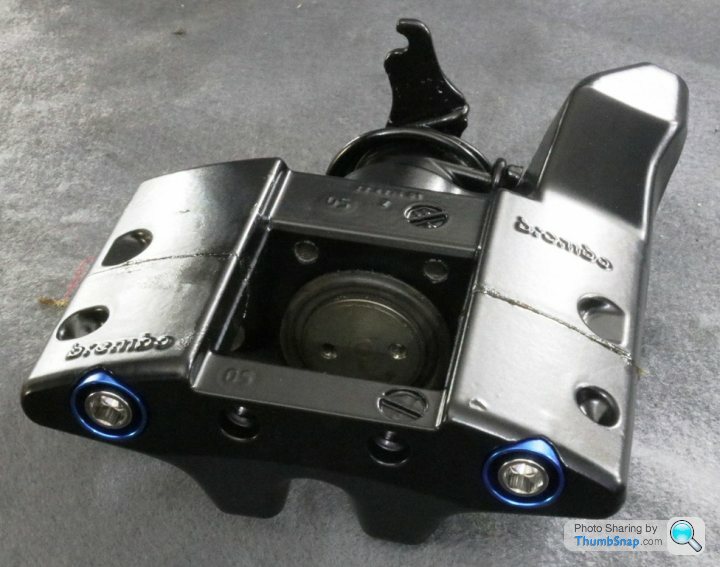
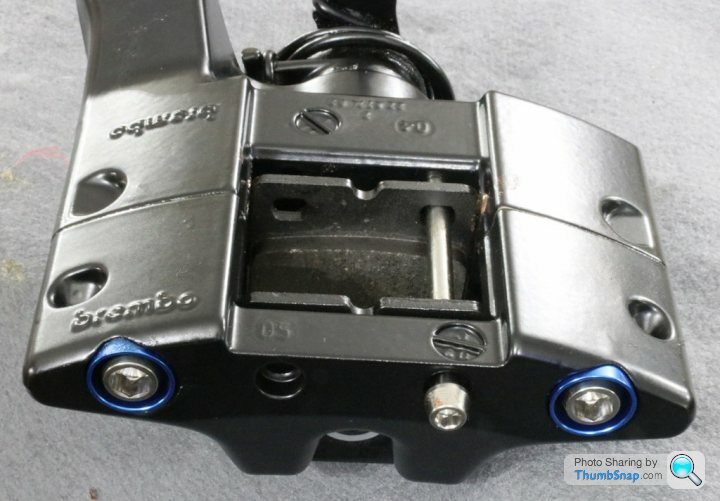
It was pretty straightforward replacing the caliper half connection bolts with virtually corrosion-proof Titanium bolts sized M10x70 in 1.5mm thread pitch. I used a set of 4 blue anodised cup washers under the heads.

The sliders required a little more thought. With the original pins being 90mm long and 6.0mm diameter along the length narrowing to 4.0mm at the tips, I decided to use some M6 x 100 x 1.0 Titanium cap head bolts to replace them.
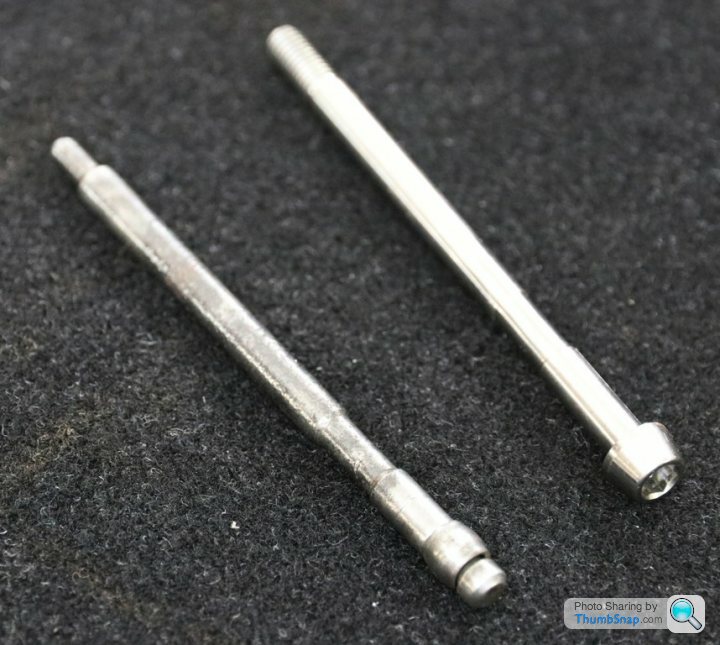
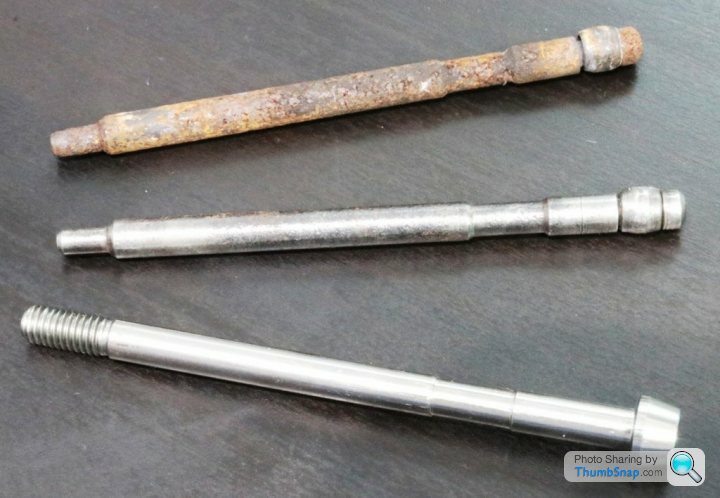
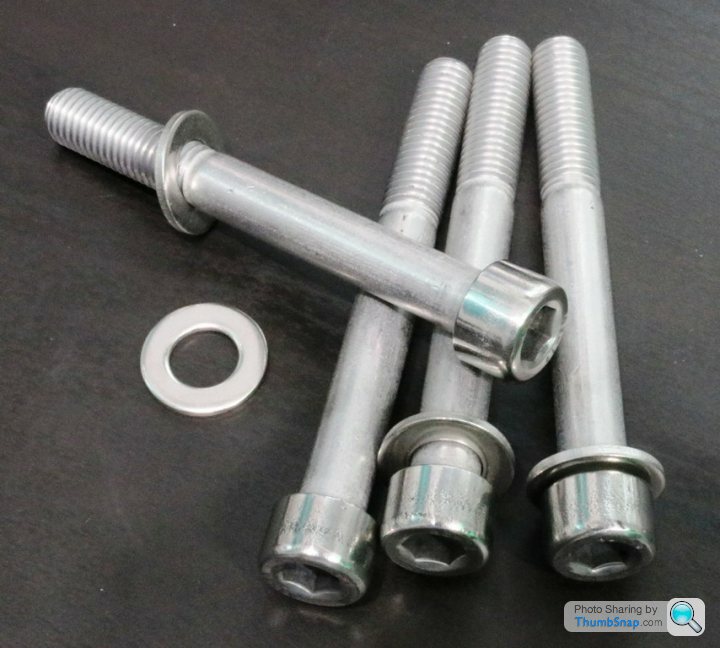
Here is a comparison between the "as removed", cleaned and replacement "pins".
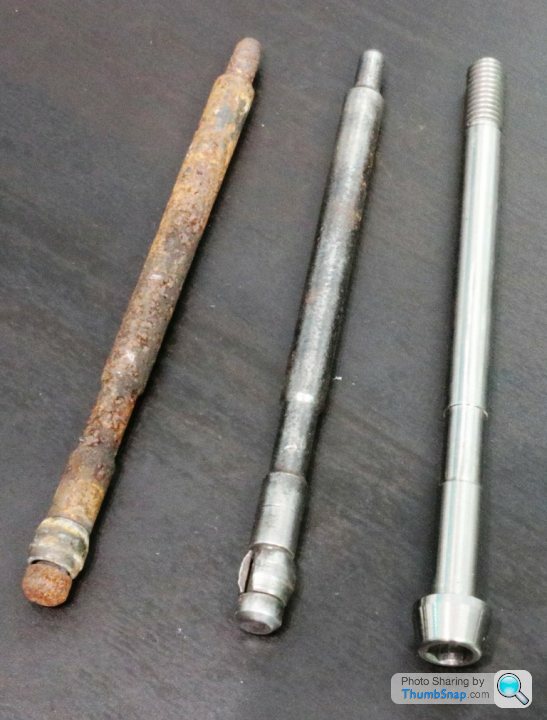
As new bolts are threaded 25mm at the end, and I only needed 15mm, I used 100mm long M6 bolts with the last 10mm of thread removed. I then drilled the 4mm hole in the caliper to 5mm and then tapped an M6x1.0 thread into it. This left the entire sliding section through the pads as unthreaded and the thread set within the caliper body.
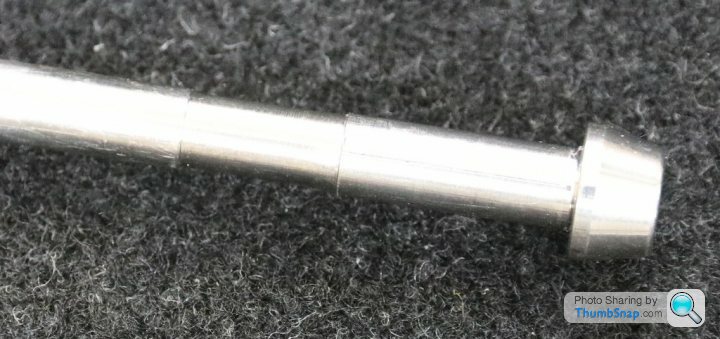
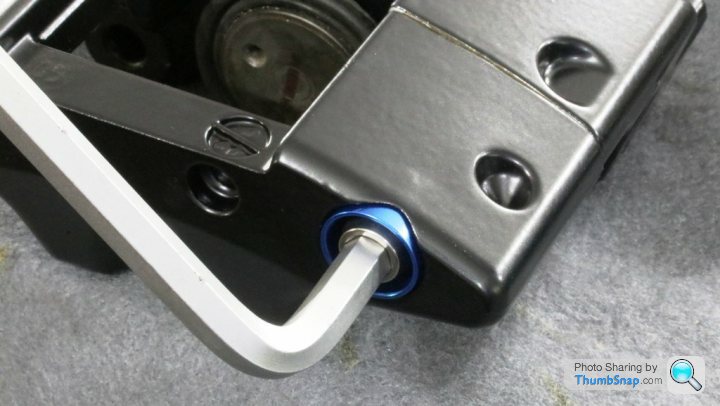
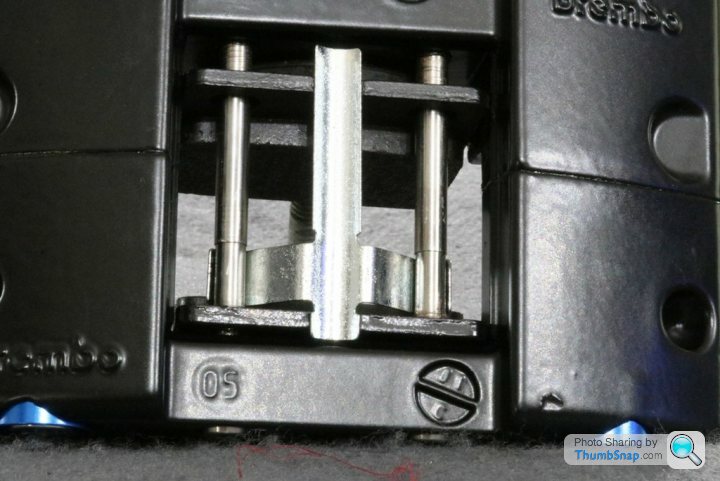
All that was then left to do was recess the M6 bolt heads into the outer body of the caliper for an almost flush appearance and machine the two smaller diameter 5.0mm indents into the new pins to locate the pad spring clip. The indents are 11.0mm wide.

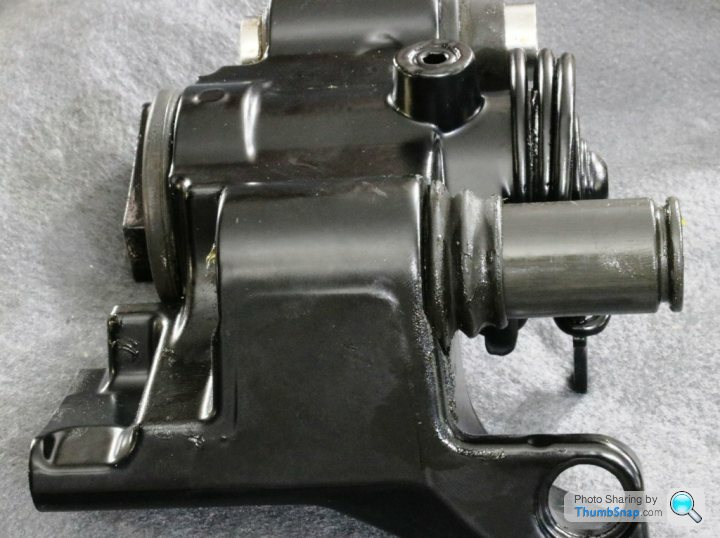
Following getting the caliper bodies powdercoated in a satin black
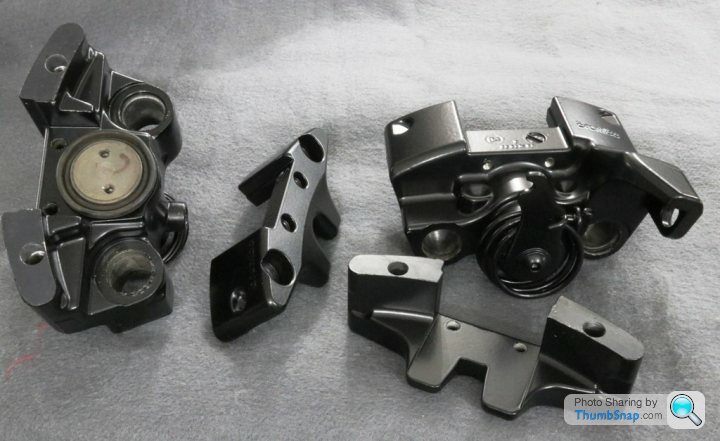
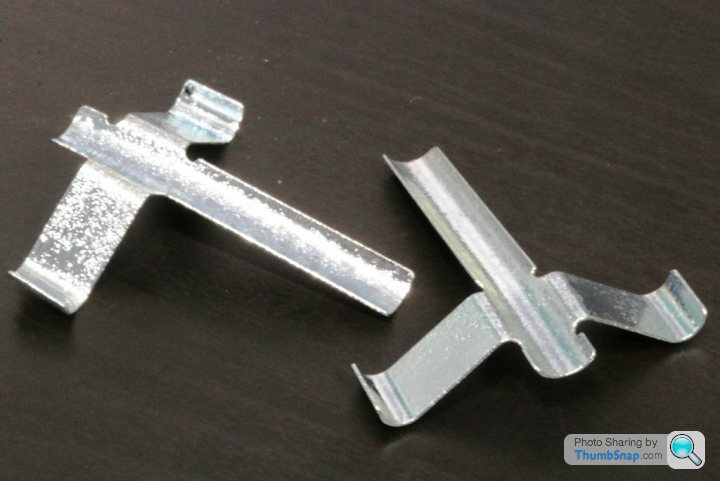
and electroplating the clips for further corrosion protection,

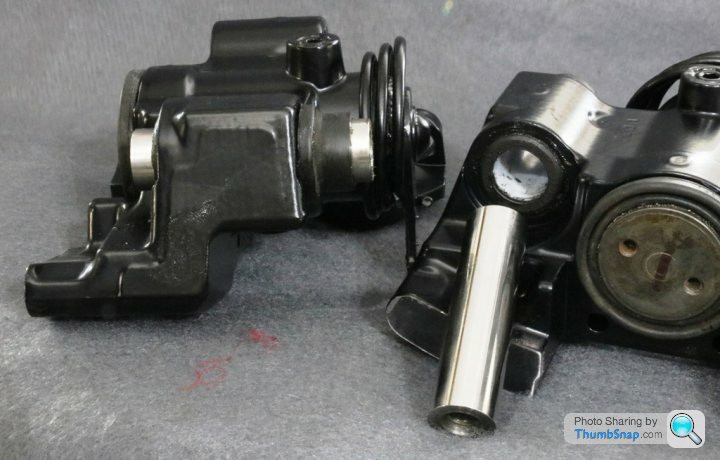
the calipers were reassembled. As the caliper mounting sliders were removed for the powder coating, these needed refitting. The forward mount consists of a rubber tube with a split nylon insert and a steel tube. Applying a small amount of grease to the outside of the rubber tube, press it through the caliper so that it pops out and seats either side, then lightly grease the nylon tube and refit it inside the rubber tube.
After thoroughly cleaning and polishing my mount pins, I greased them and refitted them through the nylon tube, ensuring they "float" freely.
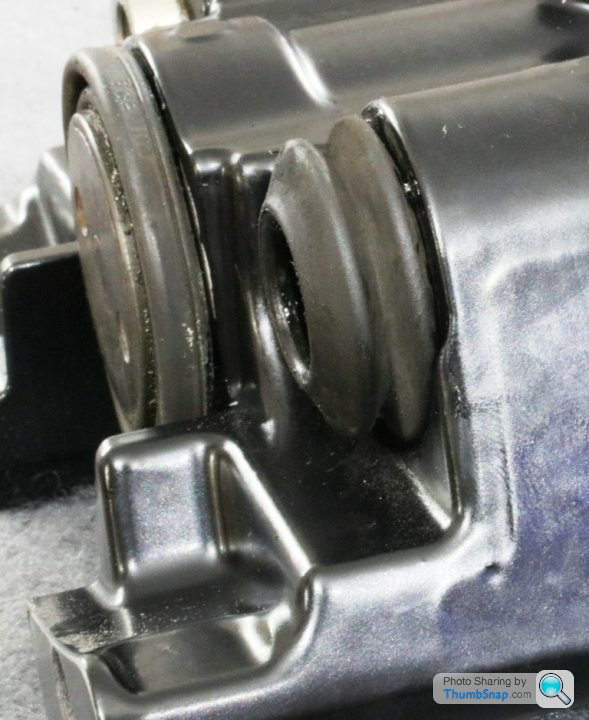
Next, moving on to the rear mount, the bellows style seal fits into an INTERNAL groove on the caliper body and an EXTERNAL groove in the mounting pin. Here is a bellows fitted into the internal groove.
After cleaning and lubricating the sliding pin, make sure it slides freely in the caliper body. You can then slide it through the caliper body and right past the single bellows you have now installed.
The pin retains the bellows within its internal groove in the caliper. You can now refit the bellows the other end....

before bringing the tube back through this second bellows, locking it into the caliper housing and allowing the 2 bellows to sit in the external grooves of the pin.

The outer half of the caliper body can now be refitted
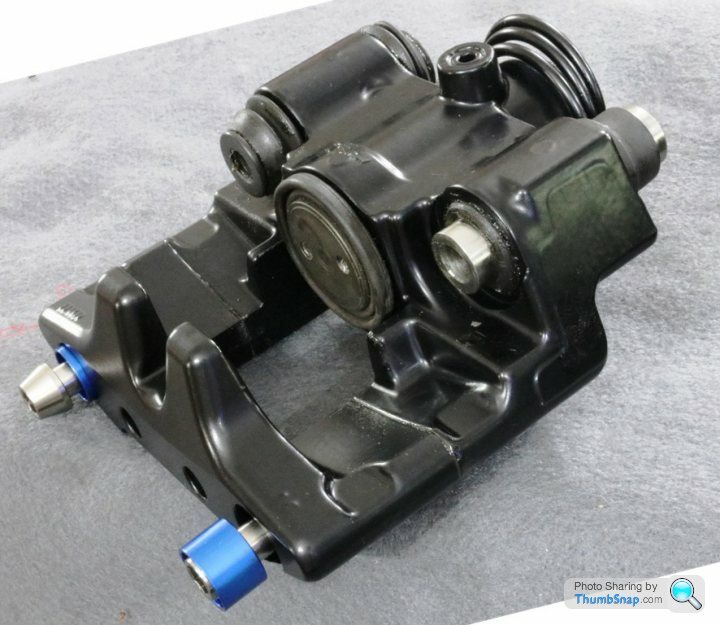
using the new titanium bolts and cup washers and an M8 hexagon key.
and there you have the main body of the caliper complete.
We can now install the caliper to the car before installing the pads, but for clarity, I will show the details here off the car.
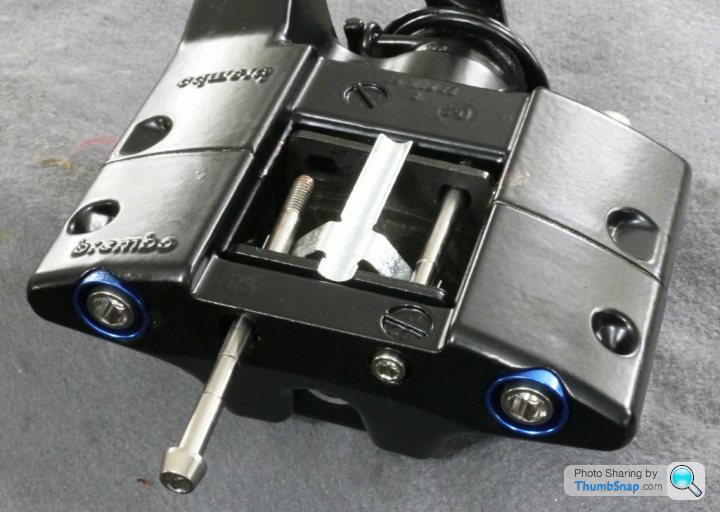
Using one of the new titanium "pin" bolts, install the outer pad....

followed by the inner pad. I applied a thin coating of copper grease to the threads of the "pin", sides of both pads and the back face of the inner pad.
nipping up the "pin" into the now threaded caliper. Next, the spring clip and second caliper pin are installed.
Both pins can now be nipped-up with the spring clip seated nicely in the machined groove of the pins.
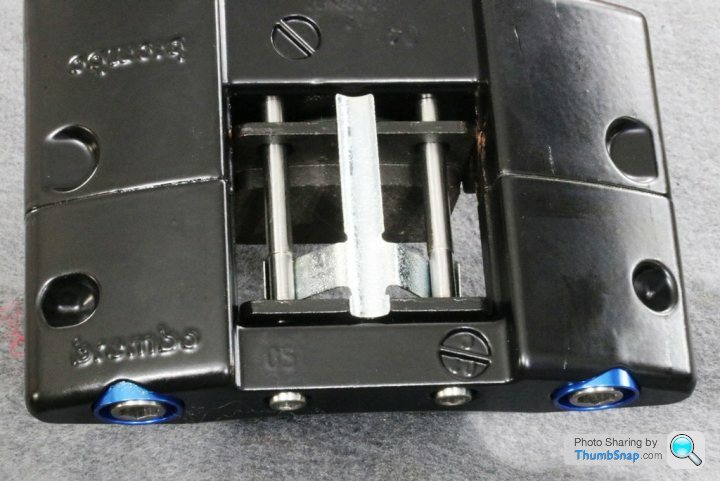
We now have a fully assembled caliper.

Here you can see how the spring clips lock into the pin recess grooves I machined into them.
Ready to install, hopefully very much corrosion proof.

Underside view.
I then used some new M10x90mm 1.5mm pitch A4 Stainless Steel cap head bolts and washers to refit the caliper assemblies to the suspension upright.

Fitting new pads into the smooth Titanium sliders is a breeze with a light anti-seize grease applied to the threads to discourage the aluminium caliper from corroding or galling.
Hopefully, a permanent solution to a known issue that looks quite nice too.
I may now revisit the design of the service calipers although I have already replaced the bolts that thread into the alloy housing suspension uprights with studs and Titanium nuts to eliminate wear on those housing threads.
As I needed to retract the piston to allow the pads to clear the wear lip on the disc, either to replace the disc or the handbrake pads, being unable to remove the pins meant I could not remove the old pads to access the piston and rewind it back into the caliper body.
As the pads were to be replaced anyway, I ended up having to use a lever bar to prise the caliper over the disc wear lip, seriously damaging the pads in the process.
With the caliper off, I used proper engineering quality drifts to try and drive out the pins but this bent one drift and bent the pad retaining pins during the attempt. After separating the 2 halves of the caliper by cutting the pins and removing the two M10 Torx bolts, I was still unable to remove the pin from the alloy caliper housing so unfortunately needed to replace the caliper.
After this experience, I decided to try and remove the handbrake pads on my own DB9 and clean and lubricate to prevent the same situation costing myself a pair of calipers.
I decided there and then that there must be a better way of retaining the pads, that only ever get used as a parking brake, and so set about modifying the design used by Brembo that is just not up to the rigours of weather and corrosion suffered by a road used car.
Although very tight, I did manage to drive out the pad guide pins but noticed the dreadful corrosion along the sliding area of the pin. After cleaning one pin, I measured over 1.0mm of rust build-up along the pin length, up from 5.97mm to 7.03mm.
Next, I removed the 2 rusty Torx bolts that held the two caliper halves together.
Finally, I removed the two caliper to hub carrier bolts, again, very rusty along the length.
It was pretty straightforward replacing the caliper half connection bolts with virtually corrosion-proof Titanium bolts sized M10x70 in 1.5mm thread pitch. I used a set of 4 blue anodised cup washers under the heads.
The sliders required a little more thought. With the original pins being 90mm long and 6.0mm diameter along the length narrowing to 4.0mm at the tips, I decided to use some M6 x 100 x 1.0 Titanium cap head bolts to replace them.
Here is a comparison between the "as removed", cleaned and replacement "pins".
As new bolts are threaded 25mm at the end, and I only needed 15mm, I used 100mm long M6 bolts with the last 10mm of thread removed. I then drilled the 4mm hole in the caliper to 5mm and then tapped an M6x1.0 thread into it. This left the entire sliding section through the pads as unthreaded and the thread set within the caliper body.
All that was then left to do was recess the M6 bolt heads into the outer body of the caliper for an almost flush appearance and machine the two smaller diameter 5.0mm indents into the new pins to locate the pad spring clip. The indents are 11.0mm wide.
Following getting the caliper bodies powdercoated in a satin black
and electroplating the clips for further corrosion protection,
the calipers were reassembled. As the caliper mounting sliders were removed for the powder coating, these needed refitting. The forward mount consists of a rubber tube with a split nylon insert and a steel tube. Applying a small amount of grease to the outside of the rubber tube, press it through the caliper so that it pops out and seats either side, then lightly grease the nylon tube and refit it inside the rubber tube.
After thoroughly cleaning and polishing my mount pins, I greased them and refitted them through the nylon tube, ensuring they "float" freely.
Next, moving on to the rear mount, the bellows style seal fits into an INTERNAL groove on the caliper body and an EXTERNAL groove in the mounting pin. Here is a bellows fitted into the internal groove.
After cleaning and lubricating the sliding pin, make sure it slides freely in the caliper body. You can then slide it through the caliper body and right past the single bellows you have now installed.
The pin retains the bellows within its internal groove in the caliper. You can now refit the bellows the other end....
before bringing the tube back through this second bellows, locking it into the caliper housing and allowing the 2 bellows to sit in the external grooves of the pin.
The outer half of the caliper body can now be refitted
using the new titanium bolts and cup washers and an M8 hexagon key.
and there you have the main body of the caliper complete.
We can now install the caliper to the car before installing the pads, but for clarity, I will show the details here off the car.
Using one of the new titanium "pin" bolts, install the outer pad....
followed by the inner pad. I applied a thin coating of copper grease to the threads of the "pin", sides of both pads and the back face of the inner pad.
nipping up the "pin" into the now threaded caliper. Next, the spring clip and second caliper pin are installed.
Both pins can now be nipped-up with the spring clip seated nicely in the machined groove of the pins.
We now have a fully assembled caliper.
Here you can see how the spring clips lock into the pin recess grooves I machined into them.
Ready to install, hopefully very much corrosion proof.
Underside view.
I then used some new M10x90mm 1.5mm pitch A4 Stainless Steel cap head bolts and washers to refit the caliper assemblies to the suspension upright.
Fitting new pads into the smooth Titanium sliders is a breeze with a light anti-seize grease applied to the threads to discourage the aluminium caliper from corroding or galling.
Hopefully, a permanent solution to a known issue that looks quite nice too.
I may now revisit the design of the service calipers although I have already replaced the bolts that thread into the alloy housing suspension uprights with studs and Titanium nuts to eliminate wear on those housing threads.
Edited by 8Tech on Saturday 2nd December 15:03
Thanks for a rally good write up 8Tech, a very neat job.
Those Brembo calipers are really something aren't they? I am guessing alloy wheel cleaner doesn't help prevent seizing either along with salt and moisture.
I did some from an Alfa Brera and it took half a day to sort out, they dont underprice the pins either!
I split the calipers, applied a mix of thinners and atf which usually frees anything but had to resort to heat and brute force to remove the stupid pins.
Incidentally what grade of stainless stud did you use and will there be a problem with electrolytic corrosion/erosion between Ti, alloy and stainless?
The only stainless I am using are the bolts for mounting the calipers to the upright, replacing the rusty steel ones. I used A4 grade for both the bolts and the thick series washers.
The titanium is the most common 6AL-4V grade and with the only contact points being greased during assembly, the titanium cannot corrode anyway and I don't expect the Brembo alloy to corrode either with the degree of insulation offered by the grease against any electrolytic ingress.
The titanium is the most common 6AL-4V grade and with the only contact points being greased during assembly, the titanium cannot corrode anyway and I don't expect the Brembo alloy to corrode either with the degree of insulation offered by the grease against any electrolytic ingress.
Edited by 8Tech on Sunday 3rd December 11:53
I suspect that a lot of the seizing issues are caused by the maintenance schedules wanting a visual inspection rather than a quick strip and clean.
I'm guilty of it too. A cursory glance and a shrug as the handbrake works. Whereas periodic dismantling and rebuilding would prevent these types of issues.
I'm guilty of it too. A cursory glance and a shrug as the handbrake works. Whereas periodic dismantling and rebuilding would prevent these types of issues.
Cold said:
I suspect that a lot of the seizing issues are caused by the maintenance schedules wanting a visual inspection rather than a quick strip and clean.
I'm guilty of it too. A cursory glance and a shrug as the handbrake works. Whereas periodic dismantling and rebuilding would prevent these types of issues.
I completely agree. It does seem a waste of time stripping and rebuilding the pads and pins when you assume they are fine, and under normal use, the pads are subject to no wear at all, but I thing just pulling and cleaning the pins, greasing the sides of the pads and rear of the inner pad, greasing the pins and spring and refitting could eliminate the issue completely.I'm guilty of it too. A cursory glance and a shrug as the handbrake works. Whereas periodic dismantling and rebuilding would prevent these types of issues.
Gday2 said:
Great writeup thank you for your effort.
I had a quick look for the screws you used but could not find them, I just found el cheepo Chinese stuff which I do not trust. Could you let us know your source please.
Cheers
Christian
https://www.pro-bolt.com/titanium/titanium-bolts-s...I had a quick look for the screws you used but could not find them, I just found el cheepo Chinese stuff which I do not trust. Could you let us know your source please.
Cheers
Christian
Product codes:
MTISC6100
MTISC1070
LWACP10
Cheers.
Great & helpful post, thanks!
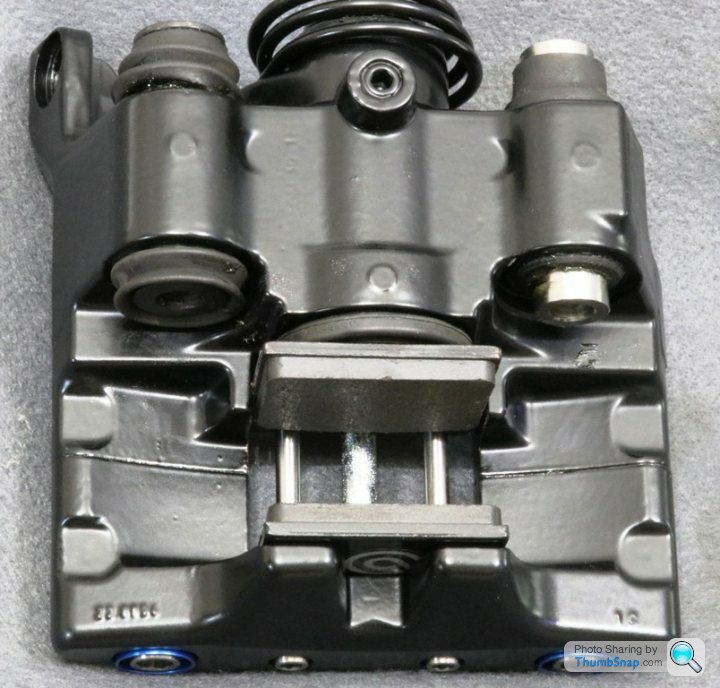
Does anyone know the torque for the two M10 bolts https://thumbsnap.com/1Ylws5hh
that clamp the caliper together?
Does anyone know the torque for the two M10 bolts https://thumbsnap.com/1Ylws5hh
that clamp the caliper together?
Edited by TR-Spider on Wednesday 13th March 14:17
TR-Spider said:
Great & helpful post, thanks!
Does anyone know the torque for the two M10 bolts https://thumbsnap.com/1Ylws5hh
that clamp the caliper together?
There is nothing specified in the workshop manual for those bolts (As I assume they are not required to be removed for general maintenance) it only covers the caliper to vertical link bolts. Without knowing the bolt material strength, difficult to calculate.Does anyone know the torque for the two M10 bolts https://thumbsnap.com/1Ylws5hh
that clamp the caliper together?
Edited by TR-Spider on Wednesday 13th March 14:17
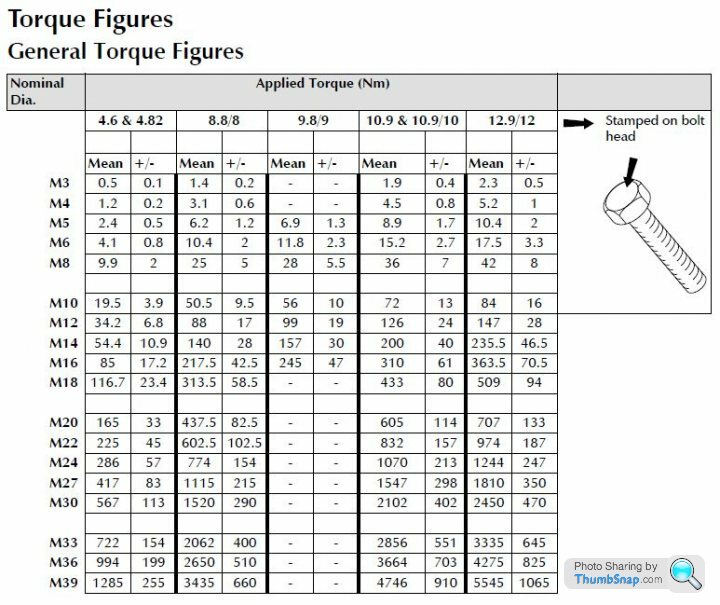
Thanks for the input, I think I'll go with the 50Nm from the general table.
I can easily check the torque after while without taking the wheel off.
Probably one would need to contact Brembo for the specs -
but in the end it's only the handbrake (and I won't do highspeed drift excercises with it).
Interesstingly my mecanic, who knows the caliper from Lambos etc, said that it's common practice to split them for a disk change.


A very helpful article especially as the workshop manual gives no guidance at all. My units were also very rusted but once cleaned up were fine. The complete job is so much easier once the caliper is split. The two torx bolts that secure the two halves were tightened up to 50Nm torque as suggested.
Edited by pcarmour on Saturday 25th March 07:50
Edited by pcarmour on Saturday 25th March 13:46
Gassing Station | Aston Martin | Top of Page | What's New | My Stuff