Tamiya XV02RS Pro build thread
Discussion


Apparently these aren't common, so enjoy a lot of pictures.
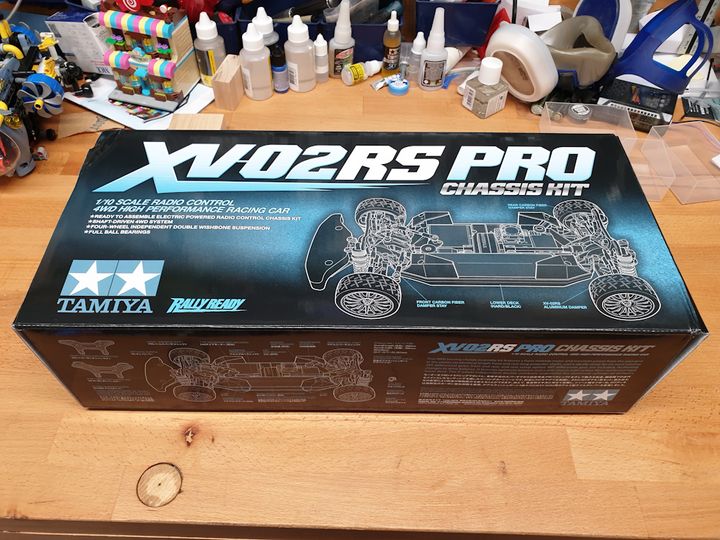
The XV02 is an AWD rally chassis. The RS bit means it's for road rally, and the Pro bit means you get full ball bearings, some shiny blue bits, hex hardware, and so on.
It comes in a box!
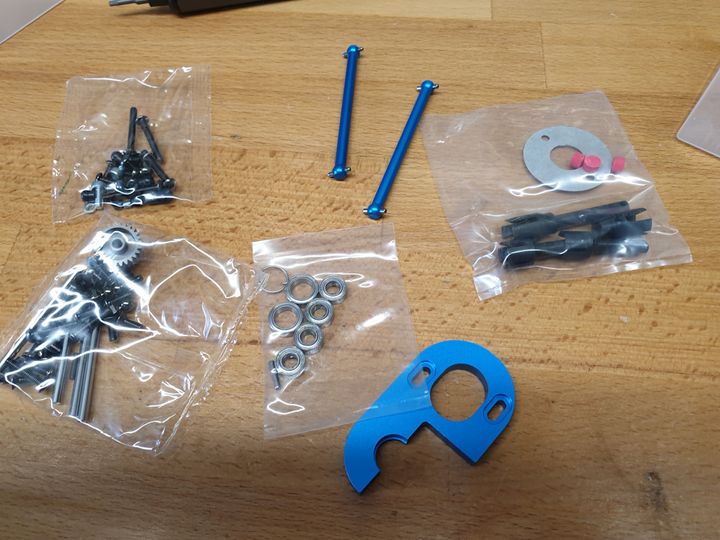
The box is full of stuff. No motor, body, or ESC in this though.
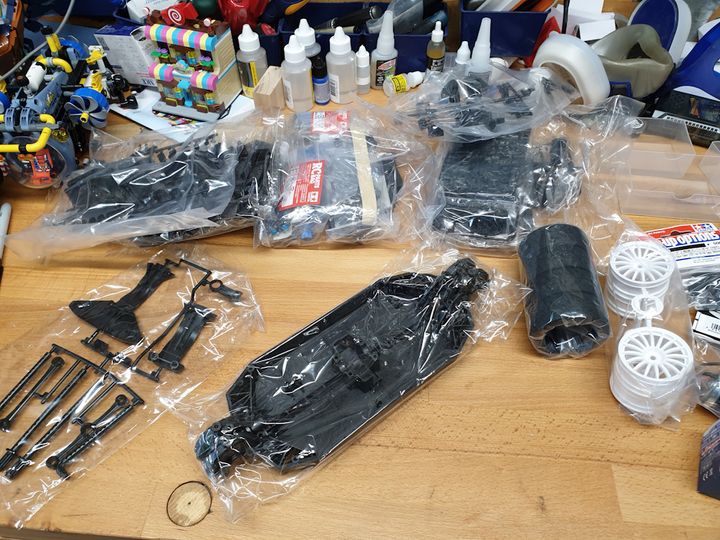
Don't panic. I bought all the extra bits I'll need. And some I technically don't, but decided to add anyway - specifically a centre diff.
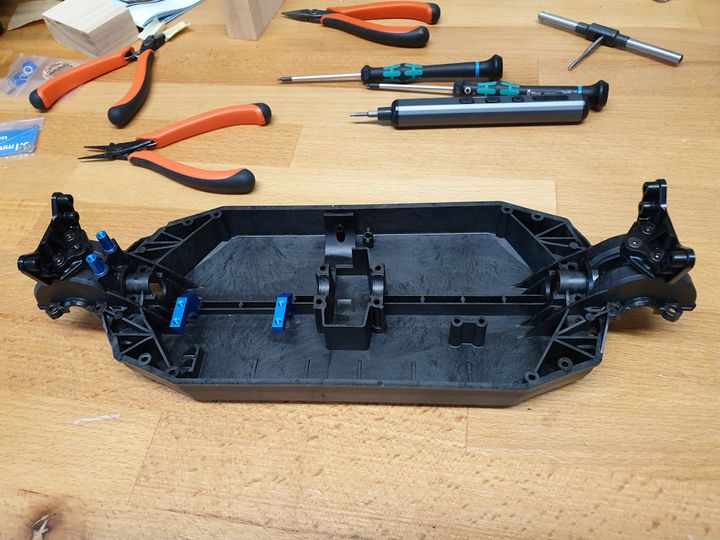
First stage. The tub is composite - I think glass reinforced. Aluminium servo mounts and steering mounts go in, with some wood glue to act as threadlock, because wood glue won't attack the plastic like normal threadlock does.
 [url]
[url]
Steering turnbuckles - I tap both ends, Tamiya (in the wrench) for the standard thread, an eBay special (the gold-coated one) for the reverse thread. This makes them both stronger and easier to assemble than trying to drive the turnbuckle straight into the plastic. I tapped everywhere I could on this build.
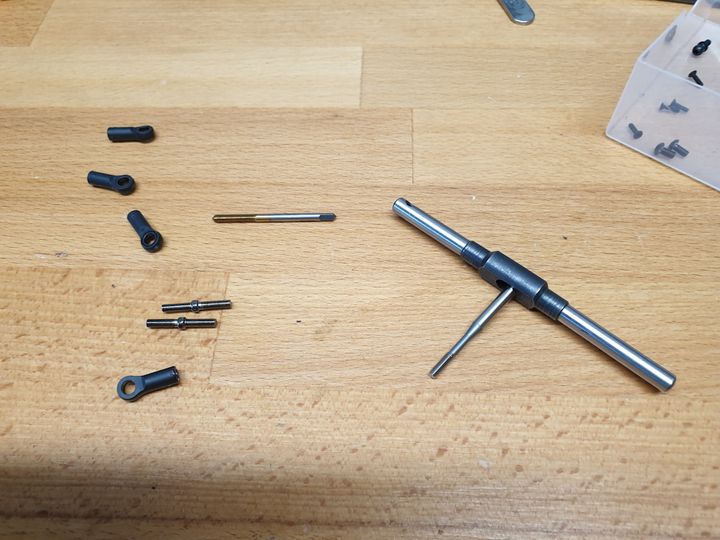
They attach to some other bits to form the steering linkage, which is ball bearing mounted. Plastic, but slop-free. That goes onto the mounts installed in the first step.
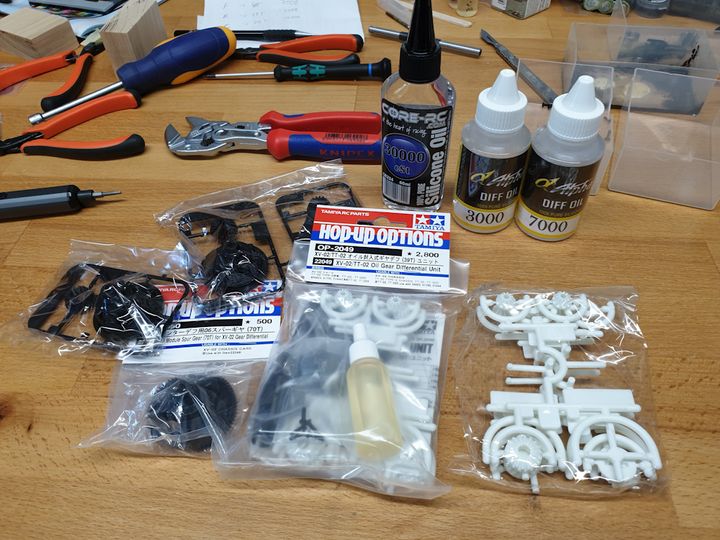
Next the diffs. The XV has the option to have 40-tooth diffs at each end, or to put a 39-tooth at one end or t'other. That lets you create forward bias or reverse bias. I went reverse bias because oversteer is more fun. Tamiya recommend putting in either a slipper clutch (£60ish!) or a third diff (£35ish) in the middle if you're not using 40-tooth at both ends. The third diff needs to be pretty darned stiff, so I'm doing 7,000 oil at the front, 3,000 at the back, 30,000 in the centre.
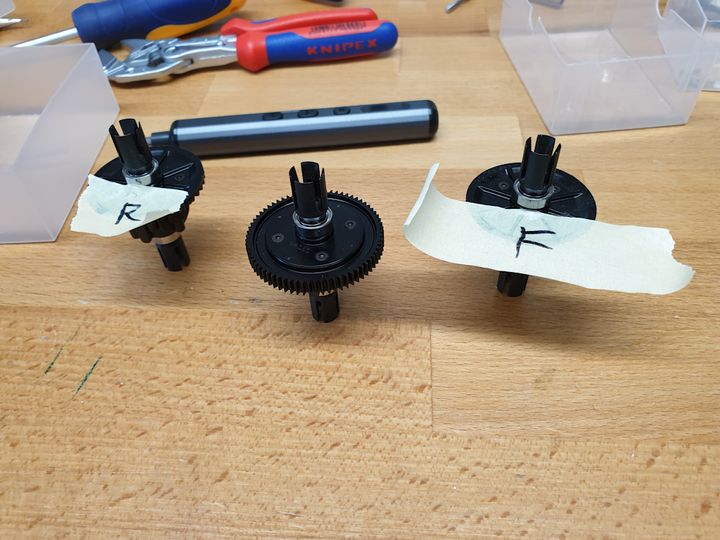
I've got pictures of assembling them if anyone wants. I think they're the same as the TT02 diffs. Anyways, remember to label them.
The XV02 is an AWD rally chassis. The RS bit means it's for road rally, and the Pro bit means you get full ball bearings, some shiny blue bits, hex hardware, and so on.
It comes in a box!
The box is full of stuff. No motor, body, or ESC in this though.
Don't panic. I bought all the extra bits I'll need. And some I technically don't, but decided to add anyway - specifically a centre diff.
First stage. The tub is composite - I think glass reinforced. Aluminium servo mounts and steering mounts go in, with some wood glue to act as threadlock, because wood glue won't attack the plastic like normal threadlock does.
Steering turnbuckles - I tap both ends, Tamiya (in the wrench) for the standard thread, an eBay special (the gold-coated one) for the reverse thread. This makes them both stronger and easier to assemble than trying to drive the turnbuckle straight into the plastic. I tapped everywhere I could on this build.
They attach to some other bits to form the steering linkage, which is ball bearing mounted. Plastic, but slop-free. That goes onto the mounts installed in the first step.
Next the diffs. The XV has the option to have 40-tooth diffs at each end, or to put a 39-tooth at one end or t'other. That lets you create forward bias or reverse bias. I went reverse bias because oversteer is more fun. Tamiya recommend putting in either a slipper clutch (£60ish!) or a third diff (£35ish) in the middle if you're not using 40-tooth at both ends. The third diff needs to be pretty darned stiff, so I'm doing 7,000 oil at the front, 3,000 at the back, 30,000 in the centre.
I've got pictures of assembling them if anyone wants. I think they're the same as the TT02 diffs. Anyways, remember to label them.
Bag B is mostly more drivetrain things.
But begins with assembling the front arms to the lower part of the front diff housing. Teeny bit of wiggle in the arms so I added shims left over from the diffs - 0.1mm each side was just enough.
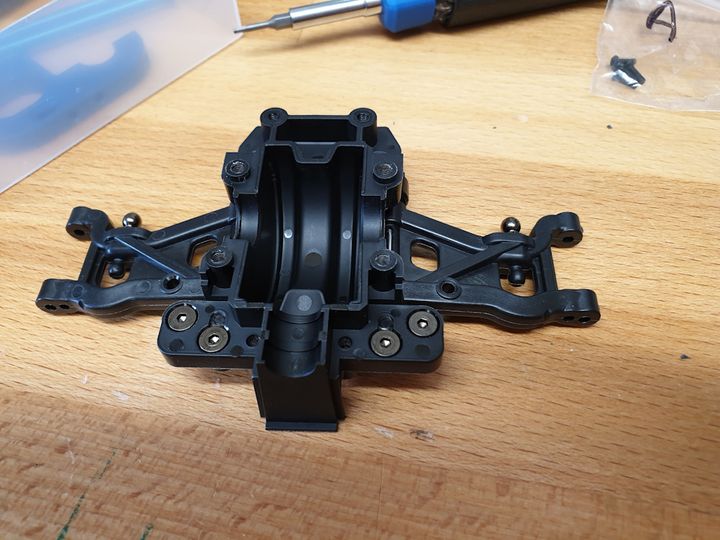
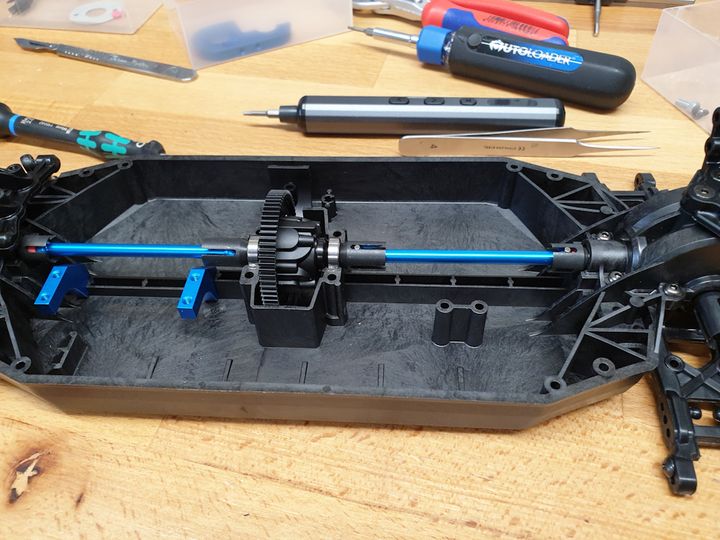
With the tub upside down the diff and its driving gear (note that you get different driving gears to fit with either the 39 or 40 tooth diff) go in.
I found there was a bit of slop here, so added some aluminium duct tape where the bearings sit before putting the cover and suspension arms on. No, really, I didn't have to take it apart and redo it at all, honest. Anyways, here it is done.
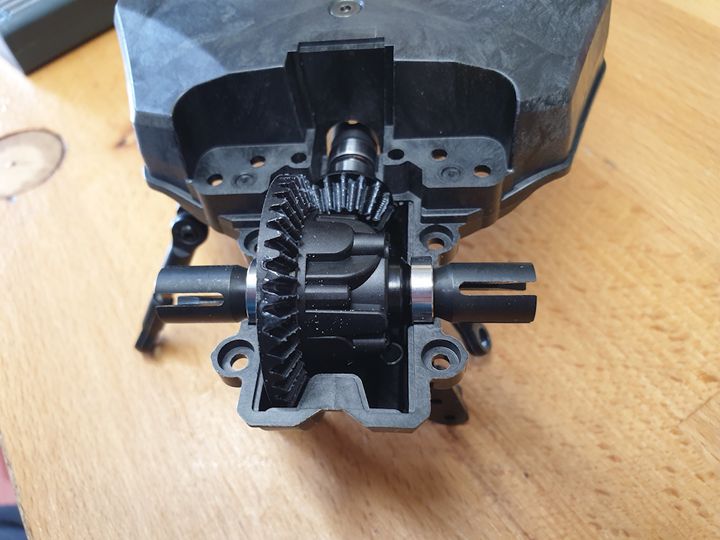
The rear diff and arms are done in exactly the same way, so next is the prop shafts. There are little pink foam bits to go into the ends to stop them rattling; I found one end needed one pink foam, the other needed one and a half. More aluminium tape needed for the centre diff's bearing housings.
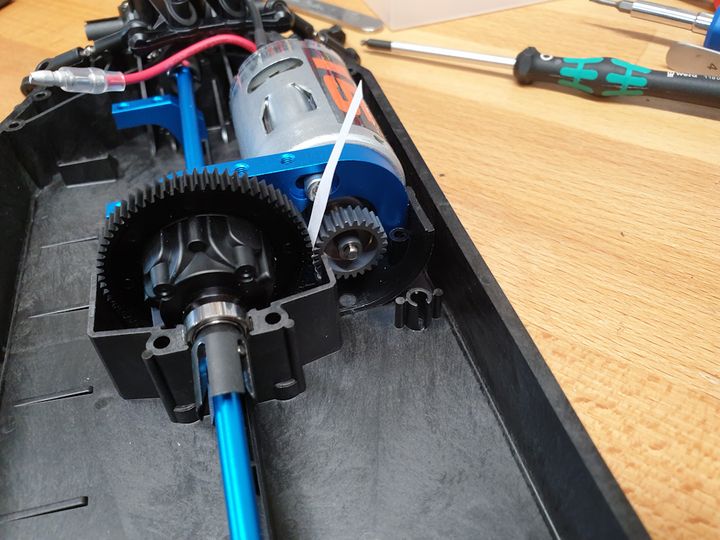
Motor goes in - a fairly modest brushed setup, though these Core RC motors seem fairly punchy. I set the gear mesh with a little bit of paper, because I read that's how to do it, and it seems to work. This is slightly awkward as you can't get to one of the motor screws with it installed, but you can tighten the other one right up, remove the mount, and then tighten the other, and that works OK.
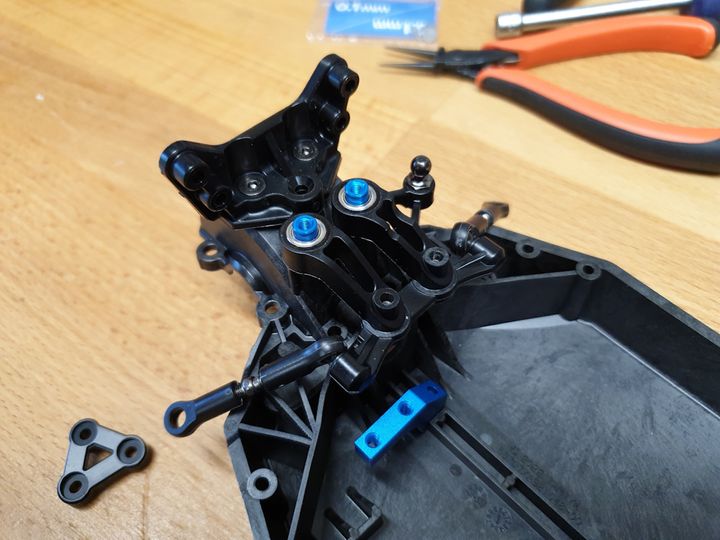
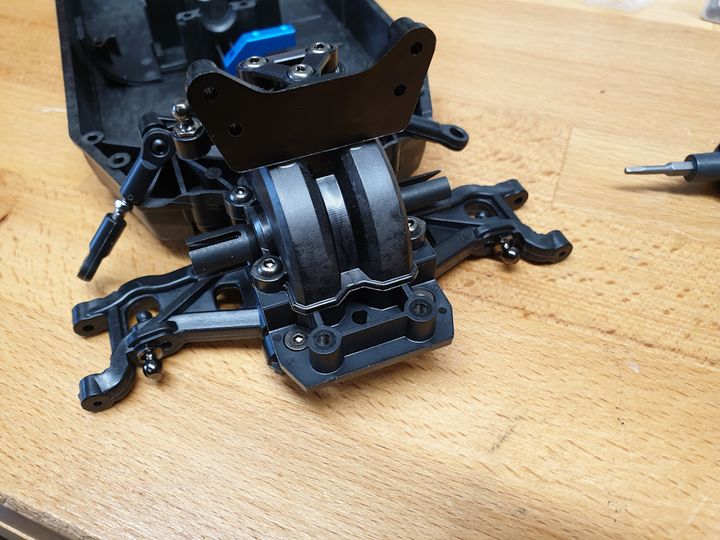
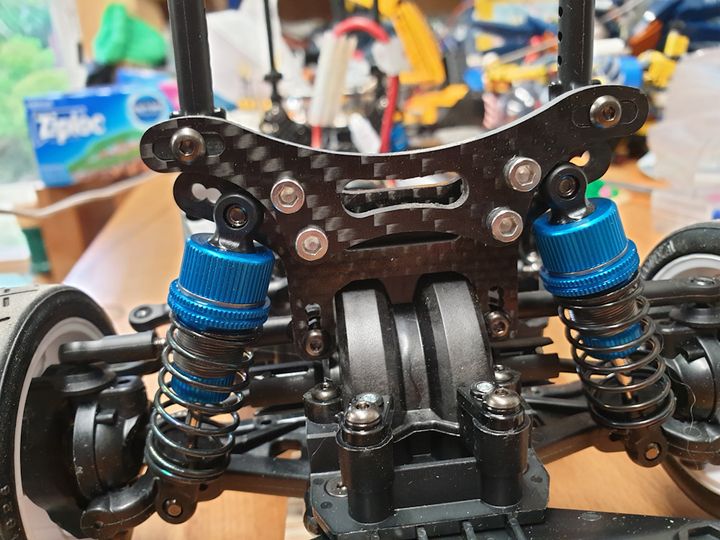
More turnbuckles, and they attach to the carbon fibre shock tower. The RS has shorter towers than the "normal" XV02. Also the turnbuckle ends have little dots on them that say which way they attach to the ball ends. Don't put the shock tower on backwards like I have here.

Next the front bumper goes on, then you rinse and repeat with the rear (though that has a smaller bumper).
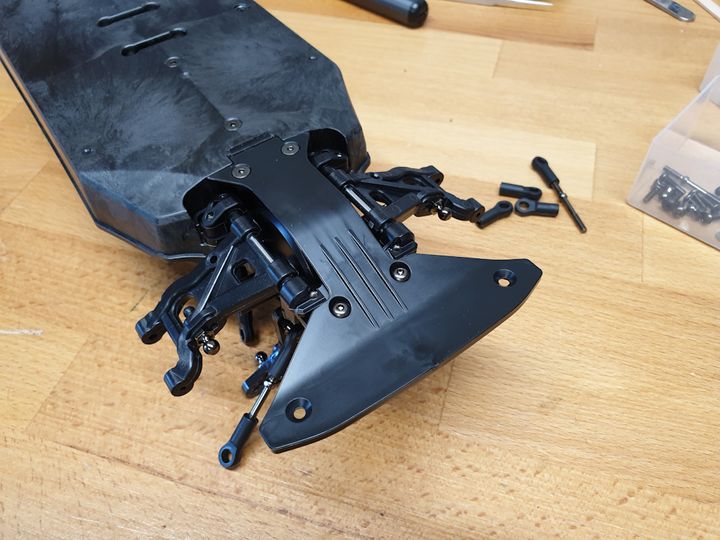
Front universals and the front uprights next.

The rears are similar as you might imagine by this stage. Next the shocks - nice aluminium bodies for these. They're shorter than the non-RS version.
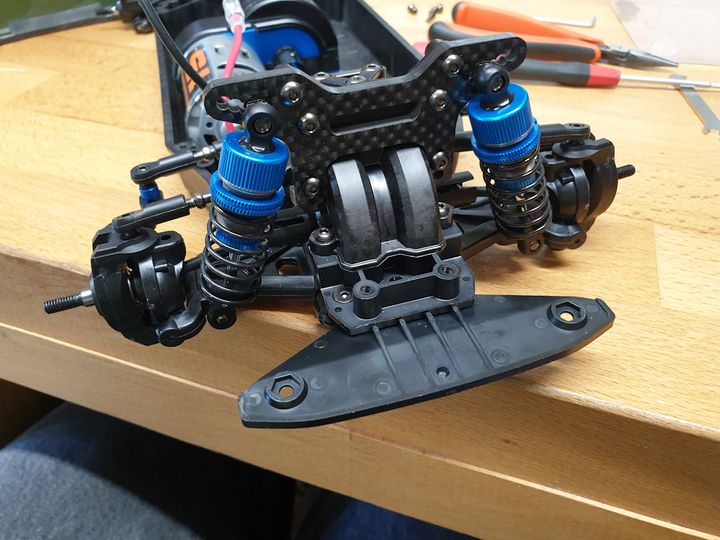
Next is the servo saver, then the servo goes in. Note that the outdrive from the centre diff will rub against the servo unless you trim the corner off its mounting ears. This makes a really weird noise.
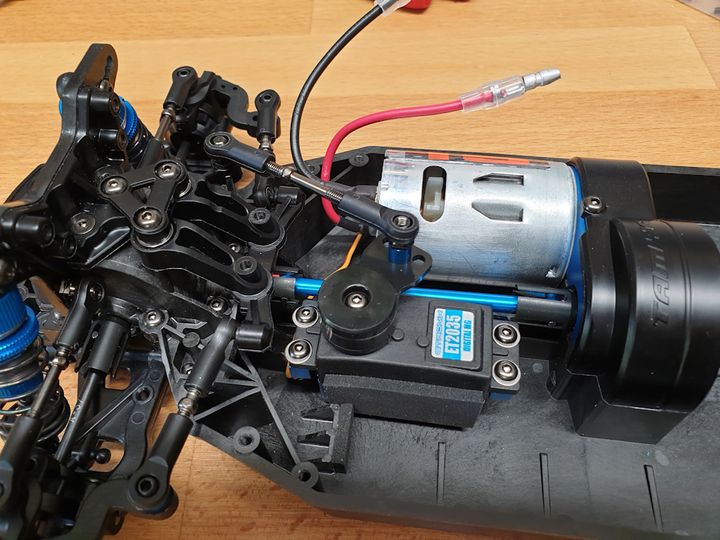
Rest of the electronics go in - those corner bits pivot on a screw to hold the battery in place, which is quite neat. The battery goes vertically, because why not.
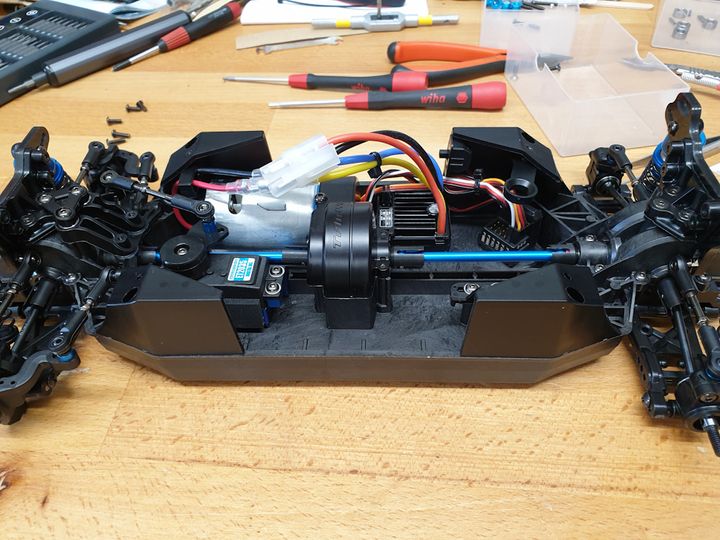
Strangely you get ARB mounts, but no ARBs.
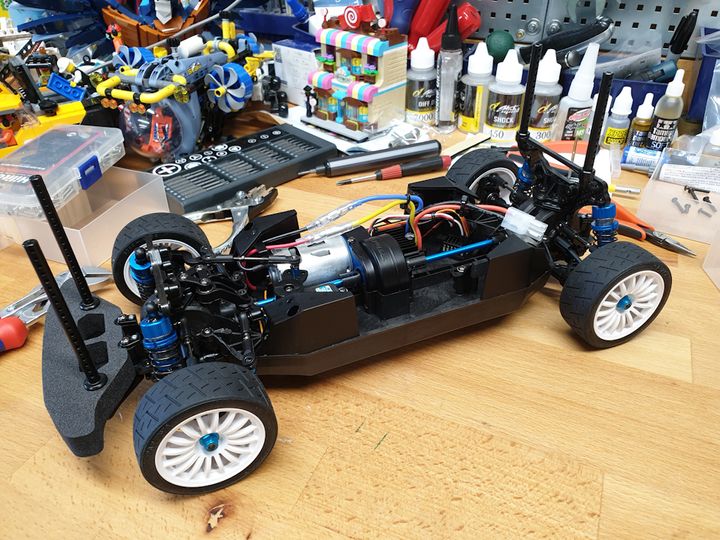
Plastic wheel hexes. BOO.

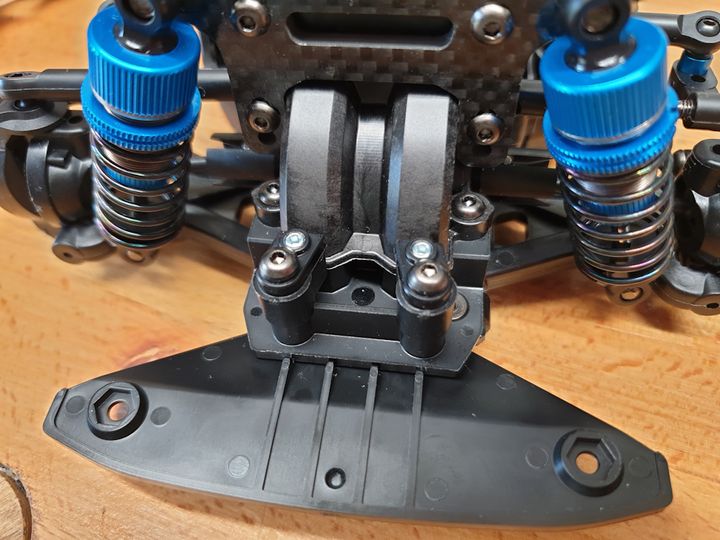
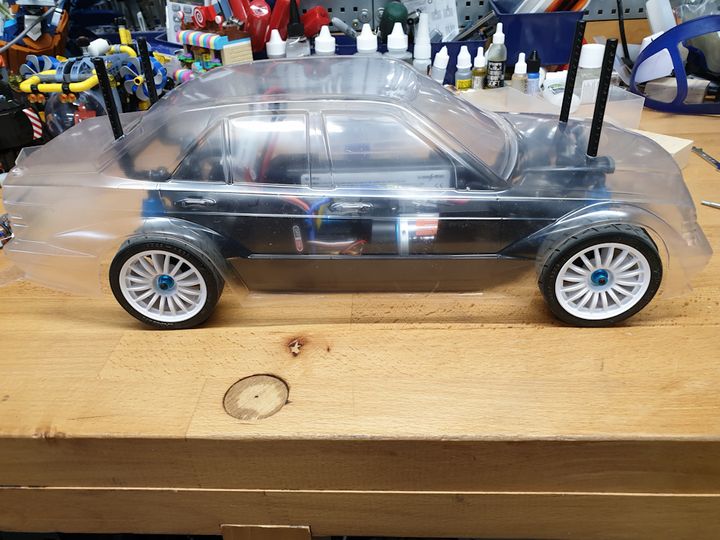
On go the wheels (with foams), and the body mounts, which are in completely the wrong place for literally every body Tamiya has ever made.
At this stage let's skip the bit where I try a Volvo 850 body but discover that when you cut it out the sides splay out by about 4cm, making it completely unusable. Instead I quite like the look of the Tamiya Mercedes 190E body, but it only comes with pre-cut mounting holes in TT01/TT02 positions.
However, with a bit of ingenuity, and some spare spacers from one of the sprues, you can move the rear body mount back to where it'd be on a TT02 chassis. The front is a bit tricker; I ended up designing an fitting a little carbon fibre bracket that takes another set of rear body mounts and positions them where they'd be on a TT02.
Mess around with some washers as spacers and you get to this stage:
Then skip where you trash the first body (anyone who says you can use grime & tar remover to get paint off a polycarbonate body either hasn't tried it, or is particularly cruel). Second attempt goes much better - I'm tempted to put some Max Power style sponsor stickers down by the front doors, but I'll probably keep it classy. This is Tamiya Translucent Red, backed with Iridescent Pink/Gold, backed with Light Gunmetal. It shimmers nicely in the sun.

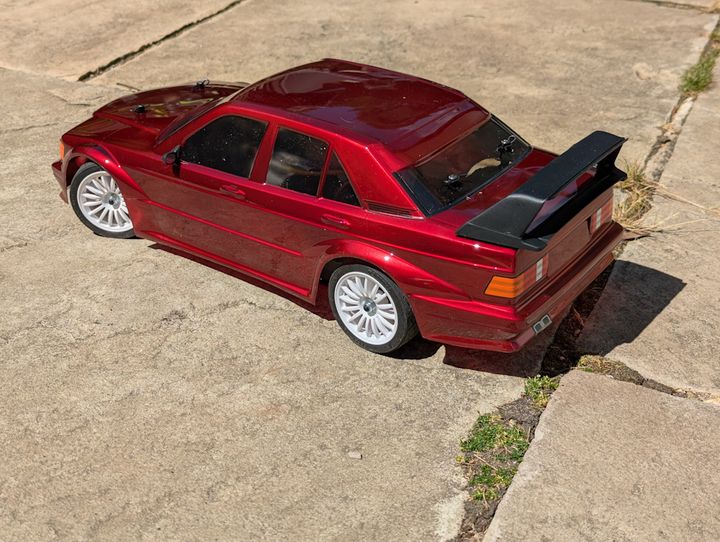
I may well cut a bit of vinyl to go over the top of the rear windscreen as that looks a bit odd at the moment.
Drives very nicely; the rear bias means no understeer ever, and it'll do controlled drifts fairly easily. I should probably get on with selling some of the others I've built to free up space and funds.
But begins with assembling the front arms to the lower part of the front diff housing. Teeny bit of wiggle in the arms so I added shims left over from the diffs - 0.1mm each side was just enough.
With the tub upside down the diff and its driving gear (note that you get different driving gears to fit with either the 39 or 40 tooth diff) go in.
I found there was a bit of slop here, so added some aluminium duct tape where the bearings sit before putting the cover and suspension arms on. No, really, I didn't have to take it apart and redo it at all, honest. Anyways, here it is done.
The rear diff and arms are done in exactly the same way, so next is the prop shafts. There are little pink foam bits to go into the ends to stop them rattling; I found one end needed one pink foam, the other needed one and a half. More aluminium tape needed for the centre diff's bearing housings.
Motor goes in - a fairly modest brushed setup, though these Core RC motors seem fairly punchy. I set the gear mesh with a little bit of paper, because I read that's how to do it, and it seems to work. This is slightly awkward as you can't get to one of the motor screws with it installed, but you can tighten the other one right up, remove the mount, and then tighten the other, and that works OK.
More turnbuckles, and they attach to the carbon fibre shock tower. The RS has shorter towers than the "normal" XV02. Also the turnbuckle ends have little dots on them that say which way they attach to the ball ends. Don't put the shock tower on backwards like I have here.
Next the front bumper goes on, then you rinse and repeat with the rear (though that has a smaller bumper).
Front universals and the front uprights next.
The rears are similar as you might imagine by this stage. Next the shocks - nice aluminium bodies for these. They're shorter than the non-RS version.
Next is the servo saver, then the servo goes in. Note that the outdrive from the centre diff will rub against the servo unless you trim the corner off its mounting ears. This makes a really weird noise.
Rest of the electronics go in - those corner bits pivot on a screw to hold the battery in place, which is quite neat. The battery goes vertically, because why not.
Strangely you get ARB mounts, but no ARBs.
Plastic wheel hexes. BOO.
On go the wheels (with foams), and the body mounts, which are in completely the wrong place for literally every body Tamiya has ever made.
At this stage let's skip the bit where I try a Volvo 850 body but discover that when you cut it out the sides splay out by about 4cm, making it completely unusable. Instead I quite like the look of the Tamiya Mercedes 190E body, but it only comes with pre-cut mounting holes in TT01/TT02 positions.
However, with a bit of ingenuity, and some spare spacers from one of the sprues, you can move the rear body mount back to where it'd be on a TT02 chassis. The front is a bit tricker; I ended up designing an fitting a little carbon fibre bracket that takes another set of rear body mounts and positions them where they'd be on a TT02.
Mess around with some washers as spacers and you get to this stage:
Then skip where you trash the first body (anyone who says you can use grime & tar remover to get paint off a polycarbonate body either hasn't tried it, or is particularly cruel). Second attempt goes much better - I'm tempted to put some Max Power style sponsor stickers down by the front doors, but I'll probably keep it classy. This is Tamiya Translucent Red, backed with Iridescent Pink/Gold, backed with Light Gunmetal. It shimmers nicely in the sun.
I may well cut a bit of vinyl to go over the top of the rear windscreen as that looks a bit odd at the moment.
Drives very nicely; the rear bias means no understeer ever, and it'll do controlled drifts fairly easily. I should probably get on with selling some of the others I've built to free up space and funds.
generationx said:
Ooh excellent thread Sporky, watching with great interest. I m very tempted to get one of these and maybe use a Yaris WRC shell to continue the modern flavour. The only problem I have is hop-up temptation
Is it absolutely full bearings, no plain in sight? CV driveshafts?
Thanks
It is absolutely full bearings, no plastic, no bushings. These are the driveshafts - I think they're CV but not really sure.Is it absolutely full bearings, no plain in sight? CV driveshafts?
Thanks
I definitely enjoyed the build - like the TT02BR it's obviously Tamiya, but with all the things some people don't like about Tamiya solved - better plastics, hex hardware, bearings, etc.
Sporky said:
generationx said:
Ooh excellent thread Sporky, watching with great interest. I m very tempted to get one of these and maybe use a Yaris WRC shell to continue the modern flavour. The only problem I have is hop-up temptation
Is it absolutely full bearings, no plain in sight? CV driveshafts?
Thanks
It is absolutely full bearings, no plastic, no bushings. These are the driveshafts - I think they're CV but not really sure.Is it absolutely full bearings, no plain in sight? CV driveshafts?
Thanks
I definitely enjoyed the build - like the TT02BR it's obviously Tamiya, but with all the things some people don't like about Tamiya solved - better plastics, hex hardware, bearings, etc.
Thank you


Thanks for posting this lot.
generationx said:
Ooh excellent thread Sporky, watching with great interest. I m very tempted to get one of these and maybe use a Yaris WRC shell to continue the modern flavour. The only problem I have is hop-up temptation
Is it absolutely full bearings, no plain in sight? CV driveshafts?
Thanks
Yeah this is what I was thinking. I've got a GR Yaris shell on a MF01X chassis. It might need some WRC company.Is it absolutely full bearings, no plain in sight? CV driveshafts?
Thanks
Hey Sporky
Bit of a long shot but been reading this post and love it how are you finding the Xv02RS?
I would love to be able to fit other bodies to my XV02 RS which iv had for almost two years and have been frustrated with the post position, I have been meaning to
Message you about this and would love to have this fix for the positioning and appreciate you actually worked out a decent way of doing it for the RS and the only one it seems online.
I hope that you see this after so long.
Have a good day KR Jamesy
Honestly it's been on a shelf since I finished - not a comment on the quality, just that I like building much more than driving.
I can dig out the details of the mounts. You need to get a bit of carbon fibre cut, and some longer screws, everything else was in the box I think. Maybe some washers.
I can dig out the details of the mounts. You need to get a bit of carbon fibre cut, and some longer screws, everything else was in the box I think. Maybe some washers.
Hey I didn’t think you would reply so soon awesome. Yeah same with me to be honest I enjoyed building it and found it quite different to other Tamiya kits. I used it a few times start of the year and then the motor or ESC went and I stripped them out and not used it since sadly.
When you can that would be great thank you and I will need to get a company to make the mount I could give it a go, It wouldn’t look no way near as nice as the one you made tho. Good to know I can use the spare hardware I should have something to fit for the screws. The bodyshell you did came out nice love the colour. I have a focus wrc 03 on it currently but would like to use other bodyshells.
Cheers James E
Sorry, I forgot this a bit!
You need one of this for the extra short body mounts:
https://www.modelsport.co.uk/product/tamiya-xv-02-...
Then there are spare spacers on one of the sprues, but I can't remember which, and you'll need some long M3 bolts and a custom bracket to go on the rear.
You need one of this for the extra short body mounts:
https://www.modelsport.co.uk/product/tamiya-xv-02-...
Then there are spare spacers on one of the sprues, but I can't remember which, and you'll need some long M3 bolts and a custom bracket to go on the rear.
Gassing Station | Scale Models | Top of Page | What's New | My Stuff