Guys, I'm gonna need your help.
Discussion


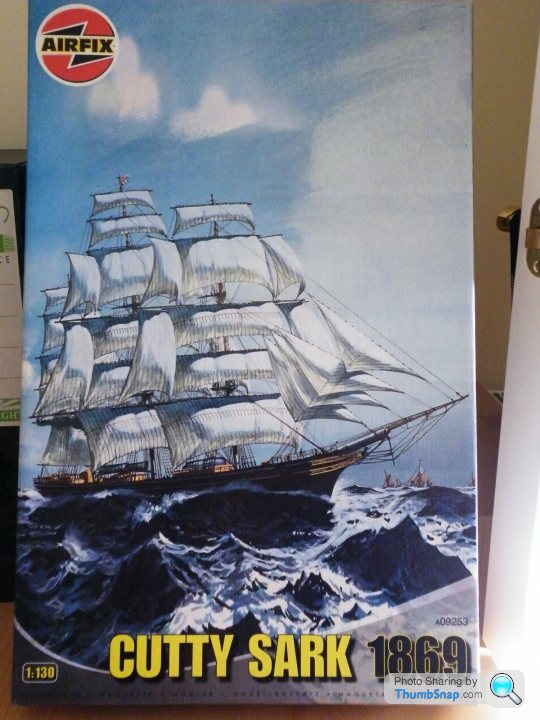
Been thinking aloud around the house recently about building some models again. The last I did were probably 15 years ago and were cars. So on Christmas morning I get a large wrapped box from my daughter with this inside 
Now I am quite keen to get going but know preparation is the key so I am going to get the paints and stuff I need first. But I have some questions.
1. Painting, on the sprues or after assembly?
2. Getting a good finish, painting always lets my modeling down, now I am not about to go and buy an airbrush so any tips on getting a good finish would be much appreciated.
3. I have looked all over the net for pictures of the ship to get ideas for colour etc. It's hard to find any that don't show it as a burnt wreck - I suppose a library might be a good idea.
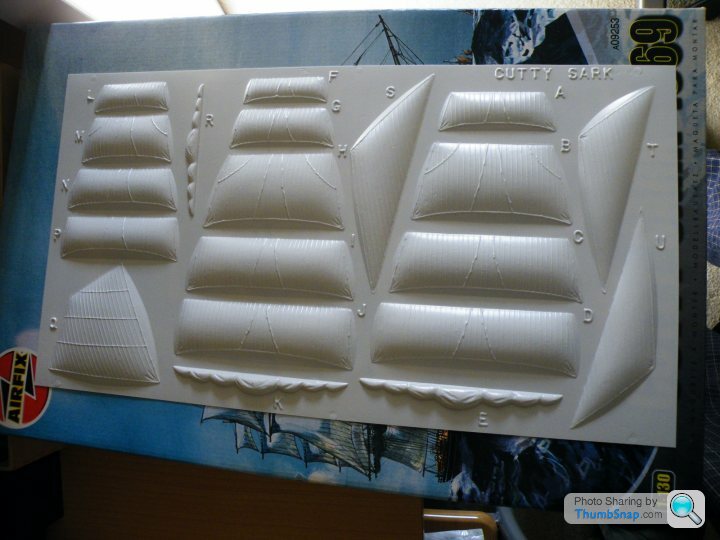
4. Sails. The sails in the kit are blown plastic and look a bit pants IMO, any tips on making some using the card provided as a pattern?
5. Rigging. is all I can say at the moment! Looks like it could be a real mare of a job with my fat fingers! Again, any tips would be much appreciated.
I'll update the thread as I go, if anyone is interested, but time is tight so it's going to be a slow old process!

Now I am quite keen to get going but know preparation is the key so I am going to get the paints and stuff I need first. But I have some questions.
1. Painting, on the sprues or after assembly?
2. Getting a good finish, painting always lets my modeling down, now I am not about to go and buy an airbrush so any tips on getting a good finish would be much appreciated.
3. I have looked all over the net for pictures of the ship to get ideas for colour etc. It's hard to find any that don't show it as a burnt wreck - I suppose a library might be a good idea.
4. Sails. The sails in the kit are blown plastic and look a bit pants IMO, any tips on making some using the card provided as a pattern?

5. Rigging.
is all I can say at the moment! Looks like it could be a real mare of a job with my fat fingers! Again, any tips would be much appreciated.I'll update the thread as I go, if anyone is interested, but time is tight so it's going to be a slow old process!
T89 Callan said:
RE Paint finish, I have found that oil paints give a better/smoother finish than the new acrylic paints from Tamiya and Revell.
RE Sails, I suspect a quick serch of ebay/internet will find you an add-on pack designed for this kit that will give you decent sails and other nice bits.
As for painting on the spru's I don't as you usually need to remove the moulding flash and clean up were th sprus met so you need to paint them again.
Just don't rush.
Thanks, will get a look about for the paints. Having seen the post above, without sails looks quite nice! RE Sails, I suspect a quick serch of ebay/internet will find you an add-on pack designed for this kit that will give you decent sails and other nice bits.
As for painting on the spru's I don't as you usually need to remove the moulding flash and clean up were th sprus met so you need to paint them again.
Just don't rush.

Big Al. said:


Need any help give me a shout.

BTW we have Sussex Model Center in Worthing to get all your gubbins, pop over and we'll make an afternoon of it.
ETA, you should remember the colour scheme weren’t you there at the launch!
Might be worth a pop over mate, got summat to drop off at yours anyway. 
At the launch
 that's rich coming from you.
 dr_gn said:
Oh. My. God.
To explain further: I completed the Airfix HMS Victory earlier this year. It took months, and was possibly the worst kit I have ever had the misfortune of building. The black plastic is brittle, the masts were bent, the engineering of the kit made painting extremely difficult, and the fit of the parts was pretty atrocious (even when the huge amounts of flash had been carved off).
That's kind of what I thought. There does seem to be a lot of excess all over, so a fair bit of tidying is going to have to be done.To explain further: I completed the Airfix HMS Victory earlier this year. It took months, and was possibly the worst kit I have ever had the misfortune of building. The black plastic is brittle, the masts were bent, the engineering of the kit made painting extremely difficult, and the fit of the parts was pretty atrocious (even when the huge amounts of flash had been carved off).
dr_gn said:
I brush painted the lot, except for an overcoat of satin varnish which I airbrushed. Regarding the rigging: by the time I got that far I'd had enough and just followed the instructions, which give the absolute minimum information. You really can get very quickly in too deep with rigging if you wanted to replicate it exactly. These Airfix models aren't detailed enough to have all the pulley blocks and tie-off points to make a really accurate model (without loads of scratch building).
Following the instructions is all I am capable of doing, so it will be a long haul, I am prepared for that much.dr_gn said:
Personaly, I'd leave the sails off altogether.
I built the Revell version of the Cutty Sark years ago; it is a good looking ship, but you will need patience.
Have fun!
Leaving sails off is now my preferred option at this point.I built the Revell version of the Cutty Sark years ago; it is a good looking ship, but you will need patience.
Have fun!
Thanks for the input, really useful.
 Maybe I should build the kit as the ship is currently, I think then I'd only have to make the hull Oh, and an effigy of Big Al tied to the main mast.
Edited by .Mark on Monday 4th January 08:56
dr_gn said:
Oh. My. God.
To explain further: I completed the Airfix HMS Victory earlier this year. It took months, and was possibly the worst kit I have ever had the misfortune of building. The black plastic is brittle, the masts were bent, the engineering of the kit made painting extremely difficult, and the fit of the parts was pretty atrocious (even when the huge amounts of flash had been carved off).
That's kind of what I thought. There does seem to be a lot of excess all over, so a fair bit of tidying is going to have to be done.To explain further: I completed the Airfix HMS Victory earlier this year. It took months, and was possibly the worst kit I have ever had the misfortune of building. The black plastic is brittle, the masts were bent, the engineering of the kit made painting extremely difficult, and the fit of the parts was pretty atrocious (even when the huge amounts of flash had been carved off).
dr_gn said:
I brush painted the lot, except for an overcoat of satin varnish which I airbrushed. Regarding the rigging: by the time I got that far I'd had enough and just followed the instructions, which give the absolute minimum information. You really can get very quickly in too deep with rigging if you wanted to replicate it exactly. These Airfix models aren't detailed enough to have all the pulley blocks and tie-off points to make a really accurate model (without loads of scratch building).
Following the instructions is all I am capable of doing, so it will be a long haul, I am prepared for that much.dr_gn said:
Personaly, I'd leave the sails off altogether.
I built the Revell version of the Cutty Sark years ago; it is a good looking ship, but you will need patience.
Have fun!
Leaving sails off is now my preferred option at this point.I built the Revell version of the Cutty Sark years ago; it is a good looking ship, but you will need patience.
Have fun!
Thanks for the input, really useful.
Maybe I should build the kit as the ship is currently, I think then I'd only have to make the hull Oh, and an effigy of Big Al tied to the main mast.Edited by .Mark on Monday 4th January 09:12
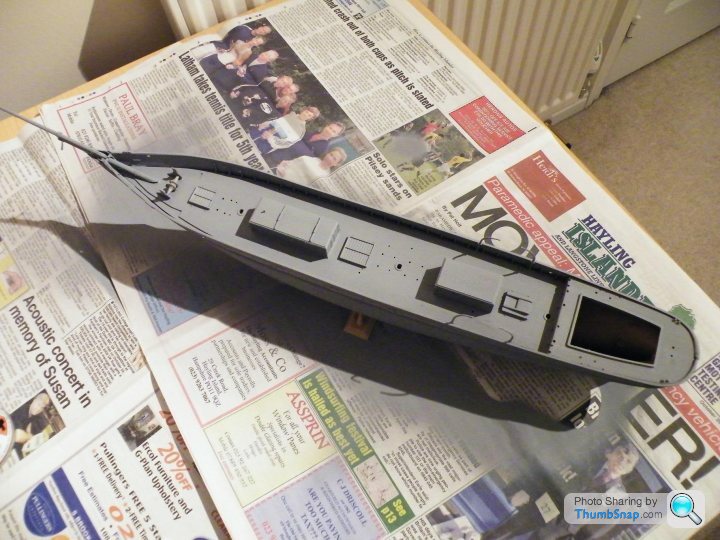
So, I unpacked it and checked the parts. Few bits and pieces broken, such as railings and the settings. Emailed Airfix to see what they say, I am guessing they will send new bits. Won't start until they reply though in case I have to return the whole thing.
Pity, because those parts don't come in to play until later.
Pity, because those parts don't come in to play until later.
That's a nice looking model, and well built sir. In all honesty, I'd never get round to selling the one I have, couldn't justify buying another, so I am going to have to stick with it.
Fully appreciate it may turn out to be a load of old cack, but I'll give it a shot. Keep up the tips though, I'll need 'em!
Fully appreciate it may turn out to be a load of old cack, but I'll give it a shot. Keep up the tips though, I'll need 'em!
dr_gn said:
.Mark said:
Pardon the ignorance, but the detail on the hull etc. is not great, would the primer not fill some of it - or do you mean just a light dusting?
Halfords Plastic Primer should be fine, and you should be able to build up to a decent uniform grey or white without losing any real detail. Filler primer on the other hand will obscure everything within about 3 coats.
 Off to Halfrauds I go.
OK so I have made a start. Remember guys this is the first model in over - well probably 20 years! Still waiting for some parts from Airfix but can plod on for a bit still. Seem to have lost some of the decking detail with the primer but it's still just about there - shouldn't be so heavy handed!
Question is, should I start to paint now or prime everything and paint after build is complete - but before rigging obviously.
Question is, should I start to paint now or prime everything and paint after build is complete - but before rigging obviously.

dr_gn said:
So far so good.
Personally, I'd paint what you've got now. Looks like there is still a bit of a gap on the stern: get rid of it now or it will bug you later!
Yes, I had noticed that - it's on the list.Personally, I'd paint what you've got now. Looks like there is still a bit of a gap on the stern: get rid of it now or it will bug you later!
dr_gn said:
Just take your time with the painting: get a good quality, wide brush for the hull and deck colours.
Keep up the good work!
Daughter is an artist - plentiful supply of brushes Keep up the good work!

There are some real fine detailing though that need to be gold - ships name in various places and other stuff. Even a 1 hair brush would probably be too big! What's the best way to tackle this? I had thought about some paint on a sponge or something and gently press it on - the detail that needs to be gold is raised obviously.

That's pretty impressive - will get some practice in.
Been looking at a lot of builds on the web and there are a whole variety of different colour schemes going on. Some use lots of black, others use white here and there - none I have seen match the Airfix colour plans.
Is there a proper way to complete this or is down to preference and a bit of artistic license?
So for those of you bored enough, an update.
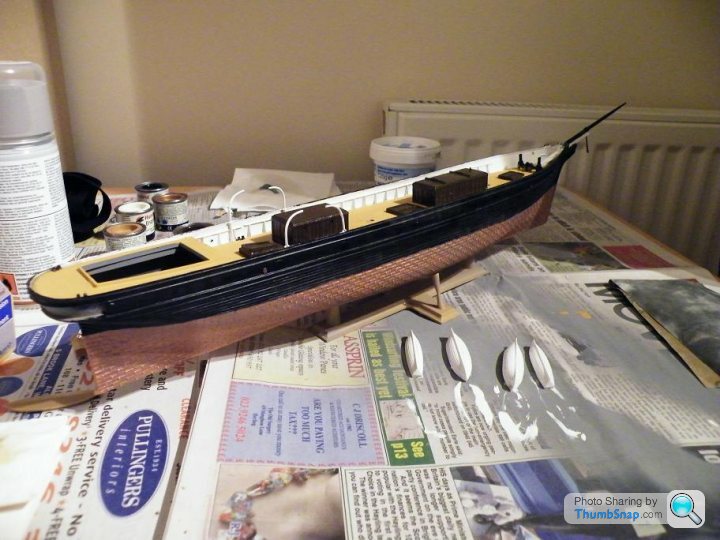
Lessons learnt so far. Have a mental walk through of the build, I wish I had painted some parts before assembly, there is plenty of touching up going on currently over painting bits I have 'gone over the lines on'. So hull is only on 1st coat, rest of deck etc. is more or less done, a few touching in here and there.
Still waiting for Airfix to send the replacement broken parts - been waiting weeks now!
Overall I am pretty pleased with it so far. Not rushing (you can tell by the dates of posts!) but I am enjoying it.

Lessons learnt so far. Have a mental walk through of the build, I wish I had painted some parts before assembly, there is plenty of touching up going on currently over painting bits I have 'gone over the lines on'. So hull is only on 1st coat, rest of deck etc. is more or less done, a few touching in here and there.
Still waiting for Airfix to send the replacement broken parts - been waiting weeks now!
Overall I am pretty pleased with it so far. Not rushing (you can tell by the dates of posts!
) but I am enjoying it.dr_gn said:
From the photo, it looks very, very good to me. Well done.
BTW regarding filler: I have recently re-discovered "Milliput", which is a 2 part filler, and can be smoothed with water (ie a suitably moistened finger). No laughing please.
Thanks, very kind. BTW regarding filler: I have recently re-discovered "Milliput", which is a 2 part filler, and can be smoothed with water (ie a suitably moistened finger). No laughing please.

I did say I would get round to the filler and I should. It's just at the moment the gap is not bothering me too much. Going to a model shop later so I will look out for it.
The gap - bcause there is only really one (so far) is at the stern where the 2 halves of hull meet at the deck. Like I say, not bothering me a great deal, but will see how many times I look at it from the corner of my eye through the build. It won't be hard to rectify even when the ship is complete.
Bet you thought I'd given up!
Have added some deck stuff, but it's real fiddly, need to realign some of the guard rails and touch up where I trimmed the parts from the Sprue. Quite pleased with the dry brushing on the ladders on the deck structures but not happy with the results on the hull where the name is and intricate woodwork. Too embarrassed to show you here - any tips? Sand it gently back or use a paint stripper of some sort?
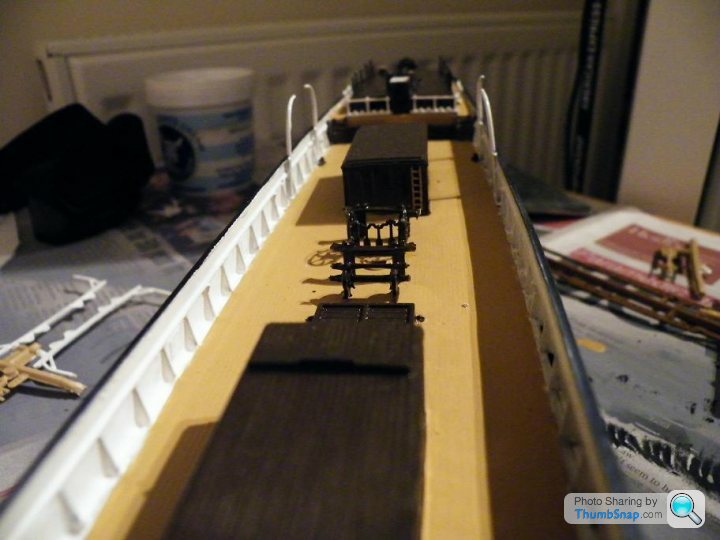
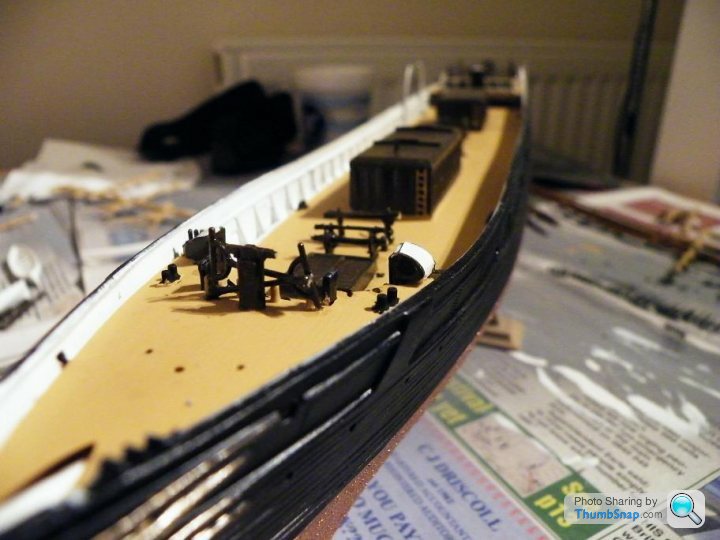
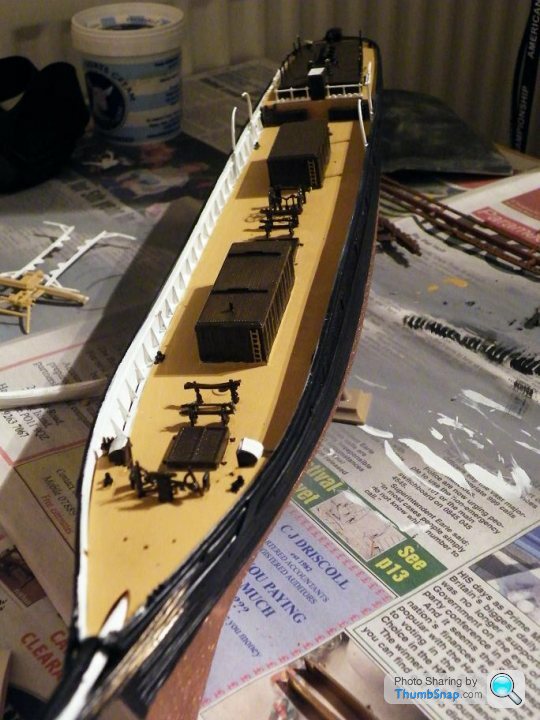
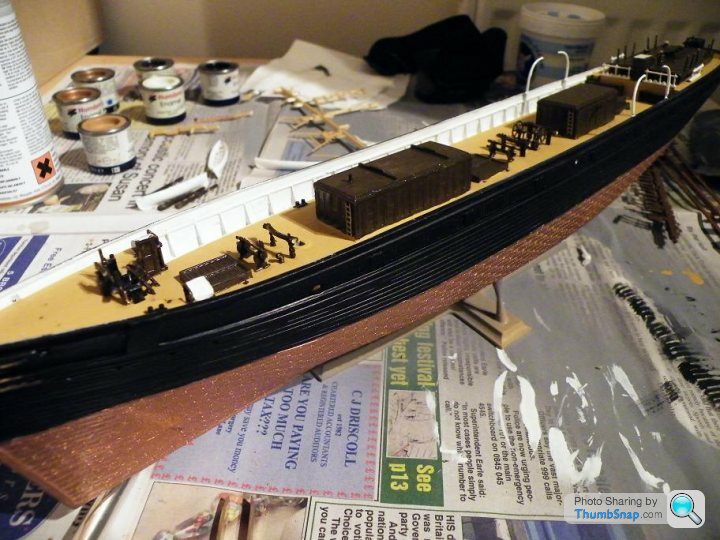
Have added some deck stuff, but it's real fiddly, need to realign some of the guard rails and touch up where I trimmed the parts from the Sprue. Quite pleased with the dry brushing on the ladders on the deck structures but not happy with the results on the hull where the name is and intricate woodwork. Too embarrassed to show you here - any tips? Sand it gently back or use a paint stripper of some sort?


dr_gn said:
Did you have too much paint on the brush?
Yeah, got too cocky. The ladders went really well so I waded in - should have known better. Noticed one side of the hull where I want to paint is quite badly deformed during moulding, that'll be the side that faces the wall I did notice it to start but now it's all painted it has brought it out.Gassing Station | Scale Models | Top of Page | What's New | My Stuff