New restoration project - what have I done!
Discussion


Thanks everyone! All great comments as much appreciated!
Not sure on value to be honest, and it's a niche house, so only worth as much as someone's willing to pay for it!
Had a good day today, anyone spot the new progress!
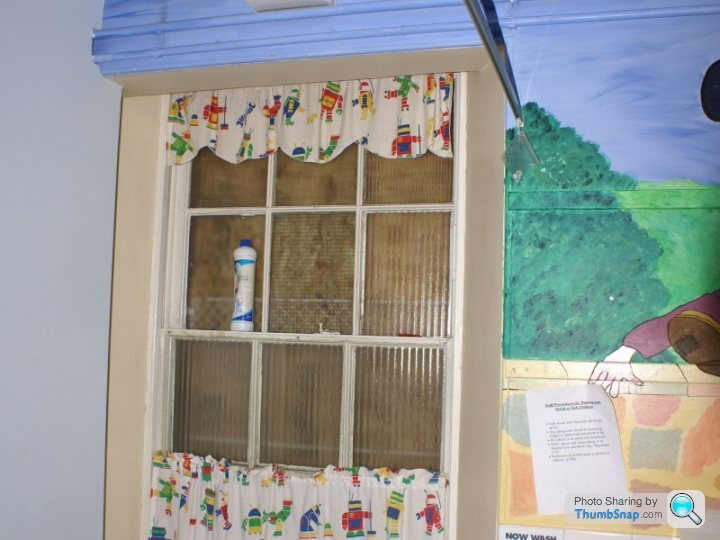
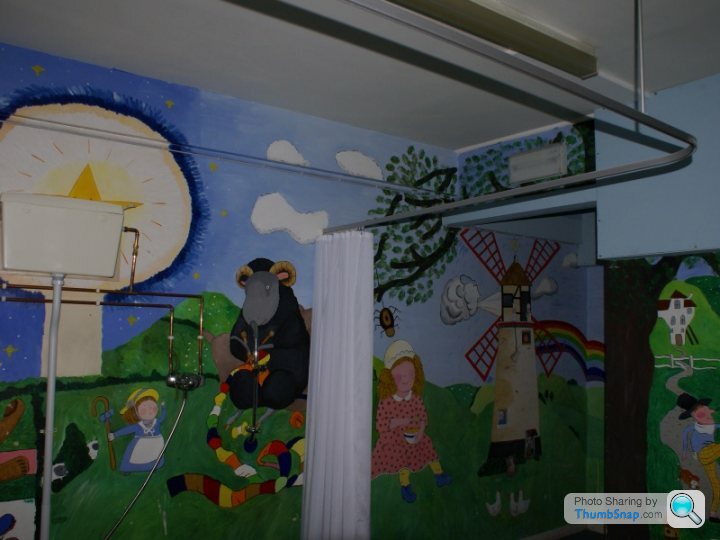
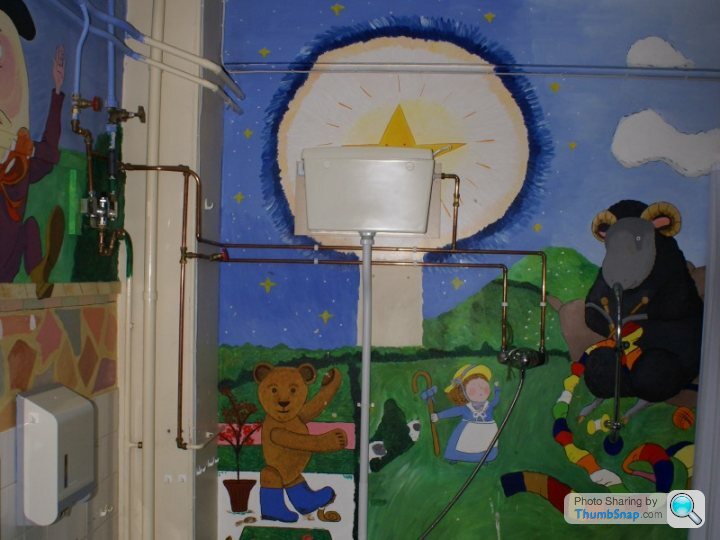
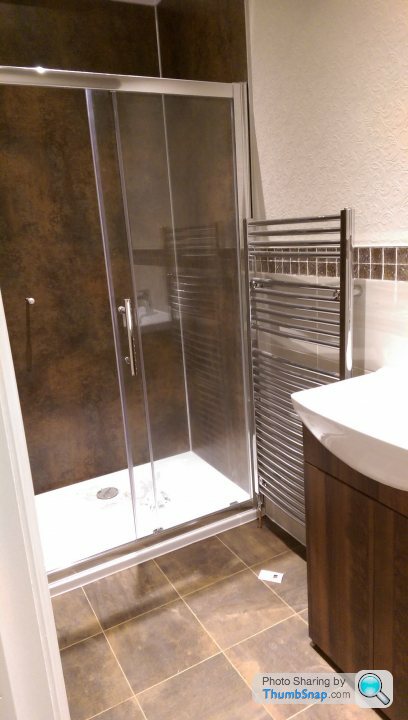
Managed to get some better shot of bedroom 6 ensuite, got this siliconed up today and cleaned down, just the shower and toilet seat to fit now and we've got a finished room!
And the next phase of work starts soon....
Not sure on value to be honest, and it's a niche house, so only worth as much as someone's willing to pay for it!
Had a good day today, anyone spot the new progress!
Managed to get some better shot of bedroom 6 ensuite, got this siliconed up today and cleaned down, just the shower and toilet seat to fit now and we've got a finished room!
And the next phase of work starts soon....
The Moose said:
Lighting 
Spot on! As Clarkson would say "POWER!" for the first time in a lot of years we have power on the ground floor, admittedly not everywhere, but now 3 rooms have full sockets and lights and the other rooms have mostly lights, big step forward as the extension leads were really starting to frustrate me! We, (electricians and myself) managed to get about 80% of the lights, sockets and switches fitted over the last two days, and after a £370 bill for RCBO's for the ground floor / main board we have some juice flowing!
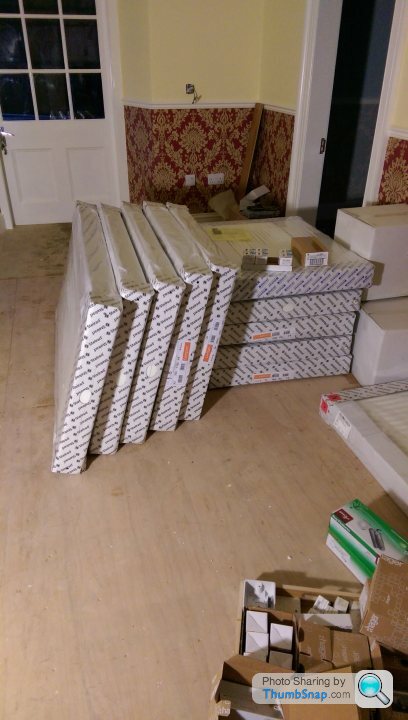
Have got another 56m2 of flooring arriving tomorrow, which should keep us busy next week! Also, got the next 11 radiators to fit, so all being well should have full power and heating by Christmas, which might mean a chance of getting a few days off over the holidays!
Some more progress has been made!
Some time off work for the Christmas holidays has allowed us to push on!
Another big milestone reached recently......Heating!
All radiators now fitted (except one bathroom towel rad) and connected, and the system working! Sooooooo much nicer to work in a warm, light space with sockets everywhere that work and not in full artic gear with site lights and a hundred extension leads running everywhere!
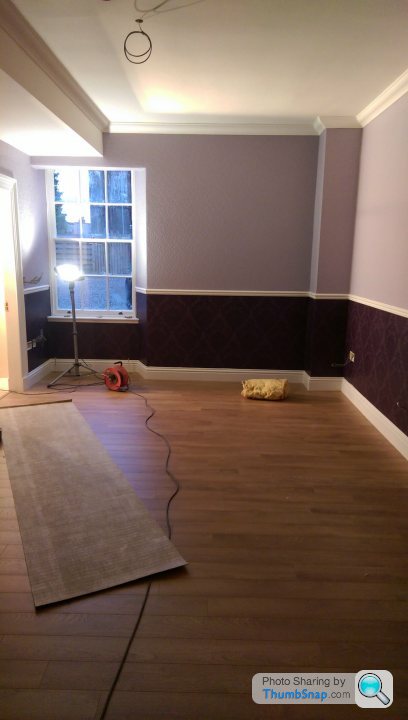
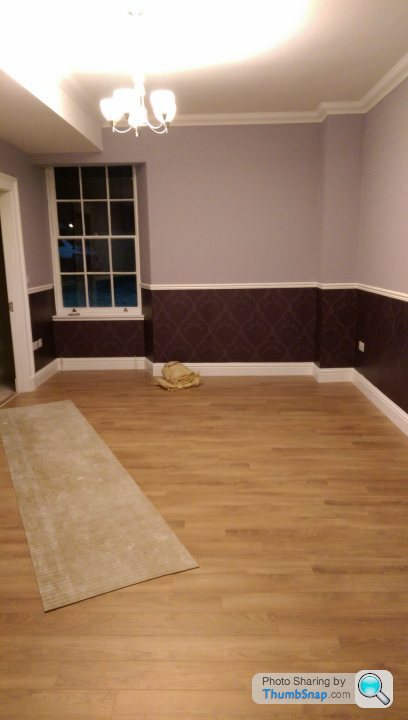
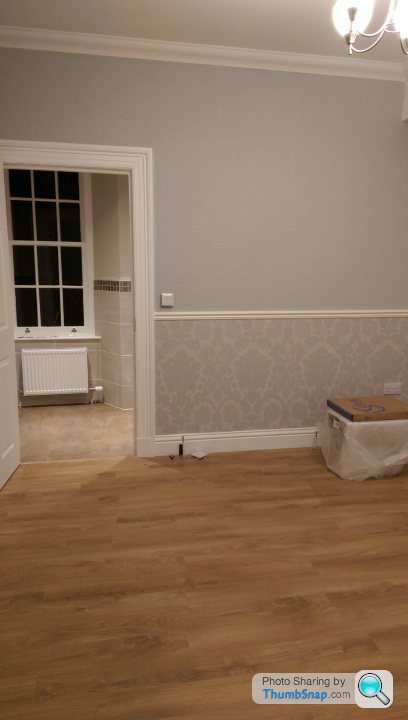
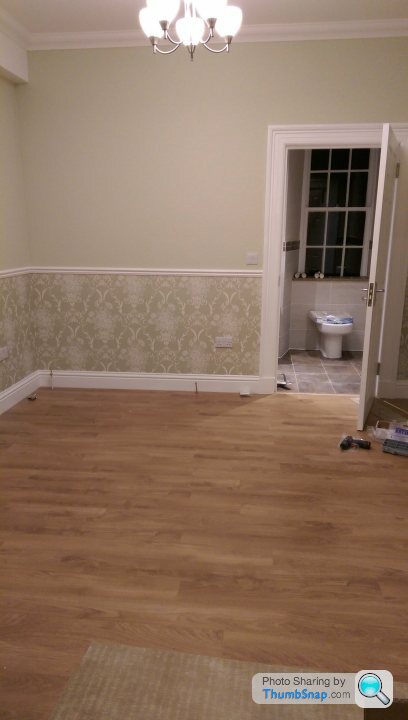
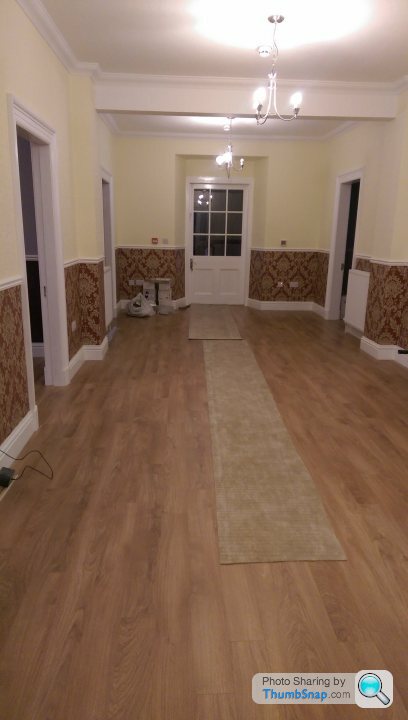
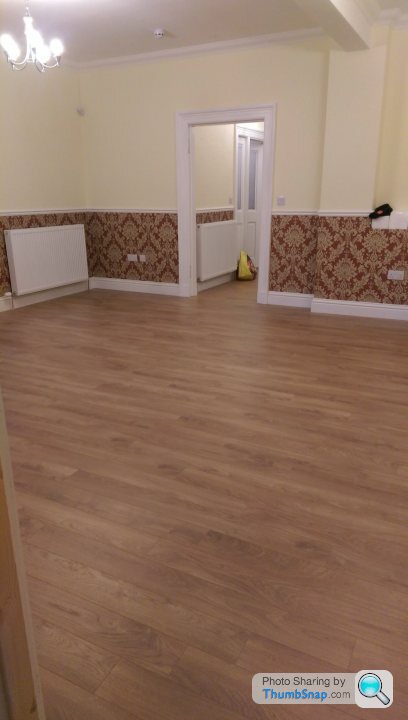
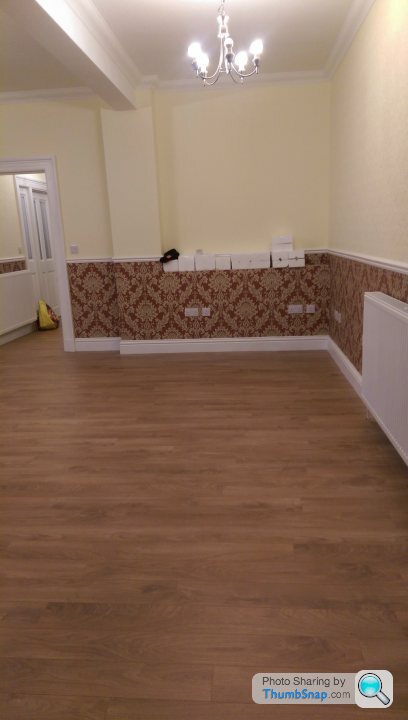
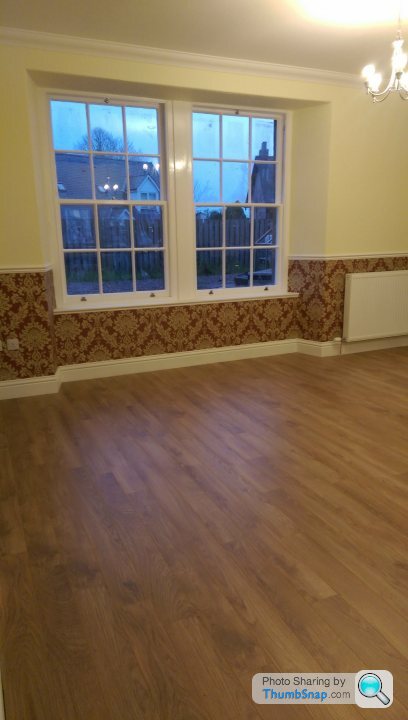
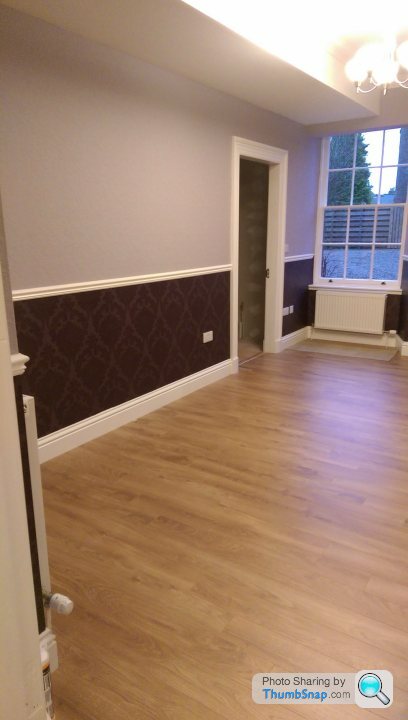
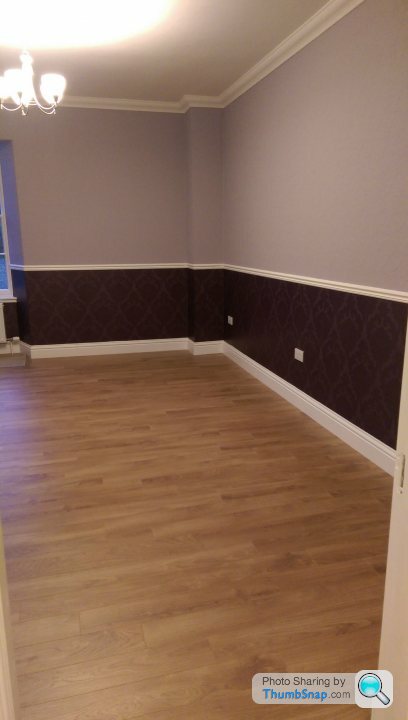
The lower hall is now almost complete, wall papering and decoration is complete and floors laid, the big room is also done and ready for a few final details and some painting of a few things, but 95% complete.
Here's a few more pictures
Bedroom 5
Some time off work for the Christmas holidays has allowed us to push on!
Another big milestone reached recently......Heating!
All radiators now fitted (except one bathroom towel rad) and connected, and the system working! Sooooooo much nicer to work in a warm, light space with sockets everywhere that work and not in full artic gear with site lights and a hundred extension leads running everywhere!
The lower hall is now almost complete, wall papering and decoration is complete and floors laid, the big room is also done and ready for a few final details and some painting of a few things, but 95% complete.
Here's a few more pictures
Bedroom 5
Backtobasics said:
Quick question, bedroom 6 ensuite appears to have paneling in the shower cubicle rather than tiling (apologies if I'm wrong), which type did you use? I've been looking at similar for an ensuite at my house.
Yes, it's wet walled in the shower and tiled around the rest of the room. Wet wall is from Multipanel and its called patina bronze.Small update time, to be fair Christmas was a time for either a) eating, drinking & spending time with the family and friends or b) working my guts off in the house! Ok, I chose a!
But.... I did do some work! One of the projects that had been back burnered was to get the fish tank live and running!
Well, after 3 days of faffing about with pipes, water, fish, rocks and electrical stuff we now have the following talking point in the house!
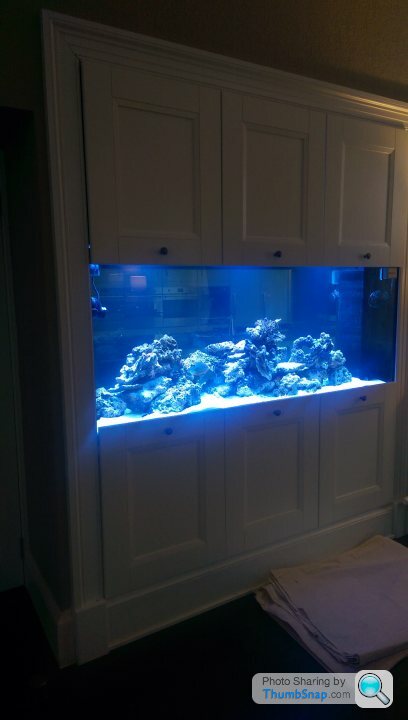

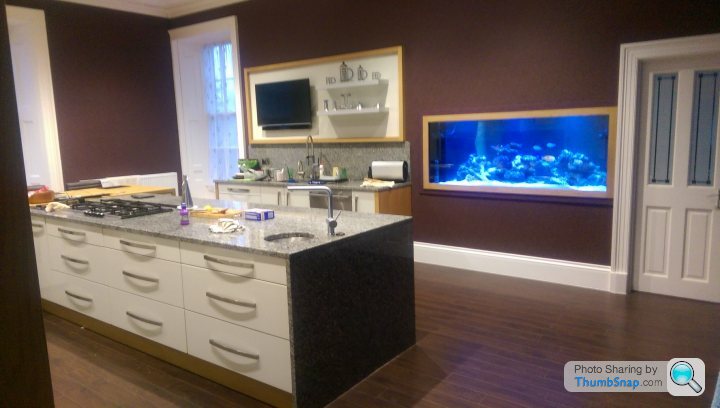
But.... I did do some work! One of the projects that had been back burnered was to get the fish tank live and running!
Well, after 3 days of faffing about with pipes, water, fish, rocks and electrical stuff we now have the following talking point in the house!
BigTom85 said:
This project really is awe inspiring.
Have you had professional help with the styling? It really does look spot on imho. Well done indeed.
Cheers Tom, not sure if awe inspiring is a bit of an exaggeration, but thanks anyway! Have you had professional help with the styling? It really does look spot on imho. Well done indeed.
All design work, colour and finish choices and layouts have been done by myself and my wife.
Ug_lee said:
I echo this, such a massive amount of work has gone into this I really don't know how GB finds the time to do this along with work and family, I am in awe!
I've a Georgian property that is nowhere near the size of this and I'm finding out the hard way just how much more involved and difficult it is to get everything 100% compared to a new build. I definitely have days where after lots of graft the only thing that has progressed is the number of further issues to sort before I can get back to where I initially started!
Griffboy, I may have missed this but did you find many problems with the house regarding the roof and the structure? I'd love to get to a point in mine where I can concentrate on the interior but mine keeps on throwing up hidden horrors before doing the nice stuff??
Cheers lee, I feel your pain! Old houses in my option give so much in the way of character, history, space, height and features, yet are so good at taking it all away again with problems, maintenance, restrictions and labour! To me it's been worth it, but now I need a rest, as so far since I've started this I've developed trigger finger from a damaged tendon, a compacted vertebrae in my back, and added a fair few scars that I didn't have before! (Mentally and physically!) oh, and gin consumption has risen dramatically! I've a Georgian property that is nowhere near the size of this and I'm finding out the hard way just how much more involved and difficult it is to get everything 100% compared to a new build. I definitely have days where after lots of graft the only thing that has progressed is the number of further issues to sort before I can get back to where I initially started!
Griffboy, I may have missed this but did you find many problems with the house regarding the roof and the structure? I'd love to get to a point in mine where I can concentrate on the interior but mine keeps on throwing up hidden horrors before doing the nice stuff??
Structure problems, yes, it's all in the blog, but the worst was dry rot caused by an un maintained leaking gutter on the stair turret which meant that one of the main supporting beams of the staircase had to be replaced with a steel support. It was a 18" x 18" chestnut beam IIRC so wasn't a 5 min job to replace, especially as I had to support the entire staircase from ground to top floor whilst it was being changed. Roof wise, we were ok, it needed repointing on the end gables, and quite a lot of replacement slates, but structurally it was sound, and very well supported, so no sagging. Being in Scotland, it's constructed with sparking boards underneath, so this helps the rigidity if it. It will one day need re slating, but not for a few years!
I have two kids, 15 and 12, (I think!) and they have grown up to me working long hours, and to be fair they have both also been down to help, especially with the work on their own rooms, as I wanted them to feel a level of ownership to the work... Whether it worked or not is hard to say, according to my son the best thing he loves about living here is the 80mb download speed! (2mb in my last house!)
It's been pointed out to me that I've not updated this for a while.........
So! Been doing some work out the back of the house. Dedicated listeners might remember I dug a flower bed a year ago, 25m long x 1.2m wide, with the aid of a digger!
There was also an open area at the rear of the house which needed to be sorted to stop the dog escaping. (Houdinis love child!)
So, after sorting out the bed, membrane fitted, and 1 tonne of chipbark (literally!) and some jump poles, it looked like a flower bed, just need to save up some penny's to fill it in with plants!
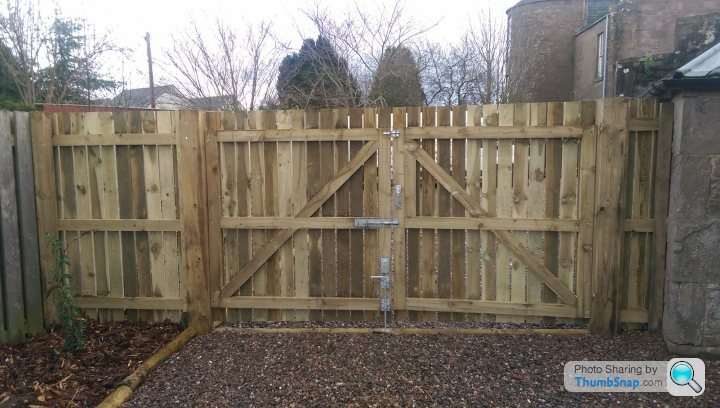
Also, set a pair of 6" posts into the ground for a pair of double gates, just in case we have to get vehicles round the back of the house, and formed a small fence section and made a pair of gates. 1800high x 2900mm wide. First time I've ever built gates, but seemed to come out ok!
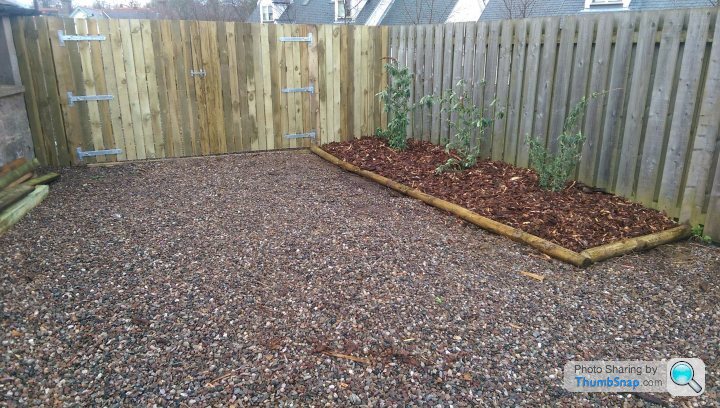
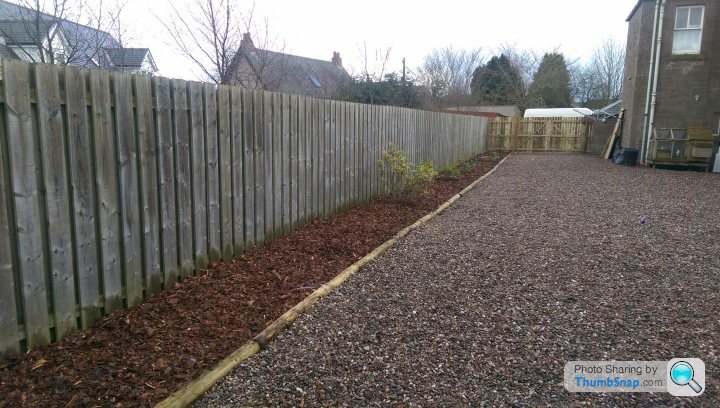
So! Been doing some work out the back of the house. Dedicated listeners might remember I dug a flower bed a year ago, 25m long x 1.2m wide, with the aid of a digger!
There was also an open area at the rear of the house which needed to be sorted to stop the dog escaping. (Houdinis love child!)
So, after sorting out the bed, membrane fitted, and 1 tonne of chipbark (literally!) and some jump poles, it looked like a flower bed, just need to save up some penny's to fill it in with plants!
Also, set a pair of 6" posts into the ground for a pair of double gates, just in case we have to get vehicles round the back of the house, and formed a small fence section and made a pair of gates. 1800high x 2900mm wide. First time I've ever built gates, but seemed to come out ok!
Kateg28 said:
Well that took a couple of hours to read.
What an epic project. The bit that really stuns me is the vision to take the school and see what a beautiful house it could be.
Have I missed the updated floor plans?
Thanks Kate! What an epic project. The bit that really stuns me is the vision to take the school and see what a beautiful house it could be.
Have I missed the updated floor plans?
It's been a real labour of love. As regards the vision, a lot of it was trying to return it to its original state (before the council got their hands on it!) to be honest when I bought it we couldn't hardly see anything inside, as it had no power and all the windows were boarded up, so we had to make a decision after viewing it with torches and screwdrivers! Seems a bit bonkers when I look back on it!
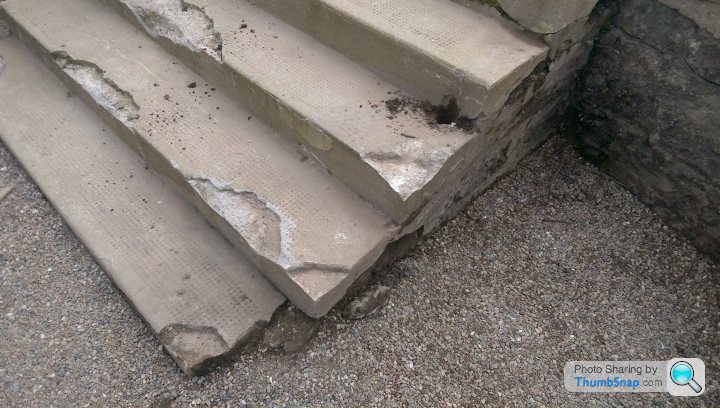
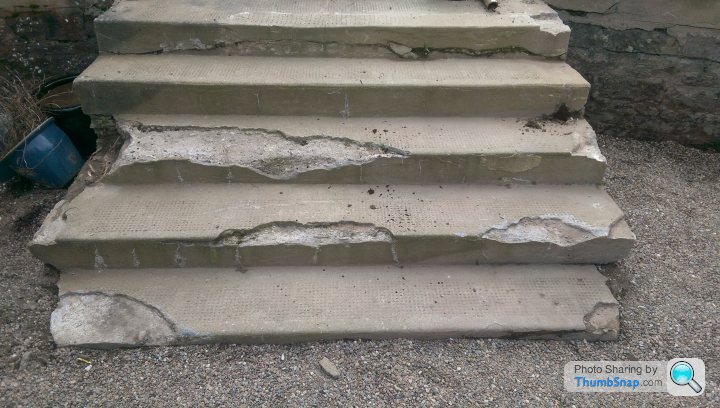
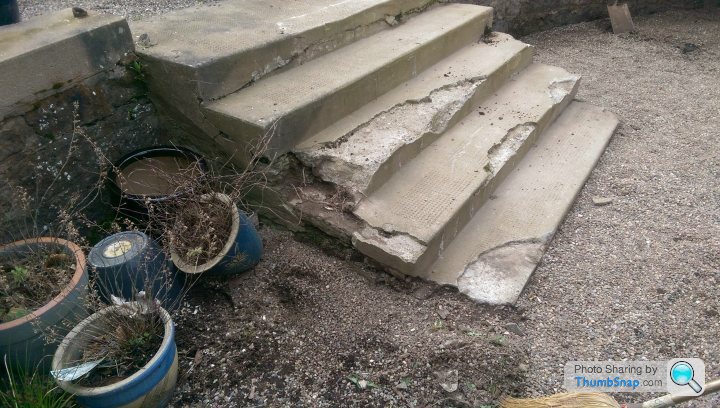
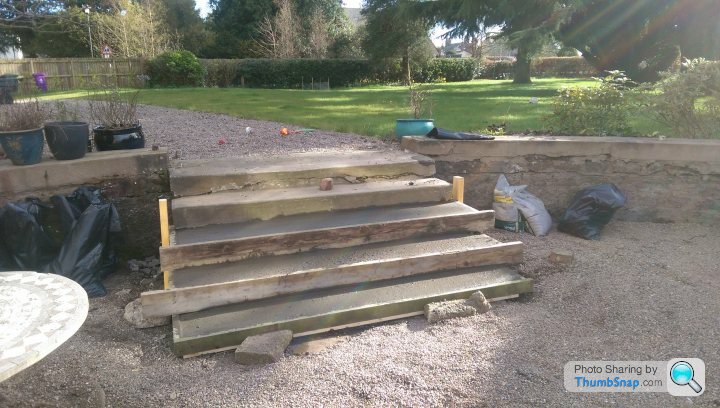
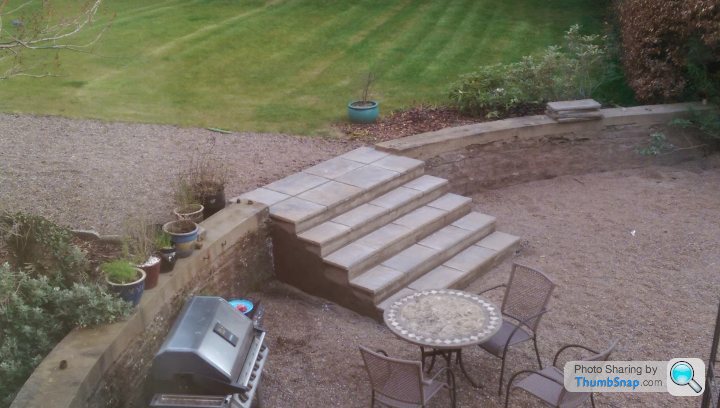
Carrying on the theme of its supposed to be summer soon, been cracking on with the outside work. One of the areas that's been a bit neglected since we started is the lower BBQ area. It's a nice area set down off the main garden roughly about 12m x 8m, and was simply gravelled before, when we had the diggers on site.
Planning to create a covered BBQ area, fire pit and seating area here, which are all in the planning stage just now.
First job is to sort out the stone steps going down to the area. They were well and truly abused by the school kids, and haven't aged well.. I'm looking for some ideas on how to renovate them without having to start again. Current thought is to try to re-shutter them and reform some of the missing step sections in concrete, then use patio stones to create nicer looking steps. Questions are how do I make the new concrete stick to the old? Any good reccomendations for bonding agents? Also thinking I might have to drill and fix metal rods / half in metal fixings for helping join the new sections together?
Or any other ideas?
A few pics of what we've got to start with.
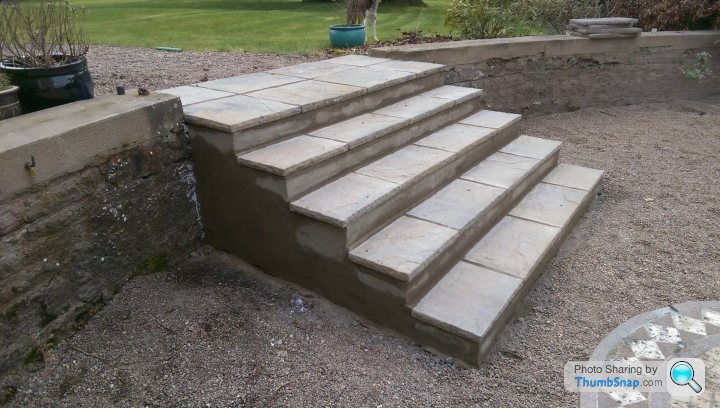
Cheers Jonesy and Jep, I took your advice and breakered off all the old top layer of concrete on the worst steps, right back down to the bare stone underneath. Then shuttered it back up to reform the 3 steps, ready for finishing when it's gone off fully.
Current thought is either to cover it in slabs, something nice and rustic, both the treads and the risers. Then to render the sides as a contrast. 2nd option is to exterior tile it, but I'm still not convinced on this, as I don't want it looking too modern... But we shall see.
Steps chipped back ready
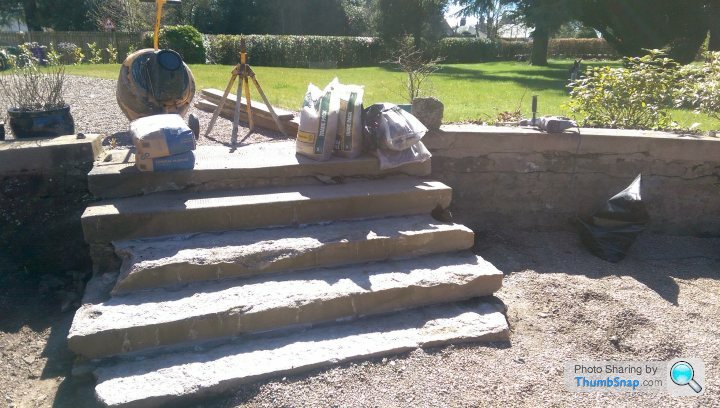
And shuttered up, and filled ready for finishing.
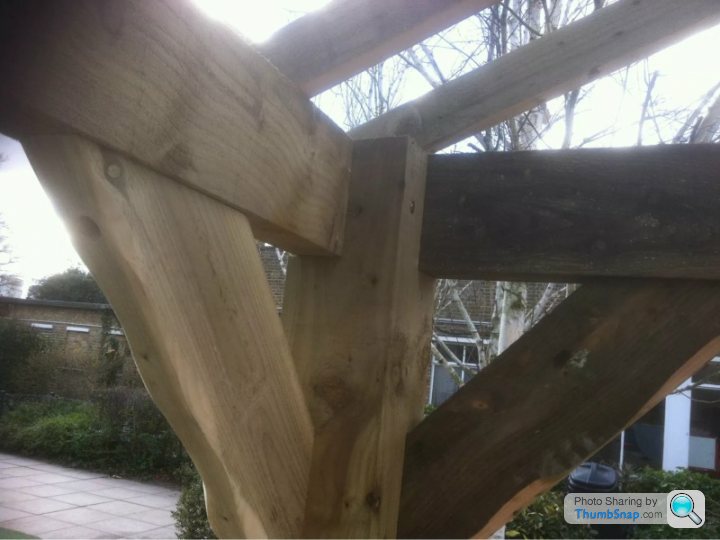
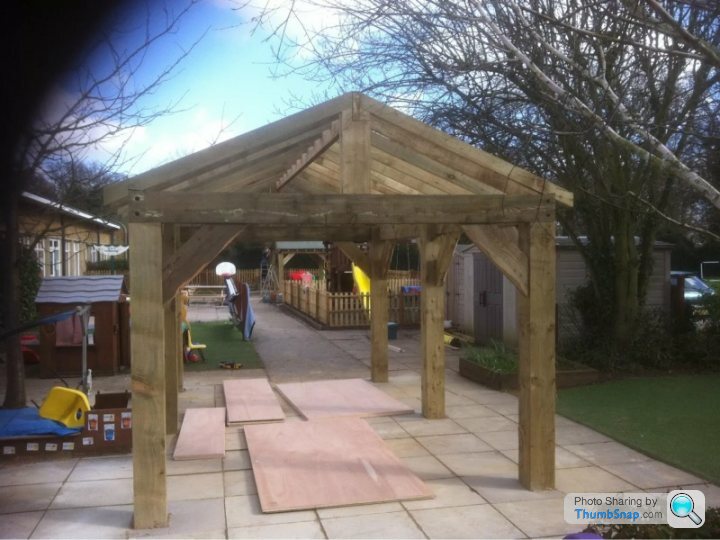
I've started doing some drawings on ideas for the BBQ area, and part of the design is to create and build a covered BBQ area, enough for a gas BBQ and a open cast charcoal grill, a big rustic prep bench and I've saved a few of the old school Belfast sinks, so was thinking of building that in as a simple wash area...
Something like this type of design, easy enough for me to build myself. But smart enough to look the part... Thoughts?
Current thought is either to cover it in slabs, something nice and rustic, both the treads and the risers. Then to render the sides as a contrast. 2nd option is to exterior tile it, but I'm still not convinced on this, as I don't want it looking too modern... But we shall see.
Steps chipped back ready
And shuttered up, and filled ready for finishing.
I've started doing some drawings on ideas for the BBQ area, and part of the design is to create and build a covered BBQ area, enough for a gas BBQ and a open cast charcoal grill, a big rustic prep bench and I've saved a few of the old school Belfast sinks, so was thinking of building that in as a simple wash area...
Something like this type of design, easy enough for me to build myself. But smart enough to look the part... Thoughts?

jep said:
Good job 
What about rendering the risers as well? Topping them off with some granite slabs with an overhang on the front and sides would finish it off nicely in my mind.
Re the eating area, I saw in the Food/Drinks/Restaurant section on the Big Green Egg thread, that tuffer had a really nice BBQ area set up that would look bob on under there.
Cheers mate, I could easily render the up stands, or clad them in stone as well to match the treads, I'll wait until the former comes off and then decide I guess. What about rendering the risers as well? Topping them off with some granite slabs with an overhang on the front and sides would finish it off nicely in my mind.
Re the eating area, I saw in the Food/Drinks/Restaurant section on the Big Green Egg thread, that tuffer had a really nice BBQ area set up that would look bob on under there.
tuffer said:
Love mine, going to do some chicken kebabs tonight.

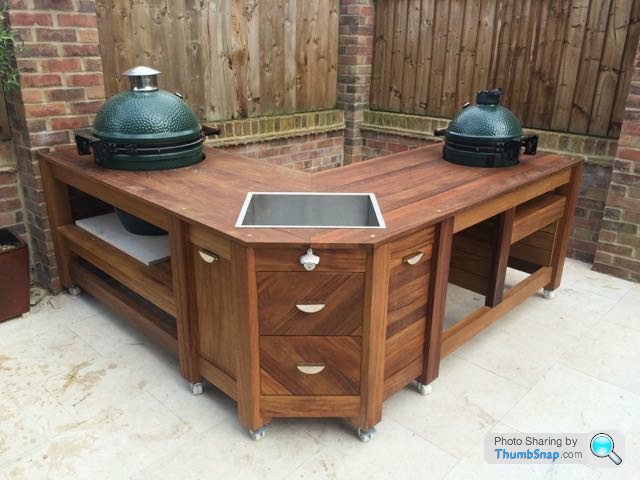
I saw that thread, looks great doesn't it. Especially being made in iroko IIRC, great material to use outside. Over the idea of making it movable as well. Some time at the drawing board needed!
After a weekends work, and some great tips from here (yep, my best work is wood based not masonry! ) we have a finished set of steps.
Decided to slab the tops of each tread with some coloured paving slabs, similar to the stone around them, the rendered the sides and risers with a coloured render, still drying out, but looking good. It was a bit of a faff rendering the risers with the slabs in place, but the only way to get a good finish under the edge of the stones. Typical steps as well, had to cut down 50% of the slabs!
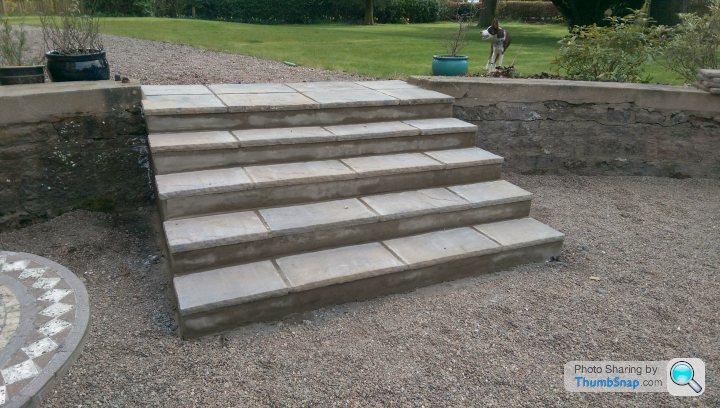
Decided to slab the tops of each tread with some coloured paving slabs, similar to the stone around them, the rendered the sides and risers with a coloured render, still drying out, but looking good. It was a bit of a faff rendering the risers with the slabs in place, but the only way to get a good finish under the edge of the stones. Typical steps as well, had to cut down 50% of the slabs!
Gassing Station | Homes, Gardens and DIY | Top of Page | What's New | My Stuff