Designed a car body that went into manufacture today.
Discussion


Please note w.e.f. April 2009 my website address and company name have changed from the difficult to remember and meaningless www.whitney-paine.com to a more sensible and easy to remember www.3dengineers.co.uk
Just finished a project to design the bodywork and former/buck for a racer that will be competing in an Aston Martin racing programme. Bodywork construction started today. To say I am happy with the outcome is an understatement...although I appreciate that beauty is in the eye of the beholder!
Pictures and links to pictures below and I would like to thank Andy Mitchell of Mitchell Motors in Wiltshire for allowing me to post the pictures on the forum. He will be competing later this year.
Start to finish of the project was 2/3 months.
The pictures show what the bodywork will look like and the former created to make the bodywork in virtual and real life.
Estimated time saving for Andy will be 35%. Accuracy massively improved. If car is crashed, he has the ability to recreate the bodywork exactly as it was before.
"Virtual" finished buck.
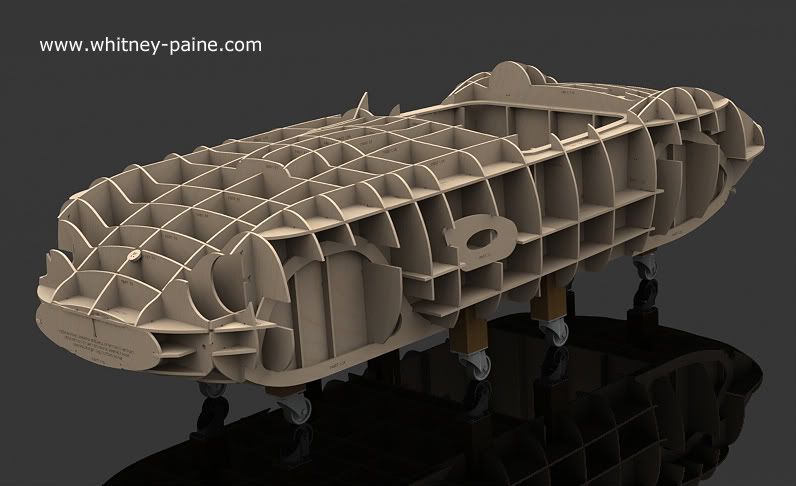
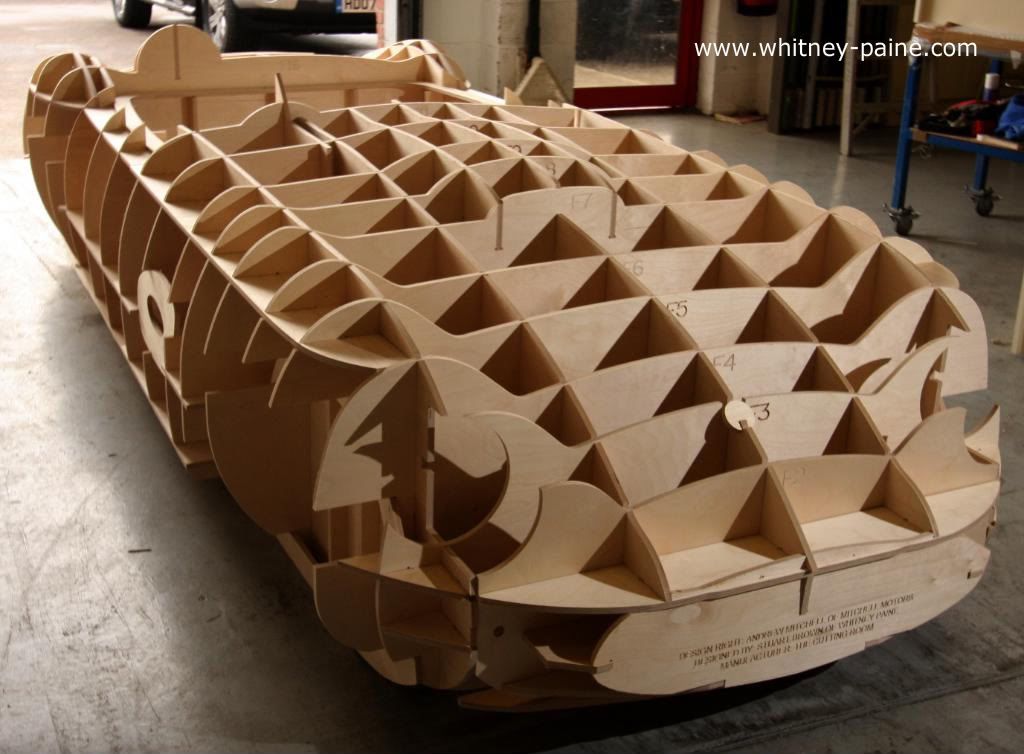
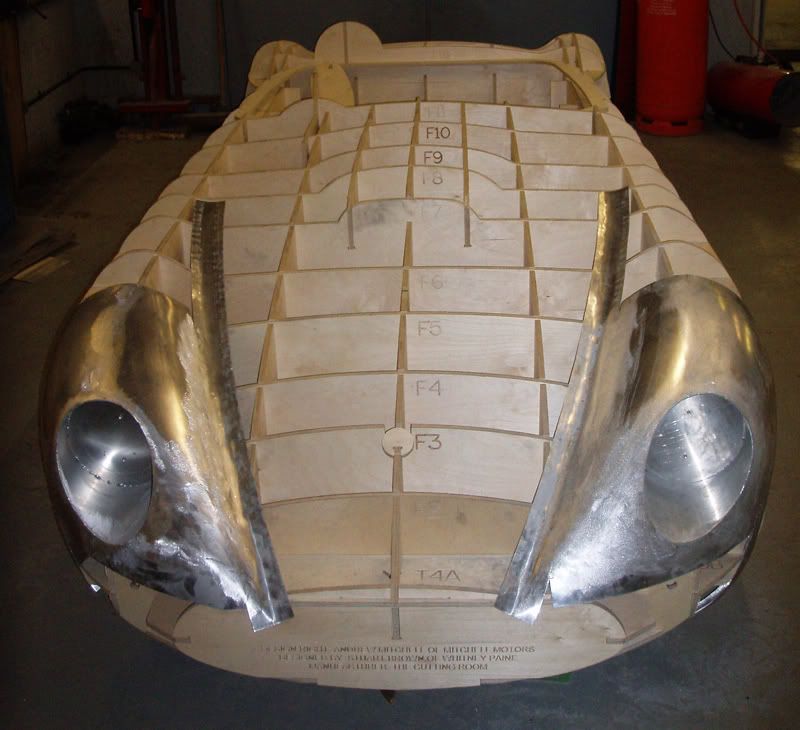
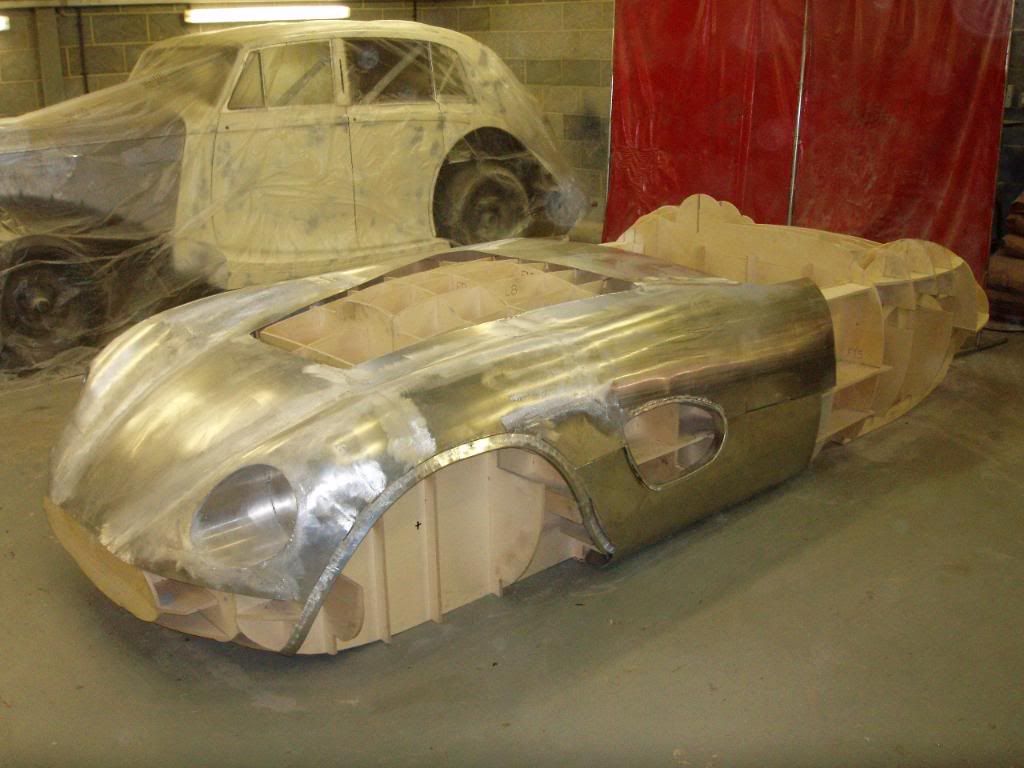
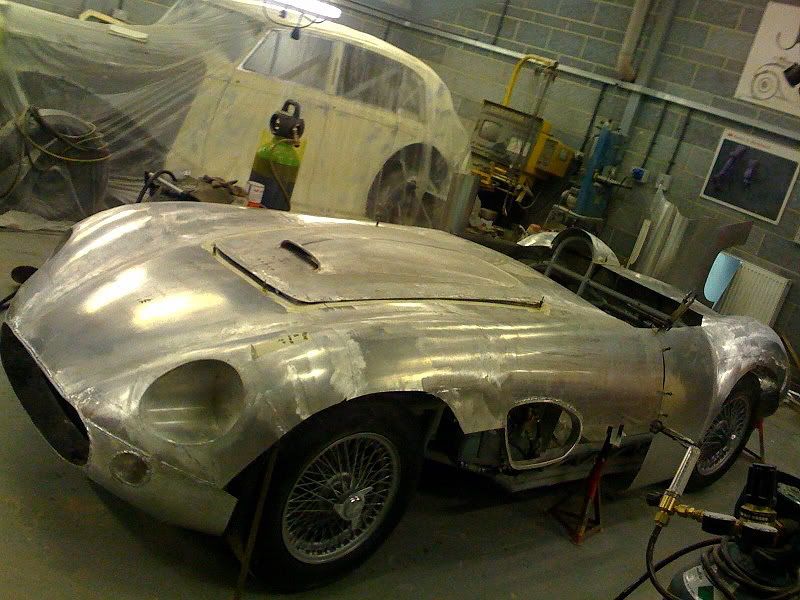
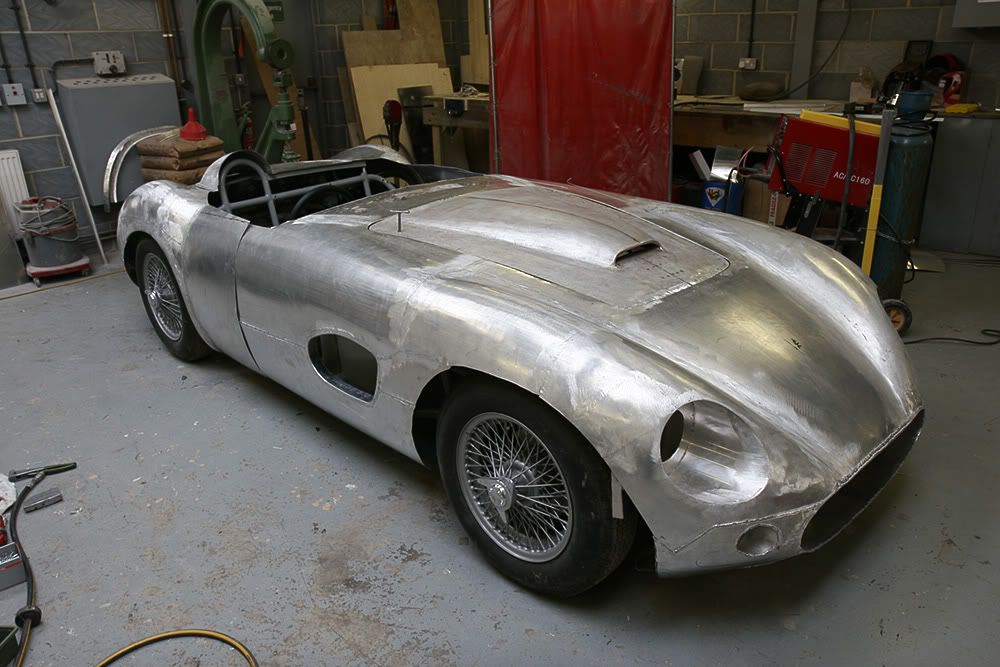
Finished buck in real life.
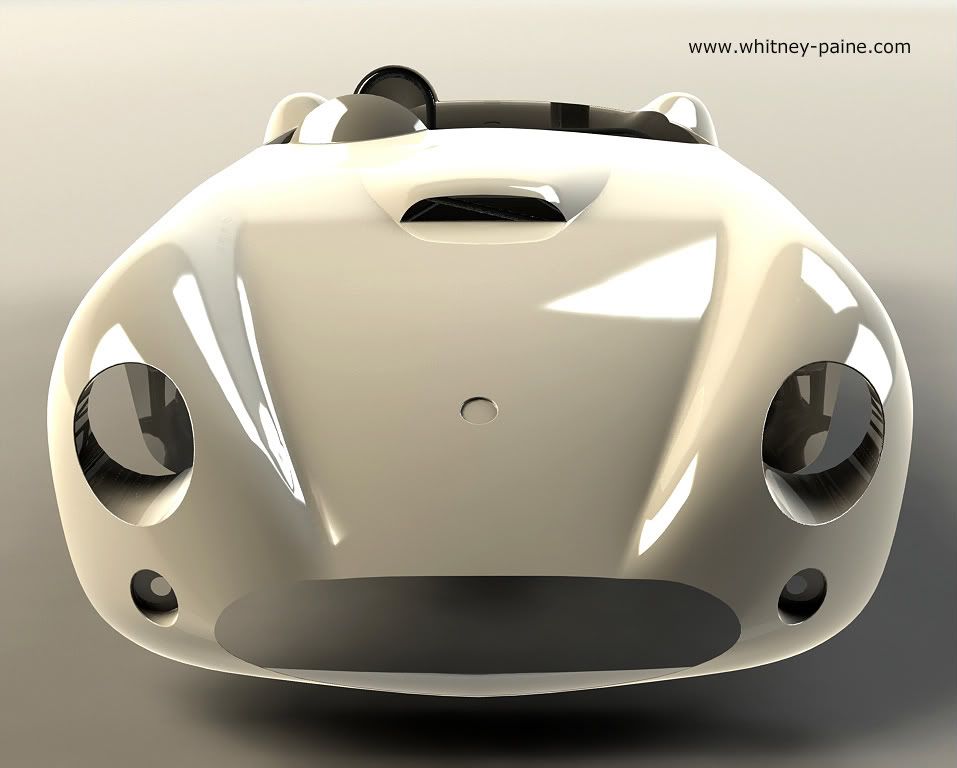
"Virtual" bodywork as it will look when car created in the flesh...colour to be decided.
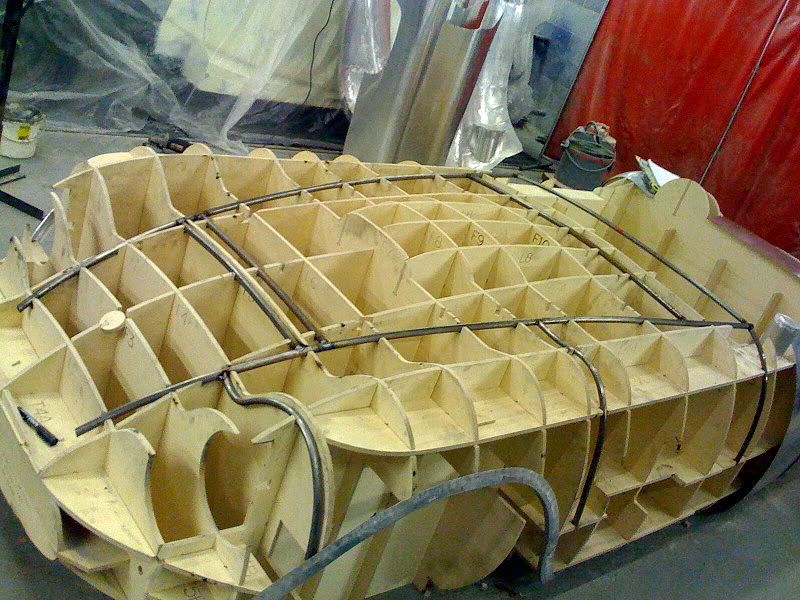
Real buck/former - close up rear view.
http://i264.photobucket.com/albums/ii190/Whitney-P...
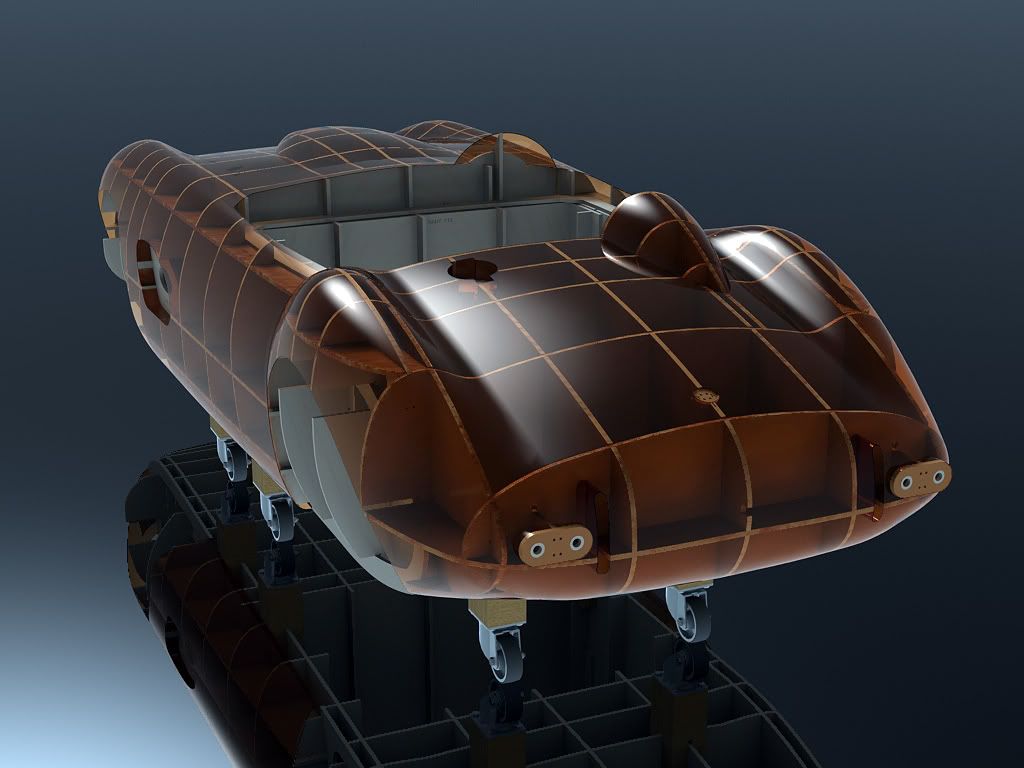
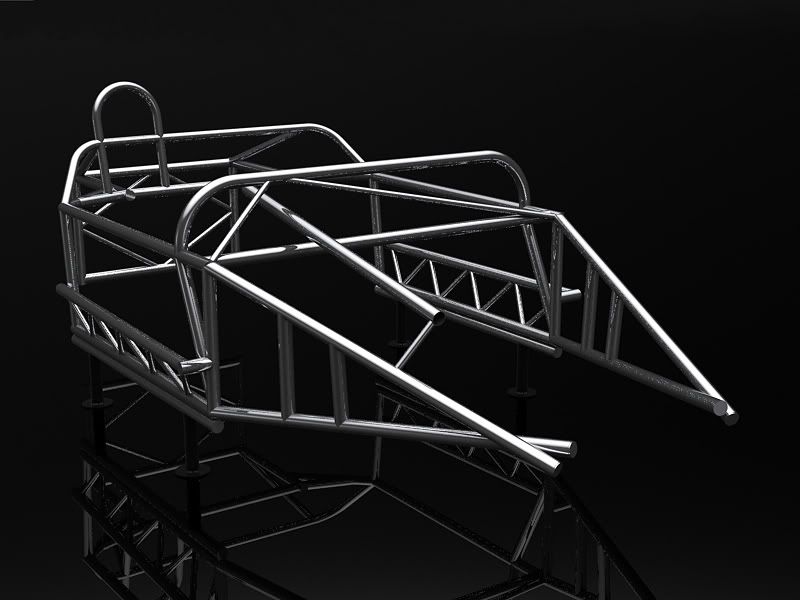
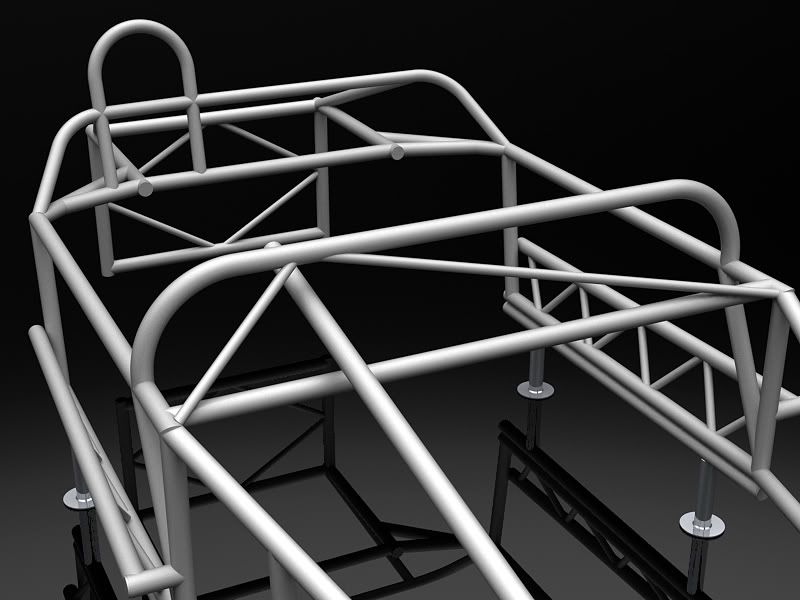
"Virtual" tubular chassis.
http://i264.photobucket.com/albums/ii190/Whitney-P...
"Virtual" bodywork with tubular chassis added.
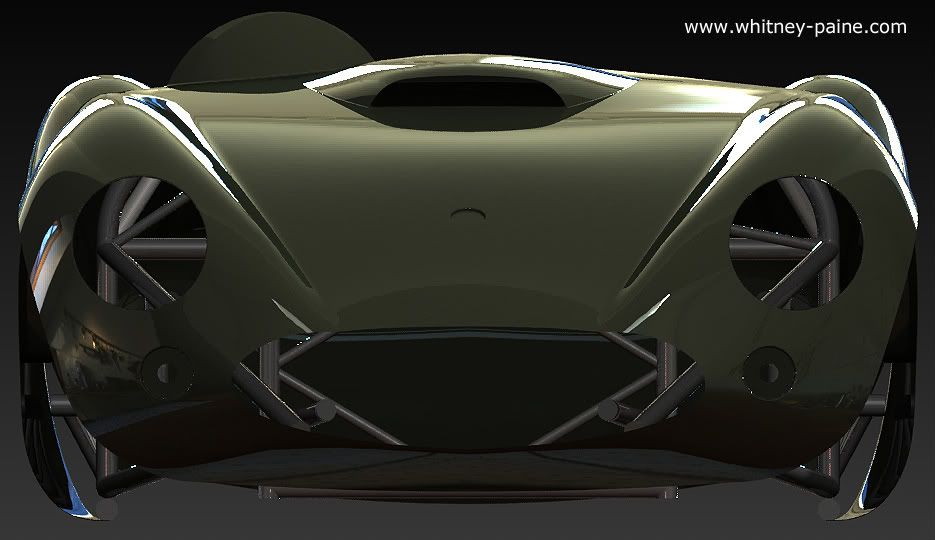
"Virtual" rear view of bodywork.

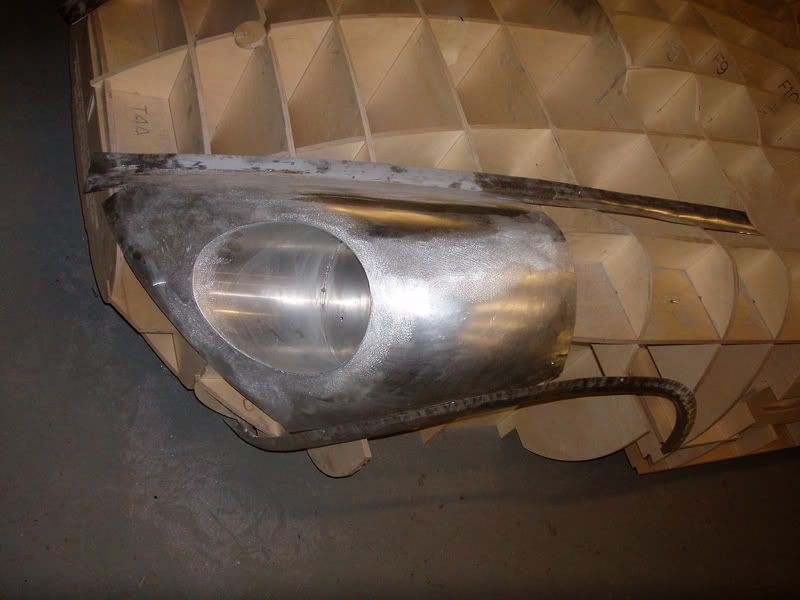
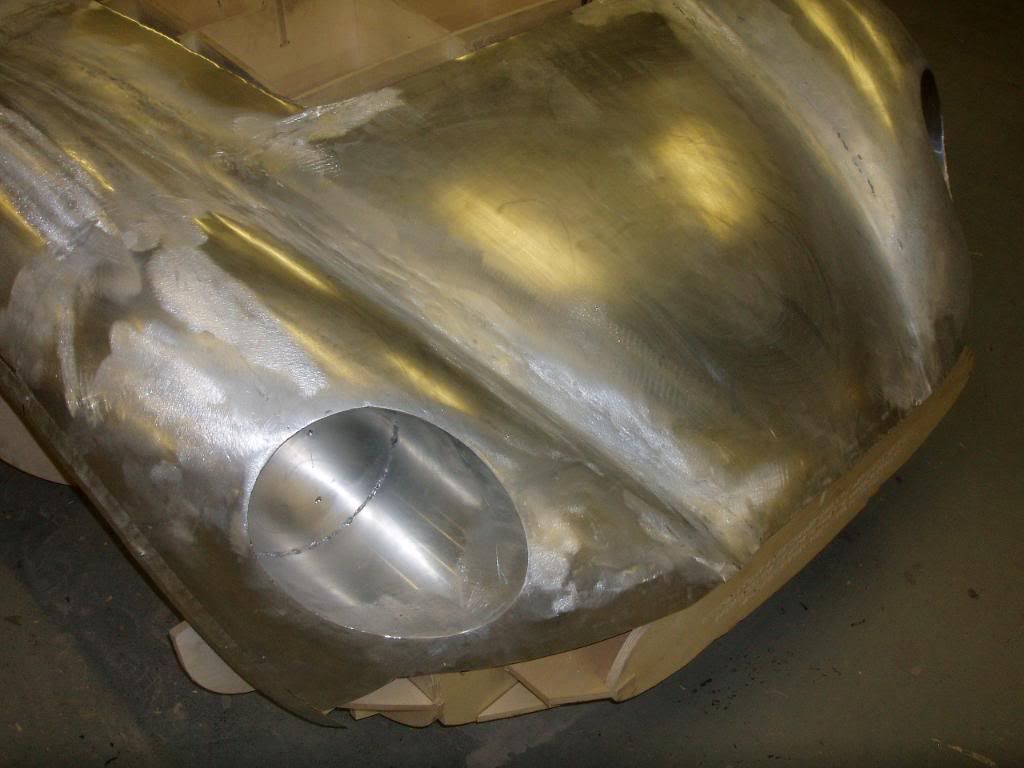
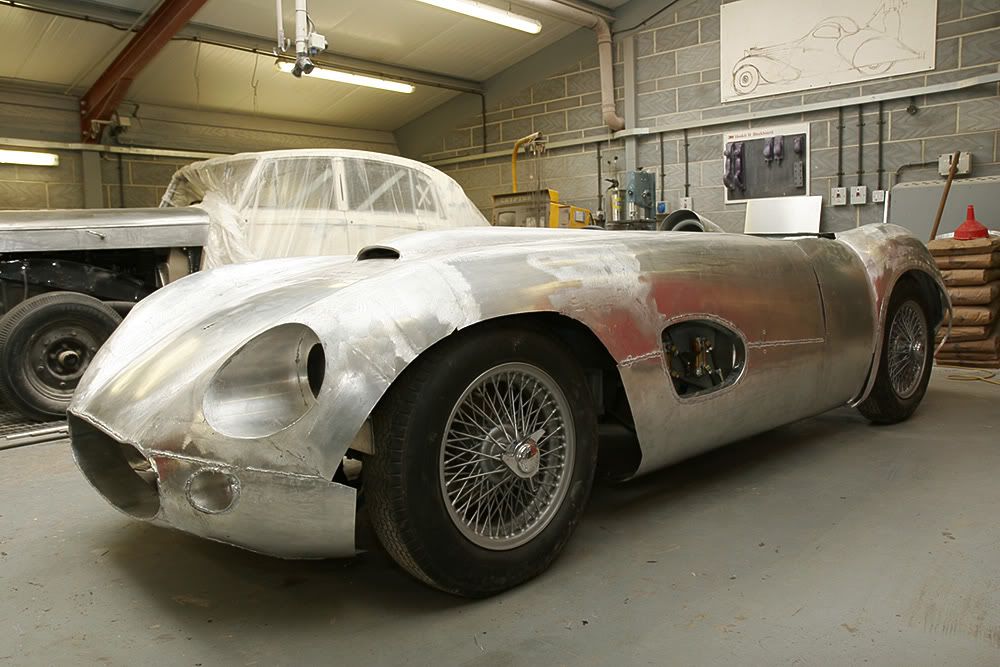
Real buck - corner close up.
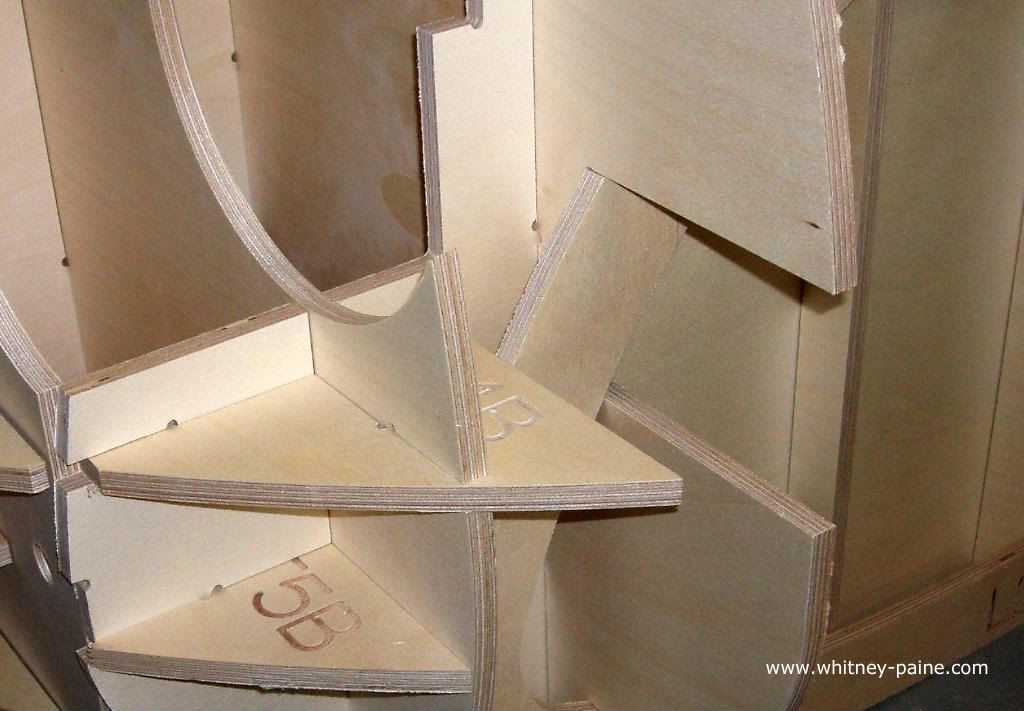
Virtual corner close up....very close I reckon...as you would expect.
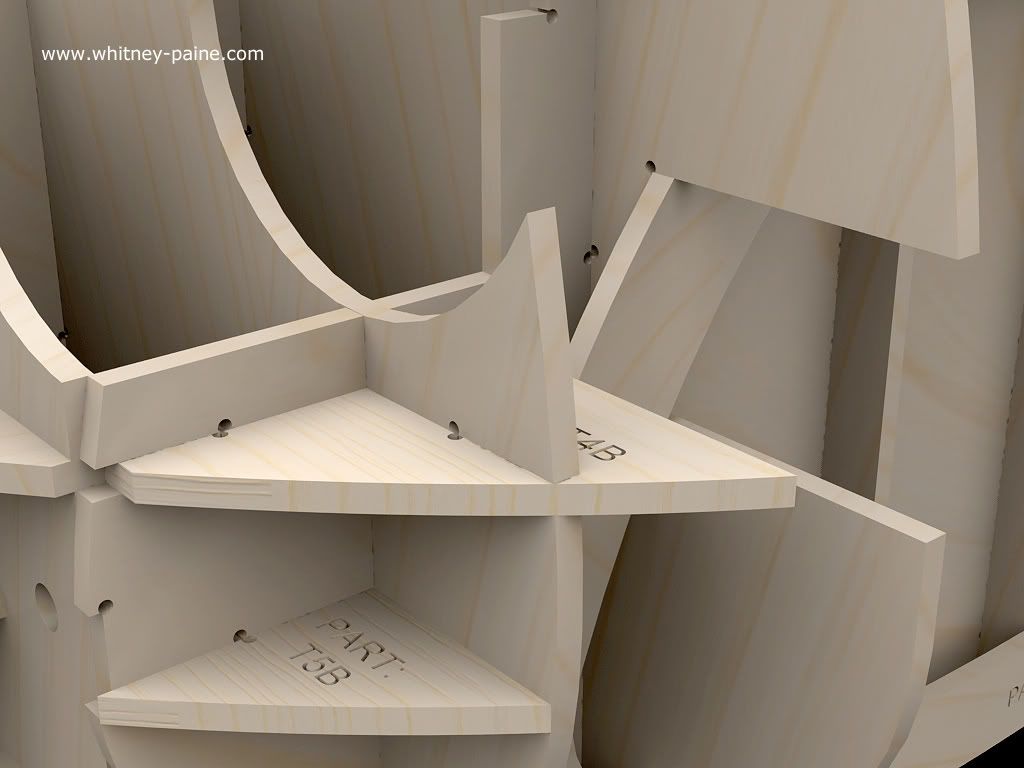
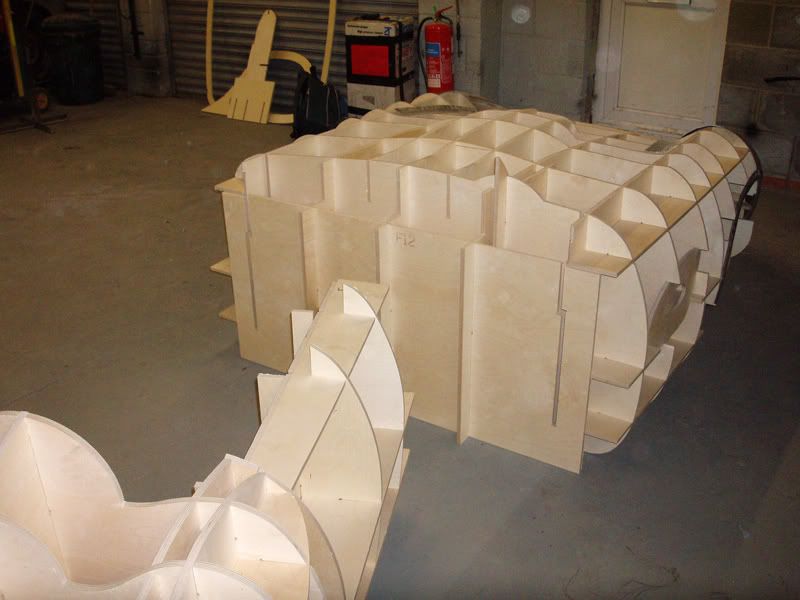
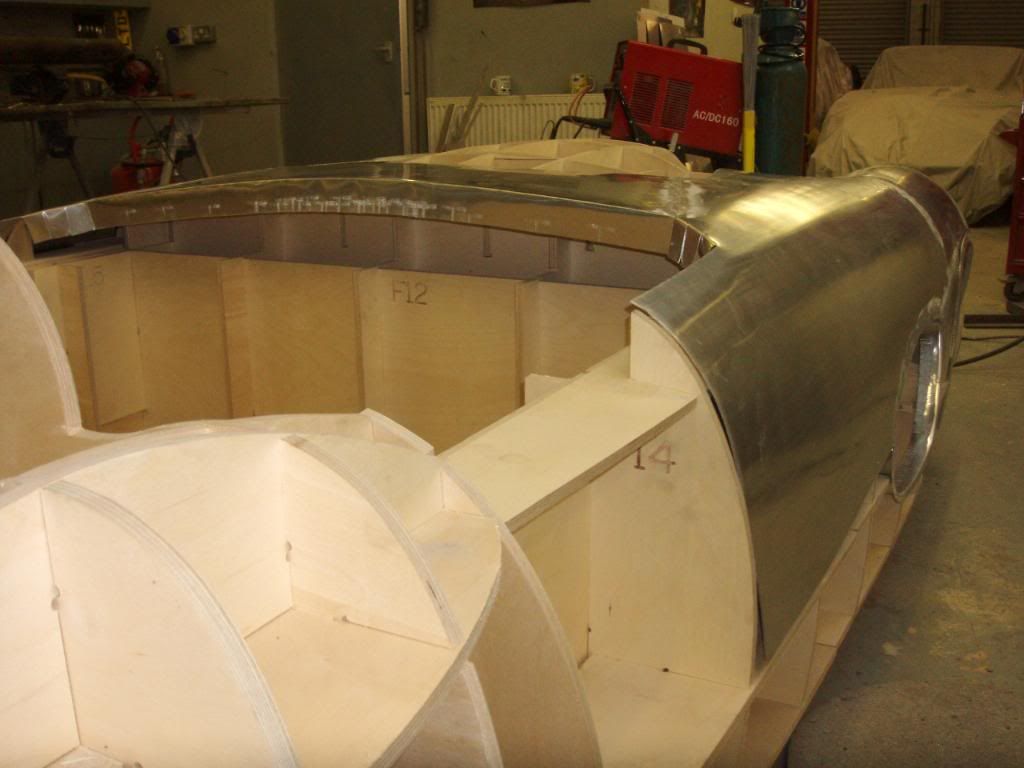
Real hoop former.
http://i264.photobucket.com/albums/ii190/Whitney-P...
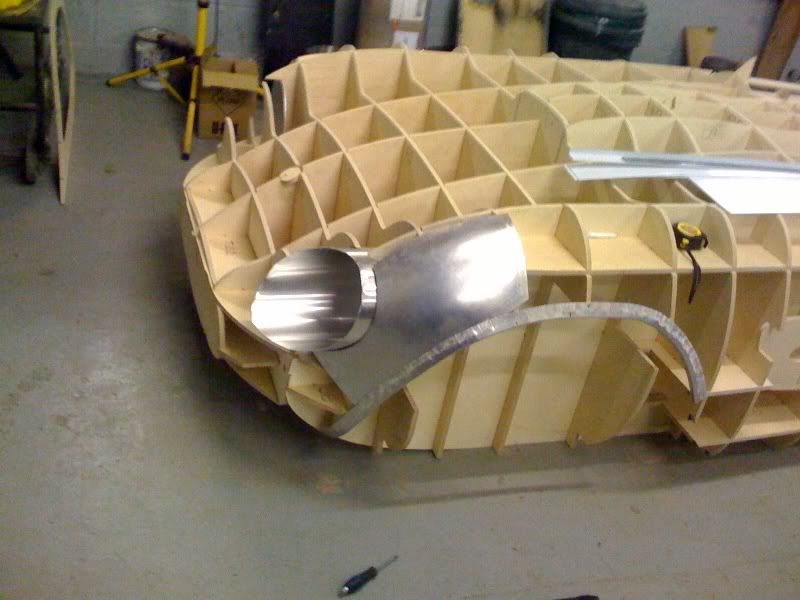
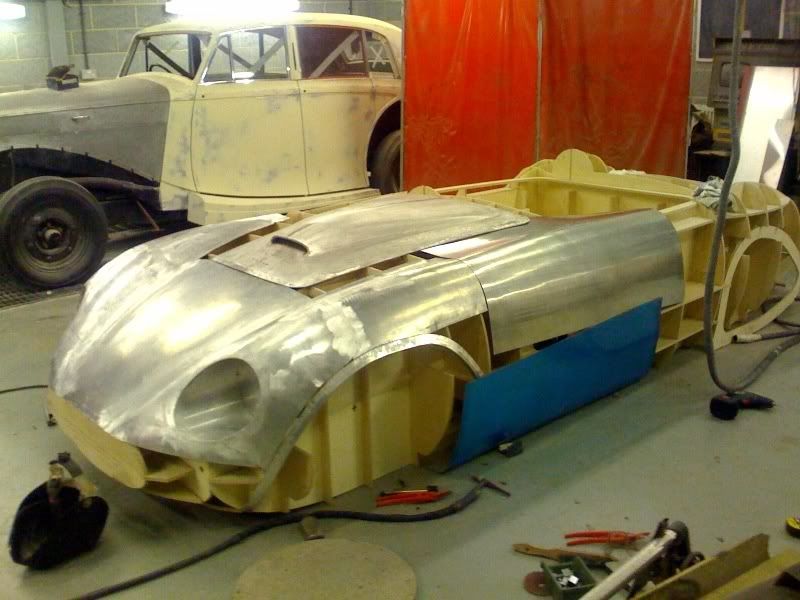
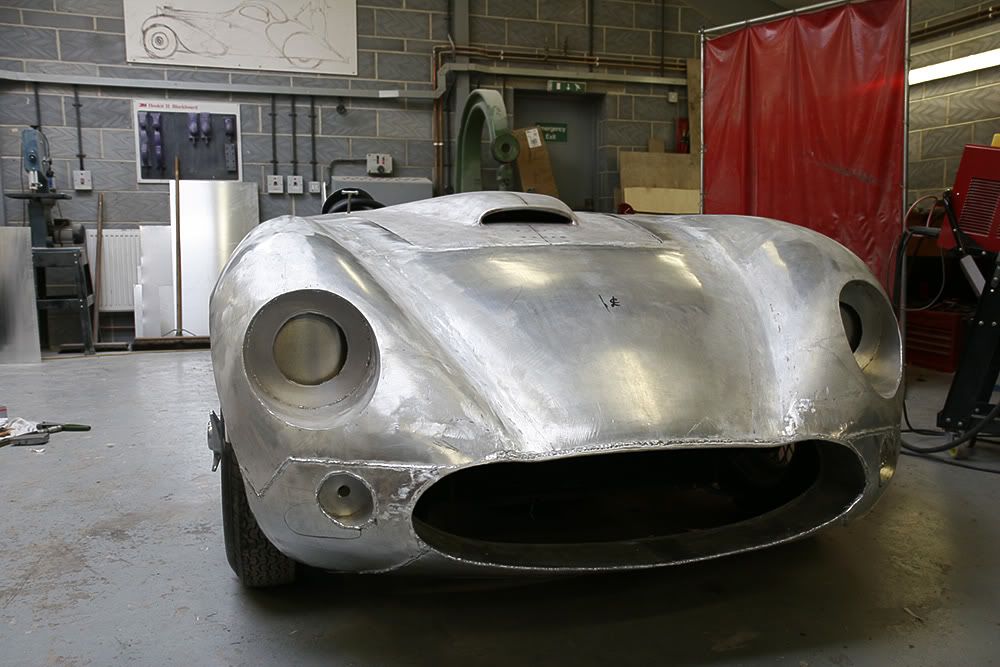
Real view over front of buck.
http://i264.photobucket.com/albums/ii190/Whitney-P...
Just finished a project to design the bodywork and former/buck for a racer that will be competing in an Aston Martin racing programme. Bodywork construction started today. To say I am happy with the outcome is an understatement...although I appreciate that beauty is in the eye of the beholder!
Pictures and links to pictures below and I would like to thank Andy Mitchell of Mitchell Motors in Wiltshire for allowing me to post the pictures on the forum. He will be competing later this year.
Start to finish of the project was 2/3 months.
The pictures show what the bodywork will look like and the former created to make the bodywork in virtual and real life.
Estimated time saving for Andy will be 35%. Accuracy massively improved. If car is crashed, he has the ability to recreate the bodywork exactly as it was before.
"Virtual" finished buck.
Finished buck in real life.
"Virtual" bodywork as it will look when car created in the flesh...colour to be decided.
Real buck/former - close up rear view.
http://i264.photobucket.com/albums/ii190/Whitney-P...
"Virtual" tubular chassis.
http://i264.photobucket.com/albums/ii190/Whitney-P...
"Virtual" bodywork with tubular chassis added.
"Virtual" rear view of bodywork.
Real buck - corner close up.
Virtual corner close up....very close I reckon...as you would expect.
Real hoop former.
http://i264.photobucket.com/albums/ii190/Whitney-P...
Real view over front of buck.
http://i264.photobucket.com/albums/ii190/Whitney-P...
Edited by 3D Engineers on Friday 13th November 16:42
Edited by 3D Engineers on Friday 13th November 16:44
Edited by 3D Engineers on Friday 13th November 16:44
CarMad426 said:
That looks fantastic, i had a little look on your site too really amazing achievement. 
Thanks everyone for your positive comments.Will keep you informed of projects progress.
SB
Edited by Whitney-Paine on Saturday 17th January 23:24
Edited by Whitney-Paine on Saturday 17th January 23:29
Stu_1.0 said:
So is this set to become an Aston Martin racer?
The car will be racing in an Aston Martin Owners Club series. That is as much as I know regarding its intended purpose. Oh and that the client wanted a car that was completely unique. Only one will ever be made, hence the reason I said it is being manufactured as opposed to being produced (pedantic I know).Thanks for everyones interest and comments.
In no particular order:
1) I have my own suite of Solidworks Premium - the best version - as I am a self-employed contractor. If you need or know someone that needs a 3D expert or someone that can convert old 2D info (paper plans, AutoCAD etc) to 3D, then please give them my name! You can see my work is of a high standard.
2) The car was not scanned, but is an original shape. Andy showed me a whole load of pictures of cars he liked and a set of ones he didn't and told me to go and create something that did not look like any of them!
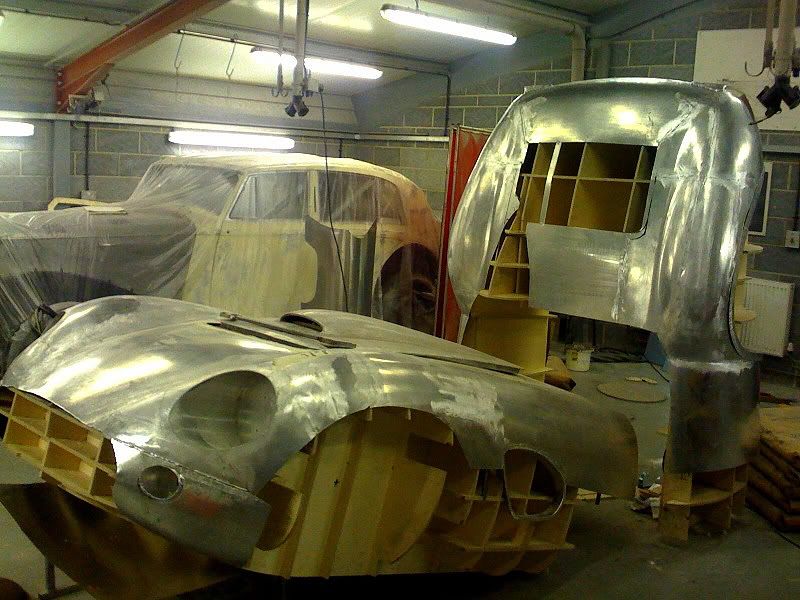
The next few weeks were a textbook case of client and designer co-operation where frequent visits to Mitchell Motors, resulted in numerous design tweaks. Some examples of how it changed and what was done are shown below.
We both learnt a lot from each other. Andy had definite ideas built over years of experience building and restoring classics cars, so I would get hit with phrases like "more haunch, more haunch" when talking about the rear arches. "On the rock Stu, it has got to be on the rock". Bemused look from me. He then gets out a straight edge and proceeds to (gently) offer it up to a DB5, AC Ace and a few other cars in his workshop to show that classic car side profiles should not have concave sides - "it looks c*** and is difficult to make". Looking down from the top the shape should look curvatious like a women.....we both agreed this was a bit Swiss Toni, but it perfectly expressed what was required and that was all that mattered.
Having the PC to sort everything out before work started, saved him a load of cash and frustration.
3) CAD techniques? Too numerous to mention really. I do remember thinking that every trick in the book had been wheeled out to get the design done.
4) Dimensions/tolerences etc. The car has only a tiny number of straight lines. Even lines that look straight in the pictures are subtly curved. This was achieved by using splines and not traditional geometric shapes. This makes the car look more organic, but splines can be a bit of a pain to work with as they have a massive amount of adjustment built in. In other words, you can muck around for hours minutely adjusting just one spline, seeking the perfect shape.
The chosen shape is constrained by hundreds if not thousands of dimensions. I dimensioned to the nearest mm, but when the buck was made it was created within a tolerence of 0.05mm! The design allowed for expansion and contraction of the wood.
Five incarnations of design below. In total, 21 versions were created!

First version and close to final version together. 1st version rejected as being too TVR and Jaguar in looks. Not a bad thing - they make great designs - but not what the client wanted.

And again

Agonising over the front wing shape. Changed loads of times WITHIN the 21 versions. In other words, before I presented Andy with a change, I had changed it loads of times myself.

I have been given permission to develop the 1st version as a separate project if I want to, as it is so different from the end product. So if anyone is interested.........
1) I have my own suite of Solidworks Premium - the best version - as I am a self-employed contractor. If you need or know someone that needs a 3D expert or someone that can convert old 2D info (paper plans, AutoCAD etc) to 3D, then please give them my name! You can see my work is of a high standard.
2) The car was not scanned, but is an original shape. Andy showed me a whole load of pictures of cars he liked and a set of ones he didn't and told me to go and create something that did not look like any of them!
The next few weeks were a textbook case of client and designer co-operation where frequent visits to Mitchell Motors, resulted in numerous design tweaks. Some examples of how it changed and what was done are shown below.
We both learnt a lot from each other. Andy had definite ideas built over years of experience building and restoring classics cars, so I would get hit with phrases like "more haunch, more haunch" when talking about the rear arches. "On the rock Stu, it has got to be on the rock". Bemused look from me. He then gets out a straight edge and proceeds to (gently) offer it up to a DB5, AC Ace and a few other cars in his workshop to show that classic car side profiles should not have concave sides - "it looks c*** and is difficult to make". Looking down from the top the shape should look curvatious like a women.....we both agreed this was a bit Swiss Toni, but it perfectly expressed what was required and that was all that mattered.
Having the PC to sort everything out before work started, saved him a load of cash and frustration.
3) CAD techniques? Too numerous to mention really. I do remember thinking that every trick in the book had been wheeled out to get the design done.
4) Dimensions/tolerences etc. The car has only a tiny number of straight lines. Even lines that look straight in the pictures are subtly curved. This was achieved by using splines and not traditional geometric shapes. This makes the car look more organic, but splines can be a bit of a pain to work with as they have a massive amount of adjustment built in. In other words, you can muck around for hours minutely adjusting just one spline, seeking the perfect shape.
The chosen shape is constrained by hundreds if not thousands of dimensions. I dimensioned to the nearest mm, but when the buck was made it was created within a tolerence of 0.05mm! The design allowed for expansion and contraction of the wood.
Five incarnations of design below. In total, 21 versions were created!
First version and close to final version together. 1st version rejected as being too TVR and Jaguar in looks. Not a bad thing - they make great designs - but not what the client wanted.
And again
Agonising over the front wing shape. Changed loads of times WITHIN the 21 versions. In other words, before I presented Andy with a change, I had changed it loads of times myself.
I have been given permission to develop the 1st version as a separate project if I want to, as it is so different from the end product. So if anyone is interested.........
Edited by Whitney-Paine on Tuesday 20th January 09:22
Edited by Whitney-Paine on Tuesday 20th January 09:24
Fees: It varies according to the client. However, I tend to charge per job. A contract price is fairer to the client and focuses my mind better. We both know where we are. Having said that, my bank balance would be a lot greater if I charged per hour! Passion costs.........me normally!
Re fees, my work normally results in a net saving for the client as everything is worked out before work commences. This obviously saves time, money and reduces frustrating snagging problems.
Racing programme? Will find out. Can't remember exact details.
Re fees, my work normally results in a net saving for the client as everything is worked out before work commences. This obviously saves time, money and reduces frustrating snagging problems.
Racing programme? Will find out. Can't remember exact details.
Edited by Whitney-Paine on Tuesday 20th January 10:25
"Indeed CNC is very accurate indeed for individual components but the fixture is an assembly, how did you manage 0.05mm on the assembly ? how was it measured ?
Or was it assembled then the final cut done by a 5 axis machine ?"
I understand what you are getting at now.
The profiles were cut out to a high tolerance and the way I designed the buck means they fit together superbly whilst allowing for expansion and contraction of the wood. 0.05mm tolerance on the assembly? I could not claim that.
SB
Edited by Whitney-Paine on Saturday 24th January 18:25
jagman21 said:
any chance of a picture of the chassis, preferably as a rolling chassis, i love all the oily bits!
I also just wanted to ask how you intended to attach the body to the chassis, I know you get an electrolytic corrosion when the two metals meet, how will you solve this or is this a relatively minor problem?
The Aston Martin works e-coat thier chassis that come in for restoration, are you doing something similar perhaps?
Body underframe being created:I also just wanted to ask how you intended to attach the body to the chassis, I know you get an electrolytic corrosion when the two metals meet, how will you solve this or is this a relatively minor problem?
The Aston Martin works e-coat thier chassis that come in for restoration, are you doing something similar perhaps?
Tubular chassis had already been created, so I reverse engineered the design into Solidworks to make sure the body fitted perfectly....which thankfully it did. Picture below:
Not sure what paint process they are using, but as painting is the firm's speciality my guess is it will be top notch.
SB
Gassing Station | General Gassing [Archive] | Top of Page | What's New | My Stuff