Pembleton mkII - Tin Tub
Discussion


Konrod said:
Nice work Ambleton, I love the way it's been thought through. Only question is whether they met the angles of view requirements in the IVA? If I recall they have to visible to some degree from the side, so assume the perspex bit protrudes a little.
That's not a requirement for the MSVA.The rear lighting requirement is pretty open and the requirement is the same for stop/tail/indicator in terms of placement. Side repeaters aren't mandated either but ill likely fit some anyway.
"At rear of vehicle
Min height 250mm
Max height 1500mm
Vehicles >1300mm wide must
be fitted with 2 position lamps
Vehicles >1300mm with 2 rear
wheels, the lamps must have min
600mm between illuminating
surfaces
Vehicles <1300mm wide with 2
rear wheels, the lamps may have
a min 400mm between
illuminating surfaces
Vehicles with a single rear
wheel, the lamps can be fitted
within the rear half of the vehicle"
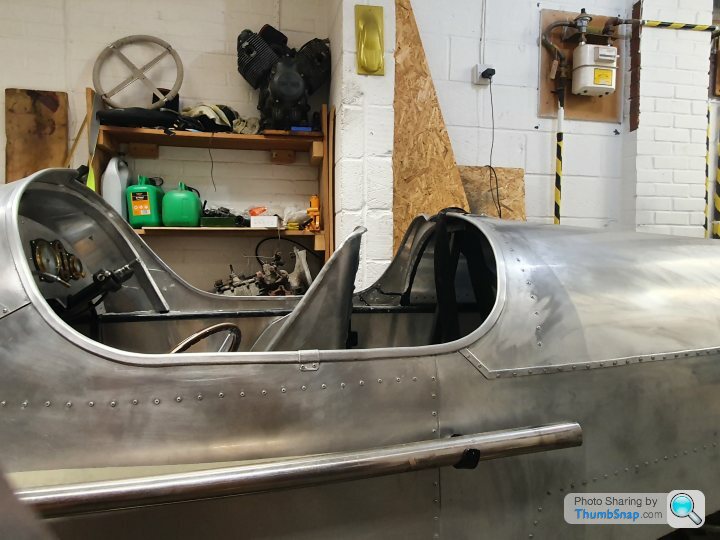
Week one down of my 4 week break:
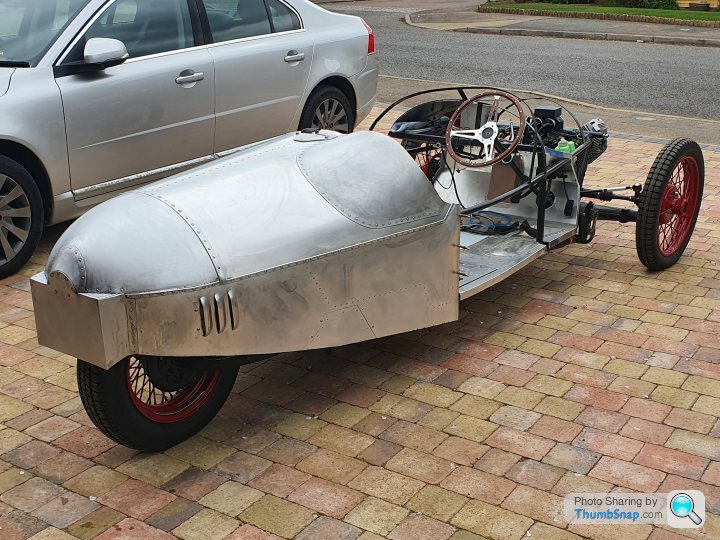
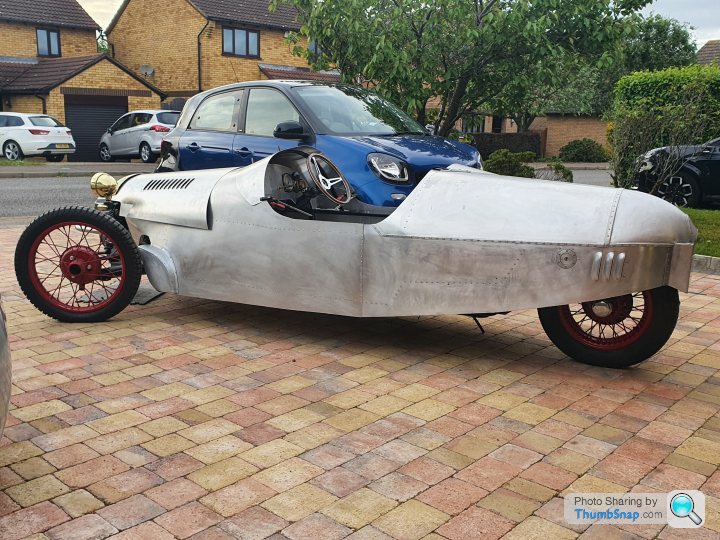
Got all the rear bodywork on now.
As I was affixing the barrel and shoulder blister I made an error. I couldve left it, but having slept on it, the right thing to do was to redo it.
This meant drilling out 162 rivets and debonding the barrel, and all the mess that comes with half cured Sika552. Cleaning up the mess, cutting and forming a new panel, bonding, drilling and resetting all the rivets. I lost a whole day, but given its been 4 years in the making thus far, a day is nothing.
PHOTOS
Konrod said:
Very nicely done. If it was a hand riveter, then you've probably got forearms like Popeye now 
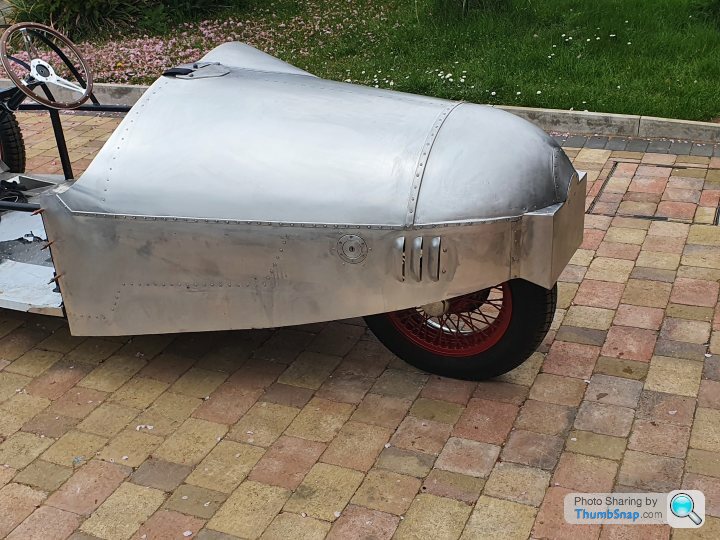
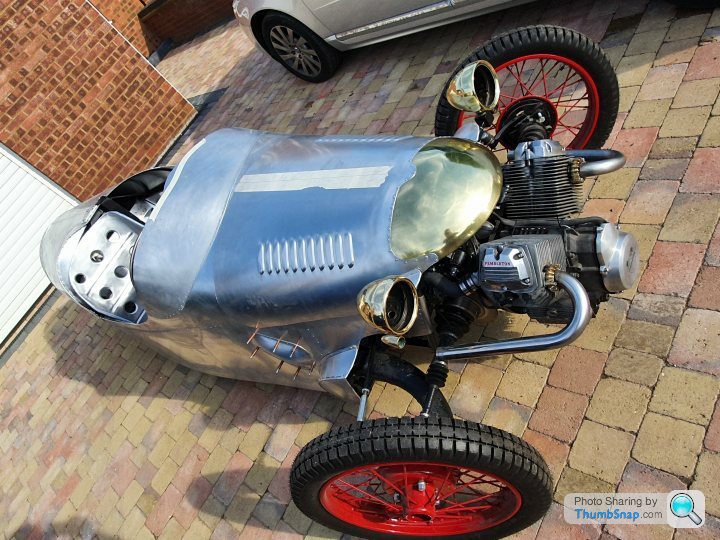
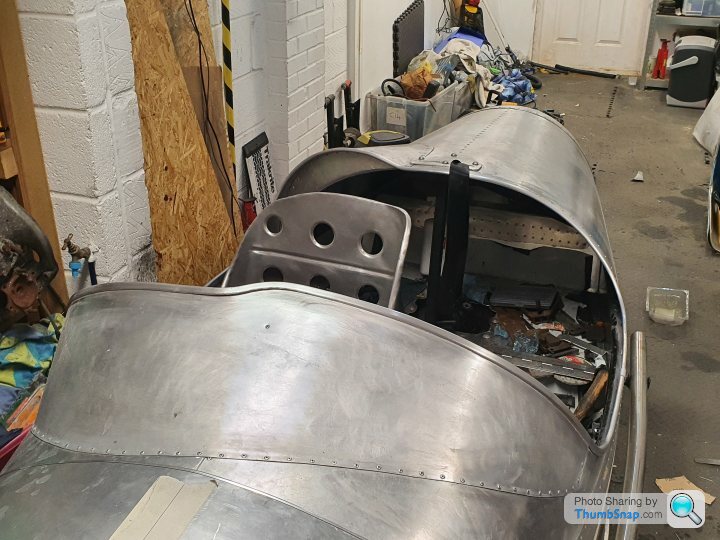
Incidentally, what is the small panel for on the lower edge drivers side, access to the axles bearings??
Bingo, exactly that. I had to remove the rear arm from my previous one and had to gingerly cut an access panel. Incidentally, what is the small panel for on the lower edge drivers side, access to the axles bearings??
I preemptively put one in this car so that I don't have the trauma of doing it at a later date. When i cut it in i hadnt fitted the rear panel yet so any balls ups could be corrected. 4xM4 button heads and hey presto, access is granted.
I'm using a Giseppa Flipper riveter. Expensive, but makes easy work of it all.
Progress has been a bit slower this week on the front end bodywork, just because there's more to do.
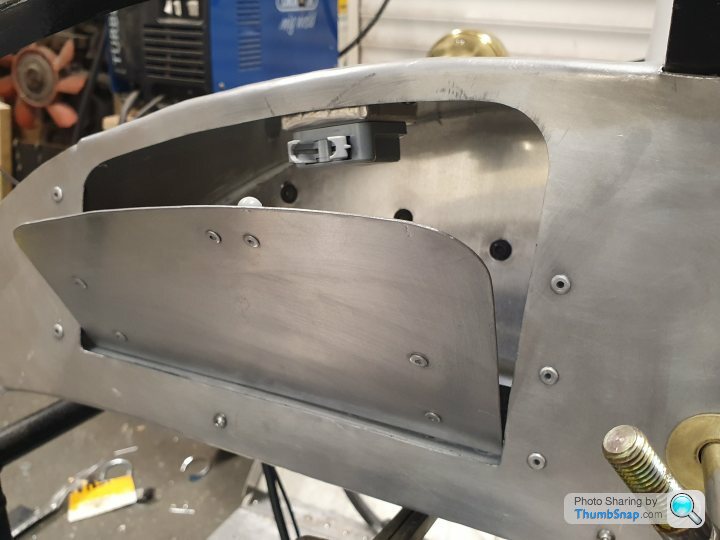
My donor was an ami and so had an ARB, which I'm carrying across.
The ARB mounts on the suspension arm damper plates and I wanted to cover these up. I tried a few alternative ideas but this seems the best. Tricky little blighters to make! They will be held on with M4 button heads for ease of removal.
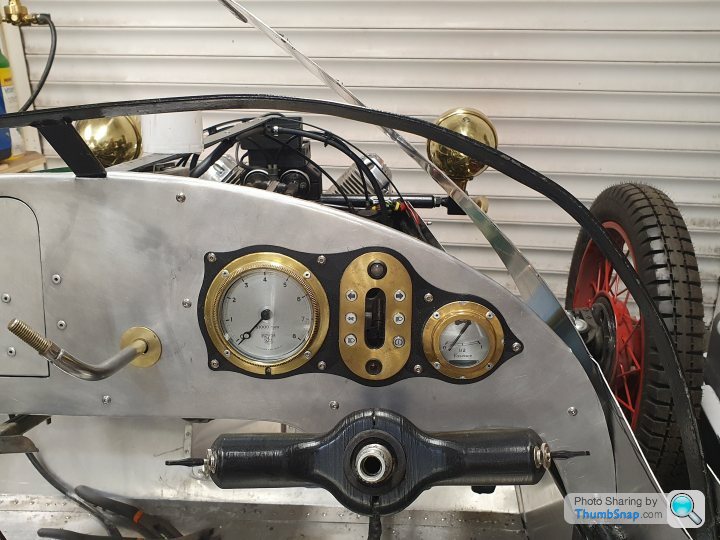
Also made a start on my dash...


My donor was an ami and so had an ARB, which I'm carrying across.
The ARB mounts on the suspension arm damper plates and I wanted to cover these up. I tried a few alternative ideas but this seems the best. Tricky little blighters to make! They will be held on with M4 button heads for ease of removal.
Also made a start on my dash...
I was all prepped to fit the front bodywork by the end of Wednesday evening and was ready to start fitting it on Thursday AM.
When I entered the garage on Thursday morning it dawned on me that really I should finish all the other bits and bobs required in the engine bay and pedalbox area whilst I still have excellent access.
So all of Thursday was spent positioning carbs, mounting, welding on little mounting tabs for the inlets, painting, drilling off and fitting throttle lines, wiring up the ignition, choke lines and final fuel line routing. So whilst a lot was done, not much to actually show for it.
Today my aim was to fire her up for the first time since the engine was removed from the donor bike.
My "new" battery has been left for several years, flat, and wouldn't hold charge and was FUBARd. A trip down to Bedford Batteries confirmed it and a new battery was purchased. Fitted up, and the timing roughly aligned....
SHES ALIIIIIIVE
The video doesn't do justice for how loud it is with just the headers affixed
Been doing lots of s tty little jobs this week whilst I still have good access to everything sans bodywork.
Made up some headlamp/indicator pedestals from some box section and some m12 bolts. (I might get something turned up in ali or brass at some point but these are acceptable for now)
Designed and printed a few adaptors and spacers for things. Made up and welded a sturdier column mount bracket.
Made a hinge and whatnot for the glovebox.
I didnt want a visible hinge or latch, so 3d printed a little tuck in hinge that's dash mounted so alignment and flush is more manageable. Then used a concealed push to release latch.


tty little jobs this week whilst I still have good access to everything sans bodywork. Made up some headlamp/indicator pedestals from some box section and some m12 bolts. (I might get something turned up in ali or brass at some point but these are acceptable for now)
Designed and printed a few adaptors and spacers for things. Made up and welded a sturdier column mount bracket.
Made a hinge and whatnot for the glovebox.
I didnt want a visible hinge or latch, so 3d printed a little tuck in hinge that's dash mounted so alignment and flush is more manageable. Then used a concealed push to release latch.
My electronic speedo is essentially a posh bicycle speedo.
It's trigger is a tiny neodymium magnet that goes past a sensor with every revolution.
I didnt really want anything outboard on the steered hub as it means the wiring has to have enough slack for the suspension travel and the steering, plus its a bit messier.
I hatched a plan to mount it on the side of the gearbox.
Plan was to mount the sensor on the gearbox, and modify a driveshaft bolt to house the magnet/trigger.
I love citroen quirky engineering more than most, but even I despair sometimes. The driveshaft bolts are M9x1.25 by 25mm long, with a plain shank section. They only protrude through the gearbox flange by about 1mm but rummaging around my spare gearbox I found that the handbrake bolt that goes through the eccentric adjuster is M9x1.25 by 35mm long. PERFECT.
I made a bracket out of some 40mm steel box and went about modifying my long bolt for the trigger magnet.

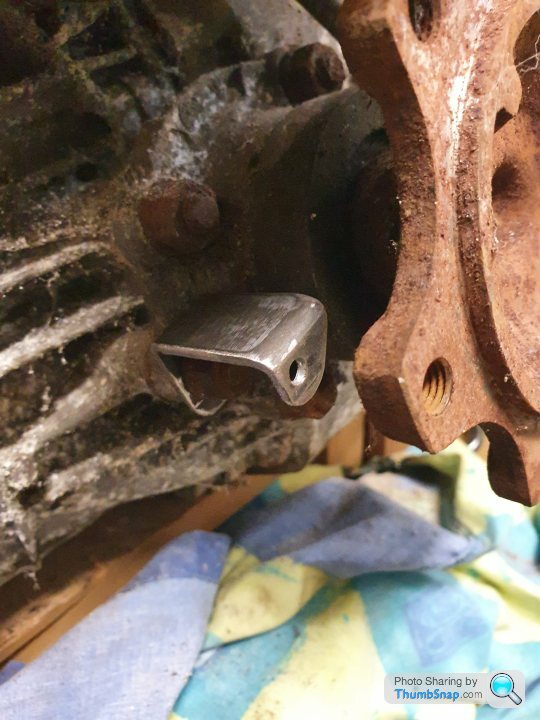
Drilled a 5mm depression in the end of the bolt and epoxied in the neodymium magnet

Rigged up on my spare gearbox.

All fitted up to the gearbox. I've marked the trigger bolt with a dab of yellow paint to make sure I don't forget in several years time.

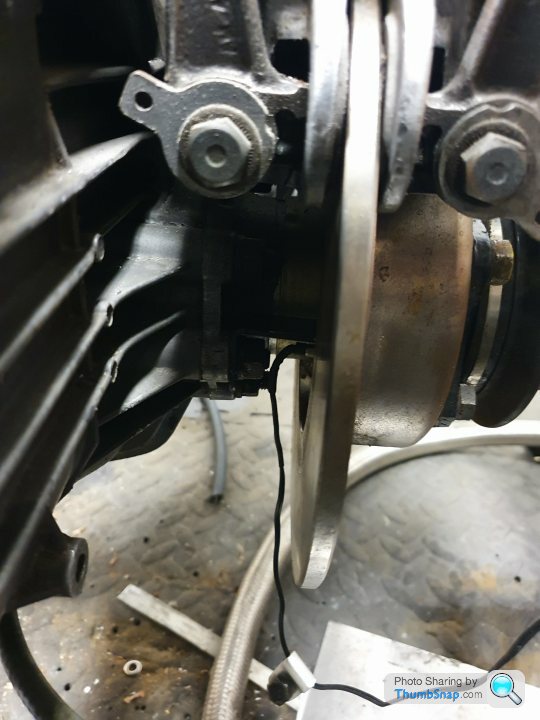
Using a little mirror to see inside the brake disc

Wire is then secured back to the gearbox and is in convoluted trunking. There's lots of clear space between the disc and any wiring/sleeving, in the photos above the cable is just "hanging".
It's trigger is a tiny neodymium magnet that goes past a sensor with every revolution.
I didnt really want anything outboard on the steered hub as it means the wiring has to have enough slack for the suspension travel and the steering, plus its a bit messier.
I hatched a plan to mount it on the side of the gearbox.
Plan was to mount the sensor on the gearbox, and modify a driveshaft bolt to house the magnet/trigger.
I love citroen quirky engineering more than most, but even I despair sometimes. The driveshaft bolts are M9x1.25 by 25mm long, with a plain shank section. They only protrude through the gearbox flange by about 1mm but rummaging around my spare gearbox I found that the handbrake bolt that goes through the eccentric adjuster is M9x1.25 by 35mm long. PERFECT.
I made a bracket out of some 40mm steel box and went about modifying my long bolt for the trigger magnet.
Drilled a 5mm depression in the end of the bolt and epoxied in the neodymium magnet
Rigged up on my spare gearbox.
All fitted up to the gearbox. I've marked the trigger bolt with a dab of yellow paint to make sure I don't forget in several years time.
Using a little mirror to see inside the brake disc
Wire is then secured back to the gearbox and is in convoluted trunking. There's lots of clear space between the disc and any wiring/sleeving, in the photos above the cable is just "hanging".

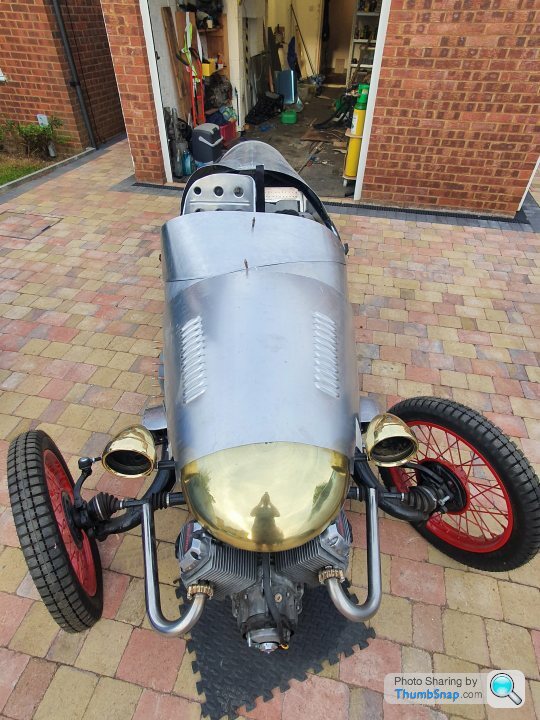
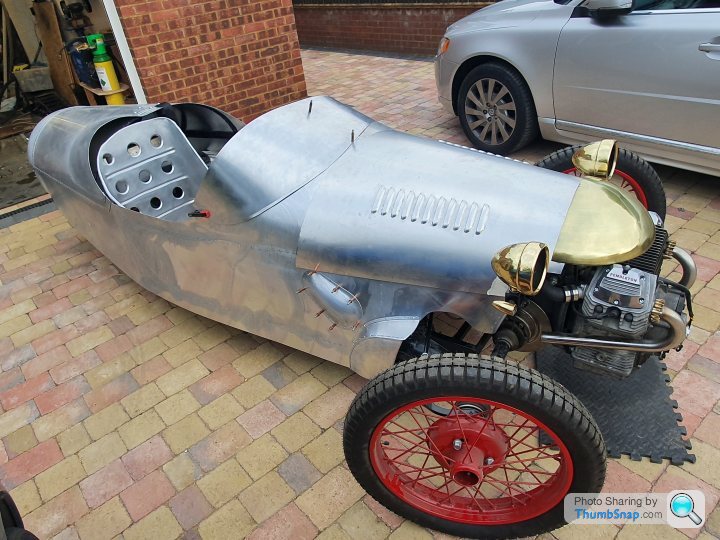
Front bodywork sides fitted today, as are my steering/suspension end plates, they came out really well and look waaaay neater than having it all exposed (as the actress said to the bishop).
The cockpit cowl hasnt had the finap shaping or trim yet, just held on with a few clecos and clamps.
The bonnet form and brass nose have just been tossed on for the photos, not fitted, trimmed or whatever.
But... ITS STARTING TO LOOK LIKE A THING!!!
I'm absolutely done with rivets though. I marked, ctr punched, drilled and set a lot if rivets this afternoon.


Full lock. Might need to limit the lock a little, but that OK.

Thanks for the encouragement.
Think today I'll be mainly working on bonnet. I did toy about splitting the bonnet and hinging it but in reality, having the bonnet as a whole and removing it one piece is actually more practical. The tail shape is perfect for resting the bonnet on when it's lifted off
Think today I'll be mainly working on bonnet. I did toy about splitting the bonnet and hinging it but in reality, having the bonnet as a whole and removing it one piece is actually more practical. The tail shape is perfect for resting the bonnet on when it's lifted off
I spent most of yesterday massaging my front end until I was satisfied.... hol up....
What I mean is that the basic preformed bonnet purchased from PMC has most of the basic shape there or there abouts but it needed a lot of careful massaging to get to sit nice on the car.
My ModelY bonnet catches are likely not to pass the MSVA so I'm going to leave the bonnet long on the sides and use a couple of M6 rivnuts and flange button heads to secure the bonnet in place.
The post MSVA I'll trim the sides shorter and use the M6 rivnuts for the catch body mounts and add the receptacles onto the bonnet.
Weather os nice today so doing a spot of bonnet prep in the garden


Today I learnt one of the dangers of having a lift off bonnet.
Bonnet was off and propped up against my workbench. As I turned and walked off I caught my foot on it. It fell over and hit my tub full of scrap timber offcuts... fking wonderful.....

In a case of "well its already fked, I can't make it any worse" I drilled out all the rivets and set about with a dolly and a hammer. Bruising and a crease remained so next was out with the power sander.

By this point I was slightly more optimistic that it wasn't completely fked so had a few more taps, removed the rest of the lacquer and a worked up the sandpaper grades.

120, 180, 240, 320, 400, 600, 1200, polish
Amazed how will its come out tbf
Bonnet was off and propped up against my workbench. As I turned and walked off I caught my foot on it. It fell over and hit my tub full of scrap timber offcuts... f
king wonderful.....In a case of "well its already f
ked, I can't make it any worse" I drilled out all the rivets and set about with a dolly and a hammer. Bruising and a crease remained so next was out with the power sander.By this point I was slightly more optimistic that it wasn't completely f
ked so had a few more taps, removed the rest of the lacquer and a worked up the sandpaper grades.120, 180, 240, 320, 400, 600, 1200, polish
Amazed how will its come out tbf
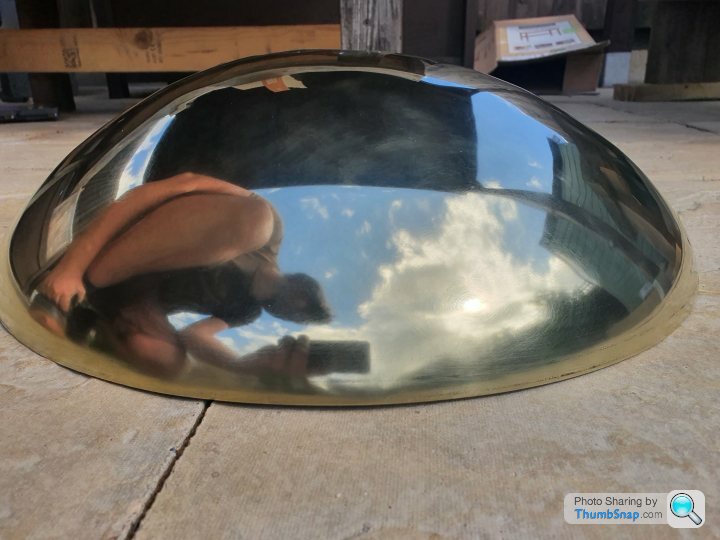
Thanks all, if it hadn't worked out then I couldve contacted and purchased another spun dome off PMC but they're now focusing on factory builds.
Chassis supply for the home builder has been terminated for a few years now but common parts are still available. Bonnet, spun nose/Tail, wheels etc.
As they shift away from reliance on 2cv parts I imagine it won't be too long before the models diverge considerably.
As far as I can tell, the only 2cv item remaining on the factory build is the gearbox.
Doofus said:
Ambleton said:
Thanks all, if it hadn't worked out then I couldve contacted and purchased another spun dome off PMC but they're now focusing on factory builds.
So they don't use old immersion heater tanks anymore?I personally think the brass looks better than copper but that's just my preference. Horses for courses
take-good-care-of-the-forest-dewey said:
I managed to forget to lock the bonnet on my westy once.
I booted it once I'd left the town and on hitting 60+ the whole bonnet sailed into the air about 30 feet straight up, flipped end over end several times, before landing in a cow field.
Thanks to the long grass, it survived unmarked.
You were incredibly lucky - couldve been much worse - hitting other cars/cyclist, causing an accident etc.I booted it once I'd left the town and on hitting 60+ the whole bonnet sailed into the air about 30 feet straight up, flipped end over end several times, before landing in a cow field.
Thanks to the long grass, it survived unmarked.
My dad had a similar experience on Thelwall viaduct maybe 8-9 years ago. Was in the fast lane and the car in front of him swerved last minute. He didn't have time to react but there was a set of roofing ladders that had departed from a builders van were laying flat with the hooks skyward. Not quite sure how but they pirouetted up and over his saab, with the only damage to tiny little dings on the bonnet and a broken number plater where it had made contact as it went up and over into the air.
He was guite shaken as it couldve been A LOT worse.
Cops came and cleared the ladders with a rolling roadblock. Builders van nowhere to be seen. They did establish the van they came off as gantry cameras could see the same van with and without ladders pre/post junction but they said there was little evidence and the numberplate wasn't clear enough yadda yadda.
And progress has slowed down again. My weekends are now pretty much fully booked for the next 6 weeks or so so it'll only be evenings.
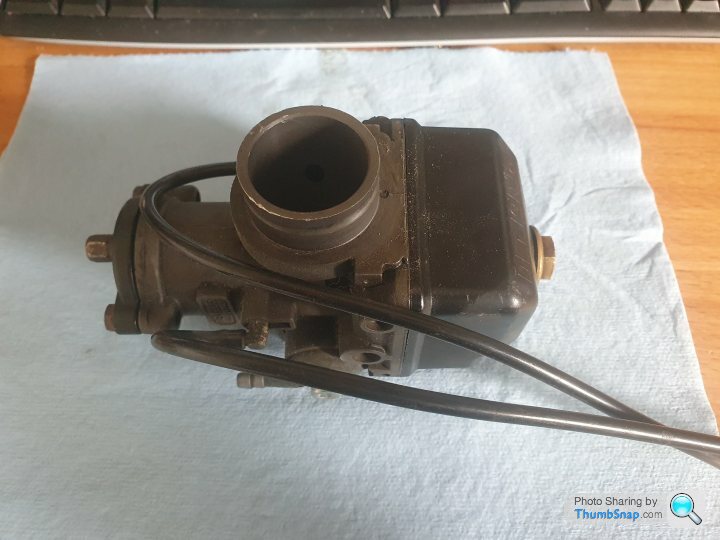
I pulled apart my carbs and rebuilt them.
Highlights were:
One carb had no O-ring between the float bowl and the body
One carb didn't have an O-ring on the idle mixture screw
I also changed the float valve for an uprated sprung unit for the increase in fuel pressure from the fuel pump instead of gravity fed like on the bike.
£60 worth of carb parts...

Stripped down:

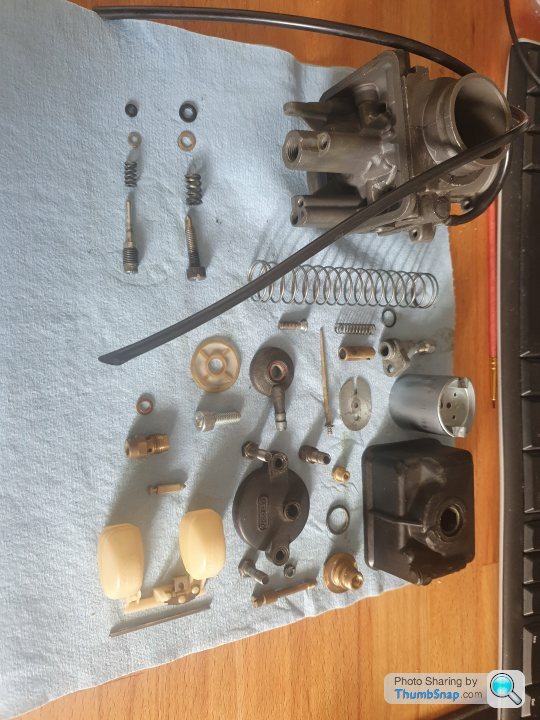
Any eagle eyed nerds among us will notice a lack of idle jet and atomiser tube here. I forgot I raided this carb for parts when I was pissing about with my previous car. I have a few sets of carbs and plenty of bits so I harvested...
All rebuilt...

I pulled apart my carbs and rebuilt them.
Highlights were:
One carb had no O-ring between the float bowl and the body
One carb didn't have an O-ring on the idle mixture screw
I also changed the float valve for an uprated sprung unit for the increase in fuel pressure from the fuel pump instead of gravity fed like on the bike.
£60 worth of carb parts...
Stripped down:
Any eagle eyed nerds among us will notice a lack of idle jet and atomiser tube here. I forgot I raided this carb for parts when I was pissing about with my previous car. I have a few sets of carbs and plenty of bits so I harvested...
All rebuilt...
Hi Lew,
Thanks. I'm just the other side of Northampton. Been a few years since I've been to a st Neots meet. Are they still occurring?
I used to live in Rushden, so I'm about another +25mins now.
Not seen a stolly update for a while but seen you're progressing with the Ferret.
Still amazes me just the sheer size if all the mechanicals on those things. Bet the stolly engine/box is a fair chunk heavier than the entire pembleton!
Minor update:
Cockpit edging trim. What a complete arse of a job.
It's 16mm×9mm aluminium half hard extrusion.
I spoke to a few people and they said the trick was anneal, anneal, anneal and form with welding gloves...
Tried that.
What happened was I covered my arms and hands with burns, swore a lot and ended up with a horrible, deformed, twisted mess....
So I made up a little tool to form the bends without warping or twisting it.... (or the need for any heat)

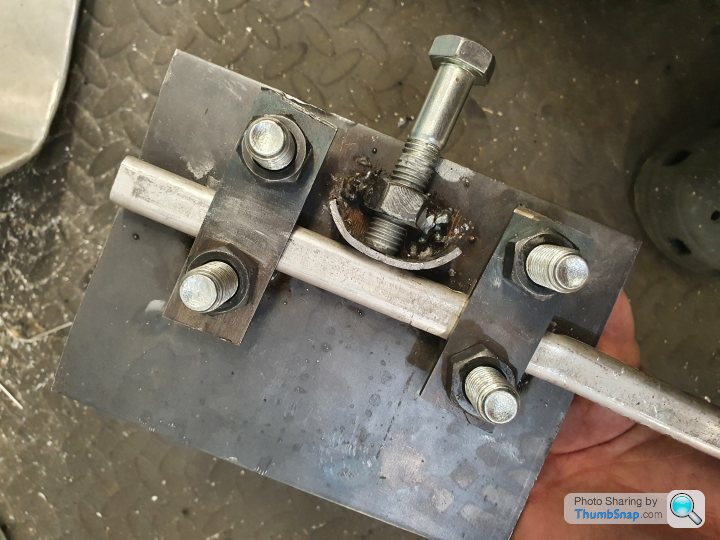
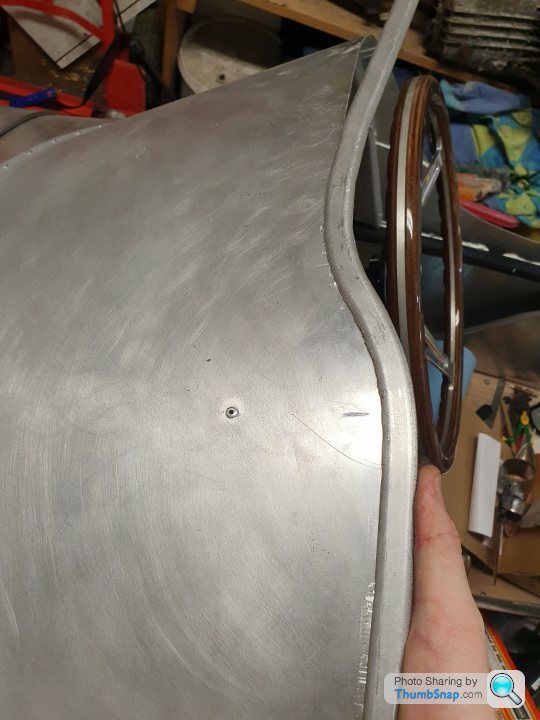
This did leave some bruising in the surface, but nothing that couldn't be removed with various abrasives.
It still took a good couple of days/evenings to get it all formed to a reasonable level though.
I split it into two bits, one round the front and one round the back, joining down the sides. The sides will have padded armrests on, hiding the joins and tabs.
Cockpit edging trim. What a complete arse of a job.
It's 16mm×9mm aluminium half hard extrusion.
I spoke to a few people and they said the trick was anneal, anneal, anneal and form with welding gloves...
Tried that.
What happened was I covered my arms and hands with burns, swore a lot and ended up with a horrible, deformed, twisted mess....
So I made up a little tool to form the bends without warping or twisting it.... (or the need for any heat)
This did leave some bruising in the surface, but nothing that couldn't be removed with various abrasives.
It still took a good couple of days/evenings to get it all formed to a reasonable level though.
I split it into two bits, one round the front and one round the back, joining down the sides. The sides will have padded armrests on, hiding the joins and tabs.
Gassing Station | Readers' Cars | Top of Page | What's New | My Stuff