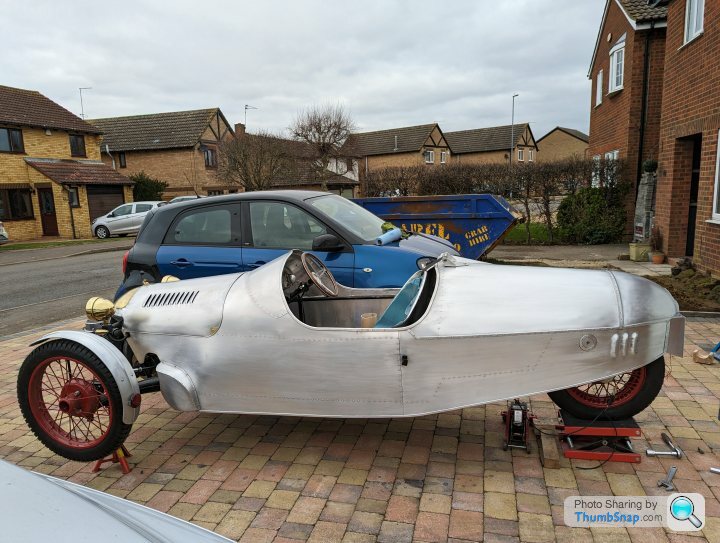
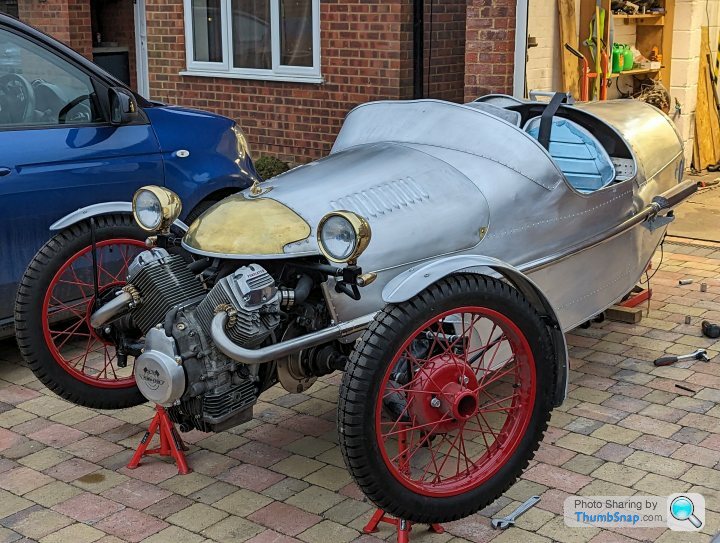
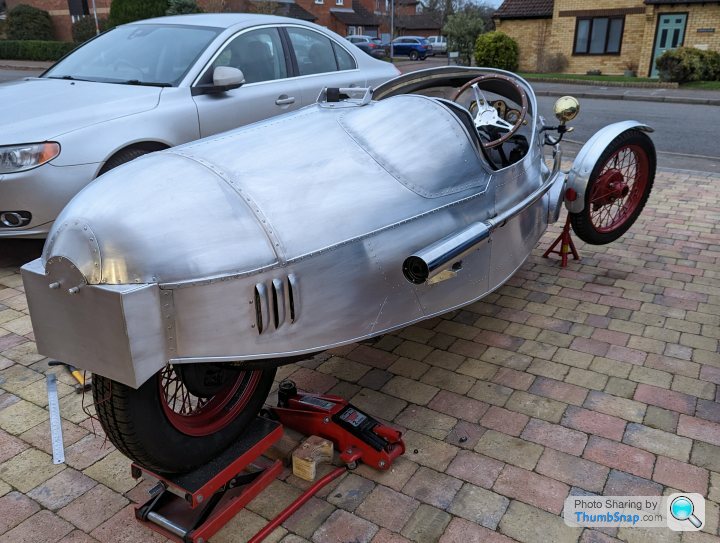
Pembleton mkII - Tin Tub
Discussion


The garage has been unbearable the last few weeks. Far too hot. Once the sun comes round the front the it beats down on two sides of the garage, the door and the roof and it just gets hotter and hotter. Grinding, welding etc doesn't help.
Picked up this baby on ebay second hand.
24". The amount of air it shifts is borderline offensive. It ain't quiet but then it doesn't need to be.

https://www.sealey.co.uk/product/5637189521/24-ind...
I paid £75 for it and it's just like new.
Picked up this baby on ebay second hand.
24". The amount of air it shifts is borderline offensive. It ain't quiet but then it doesn't need to be.
https://www.sealey.co.uk/product/5637189521/24-ind...
I paid £75 for it and it's just like new.
Thanks scrump, its not perfect, but it adds to the patination. To say it was a pain in the arse would be an understatement!
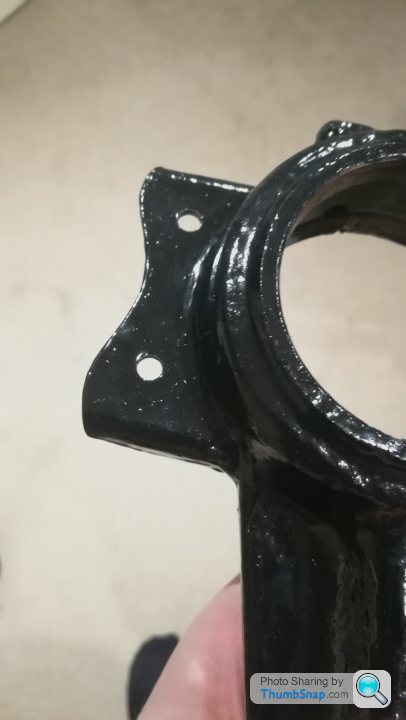
For anyone who remembers back to January 2019 (where tf does time go?!), I had the forethought back then to modify the Ami swivels to include bracketry at the rear as well as the front for some wing stays...
The front chunky mounts (M10) were originally for inertia dampers...
I hatched a plan a week or so back and ordered a length of half inch EN8 bar. I had a couple of meters of 30x30x3 angle iron already.
Bit of measuring, cutting, grinding, drilling, heating and bending later I have one side tacked up.
Please ignore the M10 bolts that are about 25mm too long (and the m12 nuts used as spacers), I need to get some that are the right length...


Just need to do the other side, fully weld, work out how to affix the wings, prime and paint....
For anyone who remembers back to January 2019 (where tf does time go?!), I had the forethought back then to modify the Ami swivels to include bracketry at the rear as well as the front for some wing stays...
The front chunky mounts (M10) were originally for inertia dampers...
In Jan2019 Ambleton said:
Welllll..... thought it was about high time I actually utilised them and scheme up some bracketry for the wings.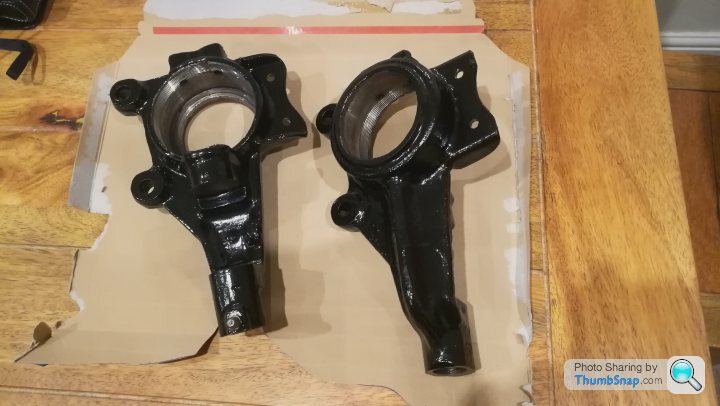
I hatched a plan a week or so back and ordered a length of half inch EN8 bar. I had a couple of meters of 30x30x3 angle iron already.
Bit of measuring, cutting, grinding, drilling, heating and bending later I have one side tacked up.
Please ignore the M10 bolts that are about 25mm too long (and the m12 nuts used as spacers), I need to get some that are the right length...
Just need to do the other side, fully weld, work out how to affix the wings, prime and paint....
Edited by Ambleton on Sunday 14th August 22:26
Ta very much. I know it may sound daft, but the "destination" is really all I care about.
I cant afford for a company or individual to build a car from scratch for me. I tried buying a pembleton and despite a lot of money and mods even that wasn't quite right for me in the end (height/width issue). Although it was a much better car when I sold it (and a reformed serial attempted murderer).
The journey is, tbh, a nescessary evil. That may sound like an odd way of putting it, but really there have been many times where I've been annoyed, head in hands, and hugely out of my depth. I want it to look a particular way and that means going off piste with a lot of bits, basically making it all up as I go along. Doesn't help that I'm a messy bugger
Purchased parts that haven't fit, made parts that I think look crap and remade a dozen times and then think "oh f k it that'll do". Coming up with whacky solutions to problems nobody else cares enought about (rear lights being one such thing)
My pal keeps telling me that "perfection is the enemy of excellence", and really without that I think I'd still be pissing about with meaningless bits that no one would ever see/notice. I just need to get the bloody thing OTR so I can enjoy it.
I cant afford for a company or individual to build a car from scratch for me. I tried buying a pembleton and despite a lot of money and mods even that wasn't quite right for me in the end (height/width issue). Although it was a much better car when I sold it (and a reformed serial attempted murderer).
The journey is, tbh, a nescessary evil. That may sound like an odd way of putting it, but really there have been many times where I've been annoyed, head in hands, and hugely out of my depth. I want it to look a particular way and that means going off piste with a lot of bits, basically making it all up as I go along. Doesn't help that I'm a messy bugger
Purchased parts that haven't fit, made parts that I think look crap and remade a dozen times and then think "oh f
k it that'll do". Coming up with whacky solutions to problems nobody else cares enought about (rear lights being one such thing)My pal keeps telling me that "perfection is the enemy of excellence", and really without that I think I'd still be pissing about with meaningless bits that no one would ever see/notice. I just need to get the bloody thing OTR so I can enjoy it.

Both sets of wing brackets now tacked up are looking amazingly symmetrical. The RHS fwd stay needed the tacks cutting and grinding first time round as it was a smidge high, but thats corrected now.
Next job is to work out how to mount the wings to them...
My wings we made for me by another pembleton builder, metalworker, vintage bike and car enthusiast, and all round good egg, Duncan, who helped me back in (checks thread) 2018 (jfc) to fold the floor....


Next job is to work out how to mount the wings to them...
My wings we made for me by another pembleton builder, metalworker, vintage bike and car enthusiast, and all round good egg, Duncan, who helped me back in (checks thread) 2018 (jfc) to fold the floor....
Right... So.... Where were we.....
Christmas has come and gone and I suppose I better don my garage scruffs and bugger on with the Pembleton.
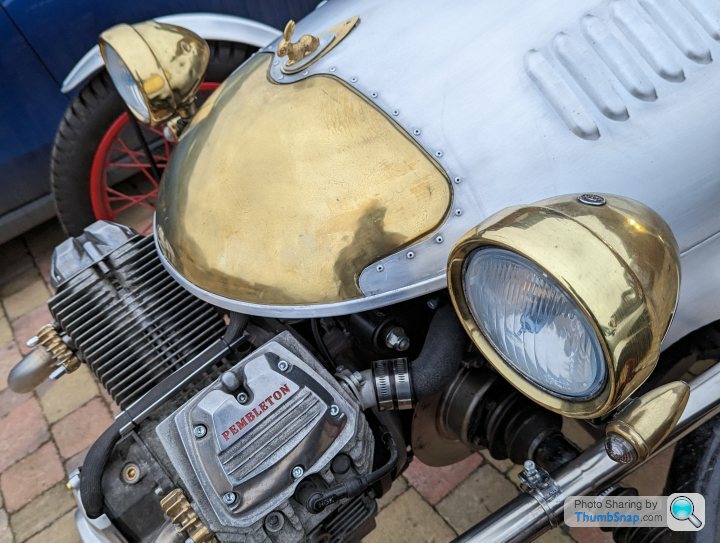
I was pondering mirrors and bought a pair of motorbike ones that are CE marked. I could've just drilled a hole through the bodywork and mounted then that way but instead I've made up some cranked stalks from some brass rod and some little mounting blocks out of some aluminium bar stock.
Please ignore the M5 screws sticking out. They'll be replaced with grub screws. Fixed with 4xM6 from the inside.


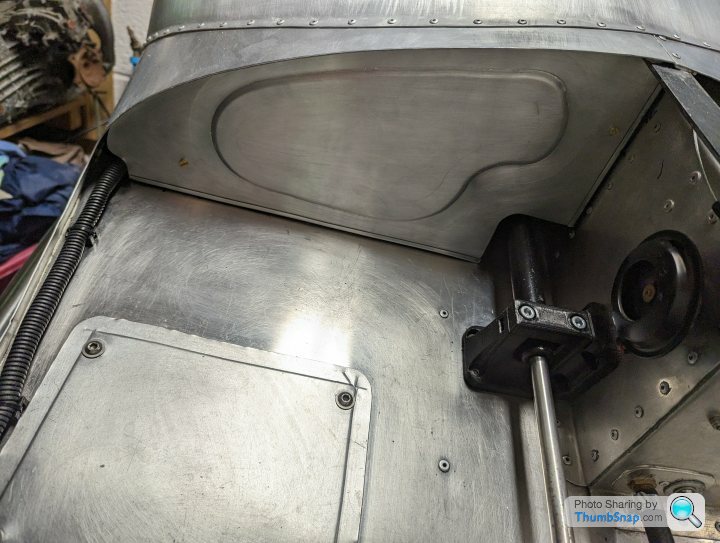
I've also made up some proper bracketry out of 2mm aluminium for the silencers. To mount back to the bodywork.


I've also refitted the nosecone and started to do the rest of the extruded edging.

And a detail for my wife...
 |https://thumbsnap.com/L6W9VoGd[/url]
(Which will be removed for MSVA)
Yes, I know it's not sitting flat, it's only placed on loosely.
I don't really have many big jobs to do now.
All little pissy jobs.
- Make a handbrake lever
- Connect the handbrake and make a little surround where the rod goes through the bulkhead.
- Finish wiring the lights
- Finish the wing brackets and mount
- Final fit of the exhaust
- Body Skirt edging
- Fit Mirrors
- Fit seatbelts
- Finish and fit the seats (including making passenger tilt and release mech)
- Remove, fettle and refit the dash
- Finish wiring the dash
Christmas has come and gone and I suppose I better don my garage scruffs and bugger on with the Pembleton.
I was pondering mirrors and bought a pair of motorbike ones that are CE marked. I could've just drilled a hole through the bodywork and mounted then that way but instead I've made up some cranked stalks from some brass rod and some little mounting blocks out of some aluminium bar stock.
Please ignore the M5 screws sticking out. They'll be replaced with grub screws. Fixed with 4xM6 from the inside.
I've also made up some proper bracketry out of 2mm aluminium for the silencers. To mount back to the bodywork.
I've also refitted the nosecone and started to do the rest of the extruded edging.
And a detail for my wife...
|https://thumbsnap.com/L6W9VoGd[/url](Which will be removed for MSVA)
Yes, I know it's not sitting flat, it's only placed on loosely.
I don't really have many big jobs to do now.
All little pissy jobs.
- Make a handbrake lever
- Connect the handbrake and make a little surround where the rod goes through the bulkhead.
- Finish wiring the lights
- Finish the wing brackets and mount
- Final fit of the exhaust
- Body Skirt edging
- Fit Mirrors
- Fit seatbelts
- Finish and fit the seats (including making passenger tilt and release mech)
- Remove, fettle and refit the dash
- Finish wiring the dash
Ambleton said:
I don't really have many big jobs to do now.
All little pissy jobs.
Done - Make a handbrake lever
Done - Connect the handbrake and make a little surround where the rod goes through the bulkhead.
Done - Sort gear knob
- Finish wiring the lights
- Finish the wing brackets and mount
- Final fit of the exhaust
- Body Skirt edging
- Fit Mirrors
- Fit seatbelts
- Finish and fit the seats (including making passenger tilt and release mech and seat pads)
- Make and fit arm pads
- Remove, fettle and refit the dash
- Finish wiring the dash
- Bonnet fixings
Next one that will be done is the dash out and fettle, followed by light wiring I think.All little pissy jobs.
Done - Make a handbrake lever
Done - Connect the handbrake and make a little surround where the rod goes through the bulkhead.
Done - Sort gear knob
- Finish wiring the lights
- Finish the wing brackets and mount
- Final fit of the exhaust
- Body Skirt edging
- Fit Mirrors
- Fit seatbelts
- Finish and fit the seats (including making passenger tilt and release mech and seat pads)
- Make and fit arm pads
- Remove, fettle and refit the dash
- Finish wiring the dash
- Bonnet fixings
Making my way through the list
(and adding more as I go
 )
)If the weather isn't crap all weekend I might roll her out of the garage and take stock from 10-20 yards back.


Thanks.
You'll notice the LHS has lower skirt edging, the RHS doesn't yet.
Also the exhausts aren't actually fitted yet, just loosely in place. Same with the bonnet. It's just placed on, need to figure out a way to secure it properly for the MSVA that won't leave holes when I change to the ford modelY catches I've cleaned up
It'll look better once all the little finishing details are in place properly and has mirrors and (post MSVA) some aero screens and rear rack fitted etc.
With the list of jobs getting smaller and smaller I thought id finish off my wing brackets as they were the only job with any real fabrication left... I think.
Cut, drilled and bent some brackets to match the wings.


Notched them out to sit on the stays better

Welded up, with a couple of coats of zinc primer and a couple of coats of black stippled coat.


Will get some photos fitted in some daylight next weekend.
Cut, drilled and bent some brackets to match the wings.
Notched them out to sit on the stays better
Welded up, with a couple of coats of zinc primer and a couple of coats of black stippled coat.
Will get some photos fitted in some daylight next weekend.
Other areas haven't been totally neglected either.
I finished the headlight wiring, removed, trimmed and refit the dash panel and added some keeper plates to the bonnet to lock it in place. You sort of angle it down and slide it back.
This keeps the bonnet tight to the scuttle and also means it can only go in one place.


I finished the headlight wiring, removed, trimmed and refit the dash panel and added some keeper plates to the bonnet to lock it in place. You sort of angle it down and slide it back.
This keeps the bonnet tight to the scuttle and also means it can only go in one place.
Good weekend.
Trimmed the mudguards down and beaded the edge as they were a bit long for my liking.
Fitted them to my painted cycle wing brackets.
Made up some little brackets for reflectors to go onto the back of the front wings and fitted them.
And trimmed the skirt the same on both sides and got the edging fitted. Bond is now going off whilst it's taped in position. I actually changed the shape of the rear skirt a fraction so it flows nicer.
I also bought some cheap as chips convex scooter mirrors from eBay for £13, I think Lexmoto? Who knows. Anyway, these are in ugly but nice smooth rounded plastic moulded housings which will pass the test. Will finish the seats before I decide on final locations but I have an idea.
Was so busy I forgot to take any photos...
So. What's left?
Bit of wiring to do.
Final fit of the zorsts
Finish the Seats
Mirrors
Test


Doofus said:
Ambleton said:
Not sure I'd want to do it again!
If that were true, you'd have started cutting corners 
Thats exactly why I'm not cutting corners! I don't intend on selling it or building another so I'm trying to get it right first time, hence I'm dithering!
If it was a quick fleeting fancy I would've bashed it out, used it for a season or two and shifted on!
I'm trying to get the big single hit items right like the bodywork and shape. Some things can easily be amended or added later. (screens, luggage rack, seating mods, etc)
Finished the dash (clocks, warning lights and switch) wiring today and made a cover. This doubles up as a "hidey" cover, but also will protect our from muck and detritus from under the bonnet and that.
At the moment is held in place with some M4 button heads but I've ordered some knurled thumb screws for easier access should I need it.
This is a list for myself more than anything....
List of jobs still to do:
1- Work out how to mount and latch passenger seat
2- upholster and fit seats
3- fit seat belts
BOOK MSVA
4- final fit of column
5- fit mirrors
6- adjust handbrake
7- set up suspension properly and set bump stops
8- do tracking
9- set up carbs
10- set up Speedo
11- make and fit front mudguard brows
12- fit engine guard
I have a whole list of jobs to do post MSVA too, which includes carpeting out the boot area and painting the inside of the cockpit. I did the last one in stonechip pick-up bed liner and it worked well and looked really good too.
I also want to make a luggage rack and a tonneau cover. And possibly rig up an external handbrake...
Right... I have actually been doing stuff in the background but I've also had some fairly upsetting family issues that I won't bore you with....
Regardless, we have more progress.

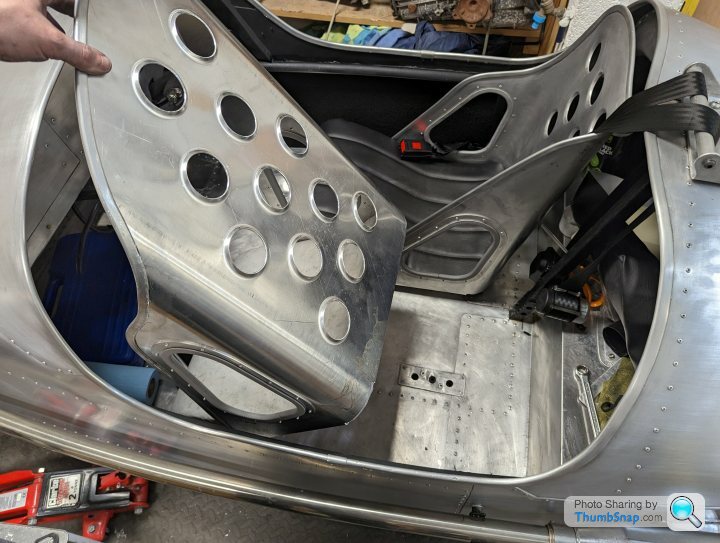
After my good lady made the seat covers for me I redid the seat backs (yes, again lol).
This time in 2mm aluminium NS4 half hard. Had the 2d flat patter laser cut and got my colleague at work to throw them on the brake and rollers.


I got in touch with PMC and got 3x 3m lengths of the smaller edge trim. The same as I used on the skirt. It's 13mm tall for reference...

With doubler plates and trim around the belt pass through holes I mounted them to the bases and trimmed to the barrel back. Next joy was actually forming the edge trim... What an arse of a job that is


Driver's seat dearly ready for final fit. Got a little bit more work to do on passenger seat but coming along...
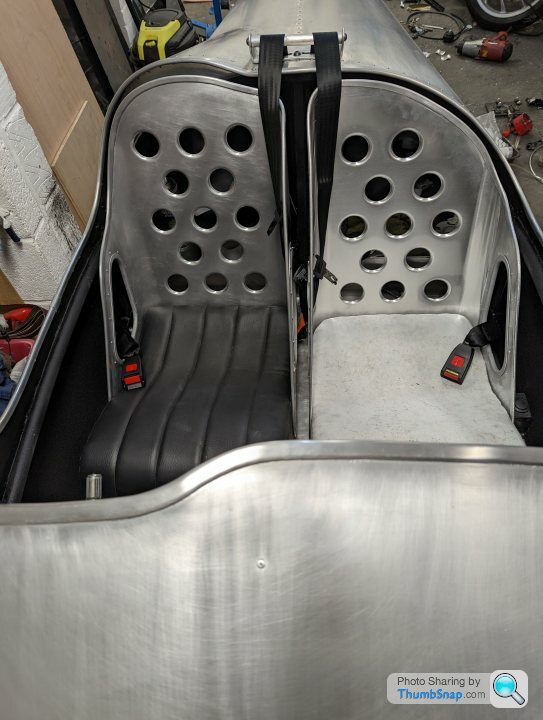

Sharp eyed amongst you may notice I've carpeted the interior lower sides and painted above the chassis rail in crinkle black.

Still got the seat cover to put on the passenger seat as well as the striker for the latch, which is under the floor and allows the whole passenger seat to hinge forward. The driver's seat is on rails.
Button is located on the floor just to the left of the seat.
Regardless, we have more progress.
After my good lady made the seat covers for me I redid the seat backs (yes, again lol).
This time in 2mm aluminium NS4 half hard. Had the 2d flat patter laser cut and got my colleague at work to throw them on the brake and rollers.
I got in touch with PMC and got 3x 3m lengths of the smaller edge trim. The same as I used on the skirt. It's 13mm tall for reference...
With doubler plates and trim around the belt pass through holes I mounted them to the bases and trimmed to the barrel back. Next joy was actually forming the edge trim... What an arse of a job that is
Driver's seat dearly ready for final fit. Got a little bit more work to do on passenger seat but coming along...
Sharp eyed amongst you may notice I've carpeted the interior lower sides and painted above the chassis rail in crinkle black.
Still got the seat cover to put on the passenger seat as well as the striker for the latch, which is under the floor and allows the whole passenger seat to hinge forward. The driver's seat is on rails.
Button is located on the floor just to the left of the seat.
Ahhh, a bank holiday weekend.
I'd provisionally pencilled in 3 days of tinker time but apparently my OH actually wanted to spend some time with me (jokes on her... I think).
As such I sacrificed my Sunday to potter around a national trust property and gardens. It wasn't all bad news though because a coffee and a slice of cake was my reward.... Plus I got to witness a father of two boisterous boys try for about 30mins to fish a frisbee out of a big pond using a variety of branches he'd selected from the nearby woodland, without falling in himself. It was prime entertainment.
So... What did I do with my Saturday and Monday?
Actually rather a lot. I'm in full "prep for MSVA" mode now.
Saturday I did the timing and balanced the carbs, set up the throttle cable and clutch etc. It's now running absolutely sweet as a nut with an idle of 740rpm
Today I did a whole bunch of other stuff:
1- ride height raised a bit
2- bump stops fitted
3- tracking (this is a bit tricky on a three wheeler)
4- mudguard brows made and bonded on
5- wheel centres fitted
6- bled the brakes
7- calibrated the speedo
The other week I also fitted a sump spacer to the engine. The oil works very hard in the small block. Not only are they fully air cooled, but there's also only 1.85L of oil in there as standard. The sump spacer increases the oil capacity by over 1L, to a smidge under 3L total capacity. I also have a temp gauge to fit to monitor bulk oil temp.
I've also been suffering with a brake fluid loss. IMO there's two fluids you don't want pissing. One is brake fluid, the other is fuel.
At first I thought it was a caliper as the LHM was dripping off the brake disc. In the end it turned out to be donut seals around the reservoir-M.Cylinder. The fluid was running along the body of the M.cyl and then tracking along the brake line, onto the caliper and then onto the disc.
These seals were split (new M.Cyl). I had another, old master cyl and those seals were much more supple and squidgy so stole those to fit.
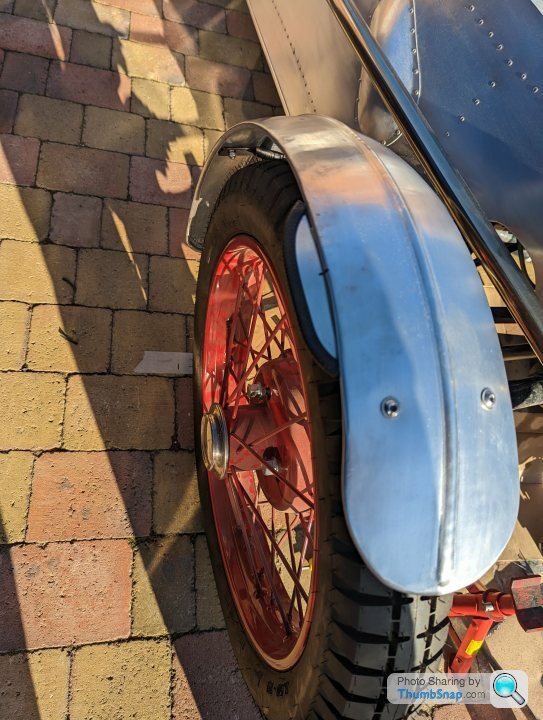
Here's a pic of the wing eyebrows to cover the wheel centres in a true plan view (required for MSVA)
I'd provisionally pencilled in 3 days of tinker time but apparently my OH actually wanted to spend some time with me (jokes on her... I think).
As such I sacrificed my Sunday to potter around a national trust property and gardens. It wasn't all bad news though because a coffee and a slice of cake was my reward.... Plus I got to witness a father of two boisterous boys try for about 30mins to fish a frisbee out of a big pond using a variety of branches he'd selected from the nearby woodland, without falling in himself. It was prime entertainment.
So... What did I do with my Saturday and Monday?
Actually rather a lot. I'm in full "prep for MSVA" mode now.
Saturday I did the timing and balanced the carbs, set up the throttle cable and clutch etc. It's now running absolutely sweet as a nut with an idle of 740rpm
Today I did a whole bunch of other stuff:
1- ride height raised a bit
2- bump stops fitted
3- tracking (this is a bit tricky on a three wheeler)
4- mudguard brows made and bonded on
5- wheel centres fitted
6- bled the brakes
7- calibrated the speedo
The other week I also fitted a sump spacer to the engine. The oil works very hard in the small block. Not only are they fully air cooled, but there's also only 1.85L of oil in there as standard. The sump spacer increases the oil capacity by over 1L, to a smidge under 3L total capacity. I also have a temp gauge to fit to monitor bulk oil temp.
I've also been suffering with a brake fluid loss. IMO there's two fluids you don't want pissing. One is brake fluid, the other is fuel.
At first I thought it was a caliper as the LHM was dripping off the brake disc. In the end it turned out to be donut seals around the reservoir-M.Cylinder. The fluid was running along the body of the M.cyl and then tracking along the brake line, onto the caliper and then onto the disc.
These seals were split (new M.Cyl). I had another, old master cyl and those seals were much more supple and squidgy so stole those to fit.
Here's a pic of the wing eyebrows to cover the wheel centres in a true plan view (required for MSVA)
MSVA application assessed and approved.
Paid for and booked for 7th June (earliest availability).
Need to look into hiring a trailer to get it there and back. I don't fancy an hour+ either way in rush hour on its maiden voyage!
Fitted the mirrors this weekend. I didn't much like drilling the bodywork!
Paid for and booked for 7th June (earliest availability).
Need to look into hiring a trailer to get it there and back. I don't fancy an hour+ either way in rush hour on its maiden voyage!
Fitted the mirrors this weekend. I didn't much like drilling the bodywork!
Gassing Station | Readers' Cars | Top of Page | What's New | My Stuff