1964 Alvis Stalwart
Discussion


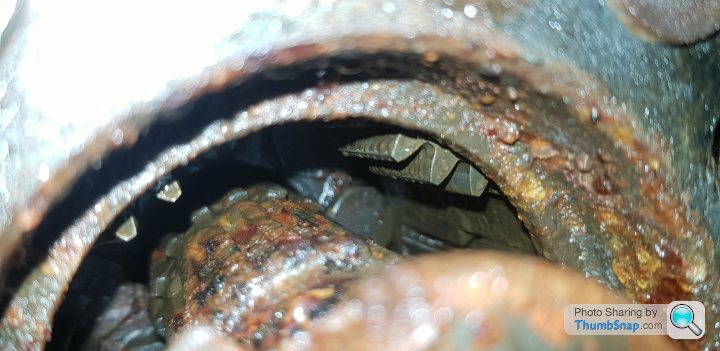
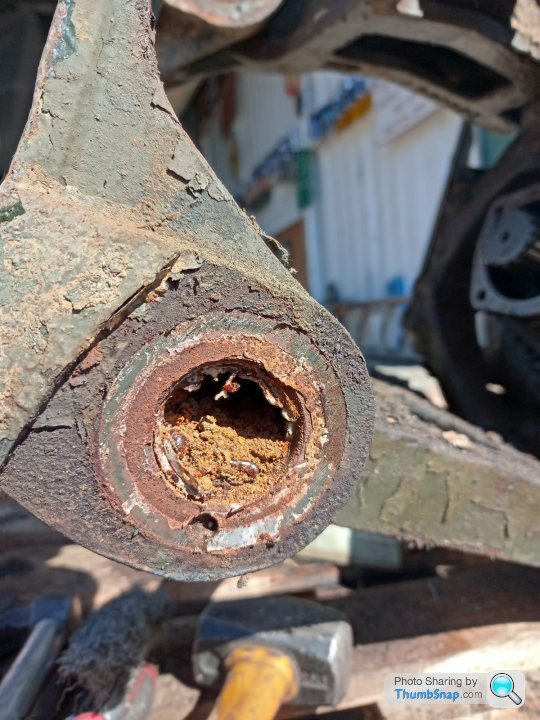
Yep it's a lump, you wouldn't want to trap anything in between it put it that way!
I know we joke but technically the suspension should be aligned to some level, the hulls are known to move around a surprising amount especially in heavy use, I spoke to a chap who is ex Fazakerley Engineering who fully rebuilt Stalwarts for the military back in the day and he said they used to have a long piece of inch rod that they'd pass through all the wishbone holes to make sure everything was roughly in line. Whether they were skimmed or packed out with the hull facing material I don't know.
Hopefully get another shift in on it tomorrow, I'm determined to get that drive attached properly! With the potholes around our way at the moment I could really do with it as transport
Thanks very much MD, your kind words are always appreciated. I admit even at 29 after having the hub on and off about 500 times yesterday I ache like a b d with a few abrasions too!
Get that Stolly bought! It's even HPI clear, what more could a man ask for? A mate has a couple of Supacats and they are bloody cool but a weird old thing mechanically, as I remember they're chain drive inside using Land Rover hubs etc on the outside. He has a WMIK one (weapons mounted installation kit) and a standard, which without preparation he decided to launch into his big pond, and swiftly sunk

That'd be quite a thing to sober up in the morning to, then realise you have to admit said purchase to the better half
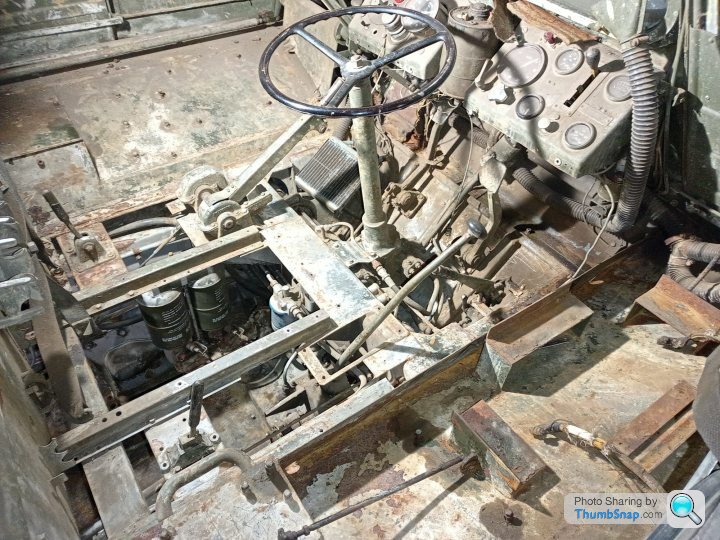
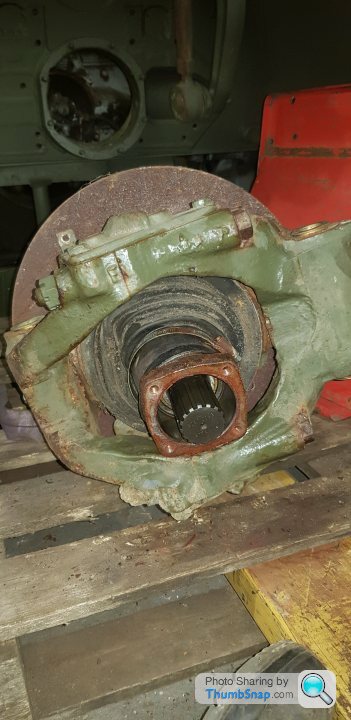
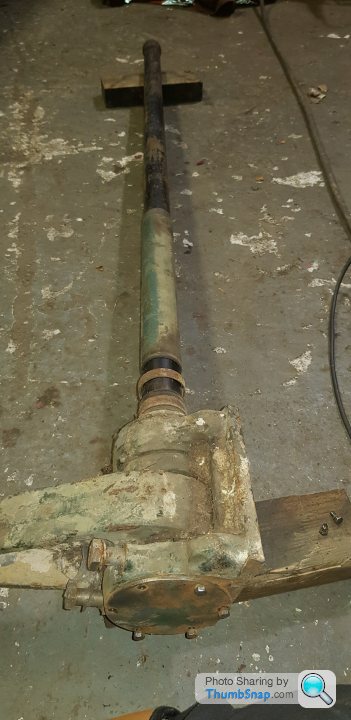
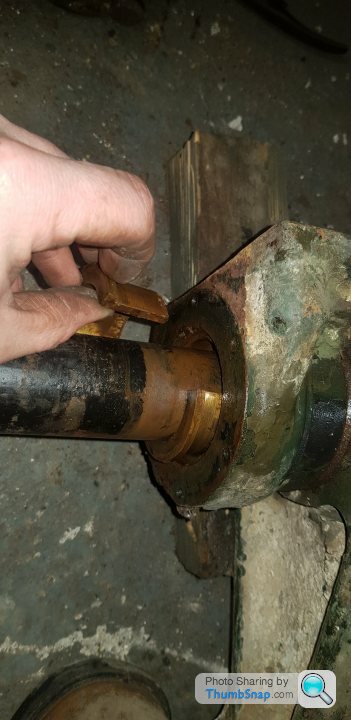
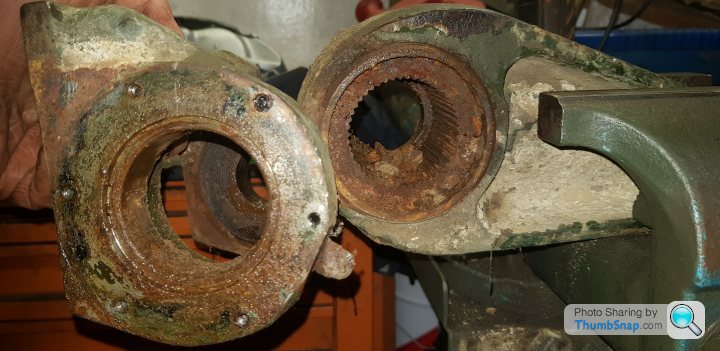
Back to the rusty heap, yesterday was quite a struggle. We eventually managed to get the splined drive aligned and together with pin and lock ring in place... then the 4 bolt flange locking the outer swivel housing to the inner simply would not line up correctly.

So off it came again, a bit of modification and back on again. We managed to get the top suspension pin in and then all it needed was to be pushed in and down that last little bit to line the bottom pin up. Would it go in? No it bloody wouldn't. The only thing that could bind it up would be the inner tracta joint pulling out of alignment, as in that drive joint behind the stub poking out of the hull a good few posts ago, behind the wishbones and shocks. Unfortunately we'd been pulling the whole lot backwards and forwards a bit for access and in the process the drive knuckles had been pulled apart just enough to disengage and drop inside the inner swivel housing. So, pin out, off it came again in the hopes that we could pull it back far enough to see inside and realign the joint.
We had at best an inch gap to work through, roughly realigned everything and tried again. With a good shove and a satisfying clonk it all went together perfectly. A great relief after hours of head scratching and swearing!
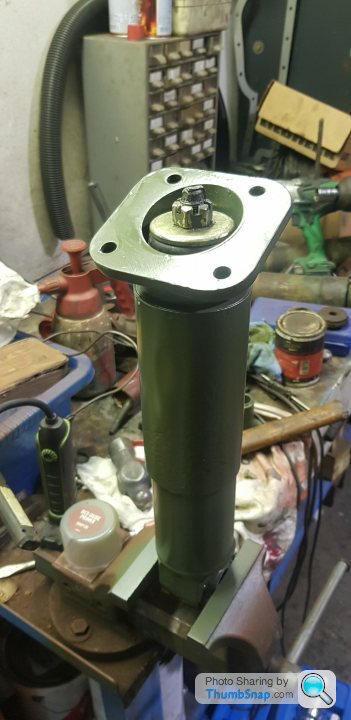
Shocks fitted, backplates and calliper on we finally have this


d with a few abrasions too! Get that Stolly bought! It's even HPI clear, what more could a man ask for? A mate has a couple of Supacats and they are bloody cool but a weird old thing mechanically, as I remember they're chain drive inside using Land Rover hubs etc on the outside. He has a WMIK one (weapons mounted installation kit) and a standard, which without preparation he decided to launch into his big pond, and swiftly sunk
That'd be quite a thing to sober up in the morning to, then realise you have to admit said purchase to the better half
Back to the rusty heap, yesterday was quite a struggle. We eventually managed to get the splined drive aligned and together with pin and lock ring in place... then the 4 bolt flange locking the outer swivel housing to the inner simply would not line up correctly.
So off it came again, a bit of modification and back on again. We managed to get the top suspension pin in and then all it needed was to be pushed in and down that last little bit to line the bottom pin up. Would it go in? No it bloody wouldn't. The only thing that could bind it up would be the inner tracta joint pulling out of alignment, as in that drive joint behind the stub poking out of the hull a good few posts ago, behind the wishbones and shocks. Unfortunately we'd been pulling the whole lot backwards and forwards a bit for access and in the process the drive knuckles had been pulled apart just enough to disengage and drop inside the inner swivel housing. So, pin out, off it came again in the hopes that we could pull it back far enough to see inside and realign the joint.
We had at best an inch gap to work through, roughly realigned everything and tried again. With a good shove and a satisfying clonk it all went together perfectly. A great relief after hours of head scratching and swearing!
Shocks fitted, backplates and calliper on we finally have this
Thanks Niall, that will roll round much sooner than you think! It does look absolutely cracking though, Scramble should be a nice run out for it.
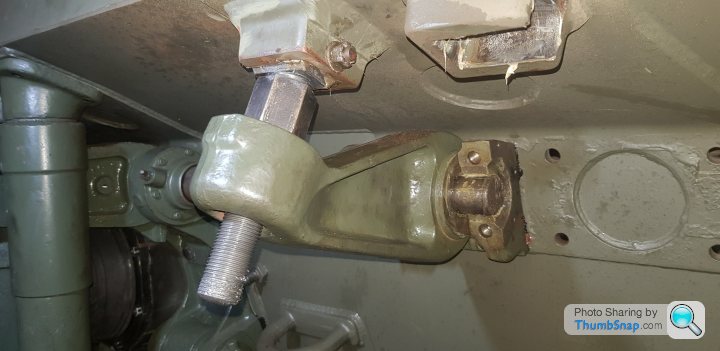
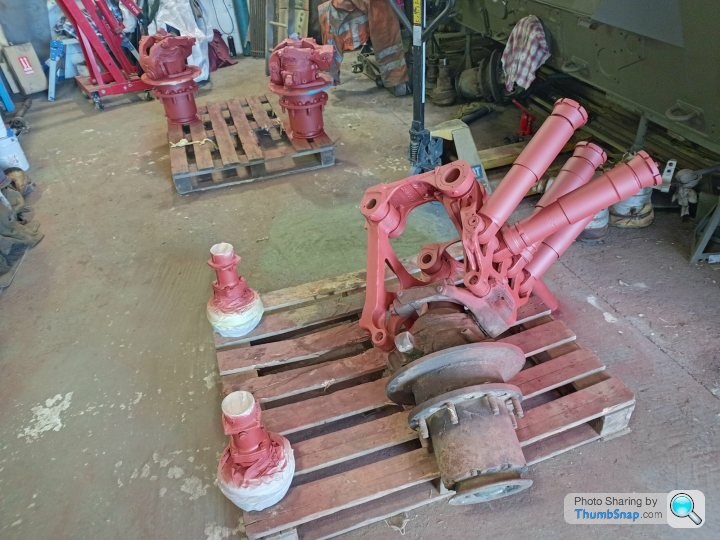
Fortunately I do have 4 spare wheel stations now, a full set of 3 LH ones so 2 steering and one fixed, fundamentally the mechanical part remains the same between them all, the front simply has two track rod eyes, the middle one, and the rear is fixed with lock plates to keep it straight.
There is another in the storage shed but I can't remember what for, so apart from getting the old ones out of the suspension units in theory it should be a paint and swap over job as opposed to stripping and rebuilding from scratch, which should speed things up a tad
All too kind you know I'm just a fat bloke with a hammer!
Today was the first day back on the Wart for a couple of weeks as had a few other things going on and it's been rather chilly!
Annoyingly after fitting the wheel station I tried fitting the torsion bar assembly and reaction arm all in one and speared straight through the rubber gaiter that joins each wishbone on the torsion bar tube. It was pretty clear it'd have to come apart to fit the bar on its own then build up once on the hull so we set about making a gaiter by wrapping round some flat rubber sheet and clipping it together, then using tiger seal adhesive to glue the centre together. This was an absolute sod to fit right back behind the shocks at the hull, we tried some 60mm rubber rad hose but that proved too chunky to fit next to the bevel box housing so that was a no go.
Anyway a few pics of stripping the bar assembly, thankfully far easier and relatively straightforward than I'd built the task up to be in my head. That's the thing with Stollies, if you assume the worst at least in theory it can only go as bad or better than you thought as a bonus


When you consider this is all the 'spring' that big assembly needs it is mighty impressive as relatively speaking they take up no space, the whole design really is quite something for a vehicle of its time. In a way I'm glad I've been forced to take this bit apart as it's fairly simple and gives a chance to clean all the crap out and lubricate properly etc. There are videos in period of them driving over a line of railway sleepers at speed and the whole vehicle staying more or less level as the wishbones shoot up and down. The suspension is very tight and squeaky at the moment but with lubrication and use I'm hoping this will improve hugely more or less back to how it should be
Today was the first day back on the Wart for a couple of weeks as had a few other things going on and it's been rather chilly!
Annoyingly after fitting the wheel station I tried fitting the torsion bar assembly and reaction arm all in one and speared straight through the rubber gaiter that joins each wishbone on the torsion bar tube. It was pretty clear it'd have to come apart to fit the bar on its own then build up once on the hull so we set about making a gaiter by wrapping round some flat rubber sheet and clipping it together, then using tiger seal adhesive to glue the centre together. This was an absolute sod to fit right back behind the shocks at the hull, we tried some 60mm rubber rad hose but that proved too chunky to fit next to the bevel box housing so that was a no go.
Anyway a few pics of stripping the bar assembly, thankfully far easier and relatively straightforward than I'd built the task up to be in my head. That's the thing with Stollies, if you assume the worst at least in theory it can only go as bad or better than you thought as a bonus
When you consider this is all the 'spring' that big assembly needs it is mighty impressive as relatively speaking they take up no space, the whole design really is quite something for a vehicle of its time. In a way I'm glad I've been forced to take this bit apart as it's fairly simple and gives a chance to clean all the crap out and lubricate properly etc. There are videos in period of them driving over a line of railway sleepers at speed and the whole vehicle staying more or less level as the wishbones shoot up and down. The suspension is very tight and squeaky at the moment but with lubrication and use I'm hoping this will improve hugely more or less back to how it should be
Very lucky, I know back in the 70s a lot of American muscle made use of torsion bars on the front suspension like Challengers etc.
Thanks very much for those words, if you ever get chance and are interested have a look at some of the Australian Armour and Artillery Museum restoration videos on YouTube, absolutely superb work and what they'll build into a full tank or tank destroyer from a collection of blown up bent and buckled pieces of armour plate is truly amazing. Well and truly puts any of my measly efforts to shame!
I wish I had more regular and interesting updates for the thread but it's difficult when half the time you're on your own, or at work working on other large vehicles to pay for your hobby of working on large vehicles
A very similar Pathe video to that is 'On 6 wheels anywhere', at the end they land on the ramp of a troop ship, looks bloody scary!
Today was operation fit torsion bar assembly to hull, firstly the 'holder' was bolted up, then bar pushed back into position ready to fit the splined reaction arm.
Before fitting the arm I thought I'd make sure the torsion adjustment nut would move nicely. So begins a day of struggle
It was tight as hell all the way off, 2ft Stilsons with a 5ft scaffold tube plus the thread glowing orange following some help from my friends oxy and acetylene had it off eventually!
Removed the lug and stud from its holder on the hull and cleaned up inside and greased. It's a half moon of sorts that sits inside a female housing so allows a slight amount of movement.

I rotary wire brushed the threads to clean them up and gave it a dress up with the edge of a file where it'd picked up, sadly I don't have a 1" UNF tap and die (now on order) so with it in the vice I used the old trick of cutting a slot in the thread with a thin cutting disc and coated it in some valve grinding paste to try and act like a self tapper.
This worked surprisingly well and having wound the nut up and down a few times working back and forth I could easily wind it up and down by hand. Not bad for something that an hour previously needed a scaff bar to turn!
Bar and reaction arm in place
Winding some tension into the bar, we tried a jack under the hub to see if it'll move up and down, with no engine or weight in the back there's a bit of movement but not a lot til the whole thing starts to lift off the stands!
Finally a nice piece of breather hose fitted with freshly painted clips etc, all nice little details to add to the finished product. It might be ready by the time fossil fuels are a long distant memory
Before fitting the arm I thought I'd make sure the torsion adjustment nut would move nicely. So begins a day of struggle
It was tight as hell all the way off, 2ft Stilsons with a 5ft scaffold tube plus the thread glowing orange following some help from my friends oxy and acetylene had it off eventually!
Removed the lug and stud from its holder on the hull and cleaned up inside and greased. It's a half moon of sorts that sits inside a female housing so allows a slight amount of movement.
I rotary wire brushed the threads to clean them up and gave it a dress up with the edge of a file where it'd picked up, sadly I don't have a 1" UNF tap and die (now on order) so with it in the vice I used the old trick of cutting a slot in the thread with a thin cutting disc and coated it in some valve grinding paste to try and act like a self tapper.
This worked surprisingly well and having wound the nut up and down a few times working back and forth I could easily wind it up and down by hand. Not bad for something that an hour previously needed a scaff bar to turn!
Bar and reaction arm in place
Winding some tension into the bar, we tried a jack under the hub to see if it'll move up and down, with no engine or weight in the back there's a bit of movement but not a lot til the whole thing starts to lift off the stands!
Finally a nice piece of breather hose fitted with freshly painted clips etc, all nice little details to add to the finished product. It might be ready by the time fossil fuels are a long distant memory

That is a pretty good idea about a hybrid set up using motors. It's amazing how relatively old fashioned a lot of modern military stuff is, mostly older vehicles with modern bits bolted on. When you think Challenger 3 is in development now to counter the latest kit and to my knowledge we're still using the same Rolls-Royce/Perkins CV12 in it that Challenger 1 was powered by all the way back in 1981. Challenger 2 has been around since the mid 90s, so it will be interesting to see how they fare in Ukraine as I suspect it may come as an unpleasant surprise.
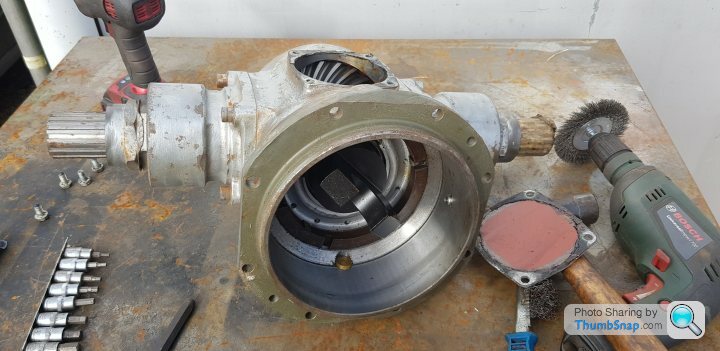
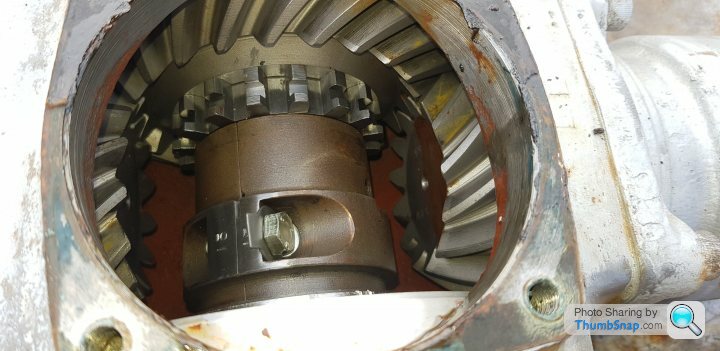
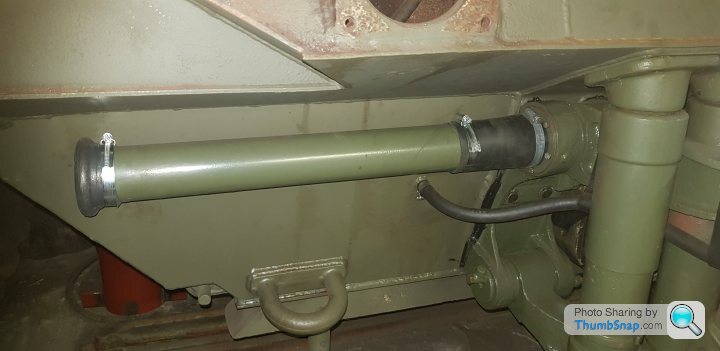
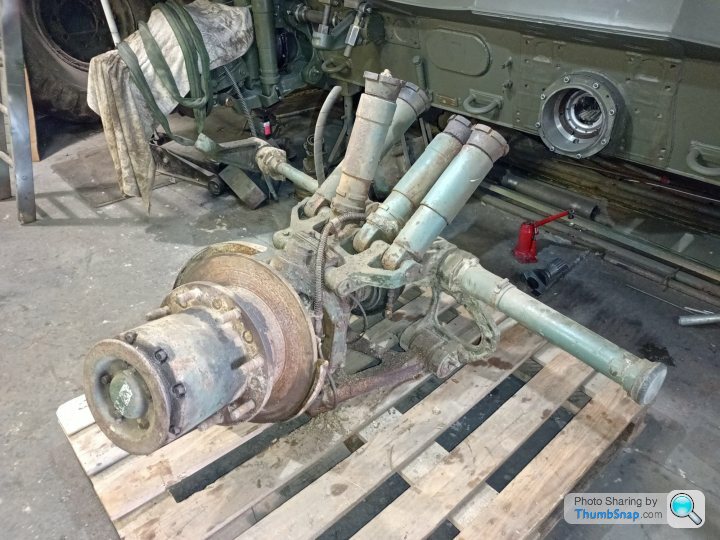
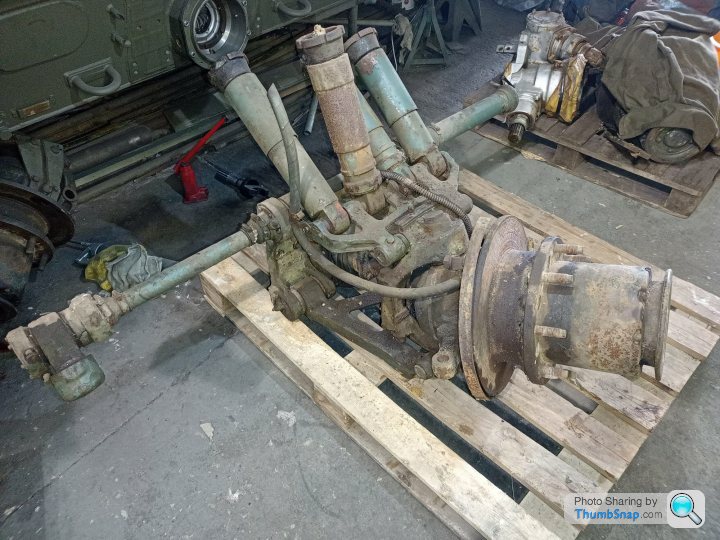
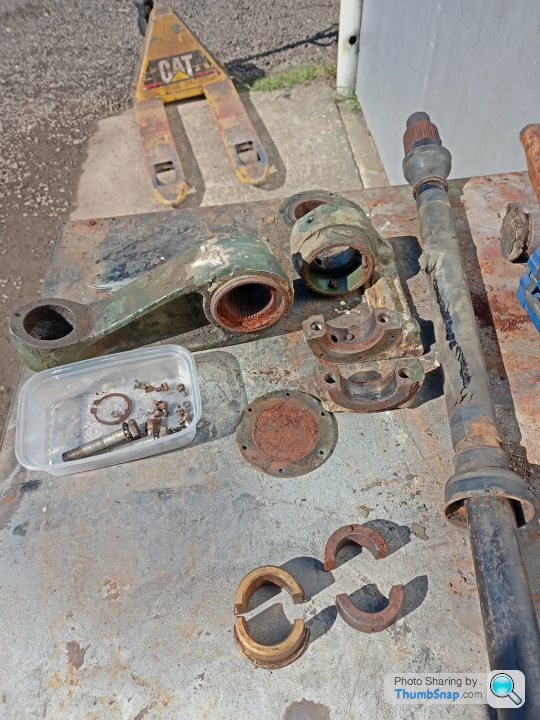
Today we retrieved a centre bevel box from the parts horde ready to clean up for fitment. You may remember the huge struggle I had getting the sliding drive couplings back inside the centre bevel boxes as they'd rusted solid into the transfer box. Well these ones look quite a lot nicer!
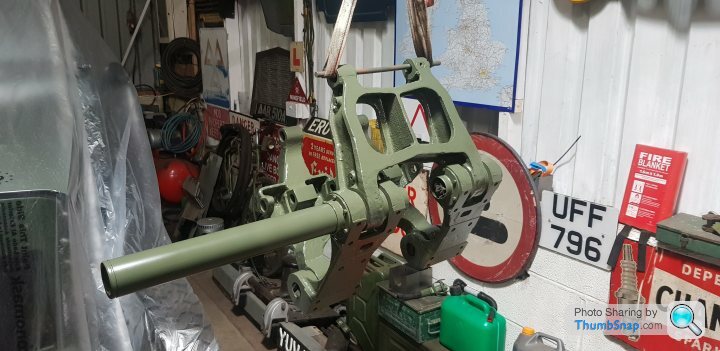
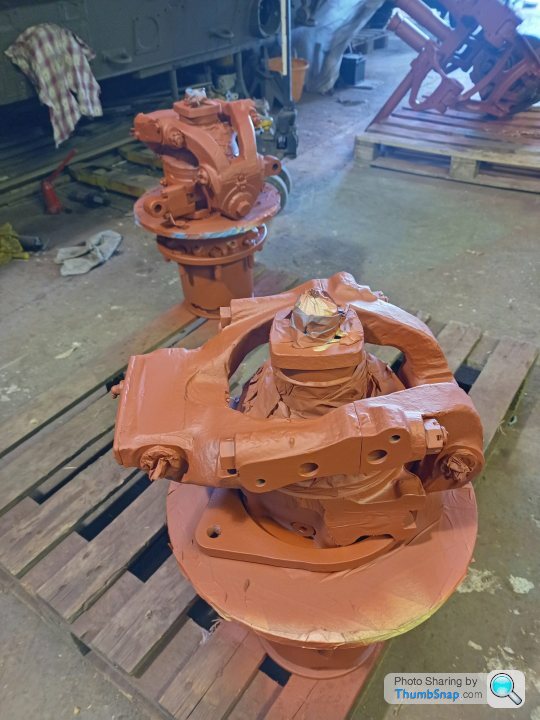
They look really nice painted up in some 2k silver, next step fit to hull!


Today we retrieved a centre bevel box from the parts horde ready to clean up for fitment. You may remember the huge struggle I had getting the sliding drive couplings back inside the centre bevel boxes as they'd rusted solid into the transfer box. Well these ones look quite a lot nicer!
They look really nice painted up in some 2k silver, next step fit to hull!
Seems a bit mad really that particularly in these tense times we've allowed our fleet to get so low. I know the days of the tank are pretty much done but you'd still expect more than that!

Through the hobby back in 2018 we had a look in Andy Baker's Chally 1 at War and Peace, stunning vehicle but if you were placed inside and didn't know any different you'd think you were in a Chieftain no doubt about it. I certainly don't envy anyone that's had to go to war in any of these things, let alone back to WW2 era and before
Through the hobby back in 2018 we had a look in Andy Baker's Chally 1 at War and Peace, stunning vehicle but if you were placed inside and didn't know any different you'd think you were in a Chieftain no doubt about it. I certainly don't envy anyone that's had to go to war in any of these things, let alone back to WW2 era and before
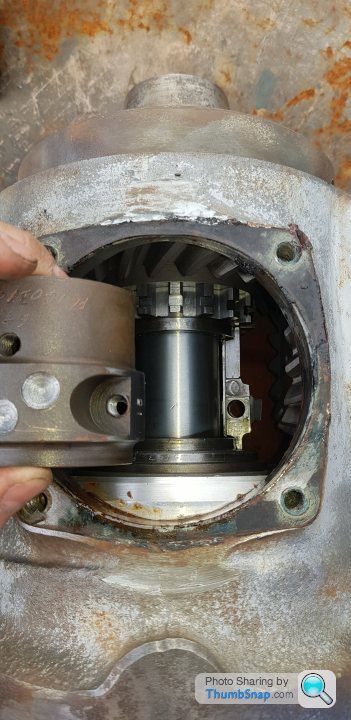
Another day, another bevel box. This being the centre right hand one. Got the hull all cleaned out and tried dry fitting, it was tight as hell and after a great many tries it finally went all the way home. My mate Tyler cleaned out inside the hull underneath the cab floor and found one of the hull drain bungs, a 7/16 spanner and best of all a mummified mouse
We checked the wheel stations on the pallet from a few posts back and it looks like we have a front RH and a LH, and a LH centre. This could be a big bonus as it should save rebuilding the front right station, so it may be rolling sooner rather than later. Fingers crossed for Christmas 2046

Regards driving on the road the licence sort of depends on what you actually register it as. That is a bit of a concern to get sorted soon, as road registering them is getting difficult/impossible now. It's a bit of a grey area but I was hoping to potentially register as a 'mobile project vehicle' meaning I'd only be able to drive it for the purpose of 'education or display'. Ideally I'd rather not do my HGV as it's pricey and a bit of a faff. I keep on nagging work to find a reason to pay for me to do the licence but annoyingly as I work in the earthmoving department there isn't really any need as it's only big diggers and off road plant I work on, not cranes that need road test after repair etc.
There has been some progress since last time round, I need to get a move on in a big way over the next few months as early September all things being well I shall be a Dad

Tyler has been busy cramming all 6ft5 of himself inside and underneath the cab with a Henry hoover and reminding me what a crap job I did of pressure washing it all out
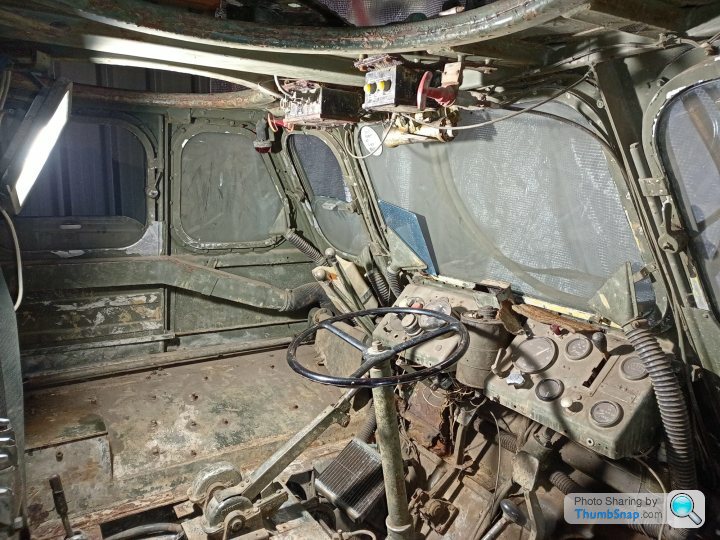

It is quite clear at some point she has had a front end prang as when he removed the floor plates there was loads of glass underneath and you can see the shoddy welds on the outside as they've grafted a repair section in up to the lower portion of the windows.
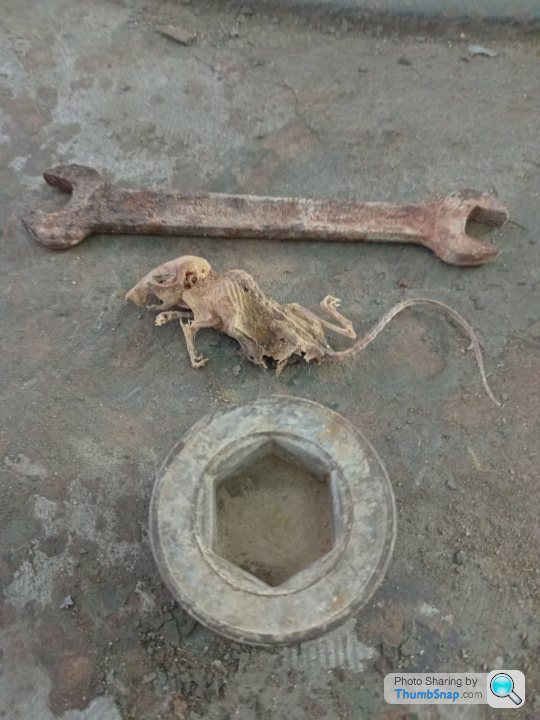
These are the treasures from his archaeological dig into her bowels, a rusty spanner, a quite dead mouse, and a hull drain bung!
We had a bloody good sort out at the weekend moving wheel stations that aren't needed at the moment back into storage, then pulled the old centre right station out to convert/refurbish.
I stripped the torsion bar this evening ready for bare metalling and paint, and cracked on with getting the new and old stations apart.
One pin came out, sadly the top one was absolutely solid even with heat and a sledgehammer so no messing about, let's chop it!
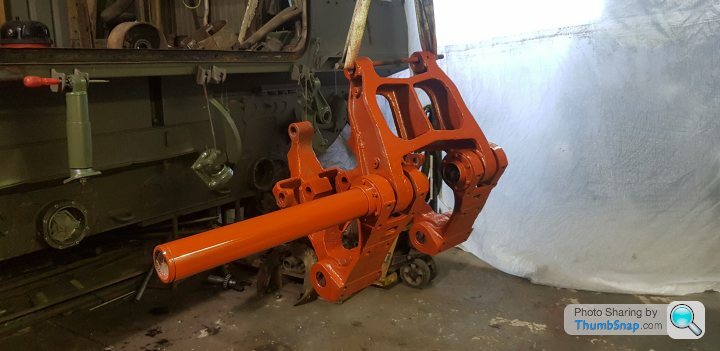
The 'new' recon station split in half ready to be masked, cleaned up and painted.
Torsion bar took some bashing apart, no surprise there!
Bracket and reaction arm ready for cleaning up
I need to rotate the 'old' station to split in half to remove from the wishbones in the same way I have the new, it's a bit seized up at present as it's full of half a river, so there's this week's challenge

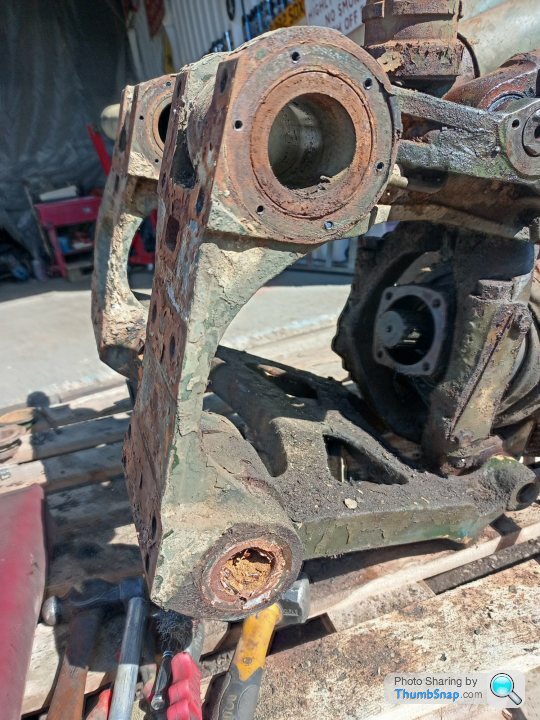
You can see why I've taken the decision to completely replace this one, I will clean this one up for parts I think
There has been some progress since last time round, I need to get a move on in a big way over the next few months as early September all things being well I shall be a Dad
Tyler has been busy cramming all 6ft5 of himself inside and underneath the cab with a Henry hoover and reminding me what a crap job I did of pressure washing it all out
It is quite clear at some point she has had a front end prang as when he removed the floor plates there was loads of glass underneath and you can see the shoddy welds on the outside as they've grafted a repair section in up to the lower portion of the windows.
These are the treasures from his archaeological dig into her bowels, a rusty spanner, a quite dead mouse, and a hull drain bung!
We had a bloody good sort out at the weekend moving wheel stations that aren't needed at the moment back into storage, then pulled the old centre right station out to convert/refurbish.
I stripped the torsion bar this evening ready for bare metalling and paint, and cracked on with getting the new and old stations apart.
One pin came out, sadly the top one was absolutely solid even with heat and a sledgehammer so no messing about, let's chop it!
The 'new' recon station split in half ready to be masked, cleaned up and painted.
Torsion bar took some bashing apart, no surprise there!
Bracket and reaction arm ready for cleaning up
I need to rotate the 'old' station to split in half to remove from the wishbones in the same way I have the new, it's a bit seized up at present as it's full of half a river, so there's this week's challenge
You can see why I've taken the decision to completely replace this one, I will clean this one up for parts I think
Edited by LewG on Tuesday 14th March 21:46
Thanks all! Indeed it can be a bit of a busman's holiday but fundamentally I enjoy working on the thing and the time just flies by. Work has taught me some pretty valuable skills in working on big seized crap and borrowing their equipment on occasion is an additional plus
Annoyingly I passed my test in 2010 so the 7.5 tonne 'grandfather rights' are a no go for me. It is mostly the width issue to my knowledge, although with suspension adjustment I believe the measurement across the hubs can be reduced. We shall see, I'll have a go at registering and keep my fingers crossed.
Annoyingly I passed my test in 2010 so the 7.5 tonne 'grandfather rights' are a no go for me. It is mostly the width issue to my knowledge, although with suspension adjustment I believe the measurement across the hubs can be reduced. We shall see, I'll have a go at registering and keep my fingers crossed.
I'm not sure about that, I believe on Mk2s they have 2 'Airpaks' doing 3 wheels a piece, this being Mk1 it is effectively single circuit with only the one Airpak. Yellowjack is right about the FV432, they use steering brakes as main brake and handbrake, and with Bulldog it was indeed upgraded to have separate main brakes I assume from a safety perspective. When we had our CVRT on the road that was fine as no width issue, and built with 2 sets of discs and callipers, main brakes on the footbrake and steering tillers on their own set of discs and pads.
It makes me wonder whether it's a HGV thing as my Series Landy only has single circuit brakes and no issue there, it was always adds a degree of background excitement when flying down a mountain pass in Wales that's for sure.
Big congrats to you too Niall, think it's about time we both got a move on! This wasn't in the plan for this year and definitely wasn't for trying chuffed all the same though.
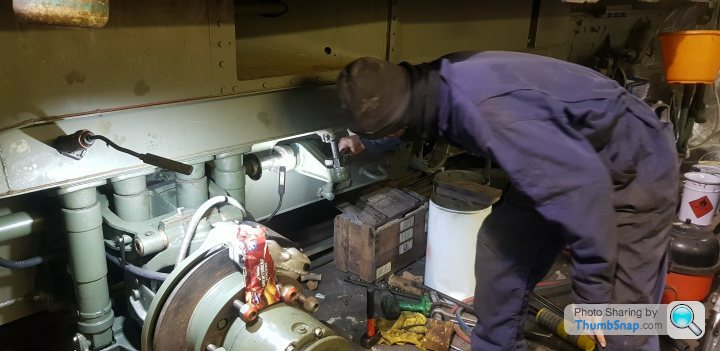
Spent some time messing around with other stuff at home today and popped to the yard this afternoon to find Tyler had separated the hub I was messing around with in the week so that was a great step forward and much appreciated. We heated the ends of the wishbones up to glowing orange and it still took a drift and club hammer to get the ends of the cut pin out!
After that lots of cleaning bits up and wire brushing, all with the help of Mrs G to be in appropriate work gear. I would definitely be killed if she knew I'd posted a pic. On the plus side she seems to have found a new calling in life with tapping out UNF threads. Suits me
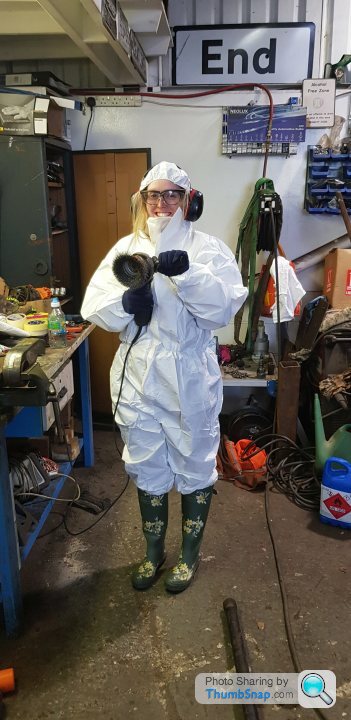
A good bench tidy and that was that for the day.
It makes me wonder whether it's a HGV thing as my Series Landy only has single circuit brakes and no issue there, it was always adds a degree of background excitement when flying down a mountain pass in Wales that's for sure.
Big congrats to you too Niall, think it's about time we both got a move on! This wasn't in the plan for this year and definitely wasn't for trying
chuffed all the same though. Spent some time messing around with other stuff at home today and popped to the yard this afternoon to find Tyler had separated the hub I was messing around with in the week so that was a great step forward and much appreciated. We heated the ends of the wishbones up to glowing orange and it still took a drift and club hammer to get the ends of the cut pin out!
After that lots of cleaning bits up and wire brushing, all with the help of Mrs G to be in appropriate work gear. I would definitely be killed if she knew I'd posted a pic. On the plus side she seems to have found a new calling in life with tapping out UNF threads. Suits me
A good bench tidy and that was that for the day.
Very good!
V-a-v I got the seals from Richard Banister down in Northiam in Sussex, he is extremely knowledgeable and even in 2023 has an amazing stock of pretty much everything. He responds best to his email, wjrbanister@gmail.com
I must say those callipers look in nice condition, are they leaking at all? If the seals aren't cut up with rust or debris and the pistons are tight in the bores I would potentially re-use what you can. One piece of advice I can give is make sure the grooves the seals sit in are absolutely surgically clean with no rust deposits at all, I put a new seal in having just cleaned the groove out with some Scotchbrite and the piston was extremely tight to refit, resulting in a broken seal which was annoying.
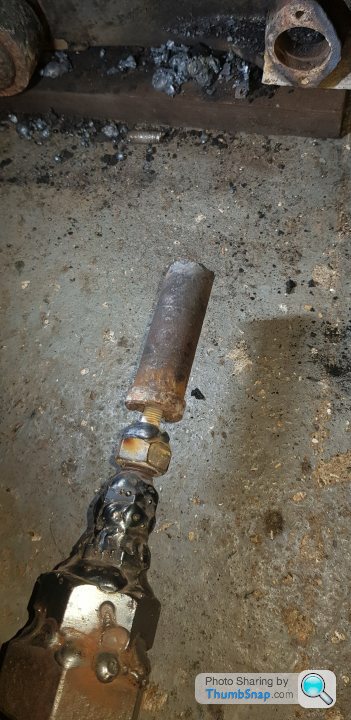
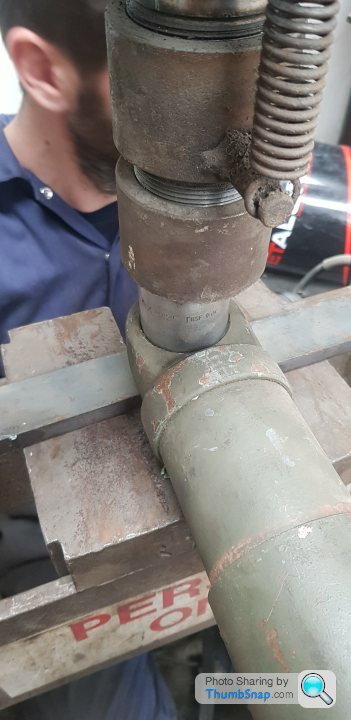
Had the day off work today so cracked on with needle gunning the centre wishbone assembly and getting my head around removing the worn shock absorber pin.
Out with the monster slide hammer complete with my masterpiece of step down engineering
Unsurprisingly this swiftly broke, left the snapped bolt inside and didn't move even a fraction.
Drill it out, hammer in a Torx bit and hope for the best. Result!
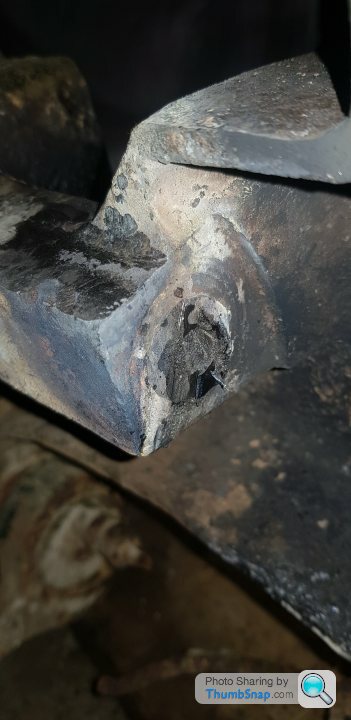
Deciding to go for full destruction I burnt the rubber bushes out the bottom of the shock and rebound units, moved to one side as much as possible and tries accurately cutting with the torch each pin and sleeve.
The first section of pin out. The middle part could then be drifted out from the 'open' end.
This then left the very inner seized still in place. This was something of a head scratcher to solve. I tried drilling a small blanking plug hole out in the bottom of the wishbone for a grease nipple and tried to 'hydraulic' it out as you would a spigot bearing in a flywheel for example. As the pin is hollow this didn't work as it simply pushed grease through the hole, and after plugging only pushed it into the other side pin, as there are a pair of pins, both handling 2 shocks a piece.
I knew I'd got some very long M12 bolts in my odds and sods collection so my idea was weld it to the end of the pin and use it with the slide hammer. By some miracle the grease gallery hole up the middle was perfect to tap to M12, so with an M12 tap on several socket bars we tapped the last piece out, then threaded the bolt up the middle and welded in place
With some heat and a good few whacks, out it came! With the hole going right through to the other side, we noticed when greasing dampness around the pin joints, so it was clearly lubricating properly. We tried a drift right through and with sledgehammer persuasion it came out easily. At least we now have one to copy to make a new one if required. All good progress!

V-a-v I got the seals from Richard Banister down in Northiam in Sussex, he is extremely knowledgeable and even in 2023 has an amazing stock of pretty much everything. He responds best to his email, wjrbanister@gmail.com
I must say those callipers look in nice condition, are they leaking at all? If the seals aren't cut up with rust or debris and the pistons are tight in the bores I would potentially re-use what you can. One piece of advice I can give is make sure the grooves the seals sit in are absolutely surgically clean with no rust deposits at all, I put a new seal in having just cleaned the groove out with some Scotchbrite and the piston was extremely tight to refit, resulting in a broken seal which was annoying.
Had the day off work today so cracked on with needle gunning the centre wishbone assembly and getting my head around removing the worn shock absorber pin.
Out with the monster slide hammer complete with my masterpiece of step down engineering
Unsurprisingly this swiftly broke, left the snapped bolt inside and didn't move even a fraction.
Drill it out, hammer in a Torx bit and hope for the best. Result!
Deciding to go for full destruction I burnt the rubber bushes out the bottom of the shock and rebound units, moved to one side as much as possible and tries accurately cutting with the torch each pin and sleeve.
The first section of pin out. The middle part could then be drifted out from the 'open' end.
This then left the very inner seized still in place. This was something of a head scratcher to solve. I tried drilling a small blanking plug hole out in the bottom of the wishbone for a grease nipple and tried to 'hydraulic' it out as you would a spigot bearing in a flywheel for example. As the pin is hollow this didn't work as it simply pushed grease through the hole, and after plugging only pushed it into the other side pin, as there are a pair of pins, both handling 2 shocks a piece.
I knew I'd got some very long M12 bolts in my odds and sods collection so my idea was weld it to the end of the pin and use it with the slide hammer. By some miracle the grease gallery hole up the middle was perfect to tap to M12, so with an M12 tap on several socket bars we tapped the last piece out, then threaded the bolt up the middle and welded in place
With some heat and a good few whacks, out it came! With the hole going right through to the other side, we noticed when greasing dampness around the pin joints, so it was clearly lubricating properly. We tried a drift right through and with sledgehammer persuasion it came out easily. At least we now have one to copy to make a new one if required. All good progress!
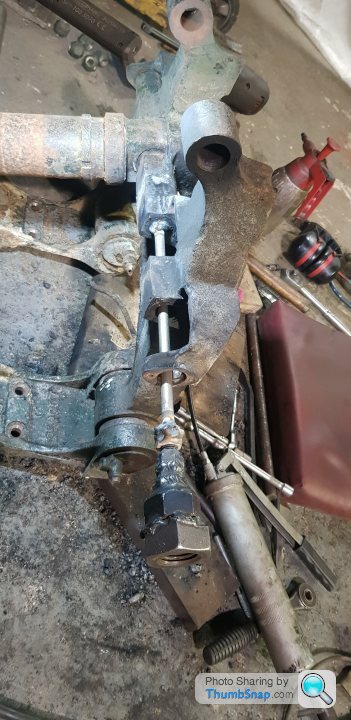
Wishbones given some heat and several dosings of WD40 to soak, then pushed apart with a small bottle jack and hammered back with my big hide mallet. I thought I'd like to get them moving at this stage as it'll make it all hugely easier to get back together.

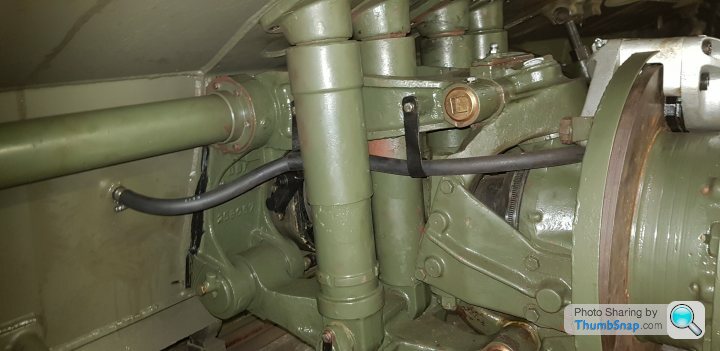
The rear station setup was basically solid, so with torsion bar fitted we clamped up the gaiters we made and absolutely pumped all the suspension points with 5w ATF in an attempt to creep some oil into every bush and pivot. These normally run EP90 gear oil, not grease.
It was good to see oil spilling out of so many of the joints because that means it's actually getting down the built in pipework to where it should.
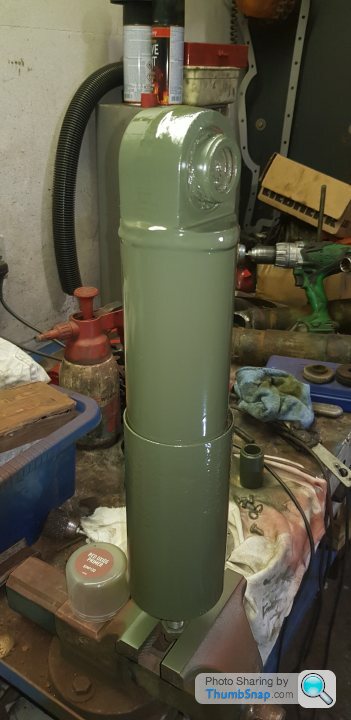
With the old shocks removed we pressed out the outer bush sleeves with a 20t press, the bushes for the top 'cap' were knackered too so I sacrificed one of my new rebound bump stop cylinders and nicked the bushes from that.
Finally some paint on several hub components, I just had to put the shock together for a picture
Edited by LewG on Sunday 26th March 10:52
Another exciting Friday night applying more of NATO's finest! Shock absorber pin dropped off at a local engineering company to be copied and remade. Annoyingly work's ever helpful health and safety weirdos have locked off our lathe as 'nobody is trained to use it', so that's rather annoying

A small update on activities of late as we've just returned from a few days exploring North Yorkshire.
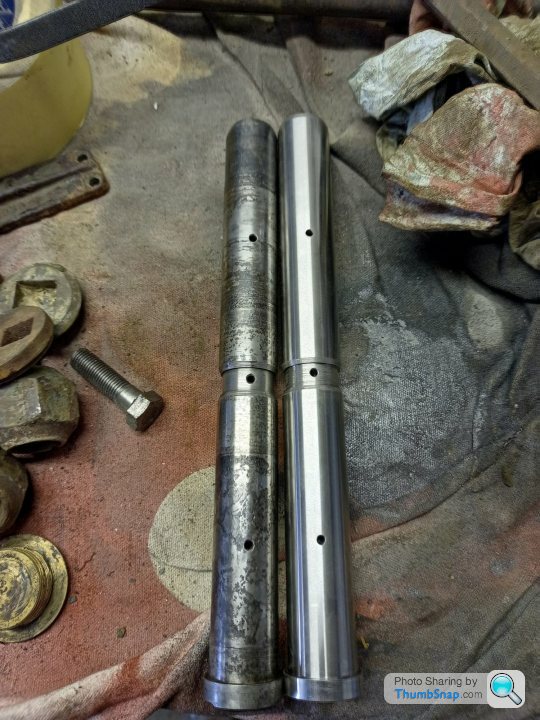
I dropped the shock pin off for remanufacture some time last week so that's collected now, they seem to have done a nice job of it in EN24 steel so hopefully that works well. I am hoping it will work as a shock absorber mounting pin without further hardening etc, so if anyone has any advice on that it'd be appreciated. In the past I have made knurled punches etc at college and from memory we torch heated them to a straw colour and then quenched them in oil to harden. They still work well now so must have done something right.
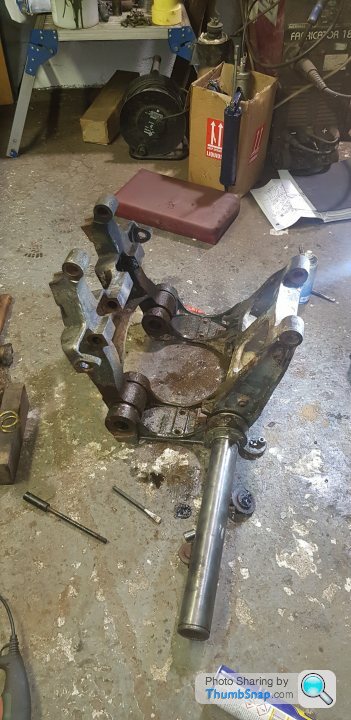
In my absence my mate Tyler had some time off work and fair play to him he's been cracking on like a champ, prior to me going we dragged some extra bevel boxes out and the front wheel station ready for stripdown.
The shock pins and bushes on this station are helpfully also knackered no change there
Replacement drives cleaned up and painted with some finest red lead
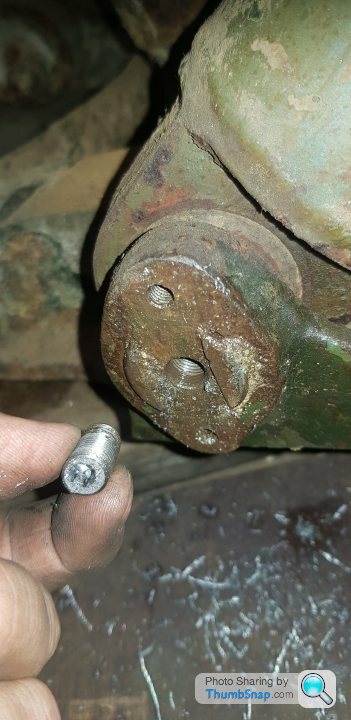
Something tells me this wishbone pivot hasn't seen any oil in some time
Finally the last torsion bar for this side in pieces.
I dropped the shock pin off for remanufacture some time last week so that's collected now, they seem to have done a nice job of it in EN24 steel so hopefully that works well. I am hoping it will work as a shock absorber mounting pin without further hardening etc, so if anyone has any advice on that it'd be appreciated. In the past I have made knurled punches etc at college and from memory we torch heated them to a straw colour and then quenched them in oil to harden. They still work well now so must have done something right.
In my absence my mate Tyler had some time off work and fair play to him he's been cracking on like a champ, prior to me going we dragged some extra bevel boxes out and the front wheel station ready for stripdown.
The shock pins and bushes on this station are helpfully also knackered
no change there Replacement drives cleaned up and painted with some finest red lead
Something tells me this wishbone pivot hasn't seen any oil in some time
Finally the last torsion bar for this side in pieces.
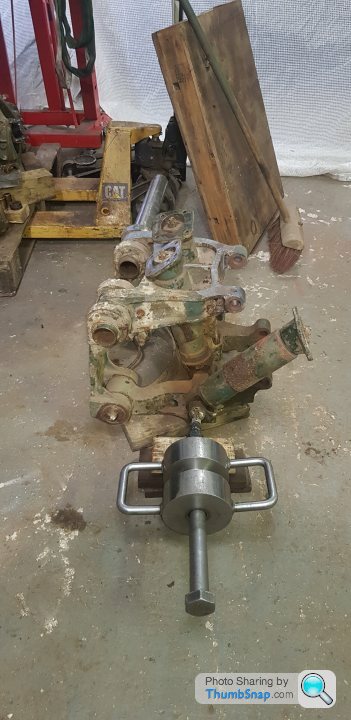
Ok an update, we've bashed a few pins out of the front station, centre and front drives have been painted, I've reassembled the centre bevel box and bought some new suspension bushes from a Saladin (see below) which turned out to be too small 
That's about it really, operation baby arrival has been in full swing, a bit of decorating on the house, buying lots of IKEA furniture, buying a terribly boring estate car etc
The Ferret needed some further fettling to drive down to Capel Military Show in Surrey too which was a good laugh, it's nice to have her back on the road again though and build some confidence in it.
It's a bugger to be honest, I really wanted it as a rolling project again by September. I have got some time off late July to mid August so you never know, might find some time then!
Gassing Station | Readers' Cars | Top of Page | What's New | My Stuff