Mk2 Golf Revival - Blog just coz
Discussion


Lesson Learned and advice for anyone undertaking work like this....The arch rot was unexpected and therefore not included in the quote for work. I have agreed to pay an extra £300 for this unexpected labour. thankfully I currently have enough cash to absorb this extra cost, but in hindsight, if there were any such surprises and I didnt have any contingency money, I would be in a very sticky Situation.
Onto the Bonnet and the driver's door. Both of these have needed to be replaced: the bonnet had a few big dents in from when my mates younger brother who was 6foot 6 and about 100kg decided to pose on the bonnet for a photo (suffice to say I flipped out pretty hard at the time). The drivers door just has too much rot unfortunately.
Sourced replacement parts from Volksmagic for £180 for both. And the bonnet had the nice addition of a sound deadening lining, which I intend to re-use.
Here's the befores, durings and Afters:
DOOR


A hole has been discovered in the replacement Door :-( - A bit more unexpexcted repair work - but that's life

BONNET

Bit of cheeky NVH material


And now back to bare metal

Sourced replacement parts from Volksmagic for £180 for both. And the bonnet had the nice addition of a sound deadening lining, which I intend to re-use.
Here's the befores, durings and Afters:
DOOR
A hole has been discovered in the replacement Door :-( - A bit more unexpexcted repair work - but that's life
BONNET
Bit of cheeky NVH material
And now back to bare metal
Meanwhile....I've decided to keep the look completely original, because (and please no-one take offence) there are a hell of a lot modified and customied Golfs out there, Very few are restored to be completely original....and even fewer NON-GTI's are resprayed and kept original. My view is, if I want a Golf mk2 to modify, I'll buy another one. So a lot of words, but in summary I have got my wheels ready for refurb. The original 14 inch Steels the car came with. I also have another set of spare steels and a set of 14" alloys (as per some of the pics) - no idea what to do with the spares but the plan is the give these four a good sand blasting and nice silver lick of paint.
(totally up for suggestions with what whacky ideas I could do with the other wheels - like Chrome perhaps? or powerdercoated Grey? )
Took them down to Kwik fit to get the tyres removed, which the guy kindly offered to do for free. he was in fact so nice and helpful that felt it was only right to slip him a tenner. (still way cheaper than getting other places to do it)

And de-tyred - they look so dinky without their tyres, almost like Toy wheels!


(totally up for suggestions with what whacky ideas I could do with the other wheels - like Chrome perhaps? or powerdercoated Grey? )
Took them down to Kwik fit to get the tyres removed, which the guy kindly offered to do for free. he was in fact so nice and helpful that felt it was only right to slip him a tenner. (still way cheaper than getting other places to do it)
And de-tyred - they look so dinky without their tyres, almost like Toy wheels!
darkyoung1000 said:
I do like a MK2 Golf (I had a GTD), and especially nice to see one with such history getting restored...in time for another historic moment!
Keep up the good work!
Tom
Thanks for kind words Tom. Yeah I guess it will be a very historic moment in my life!! SCARY when I think about it. But I love having the continuity of the same car since my teenage years, never gonna get rid EVER.Keep up the good work!
Tom
Paul S4 said:
Good write up.
I agree with keeping the steel original wheels, although I would be tempted to lower the car just a little bit, maybe fit some eg Eibach springs/dampers or whatever. Just to give it a more 'modern' look and hopefully improve the handling ? Nothing ridiculous, just something subtle !
We had a Mk 3 1.6 in our family, but I agree that the Mk 2 Golf looks so much better.
Thanks for you message! I too am tempted to lower it, but for now I'm going to stay true to my first intentions. I could always lower it at some point in the future (I'm never getting rid of it after all)I agree with keeping the steel original wheels, although I would be tempted to lower the car just a little bit, maybe fit some eg Eibach springs/dampers or whatever. Just to give it a more 'modern' look and hopefully improve the handling ? Nothing ridiculous, just something subtle !
We had a Mk 3 1.6 in our family, but I agree that the Mk 2 Golf looks so much better.
Things are progressing nicely.....I think we are over the hill of the major work and heading for a paint booth very soon  !!!
!!!
I know I have said already, but it really fascinates me how with a few tools and some MAD SKILLS, you can transform a rusty scrap of metal into something that represent an actual car part. As the kids say nowadays, it is 'fully sick' watching the transformation.
So the driver's Door.....last post showed it with an unexpected hole after sand blasting. got that sorted in a jiffy


And Abrakadabra.....passengers side inner and outer arch, sorted as well.
Inner arch cut out and replaced with complete repair arch. (£21.30 from VW Heritage). Outer arch then replaced and fibreglass over the top ( I havent quite worked out why yet, but will ask next time I'm there) and then a skim of filler and Voila


!!!I know I have said already, but it really fascinates me how with a few tools and some MAD SKILLS, you can transform a rusty scrap of metal into something that represent an actual car part. As the kids say nowadays, it is 'fully sick' watching the transformation.
So the driver's Door.....last post showed it with an unexpected hole after sand blasting. got that sorted in a jiffy
And Abrakadabra.....passengers side inner and outer arch, sorted as well.
Inner arch cut out and replaced with complete repair arch. (£21.30 from VW Heritage). Outer arch then replaced and fibreglass over the top ( I havent quite worked out why yet, but will ask next time I'm there) and then a skim of filler and Voila
Another update on the progress - The car is basically now primed and ready for paint!! Super exciting part of the journey where all the really hard work is done.
I've learned a lot about bodywork techniques these last few weeks from my man doing all the work and the take away is that it all takes patience, time and relentless attention to detail. I think in future I will have a go myself, but will make sure I have the time and space to devote to it (without the looming deadling of a wedding)
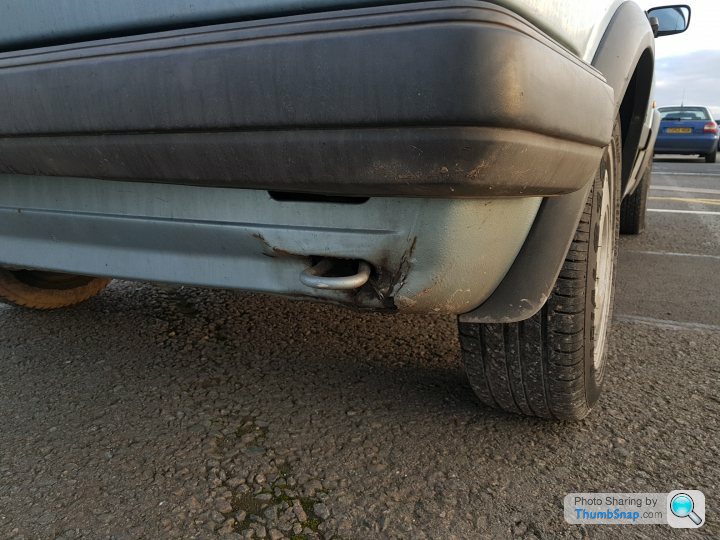
So one of my favorite transformations is probably the rear lower valance hole where the towing eye comes through. I'll just use a few photos to demonstrate an example of steps through this one repair to highlight just how "good as new" the bodywork will be after this. It was well and truly rotten when I took the car is and look at it now.....
BEFORE -its hard to see from the picture, but basucally there was a load of rust all the way through the panel
During


 [url]
[url]
And as of today (no paint yet)

I've learned a lot about bodywork techniques these last few weeks from my man doing all the work and the take away is that it all takes patience, time and relentless attention to detail. I think in future I will have a go myself, but will make sure I have the time and space to devote to it (without the looming deadling of a wedding)
So one of my favorite transformations is probably the rear lower valance hole where the towing eye comes through. I'll just use a few photos to demonstrate an example of steps through this one repair to highlight just how "good as new" the bodywork will be after this. It was well and truly rotten when I took the car is and look at it now.....
BEFORE -its hard to see from the picture, but basucally there was a load of rust all the way through the panel
During
[url]And as of today (no paint yet)


Bonnet.....we've already seen the early shots of it as a black bonnet and being rubbed down and prepped
So this is where it's go to now. As a test to check the finish, we wiped some water over the surface and I ran my eye across the surface....Not a ripple or dink in sight! good as new! (well once painted!


So this is where it's go to now. As a test to check the finish, we wiped some water over the surface and I ran my eye across the surface....Not a ripple or dink in sight! good as new! (well once painted!

The Real test came when I looked over the roof after wetting the surface to make it easier to see any imperfections. It was really was like looking at the sea on a windy day, completely all over the place. But now, Nothing to be seen except a beautiful grey shimmer of the primer over the super smooth consistent surface

The Tailgate...


A bit of atrocious DIY from me when I had to repair a wire that had broken....I was a student and too poor and lazy to do the job properly. I had lots of beer to drink AHEM, I mean studying to do. Left the hole into the tailgate in a sorry state a few years later. but it's fine, I'm getting the job done properly now that I am a real adult that enjoys evening conversation about pressure washers, the economy, current affairs and other such adult stuff .


Got my new gaitors ready to replace the duct tape bodge I did back in 2008 - £12 for the pair delivered, OEM parts. Not cheap for a couple of bits of rubber, but will be more effective that wrapping in tape

A bit of atrocious DIY from me when I had to repair a wire that had broken....I was a student and too poor and lazy to do the job properly. I had lots of beer to drink AHEM, I mean studying to do. Left the hole into the tailgate in a sorry state a few years later. but it's fine, I'm getting the job done properly now that I am a real adult that enjoys evening conversation about pressure washers, the economy, current affairs and other such adult stuff .
Got my new gaitors ready to replace the duct tape bodge I did back in 2008 - £12 for the pair delivered, OEM parts. Not cheap for a couple of bits of rubber, but will be more effective that wrapping in tape
So with all the doors and tailgate removed, heres a few snaps of the main body getting done
Remember this area by the rear window....

Thank the Lord for sand and compressed air!

Looking a bit naked there buddy

Time to crack out the masking tape

This photo when examined closely shows the masking off of some of the door apeture. I wasnt best pleased about this as I wanted the whole door apeture done....Turns out I was in a tizz about nothing...this stage of masking is for the 'Hard-wearing' surfaces which need a proper etch primer first. The whole apeture will be painted but just doesnt need the same level of prep because, a) its it much better condition because it's essentially inside the car hence less prep and b) it doesnt need to be as protected as much the external facing surfaces anyway


Spitting distance from getting the spray gun out!! Buzzin'!

Remember this area by the rear window....
Thank the Lord for sand and compressed air!
Looking a bit naked there buddy
Time to crack out the masking tape
This photo when examined closely shows the masking off of some of the door apeture. I wasnt best pleased about this as I wanted the whole door apeture done....Turns out I was in a tizz about nothing...this stage of masking is for the 'Hard-wearing' surfaces which need a proper etch primer first. The whole apeture will be painted but just doesnt need the same level of prep because, a) its it much better condition because it's essentially inside the car hence less prep and b) it doesnt need to be as protected as much the external facing surfaces anyway
Spitting distance from getting the spray gun out!! Buzzin'!
Turns out there are lots of steps to the Primer process, different parts of the car getting different treatment, so getting it in to paint hasnt been as quick as I'd hoped.
So the progress since the last post is.....
- Front windscreen is out
- Fuel filler flap is off
- Stonechip protector is on the sills, front and rear lower panels
I am currently over in Guernsey doing lots of wedding admin in preparation for our wedding here is September and expectation is, by the time I'm back home, my beloved old Golf will have a new lick of paint, and re-trimming can begin. Updated photos to follow


Door Apetures have now been painted! And this is going to sound a bit OTT perhaps, but I got really emotional just seeing this first bit of paint on the Golf; As person who is generally devoid of emotion, the only way I can describe this is like the choked up overwhelming emotion you feel when you see one of your close friends walking down the aisle at their wedding day. It's just a lovely feeling, and now I have an inkling as to how those people feel on Car SOS when they get their baby back and see it back to it former glory. I am 100% gonna need some tissues (for the tears, nothing else!)


astonishing how quickly things move once it's reday for paint the paint is coming thick and fast (well not too thick I hope) - goes to show that old cliche that it's all the the prep work to not so much a cliche as it is Gospel, which should be taught to all petrolheads from a young age.
My donor door has got its first lick of paint now - not bothering to do the whole inside of the door, just the bits you will see. The purists will no doubt be tutting and shaking their heads in clippety-clop high-horse disapproval....I am doing this to keep my car on the road and make it look presentable again, no to be a show car, so I dont see the point in using the paint over the entire inside of the door.

Bonnet inside also now Done! - but wont really be seeing much of this, as the donor bonnet came with that sound deadening material which I fully intend to exploit. lookin pretty shiny though, eh!

My donor door has got its first lick of paint now - not bothering to do the whole inside of the door, just the bits you will see. The purists will no doubt be tutting and shaking their heads in clippety-clop high-horse disapproval....I am doing this to keep my car on the road and make it look presentable again, no to be a show car, so I dont see the point in using the paint over the entire inside of the door.
Bonnet inside also now Done! - but wont really be seeing much of this, as the donor bonnet came with that sound deadening material which I fully intend to exploit. lookin pretty shiny though, eh!
Clearly 30 years of sun, rain, salt, your mates sitting on the bonnet rallying on gravel roads has an undeniable impact to the colour of the paint. Just look at how much this silvery blue pops and shines compared to what it was before - we have used the VW spec factory paint, identical colour and yet when its new it really demonstrates how faded the paint was before. When I showed a couple of snaps to a friend, he pointed out that never again will it look this good (thanks Pete) - I chose to ignore this and just revel in the sparkle and imagine taking it for a spin on a glorious summers day
Here she is.....


The roof looks smooth and shimmery as an ice rink


Here she is.....
The roof looks smooth and shimmery as an ice rink
Gassing Station | Readers' Cars | Top of Page | What's New | My Stuff