1996 BMW E36 328i Coupe - we have history...
Discussion


That brings us up to date. I’m satisfied with what I’ve achieved so far. Everything works as it should. The cooling system, brakes and starter are nice and new, and even the little orange computer screen does what it’s supposed to without any dead pixels. Yes, the bodywork is shoddy, and the air con doesn’t work (we’re ignoring that), but this car has already given me great satisfaction and pleasure up to this point, and it’s all good.
The question is, what’s next? The whole restoration idea is now completely dead, and good riddance to it. For the right car I could probably develop the patience and eye for detail needed for a proper restoration, but this wasn’t the right car. It was just the one I had. My new direction, and I think it’s the right one, is to transform this motorway-munching rep cruiser into something more suited to chucking round Donnington or Mallory Park. That makes sense to me. I have the Skoda for every-day real-world driving, and it does it well. Giving myself a choice between two cars to perform the same task makes very little sense to me. Each needs to have its own focus really. Thus, it is decreed that the beemer shall be a Track Car.
Now, this is a one-step-at-a-time kind of approach, not a ‘look what I built in a week!’ kind of thing. I would have liked to track the car in its basically stock configuration (albeit manual rather than auto, and with decent brake pads), but COVID had other ideas. Doing that would have given me a good baseline to compare my mods to, but by the time I get it on track now I will most likely have done something to the suspension, and probably have proper tyres on it. You might say ‘well just wait until you’ve done a ‘stock’ track day before you fit your coilovers,’ but you might as well also say, ‘don’t press that button.’ We all know what’s going to happen.
After that, the sky is the limit. Who knows, in a few years I might have gone full Brian:
https://www.pistonheads.com/gassing/topic.asp?h=0&...
For now, I’d like to keep it useable on the road, but in the long term I have no objection in principle to it being a dedicated, illegal-in-most-countries, snarling track weapon that needs trailering around. I doubt it will ever really get that far, as that takes dedication I don’t have, and requires the car to survive long enough to undergo all that work. All I’m saying is I’m not ruling it out, ok?
Anyway, back to reality, and the near future. The most important stuff is suspension, brakes and tyres (says I, the Driving God of precisely one track day when I was barely out of nappies), so that is where my focus will be for now. I’ll be looking at putting coilovers on it probably late Feb/early March. Having done a bit of internet research, I’m thinking of BC or HSD. I’m looking for something decent, but not premium (not much point right at the beginning of my racing career…). I’m not averse to second-hand as long as they’re decent quality and not too jiggered. Maybe I should get myself on some suitable fora and ask away…
I’ve already got some EBC yellow stuff pads that I bought in anticipation of my December track day. They’re waiting to be fitted. I have no intention of doing anything about the discs or the rest of the braking setup just yet (well, maybe some ATE Super Blue fluid). The existing discs are vented, and hopefully they’ll do well enough for me.
When I looked, I was pleasantly surprised at how affordable track day tyres can be (depends on your car and how quickly you get through them I suppose). I’ll do a bit more research but Toyos or Nankangs seem to fit the bill. Again, something decent, track focussed but not excessively expensive. Anything will be better than the Teflon Pirellis, though.
Beyond that, I have a few ideas but really no set preference. I guess I’ll listen to the car and see what I feel it needs. A sporty exhaust is most likely on the agenda (once it’s ‘stanced’ the exhaust is mandatory, isn’t it?). Poly bushes are also likely, and when I get better at increasing cornering speed I imagine better seats might become necessary to avoid swapping from driver to passenger mid-corner. More power is probably unnecessary, but as the ECU is ready to accept an M50 manifold it’d be rude not to add that to the list for some future occasion. An LSD might be fun, both to fit and to drive, but probably unnecessary for a while.
It’s all up for grabs – we’ll see how far I get before I crash it, or the engine explodes, or the car turns to rust. When any of those things happens, I’ll re-evaluate and then buy a new project car.
There's no update on P956 BVJ (although I did just order four Nankang Sportnex NS-2Rs for it, in anticipation of booking a track day in the not too distant future).
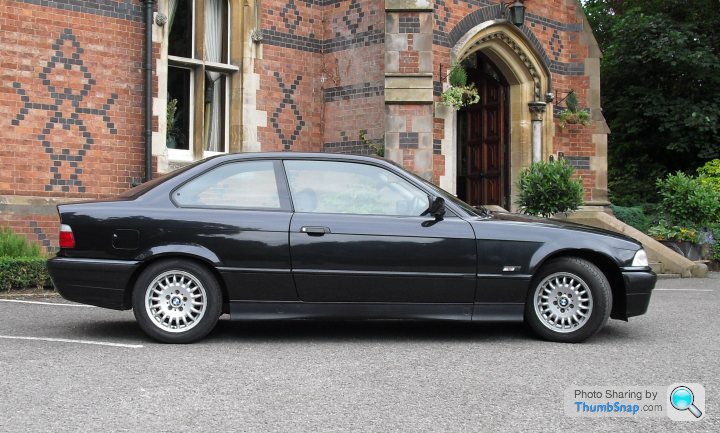
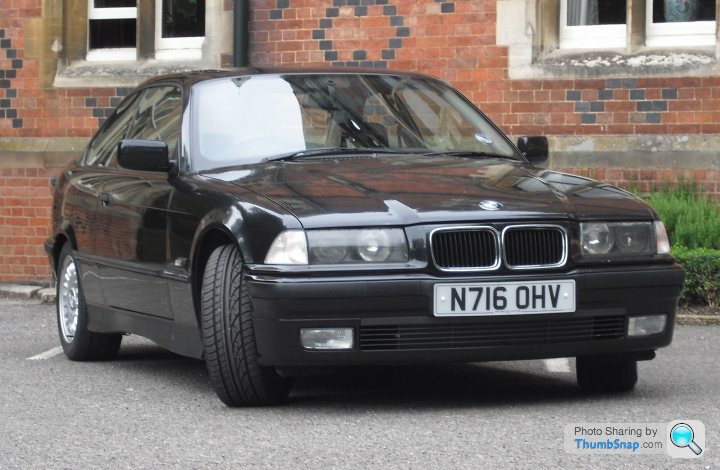
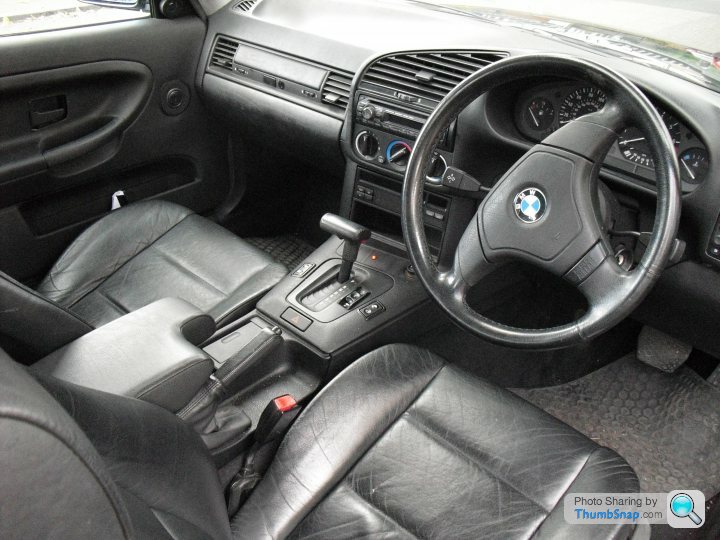
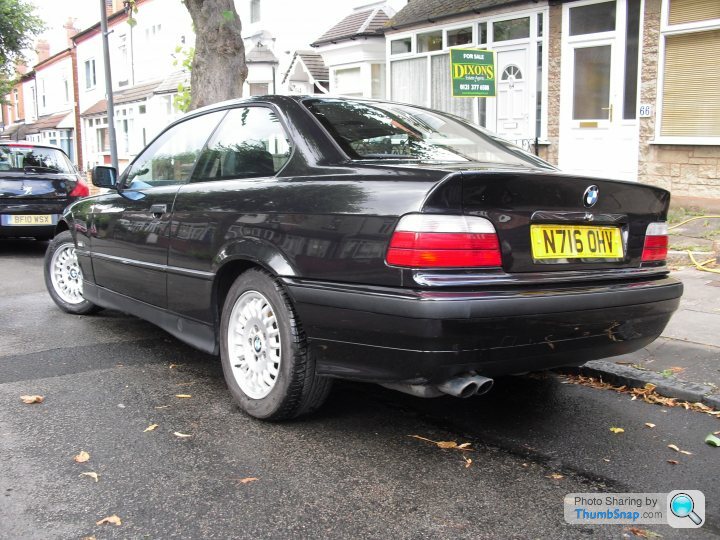
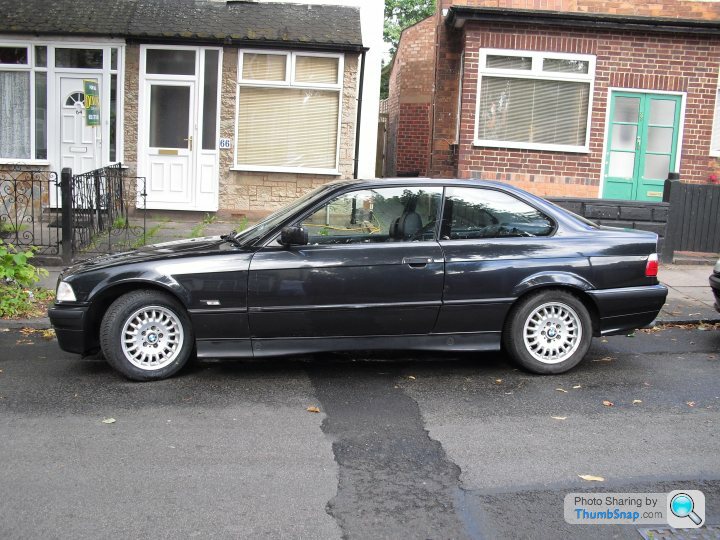
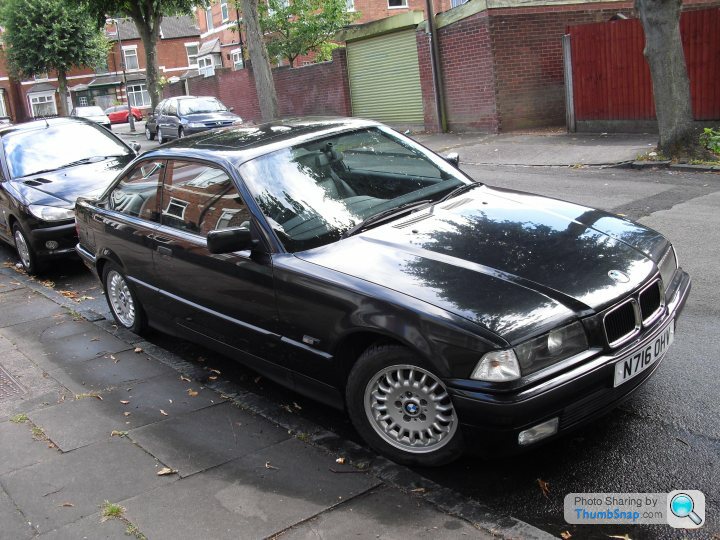
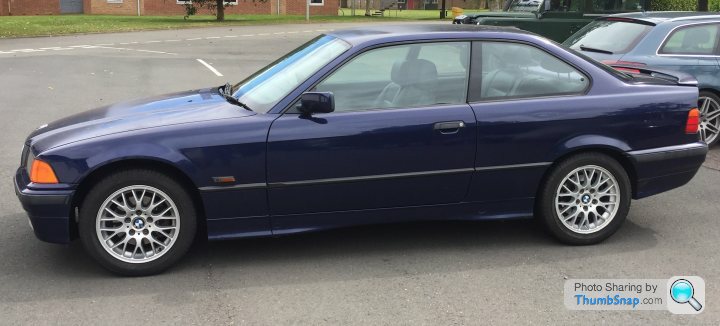
However, looking through an old HDD I found some photos from when I sold the old black one, so I thought I'd treat you to those. This would have been in about 2010 I think.
Clearly, I wasn't a fan of having the wheels pointing straight. And I don't think black is a good colour for these.
 [url]
[url]
 |https://thumbsnap.com/K9Q6sgJT[/url][url]
 |https://thumbsnap.com/YAnSZuUa[/url][url]
 |https://thumbsnap.com/7EoYXVu9[/url][url]
 |https://thumbsnap.com/josRdo1a[/url][url]
 |https://thumbsnap.com/W2kNueQb[/url][url]
 |https://thumbsnap.com/snqgHtqE[/url][url]
 |https://thumbsnap.com/RNjRxtw1[/url]
However, looking through an old HDD I found some photos from when I sold the old black one, so I thought I'd treat you to those. This would have been in about 2010 I think.
Clearly, I wasn't a fan of having the wheels pointing straight. And I don't think black is a good colour for these.
[url]|https://thumbsnap.com/K9Q6sgJT[/url][url]|https://thumbsnap.com/YAnSZuUa[/url][url]|https://thumbsnap.com/7EoYXVu9[/url][url]|https://thumbsnap.com/josRdo1a[/url][url]|https://thumbsnap.com/W2kNueQb[/url][url]|https://thumbsnap.com/snqgHtqE[/url][url]|https://thumbsnap.com/RNjRxtw1[/url]This is the first job I have done on the car since starting this thread, so there are photos! Hooray!
A few months ago, when I was getting ready to take it to a track and dominate, or something, I started changing fluids. I thought, it being an old and fairly unloved vehicle, that if I hadn’t changed a fluid, then it probably had never been done. I changed the oil about 5 years and about 1k miles ago. I think I’ll leave that for a bit. Maybe I’ll change it after my first track day. The power steering fluid was changed when I had that problem with the steering, that turned out to be a stiff UJ. The brake fluid was changed when I did the brake overhaul a few months ago, and the gearbox oil was new when I put the gearbox on the car.
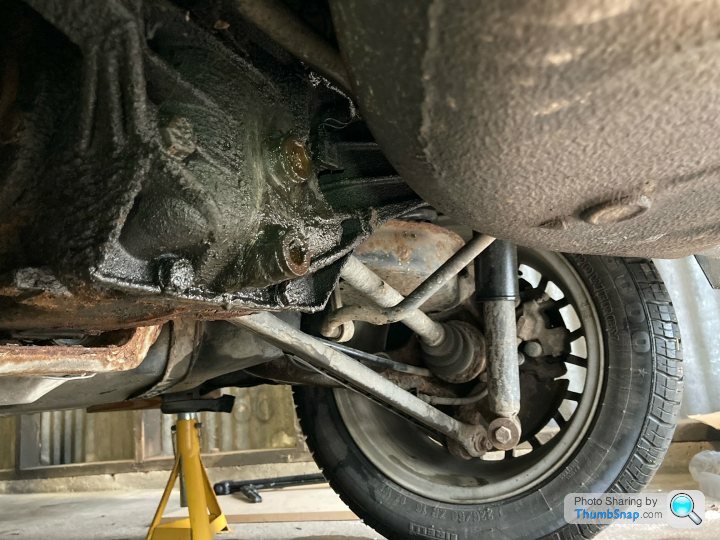
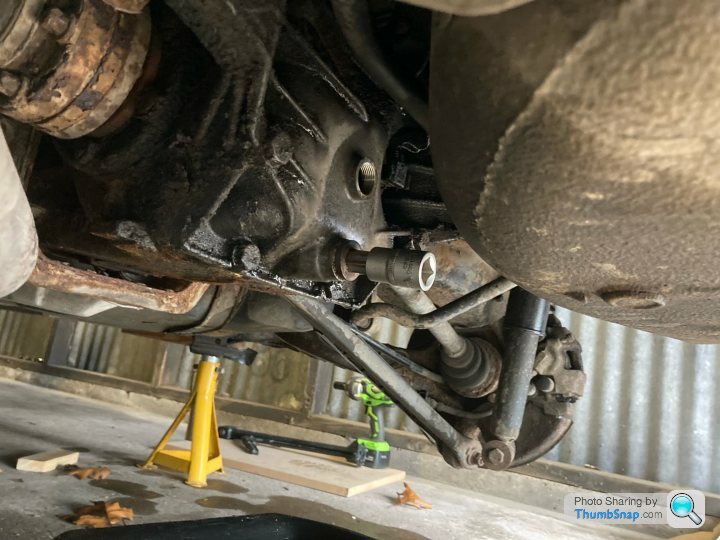
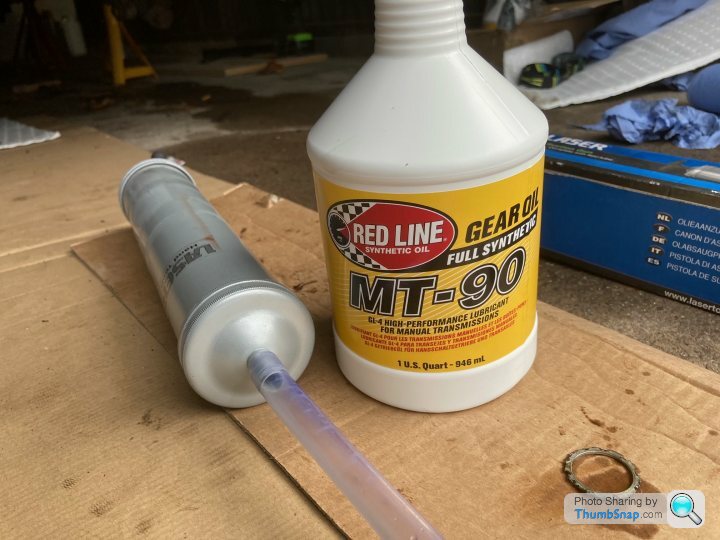
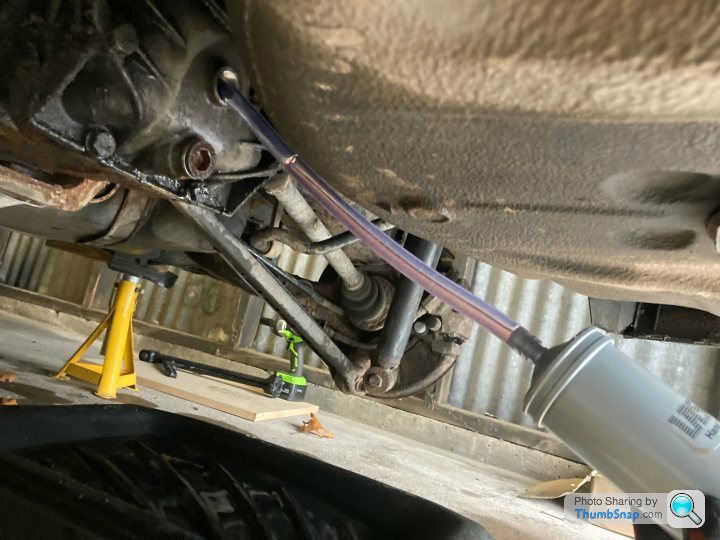
The diff was one thing that stood out as probably still having the fluid that Gunther in the BMW factory put in there in 1996 (probably wearing a hairnet to keep his mullet safely away from the oil). So, back in October (I think) I had bought all the bits and pieces necessary to change the diff fluid. That was, approx. 2 litres of Redline MT-90 gear oil, some new crush washers, and a 14mm hex bit for undoing the plugs. I already had an oil catch pan, some oil-absorbing pads, a big syringe, a 14mm spanner, some penetrating fluid and a large hammer.
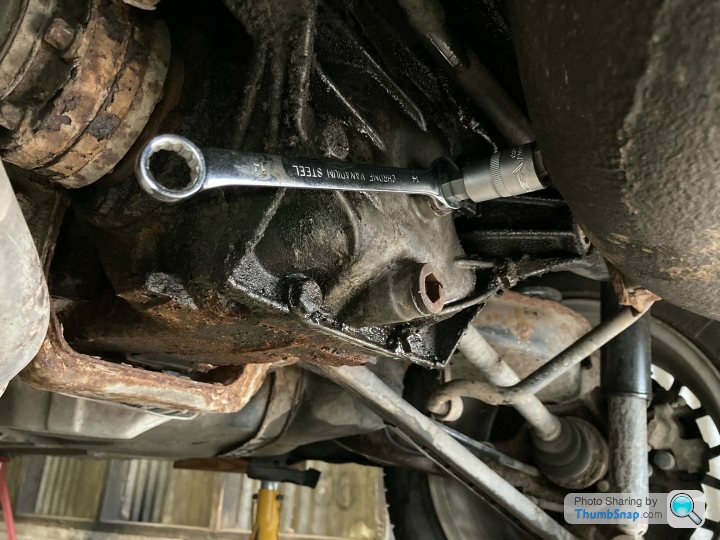
One tricky thing about this job is that the fill plug is high enough that the spare wheel well is seriously in the way if you try to undo it in any conventional manner. There’s certainly no room to plug your breaker bar into the back of your 14mm hex bit and undo it as you may wish to. Instead, it is necessary to insert your hex bit into the plug so that there is some hexy goodness still protruding, and then apply a 14mm spanner (and probably a large hammer) to it to crack it. I took to inserting the hex bit through the ring end of my 14mm spanner, and then into the plug. That had the advantage of making sure it didn’t fall off whilst I was taking my runup with a lump hammer.
It seemed a good idea to try and warm up the diff a bit before I started, given that it was a little on the chilly side this morning. So I went for an essential drive in the fog (only one of my front fog lights works, apparently, but I’m considering terminating their contracts at some point and using the holes for brake ducts, so I’m not too fussed). Before I went, I lined up my jack and axle stands, and all my tools and bits and pieces, so that on my return I could get it straight up and drain the oil whilst it was still warm.
As it turned out, my trolley jack under the front subframe couldn’t get it high enough to get the axle stands under the jacking points, so I reverted to the standard E36 jack (a new one because I bent my old one after finishing the manual swap. Chocks? What are chocks?). As it turned out, that couldn’t get it high enough to get the axle stand under the jacking point either. You’d think I’d never jacked up my car before, wouldn’t you? A bit of 18mm MDF under the jack gave me the extra height I needed to get the axle stands under the front. I used the trolley jack on the diff to get the rear up, which just about managed to get it high enough. I’m not sure the car was quite as level as I’d like it to be for this job, but it was as close as I was going to get it. Plus I hadn’t crushed myself to death under 1400kg of Bavaria’s finest steel yet, so I quit while I was ahead.
Why have I recounted this tale of jacking incompetence? Because it made my masterplan to warm up the diff somewhat less effective than it might otherwise have been. By the time I got under the back of the car with my spanners, I would estimate that the diff oil was about half a degree warmer than it was before I started the car this morning.
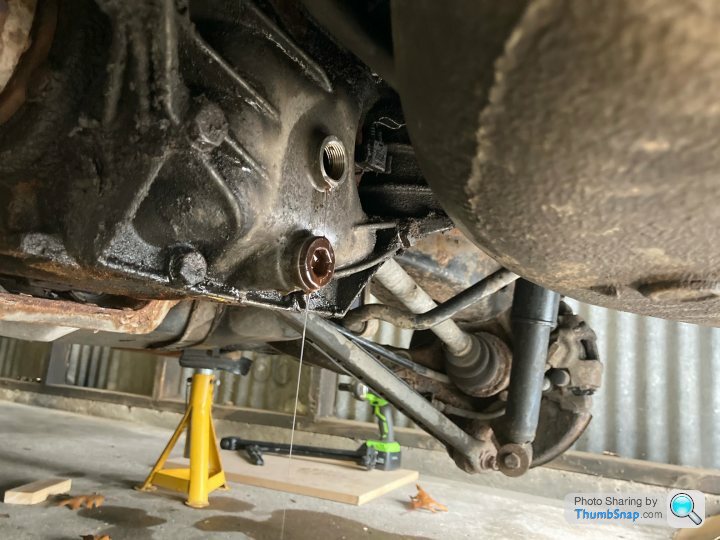
So, under the car. A bit of engine degreaser, a wire brush and some blue roll were necessary to clear the muck from around the fill and drain plugs. I don’t really want that sneaking into my diff. Then the Now for the key bit – to undo the fill plug before undoing the drain plug. This is me heeding the warnings of people more experienced than I. It is worth knowing that you can undo your fill plug before you drain the oil, otherwise you could end up a bit stuck. Also it allows air in the top whilst the oil falls out the bottom, making for a lovely smooth stream. Very important.
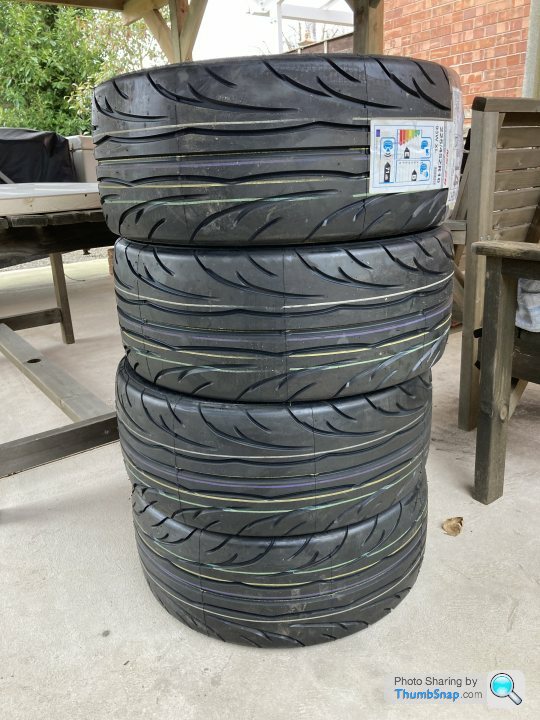
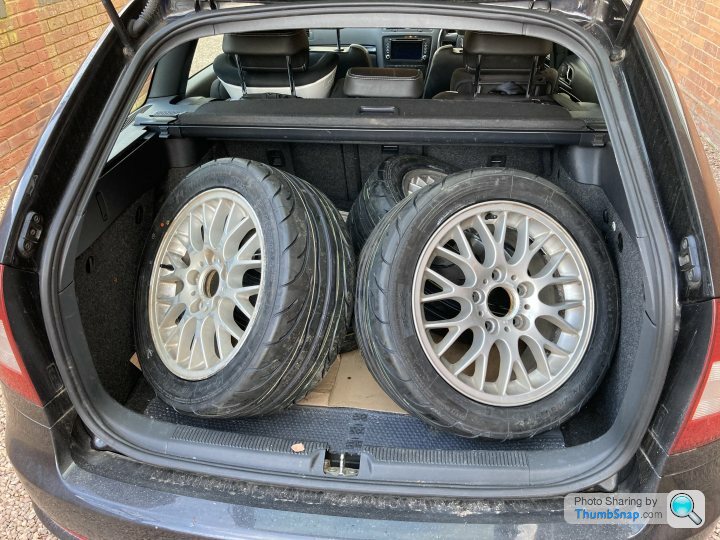
My fill plug put up a fight. Even applying my hammer with gusto was insufficient to overcome its reluctance. Time for the penetrating fluid. A liberal squirt for both plugs. Whilst I waited for this to take effect, I took the wheels off. This wasn’t just for fun (though it is always fun). The Nankang NS2Rs that I ordered the other day have now arrived, so I will take the wheels and tyres to my friendly local tyre fitter to unite them with each other, and say goodbye to the aged Teflon Pirellis.
By now, the advantage I had gained from warming the diff this morning was definitely questionable.
Back to the fill plug. Ring end of the spanner on the hex bit. Hex bit inserted into the plug. Hammer in hand. 30 metre runup, full backswing, and… it turned. Not very dramatic, but that was sufficient to get it undone. I thought the car was slightly lower at the back than it was at the front, so was expecting a little bit of oil to come out of the fill hole at this stage. It didn’t, which either means the car was more level than I thought, or the level was a bit low. Most likely the latter.
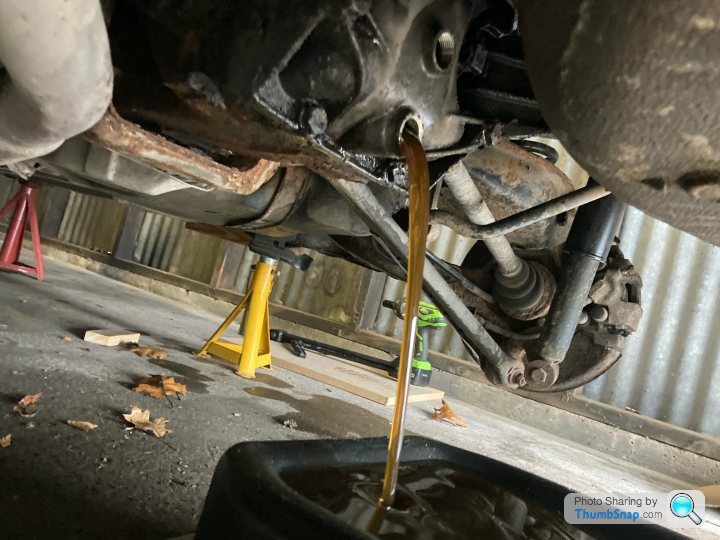
Once that was out, I applied the same level of vigour to the drain plug, which also gave up the fight quite nicely, and the oil streamed out very pleasingly. The old washers did not look very happy.
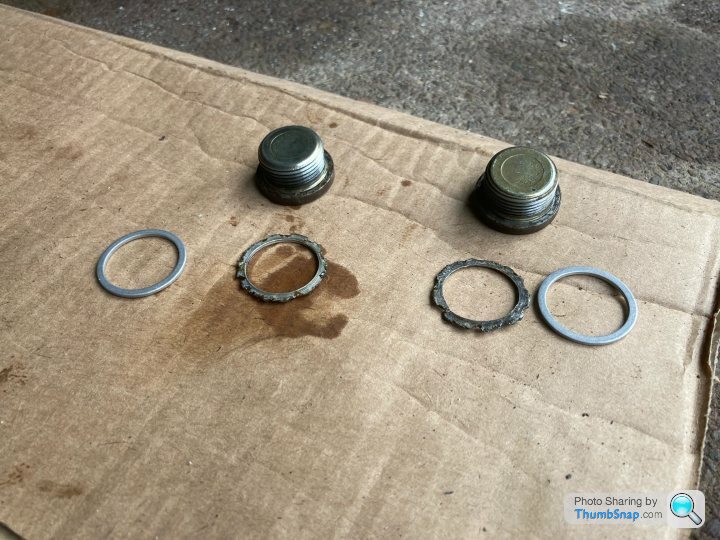
I left the oil draining for a while, and had a couple of brownie bites and a drink. Once the flow had stopped, plug back in with a new washer and out comes the big syringe. The diff swallowed most of the 2 litres of Redline before it started dribbling from the fill hole. I let the dribble slow a bit before I put the fill plug back in, fairly confident that the level is close enough. Plug back in (new washer), a quick wipe, and job done.

It’s a very straightforward operation, complicated only by the proximity of the spare wheel well to the fill plug. Forewarned is forearmed, though, and as long as you’re prepared for this, it’s all good. I had bought a 14mm hex bit that turned out to be too short, so once inserted in the plug there was no room for the spanner. Fortunately I checked this when I got the bit, and so had ordered a longer one. As it turned out, both were useful, as the long one only just fit in the space, so was only good for the first half turn or so before it got in the way. The short one then became useful – call it foresight!

That’s all for now. Pictures of wheels and tyres to follow soon.
A few months ago, when I was getting ready to take it to a track and dominate, or something, I started changing fluids. I thought, it being an old and fairly unloved vehicle, that if I hadn’t changed a fluid, then it probably had never been done. I changed the oil about 5 years and about 1k miles ago. I think I’ll leave that for a bit. Maybe I’ll change it after my first track day. The power steering fluid was changed when I had that problem with the steering, that turned out to be a stiff UJ. The brake fluid was changed when I did the brake overhaul a few months ago, and the gearbox oil was new when I put the gearbox on the car.
The diff was one thing that stood out as probably still having the fluid that Gunther in the BMW factory put in there in 1996 (probably wearing a hairnet to keep his mullet safely away from the oil). So, back in October (I think) I had bought all the bits and pieces necessary to change the diff fluid. That was, approx. 2 litres of Redline MT-90 gear oil, some new crush washers, and a 14mm hex bit for undoing the plugs. I already had an oil catch pan, some oil-absorbing pads, a big syringe, a 14mm spanner, some penetrating fluid and a large hammer.
One tricky thing about this job is that the fill plug is high enough that the spare wheel well is seriously in the way if you try to undo it in any conventional manner. There’s certainly no room to plug your breaker bar into the back of your 14mm hex bit and undo it as you may wish to. Instead, it is necessary to insert your hex bit into the plug so that there is some hexy goodness still protruding, and then apply a 14mm spanner (and probably a large hammer) to it to crack it. I took to inserting the hex bit through the ring end of my 14mm spanner, and then into the plug. That had the advantage of making sure it didn’t fall off whilst I was taking my runup with a lump hammer.
It seemed a good idea to try and warm up the diff a bit before I started, given that it was a little on the chilly side this morning. So I went for an essential drive in the fog (only one of my front fog lights works, apparently, but I’m considering terminating their contracts at some point and using the holes for brake ducts, so I’m not too fussed). Before I went, I lined up my jack and axle stands, and all my tools and bits and pieces, so that on my return I could get it straight up and drain the oil whilst it was still warm.
As it turned out, my trolley jack under the front subframe couldn’t get it high enough to get the axle stands under the jacking points, so I reverted to the standard E36 jack (a new one because I bent my old one after finishing the manual swap. Chocks? What are chocks?). As it turned out, that couldn’t get it high enough to get the axle stand under the jacking point either. You’d think I’d never jacked up my car before, wouldn’t you? A bit of 18mm MDF under the jack gave me the extra height I needed to get the axle stands under the front. I used the trolley jack on the diff to get the rear up, which just about managed to get it high enough. I’m not sure the car was quite as level as I’d like it to be for this job, but it was as close as I was going to get it. Plus I hadn’t crushed myself to death under 1400kg of Bavaria’s finest steel yet, so I quit while I was ahead.
Why have I recounted this tale of jacking incompetence? Because it made my masterplan to warm up the diff somewhat less effective than it might otherwise have been. By the time I got under the back of the car with my spanners, I would estimate that the diff oil was about half a degree warmer than it was before I started the car this morning.
So, under the car. A bit of engine degreaser, a wire brush and some blue roll were necessary to clear the muck from around the fill and drain plugs. I don’t really want that sneaking into my diff. Then the Now for the key bit – to undo the fill plug before undoing the drain plug. This is me heeding the warnings of people more experienced than I. It is worth knowing that you can undo your fill plug before you drain the oil, otherwise you could end up a bit stuck. Also it allows air in the top whilst the oil falls out the bottom, making for a lovely smooth stream. Very important.
My fill plug put up a fight. Even applying my hammer with gusto was insufficient to overcome its reluctance. Time for the penetrating fluid. A liberal squirt for both plugs. Whilst I waited for this to take effect, I took the wheels off. This wasn’t just for fun (though it is always fun). The Nankang NS2Rs that I ordered the other day have now arrived, so I will take the wheels and tyres to my friendly local tyre fitter to unite them with each other, and say goodbye to the aged Teflon Pirellis.
By now, the advantage I had gained from warming the diff this morning was definitely questionable.
Back to the fill plug. Ring end of the spanner on the hex bit. Hex bit inserted into the plug. Hammer in hand. 30 metre runup, full backswing, and… it turned. Not very dramatic, but that was sufficient to get it undone. I thought the car was slightly lower at the back than it was at the front, so was expecting a little bit of oil to come out of the fill hole at this stage. It didn’t, which either means the car was more level than I thought, or the level was a bit low. Most likely the latter.
Once that was out, I applied the same level of vigour to the drain plug, which also gave up the fight quite nicely, and the oil streamed out very pleasingly. The old washers did not look very happy.
I left the oil draining for a while, and had a couple of brownie bites and a drink. Once the flow had stopped, plug back in with a new washer and out comes the big syringe. The diff swallowed most of the 2 litres of Redline before it started dribbling from the fill hole. I let the dribble slow a bit before I put the fill plug back in, fairly confident that the level is close enough. Plug back in (new washer), a quick wipe, and job done.
It’s a very straightforward operation, complicated only by the proximity of the spare wheel well to the fill plug. Forewarned is forearmed, though, and as long as you’re prepared for this, it’s all good. I had bought a 14mm hex bit that turned out to be too short, so once inserted in the plug there was no room for the spanner. Fortunately I checked this when I got the bit, and so had ordered a longer one. As it turned out, both were useful, as the long one only just fit in the space, so was only good for the first half turn or so before it got in the way. The short one then became useful – call it foresight!
That’s all for now. Pictures of wheels and tyres to follow soon.


I’m on the slow road to track-preparedness. To start with, I’m concentrating on tyres, suspension and brakes. Seems sensible.
Tyres - the Nankangs are on the wheels, but haven’t quite made it onto the car yet.
Suspension - just ordered some HSD Dualtechs with the slightly harder springs (10kg/mm front and rear). My rationale is that, as a beginner, there’s no point spending £££ on top-notch kit, but wanted something half decent, so no auction site skip-fodder. HSD seem to have a reasonable reputation. I went for Dualtechs because I’m unlikely to be able to tell the difference between them and the Monopros. I went for the harder springs because the car is predominantly for chucking around tracks, it’s not my daily (the Skoda can look after my spine), and I’d probably get bored of the standard springs after a couple of track days. This is all guesswork, but I’ve got to start somewhere.
Brakes - I’ve got ATE Type 200 fluid and EBC Yellow Stuff pads, which I will insert/fit in the near-ish future. I thought about stainless braided lines, but then, as a test, tried to undo the unions on my rusty lines. Lots of penetrant was sprayed. Mole grips and flare-nut spanners were engaged. Things moved. Other things didn’t. At that point I decided discretion was the better part of valour and put off that idea indefinitely. What if it all goes right? I get shiny braided brake lines that might make a difference to my pedal feel. What if it all goes wrong? The car is off the road for weeks while I try to find the time and space to learn the art of bending and flaring brake lines and dismantling however much of my car would be necessary to replace the ones whose rusted ends I accidentally twisted off. I’m not averse to learning new skills, but as there is currently nothing wrong with the functionality of my braking system, the risk involved in attempting the braided lines is too great to bother with right now. That’s a future-BCPL problem. Racing fluid and funky pads will see me right for my first track day. Whenever that might be.
Hopefully soon there will be some photos of shiny new coilovers in a box. Then on a car. The amount of swearing involved in the transition from one to the other is yet to be determined.
Thanks for sharing your experience. Like everything with this car, it’s a learning experience. They may be horrible. Hopefully they’ll give a good experience on the track, but if not, I can always take them off and try something else. I might even be able to recoup some of the cost by selling them on, unless they’ve turned to orange dust, as some internet users have suggested they might.
Either way, I’ll learn something and have fun along the way. That’s the plan!
Either way, I’ll learn something and have fun along the way. That’s the plan!
Yes, I guess that’s often the fate of cars like these when they reach their point of lowest value. They become accessible (to people like me...) and, because they’re so cheap, are seen as disposable. Plus easy to write off as they’re worth pennies.
When I got mine you could find an E36 for less than £1k without even trying. You’d be hard pressed to do that today.
When I got mine you could find an E36 for less than £1k without even trying. You’d be hard pressed to do that today.
I've been buying stuff.
If you've been keeping up with my verbose nonsense, you may remember this:
More power is probably unnecessary, but as the ECU is ready to accept an M50 manifold it’d be rude not to add that to the list for some future occasion.Well...
More power may be unnecessary at this stage, but I managed to convince myself that the Latvian M50B25 manifold I was watching on the Bay was probably the last one in the world, and that if I didn't buy it then I'd never get one. Or at least, if I did buy it, then at least I'd have one squirrelled away so if no other ones ever appeared for sale, I could, at will, smugly produce my Latvian one and set about strapping it to my engine.
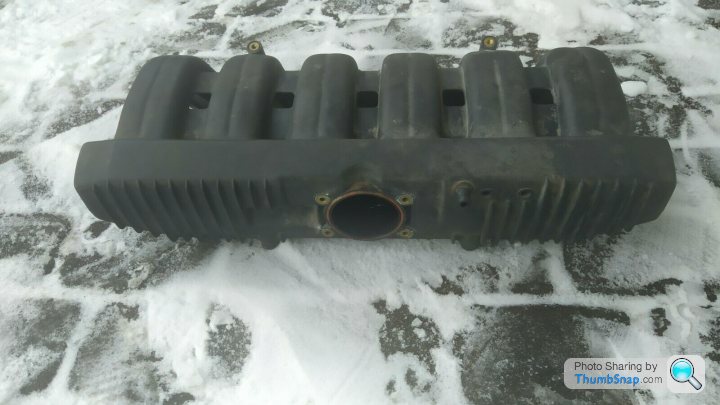
As I clicked 'definitely confirm totally unnecessary and almost certainly overpriced purchase' or whatever the phrasing is, I noticed a little picture pop up under 'related items' which looked suspiciously like an M50B25 manifold, with a fitting kit. That, as it turned out, was precisely what it was. My searching skills had clearly let me down catastrophically, and as I had been talking myself into believing my Latvian friend was holding the Holy Grail, this one (in Wales) was sitting there all along. At the point at which I noticed it, the auction had about an hour left to run.

What does one do in this situation?
I bought it, obvs.
I mean, they might be the last two ever in existence, and if I own both, then I am a rich man!
Just call me Mr M50B25.
If you've been keeping up with my verbose nonsense, you may remember this:
buy_cheap_pay_later said:
More power is probably unnecessary, but as the ECU is ready to accept an M50 manifold it’d be rude not to add that to the list for some future occasion.
More power may be unnecessary at this stage, but I managed to convince myself that the Latvian M50B25 manifold I was watching on the Bay was probably the last one in the world, and that if I didn't buy it then I'd never get one. Or at least, if I did buy it, then at least I'd have one squirrelled away so if no other ones ever appeared for sale, I could, at will, smugly produce my Latvian one and set about strapping it to my engine.
As I clicked 'definitely confirm totally unnecessary and almost certainly overpriced purchase' or whatever the phrasing is, I noticed a little picture pop up under 'related items' which looked suspiciously like an M50B25 manifold, with a fitting kit. That, as it turned out, was precisely what it was. My searching skills had clearly let me down catastrophically, and as I had been talking myself into believing my Latvian friend was holding the Holy Grail, this one (in Wales) was sitting there all along. At the point at which I noticed it, the auction had about an hour left to run.
What does one do in this situation?
I bought it, obvs.
I mean, they might be the last two ever in existence, and if I own both, then I am a rich man!
Just call me Mr M50B25.
A bit of tinkering on a glorious sunny day. Although the car was up on stands inside the garage, so I spent most of this morning lurking in there like some sort of daylight-shunning cave-oik. Annoying, but there you go.
My intention this morning was to change the brake fluid and pads for my racing-spec mega-fluid and pads. Well, of course that simple-sounding task didn't go remotely to plan. Fortunately, I decided to do pads first. This was complicated somewhat by a lack of a suitable tool to compress the pistons in the calipers - what comes of having my life, and therefore tools, split across two locations. I say fortunately, because as I was doing the front left, I discovered a tear in the caliper piston boot. I must have pinched it or caught it somehow last time I was messing about with the brakes. I didn't take a picture of it, but will do next time I go back in there. If I'd done fluid first, I'd be pretty annoyed, as I'd have to do it all over again once I'd remedied the caliper issue. The fluid can wait.
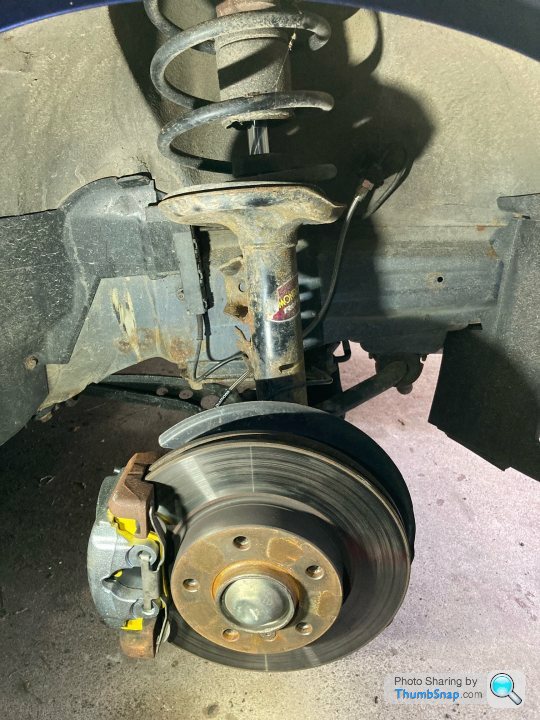
The other three corners were ok, and the pretty yellow pads went on fine. Proof (also proof of pretty orange discs):
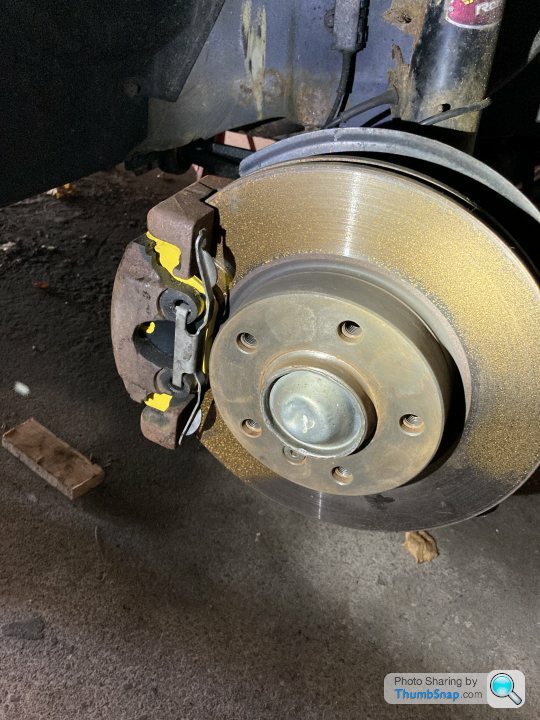
So, what to do about the torn piston boot? I considered a rebuild kit (pretty cheap), but to recondition the caliper properly would take me a while (not least because I'd want to do both sides), and I don't really want the car to be off the road for too long. Over the next few weeks I want to be fitting my coilovers and getting it out on a track. So I decided to buy some shiny new calipers for both front corners, and whilst I'm at it I'll go for those braided lines that I considered a few days ago and put off indefinitely. I'll get the full set of lines but only fit the front for now, as I have to get the calipers off anyway. It was mainly the rear lines that gave me pause previously, but I'll leave them well alone for the time being. The front left union between hard and flexible lines I have already managed to break (as in begin to unscrew, rather than the more traditional meaning of 'break' which is what I usually do to things whilst trying to fix them), and now I have some additional vice grips I'm sure I'll get the front right cracked too.
I'll probably get some rebuild kits and have a go at the old calipers in slow time. I think it'd be quite satisfying to get them properly cleaned up and restored. I could then sell them, or keep as spares I suppose.
Then there's the question of what to do with my old brake pads that only have a few hundred miles on them. They're road spec, so I can't see me ever putting them back on the car. Clean the grease off the back and sell them? Not sure anyone buys part-worn brake pads when new ones are pretty inexpensive. I guess they can go to the tip, then. A bit of a shame, but not sure what use they'll ever see in the future.
In other news, I've ordered a new fuel filter and some fuel system cleaner. No idea when the filter was last done, and thought it worth giving the engine the best chance of receiving clean fuel.
I had a look at the snorkel in the airbox. It'd be easy enough to get out, but think I'll wait until I'm driving it more regularly so I can tell if there's any difference between snorkel-in and snorkel-out.
I did promise more pictures earlier in the thread, and realise I have spectacularly failed to live up to that this morning. I've only been changing pads on an utterly filthy car though, so nothing to see here. There will follow plenty of pictures of shiny new bits going on to the car, and of that pesky torn caliper boot.
My intention this morning was to change the brake fluid and pads for my racing-spec mega-fluid and pads. Well, of course that simple-sounding task didn't go remotely to plan. Fortunately, I decided to do pads first. This was complicated somewhat by a lack of a suitable tool to compress the pistons in the calipers - what comes of having my life, and therefore tools, split across two locations. I say fortunately, because as I was doing the front left, I discovered a tear in the caliper piston boot. I must have pinched it or caught it somehow last time I was messing about with the brakes. I didn't take a picture of it, but will do next time I go back in there. If I'd done fluid first, I'd be pretty annoyed, as I'd have to do it all over again once I'd remedied the caliper issue. The fluid can wait.
The other three corners were ok, and the pretty yellow pads went on fine. Proof (also proof of pretty orange discs):
So, what to do about the torn piston boot? I considered a rebuild kit (pretty cheap), but to recondition the caliper properly would take me a while (not least because I'd want to do both sides), and I don't really want the car to be off the road for too long. Over the next few weeks I want to be fitting my coilovers and getting it out on a track. So I decided to buy some shiny new calipers for both front corners, and whilst I'm at it I'll go for those braided lines that I considered a few days ago and put off indefinitely. I'll get the full set of lines but only fit the front for now, as I have to get the calipers off anyway. It was mainly the rear lines that gave me pause previously, but I'll leave them well alone for the time being. The front left union between hard and flexible lines I have already managed to break (as in begin to unscrew, rather than the more traditional meaning of 'break' which is what I usually do to things whilst trying to fix them), and now I have some additional vice grips I'm sure I'll get the front right cracked too.
I'll probably get some rebuild kits and have a go at the old calipers in slow time. I think it'd be quite satisfying to get them properly cleaned up and restored. I could then sell them, or keep as spares I suppose.
Then there's the question of what to do with my old brake pads that only have a few hundred miles on them. They're road spec, so I can't see me ever putting them back on the car. Clean the grease off the back and sell them? Not sure anyone buys part-worn brake pads when new ones are pretty inexpensive. I guess they can go to the tip, then. A bit of a shame, but not sure what use they'll ever see in the future.
In other news, I've ordered a new fuel filter and some fuel system cleaner. No idea when the filter was last done, and thought it worth giving the engine the best chance of receiving clean fuel.
I had a look at the snorkel in the airbox. It'd be easy enough to get out, but think I'll wait until I'm driving it more regularly so I can tell if there's any difference between snorkel-in and snorkel-out.
I did promise more pictures earlier in the thread, and realise I have spectacularly failed to live up to that this morning. I've only been changing pads on an utterly filthy car though, so nothing to see here. There will follow plenty of pictures of shiny new bits going on to the car, and of that pesky torn caliper boot.
mercedeslimos said:
I always tend to keep the pads I took out for a couple of months (just in case), replaced a set on the back of a Mazda 3, and a sticking caliper wrecked the new pads in short order (MIL's car, no clue!). I was glad that I had the old pads on a Saturday afternoon or it would have been a weekend with no work for her! Might be worth taking some to a track day as a just in case (not sure if you drive it home or not) that you finish a set while out.
Good thinking - emergency spares. I shall hold on to them. 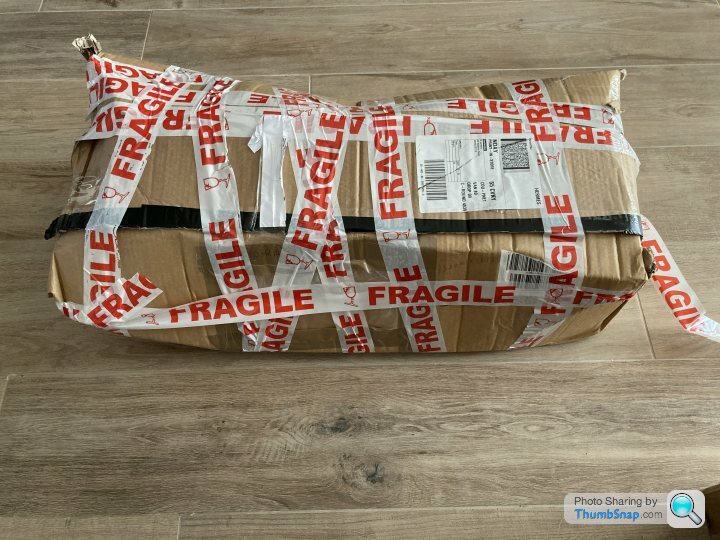
It’s a bit Christmas-like in the BCPL house. I don’t just mean because it’s still bloody freezing (it’s meant to be spring FFS). I mean because this lot has arrived.
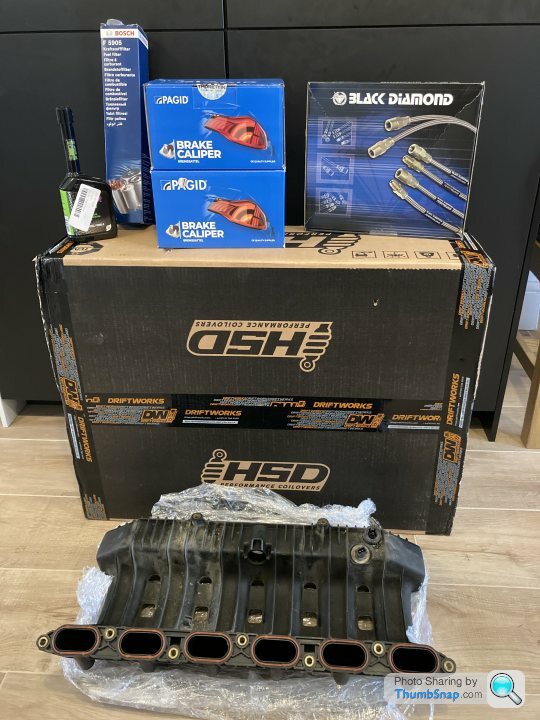
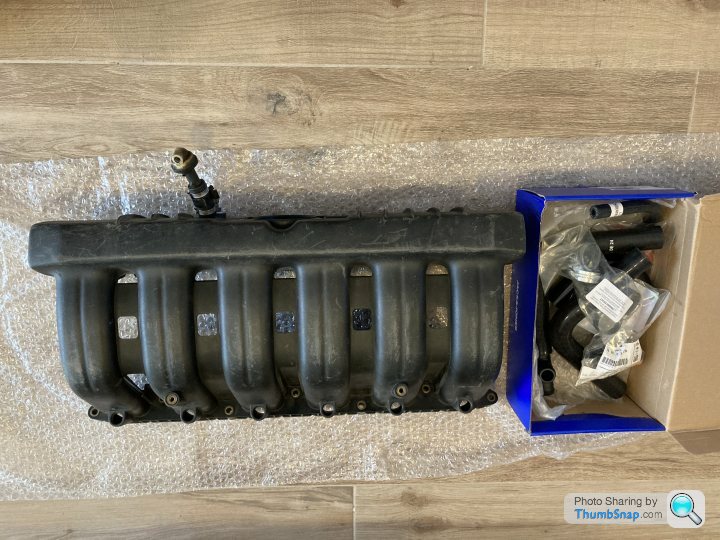
That’s my coilovers, new front brake calipers, braided brake hoses, fuel filter, fuel system cleaner, and my second M50B25 manifold. I wonder if I put both on the car, I’d get twice the HP increase...
I doubt I’ll have a chance to do much with any of it until next weekend. Priority is brakes, then fuel, then suspension. I have no intention of messing with the intake in the near future, but wanted to make sure I had the part (or two of them) to hand when I do want to.
Oh, and I’ve booked Mallory Park for 22 Apr. Plenty of time to get the car sorted.
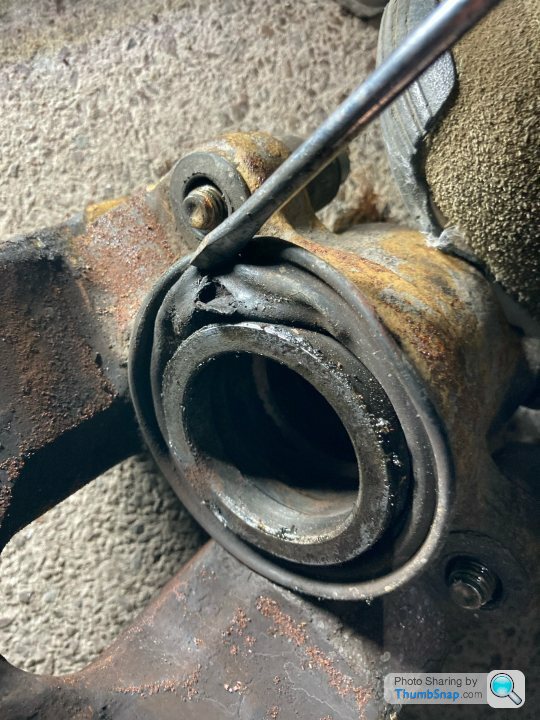
At last I have had a chance to get some of my shiny new bits onto the car.
First up, as promised, a picture of that pesky piston boot that prompted today's work on the brakes.
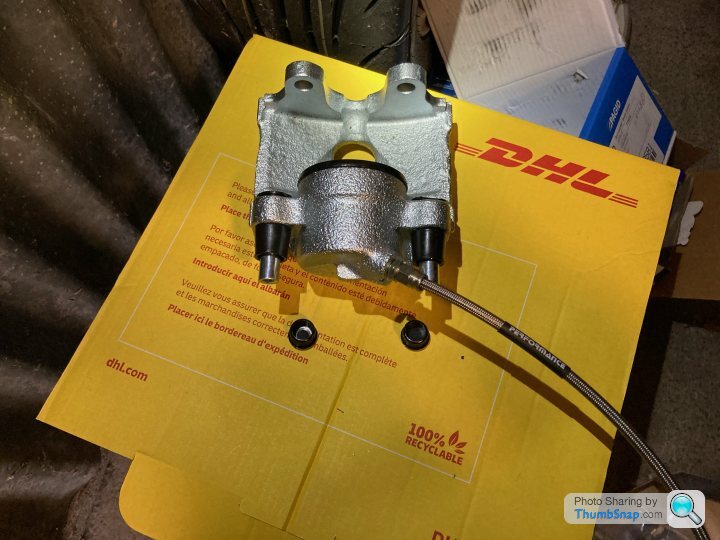
So, I got my new calipers out of the box, to be greeted by a little tag that said 'PAGID Remanufactured Caliper' or somesuch. So not new then. Never mind, I guess that's probably why they were at the less expensive end of the market. I don't recall that being made obvious when I bought them though. I probably just wasn't paying attention. That would be pretty much in character for me. I don't really have any concerns. This project is not high-end, and remanufactured calipers suit me fine.
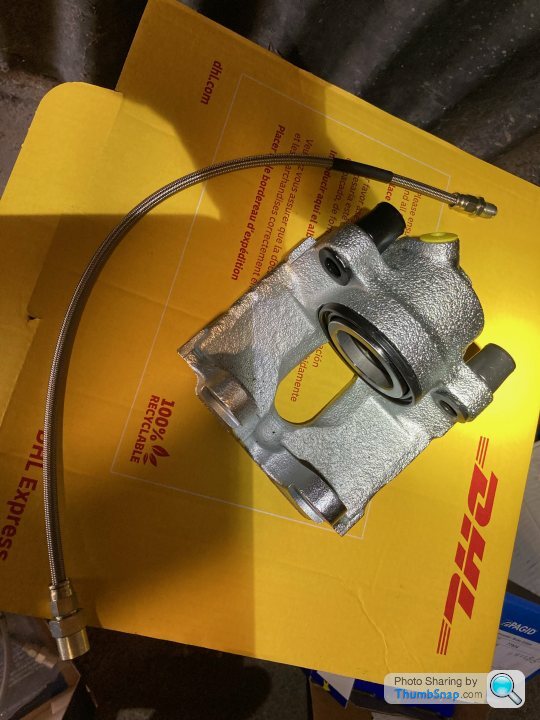
I also got my braided lines out. It's a six-line set because these cars have one on each side at the front, and two on each side at the rear. Also included in the box were four copper crush washers. I've not seen or heard of crush washers being used on this type of connection before (only on banjo bolts), but applied my logic to determine that since the six hoses had twelve ends, and of those ends eight were female and four were male (the caliper ends), the washers must go on the male ends. The result was this:
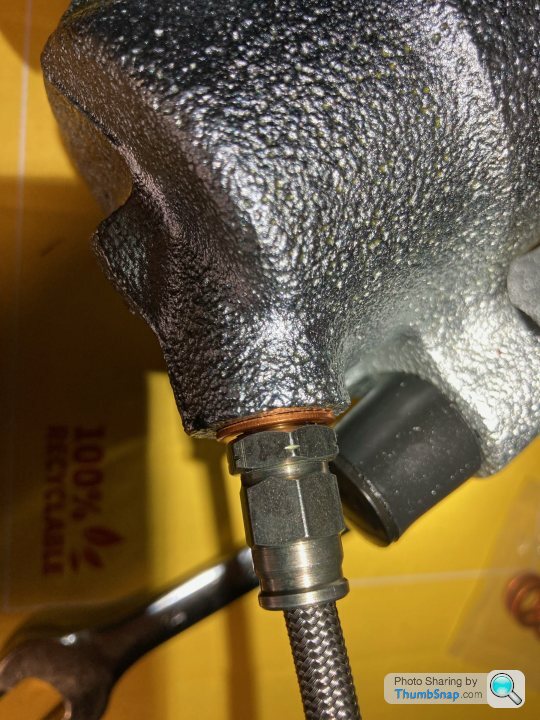
If you look closely, you can see that the flat part of the fitting above the thread has not even touched the washer, let alone crushed it. And that is screwed fully home. Confused. I did a bit of googling and determined that they probably weren't necessary, and if there were none on the old calipers/hoses (never a good indicator usually, I know), then I wouldn't bother with them. As it turned out, no washers were used in the making of this post.
So, calipers built up, with hoses screwed in firmly and guide pins greased up and slid in (ooh err...). This is just one of them, but you get the idea.
Now I have the ability to double-molegrip, I managed to undo the front right union between hard and soft lines. Actually I did this yesterday evening, so that I could sleep sound in the knowledge that I wouldn't have to start my day wrestling with stubborn nuts. I then failed to re-tighten it enough and was greeted this morning by a pool of brake fluid under one side of the car. Oops! Checked the level in the reservoir and fortunately it was ok, even though it looked like a pretty significant amount had successfully bid for freedom overnight.

It was then pretty straightforward to take one caliper off, put the other on, fully undo the union with the hard line and then screw in the new one. It was quite tricky to keep the end of the hard line out of the crud that surrounds the fitting (despite my best efforts to clean it up) whilst doing the switcheroo, so hopefully I haven't introduced any into the braking system. I guess I'll find out when I die a fiery death or become one with a tree (or not). Everything tightened up, covers and clips on.

Same on the other side, and voila - two shiny calipers held by horrid rusty caliper carriers.

All that remained was to bleed the brakes, which I did with my Gunson pressure bleeder. I have used it before and was disappointed to find that the connector that went onto the valve of the spare tyre was useless at making an airtight seal (literally its only job). I have since replaced it with a lever-type clip on connector from the Bay, which works a treat. I didn't fill the bleeder bottle with brake fluid, just filled the reservoir to the brim and used the bleeder to apply air pressure. Once both sides were bled, the level in the reservoir was perfect. Sometimes these thing do just work out! I meant to take a picture of the Gunson in action but forgot. I'm sure you get the idea.
Once that was done, I tidied up, put the wheels back on and went for a test drive. The pedal feels a bit low (only a tiny bit really), but the brakes work fine and it stops in a straight line. Hopefully the pedal will come back up over time/miles. I got it back in the garage, back on the stands, wheels off to check for leaks. Front right looks fine, but there did seem to be a bit leaking from the hard/soft union on the left, so I gave it a nip up. I'll keep an eye on it.
By now time is getting on and I have other things to do, so the fuel filter can wait. I did scoot under the car for a look to see if anything was likely to cause me an issue when I do get to it, and whilst there noticed that the gearbox drain plug seemed a bit wet. There was a small amount of oil on the housing behind it. I cleaned it up and gave it an eighth of a turn or so. I don't want to overdo it. I'll keep an eye on that one too.
First up, as promised, a picture of that pesky piston boot that prompted today's work on the brakes.
So, I got my new calipers out of the box, to be greeted by a little tag that said 'PAGID Remanufactured Caliper' or somesuch. So not new then. Never mind, I guess that's probably why they were at the less expensive end of the market. I don't recall that being made obvious when I bought them though. I probably just wasn't paying attention. That would be pretty much in character for me. I don't really have any concerns. This project is not high-end, and remanufactured calipers suit me fine.
I also got my braided lines out. It's a six-line set because these cars have one on each side at the front, and two on each side at the rear. Also included in the box were four copper crush washers. I've not seen or heard of crush washers being used on this type of connection before (only on banjo bolts), but applied my logic to determine that since the six hoses had twelve ends, and of those ends eight were female and four were male (the caliper ends), the washers must go on the male ends. The result was this:
If you look closely, you can see that the flat part of the fitting above the thread has not even touched the washer, let alone crushed it. And that is screwed fully home. Confused. I did a bit of googling and determined that they probably weren't necessary, and if there were none on the old calipers/hoses (never a good indicator usually, I know), then I wouldn't bother with them. As it turned out, no washers were used in the making of this post.
So, calipers built up, with hoses screwed in firmly and guide pins greased up and slid in (ooh err...). This is just one of them, but you get the idea.
Now I have the ability to double-molegrip, I managed to undo the front right union between hard and soft lines. Actually I did this yesterday evening, so that I could sleep sound in the knowledge that I wouldn't have to start my day wrestling with stubborn nuts. I then failed to re-tighten it enough and was greeted this morning by a pool of brake fluid under one side of the car. Oops! Checked the level in the reservoir and fortunately it was ok, even though it looked like a pretty significant amount had successfully bid for freedom overnight.
It was then pretty straightforward to take one caliper off, put the other on, fully undo the union with the hard line and then screw in the new one. It was quite tricky to keep the end of the hard line out of the crud that surrounds the fitting (despite my best efforts to clean it up) whilst doing the switcheroo, so hopefully I haven't introduced any into the braking system. I guess I'll find out when I die a fiery death or become one with a tree (or not). Everything tightened up, covers and clips on.
Same on the other side, and voila - two shiny calipers held by horrid rusty caliper carriers.
All that remained was to bleed the brakes, which I did with my Gunson pressure bleeder. I have used it before and was disappointed to find that the connector that went onto the valve of the spare tyre was useless at making an airtight seal (literally its only job). I have since replaced it with a lever-type clip on connector from the Bay, which works a treat. I didn't fill the bleeder bottle with brake fluid, just filled the reservoir to the brim and used the bleeder to apply air pressure. Once both sides were bled, the level in the reservoir was perfect. Sometimes these thing do just work out! I meant to take a picture of the Gunson in action but forgot. I'm sure you get the idea.
Once that was done, I tidied up, put the wheels back on and went for a test drive. The pedal feels a bit low (only a tiny bit really), but the brakes work fine and it stops in a straight line. Hopefully the pedal will come back up over time/miles. I got it back in the garage, back on the stands, wheels off to check for leaks. Front right looks fine, but there did seem to be a bit leaking from the hard/soft union on the left, so I gave it a nip up. I'll keep an eye on it.
By now time is getting on and I have other things to do, so the fuel filter can wait. I did scoot under the car for a look to see if anything was likely to cause me an issue when I do get to it, and whilst there noticed that the gearbox drain plug seemed a bit wet. There was a small amount of oil on the housing behind it. I cleaned it up and gave it an eighth of a turn or so. I don't want to overdo it. I'll keep an eye on that one too.
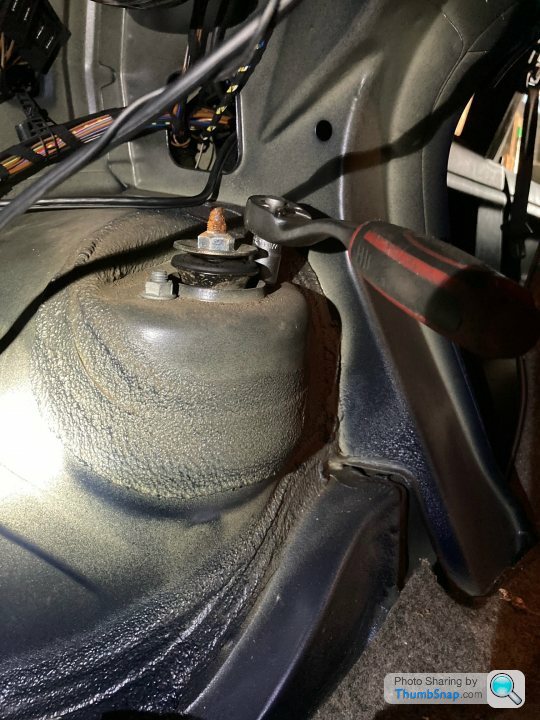
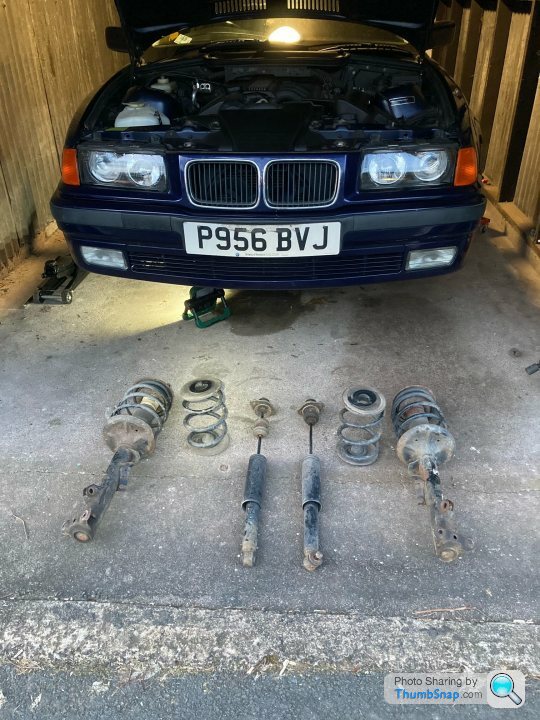
I managed to grab a bit of time after work before it got dark, so got the car up on stands in the garage with the intention of swapping the fuel filter. Once it was up, I decided I couldn't be bothered faffing with the filter, so I took off all the suspension instead. I am planning on installing the coilovers this weekend, so it wasn't a completely random act of spannering.
I knew the front struts would come off easy enough, as I'd had them both off last year (or maybe late 2019, I don't really know). The rear shocks I was less sure about, as I haven't touched them before. As it turned out, all of them came off without putting up a fight. When I saw the copper grease on the thread of the bolts at the bottom of the rear shocks, I was reminded that they had been replaced quite early in my ownership by a mechanic in Germany. He'd clearly sorted me right out and made this job nice and easy. (Not sure if thread-lock might have been a better idea on a suspension bolt... what do I know?)
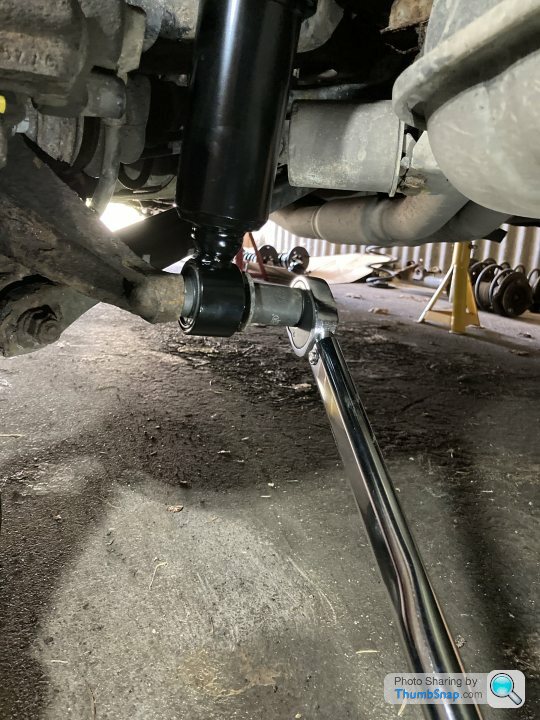
Bottom bolt off

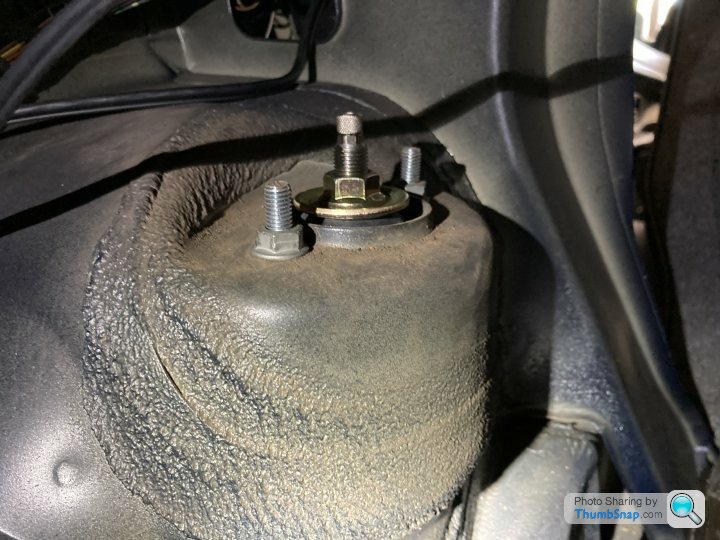
Top nuts off
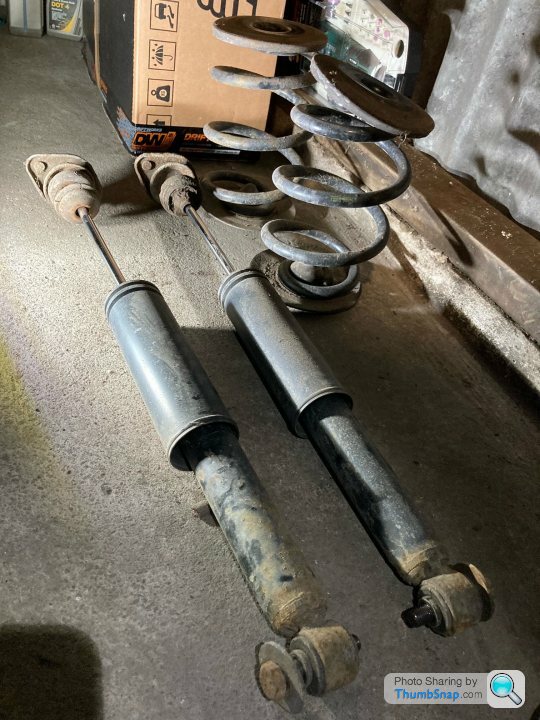
Shocks and springs off the back
No rear suspension

Front strut on
Front strut off. Cable ties saving the new brake hoses from taking the weight of the hubs.
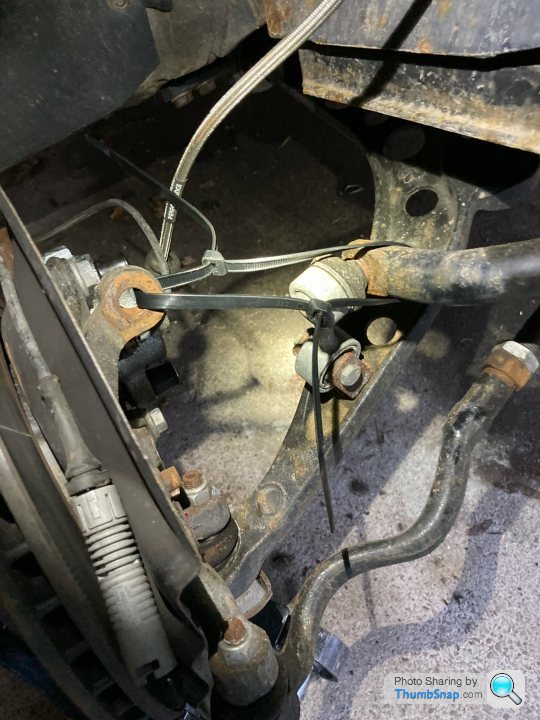
Et voila! I also disconnected the ARB from both front control arms to prevent torsion-based difficulties when installing the new struts.
I gave the old girl a run out at the weekend, to help bed in the new pads. It was gratifying to see, when I took off the wheels today, that there were no leaks from the new hoses any more after my previous efforts.
As I hadn't actually intended to take all the suspension off today, I didn't take 'before' pictures of the ridiculous arch gap, nor did I take any measurements before I jacked it up. Never mind, I think this will do as a 'before', and I'll try and take a comparable 'after' once it's 'stanced' or whatever.
Oh, and an honourable mention for this little work light that I got from Lidl. It's pretty versatile, I like it.
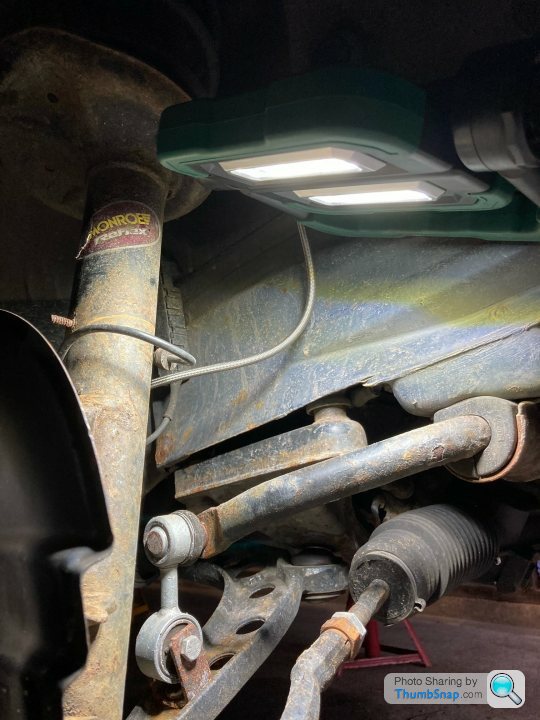
I knew the front struts would come off easy enough, as I'd had them both off last year (or maybe late 2019, I don't really know). The rear shocks I was less sure about, as I haven't touched them before. As it turned out, all of them came off without putting up a fight. When I saw the copper grease on the thread of the bolts at the bottom of the rear shocks, I was reminded that they had been replaced quite early in my ownership by a mechanic in Germany. He'd clearly sorted me right out and made this job nice and easy. (Not sure if thread-lock might have been a better idea on a suspension bolt... what do I know?)
Bottom bolt off
Top nuts off
Shocks and springs off the back
No rear suspension
Front strut on
Front strut off. Cable ties saving the new brake hoses from taking the weight of the hubs.
Et voila! I also disconnected the ARB from both front control arms to prevent torsion-based difficulties when installing the new struts.
I gave the old girl a run out at the weekend, to help bed in the new pads. It was gratifying to see, when I took off the wheels today, that there were no leaks from the new hoses any more after my previous efforts.
As I hadn't actually intended to take all the suspension off today, I didn't take 'before' pictures of the ridiculous arch gap, nor did I take any measurements before I jacked it up. Never mind, I think this will do as a 'before', and I'll try and take a comparable 'after' once it's 'stanced' or whatever.
Oh, and an honourable mention for this little work light that I got from Lidl. It's pretty versatile, I like it.
Mardgee said:
Just read this start to finish. Good read thanks, really enjoyed it. I’ve recently sold my car and fancy buying something similar and replicating your journey of doing all the jobs. Bookmarked.
Thanks for commenting, glad you've enjoyed it. I have too!I keep a spreadsheet of how much I've spent on the car over the last couple of years and it adds up pretty quickly, even when you're just doing mostly OEM-equivalent replacement, not even performance upgrades (though I'm getting to that now).
That said, it's one of those things that you can spend money and time on when you have it, and when you don't, it will sit there quietly and not judge you (or empty your bank account).
Hoping to get it on track soon and enjoy the driving as well as the spannering!
Today's fun: fitting the coilovers. Yes, I'm aware that the rears aren't actually coilovers.
I went for HSD Dualtech (their cheaper range). I've explained my reasoning before, but to recap - an established brand so, hopefully, decent quality. Beginner track driver so no need for high-end race-spec mega-struts. The cost was £625 which I judged to be reasonable for what I was getting and what I wanted to achieve. Also, given that this car is mainly for playing on the track I went for a slightly stiffer than normal spring (10kg/mm all round) in an effort to not be disappointed with the softness after the first couple of track days. All guesswork, let's see how it pans out!
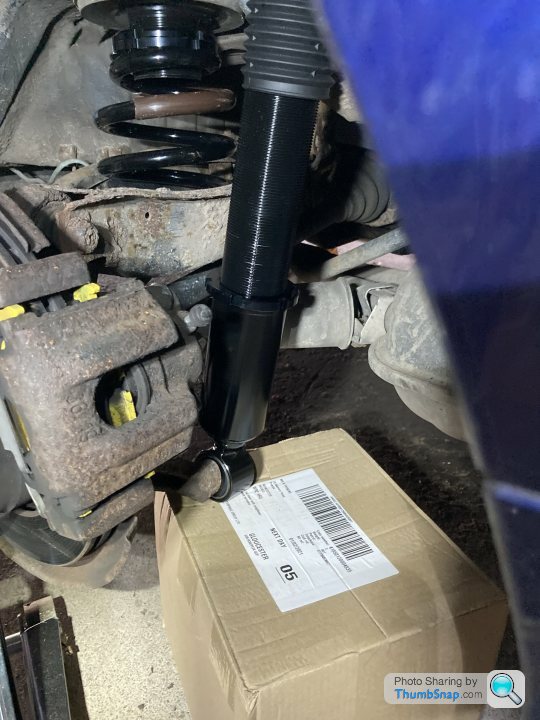
This is what we're dealing with:

It took me a while to figure out which front strut was which, as they weren't marked and the manual was silent on the matter. In the end I had to go by the orientation of the ARB link mounting brackets (for ARB links I don't have - mine bolt to the control arm rather than the strut). This will become clear later.
I also had a bit of thinking to do about the rear. First a quick comparison, new and old:

The way they are meant to go on, I believe, is for the adjustable spring seat to be bolted to the suspension arm at the bottom, like so:
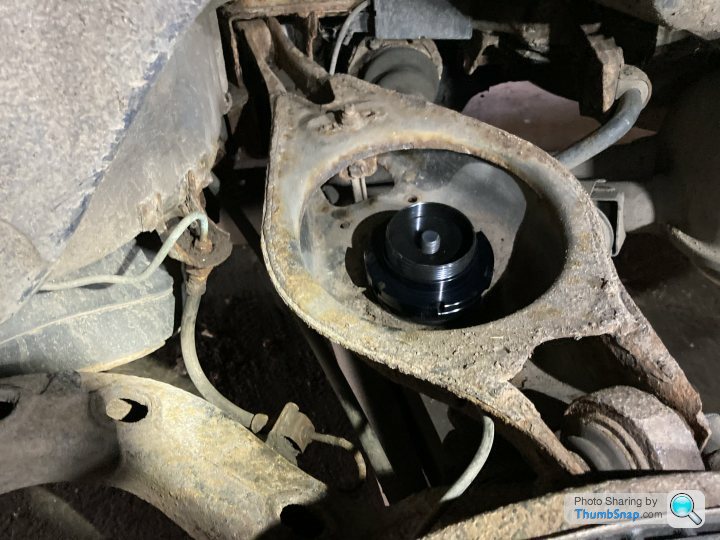
The problem with that is that when you want to adjust them with the coilover spanners, you can't because they are buried deep inside the cups on the arms:
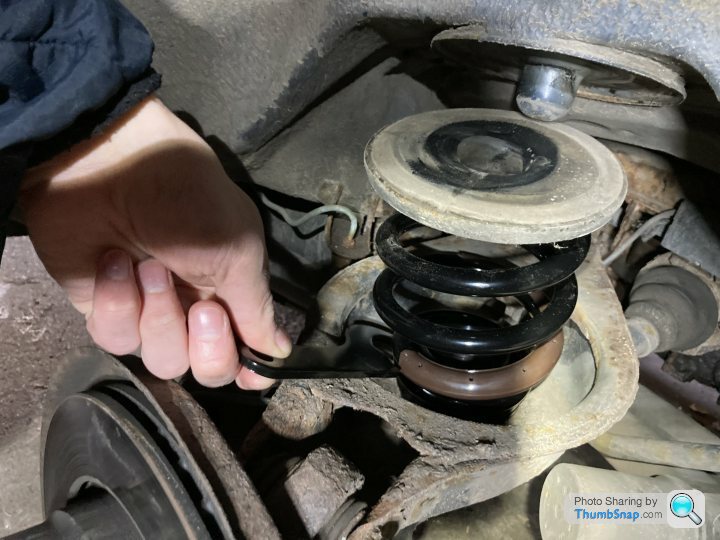
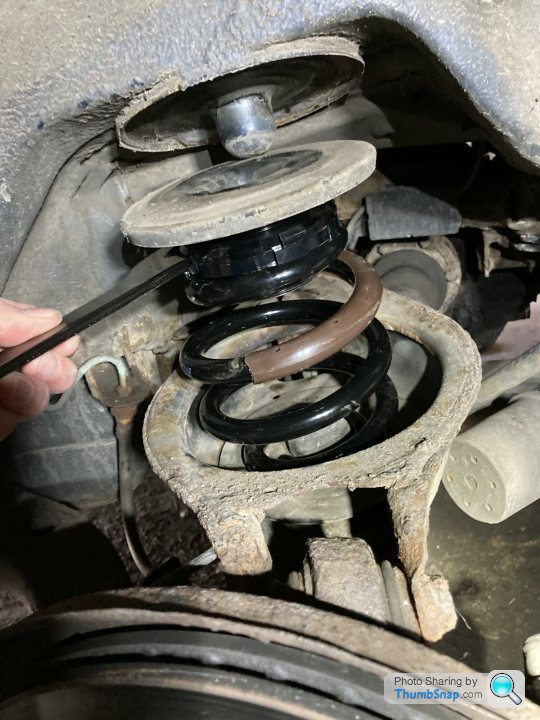
Fortunately, it is possible (whether it's advisable is an entirely different matter) to turn it upside down, as the rubber hat and butt-plug from the OEM spring fit in the adjustable spring seat and the other end of the spring respectively. This enables much easier access to the collars for adjustment. Whether it also leads to the suspension self-disassembling at high speed remains to be seen.
As per the supplied instructions, I jacked up the hub so that the spring was touching at both ends but not yet compressed, and then adjusted the damper to the correct length as defined by the distance between the top mounting point and where the bottom mounting point was now sitting. Damper bolted in (with assistance from my friend, Mr Box), and torqued appropriately. At this stage I am setting everything so it sits at the maximum ride height that this kit allows. I'm not going for low-rider status, but can always adjust downwards as required.

So that was the back done. On with the front.
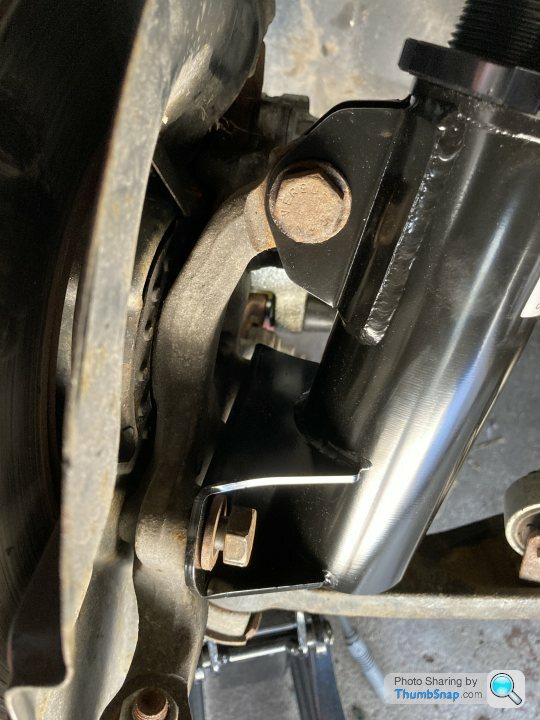
Here you can see the ARB link bracket that I mentioned. The flat face is supposed to sit towards the engine bay when the bracket is to the rear of the strut. That's the only way I could tell that this strut went on this side and the other on the other. I did at least five minutes of Googling to see if there was any other way... Although I don't need to attach drop links to them, they did come in handy for attaching brake hoses and wheel speed sensor cables to via the medium of cable ties. A bit 'council' perhaps, but as HSD didn't give me any other way of securing them to the strut, that was my solution. I did check full lock both ways to make sure nothing was being pulled or likely to get caught. Gotta love cable ties!
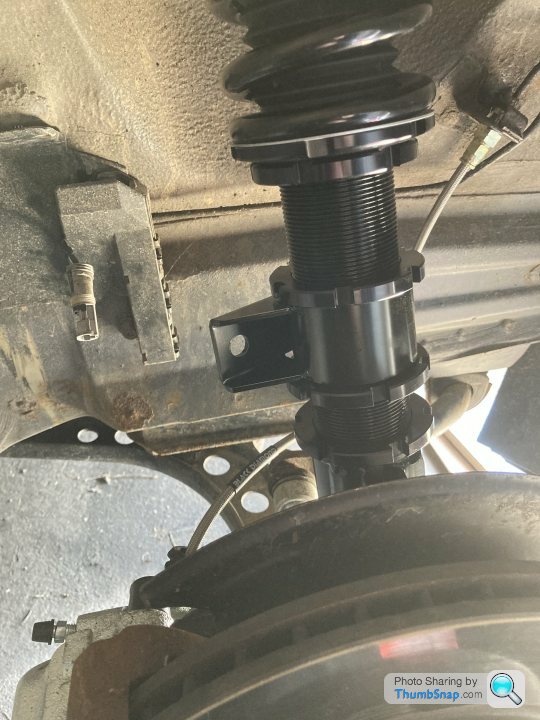
Torqued up:
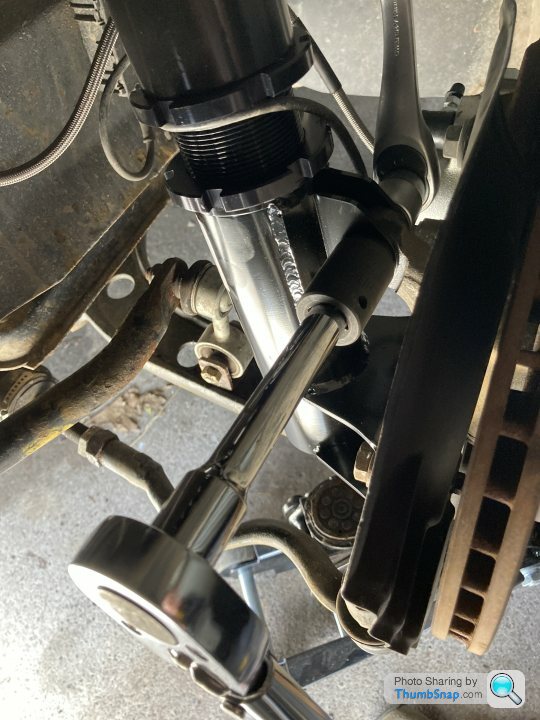
Adjusting the camber is going to be interesting. I've seen this on other E36s. I think it's just a thing. If I swapped the struts over (drop link bracket aside) I'd still have the same problem.

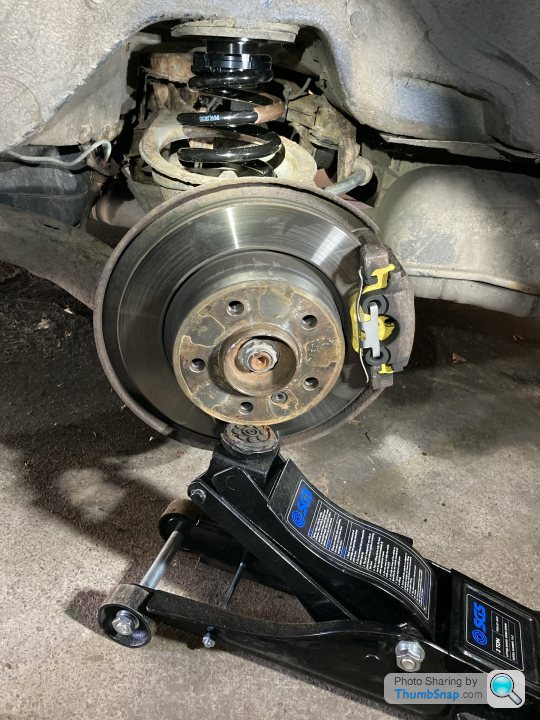
Not much droop here.
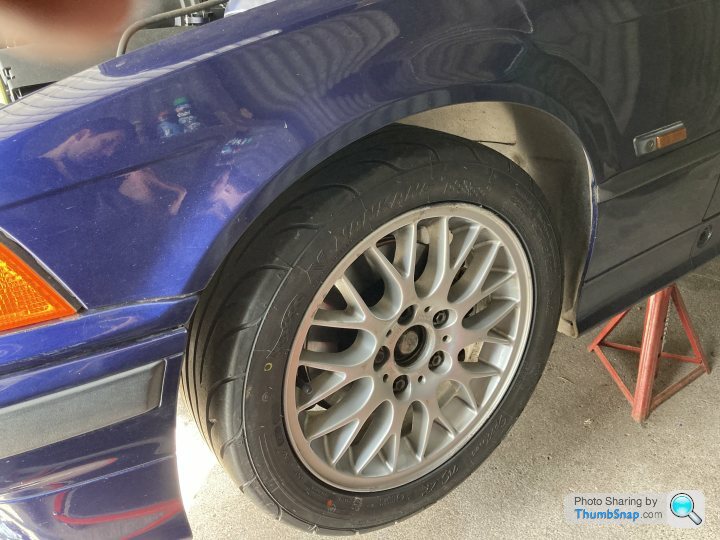
And that takes us to the obligatory before and after shots:
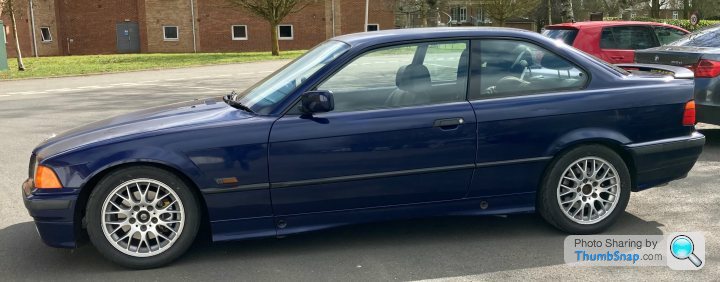
So, the front is definitely lower, but the back hasn't dropped at all, which is a bit weird. I was going to take it for a drive, but when a worrying noise led me to get out and check the front wheels, I found that the tyres were rubbing on the locking collars on the coilovers. I very gingerly returned it to the garage and there it will stay until some wheel spacers arrive! I had no idea what size to go for, so have ordered a selection and will return whatever I don't use.
I have now lowered the rear from where it is in the photo, by winding both collars on each side up as far as they will go. It still looks a tad high in the garage, but I'll give it chance to settle once I can drive it and see what's what. I can get more drop if required by removing one or both collars completely.
Anyone who has been reading my previous posts may wonder when I'll get round to doing the fuel filter that I keep going on about. Well, I thought about it. I even went as far as taking some photos of it:
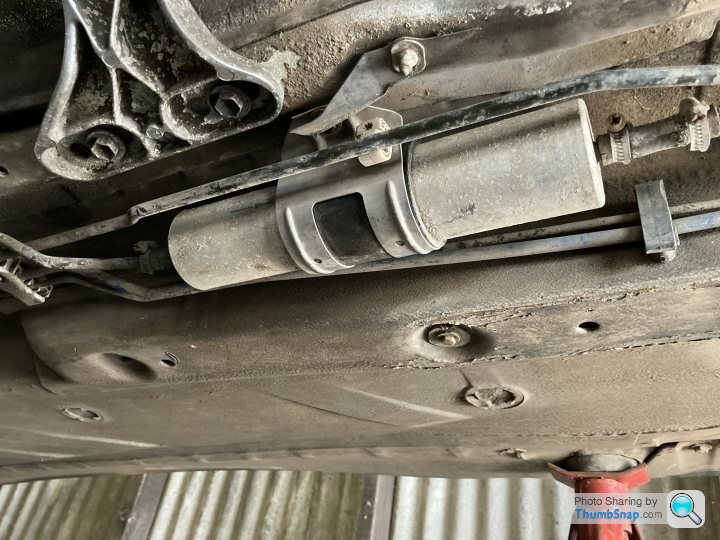
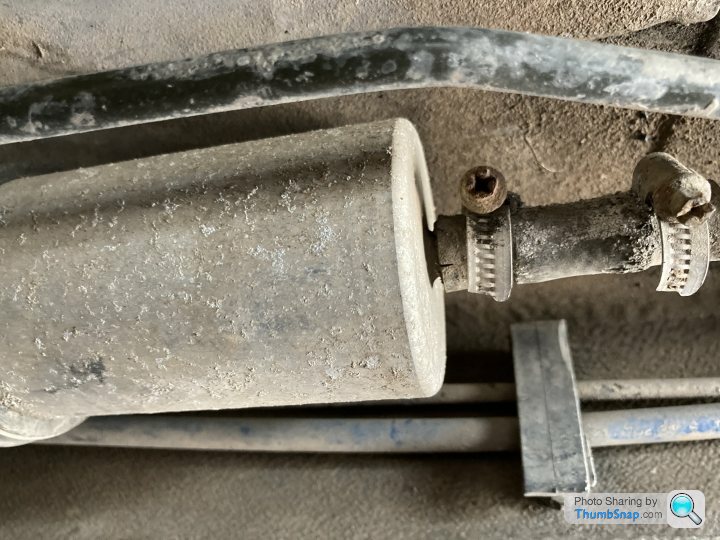
The short rubber sections look a bit suspect to me. There is at least one small split in one of them, as you can see. I think I'll order some new rubber hose before I tackle that. I don't fancy putting the old ones back on and have them fall apart on me.
So that's it for today. Next up is wheel spacers, when they arrive. I'd like to get the fuel filter done before my first track day on 22 April, but if I don't it's not a problem. I do want to put a few miles on the car before then though, to give the new bits a good shakedown and get everything nice and tight.
I went for HSD Dualtech (their cheaper range). I've explained my reasoning before, but to recap - an established brand so, hopefully, decent quality. Beginner track driver so no need for high-end race-spec mega-struts. The cost was £625 which I judged to be reasonable for what I was getting and what I wanted to achieve. Also, given that this car is mainly for playing on the track I went for a slightly stiffer than normal spring (10kg/mm all round) in an effort to not be disappointed with the softness after the first couple of track days. All guesswork, let's see how it pans out!
This is what we're dealing with:
It took me a while to figure out which front strut was which, as they weren't marked and the manual was silent on the matter. In the end I had to go by the orientation of the ARB link mounting brackets (for ARB links I don't have - mine bolt to the control arm rather than the strut). This will become clear later.
I also had a bit of thinking to do about the rear. First a quick comparison, new and old:
The way they are meant to go on, I believe, is for the adjustable spring seat to be bolted to the suspension arm at the bottom, like so:
The problem with that is that when you want to adjust them with the coilover spanners, you can't because they are buried deep inside the cups on the arms:
Fortunately, it is possible (whether it's advisable is an entirely different matter) to turn it upside down, as the rubber hat and butt-plug from the OEM spring fit in the adjustable spring seat and the other end of the spring respectively. This enables much easier access to the collars for adjustment. Whether it also leads to the suspension self-disassembling at high speed remains to be seen.
As per the supplied instructions, I jacked up the hub so that the spring was touching at both ends but not yet compressed, and then adjusted the damper to the correct length as defined by the distance between the top mounting point and where the bottom mounting point was now sitting. Damper bolted in (with assistance from my friend, Mr Box), and torqued appropriately. At this stage I am setting everything so it sits at the maximum ride height that this kit allows. I'm not going for low-rider status, but can always adjust downwards as required.
So that was the back done. On with the front.
Here you can see the ARB link bracket that I mentioned. The flat face is supposed to sit towards the engine bay when the bracket is to the rear of the strut. That's the only way I could tell that this strut went on this side and the other on the other. I did at least five minutes of Googling to see if there was any other way... Although I don't need to attach drop links to them, they did come in handy for attaching brake hoses and wheel speed sensor cables to via the medium of cable ties. A bit 'council' perhaps, but as HSD didn't give me any other way of securing them to the strut, that was my solution. I did check full lock both ways to make sure nothing was being pulled or likely to get caught. Gotta love cable ties!
Torqued up:
Adjusting the camber is going to be interesting. I've seen this on other E36s. I think it's just a thing. If I swapped the struts over (drop link bracket aside) I'd still have the same problem.
Not much droop here.
And that takes us to the obligatory before and after shots:
So, the front is definitely lower, but the back hasn't dropped at all, which is a bit weird. I was going to take it for a drive, but when a worrying noise led me to get out and check the front wheels, I found that the tyres were rubbing on the locking collars on the coilovers. I very gingerly returned it to the garage and there it will stay until some wheel spacers arrive! I had no idea what size to go for, so have ordered a selection and will return whatever I don't use.
I have now lowered the rear from where it is in the photo, by winding both collars on each side up as far as they will go. It still looks a tad high in the garage, but I'll give it chance to settle once I can drive it and see what's what. I can get more drop if required by removing one or both collars completely.
Anyone who has been reading my previous posts may wonder when I'll get round to doing the fuel filter that I keep going on about. Well, I thought about it. I even went as far as taking some photos of it:
The short rubber sections look a bit suspect to me. There is at least one small split in one of them, as you can see. I think I'll order some new rubber hose before I tackle that. I don't fancy putting the old ones back on and have them fall apart on me.
So that's it for today. Next up is wheel spacers, when they arrive. I'd like to get the fuel filter done before my first track day on 22 April, but if I don't it's not a problem. I do want to put a few miles on the car before then though, to give the new bits a good shakedown and get everything nice and tight.
Thanks, I appreciate your comment. They are great cars, fun to drive and easy to work on. Mine will never win any beauty contests but it gives me a lot of enjoyment.
I am looking forward to doing the manifold. I’ve got two track days booked in quick succession, so may look to do it after them so I can get a direct comparison of before and after. That’s only if there isn’t something more pressing to do, which is quite likely!
Thanks for the pointers on the induction kits. That’s another one of those things that I will get round to at some point. This is a slow-burn step-by-step kind of project, and I’ll probably be led by how it feels on the track. That is to say, at this stage, I don’t actually know what I want to do next!
Gassing Station | Readers' Cars | Top of Page | What's New | My Stuff