Pembleton mkII - Tin Tub
Discussion


Doofus said:
I wasn't intending to be rude, so don't be offended. I love the work you're doing, and you are developing some really nice improvements to the car. I just prefer different fuel fillers, that's all 
Oh I know you weren't being rude, my reply was tongue in cheek too, each to their own preference. Variety is the spice of life!Doofus said:
And I prefer the Brooklands, but let's not go there...

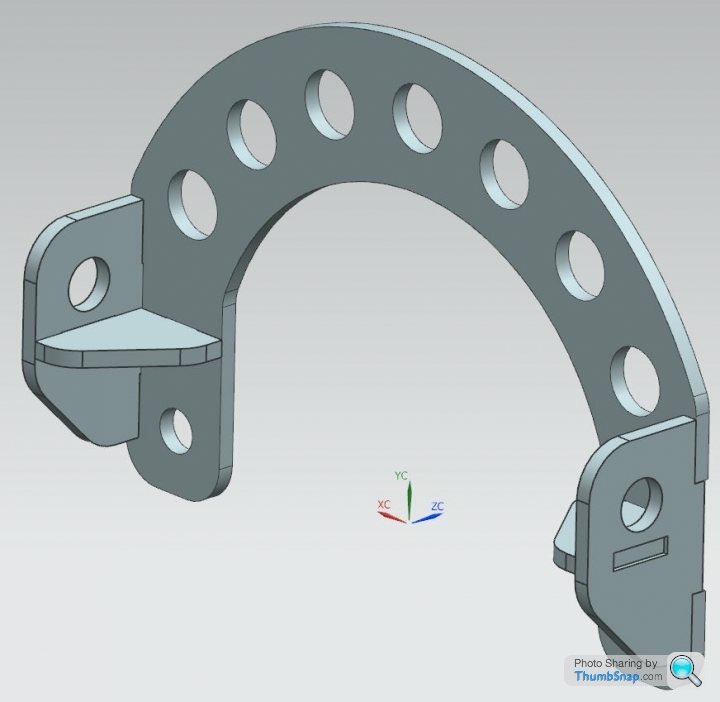
After looking at my hanger for a few days i dont like the look of it, It took an evening to make and proved my theory and design, so I CADd it up with some mods, made it look better and sent it off to a local laser cutting company to cut out of some 4mm S275 plate.

Whilst that's off being cut (I'm having a few made for myself and some other pembleton builders - Armando - let me know if you're interested in one)
I've been making a few other mods to the chassis. The seatbelt mounts needed modifying, stiffening and bracing, an additional rear bodywork support, a driver biased scuttle hoop rearward of the normal one to increase stiffness and strength of a raised scuttle.
I've also heard reports, especially with more powerful engines and those who also do engine braking, that the lamp bars can crack at the ends where they affix to the front uprights. Which can drop the engine and gearbox in extreme cases

As a preventative measure I've welded in some strengthening gussets.


Whilst that's off being cut (I'm having a few made for myself and some other pembleton builders - Armando - let me know if you're interested in one)
I've been making a few other mods to the chassis. The seatbelt mounts needed modifying, stiffening and bracing, an additional rear bodywork support, a driver biased scuttle hoop rearward of the normal one to increase stiffness and strength of a raised scuttle.
I've also heard reports, especially with more powerful engines and those who also do engine braking, that the lamp bars can crack at the ends where they affix to the front uprights. Which can drop the engine and gearbox in extreme cases
As a preventative measure I've welded in some strengthening gussets.
It's been a little while since an update. The laser cut plates arrived for the engine hangers. I ended up getting quite a few cut and made as there seemed to be a fair amount of interest from other owners too. Most of them are sold already, although I do have a few left.
Each one is like a neat little metallic jigsaw.


Welded up they fit perfectly...


So I welded up the bunch and gave a quick spray of etch primer.


Next to no progress has been made on the rest. I've done a bit of wiring, but not that much.
Each one is like a neat little metallic jigsaw.
Welded up they fit perfectly...
So I welded up the bunch and gave a quick spray of etch primer.
Next to no progress has been made on the rest. I've done a bit of wiring, but not that much.
Re invigorated to get some more done on TinTub I made a paper pattern for the rear barrel. I seem to have misplaced the original pattern piece, but as they're only really a guide anyway it wasn't a big deal.
I popped down to wickes and purchased some plastic floor protection panels for when you have builders/decorators in. The sheet size is handily the same size as aluminium (2.4mx1.2m) and is 2mm thick, very easily cut with scissors and is both made from recycled plastic, and also recyclable. At £3 a sheet it's also more palatable if I f k up.
k up.


We're busy every weekend until September now, so any and all progress must happen on weekday evenings. I still hope to get it on the road before the year is out!
I popped down to wickes and purchased some plastic floor protection panels for when you have builders/decorators in. The sheet size is handily the same size as aluminium (2.4mx1.2m) and is 2mm thick, very easily cut with scissors and is both made from recycled plastic, and also recyclable. At £3 a sheet it's also more palatable if I f
k up.We're busy every weekend until September now, so any and all progress must happen on weekday evenings. I still hope to get it on the road before the year is out!
Well I think I should probably update this.
Whilst not a huge amount of progress appears to have happened, actually a lot has, you just can't see it, so photos in this update will be minimum.
I've painted and fitted my engine/gearbox hanger properly now, gear shifter, and also properly mounted the handbrake mechanism (yet to be fully connected).
Most of my efforts the past few weeks has gone into the electrical side of things. I have finished plumbing in my fuel pump with brass bulkhead passthru's into the electrical stowage bin and little "in"/"out" ID plates.
I spent a lot of time choosing and specifying a battery too. I didn't want a motorcycle battery or a race type battery. I opted for the smallest road car battery I could get hold of easily, which is 055 size (the same as in a deawoo matiz and a few other small cars). The footprint is small, it was inexpensive and it has reasonable specs.
After the battery arrived I made a little mounting tray for it to sit in, mounted it into the chassis and cut a rubber mat for it to go on. I also made an aluminium strap to go over the top of it, and anchored it in with some M8's and rivnuts bonded into a re-enforcing plate.
A quick peruse of the MSVA test shows that switches for indicators, dip beam, main beam and horn all need to accessed with both hands remaining on the steering wheel. I don't like the "generic" stalks you can buy, and they didn't have the functionality I required. A look over the manual for my motogadget m.unit confirmed that I could keep my dashboard completely free of any switchgear if I had 4 switches on the column.
1x (on)-off-(on) toggle switch on the right hand side (up for sidelights on/off, down for on/off of dip/main, long down to turn all off)
1x momentary push on the right hand side for the horn
1x on-off-on toggle switch on the left hand side for the indicators (flicking between L/R 3 times activates hazards, even when keyed off)
1x momentary push on the left hand side for start/kill (one push for start, two for kill)
One problem i needed to overcome was mounting the switches. I created in CAD a little binnacle/column mount. All the wiring is internal and clamps around the outer column in two halves, with access panels on the rear for fitting the switches and making the electrical connections. it looks bigger on screen than in reality, its actually quite small (210mm athwart)


In addition to this I'll have a key barrel on the column further down.
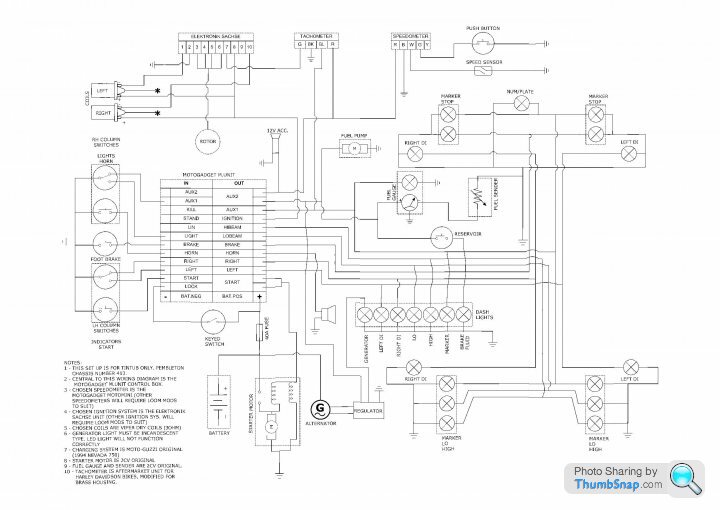
I made a wiring diagram - it took a long time.
(sorry for the poor quality as its a converted pdf)
A few other things have been bothering me recently too:
number 1 - fuel gauge
The 2CV fuel gauge is a funny old thing as the resistance change is very peculiar (non - linear). I have a standard 2cv fuel tank and a new 2cv fuel gauge sender. The problem is that the 2cv fuel gauge is integrated into the speedo housing and is very ugly. No way I'm using that, and the speedo would be useless for me anyway due to the gearbox and wheel diameter change.

I had one of these gauges in the garage so I pulled it apart to see if anything could be done to try and integrate it into the old brass smiths housing I had.
After a bit of butchery, trimmings, drillings etc i managed to get the gauge to fit. The needle was the wrong colour so i painted it black and i made a new face for it too. I spent ages looking for a similar font to my clock. I did the same with the ammeter, although not sure if I'll use that at the moment as I'm not convinced how useful they are.


My next issue revolves around the tachometer. i could use the original guzzi mechanical tacho (I still have it). I'd need to make a new face for it (obvs) and put in in a housing of correct period. My main problem with it though is that the tacho attatches right at the front top of the engine, and it'll be on show and is a large ungly cable and mounting elbow - not nice. I'd also need a new cable making up as on the bike its very short - not nearly half as long as it needs to be.
I've found online a few places that sell aftermarket Harley Davidson tachos that take an electrical signal straight from the coil - excellent. One of those is on order and will be modified with a matching face in the right housing.

The faces are just aluminium plate that I've given a turned effect by mounting on a drill and applying emery paper. The numbers/dials are printed on water slide decals and sealed with lacquer.
Next up is the speedo and dash lights. The speedo is a tricky one as the "long" gearbox and large wheel diameter mean that a 2cv one is next to useless, and any other one would need calibrating. Properly old cars did away with speedometers as it was more important to know engine rpm. Speed was merely a byproduct of gearing and RPM. With the two larger and two smaller dials shown above, i don't have much room for a speedo, but i need one by law. I've opted for the smallest digital speedo i could find (59mm x 22mm).
It comes with a magnetic switch and can be calibrated to any wheel size (perfect), shows speed, drive time, odomoter, trip etc. everything you'd expect. It's really really small and discrete and when the ignition is off, it's just a black face.
i made up a little brass mount plate with my dash lights (yes, it can be mounted vertically)....

thats all for now folks... hopefully it wont be long before i can make some real notable visible progress again.
Whilst not a huge amount of progress appears to have happened, actually a lot has, you just can't see it, so photos in this update will be minimum.
I've painted and fitted my engine/gearbox hanger properly now, gear shifter, and also properly mounted the handbrake mechanism (yet to be fully connected).
Most of my efforts the past few weeks has gone into the electrical side of things. I have finished plumbing in my fuel pump with brass bulkhead passthru's into the electrical stowage bin and little "in"/"out" ID plates.
I spent a lot of time choosing and specifying a battery too. I didn't want a motorcycle battery or a race type battery. I opted for the smallest road car battery I could get hold of easily, which is 055 size (the same as in a deawoo matiz and a few other small cars). The footprint is small, it was inexpensive and it has reasonable specs.
After the battery arrived I made a little mounting tray for it to sit in, mounted it into the chassis and cut a rubber mat for it to go on. I also made an aluminium strap to go over the top of it, and anchored it in with some M8's and rivnuts bonded into a re-enforcing plate.
A quick peruse of the MSVA test shows that switches for indicators, dip beam, main beam and horn all need to accessed with both hands remaining on the steering wheel. I don't like the "generic" stalks you can buy, and they didn't have the functionality I required. A look over the manual for my motogadget m.unit confirmed that I could keep my dashboard completely free of any switchgear if I had 4 switches on the column.
1x (on)-off-(on) toggle switch on the right hand side (up for sidelights on/off, down for on/off of dip/main, long down to turn all off)
1x momentary push on the right hand side for the horn
1x on-off-on toggle switch on the left hand side for the indicators (flicking between L/R 3 times activates hazards, even when keyed off)
1x momentary push on the left hand side for start/kill (one push for start, two for kill)
One problem i needed to overcome was mounting the switches. I created in CAD a little binnacle/column mount. All the wiring is internal and clamps around the outer column in two halves, with access panels on the rear for fitting the switches and making the electrical connections. it looks bigger on screen than in reality, its actually quite small (210mm athwart)
In addition to this I'll have a key barrel on the column further down.
I made a wiring diagram - it took a long time.
(sorry for the poor quality as its a converted pdf)
A few other things have been bothering me recently too:
number 1 - fuel gauge
The 2CV fuel gauge is a funny old thing as the resistance change is very peculiar (non - linear). I have a standard 2cv fuel tank and a new 2cv fuel gauge sender. The problem is that the 2cv fuel gauge is integrated into the speedo housing and is very ugly. No way I'm using that, and the speedo would be useless for me anyway due to the gearbox and wheel diameter change.
I had one of these gauges in the garage so I pulled it apart to see if anything could be done to try and integrate it into the old brass smiths housing I had.
After a bit of butchery, trimmings, drillings etc i managed to get the gauge to fit. The needle was the wrong colour so i painted it black and i made a new face for it too. I spent ages looking for a similar font to my clock. I did the same with the ammeter, although not sure if I'll use that at the moment as I'm not convinced how useful they are.
My next issue revolves around the tachometer. i could use the original guzzi mechanical tacho (I still have it). I'd need to make a new face for it (obvs) and put in in a housing of correct period. My main problem with it though is that the tacho attatches right at the front top of the engine, and it'll be on show and is a large ungly cable and mounting elbow - not nice. I'd also need a new cable making up as on the bike its very short - not nearly half as long as it needs to be.
I've found online a few places that sell aftermarket Harley Davidson tachos that take an electrical signal straight from the coil - excellent. One of those is on order and will be modified with a matching face in the right housing.
The faces are just aluminium plate that I've given a turned effect by mounting on a drill and applying emery paper. The numbers/dials are printed on water slide decals and sealed with lacquer.
Next up is the speedo and dash lights. The speedo is a tricky one as the "long" gearbox and large wheel diameter mean that a 2cv one is next to useless, and any other one would need calibrating. Properly old cars did away with speedometers as it was more important to know engine rpm. Speed was merely a byproduct of gearing and RPM. With the two larger and two smaller dials shown above, i don't have much room for a speedo, but i need one by law. I've opted for the smallest digital speedo i could find (59mm x 22mm).
It comes with a magnetic switch and can be calibrated to any wheel size (perfect), shows speed, drive time, odomoter, trip etc. everything you'd expect. It's really really small and discrete and when the ignition is off, it's just a black face.
i made up a little brass mount plate with my dash lights (yes, it can be mounted vertically)....
thats all for now folks... hopefully it wont be long before i can make some real notable visible progress again.
You can build a pembleton with a bmw Airhead engine. Mike Meakins "Bolide" brooklands or Duncans SilverSurfer one (brooklands) and two (supersport) are good examples of these.
I'm not sure anyone has built a pembleton yet with an oil head motor, but dont see why it cant be done, the engine itself is a lot more modern looking, so maybe that's part of the reason. I've seen various 2cvs with the oilhead conversion, and also two Lomaxs, so it's a well known thing to mate this engine to a 2cv gearbox. You need to speak to Sparrow Automotive if this is something you are considering.
I do know of a chap who's designed and currently building his own three wheeler (mosquito) which has a bmw r1150 engine mated to an Audi A3/A4 hybrid gearbox. I believe it's an A4/Passat gearbox with an A3 bellhousing (or the other way round), something to do with the placement if the starter motor.
I can send you further details if you PM me.
If you want to keep the donor gearbox and final drive then you'd be looking at a complete custom or modifying a Triking (or similar) to take the drive line (with an extended prop shaft) or converting a pembleton to rear drive. Either way substantial fabrication, jigging, body and design work would be required.
Might be a bit heavy? The guzzi engine with alternator etc (excluding flywheel and clutch) isnt that heavy. I'd guess about 30kgs.
Blackjack made the zero with either a guzzi big block or a vw flat 4 engine. It's not the prettiest, but it's not horrendous either. They've made a complex cowl to cover most of the ugly bits...

Looks a lot better (imo) with the guzzi motor though...
Blackjack made the zero with either a guzzi big block or a vw flat 4 engine. It's not the prettiest, but it's not horrendous either. They've made a complex cowl to cover most of the ugly bits...
Looks a lot better (imo) with the guzzi motor though...
nakedninja said:
Sorry for the slight thread hijack, but do you have any links to BMW engined 3 wheelers? I am now getting tempted to build something with the flat twin and want to do some research.
Your build is really coming on now, I'm looking forward to seeing the finished product.
Naked ninja - I replied to your PM, but used my other email as my one linked to PH mostly is spam.Your build is really coming on now, I'm looking forward to seeing the finished product.
Well, my electronic tacho arrived...
Seems sacrilege, but my first thought was, now how does this come apart...


The front bezel is pressed on and crimped around. I tried with all sorts of prying tools, but nothing was shifting, so I took it to the grinder... carefully. The bezel popped off after a few passes, trying to keep the heat to a minimum.


I marked the centre boss and cut the needle, enlarged the centre hole to pass over the boss and tried for fit.


I spent ages making a new face graphic.

Next job is to print it into a water slide and get it on the aluminium face...
Seems sacrilege, but my first thought was, now how does this come apart...
The front bezel is pressed on and crimped around. I tried with all sorts of prying tools, but nothing was shifting, so I took it to the grinder... carefully. The bezel popped off after a few passes, trying to keep the heat to a minimum.
I marked the centre boss and cut the needle, enlarged the centre hole to pass over the boss and tried for fit.
I spent ages making a new face graphic.
Next job is to print it into a water slide and get it on the aluminium face...

Gassing Station | Readers' Cars | Top of Page | What's New | My Stuff