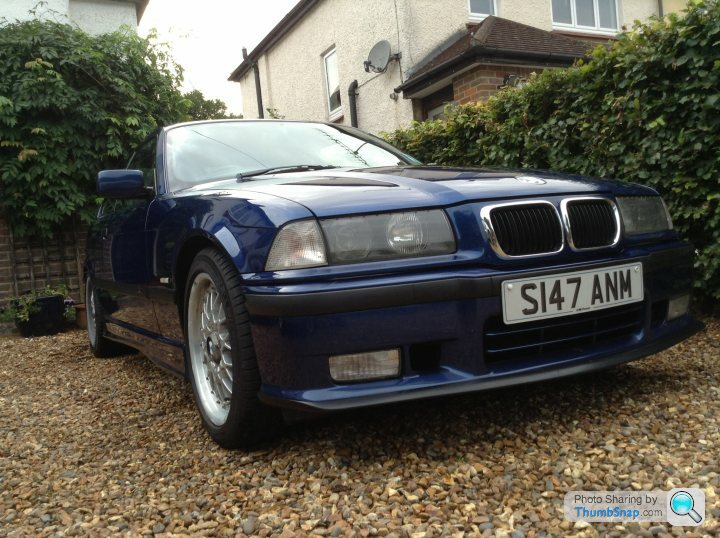
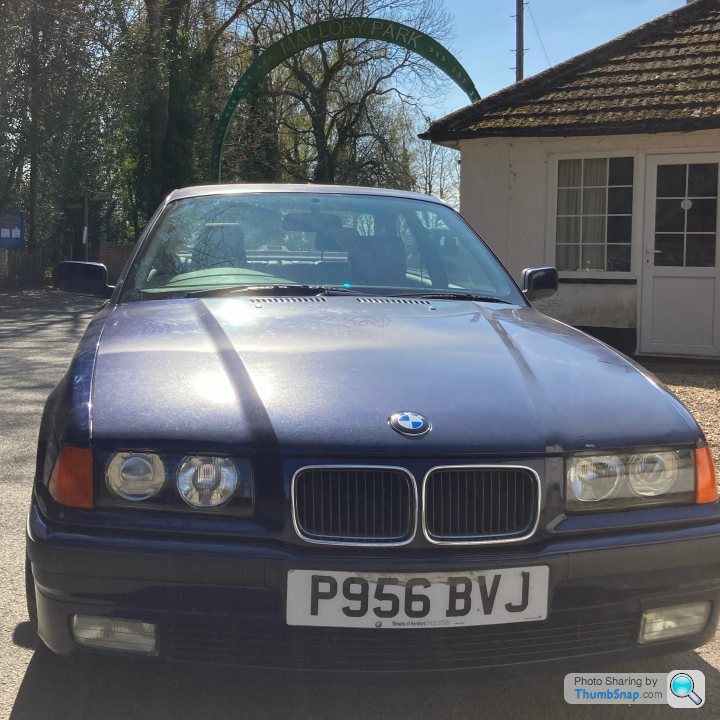
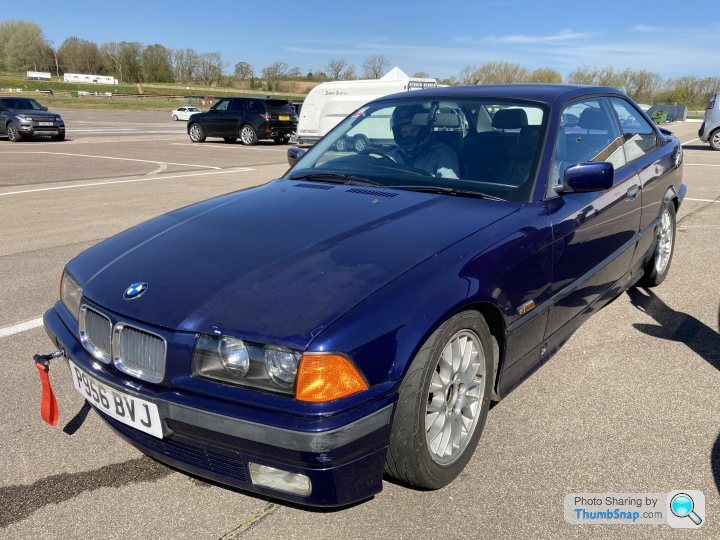
1996 BMW E36 328i Coupe - we have history...
Discussion


I took advantage of what looks to be a very brief early hint of summer to get out and do a very straightforward job that I have been meaning to do but hadn't until now. That is, changing the brake fluid. The fluid that's in there hasn't been in for long (standard Comma DOT 4), but when I redid the brakes and bled them all through a year ago I had no intention of taking the car on the track and abusing it. I therefore felt the need to replace it all with ATE Type 200. It says 'Racing Quality' on the tin, which says all that needs saying, really!
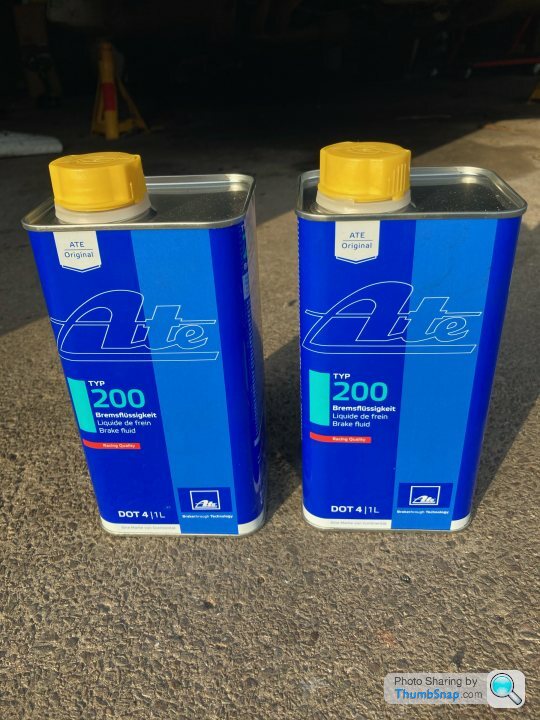
Now, as I understand it, this stuff used to be blue, but that's now illegal or something. When replacing all the fluid in the system, it'd be really useful to have the replacement fluid be a different colour to the old. That way you can see when it starts coming through the bleed nipple. However, what we have to contend with now (can I still blame the EU? Immigrants? 5G?) is replacing fluid with another fluid that's the same colour. It's like painting a white wall white - you can't tell if you've got it all.
I can't remember what the nominal capacity for the system is, but a guy on the internet said 1 litre would be enough for a full flush. I got 2 litres, because. My plan was to overdo it, then I've got some level of confidence that all the old has been replaced with the new. I also wasn't sure if it was the done thing to bleed the clutch at the same time, but it seemed logical as that way there aren't two different types of fluid living in what is a common system.
So I set up mu Gunson pressure bleeder. I've mentioned this before, but haven't yet treated you to a photo. I thought I better had in case you started thinking I was making it up and was actually bleeding my brakes by blowing down a hosepipe or something. I have also mentioned previously the connector that goes on the tyre valve, and how the one originally supplied was useless. My new connector was pennies from China and works a treat.

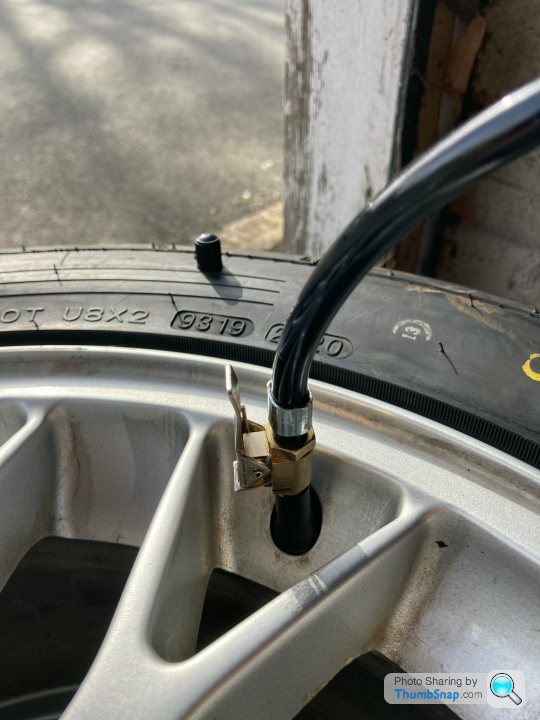
The Gunson system does say in large letters that the max pressure is 1.4 bar, but I couldn't be bothered de-pressurising my tyre for it, so I treated it to about 2.4 bar. It didn't explode.
I used a small container with capacity markings on to catch the fluid. That way I could easily keep track of how much I was taking from each corner.
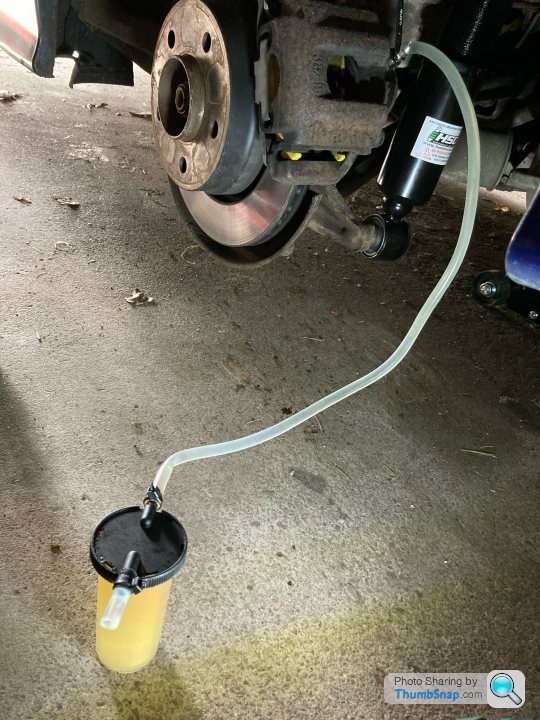
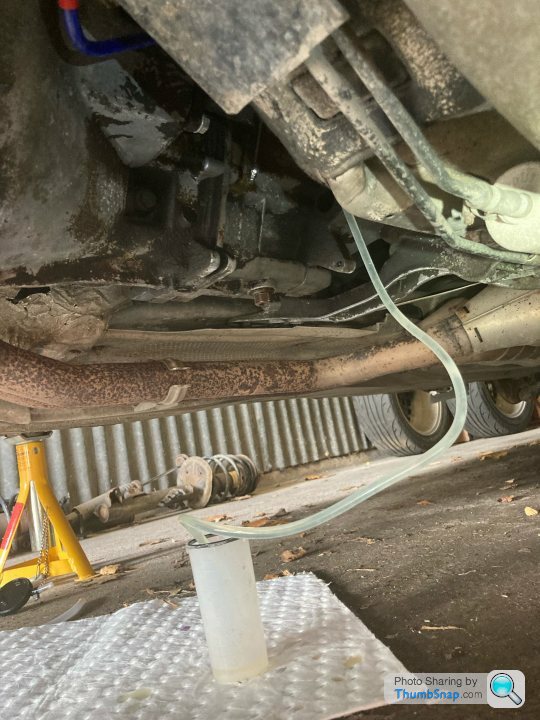
I ended up taking approx 330ml out of each rear caliper, about 210ml out of each front caliper, and 360ml out of the clutch slave cylinder. By my maths that makes just shy of 1.5 litres. I'd say about 100-150ml was wastage: left in the bleeder, syringed out of the reservoir or dropped on the floor, as I've got between a third and a half of a litre left in one of the tins.
I didn't intend to take that much out of the clutch, but the first 120ml was really dark and cloudy, and the second lot was still pretty grotty, so I took a third 120ml and it looked much better. I only filled the system in Oct 20, when I put the manual box and the clutch in, and haven't done many miles since. I can only assume the old lines I used had some muck inside them. I'm glad I've flushed it now.
So that's done. Brakes are good to go. Tyres are good to go. Suspension is almost good to go - I just need the wheel spacers to stop it eating my front tyres.
Now, as I understand it, this stuff used to be blue, but that's now illegal or something. When replacing all the fluid in the system, it'd be really useful to have the replacement fluid be a different colour to the old. That way you can see when it starts coming through the bleed nipple. However, what we have to contend with now (can I still blame the EU? Immigrants? 5G?) is replacing fluid with another fluid that's the same colour. It's like painting a white wall white - you can't tell if you've got it all.
I can't remember what the nominal capacity for the system is, but a guy on the internet said 1 litre would be enough for a full flush. I got 2 litres, because. My plan was to overdo it, then I've got some level of confidence that all the old has been replaced with the new. I also wasn't sure if it was the done thing to bleed the clutch at the same time, but it seemed logical as that way there aren't two different types of fluid living in what is a common system.
So I set up mu Gunson pressure bleeder. I've mentioned this before, but haven't yet treated you to a photo. I thought I better had in case you started thinking I was making it up and was actually bleeding my brakes by blowing down a hosepipe or something. I have also mentioned previously the connector that goes on the tyre valve, and how the one originally supplied was useless. My new connector was pennies from China and works a treat.
The Gunson system does say in large letters that the max pressure is 1.4 bar, but I couldn't be bothered de-pressurising my tyre for it, so I treated it to about 2.4 bar. It didn't explode.
I used a small container with capacity markings on to catch the fluid. That way I could easily keep track of how much I was taking from each corner.
I ended up taking approx 330ml out of each rear caliper, about 210ml out of each front caliper, and 360ml out of the clutch slave cylinder. By my maths that makes just shy of 1.5 litres. I'd say about 100-150ml was wastage: left in the bleeder, syringed out of the reservoir or dropped on the floor, as I've got between a third and a half of a litre left in one of the tins.
I didn't intend to take that much out of the clutch, but the first 120ml was really dark and cloudy, and the second lot was still pretty grotty, so I took a third 120ml and it looked much better. I only filled the system in Oct 20, when I put the manual box and the clutch in, and haven't done many miles since. I can only assume the old lines I used had some muck inside them. I'm glad I've flushed it now.
So that's done. Brakes are good to go. Tyres are good to go. Suspension is almost good to go - I just need the wheel spacers to stop it eating my front tyres.
I had a car day today. That's not to say that I achieved a great deal, or anything of note, really, just that I spent the day in the vicinity of the car doing sort of car things.
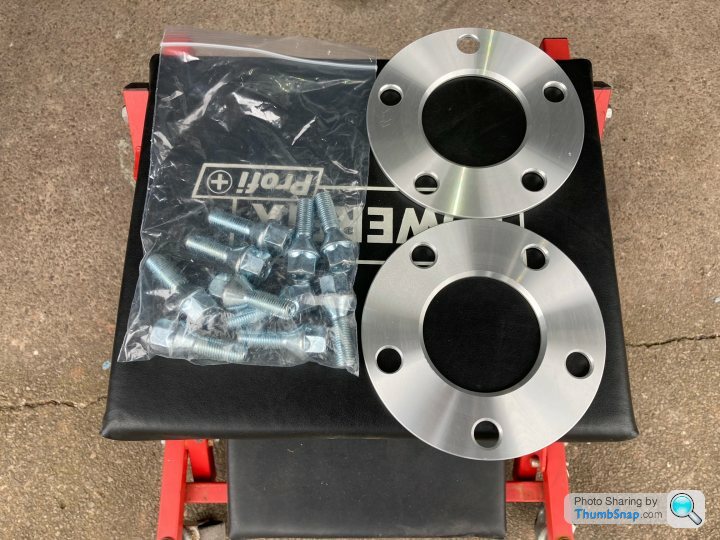
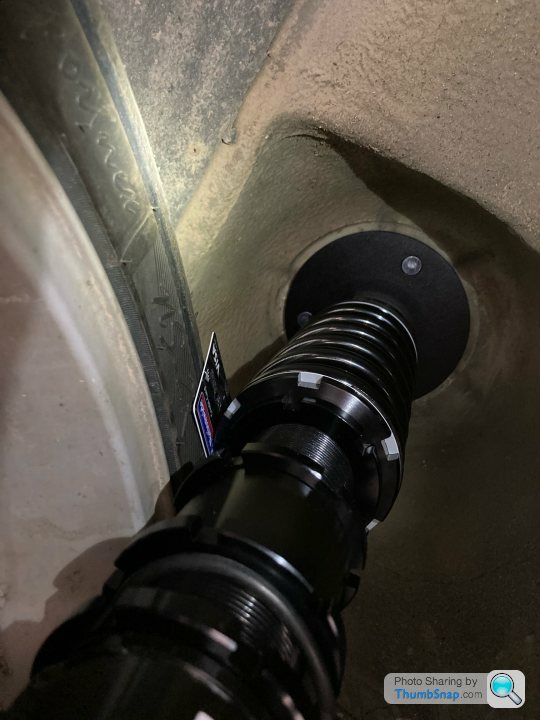
First up, wheel spacers. you may remember that my HSD coilovers that I just fitted had an appetite for my front tyres, so I needed to separate them to avoid turning my tyres into those rubber granules you get on artificial sports pitches. Not wanting to mess around with the geometry of the car too much, I decided to try the smallest ones I had first - the 5mm ones.

Clearance? Loads of it. You could get a sheet of graphene in there! The wheel spun freely without contact with the strut, however it was so close that when I put a single credit card in the gap, it stayed there, gripped between the tyre and the strut. That's less than 1mm. I'm no expert, but intuitively I feel that less than 1mm probably isn't enough.
So out came the 10mm spacers. I have read that you shouldn't use 10mm spacers on E36s, because the thickness of the spacer is sufficient to negate any load-bearing ability of the protrusion on the hub itself, but isn't thick enough to have its own protrusion of sufficient depth to support the wheel/vehicle. Well, I'd ordered these Bimec 10mm spacers and they look pretty well machined with a decent protrusion. I made the assumption that, as they weren't cheap, some thought had probably gone into making them work without breaking the vehicle, and if lots of people had broken their vehicle by using them they probably wouldn't sell them any more. All highly illogical - I've got them so I'll use them.


How about the clearance now?
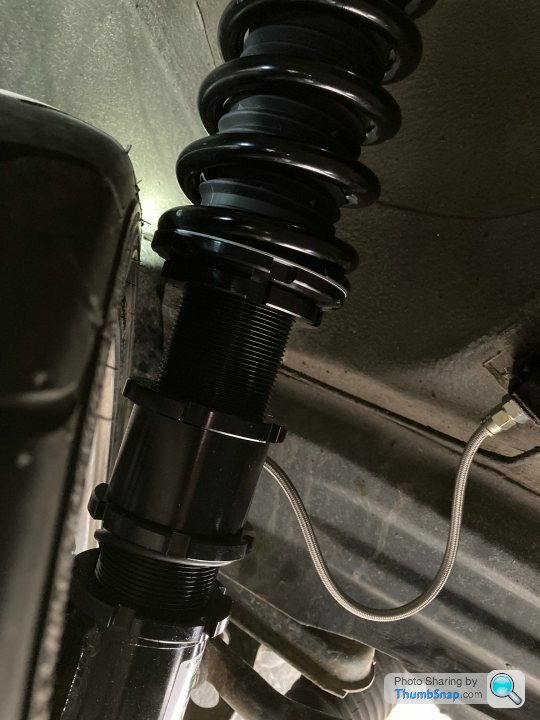
I got 7 credit cards (or equivalent - I don't actually have 7 credit cards) in there this time, so just under 7mm of clearance. That feels a bit better than the gnat's fart that I had with the 5mm spacer.
I had looked up the front and rear track widths for my car on some sort of data website, which gave the front as 1408mm and the rear as 1421mm. What I had now done was make the front 1428mm by adding 10mm to each side. In order to at least keep the rear slightly wider than the front as BMW intended, I put the 5mm spacers on the rear.
I'm not sure why I added a photo of that - it looks exactly as you imagined it would. Anyway, in theory (if the data website was correct) I should now have a front track of 1428mm and a rear of 1431mm - almost square. Now that I have lowered the rear and the car is driveable, here are the before, after, and after after photos.
Stock suspension:
Straight after fitting HSDs:
Now with the rear lowered:

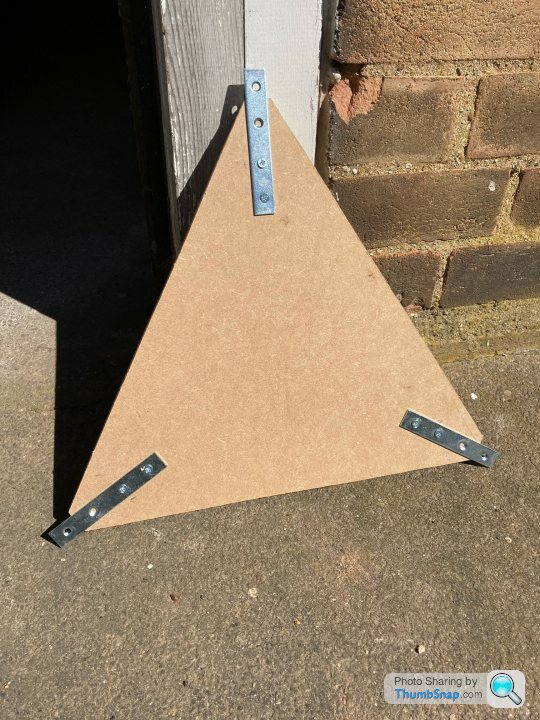
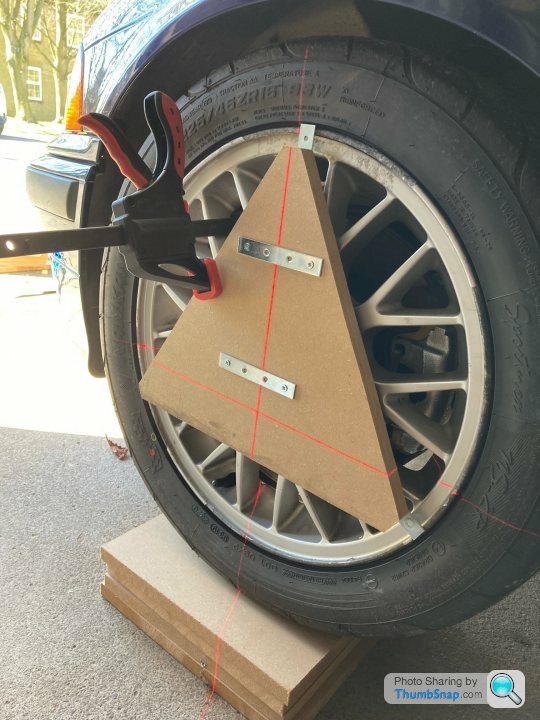
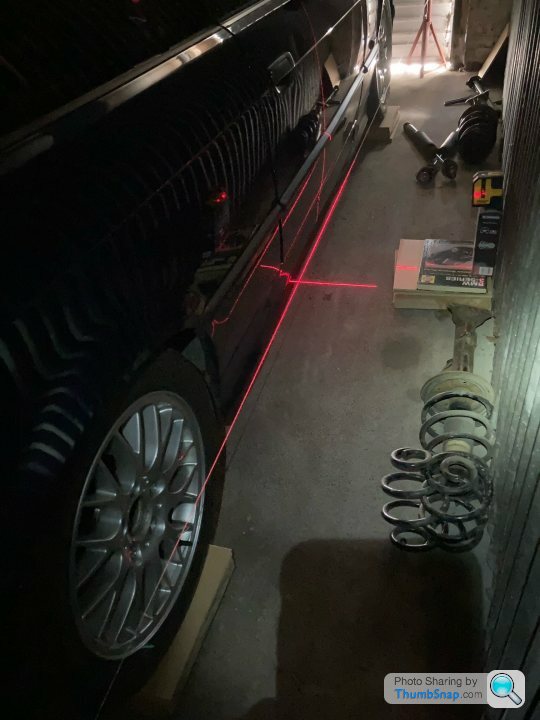
Now the fun (?) began. I've been reading up on wheel alignment, specifically DIY techniques. I found a forum with two Americans arguing about whether measuring camber with a triangular piece of wood and an iPhone inclinometer app was accurate, or whether it could be but only if you get your car completely level, on its wheels but raised up, first. I borrowed a bit of both. I cut a load of 30cm squares out of some left over MDF and hardboard the other day, and planned to use them under the wheels to level the car before measuring camber using an equilateral triangle (three points of contact on the rim, not the tyre) and my iPhone, and toe using string and a measuring tape. Here is the disco I ended up with.


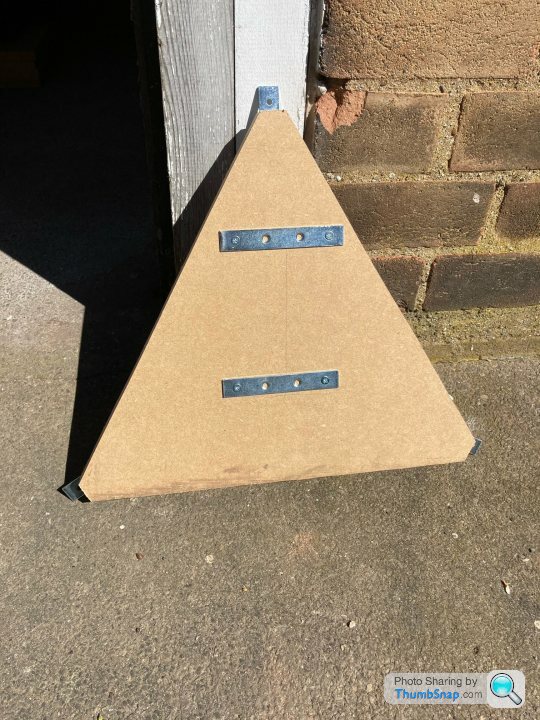
Initially I had made an equilateral triangle from MDF, made to measure for my rims using the factor supplied by the first argumentative American (radius x 1.732). It just about rested on the rim but was probably slightly smaller that would have been convenient, as it kept slipping off. I also noted that, as my iPhone has buttons on both sides, it wouldn't fit flush to the board, which would no doubt ruin my microscopically accurate readings. I therefore cut the corners off my triangle and modified it thusly. The two parallel brackets allow the phone to rest on the board without the volume buttons holding it off.
In use (also making use of the laser level, since I had it):
Funnily enough I didn't take any pictures of me using my phone as an inclinometer, as I also use it as my camera. The readings I got from it are as follows (all negative):
Front left: 3.0 deg
Front right: 2.5 deg
Rear left: 1.8 deg
Rear right 2.6 deg
As a sanity check, I then took the measurements again, but using a spirit level and a piece of wood of the correct length to span rim-to-rim and hold the level off the tyres. I found this method tricky as it involves holding everything in position whilst trying to look at the bubble in the level and the tape measure at the same time. It was all a bit wobbly and vague, but gave the following measurements:
Front left: 3.0 deg
Front right: 3.0 deg
Rear left: 2.2 deg
Rear right 2.7 deg
To be honest, I'm inclined to trust the first set of measurements more, as everything was a lot more stable and less reliant on my holding everything steady with my hands.
I decided to leave the camber alone. I seem to remember the rear camber bolts are seized solid and couldn't be bothered messing with them today. The front measurements are not as close to each other as I'd like, but both front struts are set to their central position on the camber plates and I don't want to start running them on different settings to each other on the strength of my probably fairly sketchy measurements. The maximum difference between them is 0.5 degrees, which is significant but not terrible. I'll see what the machine says when I get it done properly!
On to toe. This string method is a bit of a pain in the backside. I spent most of the afternoon chasing measurements around the car. Let's start at the beginning though.
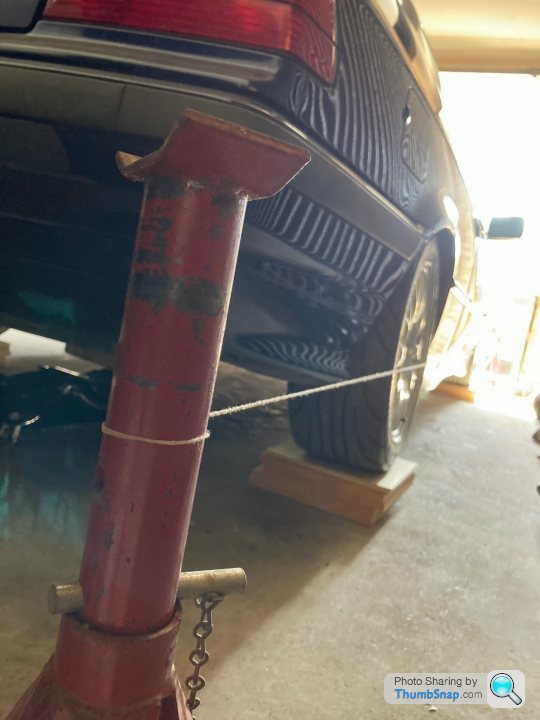
I used the laser level to get the string level through the centres of each wheel. Also looked pretty cool.
Now, in theory, given the track width data that I had, the string should have been 1.5mm further from the centre of the front wheels on each side than it was from the centres of the rear wheels (making up the now 3mm difference in track width). Is that what happened? Of course not! I went round and round the car, chasing measurements, checking the string-to-string distance front and rear to make sure it was square, and ended up with between 7 and 9mm difference between front and rear on each side. No idea. But it was square, and the differences were the same, so I went with it.
Toe measurements:
Front Left: 0.4 deg toe out
Front Right: 0.2 deg toe in
Rear Left: 0 toe
Rear Right: 0.6 deg toe in
Again, I left the rear alone. I will un-seize all the bolts before taking it for a proper alignment.
Here's a photo to represent what happened next.
What actually happened next was that I adjusted the front toe without the steering lock on, and when I finally thought I'd sorted it (to 0 toe both sides), I drove off with the steering wheel on the piss by a quarter of a turn or so. Bum. Back up it went, and I tried again with the key out and steering lock on. The result wasn't quite perfect (steering wheel still not 100% straight) but better than it was, and quite frankly I've had enough of chasing probably inaccurate measurements around the car for hours. There's a reason why wheel alignment machines exist and why normal, sensible people pay for trained technicians to use them on their cars. It honestly isn't worth a day of your life obtaining and adjusting measurements that are almost certainly bulls t anyway. But you knew that. That's why you take your car to the wheel alignment specialist and sit down with a horrendous coffee whilst reading a seven-year-old Top Gear magazine and waiting for the young gentleman to fire frickin' lasers at your wheels.
What have I learned? My little camber triangle thing looks cool, but DIY alignment? Don't bother!
First up, wheel spacers. you may remember that my HSD coilovers that I just fitted had an appetite for my front tyres, so I needed to separate them to avoid turning my tyres into those rubber granules you get on artificial sports pitches. Not wanting to mess around with the geometry of the car too much, I decided to try the smallest ones I had first - the 5mm ones.
Clearance? Loads of it. You could get a sheet of graphene in there! The wheel spun freely without contact with the strut, however it was so close that when I put a single credit card in the gap, it stayed there, gripped between the tyre and the strut. That's less than 1mm. I'm no expert, but intuitively I feel that less than 1mm probably isn't enough.
So out came the 10mm spacers. I have read that you shouldn't use 10mm spacers on E36s, because the thickness of the spacer is sufficient to negate any load-bearing ability of the protrusion on the hub itself, but isn't thick enough to have its own protrusion of sufficient depth to support the wheel/vehicle. Well, I'd ordered these Bimec 10mm spacers and they look pretty well machined with a decent protrusion. I made the assumption that, as they weren't cheap, some thought had probably gone into making them work without breaking the vehicle, and if lots of people had broken their vehicle by using them they probably wouldn't sell them any more. All highly illogical - I've got them so I'll use them.
How about the clearance now?
I got 7 credit cards (or equivalent - I don't actually have 7 credit cards) in there this time, so just under 7mm of clearance. That feels a bit better than the gnat's fart that I had with the 5mm spacer.
I had looked up the front and rear track widths for my car on some sort of data website, which gave the front as 1408mm and the rear as 1421mm. What I had now done was make the front 1428mm by adding 10mm to each side. In order to at least keep the rear slightly wider than the front as BMW intended, I put the 5mm spacers on the rear.
I'm not sure why I added a photo of that - it looks exactly as you imagined it would. Anyway, in theory (if the data website was correct) I should now have a front track of 1428mm and a rear of 1431mm - almost square. Now that I have lowered the rear and the car is driveable, here are the before, after, and after after photos.
Stock suspension:
Straight after fitting HSDs:
Now with the rear lowered:
Now the fun (?) began. I've been reading up on wheel alignment, specifically DIY techniques. I found a forum with two Americans arguing about whether measuring camber with a triangular piece of wood and an iPhone inclinometer app was accurate, or whether it could be but only if you get your car completely level, on its wheels but raised up, first. I borrowed a bit of both. I cut a load of 30cm squares out of some left over MDF and hardboard the other day, and planned to use them under the wheels to level the car before measuring camber using an equilateral triangle (three points of contact on the rim, not the tyre) and my iPhone, and toe using string and a measuring tape. Here is the disco I ended up with.
Initially I had made an equilateral triangle from MDF, made to measure for my rims using the factor supplied by the first argumentative American (radius x 1.732). It just about rested on the rim but was probably slightly smaller that would have been convenient, as it kept slipping off. I also noted that, as my iPhone has buttons on both sides, it wouldn't fit flush to the board, which would no doubt ruin my microscopically accurate readings. I therefore cut the corners off my triangle and modified it thusly. The two parallel brackets allow the phone to rest on the board without the volume buttons holding it off.
In use (also making use of the laser level, since I had it):
Funnily enough I didn't take any pictures of me using my phone as an inclinometer, as I also use it as my camera. The readings I got from it are as follows (all negative):
Front left: 3.0 deg
Front right: 2.5 deg
Rear left: 1.8 deg
Rear right 2.6 deg
As a sanity check, I then took the measurements again, but using a spirit level and a piece of wood of the correct length to span rim-to-rim and hold the level off the tyres. I found this method tricky as it involves holding everything in position whilst trying to look at the bubble in the level and the tape measure at the same time. It was all a bit wobbly and vague, but gave the following measurements:
Front left: 3.0 deg
Front right: 3.0 deg
Rear left: 2.2 deg
Rear right 2.7 deg
To be honest, I'm inclined to trust the first set of measurements more, as everything was a lot more stable and less reliant on my holding everything steady with my hands.
I decided to leave the camber alone. I seem to remember the rear camber bolts are seized solid and couldn't be bothered messing with them today. The front measurements are not as close to each other as I'd like, but both front struts are set to their central position on the camber plates and I don't want to start running them on different settings to each other on the strength of my probably fairly sketchy measurements. The maximum difference between them is 0.5 degrees, which is significant but not terrible. I'll see what the machine says when I get it done properly!
On to toe. This string method is a bit of a pain in the backside. I spent most of the afternoon chasing measurements around the car. Let's start at the beginning though.
I used the laser level to get the string level through the centres of each wheel. Also looked pretty cool.
Now, in theory, given the track width data that I had, the string should have been 1.5mm further from the centre of the front wheels on each side than it was from the centres of the rear wheels (making up the now 3mm difference in track width). Is that what happened? Of course not! I went round and round the car, chasing measurements, checking the string-to-string distance front and rear to make sure it was square, and ended up with between 7 and 9mm difference between front and rear on each side. No idea. But it was square, and the differences were the same, so I went with it.
Toe measurements:
Front Left: 0.4 deg toe out
Front Right: 0.2 deg toe in
Rear Left: 0 toe
Rear Right: 0.6 deg toe in
Again, I left the rear alone. I will un-seize all the bolts before taking it for a proper alignment.
Here's a photo to represent what happened next.
What actually happened next was that I adjusted the front toe without the steering lock on, and when I finally thought I'd sorted it (to 0 toe both sides), I drove off with the steering wheel on the piss by a quarter of a turn or so. Bum. Back up it went, and I tried again with the key out and steering lock on. The result wasn't quite perfect (steering wheel still not 100% straight) but better than it was, and quite frankly I've had enough of chasing probably inaccurate measurements around the car for hours. There's a reason why wheel alignment machines exist and why normal, sensible people pay for trained technicians to use them on their cars. It honestly isn't worth a day of your life obtaining and adjusting measurements that are almost certainly bulls
t anyway. But you knew that. That's why you take your car to the wheel alignment specialist and sit down with a horrendous coffee whilst reading a seven-year-old Top Gear magazine and waiting for the young gentleman to fire frickin' lasers at your wheels.What have I learned? My little camber triangle thing looks cool, but DIY alignment? Don't bother!
B'stard Child said:
I made a camber check guage for my track car years ago - spirit level with a spacer on one end that meant that when the bubble was central the camber was spot on.
That sounds sensible. A quick, easy check for a pre-determined measurement. One to bear in mind I think! 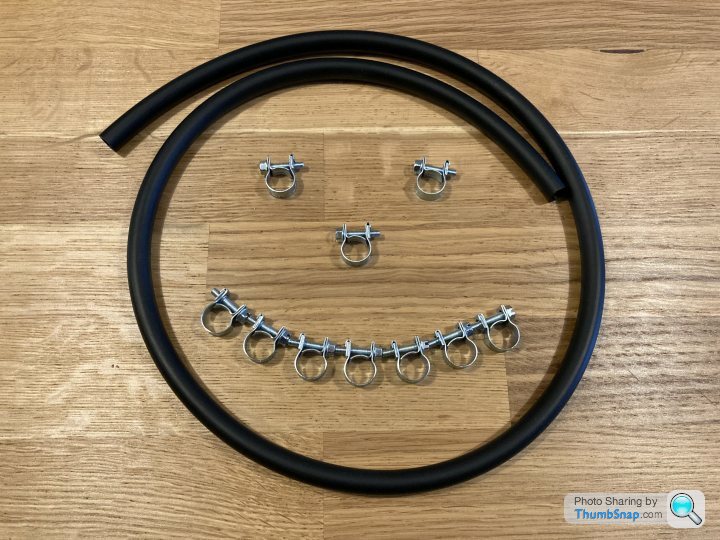
Thanks for the comments everyone. I had a look at the induction kits. The Dave F one looks like it’s just a cone filter with a heat shield as far as I can tell, much like this one:
https://www.ebay.co.uk/itm/K-N-57i-GEN-II-INDUCTIO...
The Simota one looks a bit more specialised, with a shroud to direct the cold air into the filter. I’ve not found anything similar.
I do remember angel eyes being aspirational when I had my first E36. I wasn’t really into modifying though so never really considered it. I had other things to spend my money on then as well, like a mortgage!
LanceRS said:
I am really enjoying this thread. Mine was a daily driver that I used for 9 years and 110k miles, absolutely loved it and in hindsight I should have fought harder when it was hit from behind and written off (because it was old, high mileage and they didn’t think that it was worth much rather than because it was particularly damaged).
Your enthusiastic spannering should be a lesson to us all and takes me back to my youth when I had the time and space to do it.
Anyway, just in case anyone is interested and because I rarely pass up the opportunity to do so, I shall show you mine.
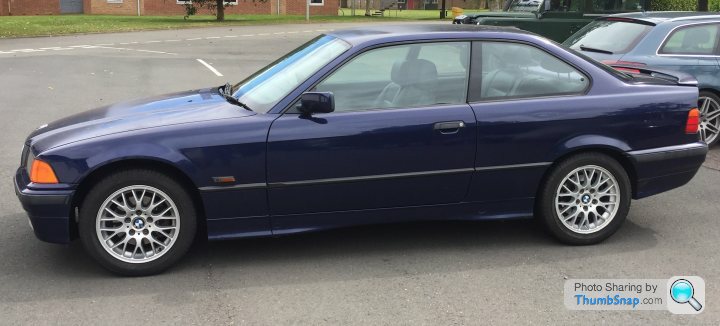
That looks (looked) lovely. Your tale is reminiscent of what happened to my first one. Having been the meat in a BMW sandwich on the M5, the insurers wrote it off. It only would have cost a couple of hundred quid more to get it fixed, and I never found another as good. It was the one that got away. All part of life’s rich tapestry, I suppose, and at least I’ve got this one to play with! Your enthusiastic spannering should be a lesson to us all and takes me back to my youth when I had the time and space to do it.
Anyway, just in case anyone is interested and because I rarely pass up the opportunity to do so, I shall show you mine.
Ahead of my track day next Thursday, I need to get the wheels properly aligned, by someone who knows what they are doing, and who is armed with something a bit more technical than a piece of string and some MDF.
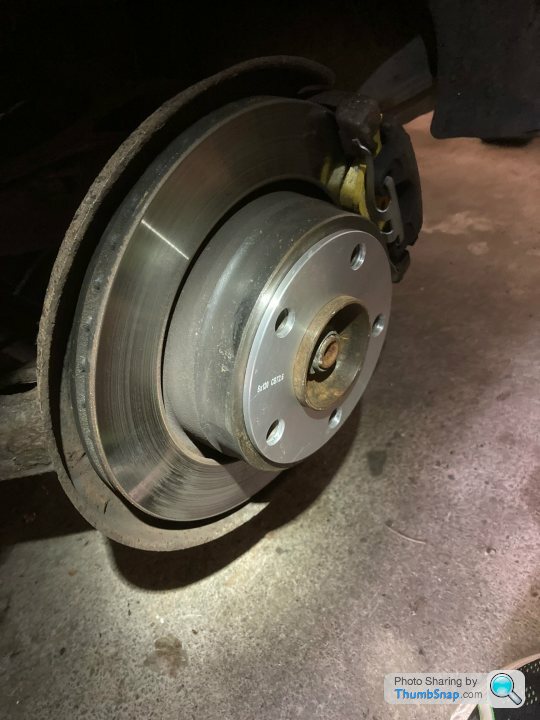
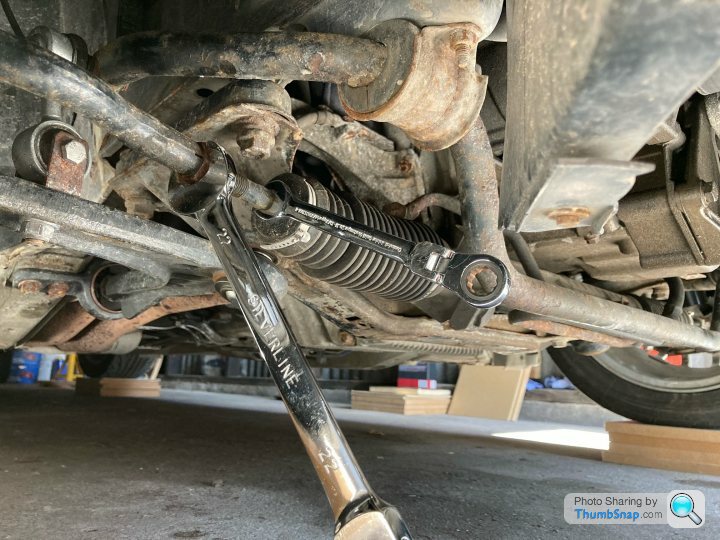
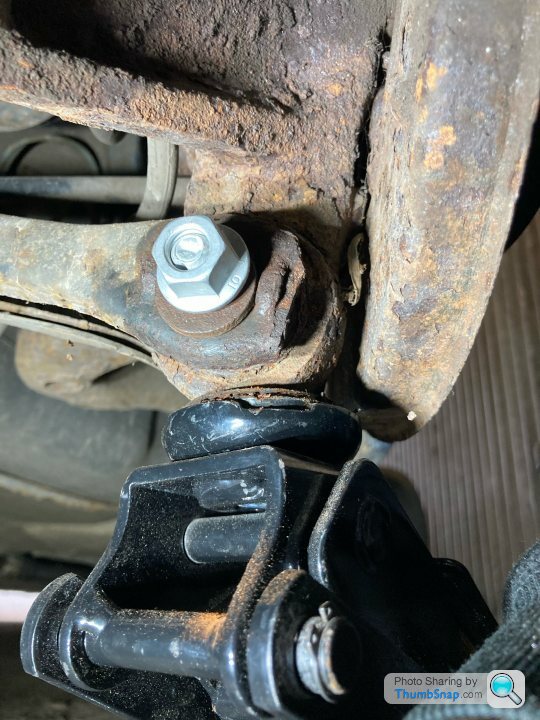
Last time I took it for alignment, I seem to remember the chap was unable to adjust the rear camber because the bolts on both sides were seized. I've always just assumed he wasn't trying hard enough, and that at some point I would get on it and loosen them off. That was my plan for this evening, so that when I take it in this time, there is no excuse and all will be adjusted.
Lump hammer, breaker bar, extensions, rattle gun, impact sockets. Lots of penetrant. Lots of noise and huffing and puffing. The result? The left one now rotates, although I couldn't get the nut to rotate on the bolt. The whole thing will now turn in place, which allows some adjustment but is likely to re-adjust itself 'in-flight' as I can't tighten it.
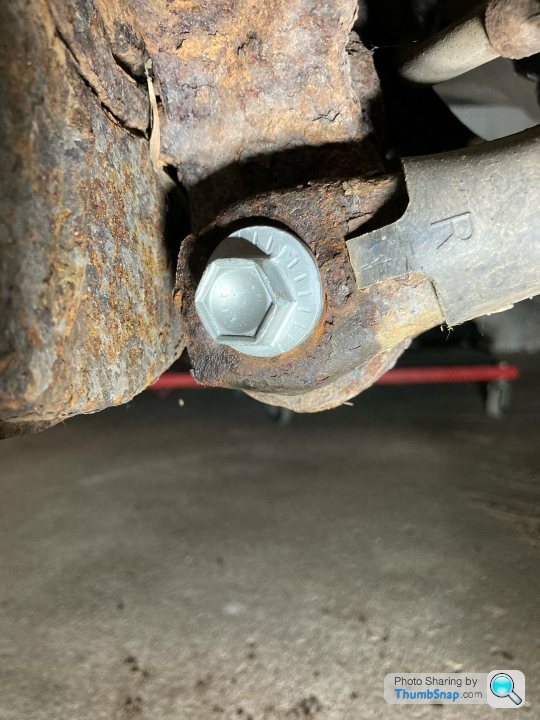
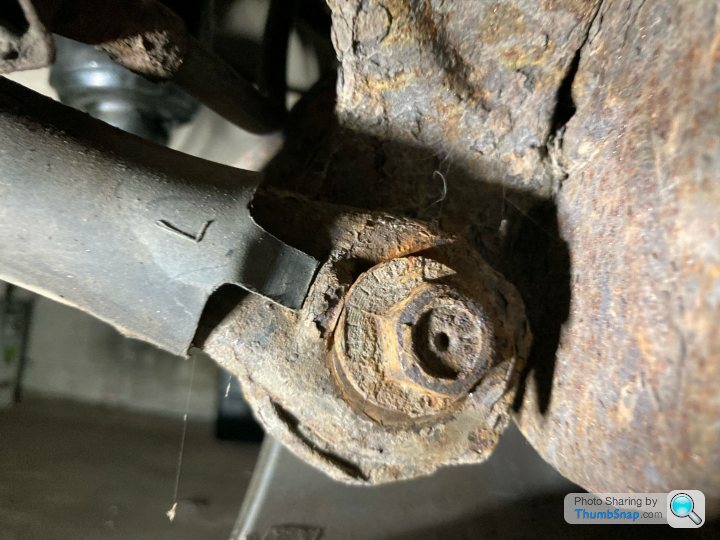
That was the good news story, though. The right one now looks like this:
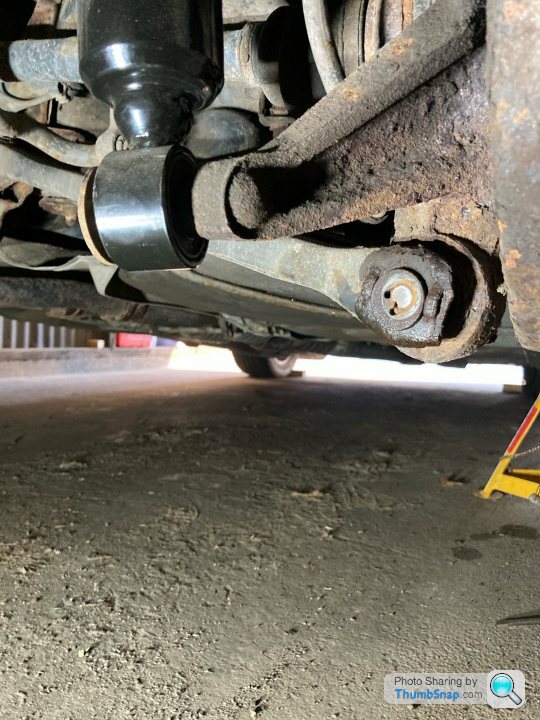
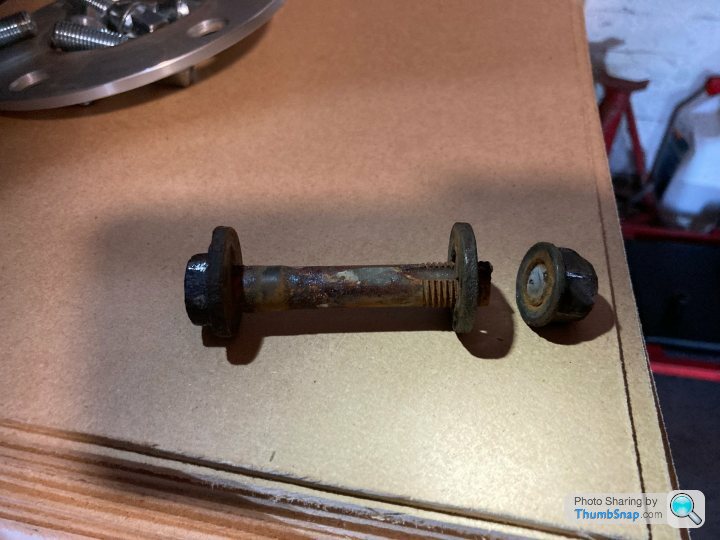
Oops.
I'll just go and source a new eccentric bolt and nut to fit before next Thursday...
Last time I took it for alignment, I seem to remember the chap was unable to adjust the rear camber because the bolts on both sides were seized. I've always just assumed he wasn't trying hard enough, and that at some point I would get on it and loosen them off. That was my plan for this evening, so that when I take it in this time, there is no excuse and all will be adjusted.
Lump hammer, breaker bar, extensions, rattle gun, impact sockets. Lots of penetrant. Lots of noise and huffing and puffing. The result? The left one now rotates, although I couldn't get the nut to rotate on the bolt. The whole thing will now turn in place, which allows some adjustment but is likely to re-adjust itself 'in-flight' as I can't tighten it.
That was the good news story, though. The right one now looks like this:
Oops.
I'll just go and source a new eccentric bolt and nut to fit before next Thursday...
Hurrah for the internet! And hurrah for Pantri Trading.
I ordered a new eccentric bolt and nut from him/them on Wednesday evening, and it arrived today.
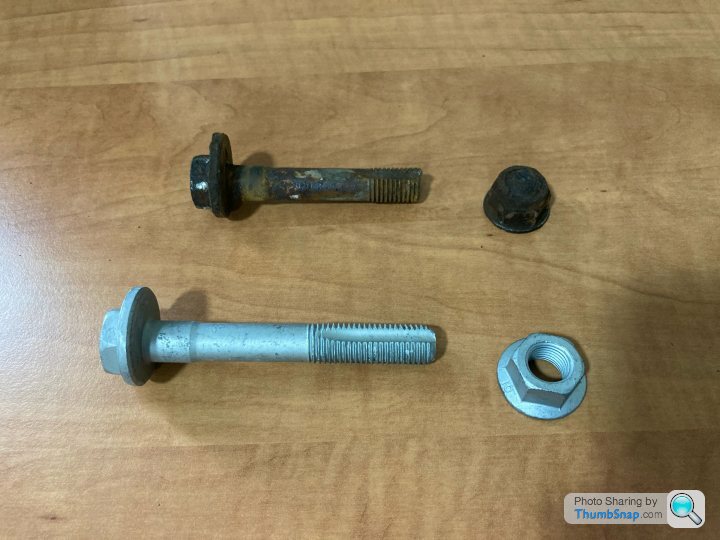
Boom. On the car.
I set both sides to maximum camber. I will see what that means in numbers when (if) I manage to get it to a proper alignment place for measurement and adjustment.
So that's that, right? Ready for Mallory Park on Thursday? Just get it down off the stands, take out any loose bits and pieces, maybe give it a bit of a shakedown and then just wait...
Or not. That bloody fuel filter was still sitting there looking at me. The sensible thing to do (in the knowledge that for me, the simplest task can turn into a drama without any external interference), would be to leave it in its box and just use the car as it is, for now. Especially since the camber bolt scare of barely 48 hours ago. But no.
'BCPL,' I say to myself, 'it's a filter. A service item. How complicated can it be? It's just a few clips and a bit of rubber hose. It can't go wrong...'
So off I go. Fuel pump fuse out. Engine cranked a few times to depressurise the system.
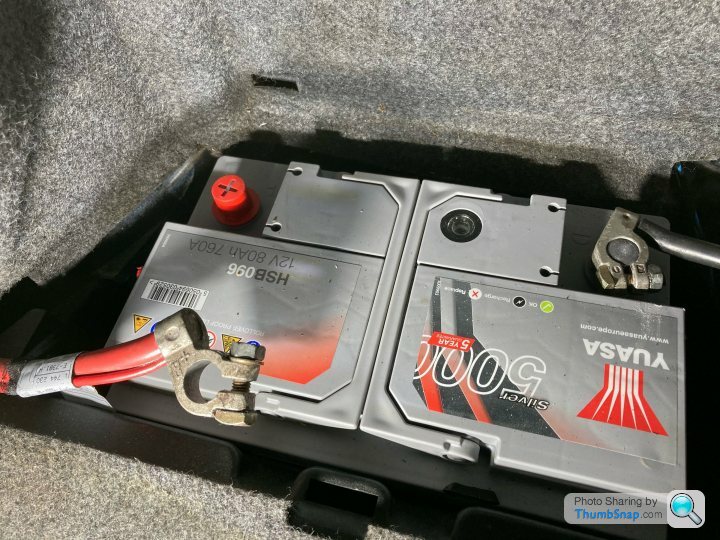
Battery disconnected.
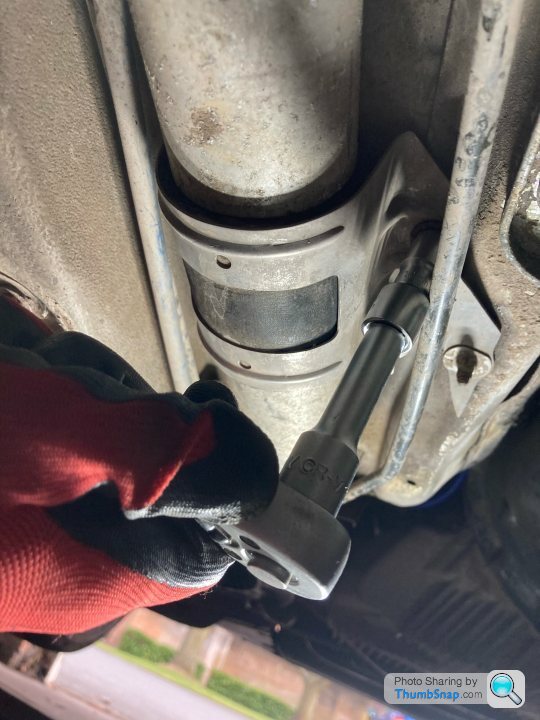
Fuel filter bracket off and hose clips undone.
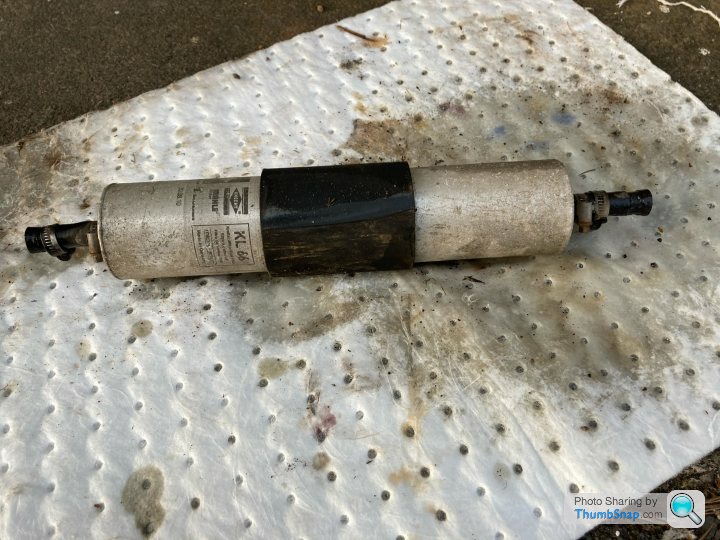
Filter off. New hose cut to length and new clips in place.
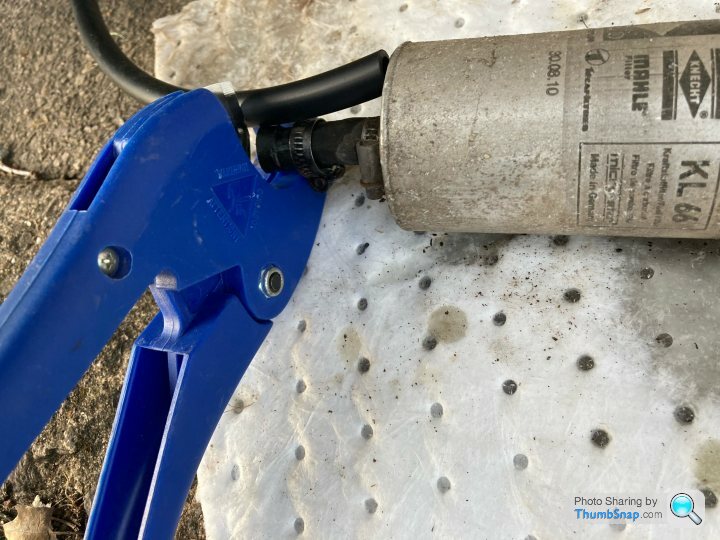
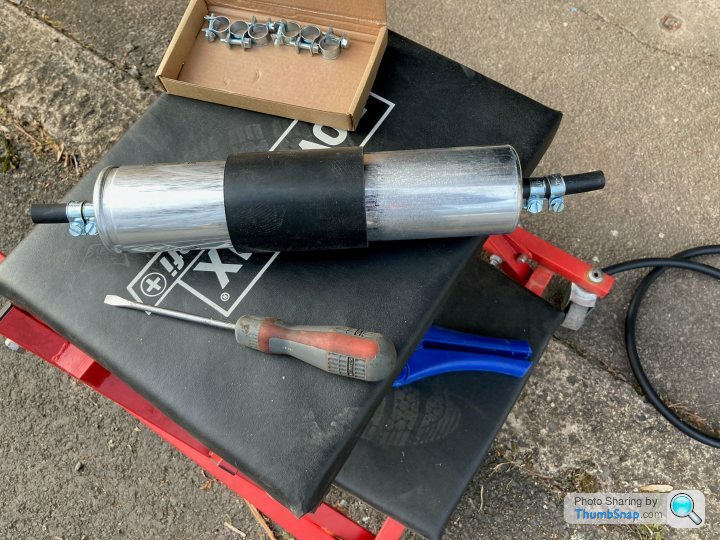
I used the red rubber caps that came on the new filter to block the ends of the hard lines, which were otherwise dribbling petrol on the floor while I was faffing about with the new hose etc.
In with the new. I didn't check the new filter against the old one, but given that I cut the rubber hose sections to the same size as the old ones, it would appear that the new filter is slightly shorter. Or I accidentally cut both new hoses to match the same end and they weren't quite the same size. Whatever, I've got a metre of hose so not a problem. I replaced the end nearer the engine with a slightly longer piece.
Clips tightened. And tightened. And tightened. In fact, tightened as far as they would go until the 'jaws' came together. That's probably not good. Fingers crossed! Fuse back in, battery reconnected, fuel pump primed a couple of times and she started up.

To be honest, I kind of already knew what I'd see when I looked under the car. I still harboured some hope, but not very much. Sure enough, petrol pissing out from both ends of the filter. I didn't get a photo of this because I was too busy depressurising and disconnecting the battery so that there was no chance of a spark and I could sort it all out tomorrow. Interestingly, after taking the fuse out this time, the engine ran for a good while on what I can only assume was an assumption of fuel. It was quite worrying in fact, but gave up eventually. Very strange.
Today's lesson on making a simple task into a sodding drama centres on using the wrong size clips. If the external dimension of the hose is 13mm, then a clip whose nominal diameter range spans 13mm is too big. I think the ones I got were 11-13mm or something. Given how much the rubber compresses, it's probably better to go closer to the internal diameter of the hose (in this case 8mm). I will be at Halfords when they open in the morning to get a range of sizes. I'm not going there twice, and the car WILL be in working order tomorrow. And then I will try to get the alignment done. And then I will LEAVE IT THE HELL ALONE!
I ordered a new eccentric bolt and nut from him/them on Wednesday evening, and it arrived today.
Boom. On the car.
I set both sides to maximum camber. I will see what that means in numbers when (if) I manage to get it to a proper alignment place for measurement and adjustment.
So that's that, right? Ready for Mallory Park on Thursday? Just get it down off the stands, take out any loose bits and pieces, maybe give it a bit of a shakedown and then just wait...
Or not. That bloody fuel filter was still sitting there looking at me. The sensible thing to do (in the knowledge that for me, the simplest task can turn into a drama without any external interference), would be to leave it in its box and just use the car as it is, for now. Especially since the camber bolt scare of barely 48 hours ago. But no.
'BCPL,' I say to myself, 'it's a filter. A service item. How complicated can it be? It's just a few clips and a bit of rubber hose. It can't go wrong...'
So off I go. Fuel pump fuse out. Engine cranked a few times to depressurise the system.
Battery disconnected.
Fuel filter bracket off and hose clips undone.
Filter off. New hose cut to length and new clips in place.
I used the red rubber caps that came on the new filter to block the ends of the hard lines, which were otherwise dribbling petrol on the floor while I was faffing about with the new hose etc.
In with the new. I didn't check the new filter against the old one, but given that I cut the rubber hose sections to the same size as the old ones, it would appear that the new filter is slightly shorter. Or I accidentally cut both new hoses to match the same end and they weren't quite the same size. Whatever, I've got a metre of hose so not a problem. I replaced the end nearer the engine with a slightly longer piece.
Clips tightened. And tightened. And tightened. In fact, tightened as far as they would go until the 'jaws' came together. That's probably not good. Fingers crossed! Fuse back in, battery reconnected, fuel pump primed a couple of times and she started up.
To be honest, I kind of already knew what I'd see when I looked under the car. I still harboured some hope, but not very much. Sure enough, petrol pissing out from both ends of the filter. I didn't get a photo of this because I was too busy depressurising and disconnecting the battery so that there was no chance of a spark and I could sort it all out tomorrow. Interestingly, after taking the fuse out this time, the engine ran for a good while on what I can only assume was an assumption of fuel. It was quite worrying in fact, but gave up eventually. Very strange.
Today's lesson on making a simple task into a sodding drama centres on using the wrong size clips. If the external dimension of the hose is 13mm, then a clip whose nominal diameter range spans 13mm is too big. I think the ones I got were 11-13mm or something. Given how much the rubber compresses, it's probably better to go closer to the internal diameter of the hose (in this case 8mm). I will be at Halfords when they open in the morning to get a range of sizes. I'm not going there twice, and the car WILL be in working order tomorrow. And then I will try to get the alignment done. And then I will LEAVE IT THE HELL ALONE!
The saga continues...
New clips obtained. I actually tried an independent parts place first but they didn't have anything small enough, so I ended up at Halfords for a selection of clips.
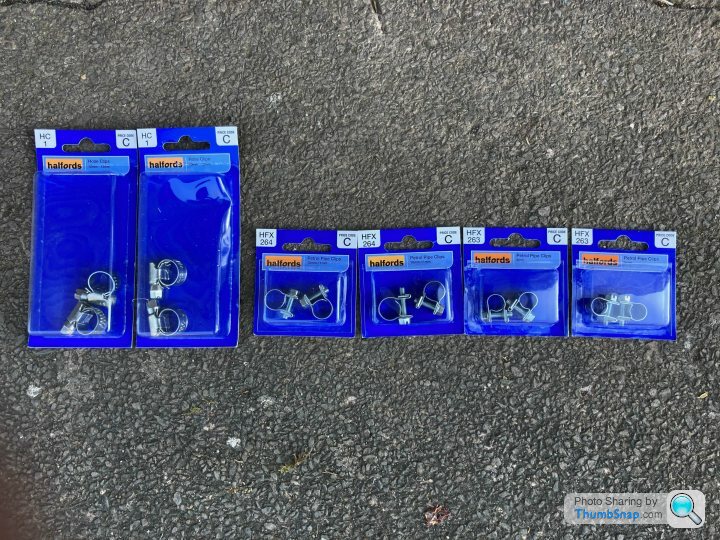
I spent a while rolling round on the floor under the car swapping the bigger clips for slightly smaller ones (from 11-13mm to 10-11mm). On the bigger clips, I'd got the 'jaws' pretty much touching each other and it wasn't holding the pressure.
The smaller ones allowed me to get a tighter fit without running out of adjustment.
Feeling rather pleased with myself (if somewhat bathed in petrol), I put the fuel pump fuse back in, reconnected the battery, and started it up. A tentative glance under the car revealed a different scene to yesterday's shower of fuel. This time there was nothing. All dry. Excellent.
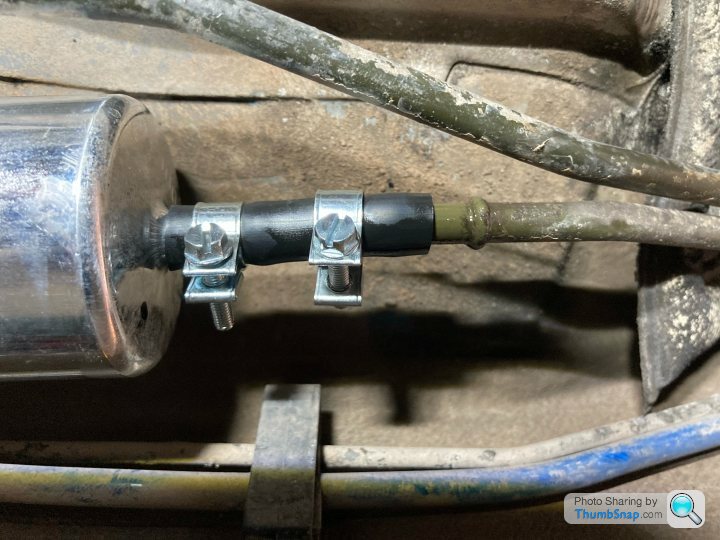
Hmmm. What's this?
I think it's some sort of balloon animal. Is it meant to do that? I suspect not, but I don't know for sure. I check the listing that I bought the hose from and it does say 'fuel hose', so it's probably ok? Right?
Well, any idiot could probably see that petrol balloons are a bad thing.
I the interests of full disclosure, and in an attempt to ensure that this isn't some kind of curated reality where I come across as the God of Common Sense and Mechanical Ability, I will now admit that I am actually an idiot. To suggest otherwise would run the risk of young, impressionable people mistaking this thread for an instruction manual on how to lead the perfect DIY mechanicking life, and subsequently to end up depressed because they can't live up to my flawless example. That's how Instagram happens.
Yes, I drove it with my petrol balloons hanging either end of the fuel filter. And yes, I got my comeuppance. No, I didn't burn to death in a spectacular fireball. How could you even think that? You monster!
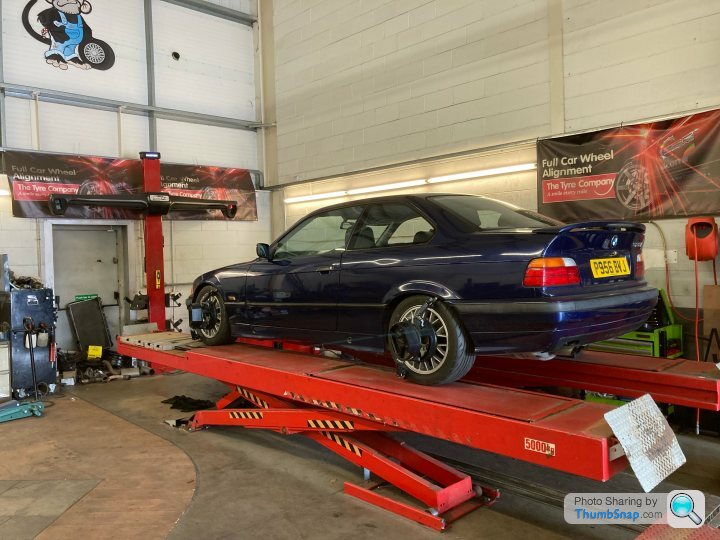
No, what actually happened was that I took it to a local tyre and alignment place to get the alignment sorted properly. Like with lasers, rather than string and MDF. I got chatting to a guy who arrived there just before me to get his lowered and almost track-prepped MX-5 aligned, and as we stood in the car park talking coilovers and other cool stuff, and enjoying the sunshine (it is a beautiful day), I noticed a wet patch under my car. Uh oh!
I adopted the prone position for a better look and sure enough, petrol was dripping out somewhere near the filter at a pretty rapid rate. Balls. Immediate Action drill was to remove the fuse, depressurise, and disconnect the battery. Then considered my options.
If this had been some sort of generic chain place, I probably wouldn't have fancied my chances. But having chatted briefly to the chaps inside and seen the hardware outside (E46 330i track car and some sort of monstrous-looking E36 with wide body kit and evidence of some epic turbo setup), I thought, these guys would probably be willing to lend me a hand. I rather sheepishly approached them and asked for help.
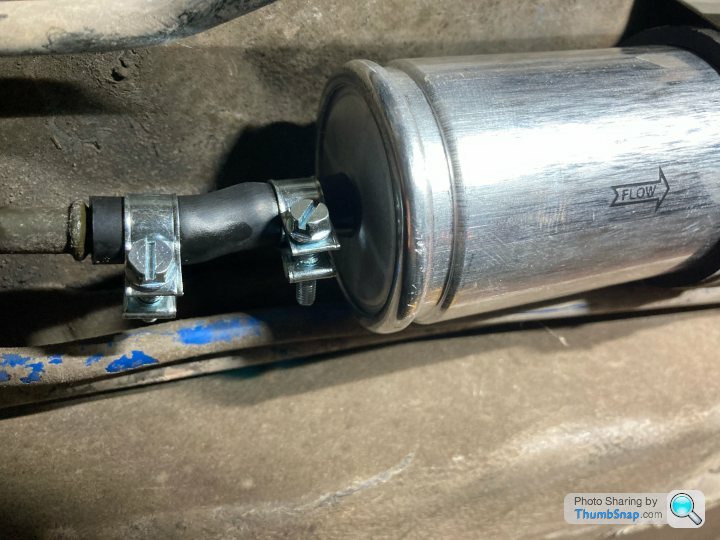
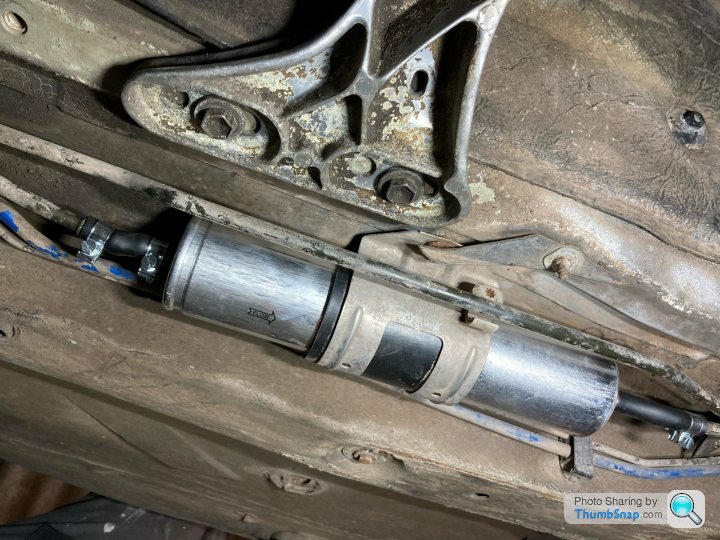
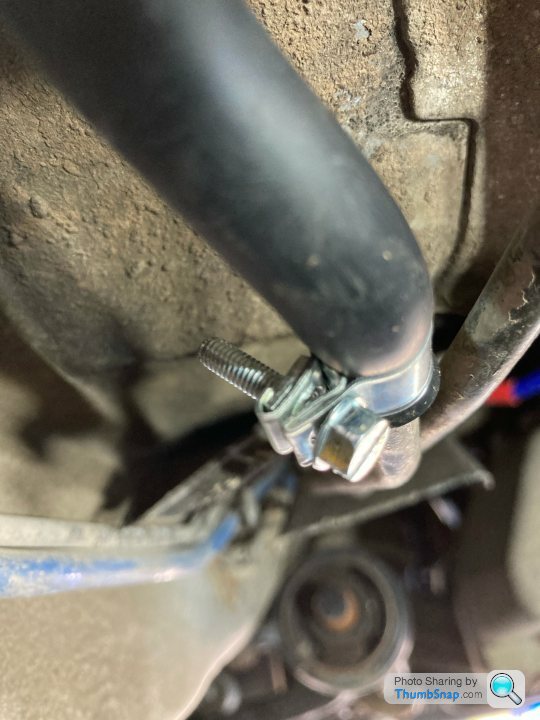
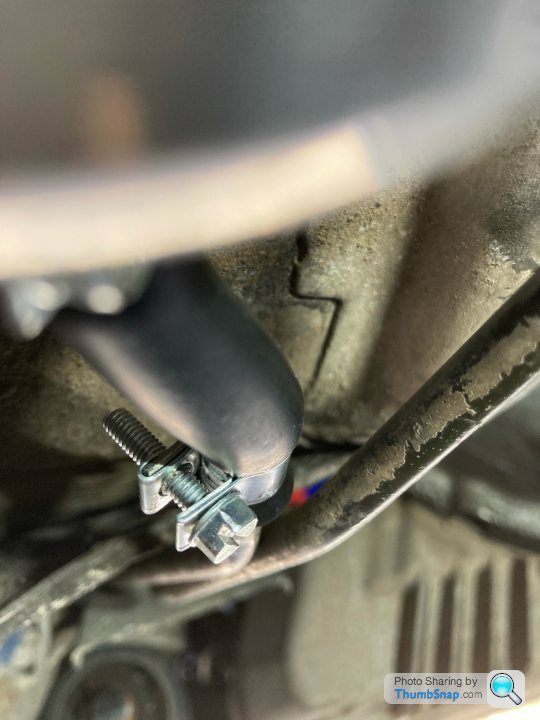
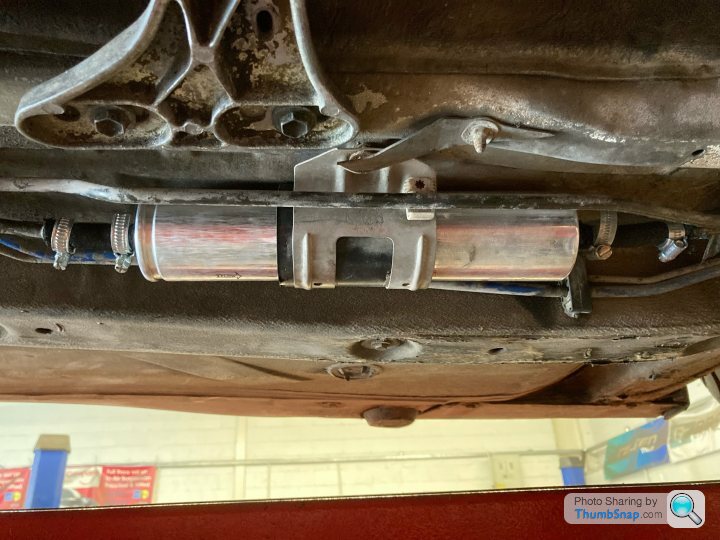
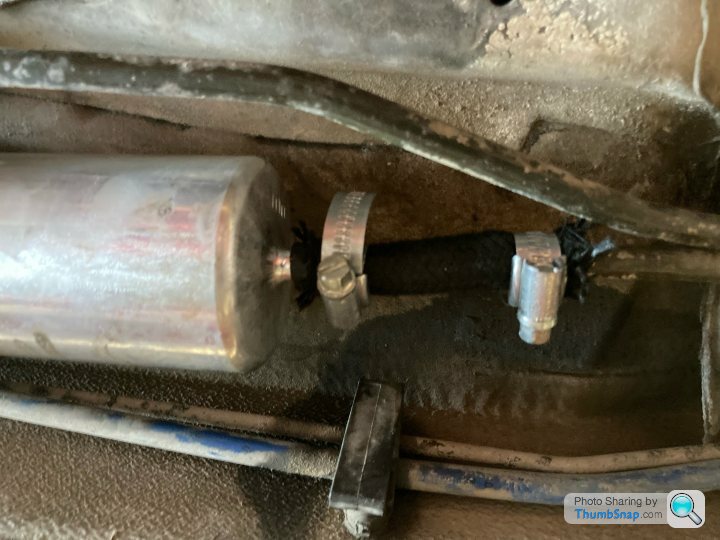
They looked after me superbly. Although it was a tyre place, therefore you wouldn't necessarily expect to find fuel hose, one of the guys happened to have a length left over from some work he'd done on his bike. They then pushed my car onto their ramp and lent me some tools so that I could go about replacing the cheap, soft, crap rubber rubbish that idiot me had thought would be ok with some proper braided fuel hose. This is the cause of my car's carpark incontinence:
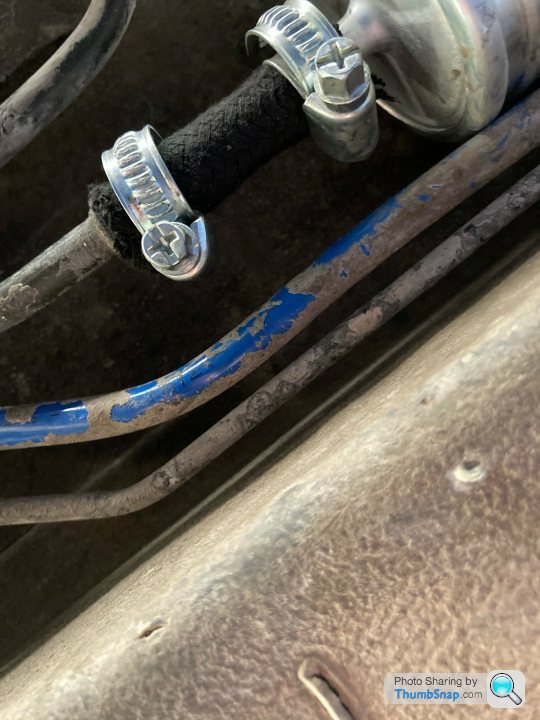
Yes, my balloon had burst. My next problem was that the smaller clips I'd used because of the compression I was getting from the soft rubber hose, wouldn't fit around the proper stuff. One of the helpful chaps dug out some old jubilee clips for me, two of which definitely went tight enough around the hose, and two of which I was far more dubious about. It looked like this.
Whilst it was up there, they did the alignment.
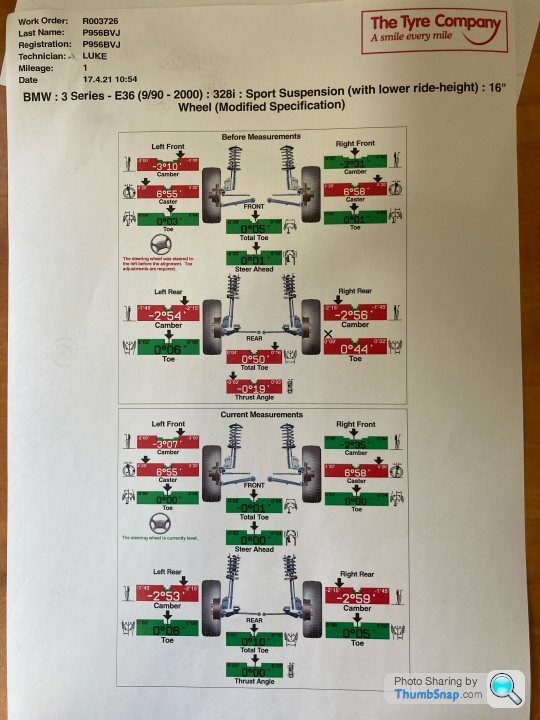
Let's compare my DIY readings with the start state on the printout. I will ignore the rear because I messed around with all the adjustment bolts this week. I'm interested in how I did with the front though.
Camber:
Front left: My reading 3.0 degrees. Their reading 3.1 degrees.
Front right: My reading 2.5 degrees. Their reading 2.31 degrees.
Toe:
Front left: My reading 0 degrees. Their reading 0.03 degrees.
Front right: My reading 0 degrees. Their reading 0.01 degrees.
For all the faffing about and assumption that my measurements were probably rubbish, actually they were really close to reality, which is quite pleasing. I will trust my camber triangle and iPhone in future, but I will probably leave the string alone!
I'd asked them for a track setup, for which the boss (and owner of both BMWs outside) suggested some numbers. He said that I should get as much camber on the back as possible, and about 0.5 degrees more than that (more negative) on the front. On toe, he said zero at the front and minimal toe in at the rear.
As an aside, I chatted to the boss whilst his employees sorted my alignment. The wide-body E36 (why didn't I take a picture of it? Fool!) is a twin-turbo V8 (from a Bentley Arnage (?)), with about 550-600bhp, which he intends to use to show off and do burnouts. Each to their own!
I'd already set my rear camber bolts to maximum, so they stayed about where they were. As the front camber plates are half-hidden inside my strut towers, I didn't get them to do anything with the front camber as it would have meant getting on and off the ramp probably several times, which would have ended up costing me a fortune. The front camber is within 0.75 degrees or so. I'll see how it feels. I can always break out the camber triangle if I want to fine tune it. My time is free. To me.
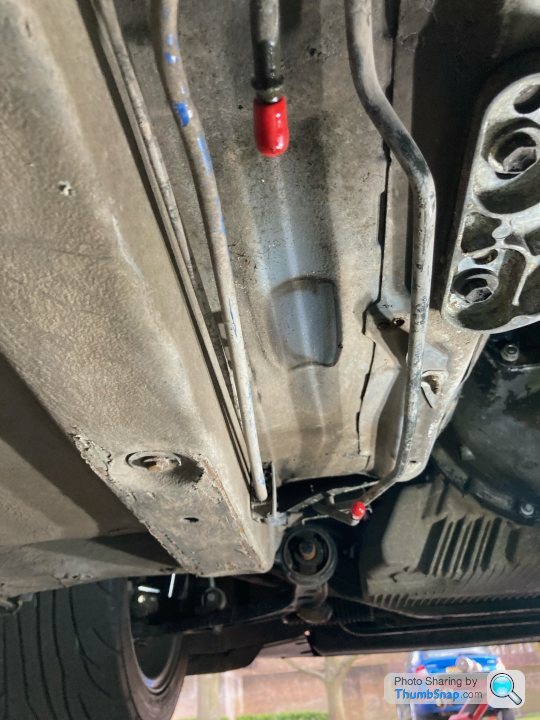
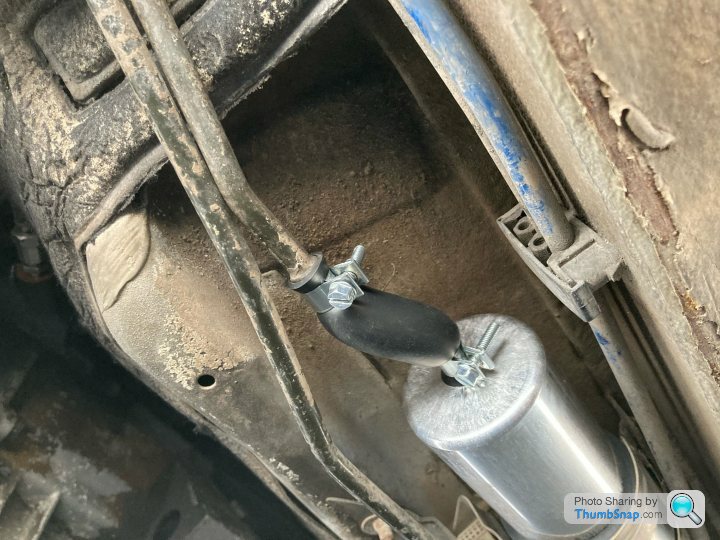
So that's the alignment as sorted as it's going to get (and the steering wheel points straight - hooray!). The next step was to get it down and see if I could get it home without depositing all my fuel on the road. Fuse in, battery connected, and it started second time. No evidence of a shower underneath. I paid and drove it home. Here are some photos I took when I got home by sticking my arm under the car.
No balloons. No drips. I'm still pretty dubious about two of the jubilee clips and their tightness, so as I sit typing this there is some blue roll sitting on the garage floor under the fuel filter so that when I go back out I can see if it's dripping. If it's ok I'll take it for a spin this afternoon to see how it all holds together. If that's ok, I'll probably leave the clips as they are, but will take spares to Mallory on Thursday in case it needs running repairs.
New clips obtained. I actually tried an independent parts place first but they didn't have anything small enough, so I ended up at Halfords for a selection of clips.
I spent a while rolling round on the floor under the car swapping the bigger clips for slightly smaller ones (from 11-13mm to 10-11mm). On the bigger clips, I'd got the 'jaws' pretty much touching each other and it wasn't holding the pressure.
The smaller ones allowed me to get a tighter fit without running out of adjustment.
Feeling rather pleased with myself (if somewhat bathed in petrol), I put the fuel pump fuse back in, reconnected the battery, and started it up. A tentative glance under the car revealed a different scene to yesterday's shower of fuel. This time there was nothing. All dry. Excellent.
Hmmm. What's this?
I think it's some sort of balloon animal. Is it meant to do that? I suspect not, but I don't know for sure. I check the listing that I bought the hose from and it does say 'fuel hose', so it's probably ok? Right?
Well, any idiot could probably see that petrol balloons are a bad thing.
I the interests of full disclosure, and in an attempt to ensure that this isn't some kind of curated reality where I come across as the God of Common Sense and Mechanical Ability, I will now admit that I am actually an idiot. To suggest otherwise would run the risk of young, impressionable people mistaking this thread for an instruction manual on how to lead the perfect DIY mechanicking life, and subsequently to end up depressed because they can't live up to my flawless example. That's how Instagram happens.
Yes, I drove it with my petrol balloons hanging either end of the fuel filter. And yes, I got my comeuppance. No, I didn't burn to death in a spectacular fireball. How could you even think that? You monster!
No, what actually happened was that I took it to a local tyre and alignment place to get the alignment sorted properly. Like with lasers, rather than string and MDF. I got chatting to a guy who arrived there just before me to get his lowered and almost track-prepped MX-5 aligned, and as we stood in the car park talking coilovers and other cool stuff, and enjoying the sunshine (it is a beautiful day), I noticed a wet patch under my car. Uh oh!
I adopted the prone position for a better look and sure enough, petrol was dripping out somewhere near the filter at a pretty rapid rate. Balls. Immediate Action drill was to remove the fuse, depressurise, and disconnect the battery. Then considered my options.
If this had been some sort of generic chain place, I probably wouldn't have fancied my chances. But having chatted briefly to the chaps inside and seen the hardware outside (E46 330i track car and some sort of monstrous-looking E36 with wide body kit and evidence of some epic turbo setup), I thought, these guys would probably be willing to lend me a hand. I rather sheepishly approached them and asked for help.
They looked after me superbly. Although it was a tyre place, therefore you wouldn't necessarily expect to find fuel hose, one of the guys happened to have a length left over from some work he'd done on his bike. They then pushed my car onto their ramp and lent me some tools so that I could go about replacing the cheap, soft, crap rubber rubbish that idiot me had thought would be ok with some proper braided fuel hose. This is the cause of my car's carpark incontinence:
Yes, my balloon had burst. My next problem was that the smaller clips I'd used because of the compression I was getting from the soft rubber hose, wouldn't fit around the proper stuff. One of the helpful chaps dug out some old jubilee clips for me, two of which definitely went tight enough around the hose, and two of which I was far more dubious about. It looked like this.
Whilst it was up there, they did the alignment.
Let's compare my DIY readings with the start state on the printout. I will ignore the rear because I messed around with all the adjustment bolts this week. I'm interested in how I did with the front though.
Camber:
Front left: My reading 3.0 degrees. Their reading 3.1 degrees.
Front right: My reading 2.5 degrees. Their reading 2.31 degrees.
Toe:
Front left: My reading 0 degrees. Their reading 0.03 degrees.
Front right: My reading 0 degrees. Their reading 0.01 degrees.
For all the faffing about and assumption that my measurements were probably rubbish, actually they were really close to reality, which is quite pleasing. I will trust my camber triangle and iPhone in future, but I will probably leave the string alone!
I'd asked them for a track setup, for which the boss (and owner of both BMWs outside) suggested some numbers. He said that I should get as much camber on the back as possible, and about 0.5 degrees more than that (more negative) on the front. On toe, he said zero at the front and minimal toe in at the rear.
As an aside, I chatted to the boss whilst his employees sorted my alignment. The wide-body E36 (why didn't I take a picture of it? Fool!) is a twin-turbo V8 (from a Bentley Arnage (?)), with about 550-600bhp, which he intends to use to show off and do burnouts. Each to their own!
I'd already set my rear camber bolts to maximum, so they stayed about where they were. As the front camber plates are half-hidden inside my strut towers, I didn't get them to do anything with the front camber as it would have meant getting on and off the ramp probably several times, which would have ended up costing me a fortune. The front camber is within 0.75 degrees or so. I'll see how it feels. I can always break out the camber triangle if I want to fine tune it. My time is free. To me.
So that's the alignment as sorted as it's going to get (and the steering wheel points straight - hooray!). The next step was to get it down and see if I could get it home without depositing all my fuel on the road. Fuse in, battery connected, and it started second time. No evidence of a shower underneath. I paid and drove it home. Here are some photos I took when I got home by sticking my arm under the car.
No balloons. No drips. I'm still pretty dubious about two of the jubilee clips and their tightness, so as I sit typing this there is some blue roll sitting on the garage floor under the fuel filter so that when I go back out I can see if it's dripping. If it's ok I'll take it for a spin this afternoon to see how it all holds together. If that's ok, I'll probably leave the clips as they are, but will take spares to Mallory on Thursday in case it needs running repairs.
The blue roll under the car was bone dry, so I went for a drive. Now the new filter is in, I put the fuel system cleaner (Wynn's) in as well. Should be good for an extra 30-40bhp I reckon.
The car feels good, there are no surprise movements or unnecessary noises. I started on a main road, which was pretty straight and allowed me to open up and work through the gears. The sound of the straight six is lovely at high revs, and will only get better when I start messing around with the intake. I then decided to turn off the main road to find some bends. What I found were some bumps, and discovered what it means to have firm springs when I accelerated over them and shook my fillings out.(Hyperbole warning - no actual fillings came out).
Whilst I was out I thought I might as well do a recce to Mallory Park, as time spent in recce is seldom wasted.
I checked the underside while I was there - no fuel to be seen. Zoomed back home and still no fuel to be seen. There might be a bit of a squeak coming from the back, but can't be sure. I haven't tightened the top nuts on my struts or dampers since installation, which apparently is sometimes necessary to stop squeaks and rattles. I'll see how it goes and if it carries on/gets worse I'll give that a go.
So I think it's pretty much good to go. I'll check the fuel line as GPM suggested. I don't want to be the one pouring fuel all over the circuit! I will also lubricate the throttle pedal, because that definitely is squeaky.
outnumbered said:
I thought jubilee clips were not recommended for use on fuel hose?
You're probably right, but that's what was stopping my fuel falling out before, and these ones seem to be doing a pretty good job of stopping it falling out right now. If it becomes a problem I can always swap them out. I have an extensive collection of hose clips now...Oh, one more thing (I literally cannot leave it alone, can I?).
Part of the auto to manual conversion kit was a throttle stop to go under the pedal to replace the kick-down switch. I had it lying around and thought I might as well get it in there.
Kick-down switch out.
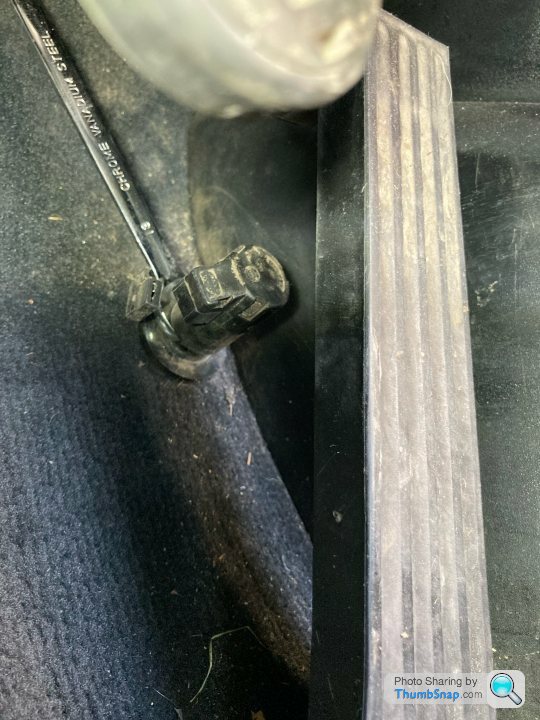
Throttle stop in. It's a pretty fancy name for a bolt with a washer and nut on it.

And adjusted to the right height with the help of my breaker bar. The aim was to have the throttle fully open as the pedal is flat to the stop, without undue tension on the cable.
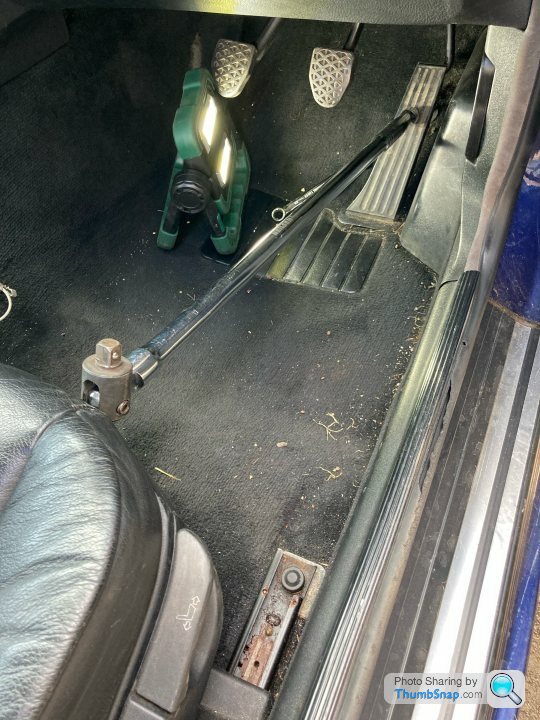
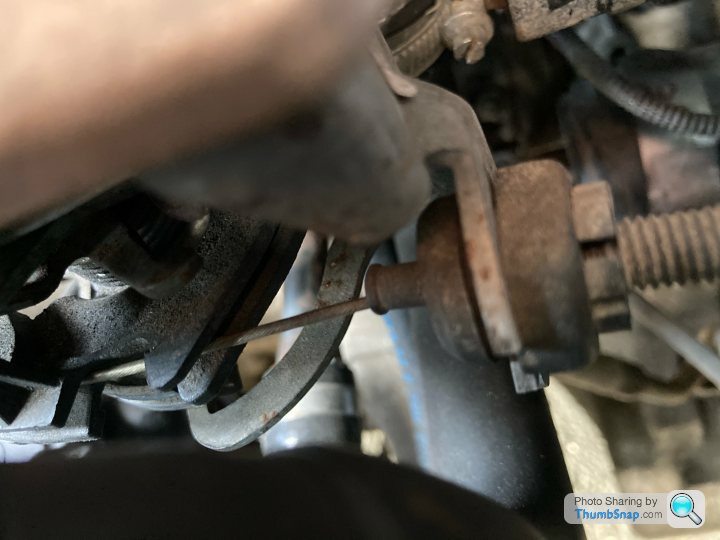
Sorted. Is that it? Probably not. It is all for today though.
Part of the auto to manual conversion kit was a throttle stop to go under the pedal to replace the kick-down switch. I had it lying around and thought I might as well get it in there.
Kick-down switch out.
Throttle stop in. It's a pretty fancy name for a bolt with a washer and nut on it.
And adjusted to the right height with the help of my breaker bar. The aim was to have the throttle fully open as the pedal is flat to the stop, without undue tension on the cable.
Sorted. Is that it? Probably not. It is all for today though.
RSpiston said:
Fuel hose - in my experience - don't ask ! - what is advertised as hose suitable for petrol may well not be ! After research and following a call with these guys I went this stuff :
https://www.merlinmotorsport.co.uk/p/stainless-ste...
The hose you currently have *may not* be suitable for modern petrol containing Ethanol and may disintegrate into a guey mess
HTH.
I look forward to the gooey mess! https://www.merlinmotorsport.co.uk/p/stainless-ste...
The hose you currently have *may not* be suitable for modern petrol containing Ethanol and may disintegrate into a guey mess
HTH.
I think the current setup will see me through this week but I will source some hose in whose provenance and specifications I have some confidence and swap it over when I get to it. The stuff that’s on there is the same that the guy at the tyre place had on his motorbike so it should be ok, at least for the short term.
Thanks for the link.
Nik Gnashers said:
Enjoying the updates !
My mechanical adventures only went as far, as de-badging my M140i today heheh, but I am enjoying your updates, thank you.
I’m sure you have better things to do than roll around in petrol and cock things up. As fun as it is, it’s not everyone’s idea of a good time! My mechanical adventures only went as far, as de-badging my M140i today heheh, but I am enjoying your updates, thank you.
Gassing Station | Readers' Cars | Top of Page | What's New | My Stuff