Kelvinators "boring car" - 1998 Corolla Liftback Project
Discussion


Honestly, the car doesnt need to be perfect, its still meant to be a cheap beater, so making the steering wheel "nicer" isn't really on the radar. The leather is intact, albeit a bit worn. I need to keep reminding myself not to focus too much on making the car perfect as that is a snowball that wont stop.
Did some testing of the front brake upgrade. Using massive 57mm piston single pot calipers from an ST202 Ceilca, and 275x25 rotors. Bit of a change from a 51mm single piston and 258x18 rotors. This combo will not fit under the stock 14s, so have to upgrade to 15s. Im going with a set of stock NB MX5 15x6 alloys (yes they need a damn good clean).


Not much room, but clears. I will need a 3mm spacer behind the rotor to center it in the carrier, so that will give me more space again. Slightly extended studs are being fitted on the front to compensate for the extra thickness.

Now that I have confirmed the spacer thickness I need, I have ordered that. Once I pass the WOF inspection I can order tyres for the wheels and fit it all up.
Also fitted the AE111 BZG strut brace. Had to drill the holes in the firewall, but they are stamped from factory so quite easy.

Did some testing of the front brake upgrade. Using massive 57mm piston single pot calipers from an ST202 Ceilca, and 275x25 rotors. Bit of a change from a 51mm single piston and 258x18 rotors. This combo will not fit under the stock 14s, so have to upgrade to 15s. Im going with a set of stock NB MX5 15x6 alloys (yes they need a damn good clean).
Not much room, but clears. I will need a 3mm spacer behind the rotor to center it in the carrier, so that will give me more space again. Slightly extended studs are being fitted on the front to compensate for the extra thickness.
Now that I have confirmed the spacer thickness I need, I have ordered that. Once I pass the WOF inspection I can order tyres for the wheels and fit it all up.
Also fitted the AE111 BZG strut brace. Had to drill the holes in the firewall, but they are stamped from factory so quite easy.
KelvinatorNZ said:
Honestly, the car doesnt need to be perfect, its still meant to be a cheap beater, so making the steering wheel "nicer" isn't really on the radar. The leather is intact, albeit a bit worn. I need to keep reminding myself not to focus too much on making the car perfect as that is a snowball that wont stop.
Fair enough. Living in a big city I've known the pleasure of having a 'beater' that you don't care about, but cleanliness is something I draw the line on.I'm far from "OCD" (as is frequently used incorrectly by people who like showing off clean cars on the internet), but I can't stand a filthy or badly worn interior.
On the other hand, I'm useless with a spanner and have huge envy for your 'just f*cking do it' attitude. To each his own.
C70R said:
Fair enough. Living in a big city I've known the pleasure of having a 'beater' that you don't care about, but cleanliness is something I draw the line on.
I'm far from "OCD" (as is frequently used incorrectly by people who like showing off clean cars on the internet), but I can't stand a filthy or badly worn interior.
On the other hand, I'm useless with a spanner and have huge envy for your 'just f*cking do it' attitude. To each his own.
Oh, don't get me wrong, its VERY clean. I cant stand grot either, so I spent a few hours just scrubbing and conditioning the steering wheel before putting it in. I still need to sort the filthy center console, as I've wiped the outside of it but it needs to be removed and stripped down to clean out the crevices. That'll happen when the interior gets torn to bits for the manual conversion.I'm far from "OCD" (as is frequently used incorrectly by people who like showing off clean cars on the internet), but I can't stand a filthy or badly worn interior.
On the other hand, I'm useless with a spanner and have huge envy for your 'just f*cking do it' attitude. To each his own.
shalmaneser said:
The brakes fill up those wheels very nicely. Will the change in brake piston size affect the brake balance?
Not the balance as such (fitting the rear disc brakes will, so I will be swapping the correct proportioning valve with that), but the master cylinder needs to be upgraded or pedal feel can suffer. I have a master from a Truno BZR coming, which runs factory 2 pot calipers with a similar fluid volume per caliper.Yes, that old game. I bloody hate rust, but unfortunately, I have found myself the proud owner of a car with some. Not bad, but in a bad place.
Before we start, a short word. PPE. Wear it. Almost everything in this post (and most other posts) will kill or seriously maim you if you don't wear the correct Personal Protective Equipment. I can't stress it enough, use a quality mask, ear plugs/protectors, gloves and safety glasses/goggles. You don't want to breathe any of this in or get it in your eyes. When welding use the appropriate face/eye protection, gloves and fireproof clothing (and check your surroundings). Stay safe.
Another word; I am not a professional. I have never done panel/body work/paint before (but know my way around a welder in a basic sense), so don't take what I have done as a guide. If in doubt, consult a pro.
It all started when I got home and noticed these little pimples in the paint. Sadly I didn't notice them when viewing the car because it was bucketing down and quite frankly I wasn't paying attention, and these aren't really known for rust.


Balls. I had my suspicions that someone else had been here before, too. That ain't a factory paint match.


I got bored one day and decided to see what the pimple was hiding. Turns out the pimple is lifting bog, and under that is very thin metal. So thin, your screwdriver pokes a hole in it. Now I've done it. Well, since I have one hole, why not two?


Rust here is very bad news. A car cannot have rust within a certain distance of the A Pillar, so there was no way it would pass a WOF like this (and the WOF has just expired).
I had two options. One, take the car to a man and get it fixed. Two, be that man and fix it myself.
Option two was the way forward, of course, because hey, ain't no learning experience like being thrown into the deep with lead weights on your feet. Plus, this is a "cheap" car, I don't want to have to pay someone too much to fix it, and it doesn't have to be perfect, just strong.
I sourced an old bonnet from a friend and set to work cutting it up to calibrate and practice with my welder. I haven't touched this at all since I welded the handbrake back to the floor of the Mini, over two years ago.


No, it's not pretty, but it took a lot of dialling in to get the flux core wire (hollow wire with flux inside to shield and protect the weld during welding) to play nice with thin panel steel. I got there in the end, and a couple more practice patches meant I was ready to give the real job a shot.
First I had to remove the old paint and bog to see what I was working with. I grabbed one of these stripping discs for my grinder and woah its amazing for this sort of work. No sparks, no damage to the metal, it just made the paint and bog suddenly disappear.

But yes, this is what I found. Lots of bog (or not much, as I've been told, but more than I wanted). It doesn't bode well for me having to reshape the panel afterwards.


I then got out the old poky tappy slag hammer, and poked more holes in it. I had to find solid metal as I couldn't weld good metal to thin crappy metal. I poked a lot more holes after these photos were taken.


With the holes poked and solid metal found, out came the cutting disc.

The bonnet provided good solid metal for the patches. In hindsight, I would've made this patch a bit bigger as it would've been easier.

And then out came the welder. Before welding, the windscreen and side windows were covered with wet sheets and rags to protect them from welding spatter. The previous repairer didn't do this, and there is a couple of spots of welding spatter etched into the side window glass.
It's not pretty, but it's solid.

With panel steel you can't just run a nice tidy bead around the edges, you have to do a series of small tack welds all around it and stitch it in. If you weld too much it will overheat the panel and warp. To keep the heat down I used a combo of an air blower on my compressor and cold wet rags. With flux core, I also had to keep stopping to wire brush the welds to clean them (as flux leaves a residue that will make any welds that touch the residue contaminated). I wouldn't do this job with flux core again, its way too finicky. A real PITA.
But, as the saying goes, "A grinder and paint make me the welder I ain't", so I hit it with a grinding wheel, also being careful to keep heat to a minimum
Also, note that random screw. I had to screw this into the panel in order to attach the negative clamp for the welder as there was no other good area to use. Its easier to drill a small hole, screw that in and then plug it with weld later than to mess around with a bad ground.

With the rear hole welded up, I cut the front section out. This was a better size cut (and the screw was moved to a new location)

The inside of the panel was full of chunks of flaky rusty rubbish. I vacuumed it out both times I opened the panel up and treated the inside of the panel with rust convertor.
This is the panel I cut out. Note the unprotected metal on the back, as well as the big lump of weld where someone had just pointed the nozzle into the hole in the panel and filled it with liquid metal.


A fresh new patch was cut from the bonnet and trimmed to fit. "Aviation snips" were the best tool for this; like scissors for metal.

Obviously the flat patch on a curved panel was no good, I'd need as much bog as the previous repair did to just level that out, so with some careful hammering, I curved the panel to fit better. The edges were also cleaned so I wasn't trying to weld on paint. Ignore the ground down spot in the middle, this is what happens when the bench grinder snatches the patch out of your fingers and jams it between the grinding wheel and rest platform. Oops.

Anyway, it was time to start gluing this patch in place with metal. On this one instead of just wire brushing the welds as I went, I chose to grind them down as I went, which made it much easier to spot holes and gaps I needed to fill, as well as reducing the amount of work on the final tidy up. Here is about a quarter done

And completely welded in and ground back

The next day I was planning on cleaning the metal back and applying filler. This was delayed slightly by my discovery that the windscreen was cracked.

A small blob of superheated welding spatter had somehow got under two layers of sopping wet rags, and a wet sheet, to land on the windscreen. This concentrated heat causes it to crack.

With nothing to lose, I decided to give a DIY repair a shot. I went out and grabbed a Rain-X repair kit

It has the cutest little bottle of resin

Long story short, you fill the crack with the resin, push the air out by gently pressing on either side of the crack from the inside, and then lay some clear strips over the crack/resin and leave in the sun for 10 mins to cure. A razor is used to shave the excess dry resin off, leaving a clean and smooth surface.

The results were actually quite impressive. You can see a thin line where the crack was (especially in the black surround), but the crack has no depth to it now. It is really hard to photograph though

A+ would use again. Not sure how it goes on chips as I haven't tested that, but it certainly works on cracks.
So moving back to the panel work, it was time to ice a cake panel. I started by using a 30 grit flap wheel on the grinder to clean the areas up and then used some 80 grit to key the panel. Then I slapped the bog on.

Having never used bog/filler before, this was a bit of an experience. Lots of Youtube videos and googling pointed me in the right direction, and it seems to have worked. One trick I was told, was that if you don't have a fancy non-stick board like the pros use to mix and spread the filler, stick a sheet of baking paper to a board. The filler won't stick to the baking paper or soak in, and it's much easier to work with.
Once the filler was dry, I started to sand it back. Using an 80 grit on the orbital sander I knocked the majority of it back, and then used 80 grit by hand to shape it more. I found this a hugely messy job with the orbital until I realised my workshop vac fit the little dust outlet on the sander (it usually has a small filter bag attached). This meant most of the dust got vacuumed up as I went, and reduced the dust a lot.

This uncovered some low spots, so I mixed more filled and filled them in and sanded it back again


This was a really hard area to shape. There are curves in so many directions all joining here, but I did the best I could with the skills at hand. A final sand with 300 grit to smooth off the filler and we were ready for primer.
After a thorough clean, I used some filler primer to protect the area and fill any small marks.


After a few coats of primer, the masking was removed and the primer was left to cure overnight before sanding.
I sanded this back trying to smooth the edges and blend the transition better

As you can see I also sanded the clear next to the primer as this was covered in old overspray from the previous repair. In hindsight I think this was where I started to go wrong. I could have got away with not sanding this and painting a much smaller area as I had intended (only planned to paint as far as the primer, into the ditch).

Anyway, my failure will become apparent soon, so let's move on. After cleaning I masked up the area, using the fold back technique to try and give a soft edge (it didn't work).

After even more cleaning (cleaning is key), I started to lay down some paint.

I could already see the paint was a slightly more red shade but hoped it would dry more orange. I also had issues with the spray can spitting drops of paint. Thankfully more coats seemed to cover these up.

Waiting for 10 minutes between coats for the paint to flash off, I laid down 3-4 coats

The coverage was good, there was no sign of the primer through the paint and it looked even.
Next was clearcoat. I had been warming both cans in warm water as I find this makes the can spray better.

Three coats of clear were sprayed

Unfortunately between the first and second coats I opened the big garage door to try and vent more fumes (the clearcoat is very cloudy), and the humidity in the garage spiked to about 88%, which is way too high. This lead to bloom, and a cloudy/milky finish to the clear. I was not happy.


You can see a hint of how it should be

It's a great colour, with so much flake

Youtube and google told me I might be able to save it with a heat gun on low, to warm the paint up and the moisture might clear. Now, this DOES work, but you have to be bloody careful or the paint can and will blister.


After causing a couple of small blisters I called it quits; I couldn't risk more damage to the new paint. I'd just have to see if the rest of the bloom clears by its self.
Unfortunately, despite drying a more orange shade, it was still tinted slightly red. The match wasn't perfect

Here was the worst of the bloom left. You can also see that the area I had repaired turned out pretty well in terms of shape and smoothness.

There was one step left that might save it. Wet sanding.
I left the paint to dry for over 24 hours and then backed the car into the drive for its first wash since I bought it.


It cleans up pretty well really. It was good getting all the dust off, as it was filthy from all the grinding/sanding. No signs of any wax though, not a single bead in sight. I also used a clay cloth on the paint as it felt like sandpaper. The paint is nice and smooth now.
Just as I was pulling the car into the garage again to dry off, I hear a *SPLAT*, and see a bird has decided my nice clean windscreen was the perfect place to take a dump


So now it was time to sand the paint. I set about wet sanding with various grades from 1200 grit to 5000 grit. I had a few issues, like some paint in a certain patch lifting loose (where I had painted over the original paint with minimal prep), and a couple of patches where I burnt through on an edge. Once again, in hindsight, try to minimise the amount of sanding on the original paint as its really hard to polish out the sanding marks afterwards. A stronger cutting compound would help, but I only have Ultimate Compound.


After wet sanding and drying off, next was to machine polish the paint to bring back the shine.
This is the end result. It's really obvious where the repair is as the colour is quite different. I should have stuck to my original plan and only painted as far as the gully that runs the length of the roof. I chose to paint further out to try and correct some of the overspray from the last repair, which I could have just fixed afterwards anyway.
I do need to keep reminding myself that it doesn't need to be perfect though. This isn't a show car, it's a $1200 beater that I'm going to modify and beat on. The goal was to fix the rust, not fix the paint.


I couldn't stop there though, since I had a nice shiny roof the rest of the car looked really dull. So, I machine polished the whole car (except the bonnet, which has no clear left to polish). It's bloody shiny now. A good coating of wax, all the windows cleaned inside and out, and it was finally time to kick the car out of the garage.

In the natural light, after the polish and wax, the colour difference isn't actually too bad. You can notice it if you're looking, but otherwise you might dismiss it as a shadow or reflection. Its miles better than what was there, even without the rust the paint was a worse match and had no gloss or shine to it.


I wrote most of this post in advance, so today was WOF inspection day, and by some miracle (not really, its a beast), the mighty Corolla passed with only an advisory for surface rust on the fuel pipe under the car (which I will treat and protect). The inspector was very impressed with the car and had only good things to say.
So with another 6 months of motoring on the clock, it's time to open the wallet again and spend more money. Now its time for the expensive bits. With any luck, we should be ready for the first track day at the end of January.
Before we start, a short word. PPE. Wear it. Almost everything in this post (and most other posts) will kill or seriously maim you if you don't wear the correct Personal Protective Equipment. I can't stress it enough, use a quality mask, ear plugs/protectors, gloves and safety glasses/goggles. You don't want to breathe any of this in or get it in your eyes. When welding use the appropriate face/eye protection, gloves and fireproof clothing (and check your surroundings). Stay safe.
Another word; I am not a professional. I have never done panel/body work/paint before (but know my way around a welder in a basic sense), so don't take what I have done as a guide. If in doubt, consult a pro.
It all started when I got home and noticed these little pimples in the paint. Sadly I didn't notice them when viewing the car because it was bucketing down and quite frankly I wasn't paying attention, and these aren't really known for rust.


Balls. I had my suspicions that someone else had been here before, too. That ain't a factory paint match.


I got bored one day and decided to see what the pimple was hiding. Turns out the pimple is lifting bog, and under that is very thin metal. So thin, your screwdriver pokes a hole in it. Now I've done it. Well, since I have one hole, why not two?


Rust here is very bad news. A car cannot have rust within a certain distance of the A Pillar, so there was no way it would pass a WOF like this (and the WOF has just expired).
I had two options. One, take the car to a man and get it fixed. Two, be that man and fix it myself.
Option two was the way forward, of course, because hey, ain't no learning experience like being thrown into the deep with lead weights on your feet. Plus, this is a "cheap" car, I don't want to have to pay someone too much to fix it, and it doesn't have to be perfect, just strong.
I sourced an old bonnet from a friend and set to work cutting it up to calibrate and practice with my welder. I haven't touched this at all since I welded the handbrake back to the floor of the Mini, over two years ago.


No, it's not pretty, but it took a lot of dialling in to get the flux core wire (hollow wire with flux inside to shield and protect the weld during welding) to play nice with thin panel steel. I got there in the end, and a couple more practice patches meant I was ready to give the real job a shot.
First I had to remove the old paint and bog to see what I was working with. I grabbed one of these stripping discs for my grinder and woah its amazing for this sort of work. No sparks, no damage to the metal, it just made the paint and bog suddenly disappear.

But yes, this is what I found. Lots of bog (or not much, as I've been told, but more than I wanted). It doesn't bode well for me having to reshape the panel afterwards.


I then got out the old poky tappy slag hammer, and poked more holes in it. I had to find solid metal as I couldn't weld good metal to thin crappy metal. I poked a lot more holes after these photos were taken.


With the holes poked and solid metal found, out came the cutting disc.

The bonnet provided good solid metal for the patches. In hindsight, I would've made this patch a bit bigger as it would've been easier.

And then out came the welder. Before welding, the windscreen and side windows were covered with wet sheets and rags to protect them from welding spatter. The previous repairer didn't do this, and there is a couple of spots of welding spatter etched into the side window glass.
It's not pretty, but it's solid.

With panel steel you can't just run a nice tidy bead around the edges, you have to do a series of small tack welds all around it and stitch it in. If you weld too much it will overheat the panel and warp. To keep the heat down I used a combo of an air blower on my compressor and cold wet rags. With flux core, I also had to keep stopping to wire brush the welds to clean them (as flux leaves a residue that will make any welds that touch the residue contaminated). I wouldn't do this job with flux core again, its way too finicky. A real PITA.
But, as the saying goes, "A grinder and paint make me the welder I ain't", so I hit it with a grinding wheel, also being careful to keep heat to a minimum

Also, note that random screw. I had to screw this into the panel in order to attach the negative clamp for the welder as there was no other good area to use. Its easier to drill a small hole, screw that in and then plug it with weld later than to mess around with a bad ground.

With the rear hole welded up, I cut the front section out. This was a better size cut (and the screw was moved to a new location)

The inside of the panel was full of chunks of flaky rusty rubbish. I vacuumed it out both times I opened the panel up and treated the inside of the panel with rust convertor.
This is the panel I cut out. Note the unprotected metal on the back, as well as the big lump of weld where someone had just pointed the nozzle into the hole in the panel and filled it with liquid metal.


A fresh new patch was cut from the bonnet and trimmed to fit. "Aviation snips" were the best tool for this; like scissors for metal.

Obviously the flat patch on a curved panel was no good, I'd need as much bog as the previous repair did to just level that out, so with some careful hammering, I curved the panel to fit better. The edges were also cleaned so I wasn't trying to weld on paint. Ignore the ground down spot in the middle, this is what happens when the bench grinder snatches the patch out of your fingers and jams it between the grinding wheel and rest platform. Oops.

Anyway, it was time to start gluing this patch in place with metal. On this one instead of just wire brushing the welds as I went, I chose to grind them down as I went, which made it much easier to spot holes and gaps I needed to fill, as well as reducing the amount of work on the final tidy up. Here is about a quarter done

And completely welded in and ground back

The next day I was planning on cleaning the metal back and applying filler. This was delayed slightly by my discovery that the windscreen was cracked.
A small blob of superheated welding spatter had somehow got under two layers of sopping wet rags, and a wet sheet, to land on the windscreen. This concentrated heat causes it to crack.

With nothing to lose, I decided to give a DIY repair a shot. I went out and grabbed a Rain-X repair kit

It has the cutest little bottle of resin

Long story short, you fill the crack with the resin, push the air out by gently pressing on either side of the crack from the inside, and then lay some clear strips over the crack/resin and leave in the sun for 10 mins to cure. A razor is used to shave the excess dry resin off, leaving a clean and smooth surface.

The results were actually quite impressive. You can see a thin line where the crack was (especially in the black surround), but the crack has no depth to it now. It is really hard to photograph though

A+ would use again. Not sure how it goes on chips as I haven't tested that, but it certainly works on cracks.
So moving back to the panel work, it was time to ice a cake panel. I started by using a 30 grit flap wheel on the grinder to clean the areas up and then used some 80 grit to key the panel. Then I slapped the bog on.

Having never used bog/filler before, this was a bit of an experience. Lots of Youtube videos and googling pointed me in the right direction, and it seems to have worked. One trick I was told, was that if you don't have a fancy non-stick board like the pros use to mix and spread the filler, stick a sheet of baking paper to a board. The filler won't stick to the baking paper or soak in, and it's much easier to work with.
Once the filler was dry, I started to sand it back. Using an 80 grit on the orbital sander I knocked the majority of it back, and then used 80 grit by hand to shape it more. I found this a hugely messy job with the orbital until I realised my workshop vac fit the little dust outlet on the sander (it usually has a small filter bag attached). This meant most of the dust got vacuumed up as I went, and reduced the dust a lot.

This uncovered some low spots, so I mixed more filled and filled them in and sanded it back again


This was a really hard area to shape. There are curves in so many directions all joining here, but I did the best I could with the skills at hand. A final sand with 300 grit to smooth off the filler and we were ready for primer.
After a thorough clean, I used some filler primer to protect the area and fill any small marks.


After a few coats of primer, the masking was removed and the primer was left to cure overnight before sanding.
I sanded this back trying to smooth the edges and blend the transition better

As you can see I also sanded the clear next to the primer as this was covered in old overspray from the previous repair. In hindsight I think this was where I started to go wrong. I could have got away with not sanding this and painting a much smaller area as I had intended (only planned to paint as far as the primer, into the ditch).

Anyway, my failure will become apparent soon, so let's move on. After cleaning I masked up the area, using the fold back technique to try and give a soft edge (it didn't work).

After even more cleaning (cleaning is key), I started to lay down some paint.

I could already see the paint was a slightly more red shade but hoped it would dry more orange. I also had issues with the spray can spitting drops of paint. Thankfully more coats seemed to cover these up.

Waiting for 10 minutes between coats for the paint to flash off, I laid down 3-4 coats

The coverage was good, there was no sign of the primer through the paint and it looked even.
Next was clearcoat. I had been warming both cans in warm water as I find this makes the can spray better.

Three coats of clear were sprayed

Unfortunately between the first and second coats I opened the big garage door to try and vent more fumes (the clearcoat is very cloudy), and the humidity in the garage spiked to about 88%, which is way too high. This lead to bloom, and a cloudy/milky finish to the clear. I was not happy.


You can see a hint of how it should be

It's a great colour, with so much flake

Youtube and google told me I might be able to save it with a heat gun on low, to warm the paint up and the moisture might clear. Now, this DOES work, but you have to be bloody careful or the paint can and will blister.


After causing a couple of small blisters I called it quits; I couldn't risk more damage to the new paint. I'd just have to see if the rest of the bloom clears by its self.
Unfortunately, despite drying a more orange shade, it was still tinted slightly red. The match wasn't perfect

Here was the worst of the bloom left. You can also see that the area I had repaired turned out pretty well in terms of shape and smoothness.

There was one step left that might save it. Wet sanding.
I left the paint to dry for over 24 hours and then backed the car into the drive for its first wash since I bought it.


It cleans up pretty well really. It was good getting all the dust off, as it was filthy from all the grinding/sanding. No signs of any wax though, not a single bead in sight. I also used a clay cloth on the paint as it felt like sandpaper. The paint is nice and smooth now.
Just as I was pulling the car into the garage again to dry off, I hear a *SPLAT*, and see a bird has decided my nice clean windscreen was the perfect place to take a dump

So now it was time to sand the paint. I set about wet sanding with various grades from 1200 grit to 5000 grit. I had a few issues, like some paint in a certain patch lifting loose (where I had painted over the original paint with minimal prep), and a couple of patches where I burnt through on an edge. Once again, in hindsight, try to minimise the amount of sanding on the original paint as its really hard to polish out the sanding marks afterwards. A stronger cutting compound would help, but I only have Ultimate Compound.


After wet sanding and drying off, next was to machine polish the paint to bring back the shine.
This is the end result. It's really obvious where the repair is as the colour is quite different. I should have stuck to my original plan and only painted as far as the gully that runs the length of the roof. I chose to paint further out to try and correct some of the overspray from the last repair, which I could have just fixed afterwards anyway.
I do need to keep reminding myself that it doesn't need to be perfect though. This isn't a show car, it's a $1200 beater that I'm going to modify and beat on. The goal was to fix the rust, not fix the paint.


I couldn't stop there though, since I had a nice shiny roof the rest of the car looked really dull. So, I machine polished the whole car (except the bonnet, which has no clear left to polish). It's bloody shiny now. A good coating of wax, all the windows cleaned inside and out, and it was finally time to kick the car out of the garage.

In the natural light, after the polish and wax, the colour difference isn't actually too bad. You can notice it if you're looking, but otherwise you might dismiss it as a shadow or reflection. Its miles better than what was there, even without the rust the paint was a worse match and had no gloss or shine to it.


I wrote most of this post in advance, so today was WOF inspection day, and by some miracle (not really, its a beast), the mighty Corolla passed with only an advisory for surface rust on the fuel pipe under the car (which I will treat and protect). The inspector was very impressed with the car and had only good things to say.
So with another 6 months of motoring on the clock, it's time to open the wallet again and spend more money. Now its time for the expensive bits. With any luck, we should be ready for the first track day at the end of January.
Part 1
Ever since looking for a Corolla, the goal was that it HAD to be manual. Autos are lame, and no good for a fun weekend/track toy. With my car, I made the compromise of an auto based on availability and cost, but with the knowledge it would be manual swapped in the near future. Well, that time has come.
I've been squirrelling away parts for the swap since I got the car, and a couple of months ago the big bits fell into place. A C52 manual transmission, flywheel with near new clutch and various other bits I need.

During the Pick A Part run when I first got the car (the same time I got all the seats) We also pillaged a manual AE111 wagon there for the other major manual bits we would need like the shifter base with cables, master cylinder and pedals.
With everything finally falling into place I arranged a time to take up some space that Iain, the friend helping me with the swap, has at a lockup, as doing the swap there with ample space will be easier than in my garage.
We planned that with the two of us it should take two days, but we were realistic that if anything goes wrong it would be pushed out, and that was OK, but it had to be done by the end of the week.
The plan was to remove the engine and box complete. I had debated if this was the best way and came to the conclusion that it will be easiest to deal with the various bits we need to swap over (such as fitting the shifter cables which is a ballache with the engine in place), and if I choose to do the cambelt and waterpump at the same time this would be a lot easier than in the car. Having the engine out of the car means we wouldn't have to try deadlifting the gearbox up onto the engine from under the car and line it up. That's never fun.
[SIZE=5]Sunday[/SIZE]
The day before we were due to pull the engine out I had a list of jobs to do to prepare the car for the work. The main one was to strip all the interior dash trims out to gain access to the pedals and center console/shifter. Taking it out now means not having to do it at the lockup.
To remove the panels the first part that needs to go is the center console with armrest. This is held in with two 10mm bolts in the armrest storage area, and two screws on the side. Under this was festy (this is a word you will hear a lot when I'm talking about the interior of this car...). Much crumbs.

Next, the center stack needs to come out. To do this remove the three climate knobs, and the recirc slider and then remove the two screws behind the far knobs.

The center stack will just pull out after that. Its held in with some clips at the top so might take some pulling. Be aware there is some wiring going to the cigarette lighter socket, and that will need disconnecting.
This leaves you with the bare climate control and whatever is in the center area (a useless CD player and single DIN pocket in my case)

Now remove the contents of the center stack, usually a double din bin. There are four screws securing it. This reveals the ECU (and lots of festy as all hell mould from leaking drinks).


Next the glovebox needs to be removed. This is done by removing the small trim at the bottom of the A pillar that tucks under the kick panel. Behind that panel is a bolt, remove that, along with the screw in the opposite bottom corner of the glovebox panel and then the three screws along the top edge of the glovebox when open. The glovebox will pull free.
The other part to remove is the trim above the drivers legs. This is once again held with a bolt behind the little trim panel at the base of the A pillar and a bolt in the opposite corner. The top edge is held in by tabs. Behind this, there may be a steel plate, which I guess is some sort of impact protection thing, and this is held with three bolts.
Now you can remove the rest of the center console. Its held with two screws on the far left and right top corners (would've been behind the glovebox and knee panel). It clips in at the top too. To gain more access to the shift cable retaining plate under the dash I also remove the footrest; this is done with a good hard yank toward the rear of the car.

Feels a bit weird driving around in a car with only half a dash and no center console.
With the interior ready to go the only other work I needed to get done was to replace the axle seals on the gearbox, and replace the shift linkage bushes.
The axle seals are easy enough if you know what you're doing. First note is to take photos or make a note of how recessed the existing seals are. In my case, they were at the base of the chamfer, but I didn't take note of this when fitting the seals, instead hoping they would bottom out (they don't) and I ended up pressing them in too far.

This was a cockup that resulted in my wasting new genuine seals and having to fit aftermarket seals instead as removing them damages them. Removing the seals with the correct tool is easy enough though

To drive the new seals in, place the old seal over top and use a hammer on the old seal to drive the new seal into place. Take care it goes in straight, and to the correct depth. It also helps to lube the outside of the new seal to help it go in. Once the seals are in place slather the inside lips in rubber grease to reduce any risk of the axle tearing the seal when refitting.
The shifter linkage bushes were easier. Under the rubber cap is this nut. Remove it.

The linkage will then slide off. Take care of the lower slider as that can fall off, and the orientation of the rubber boot. There is a bush in the arm, and one in the rubber cap above the arm
The old ones weren't too bad, but they were running dry with no lubricant at all.

If your slider is plastic you can replace it, but in my case mine is metal so I cleaned and lubricated it before refitting. The slider is the bit in the centre of the photo. The new bushes got lightly lubricated before fitting too.
Refit the washer, nut and then the rubber cap

Job done. The car was loaded up with all the tools I thought I'd need (Needed more), all the various parts, and the next day it was driven to the lockup to begin work.
[SIZE=5]Monday[/SIZE]
I met up with Iain at the lockup, and backed the car in. After unloading, off came the bonnet and we looked at what we had to do. Iain had taken the time to write up a very comprehensive list, which we started ticking jobs off as we went.

Up on stands, and this is how it spent the majority of its time. Quickjack would have hindered us in this job as it would have restricted access to under the car, as I spent a lot of time with my legs sticking out the side.

With the car on stands, all the fluids got drained and the battery removed. Of course, the drain tap on the bottom of the cheap radiator isn't drilled through so doesn't act as a drain tap. We also cracked the hub nuts as this requires a lot of force and someone to stand on the brakes to do. They're torqued to 215NM, so quite tight.
It's interesting how dirty the auto trans fluid was too. I haven't checked it since I got the car, and the trans was shifting fine (for a late 90s 4 speed auto). The fluid was black and stank; well overdue for a service.
The wiring loom was disconnected from inside the car, and fed through the firewall. The body side of the fuse box was disconnected and the engine side was left to go with the engine. The radiator was removed, and all the coolant hoses disconnected from the engine and tucked aside. The heater side of the heater hoses can be hard to remove and risks deforming the pipes, thus we removed them from the engine instead.

This is the big lump we're aiming to scrap
Next the axles had to come out. These are a pain to remove as they have a spring clip inside the gearbox. One of the shafts is accessible from the top, with a long bar and a hammer to whack it free, the other is only accessible from underneath, which resulted in me under the car on my back beating the CV with a pry bar and hammer until it popped free. When hammering on the shaft there are notches in the CV cup that you can use without causing damage

Before we could hoist the engine out we had to sort one critical thing, the AC. I didn't want to degas the AC system, and since it worked really well we had to be careful to keep the system intact. We unbolted the compressor from the engine and lowered it down onto a jack. This moved it away from getting caught up but stopped it hanging on its own hoses.
The last thing to do before removing the engine was to disconnect the mounts. The Front and RH mounts are easy. The rear is a pain due to access but isn't impossible. Stack a bunch of long 1/2" extensions out through the RH wheel well and use a rattle gun on it to remove the through bolt; it has a captive nut.
It's a different story when it comes to the LH (transmission) mount. On the auto, Toyota has made it as hard as possible to reach all the fixings to get it free, because hey, why not eh? In the end it was a mixture of ratchet spanners and squeezing hands into spaces that are too small that got the bolts out.
With that done it was time to lift. A leveller is essential for this job, it's basically the only way you can get the engine in and out without smashing a whole bunch of other things in the engine bay. To get the engine in and out you need to tilt the trans hard down.

The poor engine crane was making some interesting noises lifting this lump. It's amazing how much heavier the auto and torque convertor is than the manual.
We finished the first day with the engine and auto out and on the ground ready to split.

Its a bit oily down here. Most of this is from the valve cover and distributor O-Ring that were leaking when I got the car. It must have been leaking for years.

Its also left a bit of a mess on the crossmember

So the plan for Tuesday was to do the things you don't want to do with the engine in the car, such as the master cylinder and shifter cables. We also needed to fit the pedals, and run the clutch hard lines on the firewall.
To be continued.
Ever since looking for a Corolla, the goal was that it HAD to be manual. Autos are lame, and no good for a fun weekend/track toy. With my car, I made the compromise of an auto based on availability and cost, but with the knowledge it would be manual swapped in the near future. Well, that time has come.
I've been squirrelling away parts for the swap since I got the car, and a couple of months ago the big bits fell into place. A C52 manual transmission, flywheel with near new clutch and various other bits I need.
During the Pick A Part run when I first got the car (the same time I got all the seats) We also pillaged a manual AE111 wagon there for the other major manual bits we would need like the shifter base with cables, master cylinder and pedals.
With everything finally falling into place I arranged a time to take up some space that Iain, the friend helping me with the swap, has at a lockup, as doing the swap there with ample space will be easier than in my garage.
We planned that with the two of us it should take two days, but we were realistic that if anything goes wrong it would be pushed out, and that was OK, but it had to be done by the end of the week.
The plan was to remove the engine and box complete. I had debated if this was the best way and came to the conclusion that it will be easiest to deal with the various bits we need to swap over (such as fitting the shifter cables which is a ballache with the engine in place), and if I choose to do the cambelt and waterpump at the same time this would be a lot easier than in the car. Having the engine out of the car means we wouldn't have to try deadlifting the gearbox up onto the engine from under the car and line it up. That's never fun.
[SIZE=5]Sunday[/SIZE]
The day before we were due to pull the engine out I had a list of jobs to do to prepare the car for the work. The main one was to strip all the interior dash trims out to gain access to the pedals and center console/shifter. Taking it out now means not having to do it at the lockup.
To remove the panels the first part that needs to go is the center console with armrest. This is held in with two 10mm bolts in the armrest storage area, and two screws on the side. Under this was festy (this is a word you will hear a lot when I'm talking about the interior of this car...). Much crumbs.
Next, the center stack needs to come out. To do this remove the three climate knobs, and the recirc slider and then remove the two screws behind the far knobs.
The center stack will just pull out after that. Its held in with some clips at the top so might take some pulling. Be aware there is some wiring going to the cigarette lighter socket, and that will need disconnecting.
This leaves you with the bare climate control and whatever is in the center area (a useless CD player and single DIN pocket in my case)
Now remove the contents of the center stack, usually a double din bin. There are four screws securing it. This reveals the ECU (and lots of festy as all hell mould from leaking drinks).
Next the glovebox needs to be removed. This is done by removing the small trim at the bottom of the A pillar that tucks under the kick panel. Behind that panel is a bolt, remove that, along with the screw in the opposite bottom corner of the glovebox panel and then the three screws along the top edge of the glovebox when open. The glovebox will pull free.
The other part to remove is the trim above the drivers legs. This is once again held with a bolt behind the little trim panel at the base of the A pillar and a bolt in the opposite corner. The top edge is held in by tabs. Behind this, there may be a steel plate, which I guess is some sort of impact protection thing, and this is held with three bolts.
Now you can remove the rest of the center console. Its held with two screws on the far left and right top corners (would've been behind the glovebox and knee panel). It clips in at the top too. To gain more access to the shift cable retaining plate under the dash I also remove the footrest; this is done with a good hard yank toward the rear of the car.
Feels a bit weird driving around in a car with only half a dash and no center console.
With the interior ready to go the only other work I needed to get done was to replace the axle seals on the gearbox, and replace the shift linkage bushes.
The axle seals are easy enough if you know what you're doing. First note is to take photos or make a note of how recessed the existing seals are. In my case, they were at the base of the chamfer, but I didn't take note of this when fitting the seals, instead hoping they would bottom out (they don't) and I ended up pressing them in too far.
This was a cockup that resulted in my wasting new genuine seals and having to fit aftermarket seals instead as removing them damages them. Removing the seals with the correct tool is easy enough though
To drive the new seals in, place the old seal over top and use a hammer on the old seal to drive the new seal into place. Take care it goes in straight, and to the correct depth. It also helps to lube the outside of the new seal to help it go in. Once the seals are in place slather the inside lips in rubber grease to reduce any risk of the axle tearing the seal when refitting.
The shifter linkage bushes were easier. Under the rubber cap is this nut. Remove it.
The linkage will then slide off. Take care of the lower slider as that can fall off, and the orientation of the rubber boot. There is a bush in the arm, and one in the rubber cap above the arm
The old ones weren't too bad, but they were running dry with no lubricant at all.
If your slider is plastic you can replace it, but in my case mine is metal so I cleaned and lubricated it before refitting. The slider is the bit in the centre of the photo. The new bushes got lightly lubricated before fitting too.
Refit the washer, nut and then the rubber cap
Job done. The car was loaded up with all the tools I thought I'd need (Needed more), all the various parts, and the next day it was driven to the lockup to begin work.
[SIZE=5]Monday[/SIZE]
I met up with Iain at the lockup, and backed the car in. After unloading, off came the bonnet and we looked at what we had to do. Iain had taken the time to write up a very comprehensive list, which we started ticking jobs off as we went.
Up on stands, and this is how it spent the majority of its time. Quickjack would have hindered us in this job as it would have restricted access to under the car, as I spent a lot of time with my legs sticking out the side.
With the car on stands, all the fluids got drained and the battery removed. Of course, the drain tap on the bottom of the cheap radiator isn't drilled through so doesn't act as a drain tap. We also cracked the hub nuts as this requires a lot of force and someone to stand on the brakes to do. They're torqued to 215NM, so quite tight.
It's interesting how dirty the auto trans fluid was too. I haven't checked it since I got the car, and the trans was shifting fine (for a late 90s 4 speed auto). The fluid was black and stank; well overdue for a service.
The wiring loom was disconnected from inside the car, and fed through the firewall. The body side of the fuse box was disconnected and the engine side was left to go with the engine. The radiator was removed, and all the coolant hoses disconnected from the engine and tucked aside. The heater side of the heater hoses can be hard to remove and risks deforming the pipes, thus we removed them from the engine instead.
This is the big lump we're aiming to scrap
Next the axles had to come out. These are a pain to remove as they have a spring clip inside the gearbox. One of the shafts is accessible from the top, with a long bar and a hammer to whack it free, the other is only accessible from underneath, which resulted in me under the car on my back beating the CV with a pry bar and hammer until it popped free. When hammering on the shaft there are notches in the CV cup that you can use without causing damage
Before we could hoist the engine out we had to sort one critical thing, the AC. I didn't want to degas the AC system, and since it worked really well we had to be careful to keep the system intact. We unbolted the compressor from the engine and lowered it down onto a jack. This moved it away from getting caught up but stopped it hanging on its own hoses.
The last thing to do before removing the engine was to disconnect the mounts. The Front and RH mounts are easy. The rear is a pain due to access but isn't impossible. Stack a bunch of long 1/2" extensions out through the RH wheel well and use a rattle gun on it to remove the through bolt; it has a captive nut.
It's a different story when it comes to the LH (transmission) mount. On the auto, Toyota has made it as hard as possible to reach all the fixings to get it free, because hey, why not eh? In the end it was a mixture of ratchet spanners and squeezing hands into spaces that are too small that got the bolts out.
With that done it was time to lift. A leveller is essential for this job, it's basically the only way you can get the engine in and out without smashing a whole bunch of other things in the engine bay. To get the engine in and out you need to tilt the trans hard down.
The poor engine crane was making some interesting noises lifting this lump. It's amazing how much heavier the auto and torque convertor is than the manual.
We finished the first day with the engine and auto out and on the ground ready to split.
Its a bit oily down here. Most of this is from the valve cover and distributor O-Ring that were leaking when I got the car. It must have been leaking for years.
Its also left a bit of a mess on the crossmember
So the plan for Tuesday was to do the things you don't want to do with the engine in the car, such as the master cylinder and shifter cables. We also needed to fit the pedals, and run the clutch hard lines on the firewall.
To be continued.
Part 2
After a long and eventful first day, it was time to get stuck into the manual part of manual converting.
[SIZE=5]Tuesday[/SIZE]
The first job of the day was to crack into cutting holes in the firewall for the clutch master cylinder. Toyota was kind enough to stamp the firewall for where it should be but wasn't nice enough to stamp where the holes should be. Dicks.
Using the gasket on the master as a template, the three holes we needed were marked out and center punched. Apparently, my center punching isn't so much "center" punching as just stabbing around in the dark, but hey, winnings winning. Next, the holes were drilled. The two small holes were done with a step drill, and the large hole was done with a hole saw. Note for future me, don't oversize the pilot hole for the holesaw or it just tries to bugger off all over the show.
Regardless the holes were drilled and test fitted. It was pretty close, and a small tweak with the Dremel on the edge of the big hole made it a bang on fit. Like a bought one.


With that done a rag was placed behind the holes and the edges were protected with some black Zinc paint.

Whilst we waited for the paint on that to dry we moved onto the next job. Pissing the auto shifter right the hell off. Horrible, festy thing. With the mounting bolts removed, and only a little skin removed from my hands undoing the cable retaining plate under the dash, it was out. A 10mm ratcheting spanner is a lifesaver for those retaining plates.

That meant we could feed the cables through for the manly shifter and mount that. Attaching the external retaining plate involved me sitting in the engine bay as it was easier to reach that way, and it wouldn't be the last time I was an engine. You can see why it would be a ballache with the engine in place. Much respect to Iain for pulling the cables out of the donor with the engine still in, that didn't look fun.
Looks like it was meant to be there all along. I may have sat in the car making car noises, shifting the unattached shifter...

Since the paint was about dry, now it was time to climb up under the dash again and replace the brake pedal with the smaller manual one and fit the clutch pedal.
This isn't a job I want to do again in a hurry. It kept fighting me the whole way, but in the end I got it sorted. No real tricks to this, but a cordless ratchet helps a lot, and don't forget the screws at the top of the pedals that go in vertically. If you forget these you end up with the whole lot floating around when you use them, as I had in the M328i
With the master cylinder in place, we could then fit the hard-line for the clutch. This runs from the master down to a bracket we had to add to the brake proportioning valve. This was the other time I had to sit in the engine bay as we couldn't get the bolts for the prop valve to line back up. In hindsight, I would say remove one bolt at a time, not both. You could also fit the clutch hose to the hard-line now too.
The last thing to do in the engine bay whilst the engine was out was to replace the fuel filter. Its tucked away down in the back corner and a bit of a pain to access. I'll tell you what, it's pretty easy to get to with the engine out. The old one is stamped 2001!

One tip when fitting the new one is to attach the inlet pipe on the bottom first, and then mount it to the bracket. If you mount it first it's hard to get the pipe to line up.
Now was the fun part, splitting the auto from the engine. We had the engine suspended from the crane, and used a plank across the legs of the crane to support the trans. Under the engine, pop out the little plastic cover and undo all the torque converter bolts. Now it's as simple as removing the starter and removing all the bolts that hold the engine and trans together. Be sure to disconnect and remove all the wiring off the trans, and then use a pry bar to split the two.

And send the auto to do what it does best; be a door stop against the howling Wellington wind.

The manual box is a hard single person lift. The auto box is a moderate two person lift. Its a lot bigger and quite a bit heavier.
With the auto off, the torque converter and flex plate were removed. There are a couple of spacers on the crank, neither of which are retained. The flywheel is offered up and the new bolts torqued to spec with some Loctite on the threads. A long prybar was used on the flywheel to counter hold for torquing.
By some stroke of luck, I happened to obtain a universal clutch alignment tool many years ago with some tubs of SD1 parts I purchased. Sure enough, it worked a treat. It's the style where you use it to center the clutch disc on the friction surface of the pressure plate and then attach the whole lot to the flywheel before removing the tool. If the disc is central on the pressure plate, and the pressure plate is centered on the flywheel, it should all line up. It worked perfectly the first time.

Then it was a matter of torquing the pressure plate bolts down, and fitting the gearbox.
Before fitting the box I had to fit the brand new clutch fork I ordered. The reason for me sourcing a new fork was that the previous one in the gearbox had cracked in a couple of places and been welded, so I chose to go with a nice new one. I ordered it based on a Corolla the gearbox would have come out of. When offering it up to the pivot point I noted it was quite loose and didn't "click" into the retaining springs as it should. We decided to proceed anyway, thinking that everything looked OK, maybe it would sort its self out.
It didn't, but thats tomorrows story.
We used a similar method to removing the auto to fit the manual box. Suspend engine by crane, tilt it slightly end down, and then manhandle the trans into place whilst trying to slip a long bolt into a hole to take the weight. Took a couple of tries but went together easy enough.

With the bolts all in and torqued to spec, Iain used his expertise to rewire the inhibitor and reverse light switches. The inhibitor switch usually stops you starting the car unless in Park or Neutral, so first we needed to fake the car into thinking it was in Neutral to start. This was done by joining the two big wires on the connector (Pins 2 and 3, Black and Black/White). Next was to join the manual reverse light switch on the box to the two wires from the inhibitor switch that would usually do that job (Pins 5 and 6, Red/Blue and Red/Black).

The rest of the redundant wires which would normally go to the indicator lights in the dash cluster (which my car never had) and OD solenoid were snipped back. Everything was soldered and heatshrinked nicely, and covered in corrugated loom. Sadly no photos of the completed job, but Iain did an outstanding job, looking like it was there from factory, and it all worked first time. You can spot it in some photos if you're keen.
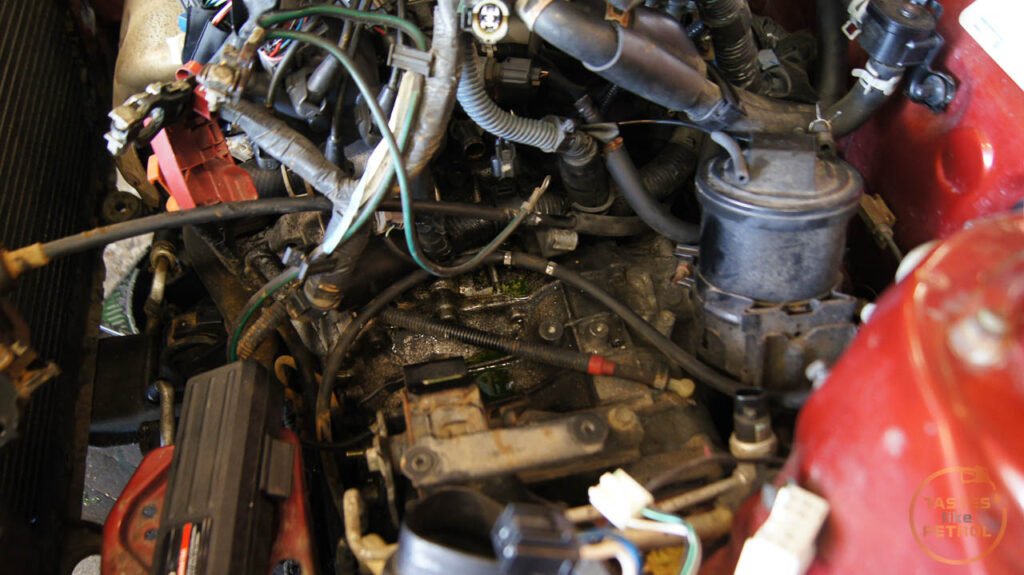
Before reinstalling the engine I took a look at the cambelt and waterpump. The belt had very little wear and the pump looked like it had been recently replaced. Everything looked so good we decided to leave it for now and just run it as it is. Despite its filth and looks, someone had looked after the basic maintenance at some point.
All that was left was to haul the engine and manual box back into the engine bay. This is where two people are a must, and a third would be handy. Trying to change the level of the engine, whilst pushing it around in the engine bay, checking it's not going to hit anything like the AC condenser, and still trying to control the engine crane, was a mission. It's doable though.
A couple of tips; First, make sure you put the right bolt through the rear mount. If you don't, it'll be a real b d to get the wrong bolt back out again and you will waste a bunch of time trying to line it all up again. Second, don't fit the LH trans mount until the engine is basically in the car. It's much easier to do is when the trans is where it needs to be, and use a ratchet spanner on the bolts in the side of the frame rail. You can also fit the plastic clip for the AC lines afterwards too which gives more room.

So thats that, the engine was in!

It was quite late by then, so we left it for the day. The first job for tomorrow is to plumb in, bleed the clutch to check it is OK (as I had this niggling feeling).
More soon.
After a long and eventful first day, it was time to get stuck into the manual part of manual converting.
[SIZE=5]Tuesday[/SIZE]
The first job of the day was to crack into cutting holes in the firewall for the clutch master cylinder. Toyota was kind enough to stamp the firewall for where it should be but wasn't nice enough to stamp where the holes should be. Dicks.
Using the gasket on the master as a template, the three holes we needed were marked out and center punched. Apparently, my center punching isn't so much "center" punching as just stabbing around in the dark, but hey, winnings winning. Next, the holes were drilled. The two small holes were done with a step drill, and the large hole was done with a hole saw. Note for future me, don't oversize the pilot hole for the holesaw or it just tries to bugger off all over the show.
Regardless the holes were drilled and test fitted. It was pretty close, and a small tweak with the Dremel on the edge of the big hole made it a bang on fit. Like a bought one.
With that done a rag was placed behind the holes and the edges were protected with some black Zinc paint.
Whilst we waited for the paint on that to dry we moved onto the next job. Pissing the auto shifter right the hell off. Horrible, festy thing. With the mounting bolts removed, and only a little skin removed from my hands undoing the cable retaining plate under the dash, it was out. A 10mm ratcheting spanner is a lifesaver for those retaining plates.
That meant we could feed the cables through for the manly shifter and mount that. Attaching the external retaining plate involved me sitting in the engine bay as it was easier to reach that way, and it wouldn't be the last time I was an engine. You can see why it would be a ballache with the engine in place. Much respect to Iain for pulling the cables out of the donor with the engine still in, that didn't look fun.
Looks like it was meant to be there all along. I may have sat in the car making car noises, shifting the unattached shifter...
Since the paint was about dry, now it was time to climb up under the dash again and replace the brake pedal with the smaller manual one and fit the clutch pedal.
This isn't a job I want to do again in a hurry. It kept fighting me the whole way, but in the end I got it sorted. No real tricks to this, but a cordless ratchet helps a lot, and don't forget the screws at the top of the pedals that go in vertically. If you forget these you end up with the whole lot floating around when you use them, as I had in the M328i
With the master cylinder in place, we could then fit the hard-line for the clutch. This runs from the master down to a bracket we had to add to the brake proportioning valve. This was the other time I had to sit in the engine bay as we couldn't get the bolts for the prop valve to line back up. In hindsight, I would say remove one bolt at a time, not both. You could also fit the clutch hose to the hard-line now too.
The last thing to do in the engine bay whilst the engine was out was to replace the fuel filter. Its tucked away down in the back corner and a bit of a pain to access. I'll tell you what, it's pretty easy to get to with the engine out. The old one is stamped 2001!
One tip when fitting the new one is to attach the inlet pipe on the bottom first, and then mount it to the bracket. If you mount it first it's hard to get the pipe to line up.
Now was the fun part, splitting the auto from the engine. We had the engine suspended from the crane, and used a plank across the legs of the crane to support the trans. Under the engine, pop out the little plastic cover and undo all the torque converter bolts. Now it's as simple as removing the starter and removing all the bolts that hold the engine and trans together. Be sure to disconnect and remove all the wiring off the trans, and then use a pry bar to split the two.
And send the auto to do what it does best; be a door stop against the howling Wellington wind.
The manual box is a hard single person lift. The auto box is a moderate two person lift. Its a lot bigger and quite a bit heavier.
With the auto off, the torque converter and flex plate were removed. There are a couple of spacers on the crank, neither of which are retained. The flywheel is offered up and the new bolts torqued to spec with some Loctite on the threads. A long prybar was used on the flywheel to counter hold for torquing.
By some stroke of luck, I happened to obtain a universal clutch alignment tool many years ago with some tubs of SD1 parts I purchased. Sure enough, it worked a treat. It's the style where you use it to center the clutch disc on the friction surface of the pressure plate and then attach the whole lot to the flywheel before removing the tool. If the disc is central on the pressure plate, and the pressure plate is centered on the flywheel, it should all line up. It worked perfectly the first time.
Then it was a matter of torquing the pressure plate bolts down, and fitting the gearbox.
Before fitting the box I had to fit the brand new clutch fork I ordered. The reason for me sourcing a new fork was that the previous one in the gearbox had cracked in a couple of places and been welded, so I chose to go with a nice new one. I ordered it based on a Corolla the gearbox would have come out of. When offering it up to the pivot point I noted it was quite loose and didn't "click" into the retaining springs as it should. We decided to proceed anyway, thinking that everything looked OK, maybe it would sort its self out.
It didn't, but thats tomorrows story.
We used a similar method to removing the auto to fit the manual box. Suspend engine by crane, tilt it slightly end down, and then manhandle the trans into place whilst trying to slip a long bolt into a hole to take the weight. Took a couple of tries but went together easy enough.
With the bolts all in and torqued to spec, Iain used his expertise to rewire the inhibitor and reverse light switches. The inhibitor switch usually stops you starting the car unless in Park or Neutral, so first we needed to fake the car into thinking it was in Neutral to start. This was done by joining the two big wires on the connector (Pins 2 and 3, Black and Black/White). Next was to join the manual reverse light switch on the box to the two wires from the inhibitor switch that would usually do that job (Pins 5 and 6, Red/Blue and Red/Black).
The rest of the redundant wires which would normally go to the indicator lights in the dash cluster (which my car never had) and OD solenoid were snipped back. Everything was soldered and heatshrinked nicely, and covered in corrugated loom. Sadly no photos of the completed job, but Iain did an outstanding job, looking like it was there from factory, and it all worked first time. You can spot it in some photos if you're keen.
Before reinstalling the engine I took a look at the cambelt and waterpump. The belt had very little wear and the pump looked like it had been recently replaced. Everything looked so good we decided to leave it for now and just run it as it is. Despite its filth and looks, someone had looked after the basic maintenance at some point.
All that was left was to haul the engine and manual box back into the engine bay. This is where two people are a must, and a third would be handy. Trying to change the level of the engine, whilst pushing it around in the engine bay, checking it's not going to hit anything like the AC condenser, and still trying to control the engine crane, was a mission. It's doable though.
A couple of tips; First, make sure you put the right bolt through the rear mount. If you don't, it'll be a real b
d to get the wrong bolt back out again and you will waste a bunch of time trying to line it all up again. Second, don't fit the LH trans mount until the engine is basically in the car. It's much easier to do is when the trans is where it needs to be, and use a ratchet spanner on the bolts in the side of the frame rail. You can also fit the plastic clip for the AC lines afterwards too which gives more room.So thats that, the engine was in!
It was quite late by then, so we left it for the day. The first job for tomorrow is to plumb in, bleed the clutch to check it is OK (as I had this niggling feeling).
More soon.
My mother had one for quite some time- a 1600cc one- maybe a 98 model ?
at the age of about 83 ish she suddenly decided to trade it in for a new car (higher seating I think to be fair)- but you should have seen the car- it had 140k miles in it and it was showroom mint. garaged and pampered its entire life. I don't even think anyone had ever sat in the rear.
it had never even had the faceoff stereo placed in it, as she doesn't like to be distracted. annoyingly she never told me, so the dealer stitched her up good and proper on the trade in. someone would have got a gem of a car for very little money as a run around.
no rust though like yours.
I had some concerns about the clutch, so day three was started with us plumbing it in and bleeding it.
[SIZE=5]Wednesday[/SIZE]
We were over time now, but were fairly confident that this would be the last day and we should have it ready to go by the end of the day. Oh how fickle Murphy can be.
The flexi was plumbed into the clutch system and the reservoir filled with brake fluid. We bled the system until no air was coming out, but the clutch pedal felt really weird (very soft with no feel) and there wasn't a huge amount of movement at the fork when the pedal was pressed. The fork was also loose as anything and moved a lot by hand. Something wasn't right. It looked like the pivot "mushroom" was too small for the fork as it just flopping about.
We decided to head to Pick A Part on a research mission. We checked the various cars there with the same gearbox and came to the conclusion that our mushroom was definitely too small.
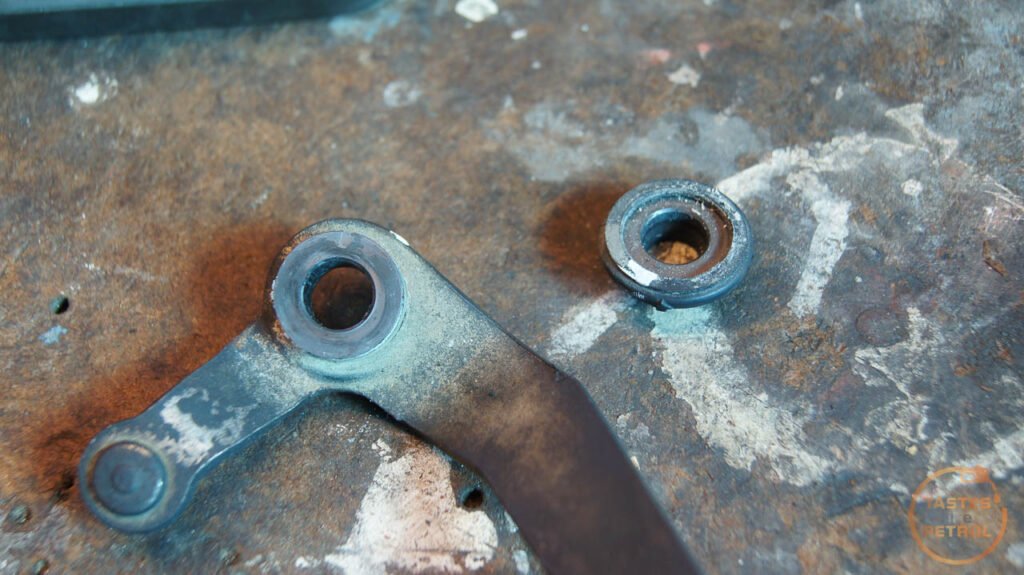
Here is a photo of one from PAP. Note how you can just see the underside of the head, how thick the shaft is and how big the hex is in relation to the boss it screws into. The spring also sits against the shaft just under the head.

Now mine. See how much smaller it is in almost all directions. The spring is miles away from touching it, and you cant see the head at all. No Bueno.

Iain made a quick call to a local wrecker he has had good luck with before (Wellington Toyota Dismantlers in Wainuiomata), and we were very lucky that they agreed to sell us a fork and pivot. They don't normally split them from boxes, so they really saved our arse.
After a "quick" drive to Wainui to pick the parts up, we went back and started the process of removing the engine again. Thankfully because we tested the clutch first there wasn't a lot else we needed to remove.

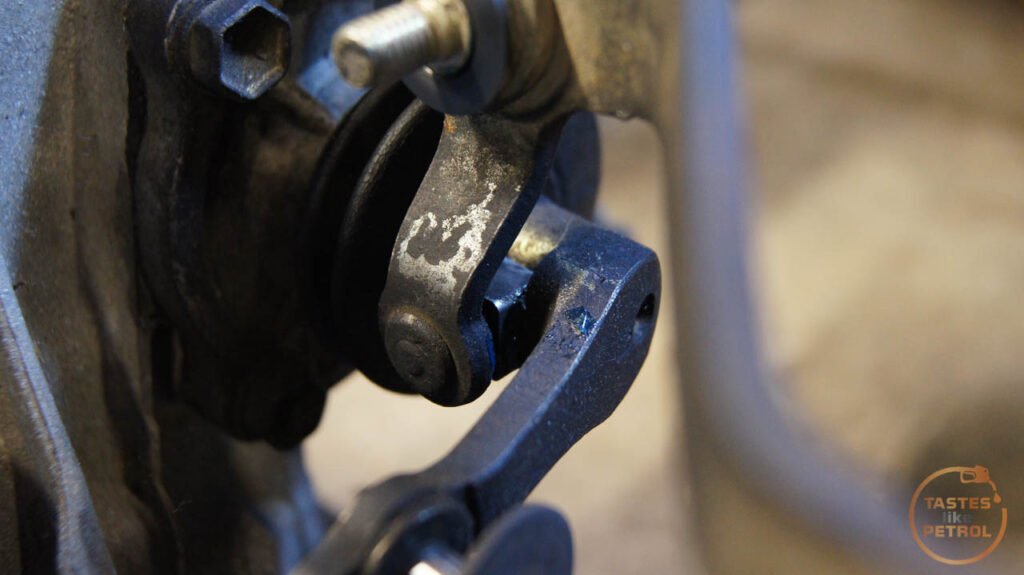
We split the box from the engine again, and this is how different the two pivots are


Its a straight replacement, and the fork now "clicks" into place on the springs. Everything was cleaned and greased, and the new fork was installed with the replacement pivot.
And hey, its back in the bay again. It took us a couple of hours to pull the engine, split box, investigate and swap the pivots, install gearbox and reinstall into car. Not bad.

With the engine back in the car again we once again hooked up and bled the clutch. This time we had a positive clutch feel and movement at the fork. The fork now has little to no play. Big difference.
Since everything was going well, we proceeded with installing the axles, shifter cables and all the various bits we disconnected.
For the first time in a couple of days we were on the ground again

So much room for activites

Makes filling the gearbox easy

But eventually, the radiator had to be refitted, but you knew it was serious because the last thing I did this day was to refit my nice valve cover. I removed it initially so it wouldn't get scratched or marked.

And that was it for Wednesday. Thursday was going to be a good day.
[SIZE=5]Thursday[/SIZE]
With only a few more things to connect up, and a couple more fluids to pour in, it was almost time to see if the car would even start.

We plugged it all back in, I checked the gearbox was in neutral and turned the key. Sure enough, the engine spun over. Win! The inhibitor wiring was good! Better than that, the reverse lights even worked. A+ work by Iain.
So that's it, all that was left was to fire it up, run it up to temp and bleed the coolant out, which is exactly what we did. Whilst it was warming up, it even passed the "will it go back and forward" test.
After what seemed like an eternity of waiting for the thermostat to open and the fan to come on, it moved under its own power.

Corolla squad!
I cannot confirm, but it may have been driven on a (private) road with no bonnet. Its a weird view, seeing the back of the headlights

A quick check the fluids were still where they should be, and the bonnet went back on.
With everything cleaned up, all the tools packed in the boot, we set off for my place in a Corolla convoy (had to get the Honda home somehow, since it's been my workhorse during this work).
[SIZE=5]Friday[/SIZE]
That brings us to today.
A couple of little niggles have shown themselves. Nothing major, but the shift base is worn and hard to find gears (it came from a car with over 260,000km on the clock), and there are some subtle noises that seem new. I also need to reassemble the interior.
Before I can reassemble the interior I needed to replace the shifter base. From a quick check at Pick A Part most seem to have quite a bit of play in the main pivot, but one of the cars I've been pillaging for parts (a bugeye like mine) has only 160k on the clock and the shifter base was nice and tight, so I grabbed that, along with a good score of a nice near new, current model, Pioneer Bluetooth headunit for a significant discount.
I couldn't fit any of the interior bits back in without cleaning them. They were all festy as hell, with sticky slimy goop everywhere. Maybe skip this section is you have a weak stomach.

Simple green does a pretty good job of cleaning it off, but ugh, people are gross

The cupholder in particular was pretty bad. It was the source of a lot of this muck. They must have spilled a lot of drinks over the years.


These were really sticky and hard to use. They didn't so much pop out as just sorta grind their way into place. the cup holder can be removed from the bottom piece with the spring by levering the tabs out

Everything was like this though. Glovebox, center console, center stack, knee panel. Everything needed a damn good clean. I know it triggered some people that have read my earlier posts seeing how festy the center stack was.

The cup holders now work nicely, and with a little grease on the rails, they slide smoothly with a defined pop when pressed.
With all that cleaning out of the way it was time to reassemble.
I noticed that the climate controls had a couple of little bulbs. I wonder if they work, I asked myself. No, they didn't. I popped a new bulb in to test

So I transferred the little green condoms over, and bam, climate lights

The ashtray light was also blown, so I replaced that with an LED since it goes through a green filter and doesn't have a condom on it. I would have LED'd the climate too but I didn't have green LEDs.
Now it's just a matter of reinstalling everything opposite to how it came out. One exception is the center bin, which is replacing the CD player. I swapped the brackets over, gave it a clean and fitted it.


The cleaned climate trim went on. This also had a lot of gunk on it previously.

And the new headunit installed. It's still not a high-end unit, but its much better sound quality than the previous one. The sound quality is so much better that it's now showing how bad the speakers are. Check out that lit up climate control too. Flash.

Cup holders and center bin.

And the main attraction. 5 Speeds of fury.

With the interior now all back together, I couldn't help but take the car for a decent fang around some local back roads. I can now conclude that having more control over the engine means I can out drive the brakes and suspension. Guess. I need to hurry up with the next lot of mods then.


So that's the manual conversion done. The difference is huge. The car is more responsive, happier to rev and a lot more flexible in how you drive it. Looking at the height of the front now too I guess its taken a decent amount of weight off the front axle.
A HUGE thanks to Iain for taking the time to help with this swap, and for letting me use his lockup space. I couldn't have done this without his help, but to be fair he's the reason I had Corolla on the mind in the first place. Also, thanks to everyone else that has supported me with this car, even if it's just a like on social media or a comment on a forum, it all matters.
Now to plan the timeline for the next mods. I have everything I need, it's just a matter of getting it done.
[SIZE=5]Wednesday[/SIZE]
We were over time now, but were fairly confident that this would be the last day and we should have it ready to go by the end of the day. Oh how fickle Murphy can be.
The flexi was plumbed into the clutch system and the reservoir filled with brake fluid. We bled the system until no air was coming out, but the clutch pedal felt really weird (very soft with no feel) and there wasn't a huge amount of movement at the fork when the pedal was pressed. The fork was also loose as anything and moved a lot by hand. Something wasn't right. It looked like the pivot "mushroom" was too small for the fork as it just flopping about.
We decided to head to Pick A Part on a research mission. We checked the various cars there with the same gearbox and came to the conclusion that our mushroom was definitely too small.
Here is a photo of one from PAP. Note how you can just see the underside of the head, how thick the shaft is and how big the hex is in relation to the boss it screws into. The spring also sits against the shaft just under the head.
Now mine. See how much smaller it is in almost all directions. The spring is miles away from touching it, and you cant see the head at all. No Bueno.
Iain made a quick call to a local wrecker he has had good luck with before (Wellington Toyota Dismantlers in Wainuiomata), and we were very lucky that they agreed to sell us a fork and pivot. They don't normally split them from boxes, so they really saved our arse.
After a "quick" drive to Wainui to pick the parts up, we went back and started the process of removing the engine again. Thankfully because we tested the clutch first there wasn't a lot else we needed to remove.
We split the box from the engine again, and this is how different the two pivots are
Its a straight replacement, and the fork now "clicks" into place on the springs. Everything was cleaned and greased, and the new fork was installed with the replacement pivot.
And hey, its back in the bay again. It took us a couple of hours to pull the engine, split box, investigate and swap the pivots, install gearbox and reinstall into car. Not bad.
With the engine back in the car again we once again hooked up and bled the clutch. This time we had a positive clutch feel and movement at the fork. The fork now has little to no play. Big difference.
Since everything was going well, we proceeded with installing the axles, shifter cables and all the various bits we disconnected.
For the first time in a couple of days we were on the ground again
So much room for activites
Makes filling the gearbox easy
But eventually, the radiator had to be refitted, but you knew it was serious because the last thing I did this day was to refit my nice valve cover. I removed it initially so it wouldn't get scratched or marked.
And that was it for Wednesday. Thursday was going to be a good day.
[SIZE=5]Thursday[/SIZE]
With only a few more things to connect up, and a couple more fluids to pour in, it was almost time to see if the car would even start.
We plugged it all back in, I checked the gearbox was in neutral and turned the key. Sure enough, the engine spun over. Win! The inhibitor wiring was good! Better than that, the reverse lights even worked. A+ work by Iain.
So that's it, all that was left was to fire it up, run it up to temp and bleed the coolant out, which is exactly what we did. Whilst it was warming up, it even passed the "will it go back and forward" test.
After what seemed like an eternity of waiting for the thermostat to open and the fan to come on, it moved under its own power.
Corolla squad!
I cannot confirm, but it may have been driven on a (private) road with no bonnet. Its a weird view, seeing the back of the headlights
A quick check the fluids were still where they should be, and the bonnet went back on.
With everything cleaned up, all the tools packed in the boot, we set off for my place in a Corolla convoy (had to get the Honda home somehow, since it's been my workhorse during this work).
[SIZE=5]Friday[/SIZE]
That brings us to today.
A couple of little niggles have shown themselves. Nothing major, but the shift base is worn and hard to find gears (it came from a car with over 260,000km on the clock), and there are some subtle noises that seem new. I also need to reassemble the interior.
Before I can reassemble the interior I needed to replace the shifter base. From a quick check at Pick A Part most seem to have quite a bit of play in the main pivot, but one of the cars I've been pillaging for parts (a bugeye like mine) has only 160k on the clock and the shifter base was nice and tight, so I grabbed that, along with a good score of a nice near new, current model, Pioneer Bluetooth headunit for a significant discount.
I couldn't fit any of the interior bits back in without cleaning them. They were all festy as hell, with sticky slimy goop everywhere. Maybe skip this section is you have a weak stomach.
Simple green does a pretty good job of cleaning it off, but ugh, people are gross
The cupholder in particular was pretty bad. It was the source of a lot of this muck. They must have spilled a lot of drinks over the years.
These were really sticky and hard to use. They didn't so much pop out as just sorta grind their way into place. the cup holder can be removed from the bottom piece with the spring by levering the tabs out
Everything was like this though. Glovebox, center console, center stack, knee panel. Everything needed a damn good clean. I know it triggered some people that have read my earlier posts seeing how festy the center stack was.
The cup holders now work nicely, and with a little grease on the rails, they slide smoothly with a defined pop when pressed.
With all that cleaning out of the way it was time to reassemble.
I noticed that the climate controls had a couple of little bulbs. I wonder if they work, I asked myself. No, they didn't. I popped a new bulb in to test
So I transferred the little green condoms over, and bam, climate lights
The ashtray light was also blown, so I replaced that with an LED since it goes through a green filter and doesn't have a condom on it. I would have LED'd the climate too but I didn't have green LEDs.
Now it's just a matter of reinstalling everything opposite to how it came out. One exception is the center bin, which is replacing the CD player. I swapped the brackets over, gave it a clean and fitted it.
The cleaned climate trim went on. This also had a lot of gunk on it previously.
And the new headunit installed. It's still not a high-end unit, but its much better sound quality than the previous one. The sound quality is so much better that it's now showing how bad the speakers are. Check out that lit up climate control too. Flash.
Cup holders and center bin.
And the main attraction. 5 Speeds of fury.
With the interior now all back together, I couldn't help but take the car for a decent fang around some local back roads. I can now conclude that having more control over the engine means I can out drive the brakes and suspension. Guess. I need to hurry up with the next lot of mods then.
So that's the manual conversion done. The difference is huge. The car is more responsive, happier to rev and a lot more flexible in how you drive it. Looking at the height of the front now too I guess its taken a decent amount of weight off the front axle.
A HUGE thanks to Iain for taking the time to help with this swap, and for letting me use his lockup space. I couldn't have done this without his help, but to be fair he's the reason I had Corolla on the mind in the first place. Also, thanks to everyone else that has supported me with this car, even if it's just a like on social media or a comment on a forum, it all matters.
Now to plan the timeline for the next mods. I have everything I need, it's just a matter of getting it done.
NGRhodes said:
Good effort there.
Did you consider an engine swap at the same time (like a 1.6 or 1.8 VVTi) ?
Of course, the only two logical options were the Blacktop 4AGE, or 2ZZGE, but that's not the point in the car at the moment. For now I'm happy with the current engine, I just need it to stop and handle better, so that's where the focus is. I prefer to drive a slow car fast, than a fast car slow.Did you consider an engine swap at the same time (like a 1.6 or 1.8 VVTi) ?
Maybe if I hold onto the car long enough and really bond with it it might be worth the cost for an engine swap, but at the moment the car already owes me far more than I could get back, as it is.
KelvinatorNZ said:
Everything was like this though. Glovebox, center console, center stack, knee panel. Everything needed a damn good clean. I know it triggered some people that have read my earlier posts seeing how festy the center stack was.
Thank you so much for those photos. It's made me feel a lot better. 
Great to see the progress.
Out of interest for a old shed , how much extra in time and money have you spent over the initial purchase price ?
To me it seems you'd have been better of buying a better condition manual one if you look at your time as say $30 an hour, not to mention the parts spend, although, you wouldn't have had the fun in the process
To me it seems you'd have been better of buying a better condition manual one if you look at your time as say $30 an hour, not to mention the parts spend, although, you wouldn't have had the fun in the process
Gassing Station | Readers' Cars | Top of Page | What's New | My Stuff