Pembleton mkII - Tin Tub
Discussion


Some progress tonight, but bot a huge amount to show.
I've drilled off the holes for the handbrake mechanism, and modified the ratchet bracket to include 4x M8 Rivnuts to allow for easier fitment/removal without worrying about dropping nuts/washers.
I also bolted in the pedalbox and refitted the rear spring, cup and pull rod.
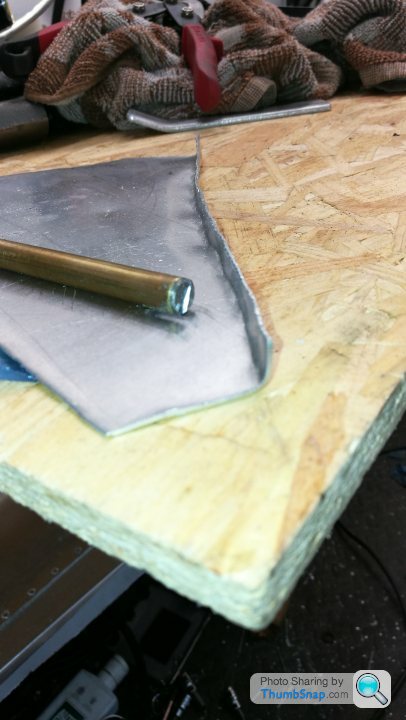
Most if this evening was spent experimenting and making tools though. One job that's looming is making a pair of seats. Most people buy seats, or modify some existing ones.
Never one to do things the easiest way, I'm going to (try to) make a pair of aluminium bucket seats, shaped specifically to match the back shape of the pembleton
To make them strong the bases and backs will have swaged holes in them, and the edges will be wired. With the lack of a bead roller, this will have to be done by hand, so I've been making a few tools and practicing tonight using some scrap bits of aluminium that were laying around on the floor all beat up.
Not bad for a first attempt!

I've drilled off the holes for the handbrake mechanism, and modified the ratchet bracket to include 4x M8 Rivnuts to allow for easier fitment/removal without worrying about dropping nuts/washers.
I also bolted in the pedalbox and refitted the rear spring, cup and pull rod.
Most if this evening was spent experimenting and making tools though. One job that's looming is making a pair of seats. Most people buy seats, or modify some existing ones.
Never one to do things the easiest way, I'm going to (try to) make a pair of aluminium bucket seats, shaped specifically to match the back shape of the pembleton
To make them strong the bases and backs will have swaged holes in them, and the edges will be wired. With the lack of a bead roller, this will have to be done by hand, so I've been making a few tools and practicing tonight using some scrap bits of aluminium that were laying around on the floor all beat up.
Not bad for a first attempt!

Scrump said:
Thanks for find the time to keep posting.
I am enjoying the thread and admire your skill.

Thanks for your kind words!I am enjoying the thread and admire your skill.
Until a few weeks ago I'd never bent a bit if metal in anger, or beat it with a hammer. Everything I do I'm learning as I go, either from inline pictures, how tos or tutorials.
If I can do it anyone can! Given the right aptitude and a bit if practice.
Doofus said:
That reminds me. What are you doing with the wheels and the motor from Victoria? 
They're currently clogging up the garage.I have the engine, plus a spare complete engine and a spare engine in bits, multiple carbs (solex and at least 2 pairs of keihin), inlet manifolds to suit both types of carbs, 2 wheels and tyres (virtually new), mudguards to suit the 2cv wheels, multiple 2cv alternators and loads of other odds and ends...
What'ya thunkin'?


Retroguy said:
One of my problems is indecision.... For example, I'm not sure whether to go short or long wheelbase (am just over 6ft, medium build) and can't make up my mind on original or wire wheels.
Retroguy - I replied to your PM on the email address included in your message. Have you seen it? 
Another reasonably productive evening in the garage!
I had another little go at wiring an edge tonight and documented the whole process in case anyone is interested or can provide any hints n tips.
With a 10mm slot cut in a short length of bar, I nibbled around the edge. About 4 or 5 passes to get it to 90degrees.
I then used a dolly and hammer to knock it over to maybe 130 degrees.

Then a 5mm kinked bit of plate with a rounded end takes it to 180degs.

Then inserted the wire and staked at the end, then knocked along the length to contain it.


I also got the rear wheel on tonight, which meant I could finally position the rear wheel housing. Once it was bonded and riveted in place I went underneath and bashed the lip up against the skin and sealed it with tigerseal all along the seams... I may have gone a bit mad...


I also modified and fitted the gearbox mount. With captain hindsight to the rescue I realise I should've done this before fixing the front bulkhead in place. It's tight... too tight... its very tight on Victoria, and I don't like it...


There's only one thing for it... make a recess panel and cut out part of the bulkhead...
CAD (cardboard aided design) to the rescue and I soon had a pattern for a blister...
All cut out and folded up I offered it up to the bulkhead and marked for surgery...

Cutting it out in situ was an absolute see you next tuesday of a job, but I had no choice...

And clecod in place! Much happier now and once fully bonded and riveted in will make the front bulkhead stiffer anyway... plus gives plenty of room for getting a spanner on the gearbox mounts (it'll move around a bit anyway whilst driving)


I had another little go at wiring an edge tonight and documented the whole process in case anyone is interested or can provide any hints n tips.
With a 10mm slot cut in a short length of bar, I nibbled around the edge. About 4 or 5 passes to get it to 90degrees.
I then used a dolly and hammer to knock it over to maybe 130 degrees.
Then a 5mm kinked bit of plate with a rounded end takes it to 180degs.
Then inserted the wire and staked at the end, then knocked along the length to contain it.
I also got the rear wheel on tonight, which meant I could finally position the rear wheel housing. Once it was bonded and riveted in place I went underneath and bashed the lip up against the skin and sealed it with tigerseal all along the seams... I may have gone a bit mad...
I also modified and fitted the gearbox mount. With captain hindsight to the rescue I realise I should've done this before fixing the front bulkhead in place. It's tight... too tight... its very tight on Victoria, and I don't like it...
There's only one thing for it... make a recess panel and cut out part of the bulkhead...
CAD (cardboard aided design) to the rescue and I soon had a pattern for a blister...
All cut out and folded up I offered it up to the bulkhead and marked for surgery...
Cutting it out in situ was an absolute see you next tuesday of a job, but I had no choice...
And clecod in place! Much happier now and once fully bonded and riveted in will make the front bulkhead stiffer anyway... plus gives plenty of room for getting a spanner on the gearbox mounts (it'll move around a bit anyway whilst driving)
choogh said:
Excellent work, and development, that modification should be incorporated within. PMC design for new builds.
Great blog.
Charlie
Thanks for your kind words. There's lots about the standard build that I'm not super happy with, which is one of the reasons I'm building this one.Great blog.
Charlie
I want this one to be a keeper, and an hour or two spent getting these things right now will pay dividends in the future. I can imagine myself in 5 years changing that gearbox mount and using many expletives without the extra room I've just created. It should make it a doddle now.
Not a huge amount to update. I tidied the front end of the garage on sunday and reorganised a bit.
The offside suspension is now all fitted along with the drive shafts, hubs and wheels adaptors. Next up is the wheels! Then she'll be rolling!
A development that I did not foresee, is that (apparently) Ami tie rods are shorter than 2cv ones. I only found out because I fitted my freshly restored ami tie rods with the new ball joint conversion and they didn't fit!
At first I assumed that the ball joint conversion kit was wrong. I removed and refitted them (just to make sure, almost in the hope that they'd suddenly fit). No matter what I did the hubs pointed out, even with only a few threads engaged.... surely this cant be right...
I remembered that i had a spare pair of 2cv tie rods and steering arms tucked away in the corner of the garage. Old, rusted and covered in s te.
te.
I dragged them out, cracked off the nuts and removed the adjusters and arms. A side-side comparison shows that the 2cv tie rods are about 45mm longer than the Ami rods....
I've cleaned them up on the wire wheel and wiped them down and they currently in the garage after their first coat of paint. I'm just glad I had some 2cv ones knocking about!

I also wiped down the rear deck/wheel housing with a light spray of cleaner and a soft brillo pad. Its taken the shine off and left a nice uniform brushed type finish... I quite like it so I may do the bodywork like this... keeping it polished is a total PITA.

The offside suspension is now all fitted along with the drive shafts, hubs and wheels adaptors. Next up is the wheels! Then she'll be rolling!
A development that I did not foresee, is that (apparently) Ami tie rods are shorter than 2cv ones. I only found out because I fitted my freshly restored ami tie rods with the new ball joint conversion and they didn't fit!
At first I assumed that the ball joint conversion kit was wrong. I removed and refitted them (just to make sure, almost in the hope that they'd suddenly fit). No matter what I did the hubs pointed out, even with only a few threads engaged.... surely this cant be right...
I remembered that i had a spare pair of 2cv tie rods and steering arms tucked away in the corner of the garage. Old, rusted and covered in s
te. I dragged them out, cracked off the nuts and removed the adjusters and arms. A side-side comparison shows that the 2cv tie rods are about 45mm longer than the Ami rods....
I've cleaned them up on the wire wheel and wiped them down and they currently in the garage after their first coat of paint. I'm just glad I had some 2cv ones knocking about!
I also wiped down the rear deck/wheel housing with a light spray of cleaner and a soft brillo pad. Its taken the shine off and left a nice uniform brushed type finish... I quite like it so I may do the bodywork like this... keeping it polished is a total PITA.
Pothole said:
I've just noticed you mentioned using Sikaflex up there somewhere...before this job I was temping at JLR Solihull in the Body in White shed on the production line of the new (then) XE. Us temps used to squirt this incredibly sticky stuff all day long on all sorts of brackets and body parts...if it's good enough for them, it'll probably do you, eh?
Indeed! It was used at Princess yachts too (when I was there) for bonding various bits together, windows, frames, trims etc. There's about a dozen different grades available though so who knows what type it used at JLR/princess. I'm using 552, which is a flexible structural adhesive (in addition to the rivets obviously). Comparison chart here:
https://www.jamestowndistributors.com/userportal/d...


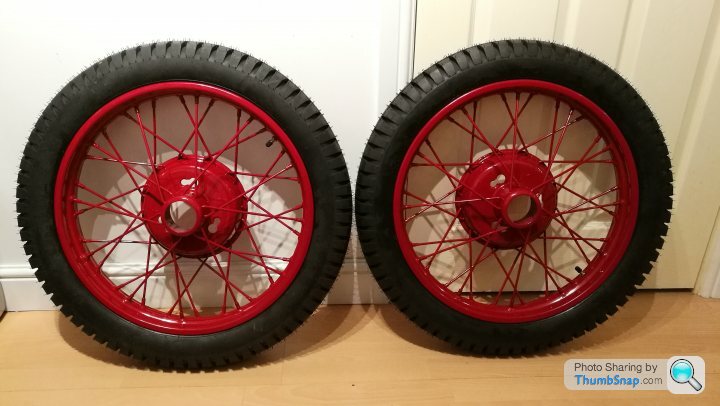
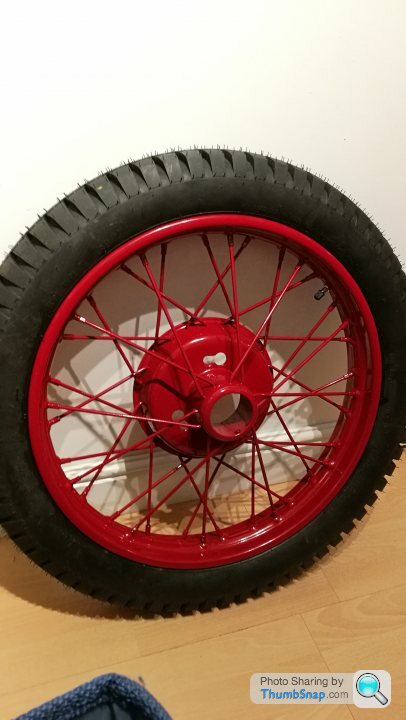
Thanks schmeeky, when I picked them up they were a bit brighter than I wanted. I thought they were going to be more maroon/wine, but I really like them now as the blood red. I think classier than the pillar box red wheels on Victoria.
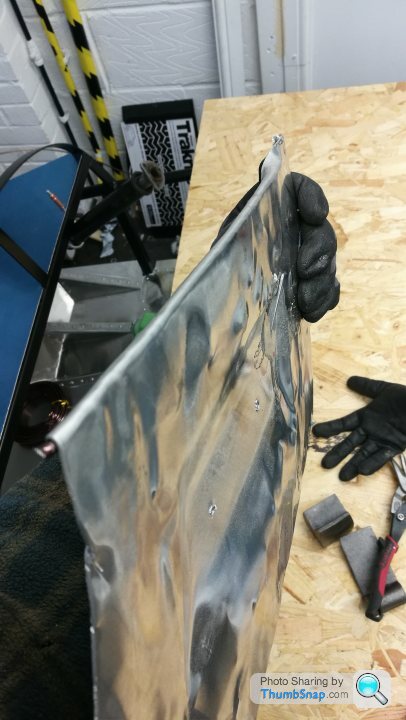
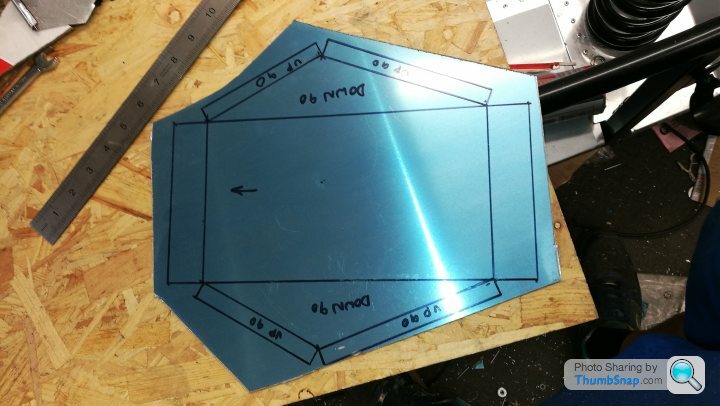
I had today off work so thought id have a go at making a seat...


I had today off work so thought id have a go at making a seat...
Thanks guys, I'm quite pleased with how its turning out.
Another day off work (holiday) another day in the garage
I finished wire beading the edge today. Same technique as used on my test pieces, but with the addition of pliers to finnish wrapping round. This does damage the surface of the aluminium slightly, but once tickled with some sandpaper comes up okay.
Wire inserted and staked every 4" or so.

Then I worked around.

Finished, tidied and wiped down with an abrasive pad.


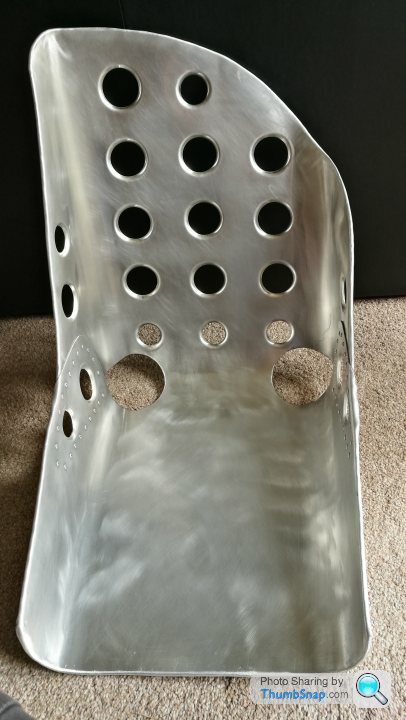

If you're wondering why it looks like there's a dink in the upper left side/back that's because there is... to clear the upper chassis rail as it wraps around.
Another day off work (holiday) another day in the garage
I finished wire beading the edge today. Same technique as used on my test pieces, but with the addition of pliers to finnish wrapping round. This does damage the surface of the aluminium slightly, but once tickled with some sandpaper comes up okay.
Wire inserted and staked every 4" or so.
Then I worked around.
Finished, tidied and wiped down with an abrasive pad.
If you're wondering why it looks like there's a dink in the upper left side/back that's because there is... to clear the upper chassis rail as it wraps around.
Astacus said:
You can’t be far off that point where you can actually sit in it with the steering wheel attached and make “broom broom” noises 
I've already (sort of) done that.I say on the floor, with steering wheel in hand (not attached).
We are another step closer though! I've welded the QR to my steering column. I did 4x8mm plug welds and then seamed along the perimeter at the top. The actual QR is quite tight to the weld on boss, so I had to linish the welds back.


Pro tip - when you're using power tools use the correct PPE. I usually laugh in the face of health and safety (safety third) but I learnt the hard way today.
I was there, angle grinding away (with the guard removed - obviously) and it snagged on my workpiece and ran away from me.... over the knuckles of three of my fingers on my left hand...
My ring finger took the brunt of the damage, and I wont show any detailed images of that, but yeah...
My fingers are all still attached but it could've been much worse, boy are they throbbing now! After about half an hour under the cold tap, then washed, then about another half hour of pressure it stopped gushing with blood and I made a classic garage bandage and went back to work.
ivanhoew said:
Makes me cringe whenever i see someone using an angle grinder with the shield taken off . ..i recently had to notch my crank on the rear engine to key the hub on there to stop it spinning , and to get clearance i had to take off the shield ,i think i magically made my arms twice as long to try to be out of the potential flight path .
Yeah, I only took it off because I accidentally bought a whole load of disks cheap that were the next size up and wouldn't quite fit under the guard... Gassing Station | Readers' Cars | Top of Page | What's New | My Stuff