BMW 330CI E46 Build thread
Discussion


d_a_n1979 said:
Some serious work in this car Tom; bet it's a superb drive
Is it road legal still or now just a track car?
Thanks. A lot of hours have got into building this and as you can imagine it is fantastic to drive now. However, I am unsure what would be changed next, if anything?Is it road legal still or now just a track car?
Will see how it goes next time it's out in April.
That's a good question. It is missing a lot now to be road legal, but It wouldn't take much to put it back on road, I did consider it over the winter, however I decided against it, in the future if I want to go back down the route I will sell the car and buy something that I can use on the road at the weekend and still do the odd track day in. I'll admit it is something I have considered lately.
I took the car off the road in around 2019/2020, it wasn't getting driven on the road besides the odd test drive and paying out for insurance, MOT and tax each year just wasn't worth it, it was quite easy to make that decision though when I already owned a trailer had the VW T6 for Towing.
Only 5 weeks till I'll be out at Cadwell - Photo from 2023

Found a replacement for the smaller more club sport seats I've had in the BMW since the Clio prior to 2018, these have been great and are still in perfect condition and were brilliant when driving the cars on the road, but always wanted to try something a little bit different, little more support and slightly different feel.
Been keeping an eye out for this specific seat as it is the same material and design as my Pro2000 seats.


Possibly keep my eye out for a second one for the passenger side.

I thought I was pretty much ready to go for Cadwell Park on Monday, but decided to make some changes to the suspension set up ahead of Cadwell, back on axle stands it goes.

Going back to the softer rear springs 350lbs and refitting the rear anti roll bar, this is the set up I've ran for the past couple of years and it's the best feeling setting up I've had but I don't think it's quite optimum.
I'd experimented with a firmer rear spring which caused even more wheel lifting and inside wheel slip under power. I then kept the stiffer rear springs and dropped the ARB when worked well at Oulton in the wet allowing the inside wheel to remain in contact with the floor helped drive out of corners. But overall I think a stiffer front anti roll bar is a better direction to go, more on this when it turns up.
Springs and dampers swapped back to the original set up.

Wheels washed and cleaned while off the car,

There's always something else going on in the background too, modifications to output flanges for a Porsche gearbox...


Been keeping an eye out for this specific seat as it is the same material and design as my Pro2000 seats.
Possibly keep my eye out for a second one for the passenger side.
I thought I was pretty much ready to go for Cadwell Park on Monday, but decided to make some changes to the suspension set up ahead of Cadwell, back on axle stands it goes.
Going back to the softer rear springs 350lbs and refitting the rear anti roll bar, this is the set up I've ran for the past couple of years and it's the best feeling setting up I've had but I don't think it's quite optimum.
I'd experimented with a firmer rear spring which caused even more wheel lifting and inside wheel slip under power. I then kept the stiffer rear springs and dropped the ARB when worked well at Oulton in the wet allowing the inside wheel to remain in contact with the floor helped drive out of corners. But overall I think a stiffer front anti roll bar is a better direction to go, more on this when it turns up.
Springs and dampers swapped back to the original set up.
Wheels washed and cleaned while off the car,
There's always something else going on in the background too, modifications to output flanges for a Porsche gearbox...
Little bit of free time over easter has given me the opportunity to make some changes to a few bits. Had a little bit of time yesterday on CAD to look at the design of the rear wing, it's a little bit bigger than I ever thought I'd have on the car, the end plates I originally designed and cut were more of a mock up and they ended up staying,
Version 2 - Cut outs in the up rights and smaller end plates with a less square design

I have already laser cut some end plates from this to mock up and will get the uprights cut out of 10mm aluminium soon.
Mock test of the uprights

Ordered a new front ARB, this one being 30mm compared with the OEM which is around 23/24mm. This carries on from the previous post where I've refitted the rear ARB and gone back to the softer springs which was always my preferred set up, I'm hoping this should remove some of the front roll out of the car and help keep the car from pitching and lifting the inside rear when loading the opposite side front. We'll see what effect it has in practise.

Fitted with polybush to suit and the ARB came with some 'lovely' rose jointed adjustable drop links...

However they are no good really, the drop links aren't supplied with spacers to space the drop link away from the ARB and the shock tab and there isn't enough room for the rose joint/shock to articulate through it's full steering angle without it binding up at some point. I did mock it up with some washers but it's just a poor solution, Maybe at some point I'll make some much longer aluminium spacers to get the spacing better and look at the artiulation a little more, but given the standard drop links a quick clean and they've gone back on.
Did a quick google and this appears to be a common thing amongst this style drop links, most people going with a standard ball joint style.

Quite a considerable difference, one thing to consider is it's not just the diameter of the roll bar, also the material it's made from, but this should be quite noticeable, thicker than what is normally fitted to an E46 M3, more in line with what was fitted to the E46 CSL

Last job for today, fitted a new battery, the Odyssey has been on the car since 2018, I've always done my best to keep it charged, however I think it's slowly start to die over the past 6 months but I generally keep it on the trickle charger. with the car not being ran or moved over winter I hadn't noticed anything but when I was sorting out the ABS I let the battery completely die by clearing the OBD lead plugged in for a few days and when I came to it the battery was completely flat. Tried to recondition it with a couple of different chargers but it just isn't holding charge for more than 2 days dropping down to 11v and below. A replacement is now £140 so looked at some alternatives that are the same dimensions and comparable spec,
Ended up with the Lucas LSLC22-12G 22Ah vs 16Ah.
We'll see how it goes but for £45 replacement,
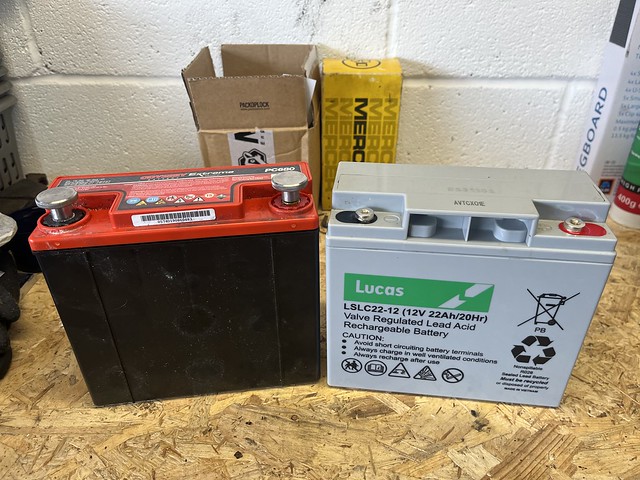
Version 2 - Cut outs in the up rights and smaller end plates with a less square design
I have already laser cut some end plates from this to mock up and will get the uprights cut out of 10mm aluminium soon.
Mock test of the uprights
Ordered a new front ARB, this one being 30mm compared with the OEM which is around 23/24mm. This carries on from the previous post where I've refitted the rear ARB and gone back to the softer springs which was always my preferred set up, I'm hoping this should remove some of the front roll out of the car and help keep the car from pitching and lifting the inside rear when loading the opposite side front. We'll see what effect it has in practise.
Fitted with polybush to suit and the ARB came with some 'lovely' rose jointed adjustable drop links...
However they are no good really, the drop links aren't supplied with spacers to space the drop link away from the ARB and the shock tab and there isn't enough room for the rose joint/shock to articulate through it's full steering angle without it binding up at some point. I did mock it up with some washers but it's just a poor solution, Maybe at some point I'll make some much longer aluminium spacers to get the spacing better and look at the artiulation a little more, but given the standard drop links a quick clean and they've gone back on.
Did a quick google and this appears to be a common thing amongst this style drop links, most people going with a standard ball joint style.
Quite a considerable difference, one thing to consider is it's not just the diameter of the roll bar, also the material it's made from, but this should be quite noticeable, thicker than what is normally fitted to an E46 M3, more in line with what was fitted to the E46 CSL
Last job for today, fitted a new battery, the Odyssey has been on the car since 2018, I've always done my best to keep it charged, however I think it's slowly start to die over the past 6 months but I generally keep it on the trickle charger. with the car not being ran or moved over winter I hadn't noticed anything but when I was sorting out the ABS I let the battery completely die by clearing the OBD lead plugged in for a few days and when I came to it the battery was completely flat. Tried to recondition it with a couple of different chargers but it just isn't holding charge for more than 2 days dropping down to 11v and below. A replacement is now £140 so looked at some alternatives that are the same dimensions and comparable spec,
Ended up with the Lucas LSLC22-12G 22Ah vs 16Ah.
We'll see how it goes but for £45 replacement,
richardracer said:
Hi Tom,
I forgot to ask, what sort of lap time improvement did you get with using slicks vs. AR/1 or similar track day tyres? Something we are thinking about, along with a fuel swirl,pot after getting surge, even with the 2 pump solution. Could you sow the mounting for your front mounted swirl pot please?
Thanks
Richardracer
Between the slicks and the AR1's around 1 or 2 seconds faster.I forgot to ask, what sort of lap time improvement did you get with using slicks vs. AR/1 or similar track day tyres? Something we are thinking about, along with a fuel swirl,pot after getting surge, even with the 2 pump solution. Could you sow the mounting for your front mounted swirl pot please?
Thanks
Richardracer
Swirl pot is a must on the E46, the two pump set up just doesn't work.
I have mine next to the fuse box

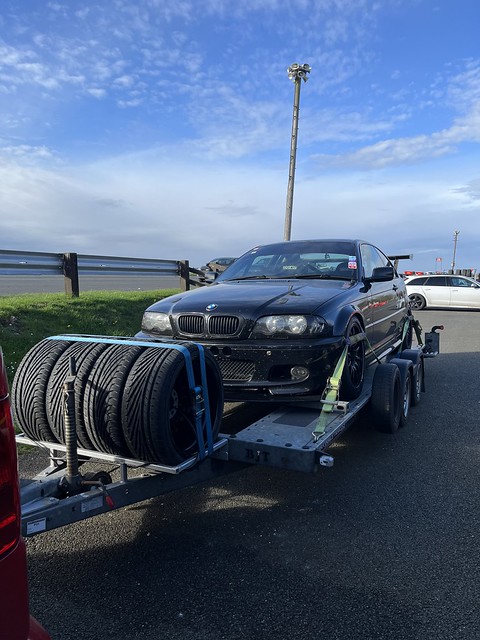
Cadwell Park April 2024.
Fresh off the trailer at 7:30, always find the morning of a trackday a little bit worrying, hoping everything is right with the car and that it's going to work, this would probably be made easier if I didn't change so many things between each day, but where is the fun in that?

The weather was totally unexpected, traveling over to Louth the previous day was shocking with torrential wind and rain, but following it was the lovely calm and sunny weather we were blessed with on Monday.
Went out for sighting laps and discovered a missfire above 3000rpm. Did a few checks thinking back over things I had changed prior to Cadwell, pulled out the laptop and checked the vanos was working correctly as I'd taken some time to change the base cam timing for the vanos cam position numbers were all positive to help with logging the cam timing for the inlet and exhaust, all seemed to work in the paddock but I had a suspicion it was related to this, popped on a older map with the same cam set up and tables as last time, low and behold the first session out it was running as normal, i'll get rid of the minus numbers in the logger code instead.

Suspension set up
Straight out of the box it was obvious how much of a difference the front antiroll bar change to the 30mm had on the handling of the car. It was so much flatter through the corners, there was much more grip on the front end and as a result of the flatter front end the drive out of the corners from increased rear grip was much improved. Finally felt like I'd gotten somewhere with it.
ABS - Refitting the MK60 with the addition of the bias valve between the MC and the ABS pump for the rear circuit.
This was the main change for the day which I wanted to do some work on figuring out, with a hope in the long run it will make the car faster.
First two morning sessions I ran the ABS as it is, nothing turned off and let the system do it's job to see what happened.
ABS/ASC/DSC completely on:

Above you can see the ABS working, detecting slip on the rear wheels and the line pressure to the rear circuit decreases. Only problem was you can see a little further along as the throttle position increases when wheel slip is detected under power it is applying the front and rear brakes. Less than ideal.
ABS still on ASC/DSC turned off using the switch - This could be short press or long press - forgot to make a note

ABS working as it should, upon detecting wheel slip it drops the rear line pressure everything working as it should.
However during one of the morning sessions I had two instances where the brake pedal went straight to the floor, once at the end of Park Straight and the second at Mansfield which resulted in a detour to the marshals hut up the hill. Both instances where two laps apart. Once it happened a second time I came in and gave the car a once over, checked for leaks, any warning lights or codes, checked fluid level. Couldn't find anything a miss at this point. Thought it was possibly down to the deceleration rate of the car using the onboard Yaw sensor and the brake pressures so went out for a session with the Yaw Sensor unplugged which disables the ASC/DSC completely.
Another reason for trying this was that I had noticed coming out of hall bends in 3rd gear, normally I drop into 2nd as it gets out the corner better there was a slightly bogging down, I thought it was still some form of intervention from the ASC/DSC, didn't really have time to sit at the laptop and go through all the logs on a trackday so decided to go with the yaw sensor unplugged and see how it felt.

ABS working as expected but noticed a drop in the maximum brake pressure I was able to get from the system, at the time I described it as though the ABS was holding me back and I had to push much harder to get the same braking effort. Notice the maximum braking pressure for this session was around 800psi rather than the 1000-1100psi I'd seen on previous sessions.
The car still bogged coming out of hall bends - Looked at the logs and found a rich spot on the map at 3500rpm and full throttle - Changes the fueling table and it started to clean up, needs a little more adjustment but can do that before going out again.
Just before lunch I gave the car another once over while there was a red flag. Jacked the car up and popped the wheels off.
What I did find explained the loss of brake pedal...
Rear pads disintegrating

Not just breaking down into little pieces, breaking away in big chunks, however these pads are quite old, I bought them in 2018, didn't run them during 2019 and refitted again in 2020. I have periodically checked them and they have looked ok but age, heat cycles and being exposed to moisture has taken it's toll.
Pads from the over side still looking good, luckily I had a spare set of rear pads in the van, popped these in and off I went again for a session before lunch.

Had manged to good 60miles on circuit in the morning, gathered a lot of information by this point and set about doing some decent sessions in the car in the afternoon, most of them being 25 minute plus.

Noticed a big difference in being strapped into the Sparco Circuit seat and the additional support it provides being a much deeper seat. There is more support under the thighs so you're sat further down deeper into the seat and don't move forward under braking and finally the additional shoulder support.

Covered in flies at the end of the day, 140+ miles later

Near Side Front slick took a beating even with the 3.6-3.8 degrees of camber. Going to do some work on this as really I need to be over 4 degrees of camber to get the most from them with this set up, watch this space...
Packed up and loaded at the end of the day, ready to go again with some tweaks.
Still not 100% happy with the ABS set up but this wasn't helped by the disintegrated rear pads and having to go back to standard rears. I did take it easy on the brakes in the afternoon and increase the braking distances which you'll probably notice in the videos.
Will order some new pads all around and continue with the Mk60 with the Yaw sensor plugged back in and DSC/ASC disabled, reading the manual this is also possible to do by unplugging the brake fluid level sensor - this will lead the ABS working fully with the Yaw sensor.
Video - Smoothest lap of the day - Happy to finally get down to a 1:40 lap time, Car will easily go into the 1:39's or less with new brake pads and start to get used to them again driving with ABS, took me a good number of back to back laps to get used to not completely lifting for Copice.
One of the afternoon sessions, I ended up lapping with a very equally paced Megane. Interesting to see the different areas both cars pick up pace on.
Still got a few bits to edit and look at but for now...
helix402 said:
I used to run an M3 Conv. front arb-27mm on all my E46s. Despite theory that it would increase understeer-it didnt. It reduced roll without a reduction in ride quality. This was on road cars, not track. I’m sure your 30mm bar will work well. If only BMW had made the E9x suspension as good as the E46!
You're right. There certainly wasn't any more under steer than I would normally have, really glad I decided to go down this route and test it out. Will try the firmer and softer settings are some point.Wouldn't it be great just to park up the car after a track day? Maybe give it a wash and leave it at that?
Started with washing wheels and giving everything a check over...
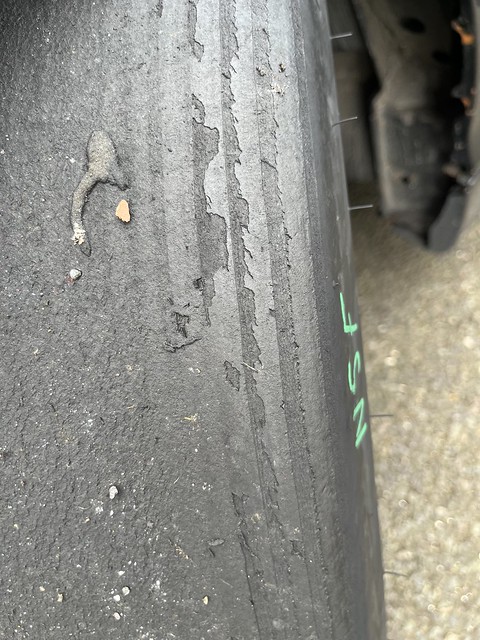
NSF tyre didn't fair that well at Cadwell even with approx 3.5 degrees of camber - I've ordered a digital level which I'm going to make/mount into a camber gauge to take some more accurate measurements this week.

OSF not as bad but still not wearing level - These tyres only had 2.6mm of material on them anyway. Cadwell was going to be a bit of a test to see how I got on with the tyres with my current alignment settings.

Also signs of the OSF demalminating at the edge.

Also found a bent ARB mount, all well and good making the car stiffer but the force has to go somewhere, found a weak link. Spoken to Gaz already and the dampers are going to go back to them for some new different designed ARB mounts and a service while they are there. This wasn't something I had planned, was going to double up the thickness of it myself but might as well get it sorted before it tears the bracket off the shock.

None bent one for reference. The bent side is the drivers side shock so will be getting maximum load around left hand corners - Possibly damaged around coppice?

Popped the splitter, front bumper and wings off the car to start to look at increasing the camber on the front

Top mounts are at their max in their current setting, and depending on what I find with the alignment this week I probably need to find about 0.5-0.7 degree extra

Taken some measurements and crunched some numbers. By my maths I need 11mm worth of additional movement on the top mounts to get up to an extra 1 degress of camber. Drilled some additional holes so I can build it back up and measure the camber change

The plan is going to be to cut some of the strut top away and plate over the top with some 5mm steel. Have already ordered some 150mm discs which I can machine with the following cut out. Planning to weld this over the strut top to strengthen it.

On the never ending list of things I want to do with the E46, I have had rusty wings written on there for a while. Deicded to do something about it. Where this is going to end I dont know!!
While I had them off I've ground away all the signs of surface rust, treated the surface and painted them with etch primer to start with

I have also cut away any tabs on the edge of the arch where the liners normally mount and wire wheeled all the inside of the arch for painting too to stop moisture starting to rust through from the back side,

Got as far as a skim of filler around the edge just to flatten out any of the low spots and marks from grinding.
Body work isn't something I would say I am amazing at, so far I've painted inside a few track cars and the quality is improving, painted wheels, mountain bikes and forks and the all spoiler, splitter and body kit for vans. Whether I decide to paint the wings we will see. Watch this space!

richardracer said:
Hi Tom,
Try downloading free app called RC-Camber if you are an iPhone user. Glad you saw such an improvement with front 30mm arb. Makes such a difference.
Off to look at swirl pots to cure fuel surge below half full.
Plan to be at Cadwell on 21st June and Oulton Park on 15th Oct, just in case you are planning your track days.
Cheers
Richard Stok
Tried using an iphone for it last time and found the resolution and accuracy to be terrible, I wasn't using the camber app you mentioned mind. Try downloading free app called RC-Camber if you are an iPhone user. Glad you saw such an improvement with front 30mm arb. Makes such a difference.
Off to look at swirl pots to cure fuel surge below half full.
Plan to be at Cadwell on 21st June and Oulton Park on 15th Oct, just in case you are planning your track days.
Cheers
Richard Stok
In the end I have bought myself a magnetic level gauge with. Did some measuring with it today on the wheel as well as putting it on the disc, found the results to be very accurate and repeatable so will be using that going forward. Measured the current camber settings to give me a base line to work from going forward.
Swirl pot will make a big difference. Was lapping at Cadwell again with the fuel light on and complete steady fuel pressure.
No post since April makes this quite a large update.
Carrying on with the strut tops I got some laser cut 5mm steel discs and used the template to mark out the new plates for the strut tops
[img]<a data-flickr-embed="true" href="https://www.flickr.com/photos/trailfairy/53751152488/in/datetaken-public/" title="Untitled"><img src="https://live.staticflickr.com/65535/53751152488_e45465f60f_z.jpg[/img]
Little bit of time with a grinder and a file and I got a profile I was happy with which would give me good access to the top mounts for adjustment,

Prepped for welding

Borrowed a mig welder of a friend and got them welded in position, I do enjoy welding and fabricating things when I've got the opportunity to do so.

Primer and under seal to keep everything from rusting

Obviously I had to return the engine bay to the previous condition, I'd only painted it last year when the engine was out

Finished ready for suspension to go back on.

Work continued ton the rusty wings, getting any marks filled and then in primer

Also ordered a new bumber to replace the standard, this is an after market bumper which is a little chunkier and much flatter at the bottom which will marry up with the splitter a lot more cleanly

Quick test fit before painting

Next job was to start ordering replacment parts and new parts before putting everything back together
Picked up a set of slicks for the front to replace the ones I killed at Cadwell with the 3.6 degrees of camber.

New brake pads all around. Something a little different this time with the EBC
RPX front
RP1 rear - These are a little less aggressive and should help with the brake balance as I used to run the RS29/RC6 and Rear RC5 for the same reason.

Coiled cable...

With the new seat fitted in the car, from a driving point of view it is a much better feel and experience, but getting in and out of the car is a pain in the backside so opted for a removeable wheel and boss. Only issue was previously wiring for the steering wheel was ran through the OEM clock spring wiring so I've removed that and ran everything through the coiled cable

Refitted with the removeable boss - Also ordered some bolts to replace the ones I was short of

New brake pads fitted, but noticed the spring retaining clips fitted to it where the wrong ones for the calipers, which did work find withthe RS29 pads but no good with the EBC's

Brand new set including pins - Genuine Porsche parts

Onto the painting. I got some quotes for the painting, I had planned to do all the pre, filling and primer so the panels were ready for base coat. Quotes were in the region of £500 cash to £570+vat. Nothing against paying that if it was my daily but for the track car decided it was too much...
Decided to commit to painting them myself. Base coat and lacquer £60. I did already have the compressor, guns, thinners and general consumables so they aren't factored into the price.
Over the past few years I've painted the inside of the E46 twice, engine bay a couple of times, the odd set of wheels, small panels, splitters and spoilers of the Volkeswagen vans, and a few more insides of track cars but nothing to the extent of the wings and bumpers.
With all the prep work done the wings and bumper started with two coats of base.

Followed by a mist coat of clear, followed by another two coats of clear with 5 minutes between each coat

Really happy with the final result, Maybe in the future it'll get a wet sand and polish but for the time being i'm more than happy, it's exactly what the E46 needed, but it was waiting for the right time and opportunity to tidy it up.

Last big job on the list was getting the alignment sorted on the car, Id set the front camber to 4.2 degrees from the 3.6 it had at Cadwell.
When I checked the rear I noticed rear left was 2 degrees, good tyre wear, Rear left was a fair bit less and you could see the difference in the tyre wear from Cadwell. Put this back to 2 degrees but needed to set the toe.
In the past I've been lucky to borrow friends unit with a ramp, alignment kit and scales etc but decided I would look at investing in my own kit, However Tegiwa string alignment kit was out of stock for 4-8 weeks...
Did some research into materials, costs, found out what sized material was the most cost effective, smaller isn't always cheepest.
Opted for buying:
19mm x 1.6mm Aluminium Tube
30mm x 30mm x 2mm mild steel
Plastic thumb turns from Ebay
Total spend £65.
I then drew up some of the most complicated pieces like the hooks for the end of the tubes and the end pieces for the vertical sections which the alignment poles go through and 3D printed them.

Welded some nuts onto the steel box for the thumb turns which haven't turned up yet, used some left over pipe insulation to protect the body work and some large heat shrink on the tubing.
Bought two cheap steel rules which are exactly the same to make measuring a set up as accurate as possible when setting it up with two people.

2024 Alignment
Front
Camber - 4.2degrees
Toe - 1mm Toe out total
Rear
Camber - 2 degrees
Toe - 1mm Toe in total
Last bits of prep to finish now before Snetterton on Thursday.
Carrying on with the strut tops I got some laser cut 5mm steel discs and used the template to mark out the new plates for the strut tops
[img]<a data-flickr-embed="true" href="https://www.flickr.com/photos/trailfairy/53751152488/in/datetaken-public/" title="Untitled"><img src="https://live.staticflickr.com/65535/53751152488_e45465f60f_z.jpg[/img]
Little bit of time with a grinder and a file and I got a profile I was happy with which would give me good access to the top mounts for adjustment,
Prepped for welding
Borrowed a mig welder of a friend and got them welded in position, I do enjoy welding and fabricating things when I've got the opportunity to do so.
Primer and under seal to keep everything from rusting
Obviously I had to return the engine bay to the previous condition, I'd only painted it last year when the engine was out
Finished ready for suspension to go back on.
Work continued ton the rusty wings, getting any marks filled and then in primer
Also ordered a new bumber to replace the standard, this is an after market bumper which is a little chunkier and much flatter at the bottom which will marry up with the splitter a lot more cleanly
Quick test fit before painting
Next job was to start ordering replacment parts and new parts before putting everything back together
Picked up a set of slicks for the front to replace the ones I killed at Cadwell with the 3.6 degrees of camber.
New brake pads all around. Something a little different this time with the EBC
RPX front
RP1 rear - These are a little less aggressive and should help with the brake balance as I used to run the RS29/RC6 and Rear RC5 for the same reason.
Coiled cable...
With the new seat fitted in the car, from a driving point of view it is a much better feel and experience, but getting in and out of the car is a pain in the backside so opted for a removeable wheel and boss. Only issue was previously wiring for the steering wheel was ran through the OEM clock spring wiring so I've removed that and ran everything through the coiled cable
Refitted with the removeable boss - Also ordered some bolts to replace the ones I was short of
New brake pads fitted, but noticed the spring retaining clips fitted to it where the wrong ones for the calipers, which did work find withthe RS29 pads but no good with the EBC's
Brand new set including pins - Genuine Porsche parts
Onto the painting. I got some quotes for the painting, I had planned to do all the pre, filling and primer so the panels were ready for base coat. Quotes were in the region of £500 cash to £570+vat. Nothing against paying that if it was my daily but for the track car decided it was too much...
Decided to commit to painting them myself. Base coat and lacquer £60. I did already have the compressor, guns, thinners and general consumables so they aren't factored into the price.
Over the past few years I've painted the inside of the E46 twice, engine bay a couple of times, the odd set of wheels, small panels, splitters and spoilers of the Volkeswagen vans, and a few more insides of track cars but nothing to the extent of the wings and bumpers.
With all the prep work done the wings and bumper started with two coats of base.
Followed by a mist coat of clear, followed by another two coats of clear with 5 minutes between each coat
Really happy with the final result, Maybe in the future it'll get a wet sand and polish but for the time being i'm more than happy, it's exactly what the E46 needed, but it was waiting for the right time and opportunity to tidy it up.
Last big job on the list was getting the alignment sorted on the car, Id set the front camber to 4.2 degrees from the 3.6 it had at Cadwell.
When I checked the rear I noticed rear left was 2 degrees, good tyre wear, Rear left was a fair bit less and you could see the difference in the tyre wear from Cadwell. Put this back to 2 degrees but needed to set the toe.
In the past I've been lucky to borrow friends unit with a ramp, alignment kit and scales etc but decided I would look at investing in my own kit, However Tegiwa string alignment kit was out of stock for 4-8 weeks...
Did some research into materials, costs, found out what sized material was the most cost effective, smaller isn't always cheepest.
Opted for buying:
19mm x 1.6mm Aluminium Tube
30mm x 30mm x 2mm mild steel
Plastic thumb turns from Ebay
Total spend £65.
I then drew up some of the most complicated pieces like the hooks for the end of the tubes and the end pieces for the vertical sections which the alignment poles go through and 3D printed them.
Welded some nuts onto the steel box for the thumb turns which haven't turned up yet, used some left over pipe insulation to protect the body work and some large heat shrink on the tubing.
Bought two cheap steel rules which are exactly the same to make measuring a set up as accurate as possible when setting it up with two people.
2024 Alignment
Front
Camber - 4.2degrees
Toe - 1mm Toe out total
Rear
Camber - 2 degrees
Toe - 1mm Toe in total
Last bits of prep to finish now before Snetterton on Thursday.
Snetterton Prep
Last few jobs before setting off for Snetterton.
After killing the last set of front slicks at Cadwell Park I got a 'brand new' set of scrubs to run at Snett. These have got 2.6mm new and these measured 2.6mm, hoping this would give a nice fresh start for looking at how the alignment is working the tyres. Hoping to get much better tyre wear and temps across the tyre rather than folding the outside edge. 4.2 degrees of camber should work right?

Went to fit the splitter to the front of the car. It fits as you would expect but with the shape of the bumper there appears to be a gap between the bumper of about 10/15mm. I wasn't happy with it so decided not to run it. I had lifted up the front of the car after adding more camber to the front but think I've gone about 5/10mm too far, will drop it down a little more so it looks a little more aggressive and adjust the splitter mounts so they sit higher for the next track day.
The drive down to Snetterton was a good 4.5 hours with a trailer but I always think it's worth the trip once a year.

Experimented with putting a go pro to the left of the passenger seat on the roll cage to try out some different angles and give a different perspective.
The morning was brilliant conditions, mild temperatures, slightly overcast and dry. Car was running fantastic. It feels so much more planted and the grip in the corners is taking some adjusting to again.

Just before lunch I took a friend out for a few laps who had never been to Snetterton before, was giving some pointers I've learnt about the circuit over the years and generally enjoying sharing the laps with friends, something I really enjoy about doing laps with passengers.
However coming out of Agostini, the car went flat as I went full throttle, I knew that feeling. Fuel starvation....
Can easily lap the E46 with the fuel light on using the fuel in the swirl pot so it's not something I normally have issues with, drive it around to the back straight and checked the data screen. Swirl pot pressure reading -4psi... Interesting, the fuel rail was still making 55psi but something was a miss and decided to dive into the pits and call it a day for the E46 for the morning and jumped in a friends car for a last 30 minute session before the chequered flag came out for lunch.
Over lunch I checked the data log. Part way through the session the swirl pot drops pressure but the rail pressure is maintained for about half a lap, eventually I do get a drop in fuel pressure at the rail coming out of Agostini. Ran the fuel pumps off the ECU and couldn't hear fuel cycling from the in tank pump.
Popped off the fuel pump cover and put a piece of fuel hose into a Jerry can and ran the pump again, no fuel...
I did have an old in take pump in the spares box. so popped that in over lunch and checked the fuel pressure. Pot pressure back to normal about 8-10psi and rail pressure 55psi.

However over lunch it had started to rain, it was time for wet tyres and a softer suspension set up. Spent the afternoon experimenting with wet lines, didn't take me long to have my first spin, coming from dry weather on slicks to full wet and wet tyres was a bit of a shock.

Finished the day with around 120 miles on track which Is my usual aim, full take of fuel and 20L

Post track day photo. Car absolutely minging after all the effort of painting the front end and the engine bay.
Wet wheels and tyres look lost in the front arches now even with spaces after changing the camber

Quick check over on the front left tyre which takes a hammering at Snetterton with all the fast right handers.
Tyre wear looks a lot better and the outer edge of the tyre hasn't been rolling over onto the shoulder, it appears the recommended 4.2 degrees of camber for the E46 on slicks is a good place to be.

Future changes.
So one thing which has bugged me with my current set up is I have all the data available on the CANBUS but I am limited by can inputs and outputs to the ECU.
Long story short because I drive the OEM BMW dash using CAN from the ECU I am unable to read CAN messages into the ECU. A lot of my sensors are wired to an Analog to Can board which take in the voltages from the sensors like oil pressure, fuel pressure, pot pressure, brake pressure for the front and rear, diff temp etc. But due to these limitations I can log them using my logger but the ECU doesn't see this data.
ECU Master have been talking about a V3 version of the software for a year or so now, they released a Beta version for testing back in May so I signed up for it. It's not a case of copying everything over as the V3 software is completely rewritten so I have completely written my map from scratch again, coping over some of the basics like VE and Ignition table but a lot of it has been set up from scratch again. One major reason for doing this was now the software has been rewritten they have reallocated some of the internal memory of the ECU which now gives much wider access of the Can messages.
Now I have got.
ECU out putting > ECU Master Stream + Stream for BMW OEM Dash + Custom stream for ABS/Wheel speeds/Traction control
Analog to Can outputting > oil pressure, fuel pressure, pot pressure, brake pressure for the front and rear, diff temp
All this data now going to the logger and the ECU.
This has enabled me to set up oil pressure protection, this would have been handy at Cadwell in 2023 when the oil pump failed.
Also set up fuel pressure protection to bring on engine management light over Can if the fuel pressure drops.

I have got the car booked in for a map check just to run over it and dial in some of the cam angles as now I've set up both variable intake and exhaust cams. Will be the first time it's been on the dyno since the engine was put back together sometime in 2021.
Finally...
Often this thread is just me stating what I think needs to be improved. But interested to hear what other people would change, what are other peoples opinions or what do other people notice?
I did say If the car worked at Snetterton I would clean it park it up and leave it alone until the next day out in the summer. But obviously I cant help myself... Should have an update at the end of the week on that one...
Last few jobs before setting off for Snetterton.
After killing the last set of front slicks at Cadwell Park I got a 'brand new' set of scrubs to run at Snett. These have got 2.6mm new and these measured 2.6mm, hoping this would give a nice fresh start for looking at how the alignment is working the tyres. Hoping to get much better tyre wear and temps across the tyre rather than folding the outside edge. 4.2 degrees of camber should work right?
Went to fit the splitter to the front of the car. It fits as you would expect but with the shape of the bumper there appears to be a gap between the bumper of about 10/15mm. I wasn't happy with it so decided not to run it. I had lifted up the front of the car after adding more camber to the front but think I've gone about 5/10mm too far, will drop it down a little more so it looks a little more aggressive and adjust the splitter mounts so they sit higher for the next track day.
The drive down to Snetterton was a good 4.5 hours with a trailer but I always think it's worth the trip once a year.
Experimented with putting a go pro to the left of the passenger seat on the roll cage to try out some different angles and give a different perspective.
The morning was brilliant conditions, mild temperatures, slightly overcast and dry. Car was running fantastic. It feels so much more planted and the grip in the corners is taking some adjusting to again.
Just before lunch I took a friend out for a few laps who had never been to Snetterton before, was giving some pointers I've learnt about the circuit over the years and generally enjoying sharing the laps with friends, something I really enjoy about doing laps with passengers.
However coming out of Agostini, the car went flat as I went full throttle, I knew that feeling. Fuel starvation....
Can easily lap the E46 with the fuel light on using the fuel in the swirl pot so it's not something I normally have issues with, drive it around to the back straight and checked the data screen. Swirl pot pressure reading -4psi... Interesting, the fuel rail was still making 55psi but something was a miss and decided to dive into the pits and call it a day for the E46 for the morning and jumped in a friends car for a last 30 minute session before the chequered flag came out for lunch.
Over lunch I checked the data log. Part way through the session the swirl pot drops pressure but the rail pressure is maintained for about half a lap, eventually I do get a drop in fuel pressure at the rail coming out of Agostini. Ran the fuel pumps off the ECU and couldn't hear fuel cycling from the in tank pump.
Popped off the fuel pump cover and put a piece of fuel hose into a Jerry can and ran the pump again, no fuel...
I did have an old in take pump in the spares box. so popped that in over lunch and checked the fuel pressure. Pot pressure back to normal about 8-10psi and rail pressure 55psi.
However over lunch it had started to rain, it was time for wet tyres and a softer suspension set up. Spent the afternoon experimenting with wet lines, didn't take me long to have my first spin, coming from dry weather on slicks to full wet and wet tyres was a bit of a shock.
Finished the day with around 120 miles on track which Is my usual aim, full take of fuel and 20L
Post track day photo. Car absolutely minging after all the effort of painting the front end and the engine bay.
Wet wheels and tyres look lost in the front arches now even with spaces after changing the camber
Quick check over on the front left tyre which takes a hammering at Snetterton with all the fast right handers.
Tyre wear looks a lot better and the outer edge of the tyre hasn't been rolling over onto the shoulder, it appears the recommended 4.2 degrees of camber for the E46 on slicks is a good place to be.
Future changes.
So one thing which has bugged me with my current set up is I have all the data available on the CANBUS but I am limited by can inputs and outputs to the ECU.
Long story short because I drive the OEM BMW dash using CAN from the ECU I am unable to read CAN messages into the ECU. A lot of my sensors are wired to an Analog to Can board which take in the voltages from the sensors like oil pressure, fuel pressure, pot pressure, brake pressure for the front and rear, diff temp etc. But due to these limitations I can log them using my logger but the ECU doesn't see this data.
ECU Master have been talking about a V3 version of the software for a year or so now, they released a Beta version for testing back in May so I signed up for it. It's not a case of copying everything over as the V3 software is completely rewritten so I have completely written my map from scratch again, coping over some of the basics like VE and Ignition table but a lot of it has been set up from scratch again. One major reason for doing this was now the software has been rewritten they have reallocated some of the internal memory of the ECU which now gives much wider access of the Can messages.
Now I have got.
ECU out putting > ECU Master Stream + Stream for BMW OEM Dash + Custom stream for ABS/Wheel speeds/Traction control
Analog to Can outputting > oil pressure, fuel pressure, pot pressure, brake pressure for the front and rear, diff temp
All this data now going to the logger and the ECU.
This has enabled me to set up oil pressure protection, this would have been handy at Cadwell in 2023 when the oil pump failed.
Also set up fuel pressure protection to bring on engine management light over Can if the fuel pressure drops.
I have got the car booked in for a map check just to run over it and dial in some of the cam angles as now I've set up both variable intake and exhaust cams. Will be the first time it's been on the dyno since the engine was put back together sometime in 2021.
Finally...
Often this thread is just me stating what I think needs to be improved. But interested to hear what other people would change, what are other peoples opinions or what do other people notice?
I did say If the car worked at Snetterton I would clean it park it up and leave it alone until the next day out in the summer. But obviously I cant help myself... Should have an update at the end of the week on that one...
Ordered myself a new diff. Didn't last long not touching it after Snetterton.

Decided it was the end of the road for the quaife, it's been a great diff in the car which I've ran with a 3.38 and a 3.73 ratio. But I am finding the limit of it more and more with the car this past year.

Removed the old diff with the 3.73 ratio and decided to sell it as a complete built unit, already sold and gone to a new home! It didn't make sense to strip down a perfectly working diff to make the new one.

Bought another 3.38 ratio diff from an auto to use as a donor

Started with disassembly of the donor, can confirm old diff oil still stinks. Ripped it open on an old towel and thrown them straight in the bin

Obviously I couldn't leave the casing in the rusty old state so gave it a good jet wash, degrease and a wipe down with some thinners before giving it a coat of paint

Put all the parts through the parts washer and laid everything out ready for building.
[img]https://live.staticflickr.com/65535/53841986548_55ee776f6c_z.jpg[img]
Bearings and crown wheel fitted to the diff, getting some more use out of the press I bought many years ago on a bit on a bit of a whim, turns out I use it all the time.

Started with setting up the bearings and the pinion drag and then set about putting the diff in the casing with the bearing on.
Got loads of photos but will keep the post short rather than a how to. In total about 6-7 hours worth of building, due to the size of the diff unit it doesn't fit inside the diff casing in one piece, so every time you want to take it out to adjust the shims you have to split the diff in two.

Managed to get the bearing clearance to a spec I was happy with as well as getting the backlash to 0.1mm. Overall everything has gone together with the provided shims which come with the Kaaz diff but it's right on the tight end of the spec


All reassembled with new seals. I have built this one with a 3.38 final drive and while the diff was apart to fit it inside the casing I have dropped the lock down to 65% as per the Kaaz Manual which they refer to as the "Medium Hard Setup"

Back in the car it goes

Bought a set of replacement discs for the rear while I was working on the rear end as well as a replacement ARB bracket, somehow managed to loose a bracket at Snetterton, I think I've forgot to torque the bolt up for the bracket when messing with fitting and removing the rear ARB and the bracket has left the chat

Final job for the weekend was adjusting the splitter mounts, with the new bumper the splitter needed raising 15mm to bring it up snug under the bumper, adjusted the brackets and refitted.
Note- That isn't the placement for the reg plate... Just popped it on there for today as I didn't want to mark the new bumper

Been a big job but it will hopefully be worth it, we'll see on the next track day!
Decided it was the end of the road for the quaife, it's been a great diff in the car which I've ran with a 3.38 and a 3.73 ratio. But I am finding the limit of it more and more with the car this past year.
Removed the old diff with the 3.73 ratio and decided to sell it as a complete built unit, already sold and gone to a new home! It didn't make sense to strip down a perfectly working diff to make the new one.
Bought another 3.38 ratio diff from an auto to use as a donor
Started with disassembly of the donor, can confirm old diff oil still stinks. Ripped it open on an old towel and thrown them straight in the bin
Obviously I couldn't leave the casing in the rusty old state so gave it a good jet wash, degrease and a wipe down with some thinners before giving it a coat of paint
Put all the parts through the parts washer and laid everything out ready for building.
[img]https://live.staticflickr.com/65535/53841986548_55ee776f6c_z.jpg[img]
Bearings and crown wheel fitted to the diff, getting some more use out of the press I bought many years ago on a bit on a bit of a whim, turns out I use it all the time.
Started with setting up the bearings and the pinion drag and then set about putting the diff in the casing with the bearing on.
Got loads of photos but will keep the post short rather than a how to. In total about 6-7 hours worth of building, due to the size of the diff unit it doesn't fit inside the diff casing in one piece, so every time you want to take it out to adjust the shims you have to split the diff in two.
Managed to get the bearing clearance to a spec I was happy with as well as getting the backlash to 0.1mm. Overall everything has gone together with the provided shims which come with the Kaaz diff but it's right on the tight end of the spec
All reassembled with new seals. I have built this one with a 3.38 final drive and while the diff was apart to fit it inside the casing I have dropped the lock down to 65% as per the Kaaz Manual which they refer to as the "Medium Hard Setup"
Back in the car it goes
Bought a set of replacement discs for the rear while I was working on the rear end as well as a replacement ARB bracket, somehow managed to loose a bracket at Snetterton, I think I've forgot to torque the bolt up for the bracket when messing with fitting and removing the rear ARB and the bracket has left the chat
Final job for the weekend was adjusting the splitter mounts, with the new bumper the splitter needed raising 15mm to bring it up snug under the bumper, adjusted the brackets and refitted.
Note- That isn't the placement for the reg plate... Just popped it on there for today as I didn't want to mark the new bumper
Been a big job but it will hopefully be worth it, we'll see on the next track day!
Scoobydrew95 said:
What an incredible thread, some really fantastic fixes, solutions and modifications.
I am a really big fan of the aero bits added to the car. Don't particularly usually like 46 coupes but yeah this is great. Looking forward to more updates.
Thanks, comments like this make it worthwhile keeping the thread updated.I am a really big fan of the aero bits added to the car. Don't particularly usually like 46 coupes but yeah this is great. Looking forward to more updates.
dhutch said:
I've not read it all having stumbled across it this lunchtime looking for something else, but what an excellent thread, project, and car.
Huge admiration for the amount of time and energy that's gone into the work, nice to see someone working to produce a car with modifications that work well, rather than just looking good but not improving reliability/handling/speed/etc
Thanks! Hopefully you get time to go back through the whole at some point.Huge admiration for the amount of time and energy that's gone into the work, nice to see someone working to produce a car with modifications that work well, rather than just looking good but not improving reliability/handling/speed/etc
Summer Update.
Not as many updates as there used to be but will try and keep it updated when I can.
After finishing putting the car back together after stripping the rear end and fitting the new diff I started to do some prep for some dyno time.
Noticed the swirl pot pressure was playing up again so put a proper APS fuel put in the fuel pump holder and chucked this back into the tank. Way overkill for the needs of the engine as it's only filling the swirl pot but I I was given a brand new one and bought myself another one so I've got a spare in the track day box.

Spent a few weeks messing around with a the V3 firmware for the ECU Master black which will be released at some point in the not too distant future. Got the car running an a fresh map, transferred everything over to the new software, found a lot of bugs and suggestions which have quickly been sorted by ECU master at this point.
Took the car down to EFI tuning to get Chris just to run through a few things mainly checking the VE table as the fuel model is different in the new ECU software
Have to do I am really happy with how the front end of the car looks now it's be freshened up with new bumper and some paint

Since I was on the dyno I have set up the Exhaust Cam as it is fully variable on the M54. From previous mapping sessions and experimentations on the OEM ECU I know these engines do pick up some torque in the mid range when retarding the exhaust cam.
First job was to set up the PID for the Vanos controls for both Inlet and Exhaust.
Work through the VE table to some full load power runs.
Do a quick test on the cam angles just to make sure what I had put in the ECU was most efficient.
Few hours of start stop running and ironing out a few bugs with the V3 software I was really happy to see the engine making
267ftlbs and 271bhp.
but with a good chunk of additional torque in the mid range. Right where I'm going to need it with the new differential as I've moved from a 3.73 back to a 3.38 final drive
I was also happy to see it make the same power it made when the engine was first built!

New laser cut design for the mounts for the wing


Still keeping my hands on Clios too. Quite a few friends still are using them that I do track days with. This one had new suspension fitted. I had it in the garage for setting right heights and alignment before Anglesey.
Anglesey Trackday - This was the first track day of the week.


Anglesey Summary
It was a bit of a mixed bag.
Turns out I am still having issues with the Michelin Slicks on the car despite the new geometry, when I get some videos up you'll be able to see the lack of grip on the rear right - Lots of sliding around when loading up that corner even when turning into corners made for some amusingly large drifts!
I used the day to run the car in a few different damper and ARB set ups from full soft to full hard to see how the car felt in different set ups.
The Kaaz differential is amazing! Really impressed - Spent a bit of time in the carpark in the morning doing figure of 8's to bed the diff in followed by an easy session clutching down around corners to let the plates bed in without any load - Following that I was straight into it. The drive out of corners is so much more consistent driving both wheels and the little bit of wheel slip and hop you get with the Quaife is gone!
I wasn't feeling 100% throughout the day either with the usual symptoms of food poisoning so was happy to get around 100 miles in all day after calling myself an early lunch break at 12:00 and having a rest till 1:30.
Cadwell Prep
After Anglesey I drive straight home as we had also booked Cadwell Park for the Wednesday of that week.
First job on the list was to replace the slicks for a new set. I had already planned for this and collected another set of slicks with a different compound which I was more interested to try.

Quick wash of the wheels, an oil change, slight alignment adjustment and back onto the trailer

Drove over to Cadwell Park Tuesday evening ready for Wednesday morning...

Cadwell Park
Start of the day didn't go as planned... Sighting laps went off without a hitch but only managed about 5 laps in session one before loosing power steering through through hall bends, quick look at the dash and noticed battery light on... pulled off the circuit at the end of hall bends.
Popped the bonnet for a quick look while waiting for recovery. Aux belt had popped off and the Aux belt tensioner was stuck down at the bottom wedged between the PAS pulley, fan and engine block.

Not the first time I've been pulled back by the tow truck from Hall bends and I'm sure it wont be the last. At least I managed to get off the circuit without causing a red flag

Had a good look at it in the paddock and found the two bolts holding the tensioner on had sheered off causing the tensioner to fall off and down into the PAW pulley and damaged the PAS pulley.
Had to take the oil filter housing off and drill out the snapped bolts.
Damaged PAS Pulley

Managed to find a replacement PAS pulley in Louth and pick up a new tensioner while it was in pieces and set about building it back up

Managed to get it back together with new parts and some replacement bolts from the spares box and managed two sessions before lunch.
First one to shake the car down and check for leaks or anything else visible.
Followed that up with a good 20-25 minute session before lunch.

First session back after lunchtime
Not the cleanest of photos of the E46 but not looking too bad after back to back trackdays in the same week

Managed a full afternoon of laps. Car felt fantastic on a different set of Michelin slicks and the Kaaz diff performed brilliantly around Cadwell Park. Finally managing the drive out of Mansfield without slipping the inside wheel. Spent a lot time trying to optimise the car set up but despite all of that it was just a plaster until I fitted a proper plated diff.


Start of the day didn't go as planned... Sighting laps went off without a hitch but only managed about 5 laps in session one before loosing power steering through through hall bends, quick look at the dash and noticed battery light on... pulled off the circuit at the end of hall bends.
Popped the bonnet for a quick look while waiting for recovery. Aux belt had popped off and the Aux belt tensioner was stuck down at the bottom wedged between the PAS pulley, fan and engine block.
Not the first time I've been pulled back by the tow truck from Hall bends and I'm sure it wont be the last. At least I managed to get off the circuit without causing a red flag
Had a good look at it in the paddock and found the two bolts holding the tensioner on had sheered off causing the tensioner to fall off and down into the PAW pulley and damaged the PAS pulley.
Had to take the oil filter housing off and drill out the snapped bolts.
Damaged PAS Pulley
Managed to find a replacement PAS pulley in Louth and pick up a new tensioner while it was in pieces and set about building it back up
Managed to get it back together with new parts and some replacement bolts from the spares box and managed two sessions before lunch.
First one to shake the car down and check for leaks or anything else visible.
Followed that up with a good 20-25 minute session before lunch.
First session back after lunchtime
Not the cleanest of photos of the E46 but not looking too bad after back to back trackdays in the same week
Managed a full afternoon of laps. Car felt fantastic on a different set of Michelin slicks and the Kaaz diff performed brilliantly around Cadwell Park. Finally managing the drive out of Mansfield without slipping the inside wheel. Spent a lot time trying to optimise the car set up but despite all of that it was just a plaster until I fitted a proper plated diff.
It's been a while so thought I'd have an update, lost interest with posting about things at the end of last year but thought some of the current stuff was worth talking about.
The car didn't need much doing to it after Cadwell besides checking over the Aux Belt situation.
Loaded up the night before the track day. Have the say the trailer I bought back in approx 2016 was one of the best purchases I ever made. it really has paid for it's self over the years!

As you can imagine Oulton in December last year, it was just wet all day. Full day on the wets, ECU traction control and ABS doing their thing and the car was fantastic!
Have to say I'm not a fan of the car from this angle especially the rear end. I think the wing has had it's time now, I do have a replacement boot to go on if I commit to it back to a cleaner none aero E46.

Pulled together a video from the last session of the day, track was starting to dry out but was still running wets
[url}https://youtu.be/ywvHQg_xL9E?si=PcY5ewTb0ei84SvU[/url]
It was one of my favourite days in the car, I had done a tank of fuel by lunch time and spent a lot more time on track than usual.
Did however manage to lose another brand new indicator again on the kerbs. Lost the same one at Cadwell in the summer!

Wet track days really do make everything disgusting!

Car got a deep clean and put it away until 2025. I thought at this point I would park it and not touch it...

Curiosity got the better of me, only reading, watching what friends are doing with upgrades to the car, I decided to look for areas where the car can be improved. So to improve lap times and help with wet track days I went from no ABS back to Mk60 with a Bias valve but decided to order a Mk60E5 which seems to be the next big braking upgrade, it is the last of the ABS pumps which works stand alone, uses canbus and can be programmed using BMW tools, ordered one of the latest pumps from a 330D from a E90 and with some help will upgrade the firmware to E92 M3 and change the parameters to match the E46.

Pump out and swapped over, also had to change the plugs to E5 specific plugs and repin the plug as the pin out is different between modules. I do have some schematics I have worked out and checked myself to accuracy so will post them if any ones interested.

New job was to pull off the hubs and look at sensor mounting, I haven't found anyone that has done this yet with an E5. The front wheel sensors from the E90/92 are vehicle specific magnetic sensors so I need to fit mag rings and mount the BMW sensors to the front hubs

Some drawings on the computer and some test prints on the 3D printer and I came up with version one, BMW front sensors have to mount end on to the mag ring so ideally need to be mounted in this orientation

Version 2 with improved drawing and dimensions

We experiemented with trying to use the rear hall sensors and flashing the unit to M3 firmware, E90 firmwares and programming the unit to use hall sensors such as the standard E46 sensors to see if it would work, but it appears it's only the specific E90 Hall sensors that will work in the rear so decided to convert the year to magnetic rings too, it works out nice that the same rings used on the front will fit on the shafts too.
[img]https://live.staticflickr.com/65535/54297719050_fa36060541_z.jpg[img]
Made up a guide to hold the magnetic rings concentric with the shafts when glueing them in place as there was slight gap and wanted them bonded as accurately as possible when spinning at 120mph!


Had all the parts professionally 3d printed. The sensor holders in stainless and the magnetic ring and rear sensor holders in nylon.

Front sensors bolting to the hub

Stripping the standard ring off a brand new front hub bearing

Magnetic ring holder pressed onto the hub and magnetic ring installed

Finally all mounted in position, just waiting on another new wheel hub for the other side.

At the moment I have got the system all connected to the car wiring, ECU and Logger.
I've bled the system and now have access to and logging a lot more data output from the E5.
4x brake pressures, one for each calipers, front and rear inlet pressures and rear pressure after the bias valve, I have decided to keep this in place so I can adjust the bias on the fly to adjust how much effort the pump has to do with controlling the bias, but the E5 appears to do a fantastic job of controlling the brake bias on the fly from what I've seen of it on a friends Porsche.
I have also mounted the E5 yaw sensor in the OEM location.
4 wheel speeds are output as standard from the E5 pump on ID206 , the Mk60 used to send it out on ID496 so I am using the logger board to read in and send out the values on the Mk60 address so the ECU has access to the wheel speeds for traction control.
I have also a revamp of the code for the data dashboard to show a lot more data relating to the E5.
Still a fair way to go before it's ready for testing but it's been good progress!
The car didn't need much doing to it after Cadwell besides checking over the Aux Belt situation.
Loaded up the night before the track day. Have the say the trailer I bought back in approx 2016 was one of the best purchases I ever made. it really has paid for it's self over the years!
As you can imagine Oulton in December last year, it was just wet all day. Full day on the wets, ECU traction control and ABS doing their thing and the car was fantastic!
Have to say I'm not a fan of the car from this angle especially the rear end. I think the wing has had it's time now, I do have a replacement boot to go on if I commit to it back to a cleaner none aero E46.
Pulled together a video from the last session of the day, track was starting to dry out but was still running wets
[url}https://youtu.be/ywvHQg_xL9E?si=PcY5ewTb0ei84SvU[/url]
It was one of my favourite days in the car, I had done a tank of fuel by lunch time and spent a lot more time on track than usual.
Did however manage to lose another brand new indicator again on the kerbs. Lost the same one at Cadwell in the summer!
Wet track days really do make everything disgusting!
Car got a deep clean and put it away until 2025. I thought at this point I would park it and not touch it...
Curiosity got the better of me, only reading, watching what friends are doing with upgrades to the car, I decided to look for areas where the car can be improved. So to improve lap times and help with wet track days I went from no ABS back to Mk60 with a Bias valve but decided to order a Mk60E5 which seems to be the next big braking upgrade, it is the last of the ABS pumps which works stand alone, uses canbus and can be programmed using BMW tools, ordered one of the latest pumps from a 330D from a E90 and with some help will upgrade the firmware to E92 M3 and change the parameters to match the E46.
Pump out and swapped over, also had to change the plugs to E5 specific plugs and repin the plug as the pin out is different between modules. I do have some schematics I have worked out and checked myself to accuracy so will post them if any ones interested.
New job was to pull off the hubs and look at sensor mounting, I haven't found anyone that has done this yet with an E5. The front wheel sensors from the E90/92 are vehicle specific magnetic sensors so I need to fit mag rings and mount the BMW sensors to the front hubs
Some drawings on the computer and some test prints on the 3D printer and I came up with version one, BMW front sensors have to mount end on to the mag ring so ideally need to be mounted in this orientation
Version 2 with improved drawing and dimensions
We experiemented with trying to use the rear hall sensors and flashing the unit to M3 firmware, E90 firmwares and programming the unit to use hall sensors such as the standard E46 sensors to see if it would work, but it appears it's only the specific E90 Hall sensors that will work in the rear so decided to convert the year to magnetic rings too, it works out nice that the same rings used on the front will fit on the shafts too.
[img]https://live.staticflickr.com/65535/54297719050_fa36060541_z.jpg[img]
Made up a guide to hold the magnetic rings concentric with the shafts when glueing them in place as there was slight gap and wanted them bonded as accurately as possible when spinning at 120mph!
Had all the parts professionally 3d printed. The sensor holders in stainless and the magnetic ring and rear sensor holders in nylon.
Front sensors bolting to the hub
Stripping the standard ring off a brand new front hub bearing
Magnetic ring holder pressed onto the hub and magnetic ring installed
Finally all mounted in position, just waiting on another new wheel hub for the other side.
At the moment I have got the system all connected to the car wiring, ECU and Logger.
I've bled the system and now have access to and logging a lot more data output from the E5.
4x brake pressures, one for each calipers, front and rear inlet pressures and rear pressure after the bias valve, I have decided to keep this in place so I can adjust the bias on the fly to adjust how much effort the pump has to do with controlling the bias, but the E5 appears to do a fantastic job of controlling the brake bias on the fly from what I've seen of it on a friends Porsche.
I have also mounted the E5 yaw sensor in the OEM location.
4 wheel speeds are output as standard from the E5 pump on ID206 , the Mk60 used to send it out on ID496 so I am using the logger board to read in and send out the values on the Mk60 address so the ECU has access to the wheel speeds for traction control.
I have also a revamp of the code for the data dashboard to show a lot more data relating to the E5.
Still a fair way to go before it's ready for testing but it's been good progress!
dhutch said:
As always very interesting to see and read, particularly the ABS upgrade.
Presumably just a much finer resolution 'cleverer' system which will give a much more modern feel to the abs and traction control?
This is the idea, the E5 being from the E9X generation cars it's a lot newer, newer technology and developed strategies. Will be interesting to see the difference, I am led to believe the control of the individual wheel pressures is a lot more refined and has the ability to learn throughout the session regarding grip levels and bias, where as the Mk60 has to make these decisions every time the brake pedal is pressed. This is only what I have read though some of the technical documentation.Presumably just a much finer resolution 'cleverer' system which will give a much more modern feel to the abs and traction control?
The real test will be doing some logging and seeing how it feels when driving, I found the Mk60 brilliant at Oulton park in the wet especially when braking on the wet line/off the main braking zone but interested to see what the difference is with the E5, like you say a more developed system.
Spring arrives which brings with it the first track day for 2025 so I have had to get the car all working ready for Oulton Park which meant finishing off some of the on going jobs from over winter.
MK60E5.
Will document a few bits of this which I have found out along the way.
I am using - 6789303/6789304 - This is from the 6 cylinder E9x Models, It is important that all the parts used are from the 6 cylinder variants, I found this out the hard way again.
With some help of a friend we have experimented with flashing to M3 software but had an issue with a pump losing some inlet valve calibrations and being unable to rerun the calibrations with a 5DD0 Fault code which I was unable to clear on one unit, I bought a spare unit and just left it as the standard 6 cylinder firmware and updated some of the onboard settings using tool32.
Once I have used the ABS with the standard software I will update it to M3 in the future.
Sensors are front wheel speed sensors from 3.0 versions - 3452670424 - The white plastic gives them away as being 6 cylinder versions.

Originally I ordered the following Yaw sensor, the internet tends to say these are compatible with all model of pump - Guess what they're not!
The following is for Pre LCI but also appears to work with an E92 M3 pump too
676269-04

The correct Yaw sensor to use with a Post LCI unit as documented above
6850375

This later Yaw sensor uses a different style plug too as well as a different pin out

4 Pin Yaw Sensor
1 - Yaw Sensor Ground
2- Can Low
3- Can High
4- Yaw Sensor V+
With all that sorted and no more fault codes in the system other than missing data like the E90 instruments, Canbus messages and steering angle It was back to the mechanical side of things
I wanted to get the sensor wiring as far away from the disc as possible.
Ground away some of the plastic which wasn't needed where the wiring went into the sensor

Added thick heat proof sleeving rated for 400+ degrees

It is close but no issues so far at the time of writing this I have tested it and no effects from heat at the moment. Going up to E46 CSL discs would create more space here which is an option for the future

One important part of keeping these set up working is going to be cooling.
I have refitted the 3" brake ducts from the front fog lights to the front of the hubs

While on the topic of the E5 - Screenshot of a log from Oulton this weekend just passed.
Brakes going into EBV - Brake biasing when the rear wheels are reaching their limit of grip.
If wheel slip is detected on the front wheels then it goes into ABS

Overall the feel of the ABS is very good, no pedal feedback which was my biggest issue with the standard MK60 from the E46.
I was getting to grips with the brakes again at Oulton at the weekend and if anything over braking for corners but with a little more seat time I will get used to how late I can brake as well as getting used to how hard I can press the brakes, still only hitting just over 1000psi on braking, once or twice I hit 1200psi without any wheel slip or ABS it's just getting used to it again after years of having no ABS.
Pulled off the new tensioner I fitted at Cadwell Park last year when the bolts snapped in the block and replaced it for a S54 tensioner and idler, if it's good enough for 8k revs on an S54 it'll be much better for this engine.
Hopefully proves to be more reliable and pass the forces from the belt to the block more effectively with the larger clamping area an 3 bolts

With this tensioner you need to run the idler at the top near the alternator to take up the slack in the belt that's created with this tensioner being in a slightly different location

Modified the mounting of the splitter to raise the back edge it slightly to give a better rake angle on it and hopefully a little more front end grip, with the replacement bumper the splitter angle ended up pretty much flat so likely not doing a great deal

Interior - No major changes - Just been working on ensuring the instrument cluster works correctly
I have set up the Centre ABS Light to work with the MK60E5 to light up when there is an ABS fault
Speedo working correctly using one of the wheel speed outputs from the E5 directly to the cluster as it uses a PWM input
Red and Yellow ABS lights disabled.

Ordered a new wing to try at Oulton Park

Slghtly smaller than the chasis mounted wing


Safe to say I noticed a big difference at Oulton without the larger wing, throughout the day I adjusted the smaller wing all the way to it's maximum setting, but the car was no where near as stable as it normally is with the larger wing, I think this is something I will go back to. Function over form on this one.
Gave the alignment a once over as I'd replaced the front right inner tie rod and track rod end and it was ready for Oulton Park

The day got off to a great start, it was fairly quiet out on circuit and had a passenger in for the first 20 minute session, looking back at the logs I ended up putting in a 2:00 dead lap in the first session of the day. I think back now for how many years I was trying to get Oulton down to a 2 minute lap!

Changed a few things during the day, Ran the front ARB on full soft and full stiff. Prefer it on the soft setting which is way stiffer than the OEM bar anyway.
Turned up the dampers and tried a few different settings away from my usual base line settings but again preferring to run the dampers in the middle of their settings rather than full hard being one way dampers.

Checked the car over in the middle of the day and noticed that one of the Nylon press on fittings for the ABS had expanded and was no longer a push fit, I had decided to epoxy one side on, but the first side I built up I'd left as a push fit, I quickly rebuilt the first side with some epoxy resin and carried on the day without issue with the ABS
Got the car on the weighbridge at lunchtime.
The car was 1255 with 22 litres of fuel - 1230kg.
There is some weight I can loose easily from the car like foot plates, fire extinguisher, as well as around 15kg in splitter and splitter mounts but it's not worth it in my opinion for what they add.

The car was going really well until I suffered a random battery failure at 3pm. Hitting the inner curb at Cascades the whole car turned off and when diagnosing the fault the battery reads a flat 0v, prior to this everything was perfect on the logger showing 14.2 volts all day. I have ordered a different/new battery to replace the Lucas battery I was running. I will be rubber mounting this one though rather than it being solid on the metal floor

Obviously theres a video. Not my tidiest of laps, could be a lot smoother if I wasn't using so much kerb unsettling the car too!
MK60E5.
Will document a few bits of this which I have found out along the way.
I am using - 6789303/6789304 - This is from the 6 cylinder E9x Models, It is important that all the parts used are from the 6 cylinder variants, I found this out the hard way again.
With some help of a friend we have experimented with flashing to M3 software but had an issue with a pump losing some inlet valve calibrations and being unable to rerun the calibrations with a 5DD0 Fault code which I was unable to clear on one unit, I bought a spare unit and just left it as the standard 6 cylinder firmware and updated some of the onboard settings using tool32.
Once I have used the ABS with the standard software I will update it to M3 in the future.
Sensors are front wheel speed sensors from 3.0 versions - 3452670424 - The white plastic gives them away as being 6 cylinder versions.
Originally I ordered the following Yaw sensor, the internet tends to say these are compatible with all model of pump - Guess what they're not!
The following is for Pre LCI but also appears to work with an E92 M3 pump too
676269-04
The correct Yaw sensor to use with a Post LCI unit as documented above
6850375
This later Yaw sensor uses a different style plug too as well as a different pin out
4 Pin Yaw Sensor
1 - Yaw Sensor Ground
2- Can Low
3- Can High
4- Yaw Sensor V+
With all that sorted and no more fault codes in the system other than missing data like the E90 instruments, Canbus messages and steering angle It was back to the mechanical side of things
I wanted to get the sensor wiring as far away from the disc as possible.
Ground away some of the plastic which wasn't needed where the wiring went into the sensor
Added thick heat proof sleeving rated for 400+ degrees
It is close but no issues so far at the time of writing this I have tested it and no effects from heat at the moment. Going up to E46 CSL discs would create more space here which is an option for the future
One important part of keeping these set up working is going to be cooling.
I have refitted the 3" brake ducts from the front fog lights to the front of the hubs
While on the topic of the E5 - Screenshot of a log from Oulton this weekend just passed.
Brakes going into EBV - Brake biasing when the rear wheels are reaching their limit of grip.
If wheel slip is detected on the front wheels then it goes into ABS
Overall the feel of the ABS is very good, no pedal feedback which was my biggest issue with the standard MK60 from the E46.
I was getting to grips with the brakes again at Oulton at the weekend and if anything over braking for corners but with a little more seat time I will get used to how late I can brake as well as getting used to how hard I can press the brakes, still only hitting just over 1000psi on braking, once or twice I hit 1200psi without any wheel slip or ABS it's just getting used to it again after years of having no ABS.
Pulled off the new tensioner I fitted at Cadwell Park last year when the bolts snapped in the block and replaced it for a S54 tensioner and idler, if it's good enough for 8k revs on an S54 it'll be much better for this engine.
Hopefully proves to be more reliable and pass the forces from the belt to the block more effectively with the larger clamping area an 3 bolts
With this tensioner you need to run the idler at the top near the alternator to take up the slack in the belt that's created with this tensioner being in a slightly different location
Modified the mounting of the splitter to raise the back edge it slightly to give a better rake angle on it and hopefully a little more front end grip, with the replacement bumper the splitter angle ended up pretty much flat so likely not doing a great deal
Interior - No major changes - Just been working on ensuring the instrument cluster works correctly
I have set up the Centre ABS Light to work with the MK60E5 to light up when there is an ABS fault
Speedo working correctly using one of the wheel speed outputs from the E5 directly to the cluster as it uses a PWM input
Red and Yellow ABS lights disabled.
Ordered a new wing to try at Oulton Park
Slghtly smaller than the chasis mounted wing
Safe to say I noticed a big difference at Oulton without the larger wing, throughout the day I adjusted the smaller wing all the way to it's maximum setting, but the car was no where near as stable as it normally is with the larger wing, I think this is something I will go back to. Function over form on this one.
Gave the alignment a once over as I'd replaced the front right inner tie rod and track rod end and it was ready for Oulton Park
The day got off to a great start, it was fairly quiet out on circuit and had a passenger in for the first 20 minute session, looking back at the logs I ended up putting in a 2:00 dead lap in the first session of the day. I think back now for how many years I was trying to get Oulton down to a 2 minute lap!
Changed a few things during the day, Ran the front ARB on full soft and full stiff. Prefer it on the soft setting which is way stiffer than the OEM bar anyway.
Turned up the dampers and tried a few different settings away from my usual base line settings but again preferring to run the dampers in the middle of their settings rather than full hard being one way dampers.
Checked the car over in the middle of the day and noticed that one of the Nylon press on fittings for the ABS had expanded and was no longer a push fit, I had decided to epoxy one side on, but the first side I built up I'd left as a push fit, I quickly rebuilt the first side with some epoxy resin and carried on the day without issue with the ABS
Got the car on the weighbridge at lunchtime.
The car was 1255 with 22 litres of fuel - 1230kg.
There is some weight I can loose easily from the car like foot plates, fire extinguisher, as well as around 15kg in splitter and splitter mounts but it's not worth it in my opinion for what they add.
The car was going really well until I suffered a random battery failure at 3pm. Hitting the inner curb at Cascades the whole car turned off and when diagnosing the fault the battery reads a flat 0v, prior to this everything was perfect on the logger showing 14.2 volts all day. I have ordered a different/new battery to replace the Lucas battery I was running. I will be rubber mounting this one though rather than it being solid on the metal floor
Obviously theres a video. Not my tidiest of laps, could be a lot smoother if I wasn't using so much kerb unsettling the car too!
Edited by tombate911 on Wednesday 19th March 23:05
Unlike me I barely touched the car since March up until the Anglesey track day in May.
I did fit a new battery to replace the failed one from Oulton Park. When I removed the original battery it was completely flat 0v so something has broken/become disconnected inside.
Fitted the new battery and checked the voltages and everything looked good.

The return of the BGW

Anglesey Coastal
After the months of beautiful weather it was forecast a dry morning at least on Anglesey. Expected to get a lot of rain in the afternoon so tried to make the most of the morning weather

Car was faultless all day, nice to only have to check tyre pressures and suspension settings
Rolling out for some morning laps


It doesn't always go to plan. Returning back to the circuit from the infield.

Just before lunch the heavens started to open. On with the wets

Some artistic garage photos


I did fit a new battery to replace the failed one from Oulton Park. When I removed the original battery it was completely flat 0v so something has broken/become disconnected inside.
Fitted the new battery and checked the voltages and everything looked good.
The return of the BGW
Anglesey Coastal
After the months of beautiful weather it was forecast a dry morning at least on Anglesey. Expected to get a lot of rain in the afternoon so tried to make the most of the morning weather
Car was faultless all day, nice to only have to check tyre pressures and suspension settings
Rolling out for some morning laps
It doesn't always go to plan. Returning back to the circuit from the infield.
Just before lunch the heavens started to open. On with the wets
Some artistic garage photos
Gassing Station | Readers' Cars | Top of Page | What's New | My Stuff