Caterham Seven 360R
Discussion


Lucky for you Top Gear made a detailed Caterham build video 
https://www.youtube.com/watch?v=cOxHV6QfJkg
Have fun! I built my Westfield a couple of years ago and loved it, so much in fact I am adding a turbo to the MX-5 engine at the minute
https://www.youtube.com/watch?v=cOxHV6QfJkg
Have fun! I built my Westfield a couple of years ago and loved it, so much in fact I am adding a turbo to the MX-5 engine at the minute
lewisco said:
Amazing, they look so much younger yet I feel that episode was a couple of years ago.Going to do the same thing myself, albeit going for a 270.
cbmotorsport said:
Helped a mate build his Caterham a few years ago. It was fun and fairly easy, and incredibly rewarding to then get to drive it.
My pal has such attention to detail that when he took it back to Caterham for testing, they couldn't find a fault. Nearly offered him a job.
Well, they need some good people 😂My pal has such attention to detail that when he took it back to Caterham for testing, they couldn't find a fault. Nearly offered him a job.
Veeayt said:
lewisco said:
Amazing, they look so much younger yet I feel that episode was a couple of years ago.Going to do the same thing myself, albeit going for a 270.

Thank you for all the kind words of encouragement. It's great to get positive feedback from likeminded petrol-heads when my friends (bar a few) and family think I'm mad.
I'm not a million miles away from Huddersfield if that tempts any seasoned spanner wielders...?
Progress has been fairly slow so far. Most of it has been spent reading instructions and rummaging around in boxes trying to identify parts / identify what is missing.
My DIY mechanic skills have up until now, extended as far as fitting exhausts so assembling a Caterham is a big leap for me. So identifying said parts hasn't come naturally. Although I do know what a de-dion tube looks like and that was definitely missing!
As the flaky instructions recommend, I started at the front and fitted the steering rack first.
There are two sets of paired clamps that...well...clamp the rack to the chassis. IVA sleeves slide over the steering arms followed by the track rod ends. All pretty straight forward.
A minor hiccup being I only realised the clamps were paired once I'd mixed them up! Nothing a bit of measuring couldn't solve.


Now time for the front suspension paraphernalia.
Lower wishbones simply bolt into place with a few washers inserted (read hammered) either side of each bush.

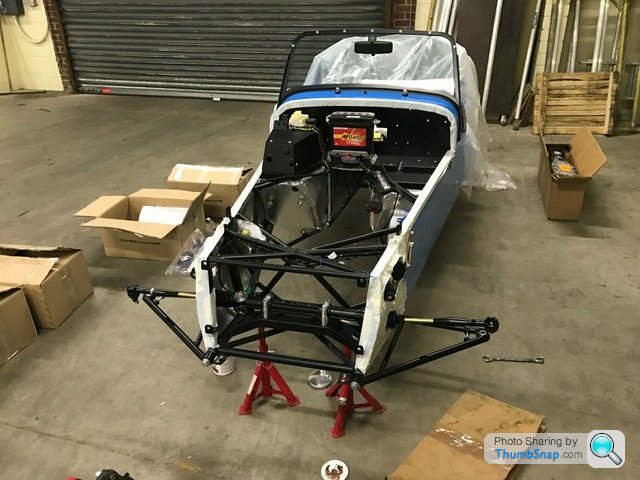
Upper wishbones were slightly more tricky as the instructions request you to insert a bush into the bush on the rear leg of the wishbone. To me a bush is something made from rubber, so it took me a while to realise that a little metal sleeve in an unmarked bag was the part for the job.
A bit of copper grease later and we have both rear legs of each upper wishbone bolted onto the chassis.

The front leg of the upper wishbones now require bolting to the chassis but not before you have assembled the headlight and indicator units and fitted them to their corresponding brackets. The brackets then slot onto the same bolts used to secure the wishbones.
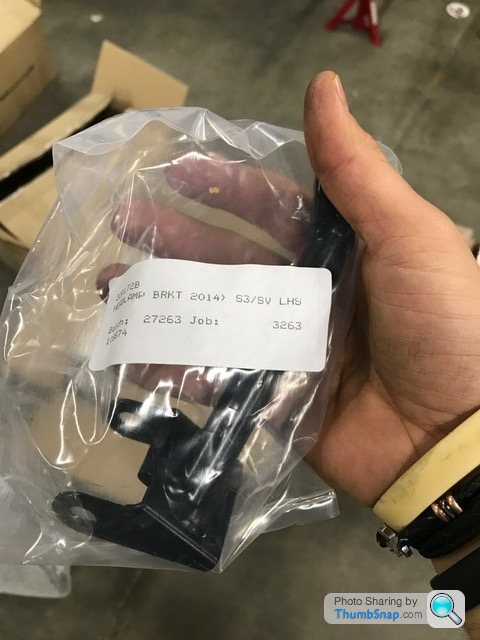
I eventually found the left hand bracket deep in the bottom of a random box but not the right hand one. It was late in the evening now so I called it a day.
The missing bracket should arrive in the post tomorrow so I can continue (and hopefully finish!!) the front suspension.
Bit of a boring and lacking update....sorry. More next time!
I'm not a million miles away from Huddersfield if that tempts any seasoned spanner wielders...?
Progress has been fairly slow so far. Most of it has been spent reading instructions and rummaging around in boxes trying to identify parts / identify what is missing.
My DIY mechanic skills have up until now, extended as far as fitting exhausts so assembling a Caterham is a big leap for me. So identifying said parts hasn't come naturally. Although I do know what a de-dion tube looks like and that was definitely missing!
As the flaky instructions recommend, I started at the front and fitted the steering rack first.
There are two sets of paired clamps that...well...clamp the rack to the chassis. IVA sleeves slide over the steering arms followed by the track rod ends. All pretty straight forward.
A minor hiccup being I only realised the clamps were paired once I'd mixed them up! Nothing a bit of measuring couldn't solve.
Now time for the front suspension paraphernalia.
Lower wishbones simply bolt into place with a few washers inserted (read hammered) either side of each bush.
Upper wishbones were slightly more tricky as the instructions request you to insert a bush into the bush on the rear leg of the wishbone. To me a bush is something made from rubber, so it took me a while to realise that a little metal sleeve in an unmarked bag was the part for the job.
A bit of copper grease later and we have both rear legs of each upper wishbone bolted onto the chassis.
The front leg of the upper wishbones now require bolting to the chassis but not before you have assembled the headlight and indicator units and fitted them to their corresponding brackets. The brackets then slot onto the same bolts used to secure the wishbones.
I eventually found the left hand bracket deep in the bottom of a random box but not the right hand one. It was late in the evening now so I called it a day.
The missing bracket should arrive in the post tomorrow so I can continue (and hopefully finish!!) the front suspension.
Bit of a boring and lacking update....sorry. More next time!
Well done and good on you for taking pics as you go- I'm sure they are important as part of the story of your car but they're also interesting to us weirdos. I always find it a massive pain to stop and photograph things when working on the cars but that may be outside + manly dirty old stuff compared to indoors clean new shiny things.
Great colour choice and I'm excited to see it come together and come alive! Hope it's a straightforward experience (or the rest of the stuff is in the boxes, fits, instructions magically improve).
Great colour choice and I'm excited to see it come together and come alive! Hope it's a straightforward experience (or the rest of the stuff is in the boxes, fits, instructions magically improve).
Kits start at 17k, but things escalate pretty quickly and looking at the price of fully built cars things must get very expensive further up the range.
Would love to do this, bucket list stuff, and I haven't even blagged a passenger ride in one let alone a drive.
Caterham are the best of a bad bunch when it comes to parts supply and flaky instructions, bit poor really considering the cost of the kit.
Would love to do this, bucket list stuff, and I haven't even blagged a passenger ride in one let alone a drive.
Caterham are the best of a bad bunch when it comes to parts supply and flaky instructions, bit poor really considering the cost of the kit.
Gassing Station | Readers' Cars | Top of Page | What's New | My Stuff