Chris' Nissan Micra K11 v3
Discussion


You may have seen the build thread on my previous car a Purple Supercharged MX5 and my current car a Pearl White R34 GTT
Skyline ownership has been faultess up until February 2020. Myself and my fiance Louise went for a drive around the B roads of Norfolk. All was well until we drove through a village and had to pull over slightly to allow a que of cars through. As I pulled forward there was an almighty crunch from the passenger side, I had hit a hidden curb....crap!
Long story short, I got the alloys repaired and repainted and it kind of put me off from driving it how I wanted to. I feared if we went out in the future down a similar road and a large lorry or tractor came the opposite direction, I wouldn't be able to put the car into a hedge to get by, pearl paint isn't cheap to fix!
We got talking and the suggestion of a cheap fun hatchback cropped up in conversation. Reminiscing of the 'old days' and how much we missed the red Micra we decided to look for another one.
With the intention of it being a cheap B road beater, it didn't need to be mint. The term s tbox was used quite alot and still is haha
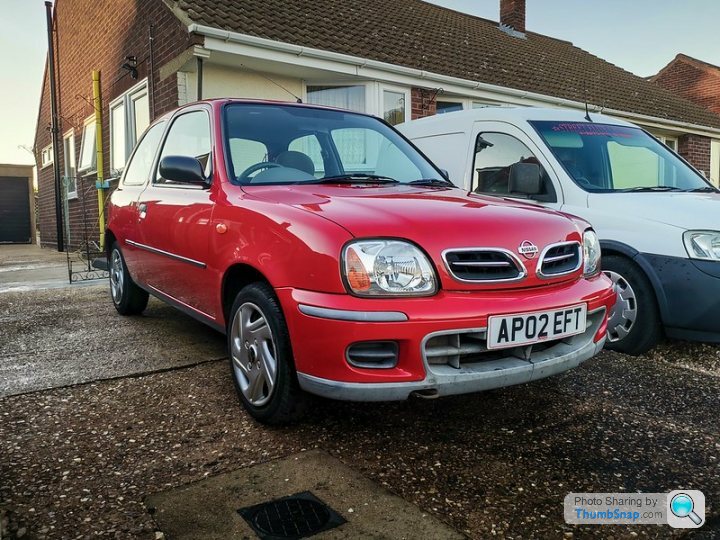
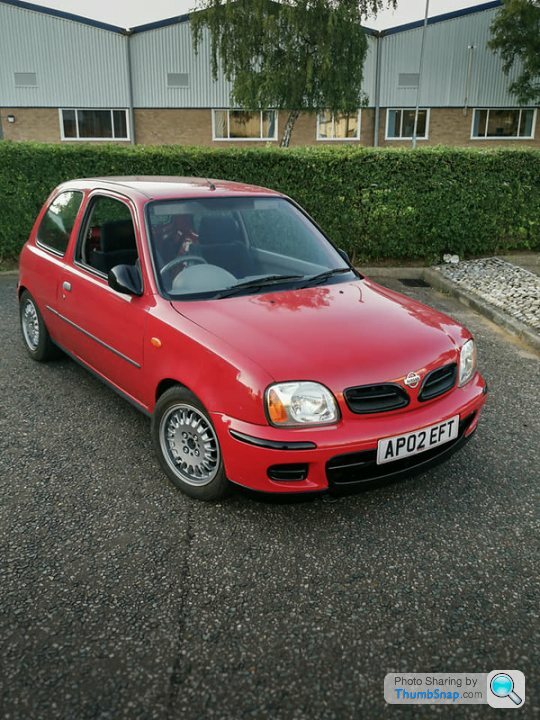
Having a small budget didn't help with the search but we found a 2nd facelift 1.0 model about 45mins away. We went to have a look and it was as described for the most part.
The clutch and cable had been changed 6 months prior but the clutch pedal was really tough and stuck half way up during travel (which made gear changes quite entertaining). The engine had an intermittant noise which sounded like a idler bearing or waterpump. The paint work was faded, the N/S rear arch has had a scrape and the sills weren't in the best condition, but the front cross member was mint with no visible corrosion.
We made a deal based on the issues and I drove away happy. I had forgotten how sluggish the 58bhp 1.0 hatchbacks were, the drive home felt like a life time.
The first thing I did when I got it home was to wash it to get some decent photos
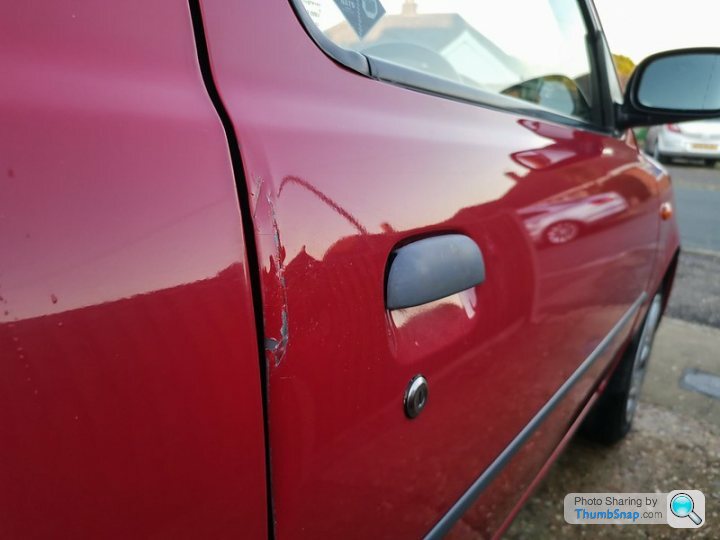
The driver's door has had a ding at some point. It was quite bad as the top would close flush before the bottom. Abit of pulling about and managed to get it to close straighter, just a shame about the door edge but hey ho
 [url]
[url]
 |https://thumbsnap.com/1zuYHTxB[/url]
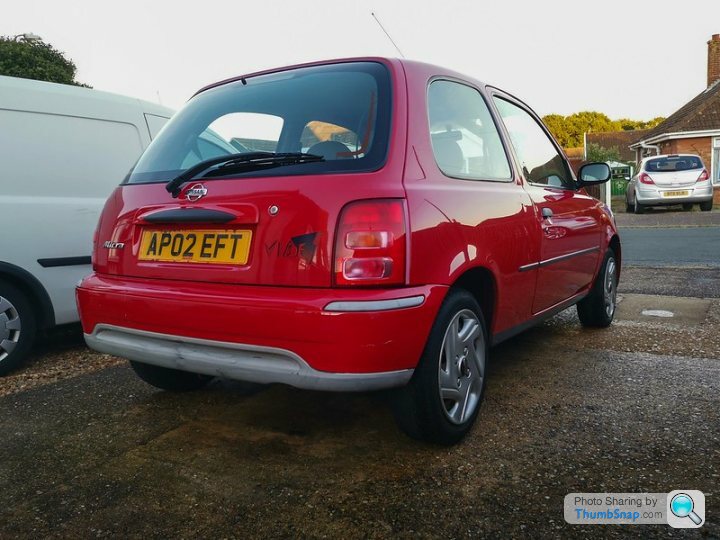
The N/S rear arch has had a scrape and the arch lip is badly corroded. The outer sill is very rusty so both will be cut out and replaced at a later date.

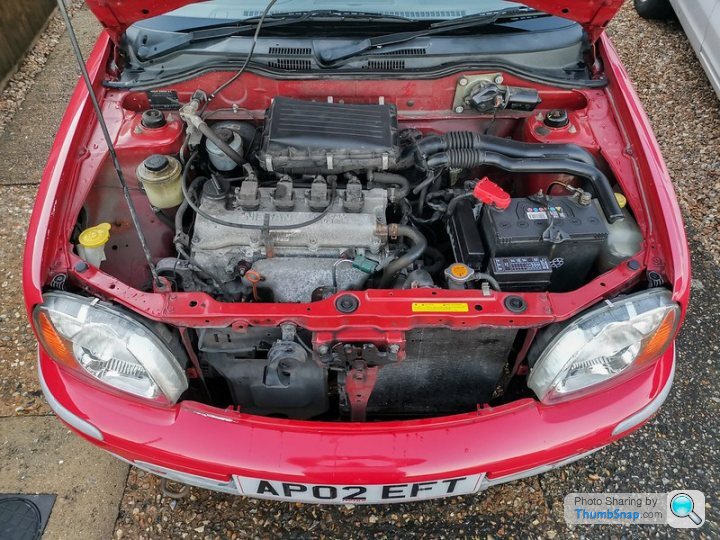
The engine bay is quite clean for a 68k-ish mile car. Nothing exciting to see I'm afraid.

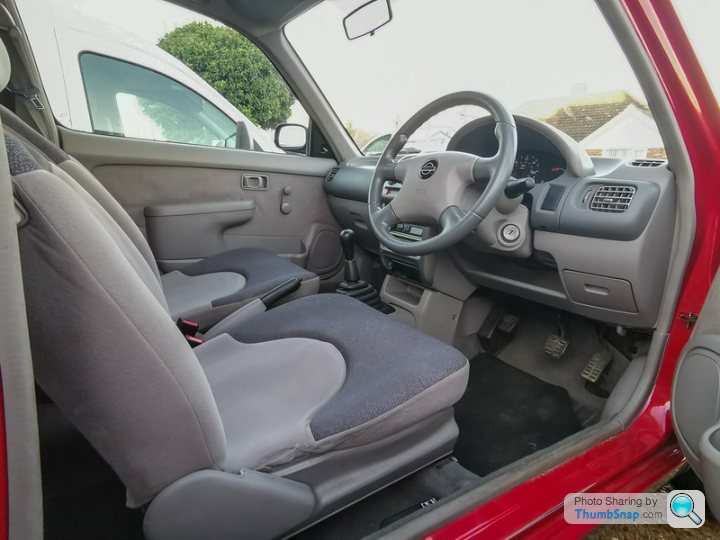
The interior is a two (maybe three) tone grey. Not the worst interior by a long shot but very basic.
Let the project begin!
Skyline ownership has been faultess up until February 2020. Myself and my fiance Louise went for a drive around the B roads of Norfolk. All was well until we drove through a village and had to pull over slightly to allow a que of cars through. As I pulled forward there was an almighty crunch from the passenger side, I had hit a hidden curb....crap!
Long story short, I got the alloys repaired and repainted and it kind of put me off from driving it how I wanted to. I feared if we went out in the future down a similar road and a large lorry or tractor came the opposite direction, I wouldn't be able to put the car into a hedge to get by, pearl paint isn't cheap to fix!
We got talking and the suggestion of a cheap fun hatchback cropped up in conversation. Reminiscing of the 'old days' and how much we missed the red Micra we decided to look for another one.
With the intention of it being a cheap B road beater, it didn't need to be mint. The term s
tbox was used quite alot and still is hahaHaving a small budget didn't help with the search but we found a 2nd facelift 1.0 model about 45mins away. We went to have a look and it was as described for the most part.
The clutch and cable had been changed 6 months prior but the clutch pedal was really tough and stuck half way up during travel (which made gear changes quite entertaining). The engine had an intermittant noise which sounded like a idler bearing or waterpump. The paint work was faded, the N/S rear arch has had a scrape and the sills weren't in the best condition, but the front cross member was mint with no visible corrosion.
We made a deal based on the issues and I drove away happy. I had forgotten how sluggish the 58bhp 1.0 hatchbacks were, the drive home felt like a life time.
The first thing I did when I got it home was to wash it to get some decent photos
The driver's door has had a ding at some point. It was quite bad as the top would close flush before the bottom. Abit of pulling about and managed to get it to close straighter, just a shame about the door edge but hey ho
[url]|https://thumbsnap.com/1zuYHTxB[/url]The N/S rear arch has had a scrape and the arch lip is badly corroded. The outer sill is very rusty so both will be cut out and replaced at a later date.
The engine bay is quite clean for a 68k-ish mile car. Nothing exciting to see I'm afraid.
The interior is a two (maybe three) tone grey. Not the worst interior by a long shot but very basic.
Let the project begin!
Before I could get stuck in with modifying I needed to get a fresh MOT despite having a month or so left on the current certificate, COVID-19 allowed a 6 month extension but buying an unknown car I wasn't going to take the risk.
The offside trackrod end was practically hanging off, how the car drove without trying to kill me is beyond me. The inner sills needed a small patch each side and was done within a week along with the track rod end and wheel alignment.
Other advisories were 3 tyres and an oil leak. We knew we'd be changing the wheels at some point and with the vehicle not being a daily driver we were happy to wait to sort it.
Now that was out of the way the fun could begin. Of course I'd be taking inspiration from the previous red K11,purely for the fact it had alot of cool bits fitted and I loved the look of it.
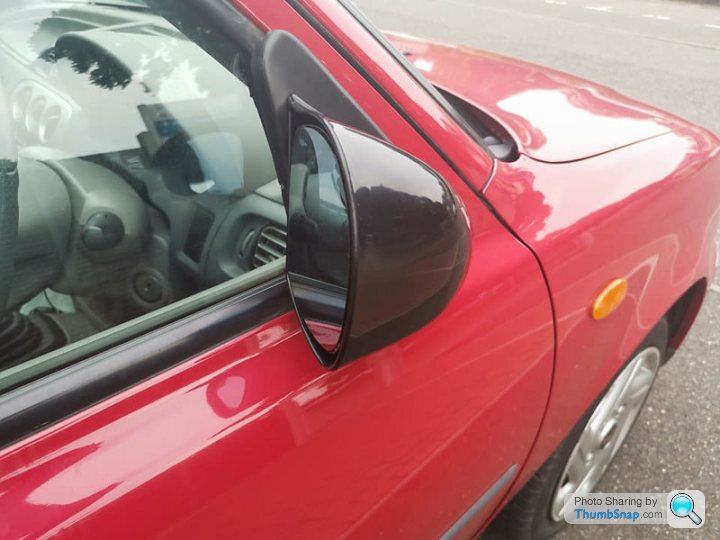
The first idea was some DTM style door mirrors, mainly because I still had a pair of brand new mirrors stored away. Searching the inter-web it was impossible to find any Mirca specific base plates. I came across a website who had a catalog of mirrors and base plates. Scrolling through I noticed VW Golf Mk3 base plates looked very similar in shape. A status on Facebook got me a reply from a friend who had some M3 style mirrors with Golf base plates. He brought them over for me to test fit and see if they'd work, with abit of drilling I reckon I could make them work.
The locating pins needed to be removed and new holes for the mounting studs.

They fit pretty well on the car! The baseplates are slightly larger than the door shape but it honestly doesn't look too out of place.

The first major decision for the build were the wheels.
Being 4x100 there are countless wheels on the market but most didn't/wouldn't suit. I had a rough idea of what I wanted the car to look like but it was difficult visualising wheels on a car which didn't have the supporting changes.
After a search on Google,Facebook and the forums I came across some examples of BMW E30 14" bottletop wheels on a couple of K11s
I managed to find some locally for a total sum of £40.00, bargain! The wheels were in pretty good condition with the odd curb rash, but what do you expect for wheels that came off a 30 year old car.
A friend kindly offered to sand blast them ready for me to paint them. Originally we thought white, but the spoke design would make keeping them clean a nightmare. The second choice was a gun metal grey, silver may be too plain/boring. I hate black wheels so that was out of the question (I feel the wheel design gets lost amongst the tyre)

I also found a set of 185/55r14 locally from a friend for the grand total of £40.00, this saved us alot of money early on.
With all of the parts finally arriving, it was time to finally lower the car. Alot of people tend to go with Corsa B coilovers, but I didnt like the idea of drilling/filing the top mount holes on the car. So we went for the Daewoo Matiz set up instead.
This compromises of Mk1 Daewoo Matiz 35mm lowering springs (rear only) on front K11 shock absorbers. The rears are Corsa B KYB shocks with 're-engineered' K11 35mm lowering springs. I've read of people complaining about the rear springs being too soft if you use the originals, thats why we went for lowering springs instead.

I ran into some issues along the way, sadly it wasn't all plain sailing. Firstly the driver side inner CV joint popped out. Secondly the upper nuts on the rear shocks wouldn't undo due to the centre spinning in the locking grips. In the end I cut the shock to get them out, made abit of a mess in the boot (oops).
The last thing was the collar from the original panhard rod was seized on the car and took alot of grinding to get it right.

Browsing through the Facebook pages and market place and I found a universal back box made to fit the K11. Being quite impatient I drove almost 2 hours to go collect it. Being a second facelift the rear bumper doesnt really have an exhaust cut out, so the backbox sits lower than the others which made fitting it that little bit more tricky. But we got around it and my bumper cutting even surprised me!


I also made a start on painting the chrome and faded plastics, starting with the bonnet grilles and fog light covers.
The offside trackrod end was practically hanging off, how the car drove without trying to kill me is beyond me. The inner sills needed a small patch each side and was done within a week along with the track rod end and wheel alignment.
Other advisories were 3 tyres and an oil leak. We knew we'd be changing the wheels at some point and with the vehicle not being a daily driver we were happy to wait to sort it.
Now that was out of the way the fun could begin. Of course I'd be taking inspiration from the previous red K11,purely for the fact it had alot of cool bits fitted and I loved the look of it.
The first idea was some DTM style door mirrors, mainly because I still had a pair of brand new mirrors stored away. Searching the inter-web it was impossible to find any Mirca specific base plates. I came across a website who had a catalog of mirrors and base plates. Scrolling through I noticed VW Golf Mk3 base plates looked very similar in shape. A status on Facebook got me a reply from a friend who had some M3 style mirrors with Golf base plates. He brought them over for me to test fit and see if they'd work, with abit of drilling I reckon I could make them work.
The locating pins needed to be removed and new holes for the mounting studs.
They fit pretty well on the car! The baseplates are slightly larger than the door shape but it honestly doesn't look too out of place.
The first major decision for the build were the wheels.
Being 4x100 there are countless wheels on the market but most didn't/wouldn't suit. I had a rough idea of what I wanted the car to look like but it was difficult visualising wheels on a car which didn't have the supporting changes.
After a search on Google,Facebook and the forums I came across some examples of BMW E30 14" bottletop wheels on a couple of K11s
I managed to find some locally for a total sum of £40.00, bargain! The wheels were in pretty good condition with the odd curb rash, but what do you expect for wheels that came off a 30 year old car.
A friend kindly offered to sand blast them ready for me to paint them. Originally we thought white, but the spoke design would make keeping them clean a nightmare. The second choice was a gun metal grey, silver may be too plain/boring. I hate black wheels so that was out of the question (I feel the wheel design gets lost amongst the tyre)
I also found a set of 185/55r14 locally from a friend for the grand total of £40.00, this saved us alot of money early on.
With all of the parts finally arriving, it was time to finally lower the car. Alot of people tend to go with Corsa B coilovers, but I didnt like the idea of drilling/filing the top mount holes on the car. So we went for the Daewoo Matiz set up instead.
This compromises of Mk1 Daewoo Matiz 35mm lowering springs (rear only) on front K11 shock absorbers. The rears are Corsa B KYB shocks with 're-engineered' K11 35mm lowering springs. I've read of people complaining about the rear springs being too soft if you use the originals, thats why we went for lowering springs instead.
I ran into some issues along the way, sadly it wasn't all plain sailing. Firstly the driver side inner CV joint popped out. Secondly the upper nuts on the rear shocks wouldn't undo due to the centre spinning in the locking grips. In the end I cut the shock to get them out, made abit of a mess in the boot (oops).
The last thing was the collar from the original panhard rod was seized on the car and took alot of grinding to get it right.
Browsing through the Facebook pages and market place and I found a universal back box made to fit the K11. Being quite impatient I drove almost 2 hours to go collect it. Being a second facelift the rear bumper doesnt really have an exhaust cut out, so the backbox sits lower than the others which made fitting it that little bit more tricky. But we got around it and my bumper cutting even surprised me!
I also made a start on painting the chrome and faded plastics, starting with the bonnet grilles and fog light covers.
The lower trims and corner bump strips got painted gloss black to match the grilles and fog light covers

[url] |https://thumbsnap.com/36ERVYfS[/url
The 14" BMW Bottletop alloys finally received a coat of paint. One of them isnt the great of conditions so I'll be on the look out for another one in the future but for now it'll be fine.

The paint I chose was Holts Simoniz Wheel Steel


The BMW centre bore is 2mm smaller, so my options were to get them machined or use spacers. I had a pair of 3mm and 6mm spacers in the garage so I went with this route.


Another major change during this particular period was stripping the interior


You may have noticed the seats have changed. Those were swapped with some Almera GTi seats that a friend and fellow Micra owner had from her project.

The front two mounting holes line up spot on. The rear outer mount requires a plate welded on and a new hole drilled. The rear inner mount uses the OEM Almera bracket which needs trimming and drilling in the centre to line up with the OEM Micra mounting hole on the transmission tunnel.
Luckily this was all done already so fitting was straight forward
I forgot how crap the DTM mirrors are for visibility (but they look cool). To help improve this a friend kindly donated a 5 panel wink mirror for the build. It takes some getting used to but its a vast improvement

[url]
|https://thumbsnap.com/36ERVYfS[/urlThe 14" BMW Bottletop alloys finally received a coat of paint. One of them isnt the great of conditions so I'll be on the look out for another one in the future but for now it'll be fine.
The paint I chose was Holts Simoniz Wheel Steel
The BMW centre bore is 2mm smaller, so my options were to get them machined or use spacers. I had a pair of 3mm and 6mm spacers in the garage so I went with this route.
Another major change during this particular period was stripping the interior
You may have noticed the seats have changed. Those were swapped with some Almera GTi seats that a friend and fellow Micra owner had from her project.
The front two mounting holes line up spot on. The rear outer mount requires a plate welded on and a new hole drilled. The rear inner mount uses the OEM Almera bracket which needs trimming and drilling in the centre to line up with the OEM Micra mounting hole on the transmission tunnel.
Luckily this was all done already so fitting was straight forward
I forgot how crap the DTM mirrors are for visibility (but they look cool). To help improve this a friend kindly donated a 5 panel wink mirror for the build. It takes some getting used to but its a vast improvement
With the interior stripped and the sun visors replaced with the 5 panel wink mirror, it got quite dangerous when it came to driving during sunset. A friend helped me fit a sun strip which should solve this issue

I decided to make a DIY front splitter made from garden edging, the idea came from a Mighty Car Mods video. Originally it was riveted on but the bottom edge was too wavvy. So I made some aluminium plates to go behind to give it some rigidity, for it to still be wavvy *sigh*
In the end I had to use stainless M6 bolts because the holes opened up too much for replacement rivets

I was on the search for some MG/Rover side skirts to modify to fit, mainly because I knew what they looked like on the car but the cheapest pair I could find was £65 shipped.
Thats when a friend contacted me after she saw a facebook status of mine, saying don't buy any she may have some in the garage. After a search she found a pair of Civic EK skirts she said I could have for free, winner!
I cut about 6" off the front and kept the sweeping edge just like the original fitment on the civic. With the skirt flipped upside down, I then had a flat edge to use to mount against the sill. The passenger rear arch that has the damage now requires more work. I was tapping the sill to see where the solid metal was and my finger went through.....oops! Luckily the skirt hides the hole for now.

When I purchased the E30 bottle top alloys they only came with 2 centre caps. I managed to find 3 more for the grand sum of £20 posted, so those were sprayed and some monochrome BMW badges were fitted to finish them off. If the wheels didnt have BMW in the casting we would have gone for something else, I quite like them with the 'proper' badge.

Another Facebook bargain was an S13 HKB steering wheel boss for £20 posted. I wasn't planning on changing the steering wheel so soon but at that price I couldnt turn it down. I couldnt have the boss just laying around un-fitted so I borrowed a Nardi wheel from a friend's Impreza GC8 that he had spare. Its not the cleanest of wheels but it'll be fine until we buy our own

With the Almera GTi seats fitted, the stock fuel/boot release lever wouldnt fit next to the seat. I relocated it to the opening behind the seat where the rear door card would have been and made a bracket to support it.

There's probably a way of mounting it nearer the front, but for now it'll do

With the interior stripped it was time to address the front door cards. The fabric had started to lift from the backing (its incredibly thin, I'm surprised its lasted this long). The bulky door pockets and handle didnt suit the theme of the car so something had to be done.
On the previous K11 build and my first MX5 I made my own carbon fibre door cards, which turned out quite well. One thing I've took forward from the MX5 version, is to reuse the top crash pad. This still makes the door cards flow into the dashboard and finishes off the doorcards nicely.
Keeping things on a budget, I went with 1.5mm aluminium which was supplied by a friend at a very good price (2x 1200mm x 600mm sheets for £37.00). Fixings were 4mm and 4.8mm rivets (only because I ran out after doing one door, oops). Unfortunately they've suffered some damage from the file,angle grinder and rivet gun (passenger side is the worst).I'll probably cover the marks with some stickers until I can re-do them.

The day we got the car we talked about the route it would go, taking heavy inspiration from the previous build (not wanting a replica). We decided to go with a Kanjozuku theme, which is ironic because it struggles to get upto the national speed limit let alone any form of late night activity haha
The first thing was a window net, easier said than done on a budget. You can buy 'proper' mounting kits, but majority of them attach to a roll cage. Thats where I had to adapt and use inspiration from other cars whether its track, auto cross, rally or drag.

For starters, I ordered the net too big. I say too big, its the correct width but because the door curves quite alot towards the A pillar the top is too long. I made 3x L brackets rivetted to the door/doorcard with a hole on the other side. A piece of 6mm round bar cut to length is fed through the brackets and net and is secured on by an R clip either end. The top is alot less 'engineered' by using an elastic bungee cord. I cut down a P clip and mounted it in the middle, this stopped the bungee cord sagging in the middle
The rear received similar treatment with a TRS helmet net I had saved from the last car. I bolted 40mm D-Rings to where the door cards would have been which gave the anchor points for the net. The rest is pretty self explanitory

One modification that suits these cars,especially the 2nd facelift models is black headlights. The 2nd facelift has a clear lense, where as the previous models have frosted glass.
With the headlights removed it was time to split them. Alot of people use the oven but I went with a heat gun instead, mainly because I have a little bit more control
With the glass lenses removed the insert popped off and the orange indicator lens was removed too.

Its made such a difference to the overall appearance, its definately a must do modification for all K11s

Just need to paint the badge on the bonnet and the front end is pretty much done

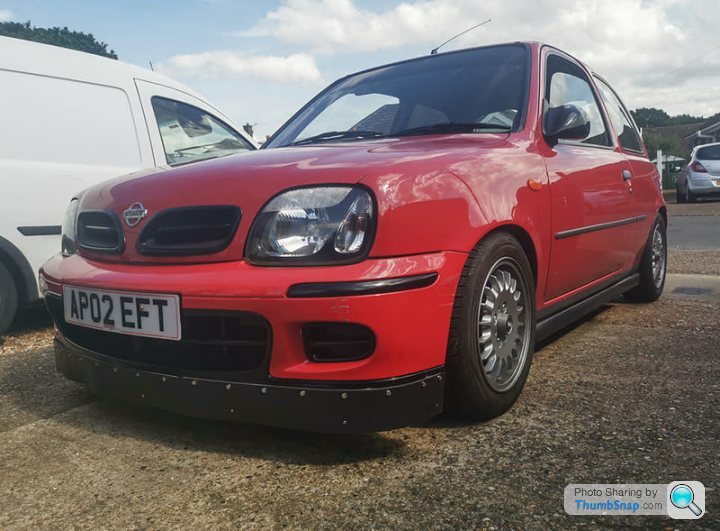
I decided to make a DIY front splitter made from garden edging, the idea came from a Mighty Car Mods video. Originally it was riveted on but the bottom edge was too wavvy. So I made some aluminium plates to go behind to give it some rigidity, for it to still be wavvy *sigh*
In the end I had to use stainless M6 bolts because the holes opened up too much for replacement rivets
I was on the search for some MG/Rover side skirts to modify to fit, mainly because I knew what they looked like on the car but the cheapest pair I could find was £65 shipped.
Thats when a friend contacted me after she saw a facebook status of mine, saying don't buy any she may have some in the garage. After a search she found a pair of Civic EK skirts she said I could have for free, winner!
I cut about 6" off the front and kept the sweeping edge just like the original fitment on the civic. With the skirt flipped upside down, I then had a flat edge to use to mount against the sill. The passenger rear arch that has the damage now requires more work. I was tapping the sill to see where the solid metal was and my finger went through.....oops! Luckily the skirt hides the hole for now.
When I purchased the E30 bottle top alloys they only came with 2 centre caps. I managed to find 3 more for the grand sum of £20 posted, so those were sprayed and some monochrome BMW badges were fitted to finish them off. If the wheels didnt have BMW in the casting we would have gone for something else, I quite like them with the 'proper' badge.
Another Facebook bargain was an S13 HKB steering wheel boss for £20 posted. I wasn't planning on changing the steering wheel so soon but at that price I couldnt turn it down. I couldnt have the boss just laying around un-fitted so I borrowed a Nardi wheel from a friend's Impreza GC8 that he had spare. Its not the cleanest of wheels but it'll be fine until we buy our own
With the Almera GTi seats fitted, the stock fuel/boot release lever wouldnt fit next to the seat. I relocated it to the opening behind the seat where the rear door card would have been and made a bracket to support it.
There's probably a way of mounting it nearer the front, but for now it'll do
With the interior stripped it was time to address the front door cards. The fabric had started to lift from the backing (its incredibly thin, I'm surprised its lasted this long). The bulky door pockets and handle didnt suit the theme of the car so something had to be done.
On the previous K11 build and my first MX5 I made my own carbon fibre door cards, which turned out quite well. One thing I've took forward from the MX5 version, is to reuse the top crash pad. This still makes the door cards flow into the dashboard and finishes off the doorcards nicely.
Keeping things on a budget, I went with 1.5mm aluminium which was supplied by a friend at a very good price (2x 1200mm x 600mm sheets for £37.00). Fixings were 4mm and 4.8mm rivets (only because I ran out after doing one door, oops). Unfortunately they've suffered some damage from the file,angle grinder and rivet gun (passenger side is the worst).I'll probably cover the marks with some stickers until I can re-do them.
The day we got the car we talked about the route it would go, taking heavy inspiration from the previous build (not wanting a replica). We decided to go with a Kanjozuku theme, which is ironic because it struggles to get upto the national speed limit let alone any form of late night activity haha
The first thing was a window net, easier said than done on a budget. You can buy 'proper' mounting kits, but majority of them attach to a roll cage. Thats where I had to adapt and use inspiration from other cars whether its track, auto cross, rally or drag.
For starters, I ordered the net too big. I say too big, its the correct width but because the door curves quite alot towards the A pillar the top is too long. I made 3x L brackets rivetted to the door/doorcard with a hole on the other side. A piece of 6mm round bar cut to length is fed through the brackets and net and is secured on by an R clip either end. The top is alot less 'engineered' by using an elastic bungee cord. I cut down a P clip and mounted it in the middle, this stopped the bungee cord sagging in the middle
The rear received similar treatment with a TRS helmet net I had saved from the last car. I bolted 40mm D-Rings to where the door cards would have been which gave the anchor points for the net. The rest is pretty self explanitory
One modification that suits these cars,especially the 2nd facelift models is black headlights. The 2nd facelift has a clear lense, where as the previous models have frosted glass.
With the headlights removed it was time to split them. Alot of people use the oven but I went with a heat gun instead, mainly because I have a little bit more control
With the glass lenses removed the insert popped off and the orange indicator lens was removed too.
Its made such a difference to the overall appearance, its definately a must do modification for all K11s
Just need to paint the badge on the bonnet and the front end is pretty much done
Ihad a pair of K11 March number plate lights hiding in my garage for awhile so it was time to fit them. The original boot handle holes will get welded when the NSR arch gets repaired, for now some tape will do.

You may have spotted the new rear lip. After struggling to find a Seat Ibiza splitter to copy the last K11, I needed to find an alternative. A friend breaks and builds Volvos and he had a 940 lip spare. Some chopping about later and it fits surprisingly well


Another item on my to-do list was to change the tail lights. Alot of people tend to fit the March prefacelift or cabriolet lights. I was very close to buying some cabriolet ones until I saw a photo of some Kouki March lights which had been split, inner coloured lenses removed making them red and clear.
I spoke to Andrew from Micra Mafia on Facebook who had stock of the stock kouki lights and placed an order. While I was waiting for them to arrive I ordered some chrome bulbs. Although now having them fitted, I think i'll need to order some LED stop/tail as the tail light element isn't very bright


During the early days of ownership I came across a company called Gizfab. These guys specialise in stainless exhaust systems, adjustable suspension arms, chassis braces and even turbo kits!
One item in particular caught my eye and that was their cross brace, which would suit the Kanjo theme to a T!


Another item from Gizfab was their Devil Wing


I noticed the boot spoiler had started to catch on the roof, despite no signs of catching when we originally fitted it.

I measured up the overall length of the gas struts and searched through a supplier's book at work to see what would fit. It seems K12 struts are 50mm shorter and should do the job.

Theres less head room now with the boot opened, but the spoiler no longer catches, thats something I can live with

You may have spotted the new rear lip. After struggling to find a Seat Ibiza splitter to copy the last K11, I needed to find an alternative. A friend breaks and builds Volvos and he had a 940 lip spare. Some chopping about later and it fits surprisingly well
Another item on my to-do list was to change the tail lights. Alot of people tend to fit the March prefacelift or cabriolet lights. I was very close to buying some cabriolet ones until I saw a photo of some Kouki March lights which had been split, inner coloured lenses removed making them red and clear.
I spoke to Andrew from Micra Mafia on Facebook who had stock of the stock kouki lights and placed an order. While I was waiting for them to arrive I ordered some chrome bulbs. Although now having them fitted, I think i'll need to order some LED stop/tail as the tail light element isn't very bright
During the early days of ownership I came across a company called Gizfab. These guys specialise in stainless exhaust systems, adjustable suspension arms, chassis braces and even turbo kits!
One item in particular caught my eye and that was their cross brace, which would suit the Kanjo theme to a T!
Another item from Gizfab was their Devil Wing
I noticed the boot spoiler had started to catch on the roof, despite no signs of catching when we originally fitted it.
I measured up the overall length of the gas struts and searched through a supplier's book at work to see what would fit. It seems K12 struts are 50mm shorter and should do the job.
Theres less head room now with the boot opened, but the spoiler no longer catches, thats something I can live with
I'll start with the most obvious one from the first photo...the kanjo door boards. This was one of the things I wanted to tie in the kanjozoku style and it happened to be one of the last things lol.
You'll usually see the osaka kanjo hand or hockey mask but with the car not being a Honda I wanted something different, and who doesn't love Mighty Car Mods?!


The next change was an experiment. I had seen on Facebook some posts from a page called KBMER who are graffiti artists. The first post was of a blue 350Z painted in an Initial D style and it really caught my eye. A few more cars followed including an NB Miata, Civic and an RX7 FC, these guys feature darker patches for shadows/shading and made it look more realistic.


My issue was, I didn't want to commit to painting the car incase I didnt like it. So I purchased some 12mm pin strip vinyl from work and gave it a go. I posted the photos on Social Media and the comments were very positive with a few suggestions.

I left the pin strip on the car to see what it would look like with the door boards and I think I can pull it off

KBMER uses ink markers to create the lines and the whole car is then clear coated. Again, clear coating the car is a large task for a drive way build, plus theres no going back. I'll stick with the vinyl for now and see how it goes.


Norfolk based vinyl wrapping company Wylde Wraps UK supplied and fitted the door boards, while the car was there they also vinyl wrapped the roof gloss black. This is the reason why the Gizfab spoiler was painted black and not colour coded.


The last big change was the fitting of some aerocatches that I borrowed from my old MX5 carbon bonnet. The bonnet took quite alot of cutting just to gain enough access to fit them, its not the prettiest of jobs but the car is far from perfect haha.
No real reason to why I fitted them, more because I had them laying about and I was bored

Igot round to finishing the pin stripe just before Modified Live Snetterton.
I had to re-do most of the passenger side as I wasn't happy with it. Dont get me wrong, this is far from perfect and I'm sure its gonna lift in places over time but its a cheap mod for the time being.


You'll usually see the osaka kanjo hand or hockey mask but with the car not being a Honda I wanted something different, and who doesn't love Mighty Car Mods?!
The next change was an experiment. I had seen on Facebook some posts from a page called KBMER who are graffiti artists. The first post was of a blue 350Z painted in an Initial D style and it really caught my eye. A few more cars followed including an NB Miata, Civic and an RX7 FC, these guys feature darker patches for shadows/shading and made it look more realistic.
My issue was, I didn't want to commit to painting the car incase I didnt like it. So I purchased some 12mm pin strip vinyl from work and gave it a go. I posted the photos on Social Media and the comments were very positive with a few suggestions.
I left the pin strip on the car to see what it would look like with the door boards and I think I can pull it off
KBMER uses ink markers to create the lines and the whole car is then clear coated. Again, clear coating the car is a large task for a drive way build, plus theres no going back. I'll stick with the vinyl for now and see how it goes.
Norfolk based vinyl wrapping company Wylde Wraps UK supplied and fitted the door boards, while the car was there they also vinyl wrapped the roof gloss black. This is the reason why the Gizfab spoiler was painted black and not colour coded.
The last big change was the fitting of some aerocatches that I borrowed from my old MX5 carbon bonnet. The bonnet took quite alot of cutting just to gain enough access to fit them, its not the prettiest of jobs but the car is far from perfect haha.
No real reason to why I fitted them, more because I had them laying about and I was bored
Igot round to finishing the pin stripe just before Modified Live Snetterton.
I had to re-do most of the passenger side as I wasn't happy with it. Dont get me wrong, this is far from perfect and I'm sure its gonna lift in places over time but its a cheap mod for the time being.
An engine swap was always on the cards, sadly nothing extravagant as an SR20 or GA16 but the CG13 or CGA3 from the K11.
Fitting a CG13 1.3 Distributor wasnt straight forward as it'll have to be a mix and match of both engines (1.0 coilpack head, 1.3 distributor bottom end and a mixture of the timing chains from what I can gather).
I held out for a CGA3 1.4 from the later coilpack models as it'd be a direct swap. Luckily Chloe (who I purchased the Almera seats, lowering springs and number plate lights from) was breaking hers due to the CVT box going wrong. Spent one Sunday removing the engine and stripping the car while we had the hoist and it was ready to come home.


The following Wednesday I got the block stripped down minus the crankshaft pulley and idler pulley (they've been removed since) ready to be wire brushed,cleaned and painted.


The rocker cover was removed to check the condition of the top end and it's pretty clean considering its got 105k. The car was originally a 1 lady owner who had a Nissan Service pack on so its been looked after

The sump was also removed so I could clean the oil pick up and check everything was good. Took awhile to remove the original sealant from the sump but some fresh VHT RTV was applied and the sump bolted back on.
Fitting a CG13 1.3 Distributor wasnt straight forward as it'll have to be a mix and match of both engines (1.0 coilpack head, 1.3 distributor bottom end and a mixture of the timing chains from what I can gather).
I held out for a CGA3 1.4 from the later coilpack models as it'd be a direct swap. Luckily Chloe (who I purchased the Almera seats, lowering springs and number plate lights from) was breaking hers due to the CVT box going wrong. Spent one Sunday removing the engine and stripping the car while we had the hoist and it was ready to come home.
The following Wednesday I got the block stripped down minus the crankshaft pulley and idler pulley (they've been removed since) ready to be wire brushed,cleaned and painted.
The rocker cover was removed to check the condition of the top end and it's pretty clean considering its got 105k. The car was originally a 1 lady owner who had a Nissan Service pack on so its been looked after
The sump was also removed so I could clean the oil pick up and check everything was good. Took awhile to remove the original sealant from the sump but some fresh VHT RTV was applied and the sump bolted back on.
Spent a couple of days cleaning the block up and painting. The engine was pretty clean to begin with so luckily I managed to skip the degreasing stage.
I used various wire brush drill attachments to clean it up and plenty of brake cleaner to get rid of the dust. With everything being aluminium it cleaned up really nicely.

The bottom end and sump was painted with Smooth Black Hammerite aerosol, while the head had the same treatment but with Smooth Silver. I've used Hammerite for years and never had it dry this glossy, how long that stays like that is anyone's guess.


I've replaced all of the sensors, waterpump and thermostat while everything was stripped. Not necessary by any means, but I know its all fresh and new

I've done my best to remove everything I can and paint it. Again, all of the silver is the same Hammerite spray but the black is Holts Simoniz Tough Black aerosol. Its covered just as good as the Hammerite and it was quite abit cheaper (another bonus of selling it at work)


I've also replaced most of the original nuts/bolts with Stainless allen cap versions.
I used various wire brush drill attachments to clean it up and plenty of brake cleaner to get rid of the dust. With everything being aluminium it cleaned up really nicely.
The bottom end and sump was painted with Smooth Black Hammerite aerosol, while the head had the same treatment but with Smooth Silver. I've used Hammerite for years and never had it dry this glossy, how long that stays like that is anyone's guess.
I've replaced all of the sensors, waterpump and thermostat while everything was stripped. Not necessary by any means, but I know its all fresh and new
I've done my best to remove everything I can and paint it. Again, all of the silver is the same Hammerite spray but the black is Holts Simoniz Tough Black aerosol. Its covered just as good as the Hammerite and it was quite abit cheaper (another bonus of selling it at work)
I've also replaced most of the original nuts/bolts with Stainless allen cap versions.
Spent Wednesday (28th Oct) taking the car apart ready to remove the engine. I managed to do everything except remove the drive shafts in an afternoon. A friend is coming over on Sunday with an engine hoist to help finish the removal.

With the unpredictable british weather and limited days off I had to make do with the best of what I had, but when it comes to paint work that can become abit tricky. All I had was a dusty and cold garage to spray in, with the help of a heat gun I managed to pull off a reasonable finish.

We decided on BMW Atlantis Blue

Unfortunately I didn't have the time to properly fit it to the engine but couldn't resist a quick photo

I purchased a complete used Janspeed exhaust system, the seller sent it via MyHermes who eventually lost it (more like someone stole it) and I received a refund from the seller.
The exhaust was the last piece of the puzzle for the engine swap,especially as its one of the first things you see when you open the bonnet. So I contacted Eden at Gizfab and asked what the lead time was for one of his 4-2-1 Manifolds, which is 4-5 weeks. The manifold and front pipe were more money than the complete system I had originally purchased, but this is made from scratch and will be a much better quality stainless than the Janspeed. This gives me plenty of time to get the swap going and luckily its the last thing I need to fit. Here are some photos from their Facebook page.


With the unpredictable british weather and limited days off I had to make do with the best of what I had, but when it comes to paint work that can become abit tricky. All I had was a dusty and cold garage to spray in, with the help of a heat gun I managed to pull off a reasonable finish.
We decided on BMW Atlantis Blue
Unfortunately I didn't have the time to properly fit it to the engine but couldn't resist a quick photo
I purchased a complete used Janspeed exhaust system, the seller sent it via MyHermes who eventually lost it (more like someone stole it) and I received a refund from the seller.
The exhaust was the last piece of the puzzle for the engine swap,especially as its one of the first things you see when you open the bonnet. So I contacted Eden at Gizfab and asked what the lead time was for one of his 4-2-1 Manifolds, which is 4-5 weeks. The manifold and front pipe were more money than the complete system I had originally purchased, but this is made from scratch and will be a much better quality stainless than the Janspeed. This gives me plenty of time to get the swap going and luckily its the last thing I need to fit. Here are some photos from their Facebook page.
We finally got the engine removed, it all went pretty smoothly to be honest. Removing 90% of the parts a few days prior certainly saved us alot of time, especially while dodging the rain showers.

Remembering where everything goes will be a task in itself...haha

Heres the rust patch I mentioned in the previous post. I thought about fitting an oil catch can, but the inlet/outlets are facing the other side of the bay which isnt ideal. I started off with a degrease and rinse to see what I was facing and it cleaned up pretty well. Thats until it dried and I was left with this


There must have been something on the surface because the rest of the engine bay was fine. It would scratch off with my finger nail, but that affected area was very smooth, my finger would skate across with hardly any effort. I was limited with what products to try, the first was vinegar...nope...next was brake cleaner....nope. Hmm.....
I wanted to avoid painting the rusty area for the fear of not being able to match the red, but this was now the reason to do it. I sanded the area with 150 grit wet and dry and it removed this weird degreaser 'stain' and also helped remove the loose corrosion. Various grades of wet and dry sandpaper later the area was now prepped ready to be treated. Once treated and everything masked off it was time to paint.
I went with Holts Simoniz Tough satin black for 2 reasons. The first was the satin finish would contrast nicely against the gloss black and silver engine. The second being I used the gloss black version to paint all the parts for the engine, so I know the coverage and finish was going to be very good.
Here are a couple more photos before the degrease


A couple of coats later and its looking pretty good. The outside temperate was dropping as the sun was setting, so I didnt have much time.


Theres a few patches that need another pass over, one or two areas will be quite tricky to get to, mainly behind the brake servo

Yes I'm aware I've missed a bit above the steering rack, but you're not going to see it.

Theres a couple of runs here and there but it was never going to be mint lol
I collected the flywheel from the machine shop, a very fast turn around which was nice.

Next up is to paint the gearbox, once that's done I need to get the engine back in on the mounts which will be the hardest part for me. Everything else can be done as and when.
Remembering where everything goes will be a task in itself...haha
Heres the rust patch I mentioned in the previous post. I thought about fitting an oil catch can, but the inlet/outlets are facing the other side of the bay which isnt ideal. I started off with a degrease and rinse to see what I was facing and it cleaned up pretty well. Thats until it dried and I was left with this
There must have been something on the surface because the rest of the engine bay was fine. It would scratch off with my finger nail, but that affected area was very smooth, my finger would skate across with hardly any effort. I was limited with what products to try, the first was vinegar...nope...next was brake cleaner....nope. Hmm.....
I wanted to avoid painting the rusty area for the fear of not being able to match the red, but this was now the reason to do it. I sanded the area with 150 grit wet and dry and it removed this weird degreaser 'stain' and also helped remove the loose corrosion. Various grades of wet and dry sandpaper later the area was now prepped ready to be treated. Once treated and everything masked off it was time to paint.
I went with Holts Simoniz Tough satin black for 2 reasons. The first was the satin finish would contrast nicely against the gloss black and silver engine. The second being I used the gloss black version to paint all the parts for the engine, so I know the coverage and finish was going to be very good.
Here are a couple more photos before the degrease
A couple of coats later and its looking pretty good. The outside temperate was dropping as the sun was setting, so I didnt have much time.
Theres a few patches that need another pass over, one or two areas will be quite tricky to get to, mainly behind the brake servo
Yes I'm aware I've missed a bit above the steering rack, but you're not going to see it.
Theres a couple of runs here and there but it was never going to be mint lol
I collected the flywheel from the machine shop, a very fast turn around which was nice.
Next up is to paint the gearbox, once that's done I need to get the engine back in on the mounts which will be the hardest part for me. Everything else can be done as and when.
Spent a few more hours on the spare engine
As a temporary measure I painted the stock exhaust manifold in VHT Black and half fitted the alternator (may have lost the lower bolt oops)

Rocker cover and coilpacks fitted (very happy with the colour choices)

Refitted some of the coolant and fuel hoses. I need to order some replacements as a couple got cut during the initial removal by a friend. He thought they were the same as the 1.0, turns out they're different.


The gearbox got a lick of paint too. The original plan was to paint it Smooth Black to match the bottom end and sump, but with the engine bay being black too I needed some more contrast

I've got a new crankshaft sensor to fit too which will be refitted once the engine and box are back in the car

As a temporary measure I painted the stock exhaust manifold in VHT Black and half fitted the alternator (may have lost the lower bolt oops)
Rocker cover and coilpacks fitted (very happy with the colour choices)
Refitted some of the coolant and fuel hoses. I need to order some replacements as a couple got cut during the initial removal by a friend. He thought they were the same as the 1.0, turns out they're different.
The gearbox got a lick of paint too. The original plan was to paint it Smooth Black to match the bottom end and sump, but with the engine bay being black too I needed some more contrast
I've got a new crankshaft sensor to fit too which will be refitted once the engine and box are back in the car
It was finally the day we got the engine back into the engine bay,woohoo!
The first job was to get the engine on the hoist and bolt up the flywheel,clutch and gearbox. Followed by the starter motor (forgot to clean/paint this oops! but you can't see it luckily), engine to gearbox braces and the battery/alternator/starter motor wiring loom.

With the front and side mounts bolted in place we jacked the driver side up to gain alittle more access to the central brace to re-attach including the rear gearbox mount and gear selector.

Next up was the wiring loom. Unfortunately without extending and tucking there's not much you can do with this. We started off by plugging in the coilpacks and injectors and fitted the rest as we worked down the loom.
I'll be trying to tidy it up a little bit more, I may be able to move some stuff and cable tie it in a different position. I won't know until I start I guess.
New fuel filter fitted and the removal of the carbon canister (just need to sort the last remaining hose) helps tidy up that corner. Battery tray was also refitted but need to give the fuse box a good clean.

New fuel filter fitted and the removal of the carbon canister (just need to sort the last remaining hose) helps tidy up that corner. Battery tray was also refitted but need to give the fuse box a good clean.

Can't do much with the brake servo or PAS lines so that corner will have to stay as it is. I'll look into a replacement PAS reservoir as they all discolour and look crap. Failing that I'll see if I can find one of those sock covers big enough to cover it up.

Driveshafts have been refitted too. Passenger side inner joint had no grease, it was more like really thin oil. That was cleaned out, both inner boots repacked with fresh grease and new clips.
The top slam panel and front brace needs to be painted
Awaiting delivery of a lower radiator mount rubber, PCV seal for the rocker cover and a coolant hose. Once they're here I can refit the radiator (purchased a new one for an Auto which are slightly thicker than the Manual ones), adjust the throttle and clutch cables and refill all of the fluids.
Then fingers crossed it doesnt leak fuel,oil or coolant on start up lol
The first job was to get the engine on the hoist and bolt up the flywheel,clutch and gearbox. Followed by the starter motor (forgot to clean/paint this oops! but you can't see it luckily), engine to gearbox braces and the battery/alternator/starter motor wiring loom.
With the front and side mounts bolted in place we jacked the driver side up to gain alittle more access to the central brace to re-attach including the rear gearbox mount and gear selector.
Next up was the wiring loom. Unfortunately without extending and tucking there's not much you can do with this. We started off by plugging in the coilpacks and injectors and fitted the rest as we worked down the loom.
I'll be trying to tidy it up a little bit more, I may be able to move some stuff and cable tie it in a different position. I won't know until I start I guess.
New fuel filter fitted and the removal of the carbon canister (just need to sort the last remaining hose) helps tidy up that corner. Battery tray was also refitted but need to give the fuse box a good clean.
New fuel filter fitted and the removal of the carbon canister (just need to sort the last remaining hose) helps tidy up that corner. Battery tray was also refitted but need to give the fuse box a good clean.
Can't do much with the brake servo or PAS lines so that corner will have to stay as it is. I'll look into a replacement PAS reservoir as they all discolour and look crap. Failing that I'll see if I can find one of those sock covers big enough to cover it up.
Driveshafts have been refitted too. Passenger side inner joint had no grease, it was more like really thin oil. That was cleaned out, both inner boots repacked with fresh grease and new clips.
The top slam panel and front brace needs to be painted
Awaiting delivery of a lower radiator mount rubber, PCV seal for the rocker cover and a coolant hose. Once they're here I can refit the radiator (purchased a new one for an Auto which are slightly thicker than the Manual ones), adjust the throttle and clutch cables and refill all of the fluids.
Then fingers crossed it doesnt leak fuel,oil or coolant on start up lol
Sunday 22nd November

Spent a couple of hours in the afternoon on the car. Unfortunately I couldnt do much until parts arrive but I managed to tick off a few smaller jobs

Fuse box and plugs cleaned
Battery tray fixed down
Battery earth fitted
Earth points cleaned to bare metal and fitted
Coolant hose/wiring clips fitted
Alternator tensioned
Exhaust manifold bolted up to front pipe
Slam panel loosely fitted
Label cable tie tags removed
Injector and Coilpack plugs cleaned
Wiper motor refitted


Wednesday 25th November

It was certainly a roller-coaster of a day * sigh *
Finished painting the top of the Slam panel
Filled the gearbox with fluid
Fitted the radiator, fan and hoses
Laid on the floor to tighten the last jubilee clip, noticed the floor was wet. Gearbox oil was pissing out because the driveshafts weren't pushed in all the way 🤦♂️ Threw some sand down to help soak it up

Removed and refitted the driveshafts, made a nice 'pop' as I pushed it in this time round. Refilled with another litre of fluid and so far no more leaks 🤞🤞
Refitted the radiator (was easier to refill with it out of the way). Also fitted the new coolant expansion tank

Spent a couple of hours in the afternoon on the car. Unfortunately I couldnt do much until parts arrive but I managed to tick off a few smaller jobs
Fuse box and plugs cleaned
Battery tray fixed down
Battery earth fitted
Earth points cleaned to bare metal and fitted
Coolant hose/wiring clips fitted
Alternator tensioned
Exhaust manifold bolted up to front pipe
Slam panel loosely fitted
Label cable tie tags removed
Injector and Coilpack plugs cleaned
Wiper motor refitted
Wednesday 25th November
It was certainly a roller-coaster of a day * sigh *
Finished painting the top of the Slam panel
Filled the gearbox with fluid
Fitted the radiator, fan and hoses
Laid on the floor to tighten the last jubilee clip, noticed the floor was wet. Gearbox oil was pissing out because the driveshafts weren't pushed in all the way 🤦♂️ Threw some sand down to help soak it up
Removed and refitted the driveshafts, made a nice 'pop' as I pushed it in this time round. Refilled with another litre of fluid and so far no more leaks 🤞🤞
Refitted the radiator (was easier to refill with it out of the way). Also fitted the new coolant expansion tank
Wednesday 2nd December
I wanted to get the last remaining jobs ticked off the list and hopefully turn the key.

First job was to fit the Almera N15 GA16 Airbox and air ducting. I found some 51mm reinforced air duct in the garage that I purchased for the supercharged MX5 but never got round to using it. I ordered a 73-51mm silicone reducer and I had some 50mm stainless tube spare to make a joiner. The ducting fits perfectly in the hole behind the coolant reservoir which was a bonus.

I also fitted a freshly painted strut brace, no idea on the brand as there are no markings on it. I bought it from Chloe along with the box because I knew it would clear. Some stainless M10 bolts finished it off a treat
I wasnt happy with how awful the OEM PAS reservoir looked, so I ordered a Mishimoto item along with some male adapters and elbow fixings because I needed them facing downwards. I made a bracket because the bolt holes were different, turns out the hoses were quite alot different than I had originally planned. I switched one fitting back to the original but due to the length of the hoses its now moved the tank approx 90 degrees, making the new bracket redundant.
I'll keep the new bracket and make a triangle bracket and hope one mounting bolt on top is enough for support.

With the engine oil, PAS and coolant now filled it was time to start it up. It didnt quite start first time (more like 3) but it started none the less. A couple of issues...
- The idle is currently around 1500rpm, thats because I couldnt check until the engine was started
- Exhaust manifold is blowing (I picked a gasket from work which 'looked' correct, turns out it wasnt. The correct one will be ordered tomorrow)
- Engine Management Light is on
I used my OBDII reader and it came back with
P1605 - A/T Diagnostic Communication Line
Because the engine and ECU are from an Auto model, the ECU can't see the CVT Controller. Fitting a 1.4 manual ECU would solve it, but its finding one with the key and transponder

By this point it had gotten dark and started to rain. I managed to get the headlights and bumper refitted just to 'finish it' off.

My to-do list is now:
- Adjust throttle cable
- Make a bracket for the PAS reservoir
- Make a bracket for the airbox
- Make a bracket for the air duct
- Paint any bolts that weren't replaced with stainless
- Fit arch liners and undertray
- Replace exhaust manifold gasket
- Test drive
I wanted to get the last remaining jobs ticked off the list and hopefully turn the key.
First job was to fit the Almera N15 GA16 Airbox and air ducting. I found some 51mm reinforced air duct in the garage that I purchased for the supercharged MX5 but never got round to using it. I ordered a 73-51mm silicone reducer and I had some 50mm stainless tube spare to make a joiner. The ducting fits perfectly in the hole behind the coolant reservoir which was a bonus.
I also fitted a freshly painted strut brace, no idea on the brand as there are no markings on it. I bought it from Chloe along with the box because I knew it would clear. Some stainless M10 bolts finished it off a treat
I wasnt happy with how awful the OEM PAS reservoir looked, so I ordered a Mishimoto item along with some male adapters and elbow fixings because I needed them facing downwards. I made a bracket because the bolt holes were different, turns out the hoses were quite alot different than I had originally planned. I switched one fitting back to the original but due to the length of the hoses its now moved the tank approx 90 degrees, making the new bracket redundant.
I'll keep the new bracket and make a triangle bracket and hope one mounting bolt on top is enough for support.
With the engine oil, PAS and coolant now filled it was time to start it up. It didnt quite start first time (more like 3) but it started none the less. A couple of issues...
- The idle is currently around 1500rpm, thats because I couldnt check until the engine was started
- Exhaust manifold is blowing (I picked a gasket from work which 'looked' correct, turns out it wasnt. The correct one will be ordered tomorrow)
- Engine Management Light is on
I used my OBDII reader and it came back with
P1605 - A/T Diagnostic Communication Line
Because the engine and ECU are from an Auto model, the ECU can't see the CVT Controller. Fitting a 1.4 manual ECU would solve it, but its finding one with the key and transponder
By this point it had gotten dark and started to rain. I managed to get the headlights and bumper refitted just to 'finish it' off.
My to-do list is now:
- Adjust throttle cable
- Make a bracket for the PAS reservoir
- Make a bracket for the airbox
- Make a bracket for the air duct
- Paint any bolts that weren't replaced with stainless
- Fit arch liners and undertray
- Replace exhaust manifold gasket
- Test drive
Sunday 6th December
So today I sorted out the PAS reservoir bracket and made a bracket for the airbox, but the breather hose coming off the rocker cover is very very close to the mounting hole so I've left that for now.
Adjusted the throttle cable leaving the airbox off incase I needed to adjust it more....car wouldnt start even with some throttle. Perhaps the throttle cable was too slack, so checked again and had it so there was barely any slack....nope it stiill wouldnt start.
We had a pretty sharp cold night (not sure if there was any frost but it was certainly cold enough to) perhaps the harsh cold had gotten to the battery? The battery was replaced the day I started to strip the engine bay, having put it on charge before the previous update I knew the battery was in good health. I tried jump starting it to rule out the battery, it had plenty of cranking but not firing.
I disconnected the 1.4 auto ECU and key transponder and refitted the original 1.0 ECU and transponder, it fired up straight away.
This was mind boggling. The car started and ran numerous times 4 days prior, got upto temperature and cooled down when I was checking for leaks etc etc The only thing I had done was adjusted the throttle cable?!
Either something is fried inside the 1.4 auto ECU or something has happened to the NATS (Nissan's factory immobiliser)
The Engine Management Light is back, we know it can't be CVT gearbox related because its a manual transmission ECU. Plugged in my OBD2 reader and no faults are found, cleared the code and the light disappears. Switch the engine off and read the ECU again, no codes found....bizzare
Anyway....
With the car running I got it moving for the first time and parked it on flat ground to check the fluids. A small top up and we're good to go for a test drive. I drove round a 1 mile radius, temperature stayed half way, EML still on but I'll ignore that for a second. Shifting gears around 3k while I bed this new clutch in but its changing gears smoothly and the clutch bite is good.

Parked up outside the house to check for any leaks and there wasn't any. This gave me an opportunity to finally clean the driveway of transmission fluid

I didn't fix the leaking exhaust manifold because I received confirmation of shipping of the new Gizfab 4-2-1 Manifold, woohoo! I'll persevere with the blow until the new one gets fitted next week at work.


The engine bay still needs some tidying up and some paint touch ins but its now running and driving and those things can come as and when


Now to get some miles on the clock and get this clutch bedded in. Its gonna be torture not putting my foot down properly especially when the new manifold goes on but it'll be worth the wait!
So today I sorted out the PAS reservoir bracket and made a bracket for the airbox, but the breather hose coming off the rocker cover is very very close to the mounting hole so I've left that for now.
Adjusted the throttle cable leaving the airbox off incase I needed to adjust it more....car wouldnt start even with some throttle. Perhaps the throttle cable was too slack, so checked again and had it so there was barely any slack....nope it stiill wouldnt start.
We had a pretty sharp cold night (not sure if there was any frost but it was certainly cold enough to) perhaps the harsh cold had gotten to the battery? The battery was replaced the day I started to strip the engine bay, having put it on charge before the previous update I knew the battery was in good health. I tried jump starting it to rule out the battery, it had plenty of cranking but not firing.
I disconnected the 1.4 auto ECU and key transponder and refitted the original 1.0 ECU and transponder, it fired up straight away.
This was mind boggling. The car started and ran numerous times 4 days prior, got upto temperature and cooled down when I was checking for leaks etc etc The only thing I had done was adjusted the throttle cable?!
Either something is fried inside the 1.4 auto ECU or something has happened to the NATS (Nissan's factory immobiliser)
The Engine Management Light is back, we know it can't be CVT gearbox related because its a manual transmission ECU. Plugged in my OBD2 reader and no faults are found, cleared the code and the light disappears. Switch the engine off and read the ECU again, no codes found....bizzare
Anyway....
With the car running I got it moving for the first time and parked it on flat ground to check the fluids. A small top up and we're good to go for a test drive. I drove round a 1 mile radius, temperature stayed half way, EML still on but I'll ignore that for a second. Shifting gears around 3k while I bed this new clutch in but its changing gears smoothly and the clutch bite is good.
Parked up outside the house to check for any leaks and there wasn't any. This gave me an opportunity to finally clean the driveway of transmission fluid
I didn't fix the leaking exhaust manifold because I received confirmation of shipping of the new Gizfab 4-2-1 Manifold, woohoo! I'll persevere with the blow until the new one gets fitted next week at work.
The engine bay still needs some tidying up and some paint touch ins but its now running and driving and those things can come as and when
Now to get some miles on the clock and get this clutch bedded in. Its gonna be torture not putting my foot down properly especially when the new manifold goes on but it'll be worth the wait!
Thursday 10th December
I made a bracket to support the air duct hose. Its a tempory thing until I can find someone with a riv-nut tool and I'll look into moving it to the suspension turret (will need to check the hose for shape/fitment at that position)


The final piece of the engine bay puzzle finally arrived, my Gizfab 4-2-1 Manifold and front pipe


First impressions, the quality and workmanship is second to none. Picking up the box I wasn't expecting it to be so light! The quality of the welds are top notch, every piece truely is a work of art.
Fitment was very good, the only issue we encountered was the 2nd lambda boss was directly under the driveshaft. I spoke to Eden at Gizfab and he said they've been using the same jig for 2+ years with no issues. He's offered to make me another front pipe with the lambda boss further back. Excellent communication and customer service.
The noise....oh the sweet...sweet....asbo noise haha This thing is LOUD. Not obnoxious loud, somewhere between Honda Civic and straight pipe haha The de-cat and design of the manifold has certainly perked things up with the driving experience and instantly noticed a difference.
Its certainly made the car very nostalgic, a throw back to the previous Red K11 with the noise and driveability, instantly putting a huge smile on my face.
I just hope its within the track day decibel limits
I made a bracket to support the air duct hose. Its a tempory thing until I can find someone with a riv-nut tool and I'll look into moving it to the suspension turret (will need to check the hose for shape/fitment at that position)
The final piece of the engine bay puzzle finally arrived, my Gizfab 4-2-1 Manifold and front pipe
First impressions, the quality and workmanship is second to none. Picking up the box I wasn't expecting it to be so light! The quality of the welds are top notch, every piece truely is a work of art.
Fitment was very good, the only issue we encountered was the 2nd lambda boss was directly under the driveshaft. I spoke to Eden at Gizfab and he said they've been using the same jig for 2+ years with no issues. He's offered to make me another front pipe with the lambda boss further back. Excellent communication and customer service.
The noise....oh the sweet...sweet....asbo noise haha This thing is LOUD. Not obnoxious loud, somewhere between Honda Civic and straight pipe haha The de-cat and design of the manifold has certainly perked things up with the driving experience and instantly noticed a difference.
Its certainly made the car very nostalgic, a throw back to the previous Red K11 with the noise and driveability, instantly putting a huge smile on my face.
I just hope its within the track day decibel limits
MDifficult said:
I can safely say that was NOT what I was expecting when I clicked the link. Bloody fantastic stuff.
Never thought you could make a K11 desirable without filling the interior with strippers, coke and £50 notes but you managed it!
Thank you Never thought you could make a K11 desirable without filling the interior with strippers, coke and £50 notes but you managed it!

Its partly why I didn't create a build thread here when I purchased the car, mainly because the early stages wouldn't have interested many people.
I hope I've done it justice
Gassing Station | Readers' Cars | Top of Page | What's New | My Stuff