Discussion


Ceejay73 said:
Good stuff Lee, now the body is out the way it's gonna be quite easy and enjoyable for a while. If I may suggest, try to get it on some reasonably high stands. Think I had mine at around 20" from the ground, much easier on the back as you are working.
Carl.
Sounds like a plan, we have some Unistrut channel in the warehouse, will build a support frame to waist height, this can also be used jig up the outriggers etc for welding, might make it mobile too so can wheel it around and pretend its back on the road - brum brum Carl.

JohnGBUK said:
I am new to the TVR scene, and will be following your progress. Good up the good work.
Hi John, welcome on board, as you’ve seen I’mpretty new too. PH is a great place for info and advice and there’s some very knowledgeable people on the forum. Do you have a car already yourself? Lee
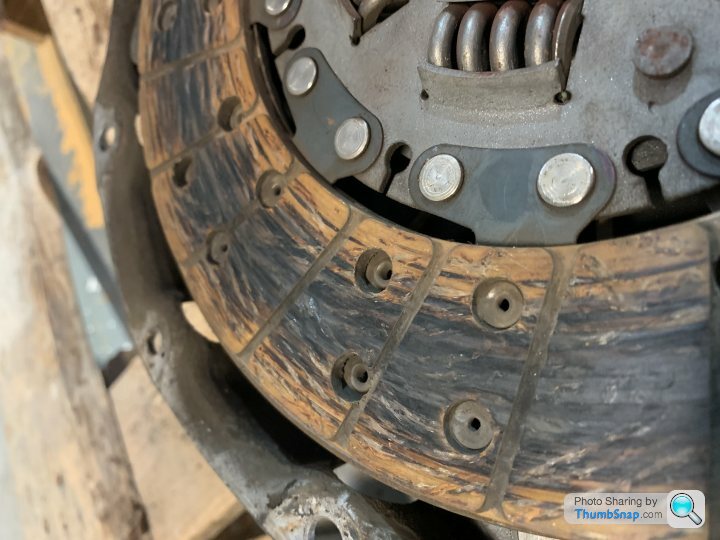
Hi Lee, check that the clutch plate is not limiting out on the actual centre of the flywheel. I have had to machine flywheels in the past so that the rivets (silver in your picture) do not limit the operation (causing a new clutch to slip). TBH it would show as a rub on those faces...
A@
A@
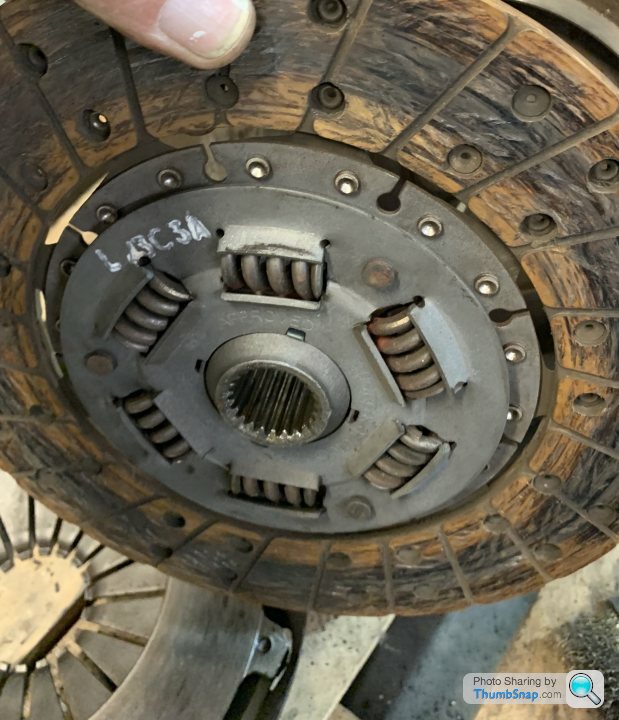
I’ll have another look, but don’t recall seeing anything on the flywheel, it’s not scored or blued, but I’ll have a look and make sure I check the clearance when I get the replacement. The back side is the same, Not quite as black which I suppose makes sense as the flywheel is the rotating component. The 1st picture was the flywheel side.
Never changed a clutch before, so don’t know what’s normal or not. But changing it anyway, don’t fancy taking it all out again for the cost of a few kebabs.
Appreciate your advice.
Never changed a clutch before, so don’t know what’s normal or not. But changing it anyway, don’t fancy taking it all out again for the cost of a few kebabs.
Appreciate your advice.
Edited by 88S1 on Friday 19th July 18:58
Edited by 88S1 on Friday 19th July 19:00
GreenV8S said:
88S1 said:
Not quite as black which I suppose makes sense as the flywheel is the rotating component. The 1st picture was the flywheel side.
The pressure and speed difference should be equal on both sides of the clutch plate. Or I have I got something completely wrong there and need to go on Utube and educate myself.
88S1 said:
Or I have I got something completely wrong there and need to go on Utube and educate myself.
The friction plate is sandwiched between the flywheel and the pressure plate. The flywheel and pressure plate rotate at the same speed (they are attached to each other) and apply equal and opposite pressure to the two faces of the friction plate.The pressure plate is fixed to the flywheel so is spinning at the same speed as the flywheel. As you you lift the clutch pedal the pressure plate clamps the friction plate between it and the flywheel so the forces on both sides of the friction plate should be more or less equal (I think).
That isnt bad at all Lee. Clutch plates frequently come out a LOT worse than that. Before you put the new one in make sure the splines on the gearbox shaft are completely clean, if I remember rightly it had been standing some time?. Any build up on the spline can make clutch movement jerky. I take it you are replacing the clutch release bearing as a matter of course. Check how the clutch arm is located both to the release and to its fulcrum point. As you haven't done this before, tie the clutch arm back with a bit of string (outside the casing) when you put it back to prevent the risk of it coming out of location when you are jiggling the box about!
greymrj said:
That isnt bad at all Lee. Clutch plates frequently come out !
New Luk clutch kit ordered, will replace the bearing and seal too whilst I’m there. Splines look good, and I will clean everything before re-assembly as you suggest. Have removed the slave cylinder, not sure that’s even working as pedal was solid and wouldn’t move, probably re-new that too, so tieing the lever back should be simple. Im a while off doing this yet though, rest of the engine to pull apart, check everything, clean, paint etc etc. Going to check the engines okay, then move onto the chassis strip down and come back to the engine after.


Rad, fuel tank, tank cradle (in good condition) fuel lines and a few other bits off tonight. Running gear to go. Nothing found that I didn’t already know, no sheared bolts or skin removed from knuckles, it’s playing nice at the moment, but I do keep applying the acetone/transmission fluid mix on the bolts well in advance to give them a fighting chance. Everything bagged and labelled and notes/photos taken at every step.
I’m getting there slowly but surely, loving every minute, and it’s easy (so far). Could do with a good clean though, where’s Barry Scott when you need him.
Be off to the shot blasters soon hopefully.

I’m getting there slowly but surely, loving every minute, and it’s easy (so far). Could do with a good clean though, where’s Barry Scott when you need him.
Be off to the shot blasters soon hopefully.
Edited by 88S1 on Wednesday 31st July 08:06
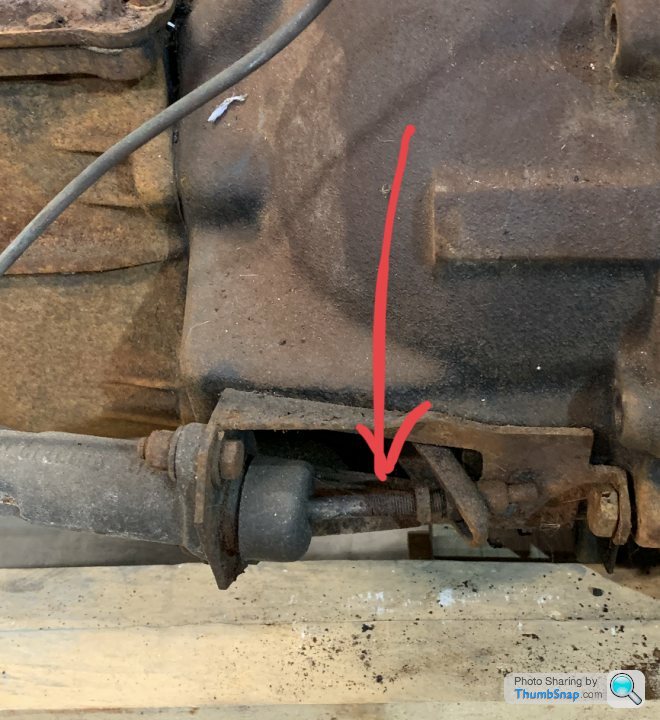
Good progress! Yes that is the Series 3 Landrover slave cylinder, I guess you are aware it is a different thread to the original fluid pipe, need the correct union and re-flare onto the end of the pipe. Many of us have gone completely S3 Landie and changed the master as well and a new pipe with Landie threads (which are NOT the same both ends!) If you need more info than is on the PH list then let us know.
greymrj said:
Good progress! Yes that is the Series 3 Landrover slave cylinder, I guess you.
Thanks, shame I have to work, would love to spend more time on it. I did read somewhere the thread is different, and getting the fitting with the correct thread is difficult. Might upgrade the master too then (going to renew all the copper pipes on the car anyway), they also look reasonable cost. Need to see if the pedals seized, not tried it since the disconnect, another thing for the endless list of things I need to do.
I’ve Been warned that the diff cradle bolts may be seized into the diff casing, (a bit of bi-metallic corrosion no doubt) so plenty of tapping and penetrating fluid for the next few days and then heat when I finally get to trying to remove them. Going to take the assembly out as a unit and work on it on the bench.
when you change the slave cylinder remember to keep the operating rod to the clutch lever. There has been a discussion on here (or was it facebook?) recently about wear between the clutch operating rod and the clutch lever. If you cant find it let me know and I will post pictures. You should sort that out at the same time or you will have a notchy clutch operation at best. While it is all out, I welded nuts to the clutch slave mounting plate and fitted using SHC screws, makes it FAR easier to fix it again.
You might find the landie cylinder casting is very slightly larger than the orifice in the cylinder mounting plate, and might need a little filing to fit. The cylinders are not OE and the castings do seem to differ slightly.
The details of the landrover thread sizes are on PH if you need them. If you are changing the master cylinder I think you will find it is a smaller diameter from memory and some Landies use an adaptor fitted to the master so the two ends of the pipe are the same.
Doubt if the pedal itself will have seized but of the master has leaked it could be a bit 'manky'! Easy to remove clean and refit (do it while the seat is out, far better for the back!)
The master cylinder does need careful sealing to the body with a sealant that wont be affected by any spill of brake fluid. Good place for a water leak otherwise.
Gassing Station | S Series | Top of Page | What's New | My Stuff