Discussion


perdu said:
That is frustrating isn't it, 'specially'when'they seem to have captured pretty well all the direction changes seen on the real thing. That is a lovely photo dr_gn, there's something to aim for when you finish the model.
Took it a Duxford a couple of weeks ago. It was a nice day out to go there when there's no airshow. Even got to sit in the TFC's Curtiss Hawk - after a bit of negotiation!I keep looking at the 1:32 Tamiya Spitfires, and thinking they have pretty much all the engine detail as standard. Wrong! The reality is, it's pretty much a blank canvas built OOB:
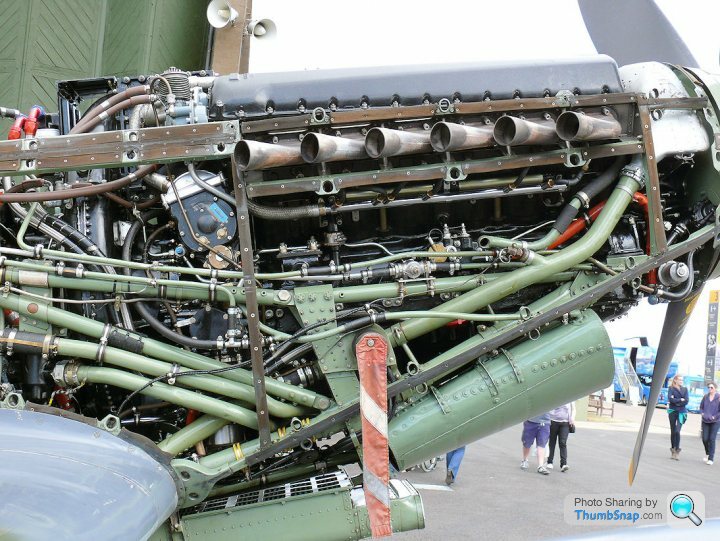
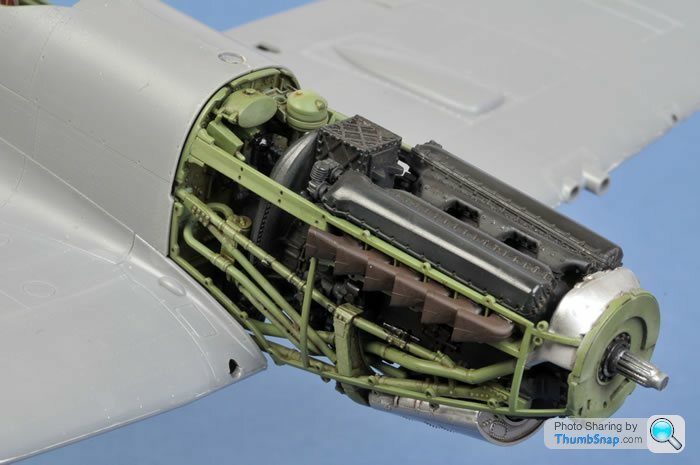
Yes that is a blank canvas but what a tremendous canvas to start with, fabulous start for a model.
Question though, how close to the interior green colour on the photograph is the painted engine mount framing of the model in real life. Monitor screens seem to alter greens quite radically don't they...
Eric, have a care mate, I only have three more left.
There's the Italeri H34 and there's another Frog HAS1/31 and a part dismantled Matchbox 'funny-noser'
But I'm having time off with the Sherpa (anyone got any decent pictures of the Main Gear Legs on a SD-330/360 series aircraft?)
Therapy from kitbashing, even my missus has noticed I'm taking a very long time with this one
Eric Mc said:
I wa building a 1/144 S360 (on hold at the moment) and finding good pictures of the wheels is really hard. The main wheels are mostly recessed ionto the pods when sitting on the ground so mostly hidden from view.
I may be able to help soon EricJust been talking with one of Bombadier Shorts guys in Belfast about this. He's offered to send me some u/c info/details/pictures of the main gear legs and some internal stuff too.
If it is OK with him I'll send you anything relative to the 360 (SD330/C23A used slightly less beefy struts so there may be some visible differences)
might be a day or two
dr_gn said:
Cheers - why don't you do a 'how to' type of thread? I wouldn't know where to start.
Hi there and I'm sorry to an extent for suggesting that you suddenly dive into figure painting- it tends to be tricky but the results can be amazing!Take the 1/10 bust of that Pawnee warrior that I posted above as an example. The base, shield, the head and shoulders are cast in resin whilst the feathers, earrings and accutraments are provided in white metal.
I tend to bond the main parts together using cyanolite or a mix of epoxy resin. This bust has no 'strained' joints as such but if it had, I would use a Dremel to drill small holes into the places where the arms and legs meet and then glue in cut lengths of 0.081" (2mm)brass rods to secure the joins.
I then drill into the base and a rectangular, six inch high piece of block wood and match them together using a temporary metal or wood dowell.
Time to remove any raised 'mating' lines using a scalpel and/or various mini files. If the figure is all white metal, wire wool is a good alternative.
Some advocate that resin parts should be washed in washing up liquid before priming but I've never bothered TBH.
Now it's time to prime the figure. I use Halford's grey or white primer using the instructions on the tin (with the last blast turning the can upside down to clear the nozzle). I then check that all the moulding lines have been removed as this primer tends to show those up.
After at least 24 hours, I block in the basic colours using Humbrol matt enamels never gloss! Again after 24 hours, it's time to mix and apply the final coat(s) using oil paints.
By far the superior brand of oil paint available is Windsor & Newton, They also supply the best quality sable brushes.
To represent flesh, I block in a mixture of matt Humbrol sand (63) mixed with some matt white (depending on ethnicity) to cover the face, hair, hands etc. Once dry, I use cocktail sticks and a file card (or similar) to mix an equal amount of Burnt Sienna, Yellow Ochre and a touch of Raw Umber and apply this to the whole area.
This seems thick and mucky but the key is to then remove the excess using a wide, dry brush or paper towel but don't use turpintine or white spirit at any point! The aim is to leave a darker shade under the eyes, nose, chin, behind ears, under the hairline etc. As oils are translucent, wiping this thick coat away leaves a sheen of paint on the raised areas where the base-coat shines through whilst the recessed areas, wrinkles and so forth are much darker.
The best way to achieve this process is to imagine that the sun is shining directly above the figure's head and envisage where the shadows would lie.
I then apply dots of Cadmium Yellow to highlighted areas such as the forehead, bridge of the nose, chin and cheekbones. I allow this to set for around 40 minutes and then blend those dots into the existing coat without muddying them.
Then paint similar small dots of Titanian or Flake White to those same areas and again wait most of an hour. This is then blended in the same way to provide the highest highlights as such.
During this process, you can add (again undilluted!) spots of Raw Umber to moustache and beard areas and again blend in for realistic hair growth.
A light sheen of Cadmium Red applied to lips gives a healthy hue to European characters.
Alas, I didn't paint the example of that Pawnee Bust that I posted. When I tackled it it turned out more like this: http://www.historexagents.com/web/pm/jl2.html
He's put a wet hand in ashes and applied it to his lower face as an act of war.
I'm quite surprised nobody has suggested the Tamiya 1/48 Mk1 Spitfire kit. (Or they have suggested it and I've missed it!) From what I can see, having read glowing reviews and also recently acquired one myself, it's simplicity itself. There seem to be only about 35 parts, without skimping on the detail, and once the interior parts are painted, I imagine that the rest of the construction could be done in a leisurely afternoon. Available for around £16 online.
kenny Chim 4 said:
dr_gn said:
Cheers - why don't you do a 'how to' type of thread? I wouldn't know where to start.
Hi there and I'm sorry to an extent for suggesting that you suddenly dive into figure painting- it tends to be tricky but the results can be amazing!Take the 1/10 bust of that Pawnee warrior that I posted above as an example. The base, shield, the head and shoulders are cast in resin whilst the feathers, earrings and accutraments are provided in white metal.
I tend to bond the main parts together using cyanolite or a mix of epoxy resin. This bust has no 'strained' joints as such but if it had, I would use a Dremel to drill small holes into the places where the arms and legs meet and then glue in cut lengths of 0.081" (2mm)brass rods to secure the joins.
I then drill into the base and a rectangular, six inch high piece of block wood and match them together using a temporary metal or wood dowell.
Time to remove any raised 'mating' lines using a scalpel and/or various mini files. If the figure is all white metal, wire wool is a good alternative.
Some advocate that resin parts should be washed in washing up liquid before priming but I've never bothered TBH.
Now it's time to prime the figure. I use Halford's grey or white primer using the instructions on the tin (with the last blast turning the can upside down to clear the nozzle). I then check that all the moulding lines have been removed as this primer tends to show those up.
After at least 24 hours, I block in the basic colours using Humbrol matt enamels never gloss! Again after 24 hours, it's time to mix and apply the final coat(s) using oil paints.
By far the superior brand of oil paint available is Windsor & Newton, They also supply the best quality sable brushes.
To represent flesh, I block in a mixture of matt Humbrol sand (63) mixed with some matt white (depending on ethnicity) to cover the face, hair, hands etc. Once dry, I use cocktail sticks and a file card (or similar) to mix an equal amount of Burnt Sienna, Yellow Ochre and a touch of Raw Umber and apply this to the whole area.
This seems thick and mucky but the key is to then remove the excess using a wide, dry brush or paper towel but don't use turpintine or white spirit at any point! The aim is to leave a darker shade under the eyes, nose, chin, behind ears, under the hairline etc. As oils are translucent, wiping this thick coat away leaves a sheen of paint on the raised areas where the base-coat shines through whilst the recessed areas, wrinkles and so forth are much darker.
The best way to achieve this process is to imagine that the sun is shining directly above the figure's head and envisage where the shadows would lie.
I then apply dots of Cadmium Yellow to highlighted areas such as the forehead, bridge of the nose, chin and cheekbones. I allow this to set for around 40 minutes and then blend those dots into the existing coat without muddying them.
Then paint similar small dots of Titanian or Flake White to those same areas and again wait most of an hour. This is then blended in the same way to provide the highest highlights as such.
During this process, you can add (again undilluted!) spots of Raw Umber to moustache and beard areas and again blend in for realistic hair growth.
A light sheen of Cadmium Red applied to lips gives a healthy hue to European characters.
Alas, I didn't paint the example of that Pawnee Bust that I posted. When I tackled it it turned out more like this: http://www.historexagents.com/web/pm/jl2.html
He's put a wet hand in ashes and applied it to his lower face as an act of war.
http://www.wingnutwings.com/ww/resinfigures
Marshdweller said:
I'm quite surprised nobody has suggested the Tamiya 1/48 Mk1 Spitfire kit. (Or they have suggested it and I've missed it!) From what I can see, having read glowing reviews and also recently acquired one myself, it's simplicity itself. There seem to be only about 35 parts, without skimping on the detail, and once the interior parts are painted, I imagine that the rest of the construction could be done in a leisurely afternoon. Available for around £16 online.
Good call. I'm about to order the 1:72 version.Sadly, I had to bin the Airfix Mk1a today - the surface quality is just so poor that despite my best efforts, nothing can be done to fix it short of filling and totally rescribing. It's just not worth the effort when the Tamiya kit is so good, and for only £3 or so more.
It's the first time I can recall giving up on a model. At least I'd not spent much time on it.
Gassing Station | Scale Models | Top of Page | What's New | My Stuff