Kelvinators TVR Tasmin
Discussion


Another small job I wanted to take on whilst the car was in bits, was to check the valve clearances. I had no history of it being done, and its a fairly important thing to check on these engines, and not hard to do.
Valve clearance is the small gap that must exist between the rocker arm and the top of the valve stem. This gap allows for expansion of the parts as they heat up (mainly the valve), so that there isn't either excessive space between the two (valve won't open as far or as long, and will make a loud tapping noise) or too little (valve may not close, and can result in a burnt valve).
Some engines have the means to self adjust, usually via a hydraulic lifter (those things that make Mitsis go "tick tick tick"), but on these older engines (and even some modern engines, like Hondas) the clearances were a scheduled service item and needs to be checked and corrected.
On this engine it's nice and easy to access with the intake piping out of the way. It's just a matter of removing the valve covers, of which mine were leaking anyway.

It turns out that a few of the valve cover bolts weren't even finger tight, so no wonder the oil was getting through the gasket!

With the covers off, you need to use a socket and ratchet to rotate the engine so that the crank timing mark lines up with TDC on the front pointer. If its correct, you should find that No 5 cylinder valves are "rocking" and this is when you measure No 1 cylinder clearances. "Rocking" is the term for when you watch the rockers on that cylinder and you will see the both are at the same height, but if you rock the crank one way, one rocker will push down slightly, and if you rock it the other way, the other rocker will push down.
Ford Cologne engines are a little special, so the layout isn't quite what you expect. Take note of the layout of the intake and exhaust valves, they aren't always in the same order.

The clearances should be as follows. These are done on a cold engine (about 20c ideally). The exhaust has a bigger clearance due to the additional heat the valve is subjected to.

When checked with a feeler gauge, there should be a slight drag on the blade, but not too tight, or too loose. You kinda just do it by feel and get to know what it should feel like

When one cylinder is done, check the list to see what rockers will be rocking next and turn the crank (in the direction of normal rotation) until those rockers rock, and check the clearances on the opposing cylinder in the list. Easy.
If any of them need adjusting, there will be a screw on the opposite end of the rocker, that either needs to be loosened or tightened to open or close the gap. Most cars have a locking nut to stop it rotating, but the Cologne doesn't, so turning the screw will adjust it, and it self locks. Mine were very tight, so I used a six sided socket and rachet to turn them. A little goes a long way though, so sometimes even a slight tweak of the screw will be the difference between loose, and the right amount of drag.

Five of six cylinders had valves that were too tight to get the blade into, and one cylinder was loose as a goose. I don't know what this means, hopefully it isn't a sign of valve recession due to a lack of lead, but time will tell. It could also just be bad adjustment from a previous mechanic....
Valve clearance is the small gap that must exist between the rocker arm and the top of the valve stem. This gap allows for expansion of the parts as they heat up (mainly the valve), so that there isn't either excessive space between the two (valve won't open as far or as long, and will make a loud tapping noise) or too little (valve may not close, and can result in a burnt valve).

Some engines have the means to self adjust, usually via a hydraulic lifter (those things that make Mitsis go "tick tick tick"), but on these older engines (and even some modern engines, like Hondas) the clearances were a scheduled service item and needs to be checked and corrected.
On this engine it's nice and easy to access with the intake piping out of the way. It's just a matter of removing the valve covers, of which mine were leaking anyway.

It turns out that a few of the valve cover bolts weren't even finger tight, so no wonder the oil was getting through the gasket!

With the covers off, you need to use a socket and ratchet to rotate the engine so that the crank timing mark lines up with TDC on the front pointer. If its correct, you should find that No 5 cylinder valves are "rocking" and this is when you measure No 1 cylinder clearances. "Rocking" is the term for when you watch the rockers on that cylinder and you will see the both are at the same height, but if you rock the crank one way, one rocker will push down slightly, and if you rock it the other way, the other rocker will push down.
Ford Cologne engines are a little special, so the layout isn't quite what you expect. Take note of the layout of the intake and exhaust valves, they aren't always in the same order.
The clearances should be as follows. These are done on a cold engine (about 20c ideally). The exhaust has a bigger clearance due to the additional heat the valve is subjected to.
When checked with a feeler gauge, there should be a slight drag on the blade, but not too tight, or too loose. You kinda just do it by feel and get to know what it should feel like

When one cylinder is done, check the list to see what rockers will be rocking next and turn the crank (in the direction of normal rotation) until those rockers rock, and check the clearances on the opposing cylinder in the list. Easy.
If any of them need adjusting, there will be a screw on the opposite end of the rocker, that either needs to be loosened or tightened to open or close the gap. Most cars have a locking nut to stop it rotating, but the Cologne doesn't, so turning the screw will adjust it, and it self locks. Mine were very tight, so I used a six sided socket and rachet to turn them. A little goes a long way though, so sometimes even a slight tweak of the screw will be the difference between loose, and the right amount of drag.

Five of six cylinders had valves that were too tight to get the blade into, and one cylinder was loose as a goose. I don't know what this means, hopefully it isn't a sign of valve recession due to a lack of lead, but time will tell. It could also just be bad adjustment from a previous mechanic....
Well yeah, Bosch K-Jetronic.... I now understand why it's so widely hated.
This will be a rather large post, as this covers about 6 weeks of work.
The TVR has been out of commission for a while now, since the running issue was getting worse to the point it wasn't able to make it down the road anymore.
The last update regarding the engine saw me remove the plenum and injectors to test them. This lead to the discovery that the flow was there, but the pattern was rubbish, so new injectors were sourced.
New Bosch injectors for the cologne are big money, and I'm trying to sort this issue for minimal cost (within reason). There is a lot of discussion online about using Mercedes injectors in various KJet powered cars (mainly VW), and it all seems good, and the injectors are much cheaper. I found one single blog post on a foreign website, that once translated confirmed that the Merc injectors do indeed work on the Cologne V6. Good enough for me.
The injectors in question are Bosch part number 0437502047, and I also got new seals, Febi 034133557E. I sourced both from FCP Euro.
The Bosch boxes made me laugh. MECHANIC ONLY!

You can see the obvious difference here. The new injectors are shorter, both in the overall length, but also in the hex part at the top.

I can now confirm that these do indeed fit, and if you check the link to the other blog above, you can see that the injector does stick out into the intake tract less, but won't be an issue (and some say is better for intake flow).
You can see the shorter hex here

These are the plastic retainers. These sit on top of the O-ring, and appear to be what actually holds the injector into the manifold, by the metal retainer pushing down on the plastic retainer, which pressed down on the O-ring. The tapered face visible in the first photo is what sits against the O-ring.


Due to the replacement injectors having a shorter hex, you cannot fit the retainer and O-ring, and then still have space to tighten the injector pipe. I found it easiest to slip the plastic retainer, O-ring and metal retainer on, leave them at the bottom of the injector, and then fit and tighten the pipe on the car. Once tight, then you slip the retainer and O-ring up into place.


So that finally solves the mystery of the injector seal. It's a normal KJet O-ring, with a plastic retainer on it.
With the new injectors sorted, they all got refitted into the manifold and secured with the metal retainer and screw.
Next was to remove and clean the fuel distributor. This is the big weird thing on top of the air box, which feeds all the injectors. This has a plunger inside it, which the sensor plate presses up on as it opens. This plunger is known to get sticky when cars are left sitting. Mine was slow to return, and wasn't moving as free as it should.

Carefully crack off all of the banjo fittings, including the feed and return on the side, and then remove the banjo bolts. Take care to collect all the copper washers, as there will be two on each banjo fitting. With the fuel lines disconnected this gives access to the three flat head screws that secure the unit to the air filter housing. Remove these screws. Now the distributor can be CAREFULLY removed. Make sure to slip a hand under it and stop the plunger from dropping right out. If it falls out and gets damaged, the whole distributor is a write-off!

You can see the plunger in the center of the unit.

With the unit on the bench you can turn it over and let the plunger slip out. If it doesn't freely drop out, it may need some compressed air in the top fuel fitting to push it out. Mine dropped out OK. Be VERY careful handling the plunger, and keep it very clean.

I cleaned the plunger and its cylinder in the main unit, and sprayed and soaked all fuel ports with carb and brake cleaner.
In the injector outlets there are individual filter baskets. I used a long, thin screw to gently screw into them, and then a sharp pull freed them


They all had some traces of dirt on them, but nothing major. I soaked them in brake clean overnight and then refitted them

The regulator was the last part to clean and overhaul. This resides on the side and is a 5/8" hex. I ordered a replacement seal kit from Delorean GO as they use the same part in their Kjet setup.
The regulator kit is PN 102807A and I also got a new seal for between the fuel distributor and airbox, PN 102855

I used a small pick to remove the old seals, and replaced them with the new green ones. The old ones looked in good shape, I wonder if they had been replaced recently to try and fix the issue? Be careful handling the regulator too, just above the o-ring in the below photo are two very small shims. These set the fuel pressure, so don't lose them! You can add or subtract shims to increase or decrease system pressure.

I also did the o-ring on the regulator piston, but no photo of that.
That's about all I could do with the distributor without splitting it, and that is a risky job that could result in further damage or leaks.
The next part to clean out was the (incorrectly named) Warm Up Regulator. This is the main control pressure regulator (the one above only controls the system pressure), and controls how rich or lean the engine runs. It has two bolts holding it down, two fuel banjo fittings, a power connector, and a vacuum hose.

Mine was pretty grotty. A lot of parts on the engine have been badly painted grey, which is flaking off and being ugly. I'll deal with that another time.


I could see some dirt in the inlet mesh already, so not a good start.

There isn't a lot to break on these, but take care taking it apart. Opening it up is easy; there are four screws on the bottom, which when removed will split the two halves.


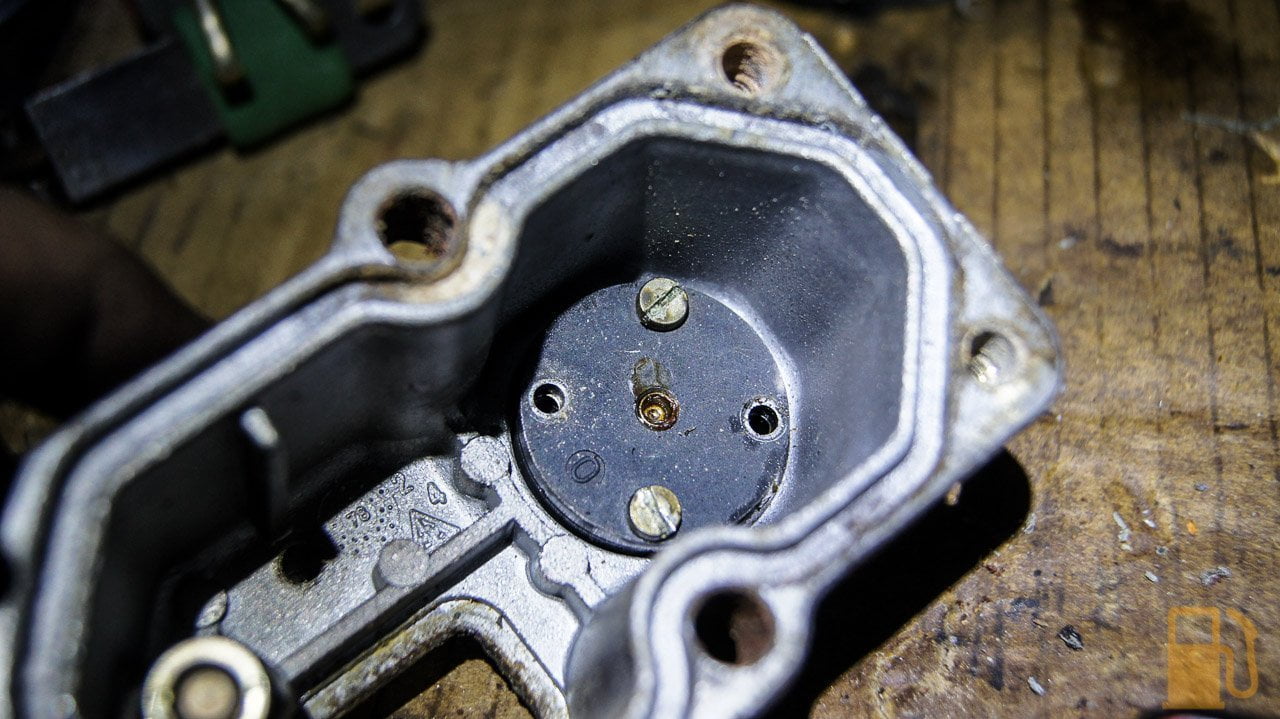
There are a few things of interest inside the top half
[LIST]
[*]Orange Arrow - Adjustment pin for COLD pressure
[*]Green Arrow - Heater element
[*]Blue Arrow - Bimetallic Strip
[*]Red Arrow - "Mexican Hat" and pin

[/LIST]
Bascially, when the engine is cold it needs a richer mixture, like a choke on a carb. A LOWER control pressure will give this result. The springs in the bottom half press on the mexican hat, which pushes on the pin, which then places pressure on the diaphragm via a little cup. This force is countered by the bimetallic strip, which pushes down on the mexican hat when cold, reducing the internal restriction. Of course you couldn't run that rich all the time, so to lean it out when warm, the WUR is warmed by both engine ambient heat, and by a 12v heating element. This heat causes the bimetallic strip to slowly bow upwards, which releases pressure against the mexican hat, allowing it to rise up and towards the diaphragm, creating an internal restriction, raising the control pressure, and leaning the mixture. The cold pressure is set by adjusting how much the bimetallic strip pushes down on the mexican hat when cold. This is done by moving the adjustment pin up and down.... with a hammer and punch.
Anyway, to continue disassembly you need to remove the clip that retains the heater connector. A large screwdriver to lever it out does the trick

And then remove the 10mm nut from the bimetallic strip and remove it. Take note of the washer placement

This is the fuel unit containing the cup and diaphragm. I have removed two of the screws already. The cup is in the middle, filled with grease (to lubricate and retain the pin)
CAREFULLY remove the disk and diaphragm. Don't damage the diaphragm as its hard to get a replacement (although there are some rebuild kits on eBay now which may work).
Removing these gives you access to the o-ring and fuel ports. One of them has a very fine five-layer mesh filter in it. Internet wisdom says to clean it, but not to remove it as it can cause issues with pressures if you do (reduces restriction). I hosed it from inside out with brake clean, and got a whole heap of what I can only describe as a fine sand from it. There was heaps.


After much testing, I eventually went back and actually threw the disassembled top half into my ultrasonic cleaner, which seemed to clean the filter out well. I tested it by shining a light through it, and there were some big differences in how much light came through. There was almost no light passing through at first, before cleaning.
Cool moody shot from that night

I refit the distributor and WUR, and refit the fuel pipes

I also plumbed in the fuel pressure testing kit, between the fuel distributor and WUR.

The system pressure was a little low, it should be over 5BAR

But the cold control pressure was crazy. It should be about 0.5BAR, not 3.6BAR!

Keep in mind this is after only cleaning, but without any adjustments. No wonder the car was leaning out hard. Remember, higher pressure is a leaner mixture.
This triggered the next couple of weeks messing with the system trying to iron out the pressures. I tried many things, including running the WUR naked, with no internals

And setting the pressure with the adjustment pin, located here

Then it all started to turn to custard, and the system pressure was low at about 4BAR, and wouldn't come up even with additional shims in the regulator. This lead to buying a replacement fuel pump.

The old pump is pretty easy to remove. Four bolts hold the mount to the car, two hoses, and two wires need to be removed.

I clamped the feed hose as the tanks had fuel in them now and set about removing the pump
Pump on the bench

The pump has an inlet filter in it, and this is what came out of that filter. It's not rust, which is good, but almost looks like fluff, some organic matter (bits of leaf?) and a lump of metal, which kinda looks like lead or solder. I might get a pre-pump filter.


The new pump is bigger and slightly longer, but otherwise a direct replacement. I couldn't reuse the sleeve from the old pump, but reused the rubber insulator


The old pump was a Bosch 0580464125. A good pump, but mine wasn't having a good time anymore. The replacement is a generic pump which met the required criteria (high flow, and up to 8BAR pressure).
The new pump sounds nicer, but the system pressure hasn't changed much at all. I tried adding a whopping great washer as a shim on the regulator and finally got 5BAR pressure, but I'm sure that isn't right. I have had the WUR open so many times now that I can open it in about 30 seconds for adjustment, but I'm still getting weird results.
Right now, the system pressure is around 5BAR with the extra shims. The cold control pressure should be about 0.5BAR (as that's what I dropped it down to after resetting the pin) but either it's very slow to rise on the gauge, or doesn't rise at all now. Warm pressure is about 2BAR, 0.9BAR too low.
The new pump can obviously do the pressure, but its either being restricted or bled off somewhere. There are no leaks, and the fuel filter was replaced when I got the car (although I do now wonder about it after the pump packing a sad).
Anyway, I reassembled the intake today, and removed the pressure tester
And fired the car into life. It had some issues at first, but tweaking the mixture screw sorted that out and it idled OK, albeit a bit lumpy and revved on about 5 cylinders. The more I ran the car, the more it was happy to pick up all the cylinders and rev again. I set the idle by ear, and so far I have taken it for a dodgy run back and forth along my road, which it seemed OK. I haven't been brave enough to take it further yet as I might take a support car with me just in case it dies in the middle of the road again.

I still want to know what the pressures are doing, but I suspect there is an issue with my pressure tester. Either that or I have a weird issue in my KJet system. I'm trying to source a second testing setup now to compare and see what happens. If I can set the pressures correctly, in theory I should be able to get a nice happy running car. Fingers crossed.
Oh, it wouldn't be my car if it didn't spill some coolant. Thankfully I believe this is just from me overfilling the radiator, as it was from the overflow. Looks like it'll need a flush at some point too.

This will be a rather large post, as this covers about 6 weeks of work.
The TVR has been out of commission for a while now, since the running issue was getting worse to the point it wasn't able to make it down the road anymore.
The last update regarding the engine saw me remove the plenum and injectors to test them. This lead to the discovery that the flow was there, but the pattern was rubbish, so new injectors were sourced.
New Bosch injectors for the cologne are big money, and I'm trying to sort this issue for minimal cost (within reason). There is a lot of discussion online about using Mercedes injectors in various KJet powered cars (mainly VW), and it all seems good, and the injectors are much cheaper. I found one single blog post on a foreign website, that once translated confirmed that the Merc injectors do indeed work on the Cologne V6. Good enough for me.
The injectors in question are Bosch part number 0437502047, and I also got new seals, Febi 034133557E. I sourced both from FCP Euro.
The Bosch boxes made me laugh. MECHANIC ONLY!

You can see the obvious difference here. The new injectors are shorter, both in the overall length, but also in the hex part at the top.

I can now confirm that these do indeed fit, and if you check the link to the other blog above, you can see that the injector does stick out into the intake tract less, but won't be an issue (and some say is better for intake flow).
You can see the shorter hex here

These are the plastic retainers. These sit on top of the O-ring, and appear to be what actually holds the injector into the manifold, by the metal retainer pushing down on the plastic retainer, which pressed down on the O-ring. The tapered face visible in the first photo is what sits against the O-ring.


Due to the replacement injectors having a shorter hex, you cannot fit the retainer and O-ring, and then still have space to tighten the injector pipe. I found it easiest to slip the plastic retainer, O-ring and metal retainer on, leave them at the bottom of the injector, and then fit and tighten the pipe on the car. Once tight, then you slip the retainer and O-ring up into place.


So that finally solves the mystery of the injector seal. It's a normal KJet O-ring, with a plastic retainer on it.
With the new injectors sorted, they all got refitted into the manifold and secured with the metal retainer and screw.
Next was to remove and clean the fuel distributor. This is the big weird thing on top of the air box, which feeds all the injectors. This has a plunger inside it, which the sensor plate presses up on as it opens. This plunger is known to get sticky when cars are left sitting. Mine was slow to return, and wasn't moving as free as it should.

Carefully crack off all of the banjo fittings, including the feed and return on the side, and then remove the banjo bolts. Take care to collect all the copper washers, as there will be two on each banjo fitting. With the fuel lines disconnected this gives access to the three flat head screws that secure the unit to the air filter housing. Remove these screws. Now the distributor can be CAREFULLY removed. Make sure to slip a hand under it and stop the plunger from dropping right out. If it falls out and gets damaged, the whole distributor is a write-off!

You can see the plunger in the center of the unit.

With the unit on the bench you can turn it over and let the plunger slip out. If it doesn't freely drop out, it may need some compressed air in the top fuel fitting to push it out. Mine dropped out OK. Be VERY careful handling the plunger, and keep it very clean.

I cleaned the plunger and its cylinder in the main unit, and sprayed and soaked all fuel ports with carb and brake cleaner.
In the injector outlets there are individual filter baskets. I used a long, thin screw to gently screw into them, and then a sharp pull freed them


They all had some traces of dirt on them, but nothing major. I soaked them in brake clean overnight and then refitted them

The regulator was the last part to clean and overhaul. This resides on the side and is a 5/8" hex. I ordered a replacement seal kit from Delorean GO as they use the same part in their Kjet setup.
The regulator kit is PN 102807A and I also got a new seal for between the fuel distributor and airbox, PN 102855

I used a small pick to remove the old seals, and replaced them with the new green ones. The old ones looked in good shape, I wonder if they had been replaced recently to try and fix the issue? Be careful handling the regulator too, just above the o-ring in the below photo are two very small shims. These set the fuel pressure, so don't lose them! You can add or subtract shims to increase or decrease system pressure.

I also did the o-ring on the regulator piston, but no photo of that.
That's about all I could do with the distributor without splitting it, and that is a risky job that could result in further damage or leaks.
The next part to clean out was the (incorrectly named) Warm Up Regulator. This is the main control pressure regulator (the one above only controls the system pressure), and controls how rich or lean the engine runs. It has two bolts holding it down, two fuel banjo fittings, a power connector, and a vacuum hose.

Mine was pretty grotty. A lot of parts on the engine have been badly painted grey, which is flaking off and being ugly. I'll deal with that another time.


I could see some dirt in the inlet mesh already, so not a good start.

There isn't a lot to break on these, but take care taking it apart. Opening it up is easy; there are four screws on the bottom, which when removed will split the two halves.


There are a few things of interest inside the top half
[LIST]
[*]Orange Arrow - Adjustment pin for COLD pressure
[*]Green Arrow - Heater element
[*]Blue Arrow - Bimetallic Strip
[*]Red Arrow - "Mexican Hat" and pin

[/LIST]
Bascially, when the engine is cold it needs a richer mixture, like a choke on a carb. A LOWER control pressure will give this result. The springs in the bottom half press on the mexican hat, which pushes on the pin, which then places pressure on the diaphragm via a little cup. This force is countered by the bimetallic strip, which pushes down on the mexican hat when cold, reducing the internal restriction. Of course you couldn't run that rich all the time, so to lean it out when warm, the WUR is warmed by both engine ambient heat, and by a 12v heating element. This heat causes the bimetallic strip to slowly bow upwards, which releases pressure against the mexican hat, allowing it to rise up and towards the diaphragm, creating an internal restriction, raising the control pressure, and leaning the mixture. The cold pressure is set by adjusting how much the bimetallic strip pushes down on the mexican hat when cold. This is done by moving the adjustment pin up and down.... with a hammer and punch.
Anyway, to continue disassembly you need to remove the clip that retains the heater connector. A large screwdriver to lever it out does the trick

And then remove the 10mm nut from the bimetallic strip and remove it. Take note of the washer placement

This is the fuel unit containing the cup and diaphragm. I have removed two of the screws already. The cup is in the middle, filled with grease (to lubricate and retain the pin)

CAREFULLY remove the disk and diaphragm. Don't damage the diaphragm as its hard to get a replacement (although there are some rebuild kits on eBay now which may work).
Removing these gives you access to the o-ring and fuel ports. One of them has a very fine five-layer mesh filter in it. Internet wisdom says to clean it, but not to remove it as it can cause issues with pressures if you do (reduces restriction). I hosed it from inside out with brake clean, and got a whole heap of what I can only describe as a fine sand from it. There was heaps.


After much testing, I eventually went back and actually threw the disassembled top half into my ultrasonic cleaner, which seemed to clean the filter out well. I tested it by shining a light through it, and there were some big differences in how much light came through. There was almost no light passing through at first, before cleaning.
Cool moody shot from that night

I refit the distributor and WUR, and refit the fuel pipes

I also plumbed in the fuel pressure testing kit, between the fuel distributor and WUR.

The system pressure was a little low, it should be over 5BAR

But the cold control pressure was crazy. It should be about 0.5BAR, not 3.6BAR!

Keep in mind this is after only cleaning, but without any adjustments. No wonder the car was leaning out hard. Remember, higher pressure is a leaner mixture.
This triggered the next couple of weeks messing with the system trying to iron out the pressures. I tried many things, including running the WUR naked, with no internals

And setting the pressure with the adjustment pin, located here

Then it all started to turn to custard, and the system pressure was low at about 4BAR, and wouldn't come up even with additional shims in the regulator. This lead to buying a replacement fuel pump.

The old pump is pretty easy to remove. Four bolts hold the mount to the car, two hoses, and two wires need to be removed.

I clamped the feed hose as the tanks had fuel in them now and set about removing the pump

Pump on the bench

The pump has an inlet filter in it, and this is what came out of that filter. It's not rust, which is good, but almost looks like fluff, some organic matter (bits of leaf?) and a lump of metal, which kinda looks like lead or solder. I might get a pre-pump filter.


The new pump is bigger and slightly longer, but otherwise a direct replacement. I couldn't reuse the sleeve from the old pump, but reused the rubber insulator


The old pump was a Bosch 0580464125. A good pump, but mine wasn't having a good time anymore. The replacement is a generic pump which met the required criteria (high flow, and up to 8BAR pressure).
The new pump sounds nicer, but the system pressure hasn't changed much at all. I tried adding a whopping great washer as a shim on the regulator and finally got 5BAR pressure, but I'm sure that isn't right. I have had the WUR open so many times now that I can open it in about 30 seconds for adjustment, but I'm still getting weird results.
Right now, the system pressure is around 5BAR with the extra shims. The cold control pressure should be about 0.5BAR (as that's what I dropped it down to after resetting the pin) but either it's very slow to rise on the gauge, or doesn't rise at all now. Warm pressure is about 2BAR, 0.9BAR too low.
The new pump can obviously do the pressure, but its either being restricted or bled off somewhere. There are no leaks, and the fuel filter was replaced when I got the car (although I do now wonder about it after the pump packing a sad).
Anyway, I reassembled the intake today, and removed the pressure tester

And fired the car into life. It had some issues at first, but tweaking the mixture screw sorted that out and it idled OK, albeit a bit lumpy and revved on about 5 cylinders. The more I ran the car, the more it was happy to pick up all the cylinders and rev again. I set the idle by ear, and so far I have taken it for a dodgy run back and forth along my road, which it seemed OK. I haven't been brave enough to take it further yet as I might take a support car with me just in case it dies in the middle of the road again.

I still want to know what the pressures are doing, but I suspect there is an issue with my pressure tester. Either that or I have a weird issue in my KJet system. I'm trying to source a second testing setup now to compare and see what happens. If I can set the pressures correctly, in theory I should be able to get a nice happy running car. Fingers crossed.
Oh, it wouldn't be my car if it didn't spill some coolant. Thankfully I believe this is just from me overfilling the radiator, as it was from the overflow. Looks like it'll need a flush at some point too.

Blanco92 said:
Don’t get me wrong, I love older cars and TVRs, but this shows how a little electrickery can be a good thing. It seems there are so many mechanical components with fine tolerances in this engine. It will be worth the reward when it’s all right.
It’s delightful to see that this one has made it into caring and knowledgable hands, keep up the good work!
Oh gosh, if it was EFI it'd be running like a dream right now. Blardy KJet!It’s delightful to see that this one has made it into caring and knowledgable hands, keep up the good work!
Just because I've been playing with the Saab, doesn't mean the TVR has been neglected. If anything, I've hit the TVR with some renewed vigour this weekend and got a couple more jobs sorted.
After having issues with the KJet system from the previous post I've left the poor TVR alone for over a month and just ignored it. Motivation has been very low, and to be honest I got to a point where I loathed seeing the car sitting in the garage. Not a good place to be.
This weekend though, I found some motivation.
I started by taking the Saab out and grabbing some more fuel to add to the tanks of the TVR, just so I'm ready to take it out on the road and see if it runs OK or not. I didn't get that far today, but I did fire her up and got the engine up to temp. Amazingly even after sitting untouched for over a month, the engine started first turn of the key, before a complete revolution of the engine was completed. A very good cold start indeed.
Since I wasn't taking the car out for a run I decided to jump into a couple of other jobs I needed done.
First was to install the replacement interior mirror. You don't realise how important one if until you don't have one, even if your rear window is cloudy. The original came with the car, but had been knocked off the windscreen and was badly cracked

It looks like it had been glued on with super glue or something

I don't know what the original mirror was from. I had been told it was a MK5 Cortina mirror, but the Cortina mirror I purchased isn't the same, although it does work fine (and has dip, which the original mirror doesn't). In future though I'd look for a mirror with curved glass, as the Cortina flat glass doesn't give a very wide field of view (guess its made to view through a 4 door sedan, not a very short 2 door).
The mirror I purchased came with a pair of "mirror pads" used to stick the mirror to the screen. They appear to be normal double sided foam tape, but maybe of the VHB (Very High Bond) type.

The only instructions on the pack were to make sure both surfaces were warmed thoroughly, with a hairdryer or similar. I used a heat gun to gently heat the mirror base up before sticking the pad to it, and then gently warming the screen up to attach it. Seemed to work, it's still on the screen and seems well enough stuck. Time will tell if it holds up long term. At least this is one less thing on the list to do


As you may spot, one other thing I changed was to go back to the leather Momo wheel. As much as I love the Futura, the wood rim is a bit slippery when you only have armstrong steering, and the leather gives much-needed purchase to turn the wheels.

The last job for the day was one I had been putting off as it didn't seem like much fun; replacing the weather seal strips around the door and roof openings. The old seals were well buggered, with the D shaped sealing surface being torn from the U shaped mounting section in multiple places. No doubt this was the reason for the car being a swimming pool when I got it, the seals weren't keeping anything out.


Someone had tried to use glue under the seal to help hold it in place. It didn't work. They had also tried to supplement to the destroyed seal with other random bits of seal... that too didn't work.
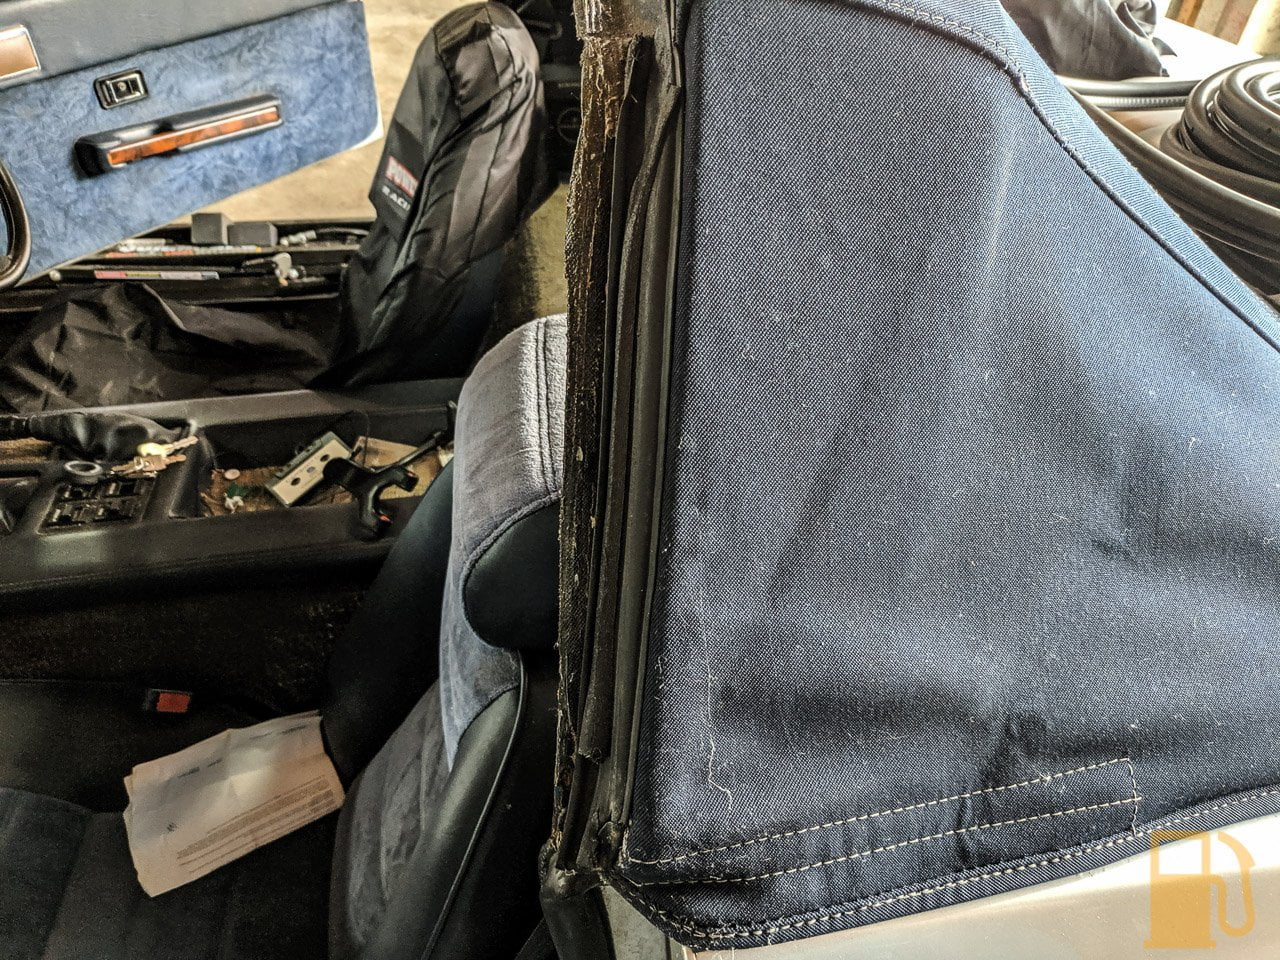
I had ordered 10M of the seal from Racetech in the UK. In hindsight, this is a pretty generic sealing strip, and probably could have sourced it locally or from eBay for less, but oh well. Its this profile

I started on the rear hoop, as it was the shorter section and easy to access and work with

It's as easy as gently pressing the channel into place over the edge, and gently tapping it in with a soft face hammer until you feel/hear it bottom out. The corners are a little fiddly but on the rear hoop its good practice for the harder ones around the screen.

There are a few places where it gets a bit tricky. One of them is the back of the door opening. It has a vertical piece, which meets at the bottom with the horizontal piece. I followed what the seal I removed did, and trimmed the ends of the new seals at about 45 degrees, and forced them into place. The seal can be cut/trimmed with a set of decent side cutters. It does have a metal spine which makes it a bit harder to cut.

The rest of it is a case of going around and tapping the seal into place. I used one continuous run from the back of the door opening, up and over the screen and down to the opposite side door opening. No joins, no less leaks.

Its a time consuming job, especially around the 90 degree turns at the top corners of the windscreen frame, which is a place you need to be very careful of as it can take a bit of extra force to get the seal to seat, but take your time and it should go well. The new seal is much nicer and makes far better contact with the doors, roof panel and windows. It might even keep some water out. I'm not kidding myself though, the seal is a last resort; this is a summer car.
From the 10M roll, I have enough left over to do the top and sides of the boot opening, but not enough for the whole thing. Maybe order another 1M if you want to do that too.
So today was a good day. A couple more jobs off the list. I'm waiting on a flash new hand made German Kjet tester to arrive, and then I will try to set the pressures again. If I still can't, it'll be back to the drawing board. I'm quickly running out of time to go for a WOF inspection to get the car roadworthy, so I'll need a good solid push over December to get the car ready. In the mean time, everything is closed up, with the roof on, to bed the new seals in. First time the roof panel has been on in ages.

Edited by KelvinatorNZ on Sunday 24th November 10:14
In the quest to both right previous wrongs and make things on this car actually work, I had to have a look at the braking system. It worked, kinda, but needed to be better.
Sitting around for a couple of years does no car any good, and the TVR hadn't had love in a while, so it was anyone's guess when the brakes were last touched.
The main braking system worked OK, albeit there is a fairly bad pulsating through the pedal when braking. I'm hoping this is due to the rust-covered rotors, and not a sticking caliper. The hand brake just doesn't work at all; you fully engage it as hard as you can hulk the handle up, and you can still easily roll the car along the garage floor. Not ideal.
The brakes on this car are... unique. The front calipers are normal, from a Granada I believe. On the Tasmin its two-piston calipers and solid rotors up front. I think the bigger engined cars upgraded to vented rotors with the same caliper (with spacers in the caliper to accommodate the wider rotor).

The rears, on the other hand, are more unusual, having been taken straight from a 70s Jaguar XJ. They're inboard, with the whole brake system in sitting next to the differential, instead of out near the wheels. Way overkill for this little car (so is the differential tbh).


This makes servicing the rear brakes a little less than ideal, as everything is tucked away in the middle of the car, surrounded by bits of suspension and tube frame chassis.
The first step to doing any work on the brakes was to get the car in the air. Unfortunately due to the placement of the frames I couldn't use the Quickjacks to lift the car this time as I wouldn't have the space to change the oil if I did (frame would be right under the sump). The TVR isn't too hard to put on stands though, but the front is low enough that I cant get the jack under it without running it up on boards first.

Before working on the brakes I took the chance to change the oil. It didn't look too bad on the dip stick, but it had to be at least two years old, and who knows how many KM since it was last changed. I drained it out, to find it was a dark grey/brown colour and smelt quite unpleasant. I guess it didn't like sitting either.
A new Ryco Z71 filter and 4.7L of Penrites finest HPR30 finished off the job nicely.


I haven't run the car much since, but the engine does seem to be a little quieter when cold, but now I know and trust what's in it.
Moving right along, onto the brakes. I wanted to check the non-functioning hand brake first, as that's the main issue that will stop the brakes passing a WOF inspection. The system isn't too complicated; There are two little calipers attached to the main calipers in the rear, which are actuated by a cable, to clamp onto the brake rotor. These little calipers are meant to be self-adjusting, but they're known to not self adjust very well and need to be set up right.
Obviously the cable had too much slack in it for a start, as the lever almost points at the sky when pulled, but the real issue is the adjustment of the pads, as there was little to no clamping happening.
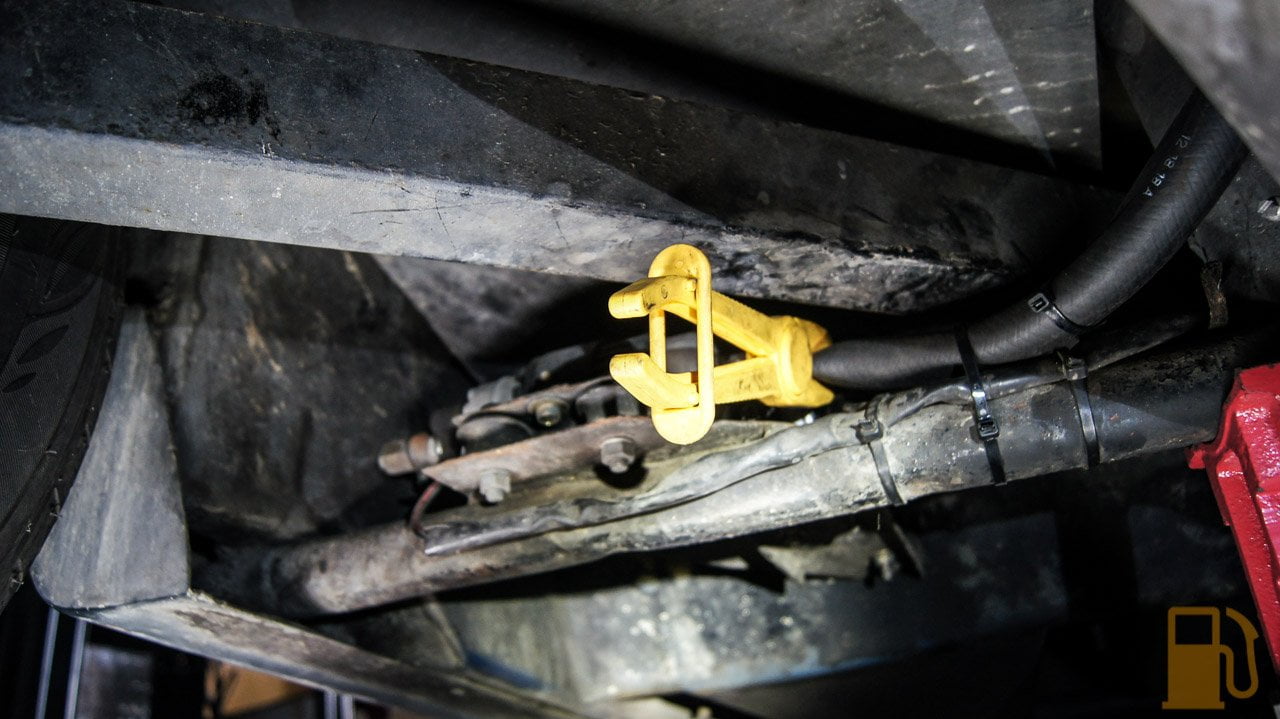
To adjust the hand brake, first back the cable completely off using the 13mm nut (green arrow) on the end of the cable. There is another 13mm nut (orange arrow) on the other side of the lever, out of sight, which will need to be "tightened" to allow the slack to be taken out of the cable.

Next the split pin in the adjuster needs to be removed

And using a big screwdriver, turn the screw clockwise until you cannot spin the hub anymore. Now back it off until you can slip a split pin through again, and that's that side done. Now adjust the other caliper the same way.
To finish the job you need to tighten the cable to remove slack. First back the hidden nut (orange arrow in above photo) off and using the nut you can see, wind in on until the slack is taken up, and then wind the hidden nut back towards the lever to lock the cable into place. With any luck, it should all be adjusted now, and ready to go. Three clicks of the lever is ideal.
Since I was under here, I took this as a good opportunity to flush the old brake fluid through and replace it with new, and bleed the braking system. Once again the old fluid is who knows how many years old, and was looking rather brown. Brake fluid should be replaced every two years as it absorbs moisture in the air, and becomes less effective (and can cause issues with blockage and rust if it's really bad).
I used my new vacuum bleeder to suck the old fluid out of the master reservoir. I've seen better fluid. It should be a nice clear yellow. I topped up with fresh Dot 4 fluid.


What came out of the rear brakes was darker than that, so obviously its been a while since the rears had been flushed. Not really that surprised, since the bleeder on the rear is such a pain to get to. Its tucked away behind this tube. Very hard to see, and limited space to swing the spanner.

There is only one bleeder on the rear; on the passengers side. The calipers have a link pipe, so bleeding one bleeds both. I made sure to suck through a lot of fluid to flush both calipers.

With the rears flushed I moved onto the front. The front is comparatively a breeze to work on, even if someone had put a brake hard pipe right in the way of the bleeder. Nothing a gentle bend cant fix.


Strangely, the fluid that came out of the front calipers was much cleaner than the rear. I suspect someone had bled the fronts without bleeding the rear. Nice one.
The vacuum bleeder is good for sucking fluid through, but I have more faith in the old one-man bleeder for actually making sure no air is in the system


You may note that a couple of photos show no brake pads. This was the next job after flushing and bleeding the brakes. I removed the pads to check the pistons weren't stuck and could be pushed back. Turns out the front pads are a set of near new Redstuff Ceramic pads. These are a good high performance street pad. A good upgrade.

Both front calipers responded well, with the pistons moving freely back, so that's a relief.
The rears aren't as much fun to work with. I found it easiest to work on my back with my feet out the back of the car. The pads are held in with two pins, which are secured with an R-clip each (like the fronts). I found on my car that one caliper had both pins inserted the same way, and one had the pins inserted from opposing sides, which meant that the location of the R-clip was different on each caliper


I used a small flat blade to pull the clips out, and then the pins just pushed out by hand. The pads took a little levering to get out but weren't too hard. The pistons on both rear calipers moved freely also, so another win. I'm sure I have receipts for the brake calipers being replaced a few years ago, so might explain why they're still in good shape. So hopefully that means the rotors just need a good hard pounding to get the rust and rubbish off them, and we might have some luck.
Unfortunately even with the hand brake adjusted as it is (three clicks maximum), it's still not quite enough to hold the car on my driveway. It should be enough to pass a warrant, as my driveway is trial by fire and far too steep, but I'm hoping I can bed the pads in and get better performance once I drive the car a bit and the rust is knocked off.
I'm getting closer to having the car ready for its WOF inspection. Slowly but surely, we will get there.
In the meantime, I made the car look a million times better, with one easy step. Tyre shine. The old 10-15 year old rubber was looking somewhat dry.

Sitting around for a couple of years does no car any good, and the TVR hadn't had love in a while, so it was anyone's guess when the brakes were last touched.
The main braking system worked OK, albeit there is a fairly bad pulsating through the pedal when braking. I'm hoping this is due to the rust-covered rotors, and not a sticking caliper. The hand brake just doesn't work at all; you fully engage it as hard as you can hulk the handle up, and you can still easily roll the car along the garage floor. Not ideal.
The brakes on this car are... unique. The front calipers are normal, from a Granada I believe. On the Tasmin its two-piston calipers and solid rotors up front. I think the bigger engined cars upgraded to vented rotors with the same caliper (with spacers in the caliper to accommodate the wider rotor).

The rears, on the other hand, are more unusual, having been taken straight from a 70s Jaguar XJ. They're inboard, with the whole brake system in sitting next to the differential, instead of out near the wheels. Way overkill for this little car (so is the differential tbh).


This makes servicing the rear brakes a little less than ideal, as everything is tucked away in the middle of the car, surrounded by bits of suspension and tube frame chassis.
The first step to doing any work on the brakes was to get the car in the air. Unfortunately due to the placement of the frames I couldn't use the Quickjacks to lift the car this time as I wouldn't have the space to change the oil if I did (frame would be right under the sump). The TVR isn't too hard to put on stands though, but the front is low enough that I cant get the jack under it without running it up on boards first.

Before working on the brakes I took the chance to change the oil. It didn't look too bad on the dip stick, but it had to be at least two years old, and who knows how many KM since it was last changed. I drained it out, to find it was a dark grey/brown colour and smelt quite unpleasant. I guess it didn't like sitting either.
A new Ryco Z71 filter and 4.7L of Penrites finest HPR30 finished off the job nicely.


I haven't run the car much since, but the engine does seem to be a little quieter when cold, but now I know and trust what's in it.
Moving right along, onto the brakes. I wanted to check the non-functioning hand brake first, as that's the main issue that will stop the brakes passing a WOF inspection. The system isn't too complicated; There are two little calipers attached to the main calipers in the rear, which are actuated by a cable, to clamp onto the brake rotor. These little calipers are meant to be self-adjusting, but they're known to not self adjust very well and need to be set up right.
Obviously the cable had too much slack in it for a start, as the lever almost points at the sky when pulled, but the real issue is the adjustment of the pads, as there was little to no clamping happening.
To adjust the hand brake, first back the cable completely off using the 13mm nut (green arrow) on the end of the cable. There is another 13mm nut (orange arrow) on the other side of the lever, out of sight, which will need to be "tightened" to allow the slack to be taken out of the cable.

Next the split pin in the adjuster needs to be removed

And using a big screwdriver, turn the screw clockwise until you cannot spin the hub anymore. Now back it off until you can slip a split pin through again, and that's that side done. Now adjust the other caliper the same way.
To finish the job you need to tighten the cable to remove slack. First back the hidden nut (orange arrow in above photo) off and using the nut you can see, wind in on until the slack is taken up, and then wind the hidden nut back towards the lever to lock the cable into place. With any luck, it should all be adjusted now, and ready to go. Three clicks of the lever is ideal.
Since I was under here, I took this as a good opportunity to flush the old brake fluid through and replace it with new, and bleed the braking system. Once again the old fluid is who knows how many years old, and was looking rather brown. Brake fluid should be replaced every two years as it absorbs moisture in the air, and becomes less effective (and can cause issues with blockage and rust if it's really bad).
I used my new vacuum bleeder to suck the old fluid out of the master reservoir. I've seen better fluid. It should be a nice clear yellow. I topped up with fresh Dot 4 fluid.


What came out of the rear brakes was darker than that, so obviously its been a while since the rears had been flushed. Not really that surprised, since the bleeder on the rear is such a pain to get to. Its tucked away behind this tube. Very hard to see, and limited space to swing the spanner.

There is only one bleeder on the rear; on the passengers side. The calipers have a link pipe, so bleeding one bleeds both. I made sure to suck through a lot of fluid to flush both calipers.

With the rears flushed I moved onto the front. The front is comparatively a breeze to work on, even if someone had put a brake hard pipe right in the way of the bleeder. Nothing a gentle bend cant fix.

Strangely, the fluid that came out of the front calipers was much cleaner than the rear. I suspect someone had bled the fronts without bleeding the rear. Nice one.
The vacuum bleeder is good for sucking fluid through, but I have more faith in the old one-man bleeder for actually making sure no air is in the system


You may note that a couple of photos show no brake pads. This was the next job after flushing and bleeding the brakes. I removed the pads to check the pistons weren't stuck and could be pushed back. Turns out the front pads are a set of near new Redstuff Ceramic pads. These are a good high performance street pad. A good upgrade.

Both front calipers responded well, with the pistons moving freely back, so that's a relief.
The rears aren't as much fun to work with. I found it easiest to work on my back with my feet out the back of the car. The pads are held in with two pins, which are secured with an R-clip each (like the fronts). I found on my car that one caliper had both pins inserted the same way, and one had the pins inserted from opposing sides, which meant that the location of the R-clip was different on each caliper


I used a small flat blade to pull the clips out, and then the pins just pushed out by hand. The pads took a little levering to get out but weren't too hard. The pistons on both rear calipers moved freely also, so another win. I'm sure I have receipts for the brake calipers being replaced a few years ago, so might explain why they're still in good shape. So hopefully that means the rotors just need a good hard pounding to get the rust and rubbish off them, and we might have some luck.
Unfortunately even with the hand brake adjusted as it is (three clicks maximum), it's still not quite enough to hold the car on my driveway. It should be enough to pass a warrant, as my driveway is trial by fire and far too steep, but I'm hoping I can bed the pads in and get better performance once I drive the car a bit and the rust is knocked off.
I'm getting closer to having the car ready for its WOF inspection. Slowly but surely, we will get there.
In the meantime, I made the car look a million times better, with one easy step. Tyre shine. The old 10-15 year old rubber was looking somewhat dry.

Looks like I might finally have the KJet pressures right. Its running and idling much better. First time its idled under 2000rpm.
https://youtu.be/3VVylMr5BVI
https://youtu.be/3VVylMr5BVI
Sigh, It seems like my life is a never-ending cycle of messing with KJet fuel pressures.
But hopefully, this will help

My quality German made KJetronic pressure testing setup arrived. Huge thanks to MissingParts on eBay, as this is some proper quality gear, and for less than I paid for the other setup.
Nicely crimped ends, with quality rubber and fabric braided hoses


The seller has a great sense of humour. "For oldtimer cars"

I hooked the new setup up, which was a lot easier with the banjo fittings, rather than the generic screw fittings


Now it was time to confirm the readings from the old gauge. Previously the cold control pressure was stone dead on the gauge, at near enough zero psi. This gauge, not so much.

We want cold pressure here, near the green line (depending on ambient temp), otherwise it's too lean when cold

So, what about the system pressure, which wouldn't go over 5bar, no matter how thick of a shim I fitted? Off the gauge; over 6bar

And we want that at 5-5.5bar, on this green line. Too high and the control pressure will be too high also.

Well damn. No wonder it still wasn't happy.
I pulled the two additional shims out, and we dropped to 5bar system pressure. Better, but not perfect.

I knocked the adjustment on the WUR to get the control pressure down to the required half bar, but the car wasn't running right.

The next step was to step back, reset everything and presume that everything I had done with the old gauge was buggered.
Because the system pressure was a tad low I wanted to add my small extra shim and see how that increased pressure (i carefully measured it when I made it, to add 0.5bar). Hah, perfect!

I found this amazing step by step guide, which I followed and it worked perfectly. Big thanks to the author of that.
The first step was to make my WUR adjustable. This is so that if I knock the pressure adjustment down too far I can use a nut to pull the pin back out, instead of having to remove and disassemble it to tap the pin back out by hand. I drilled and tapped the pin to M5x0.8 and using a screw, nut and washer, made it adjustable. The guide that I used is here. The basics of the mod are that you screw the screw in tight (or Loctite it in so it cant turn) and then tighten the nut down to pull the pin out of the body. To push it back down you wind the nut completely out, against the head of the screw and then use a punch and hammer to tap the screw/pin down again.


It would be a lot easier to use if the screw didn't have a flange as there is limited space when mounted on the car, but its what I had on hand.
With the WUR apart again I replaced the O-Ring for the diaphragm and flipped the thin metal diaphragm to the other side to even up any wear.
Following the guide, I found that my initial pressure with no springs/strip was OK, and the pressure could be increased to the correct level by hand. Good.
The next test had me checking the heater works, which when holding it in my hand with power applied, I could confirm it did get warm to the touch. Good.
Next was to test the pseudo-warm pressure by reassembling the WUR with the springs, but without the heater/strip. This applies pressure to the mexican hat and diaphram, to emulate the warm pressure. This should be 3.5bar or HIGHER.

I had just under 3bar. Not enough. This is where I had to get creative and work out how to adjust this. On other WUR, there is an adjustment screw under a brass cap on the base. You drill through that cap, and there is a hex screw to raise or lower the platform the springs sit on. I tried drilling what I thought was the cap, but turns out the base for my platform is actually a pin pressed into the housing. Its the recessed circle with a hole drilled in it.

So, with callipers in hand, I tested/measured to see if I could use a hammer and punch to also adjust that like you do the cold pressure pin. Sure enough, some careful whacks of the adjustment tool, and I had raised the platform, thus increasing pressure on the springs. 4bar is perfect.

I fully reassembled the WUR, heater/strip and all, and reinstalled on the car to test/adjust the cold pressure. I got this easily down to a solid 0.7bar (within the margin of error for the ambient temps, I didn't want to mess around too much getting it lower)

I connected the heater and watched as the pressure slowly increased. The heater and strip were working perfectly.

I got it near the required 2.9bar, but it was still a tad low with the engine running at temp, so I used the one last adjustment available; tapping the main circular unit on the WUR down. This is the part that the two fuel hoses bolt onto. This is also pressed into the body, and like the other two adjustments can be carefully tapped down with a punch. This takes very little to increase the pressure, but be very careful not to punch it down too far or the WUR had to come completely apart again to tap it back out. I alternated tapping the punch on both sides, where the arrows are pointing.

This resulted in a nice 2.9bar when warm. Excellent.

After some tweaking of the idle and CO screws, the results were immediate and obvious. The car ran and idled better than ever, including idling under 2000rpm for the first time. I set the idle to about 1000rpm, which is higher than factory spec, but it felt happier there than the 800-900rpm recommended.
http://youtu.be/3VVylMr5BVI
The only thing left to do was to put on my big boy pants and try taking it for a run. The last time it was on the road it constantly tried to die on me and left me blocking intersections. Not ideal, and no wonder I was nervous.
This time, it started and was driving perfectly. It was pulling strong and felt good... until the hesitation kicked in again at high RPM under load.
The exact same issue as before I rebuilt the Kjet system.
I came home with mixed emotion. The car ran and drove well unless I got on the throttle. Kind of a win, but also a fail.
Mrs Petrol and I were discussing the issue and she reminded me that her old Alto used to buck and hesitate if the fuel was too low...
Surely that's not the issue? Nooooo

If you look at the design of the tanks, the feed to the pump is at the front of the tanks, toward the front of the car. It's possible that under acceleration the little fuel in the tanks was sloshing away from the outlet and starving the pump. Maybe.
The orange arrow is pointing to the fuel outlet on that tank, the other is on the other tank in the same location.

Well, I guess I limp the car to the gas station and chuck some gas in and see what happens.

Well, what does happen is that if you don't have both fuel caps open when you try to put any fuel in the tanks it all comes rushing back out and pukes down the side of the car and onto the ground. Oops.
I added 20L to each tank, at great expense, and guess what, my Wife was right (like usual), the hesitation is completely gone, and it will happily rev out to redline under WOT. Amazing.
The sound and feel of the car is crazy. It's so loud, but makes a great noise. You sit so low, but the car feels big. Even when it's not moving everyone is breaking their necks to see what it is. It's not a car for the shy.
It does leave me wondering a little, if I had just filled the tanks when I first got the car, would it all have been OK anyway? The main issue I had before I rebuilt it all was that hesitation issue. In saying that, it's starting, running and driving better than it ever has since I got it, so the work was well worth it regardless.

I'm stoked. Still some things to tidy, but it is almost ready to go for a WOF check.
But hopefully, this will help

My quality German made KJetronic pressure testing setup arrived. Huge thanks to MissingParts on eBay, as this is some proper quality gear, and for less than I paid for the other setup.
Nicely crimped ends, with quality rubber and fabric braided hoses


The seller has a great sense of humour. "For oldtimer cars"

I hooked the new setup up, which was a lot easier with the banjo fittings, rather than the generic screw fittings


Now it was time to confirm the readings from the old gauge. Previously the cold control pressure was stone dead on the gauge, at near enough zero psi. This gauge, not so much.

We want cold pressure here, near the green line (depending on ambient temp), otherwise it's too lean when cold

So, what about the system pressure, which wouldn't go over 5bar, no matter how thick of a shim I fitted? Off the gauge; over 6bar

And we want that at 5-5.5bar, on this green line. Too high and the control pressure will be too high also.

Well damn. No wonder it still wasn't happy.
I pulled the two additional shims out, and we dropped to 5bar system pressure. Better, but not perfect.

I knocked the adjustment on the WUR to get the control pressure down to the required half bar, but the car wasn't running right.

The next step was to step back, reset everything and presume that everything I had done with the old gauge was buggered.
Because the system pressure was a tad low I wanted to add my small extra shim and see how that increased pressure (i carefully measured it when I made it, to add 0.5bar). Hah, perfect!

I found this amazing step by step guide, which I followed and it worked perfectly. Big thanks to the author of that.
The first step was to make my WUR adjustable. This is so that if I knock the pressure adjustment down too far I can use a nut to pull the pin back out, instead of having to remove and disassemble it to tap the pin back out by hand. I drilled and tapped the pin to M5x0.8 and using a screw, nut and washer, made it adjustable. The guide that I used is here. The basics of the mod are that you screw the screw in tight (or Loctite it in so it cant turn) and then tighten the nut down to pull the pin out of the body. To push it back down you wind the nut completely out, against the head of the screw and then use a punch and hammer to tap the screw/pin down again.


It would be a lot easier to use if the screw didn't have a flange as there is limited space when mounted on the car, but its what I had on hand.
With the WUR apart again I replaced the O-Ring for the diaphragm and flipped the thin metal diaphragm to the other side to even up any wear.
Following the guide, I found that my initial pressure with no springs/strip was OK, and the pressure could be increased to the correct level by hand. Good.
The next test had me checking the heater works, which when holding it in my hand with power applied, I could confirm it did get warm to the touch. Good.
Next was to test the pseudo-warm pressure by reassembling the WUR with the springs, but without the heater/strip. This applies pressure to the mexican hat and diaphram, to emulate the warm pressure. This should be 3.5bar or HIGHER.

I had just under 3bar. Not enough. This is where I had to get creative and work out how to adjust this. On other WUR, there is an adjustment screw under a brass cap on the base. You drill through that cap, and there is a hex screw to raise or lower the platform the springs sit on. I tried drilling what I thought was the cap, but turns out the base for my platform is actually a pin pressed into the housing. Its the recessed circle with a hole drilled in it.

So, with callipers in hand, I tested/measured to see if I could use a hammer and punch to also adjust that like you do the cold pressure pin. Sure enough, some careful whacks of the adjustment tool, and I had raised the platform, thus increasing pressure on the springs. 4bar is perfect.

I fully reassembled the WUR, heater/strip and all, and reinstalled on the car to test/adjust the cold pressure. I got this easily down to a solid 0.7bar (within the margin of error for the ambient temps, I didn't want to mess around too much getting it lower)

I connected the heater and watched as the pressure slowly increased. The heater and strip were working perfectly.

I got it near the required 2.9bar, but it was still a tad low with the engine running at temp, so I used the one last adjustment available; tapping the main circular unit on the WUR down. This is the part that the two fuel hoses bolt onto. This is also pressed into the body, and like the other two adjustments can be carefully tapped down with a punch. This takes very little to increase the pressure, but be very careful not to punch it down too far or the WUR had to come completely apart again to tap it back out. I alternated tapping the punch on both sides, where the arrows are pointing.

This resulted in a nice 2.9bar when warm. Excellent.

After some tweaking of the idle and CO screws, the results were immediate and obvious. The car ran and idled better than ever, including idling under 2000rpm for the first time. I set the idle to about 1000rpm, which is higher than factory spec, but it felt happier there than the 800-900rpm recommended.
http://youtu.be/3VVylMr5BVI
The only thing left to do was to put on my big boy pants and try taking it for a run. The last time it was on the road it constantly tried to die on me and left me blocking intersections. Not ideal, and no wonder I was nervous.
This time, it started and was driving perfectly. It was pulling strong and felt good... until the hesitation kicked in again at high RPM under load.
The exact same issue as before I rebuilt the Kjet system.
I came home with mixed emotion. The car ran and drove well unless I got on the throttle. Kind of a win, but also a fail.
Mrs Petrol and I were discussing the issue and she reminded me that her old Alto used to buck and hesitate if the fuel was too low...
Surely that's not the issue? Nooooo
If you look at the design of the tanks, the feed to the pump is at the front of the tanks, toward the front of the car. It's possible that under acceleration the little fuel in the tanks was sloshing away from the outlet and starving the pump. Maybe.
The orange arrow is pointing to the fuel outlet on that tank, the other is on the other tank in the same location.

Well, I guess I limp the car to the gas station and chuck some gas in and see what happens.

Well, what does happen is that if you don't have both fuel caps open when you try to put any fuel in the tanks it all comes rushing back out and pukes down the side of the car and onto the ground. Oops.
I added 20L to each tank, at great expense, and guess what, my Wife was right (like usual), the hesitation is completely gone, and it will happily rev out to redline under WOT. Amazing.
The sound and feel of the car is crazy. It's so loud, but makes a great noise. You sit so low, but the car feels big. Even when it's not moving everyone is breaking their necks to see what it is. It's not a car for the shy.
It does leave me wondering a little, if I had just filled the tanks when I first got the car, would it all have been OK anyway? The main issue I had before I rebuilt it all was that hesitation issue. In saying that, it's starting, running and driving better than it ever has since I got it, so the work was well worth it regardless.

I'm stoked. Still some things to tidy, but it is almost ready to go for a WOF check.
Ah yeah, sorry. This is the one forum I use where the software is too archaic to make the links work like normal.
WUR is the Warm Up Regulator, the thing I was pulling apart and adjusting.
WOT is Wide Open Throttle, or full throttle.
In terms of understanding it, a couple of my previous posts go more into detail of what the adjustments are for and what they do, this post kinda presumed you read those so glossed over it a bit. It can be hard to wrap your head around though, it's not that simplest system.
With the KJet Cologne firing on all cylinders, the next step toward a WOF was to look into the brakes and why they shudder horribly.
I had noticed the shudder on the first drive when I got the car, but hoped that it was just rust on the rotors from sitting and some heavy braking might scrape it off and make it go away. Sadly not, having done some heavy braking in the car now, it still shudders and shakes its self to bits when braking. It can be felt in the pedal and the whole car sort of pulsates as it slows down.
I had originally planned to get the front rotors skimmed and see if that improved it much, but it was bad enough that I thought I should prepare for the worst, and check the runout. I like my WOF guy, so I try to pre-empt as much as possible so I don't send him rubbish that's guaranteed to fail.
To check rotor runout (rotor warping basically, the difference between flat, and the high and low points) you use a dial indicator. A dial indicator is a gauge that moves when the little pin slides in and out of the gauge body, as the item its measuring gets closer or further away from the gauge body.
A rotor should have very little runout, somewhere in the vicinity of less than 0.10mm is a good guide.
I started with my rear rotors, as these are the ones I was most worried about, as they will be an arse to replace, and cannot be skimmed on the car.

Even after some hard stops, the rotor wasn't looking great.

Mounting the dial indicator was proving to be an issue initially. It's on a magnetic base, but it's heavy and bulky. I tried mounting it to the exhaust and suspension, but it just made the dial hard to read


And then I engaged brain and mounted it to my jack as a solid base on the floor. Duh, much easier.

Zeroed the dial at the lowest point

And turned the rotor until I found the highest point. Uh. Crap.

So yes, that's that rotor completely stuffed. 0.35mm runout. I didn't even bother checking the other side, if one is bad, that's a pair ruined. I checked in a couple of spots on the disc and came back with similar results.
Hows the front then? I mounted the dial to the caliper and zeroed it

Well, it's not great. 0.19mm runout.

That's the sort of runout that could be skimmed out, except I also measured the front rotors, and found they're below minimum thickness (11.4mm) already, so cannot be skimmed.

Well damn, that sets me back a bit, both financially and time wise.
I have ordered a set of new rotors, with the fronts coming from the UK in the form of some lovely slotted and dimpled rotors, and the standard rears from Aus. I will be reusing the existing pads as they are all near new, but will give them a scuff up first.
Not what I wanted, especially with the holidays getting in the way, so looks like we will be off the road over Christmas now too.
Oh well, at least it should stop as well as it goes now. Someone will get a damn good car when I inevitably move it on.
I had noticed the shudder on the first drive when I got the car, but hoped that it was just rust on the rotors from sitting and some heavy braking might scrape it off and make it go away. Sadly not, having done some heavy braking in the car now, it still shudders and shakes its self to bits when braking. It can be felt in the pedal and the whole car sort of pulsates as it slows down.
I had originally planned to get the front rotors skimmed and see if that improved it much, but it was bad enough that I thought I should prepare for the worst, and check the runout. I like my WOF guy, so I try to pre-empt as much as possible so I don't send him rubbish that's guaranteed to fail.
To check rotor runout (rotor warping basically, the difference between flat, and the high and low points) you use a dial indicator. A dial indicator is a gauge that moves when the little pin slides in and out of the gauge body, as the item its measuring gets closer or further away from the gauge body.

A rotor should have very little runout, somewhere in the vicinity of less than 0.10mm is a good guide.
I started with my rear rotors, as these are the ones I was most worried about, as they will be an arse to replace, and cannot be skimmed on the car.

Even after some hard stops, the rotor wasn't looking great.

Mounting the dial indicator was proving to be an issue initially. It's on a magnetic base, but it's heavy and bulky. I tried mounting it to the exhaust and suspension, but it just made the dial hard to read


And then I engaged brain and mounted it to my jack as a solid base on the floor. Duh, much easier.

Zeroed the dial at the lowest point

And turned the rotor until I found the highest point. Uh. Crap.

So yes, that's that rotor completely stuffed. 0.35mm runout. I didn't even bother checking the other side, if one is bad, that's a pair ruined. I checked in a couple of spots on the disc and came back with similar results.
Hows the front then? I mounted the dial to the caliper and zeroed it

Well, it's not great. 0.19mm runout.

That's the sort of runout that could be skimmed out, except I also measured the front rotors, and found they're below minimum thickness (11.4mm) already, so cannot be skimmed.

Well damn, that sets me back a bit, both financially and time wise.
I have ordered a set of new rotors, with the fronts coming from the UK in the form of some lovely slotted and dimpled rotors, and the standard rears from Aus. I will be reusing the existing pads as they are all near new, but will give them a scuff up first.
Not what I wanted, especially with the holidays getting in the way, so looks like we will be off the road over Christmas now too.
Oh well, at least it should stop as well as it goes now. Someone will get a damn good car when I inevitably move it on.
Thanks guys.
I know its not everyone's cuppa, it's one of those shapes that you either love or hate, but I like that its weird enough almost no one has ever seen one on the road.
My mechanic was laughing when he looked under the bonnet and saw the KJet "oh that will be trouble" he said and was curious when I said it had been rebuilt and was working like clockwork. "who did that? No one touches that sort of thing now" was what he asked and was shocked when I said I sorted it myself.
With the brake rotors slowly making their way to me from across the planet, I wanted to get the TVR in for a Warrant Of Fitness inspection to see if there was anything else I needed to order.
Its been a little nerve-wracking, knowing that this would be the longest trip the car has taken in about 3-4 years, and it's still only a 40km round trip. Nothing for the other two cars, but for the TVR, it seemed like half the country away.
To prepare for it I took the TVR for a backroad shakedown the other day; just a short 15km trip, but further than down the road and back I've done previously. The car ran and drove well, but did show up a couple of weak points. The rear shocks are feeling a bit tired and bouncy, and as I already knew, the brakes shudder badly.
Today was the day though, the first time I've had the car on the motorway at open road speeds, and for a longer distance. The car did well, felt comfortable enough on the open road, but the higher speeds did show up an annoying shake at about 80kph, which I suspect could be the old tyres on the car, similar to when I got Tess http://www.tasteslikepetrol.net/2017/12/rover-vite... (which had also been sitting for years). Otherwise everything was fine. The steering was nice and direct, the temps were good and steady, and the gearbox shifts well. She sure turns heads though; can't imagine why.
I made it in one piece, with the top down even, despite some light drizzle on the way in.

After waiting oh so patiently, the car was finally on the hoist and it was inspection time.

The inspection required two inspectors, since the TVR was so far out of their normal parameters (both are old enough to remember working on the donors like the XJS and Capri/Cortina but haven't touched anything like it in years), but after a while, I had my answer.
It was a fail.

Not completely unexpected, but unfortunately one thing I hadn't counted on was the front lower ball joints having excessive play in them. It's not the end of the world, they're MK4 Cortina parts, so I have a pair on the way already.
There were a couple of other advisories, such as the brakes shuddering, and the front tires starting to show signs of perishing, but overall I think its a pretty damn good list considering the car was last on the road 2015/2016. I've had worse on cars that have been already been on the road recently.
The rear rotors arrived today, and the fronts are en route from the UK currently. I'm looking into options for some new shocks to help with the bounce in the rear, and some new tyres will have to be on the list now too. It seemingly never ends, but once its done it should be a good solid car.
So yes, Merry Christmas to everyone, and I hope you all have a good break. Get out there and either work on, and/or drive your cars, and I'll be back in the new year.
Tasmin200 said:
Well done! Good effort.
Get new tyres though. I nearly put my Tasmin in the hedge the first time it rained as the tyres were old and hard. Loads of tread left on them but no grip at all.
Take it easy, I'm sure a few other things with show up once you're driving it regularly.
Yeah, they're diabolical really. In the dry the mix of old tyres and soft rear shocks makes for some very interesting cornering. For the age of them they look good, but the rubber has gone as hard as a rock. I had planned on replacing them anyway, but its not easy to get anything decent in the correct size for the 14s in NZ. I guess new "economy" rubber is better than old hard "sporty" rubber.Get new tyres though. I nearly put my Tasmin in the hedge the first time it rained as the tyres were old and hard. Loads of tread left on them but no grip at all.
Take it easy, I'm sure a few other things with show up once you're driving it regularly.
bolidemichael said:
An awesome update and read, once again.
I have a couple of questions - firstly, how long does it normally take for items to get to NZ from the UK and is it sent by air or sea? It shipping quite costly, as a consequence?
Can vary a lot in terms of time and cost. Usually its air freight, and takes 1-2 weeks depending on which option I use and how much I want to spend. For instance, the brake rotors I just purchased from MTec are costing 90GBP just for freight and they should be here in under 2 weeks, using a forwarding agent. Most of that cost is in the weight though, being 11kg for the pair.I have a couple of questions - firstly, how long does it normally take for items to get to NZ from the UK and is it sent by air or sea? It shipping quite costly, as a consequence?
I always try to find items locally first to reduce freight costs, but we got almost no TVRs here, and some of the donor parts are uncommon here too (we didn't get the Granada and not many Cortinas or Capris around enow) so prices can be high unless you shop around and pull strings in the trade or just out of stock and coming from overseas anyway.
Brakes have arrived, as have new tyres, but still waiting on the ball joints for the WOF. In the mean time since the car hasnt been started since i drove to the WOF and back, i whipped a plug out to see how the KJet mixtures are...

Pretty damn good i'd say. Maybe a little on the lean side, but I can live with that.
Pretty damn good i'd say. Maybe a little on the lean side, but I can live with that.
Pre-WOF-Recheck shakedown complete. Goes hard. New lower ball joints, new rear shocks, and new tyres all around. Feels a lot less like it wants to kill you now.


Recheck on Saturday, and then I should be good for some less risky motoring. Will be good to be legal for British Car Day in Feb.
Recheck on Saturday, and then I should be good for some less risky motoring. Will be good to be legal for British Car Day in Feb.
Still need to replace the brake rotors, as they aren't running true, so I'll probably make a start on them with the front pair this weekend. I also need to decide if I pull up and replace the carpet before the British Car Day show at the start of Feb, or after it. Somewhere between that, I need to give the car its first wash since I got it, and machine polish and wax the paint as its looking a bit dull (and filthy) and I want it to look great at the show.
Well, it has been an interesting time on the TVR front. Most recently, I have been dealing with one of those "why did I start this" jobs on the car.
One of the first things I did after failing the WOF inspection was to order some new tyres. The old tyres, although both a good brand (Dunlop) and near new tread, were as hard as rocks, slippery as anything, starting to crack, the wrong size, and were flat-spotted. Its no surprise really, they were about 10 years old.
The spare was even worse, I suspect it may have been from 1986, as its a long-obsolete model (Good Year Eagle NCT 60, the original spec tyre for the TVR), the rubber felt like plastic, and the date stamp was 196 without an arrow (the arrow indicates it's from the 90s, and a three-digit number indicates its pre-2000).


They got their monies worth out of this one!

After much deliberation, I decided to revert back to the standard size all around, at a "low profile" 205/60R14. The old rears were 215/65R14, so not only wider but also a lot taller (about 16mm taller than standard). This always looked a bit wrong to me; too much sidewall.

I don't know if the reason for the size change was just because of what was on hand, or if there was a deliberate choice to do it, but Its not my thing. I did have some issue getting the original size; there wasn't a lot of options for brands, but I chose to go with a tyre that's a decent economy tyre. No, it's not as good as a performance tyre, but options were limited, as was my budget, and at the price I got these for it was hard to say no. A decent new economy tyre is better than any old, hard, performance tyre.
The tyre I chose was a Nexen CP672. It has good reviews, is a modern Korean made tyre, and Nexen is OEM fit on some Hyundai and Kia cars, so it can't be all bad. At least it's not a Chinese ditch-finder.

Hover car, again

The Saab came in handy for taking it all down to the tyre shop for fitting. The Honda probably could've managed, but the Saab just ate it all up with space to spare.

With the new tyres fitted, it was time to tackle the reason I failed the WOF. The front lower ball joints.
It turns out these are the original 40 year old ball joints, as they are riveted to the arms. The replacements all have bolts holding them in. Not great news, they're a prick to get out.

I struggled around a bit on the first one, but worked out some tips that made the second a lot quicker and easier.
First, this job sucks. It's messy, it's hard to access, and takes more than your usual spanner set to do.
The split pin in the nut was my first issue. It was old and properly rusted into the hole. After a lot of faffing about trying to hammer it out with a punch, and then trying to smash it up with a chisel, the easiest way for me to remove it wasn't to remove it at all, but to chop the tails off, slip a spanner on the nut and swing off it until the nut cut through the split pin. You can see the split pin remains still in the hole, about halfway down the thread. Both the nut, and the joint are junk, so not an issue.

Now, if you have a ball joint splitter, go ahead and use it to split the ball joint, otherwise use the BFH and hit the knuckle with a few sharp hits, and the taper should pop. I found jacking the hub up helps to put pressure on the taper and make it easier to pop.

You can see in the above photo I have removed the two bolts from the tie bar. This wasn't smart, it was a real pain to line it back up again, what I did on the second one was to use a clamp and hold the bar into place on the arm, and leaving the nut-less bolts in the holes to align it

Next, undo the nut off the tie rod end and release the taper. Move the tie rod out of the way. Now for the fun part, grab your grinder, and grind the top of the rivets down so they are as low as possible, and flat.

Use a punch to mark the center of the rivet, and using plenty of cutting oil, starting with a small drill bit, drill through the rivet. Work your way up to a larger bit. After a couple of different sizes I changed to a step drill. Take care not to enlarge the hole in the arm.

The goal is to cut the head off the rivet, so you can get a chisel in and split the parts

Once you do both of the rivets, push the ball joint through the arm and that's part one done.

The new ones should come with a pair of nuts and bolts to replace the rivets, as well as a grease nipple. Fit the nipple, and pump the joint full of grease


Now refit the new joint from the underside of the arm. Make sure everything lines up, and leave all the bolts loose until everything is aligned and in place. Once all the bolts are in, tighten them all up. The two large nuts want to be 58-68NM, whilst the little ones don't have a torque setting, so just do them up tight.
Now for another fun part, getting the hub back onto the taper. I found this to be too much of an arm-full, so used a jack between the two arms to lift the upper arm and lower the knuckle over the stud. Not a Ford/TVR approved method, I'm sure, but it worked well.

And then you refit the nut. The Nylock was a pain to fit as until it cut through the nylon it kept trying to spin the balljoint, but I got there in the end. There is a torque setting, but I couldn't get a torque wrench in there, so settled for bloody tight with a spanner.

With both sides done, on went the wheels with new tyres, and it was time for a shakedown.
The front end feels a bit tighter, but the biggest difference are the new tyres, which don't try and kill you when you point the car at a corner, and the rear shocks (new damper adjustable replacements also went in as I felt the old ones were a bit soft) control the rear end better. The incorrectly high (40psi) tyre pressure resulted in a nice light steering, but a harsher ride and less grip than when the pressure was lowered to the correct 24psi. I think this car has the heaviest steering of any car I have driven.
I could help but take some photos. It's a great looking little car, and such an experience to drive.


So, with new bits in, it was time for the WOF recheck. Almost 4 years since the last one expired, a new WOF!


Its a great feeling, knowing the car is finally good enough that its back on the road, when for the last few years it had been sitting at a workshop being ignored because the injection work was just "too hard". Sadly the injection work is just the tip of the iceberg of issues with this car, but I'm working through them. I do wish the seller, or (more importantly) the "specialist" were honest about the condition of the car. Some of these issues aren't new, and are hard to miss.
So with a new WOF, what's the first thing I do? Go out and enjoy the car right? Nah, that's not how I work.

It was time to take the car off the road again, and fix the brakes. I knew this job was going to be bad, but little did I know how bad it was about to get.
As I previously mentioned, the brakes had a shudder. This was also noted at the WOF, but wasn't enough to fail on, yet.
Unfortunately, I had had enough of the shudder. It was bad when braking from 100kph, and annoying coming to a stop, so had to be fixed.
I purchased a set of new rotors, front and rear, but just needed to fit them. I was originally going to start with the fronts, as they are a lot easier to access, but decided to do the hard ones first, and get it over and done with; the rears.
Of course because I have inboard rear brakes, nothing was going to be simple. I asked around and the general opinion was that it was easiest to drop the whole rear diff to get the calipers off, so the rotors could be removed. Yay.
Dropping the diff on a Wedge isn't too bad of a job, especially with the trailing arm models like mine, as there aren't a whole lot of things holding the assembly in. Unfortunately, we found the job was made much harder on my car thanks to whoever designed the exhaust, as there isn't quite enough space between the two exhaust pipes to slip the calipers down and out. After a heck of a lot of levering, and much help from my lovely apprentice, this happened

I'll tell you now, this thing is bloody heavy. We lowered it on the jack, and removed it from the jack to work on it. I'm not too sure how we will get it back on the jack to refit it, lots of brute force I guess.
With everything on the ground it was time to remove the calipers to extract the rotors. The handbrake calipers on the top need to go first. These are held in by two pins each. One side had nice (barely) greased and free pins, the other had dry, stuck, pins. Not ideal at all. They did come out in the end.

The hand brake pads looked OK. I have receipts for them being replaced a few years ago. The units need a good clean though.

Next, the calipers came off. These were missing the lock wire on the bolts.

and then the old rotors

You can see the extent of the runout in the wear on the rotor. Above the two arrows in rough and rusty, below them is shiny and smooth. The shiny spot is the high point, where the pads have been contacting well, and the rough part where the pads haven't been working as well.

I gave the shims a quick wire brush to get the obvious crud off them, and fit the new rotors. Here is an action shot; brushing so quick my arm is nothing but a blur

This is where it went all a little pear-shaped. I didn't check the runout on the new rotors before fitting the calipers, and when I did, it was worse than before I pulled the lot out. Previously on the old rotors, I had about 0.35mm runout. Now I had over 0.60mm runout. Crap.

At this point, I flipped tables and gave up for the day.
Well, they looked nice anyway. Mmm Brembo.


Today I forced myself to go into the garage and see what I could work out. I knew the shims looked a bit average, so let's start there.
I pulled the shims off and had a look at what I had. It wasn't good. The shims are stuffed. Rusted, crusty, painted and missing bits.


And the flange didn't do much better. It had baked on crusty rust, and paint on it

I had to chip a few bits like this off with a chisel, and then I wire brushed thoroughly


I can still see some room for improvement there too, but its a lot better.
The first way to see where the runout is, is to remove all the shims and see if the rotor runs true when mounted directly to the flange. After cleaning the flange, I fit the rotor to it and checked runout. The old rotor makes a great mount for the dial indicator


Much better at 0.08mm. I think I can get it a little lower with some strategic scraping, but the spec is up to 0.10mm

That's a great success. I did the same to the other side too. The shims were worse here, and the flanges covered in old crusty rust


I cleaned these up and tested them. Boom, awesome. 0.035mm

So the take away from this is a few things. I need new shims. DONT paint faces of flanges or shims. ALWAYS use copper grease on shims to stop them sticking together and reduce corrosion. Oh, and the bolts that hold the diff to the cradle should be tight; someone previously missed that memo.
Now I need to source some new shims, and we should be good to refit. I measured the old ones, and will try to replicate the original stack, but I may need to tweak it myself as I don't know if these are right or not.

One of the first things I did after failing the WOF inspection was to order some new tyres. The old tyres, although both a good brand (Dunlop) and near new tread, were as hard as rocks, slippery as anything, starting to crack, the wrong size, and were flat-spotted. Its no surprise really, they were about 10 years old.
The spare was even worse, I suspect it may have been from 1986, as its a long-obsolete model (Good Year Eagle NCT 60, the original spec tyre for the TVR), the rubber felt like plastic, and the date stamp was 196 without an arrow (the arrow indicates it's from the 90s, and a three-digit number indicates its pre-2000).


They got their monies worth out of this one!

After much deliberation, I decided to revert back to the standard size all around, at a "low profile" 205/60R14. The old rears were 215/65R14, so not only wider but also a lot taller (about 16mm taller than standard). This always looked a bit wrong to me; too much sidewall.

I don't know if the reason for the size change was just because of what was on hand, or if there was a deliberate choice to do it, but Its not my thing. I did have some issue getting the original size; there wasn't a lot of options for brands, but I chose to go with a tyre that's a decent economy tyre. No, it's not as good as a performance tyre, but options were limited, as was my budget, and at the price I got these for it was hard to say no. A decent new economy tyre is better than any old, hard, performance tyre.
The tyre I chose was a Nexen CP672. It has good reviews, is a modern Korean made tyre, and Nexen is OEM fit on some Hyundai and Kia cars, so it can't be all bad. At least it's not a Chinese ditch-finder.

Hover car, again

The Saab came in handy for taking it all down to the tyre shop for fitting. The Honda probably could've managed, but the Saab just ate it all up with space to spare.

With the new tyres fitted, it was time to tackle the reason I failed the WOF. The front lower ball joints.
It turns out these are the original 40 year old ball joints, as they are riveted to the arms. The replacements all have bolts holding them in. Not great news, they're a prick to get out.

I struggled around a bit on the first one, but worked out some tips that made the second a lot quicker and easier.
First, this job sucks. It's messy, it's hard to access, and takes more than your usual spanner set to do.
The split pin in the nut was my first issue. It was old and properly rusted into the hole. After a lot of faffing about trying to hammer it out with a punch, and then trying to smash it up with a chisel, the easiest way for me to remove it wasn't to remove it at all, but to chop the tails off, slip a spanner on the nut and swing off it until the nut cut through the split pin. You can see the split pin remains still in the hole, about halfway down the thread. Both the nut, and the joint are junk, so not an issue.

Now, if you have a ball joint splitter, go ahead and use it to split the ball joint, otherwise use the BFH and hit the knuckle with a few sharp hits, and the taper should pop. I found jacking the hub up helps to put pressure on the taper and make it easier to pop.

You can see in the above photo I have removed the two bolts from the tie bar. This wasn't smart, it was a real pain to line it back up again, what I did on the second one was to use a clamp and hold the bar into place on the arm, and leaving the nut-less bolts in the holes to align it

Next, undo the nut off the tie rod end and release the taper. Move the tie rod out of the way. Now for the fun part, grab your grinder, and grind the top of the rivets down so they are as low as possible, and flat.

Use a punch to mark the center of the rivet, and using plenty of cutting oil, starting with a small drill bit, drill through the rivet. Work your way up to a larger bit. After a couple of different sizes I changed to a step drill. Take care not to enlarge the hole in the arm.

The goal is to cut the head off the rivet, so you can get a chisel in and split the parts

Once you do both of the rivets, push the ball joint through the arm and that's part one done.

The new ones should come with a pair of nuts and bolts to replace the rivets, as well as a grease nipple. Fit the nipple, and pump the joint full of grease


Now refit the new joint from the underside of the arm. Make sure everything lines up, and leave all the bolts loose until everything is aligned and in place. Once all the bolts are in, tighten them all up. The two large nuts want to be 58-68NM, whilst the little ones don't have a torque setting, so just do them up tight.
Now for another fun part, getting the hub back onto the taper. I found this to be too much of an arm-full, so used a jack between the two arms to lift the upper arm and lower the knuckle over the stud. Not a Ford/TVR approved method, I'm sure, but it worked well.

And then you refit the nut. The Nylock was a pain to fit as until it cut through the nylon it kept trying to spin the balljoint, but I got there in the end. There is a torque setting, but I couldn't get a torque wrench in there, so settled for bloody tight with a spanner.

With both sides done, on went the wheels with new tyres, and it was time for a shakedown.
The front end feels a bit tighter, but the biggest difference are the new tyres, which don't try and kill you when you point the car at a corner, and the rear shocks (new damper adjustable replacements also went in as I felt the old ones were a bit soft) control the rear end better. The incorrectly high (40psi) tyre pressure resulted in a nice light steering, but a harsher ride and less grip than when the pressure was lowered to the correct 24psi. I think this car has the heaviest steering of any car I have driven.
I could help but take some photos. It's a great looking little car, and such an experience to drive.
So, with new bits in, it was time for the WOF recheck. Almost 4 years since the last one expired, a new WOF!


Its a great feeling, knowing the car is finally good enough that its back on the road, when for the last few years it had been sitting at a workshop being ignored because the injection work was just "too hard". Sadly the injection work is just the tip of the iceberg of issues with this car, but I'm working through them. I do wish the seller, or (more importantly) the "specialist" were honest about the condition of the car. Some of these issues aren't new, and are hard to miss.
So with a new WOF, what's the first thing I do? Go out and enjoy the car right? Nah, that's not how I work.
It was time to take the car off the road again, and fix the brakes. I knew this job was going to be bad, but little did I know how bad it was about to get.
As I previously mentioned, the brakes had a shudder. This was also noted at the WOF, but wasn't enough to fail on, yet.
Unfortunately, I had had enough of the shudder. It was bad when braking from 100kph, and annoying coming to a stop, so had to be fixed.
I purchased a set of new rotors, front and rear, but just needed to fit them. I was originally going to start with the fronts, as they are a lot easier to access, but decided to do the hard ones first, and get it over and done with; the rears.
Of course because I have inboard rear brakes, nothing was going to be simple. I asked around and the general opinion was that it was easiest to drop the whole rear diff to get the calipers off, so the rotors could be removed. Yay.
Dropping the diff on a Wedge isn't too bad of a job, especially with the trailing arm models like mine, as there aren't a whole lot of things holding the assembly in. Unfortunately, we found the job was made much harder on my car thanks to whoever designed the exhaust, as there isn't quite enough space between the two exhaust pipes to slip the calipers down and out. After a heck of a lot of levering, and much help from my lovely apprentice, this happened

I'll tell you now, this thing is bloody heavy. We lowered it on the jack, and removed it from the jack to work on it. I'm not too sure how we will get it back on the jack to refit it, lots of brute force I guess.
With everything on the ground it was time to remove the calipers to extract the rotors. The handbrake calipers on the top need to go first. These are held in by two pins each. One side had nice (barely) greased and free pins, the other had dry, stuck, pins. Not ideal at all. They did come out in the end.

The hand brake pads looked OK. I have receipts for them being replaced a few years ago. The units need a good clean though.

Next, the calipers came off. These were missing the lock wire on the bolts.

and then the old rotors

You can see the extent of the runout in the wear on the rotor. Above the two arrows in rough and rusty, below them is shiny and smooth. The shiny spot is the high point, where the pads have been contacting well, and the rough part where the pads haven't been working as well.

I gave the shims a quick wire brush to get the obvious crud off them, and fit the new rotors. Here is an action shot; brushing so quick my arm is nothing but a blur

This is where it went all a little pear-shaped. I didn't check the runout on the new rotors before fitting the calipers, and when I did, it was worse than before I pulled the lot out. Previously on the old rotors, I had about 0.35mm runout. Now I had over 0.60mm runout. Crap.
At this point, I flipped tables and gave up for the day.
Well, they looked nice anyway. Mmm Brembo.


Today I forced myself to go into the garage and see what I could work out. I knew the shims looked a bit average, so let's start there.
I pulled the shims off and had a look at what I had. It wasn't good. The shims are stuffed. Rusted, crusty, painted and missing bits.


And the flange didn't do much better. It had baked on crusty rust, and paint on it

I had to chip a few bits like this off with a chisel, and then I wire brushed thoroughly


I can still see some room for improvement there too, but its a lot better.
The first way to see where the runout is, is to remove all the shims and see if the rotor runs true when mounted directly to the flange. After cleaning the flange, I fit the rotor to it and checked runout. The old rotor makes a great mount for the dial indicator


Much better at 0.08mm. I think I can get it a little lower with some strategic scraping, but the spec is up to 0.10mm

That's a great success. I did the same to the other side too. The shims were worse here, and the flanges covered in old crusty rust


I cleaned these up and tested them. Boom, awesome. 0.035mm

So the take away from this is a few things. I need new shims. DONT paint faces of flanges or shims. ALWAYS use copper grease on shims to stop them sticking together and reduce corrosion. Oh, and the bolts that hold the diff to the cradle should be tight; someone previously missed that memo.
Now I need to source some new shims, and we should be good to refit. I measured the old ones, and will try to replicate the original stack, but I may need to tweak it myself as I don't know if these are right or not.

Gassing Station | Readers' Cars | Top of Page | What's New | My Stuff