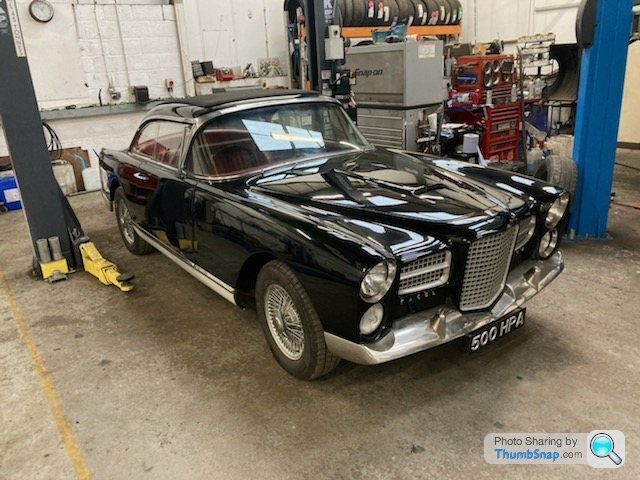
Facel Vega HK500. A childhood dream or a nightmare?
Discussion


B'stard Child said:
And so the slippery slope was found and down you slid 
Of course it's not intentional it just happened - it was an accident
Oh how true! The worst thing is I can't even claim it was an accident, as the emptying of my wallet (and all other sources of money) was premeditated Of course it's not intentional it just happened - it was an accident

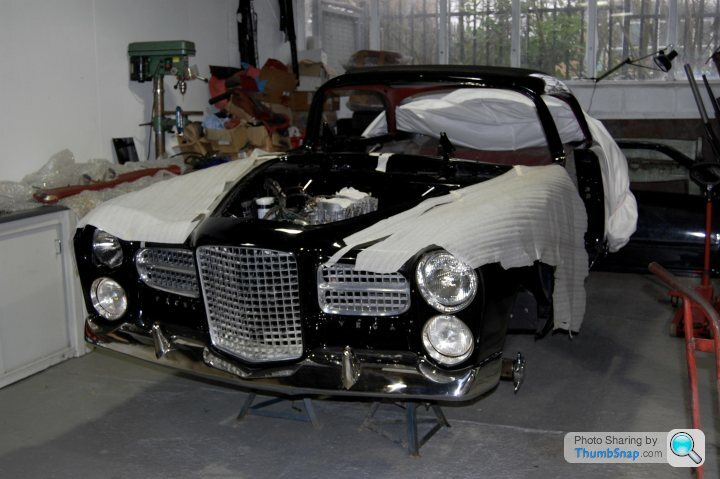
Given B'stard Child's recent comments this post should be called 'The Slippery Slope' as, over the course of a couple of months the Facel went from something that could pass as almost complete back to a collection of bits. At the time I wasn't as concerned as perhaps I should have been! I just clung to the cost spread sheet Steve and I had discussed.
What could possibly go wrong?!
Actually, as someone who had funded other restorations I wasn't quite as naive as I'm making out. I knew costs would likely escalate and timescales lengthen. I also knew that once started there would be no going back; bailing out part way through would be a road to financial disaster.
Very soon we were back to this...
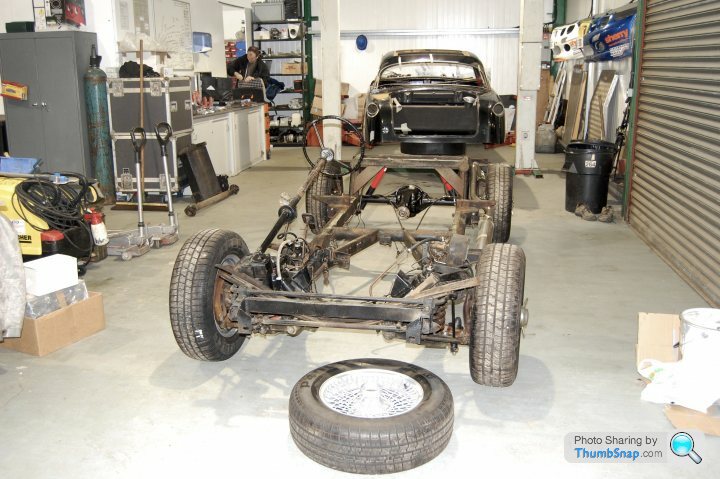
Steve captured the actual moment the body and chassis parted company.
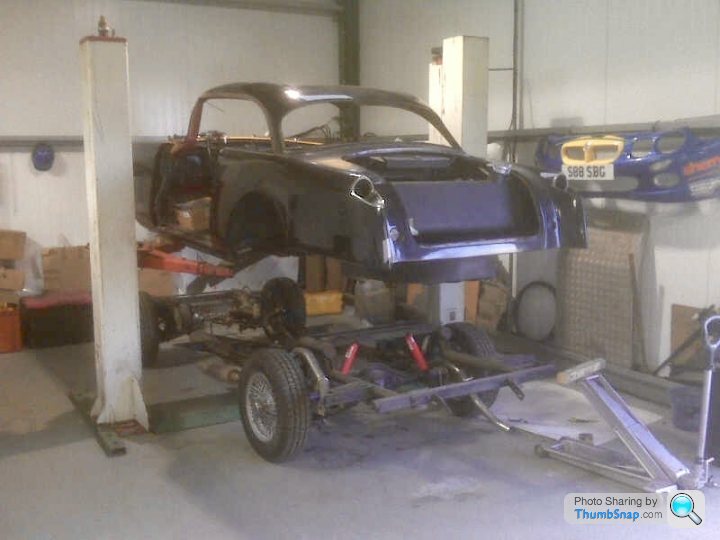
Taking the body off the chassis was a pivotal moment for a couple of reasons. Firstly, it would allow us to assess the real condition of the car (a bit of a risk) and secondly it would allow a more thorough restoration. If the answer to the first part wasn't as expected, the budget could be completely blown apart.
So what did we find?
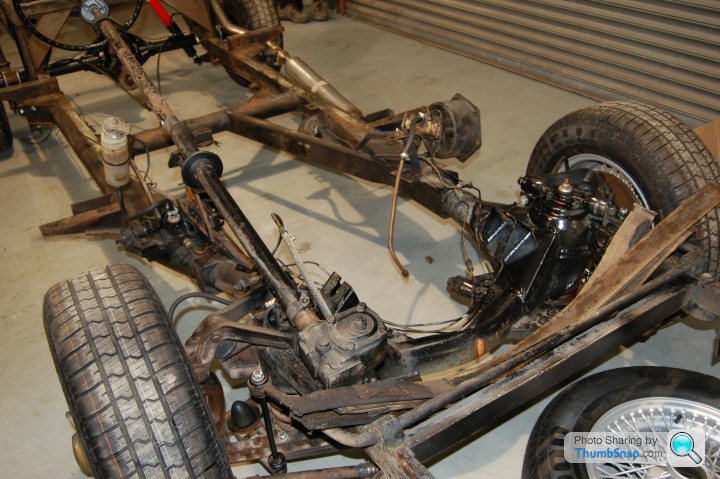
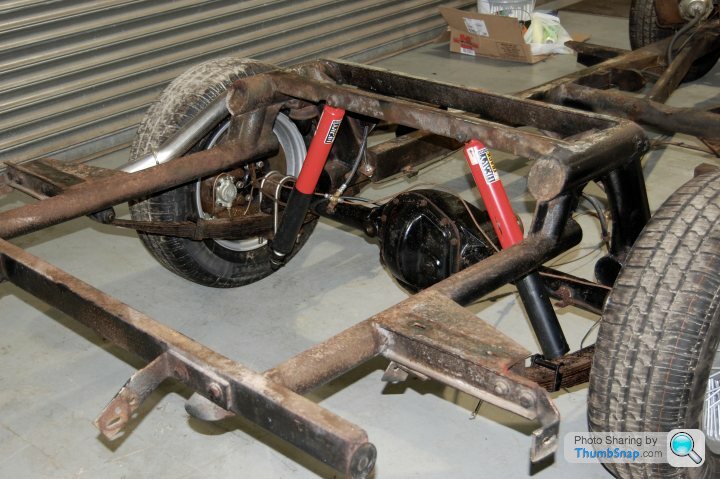
For those not familiar with the construction of the HK500, it is an amazing feat of engineering. The chassis appears to be massively over engineered, with chassis rails made from large diameter tubes and substantial cross members which are beefily braced. It would look at home as part of a ship or maybe a small bridge! The body is made from a patchwork of small panels stitched together to create a whole. For instance, the front wings form a single unit with the front panel and windscreen scuttle. Even though there is a separate chassis, the floor of the body is a welded steel structure that is reminiscent of monocoque construction. Given this 'belt and braces' approach, the amazing thing is how little rigidity the complete car possesses.
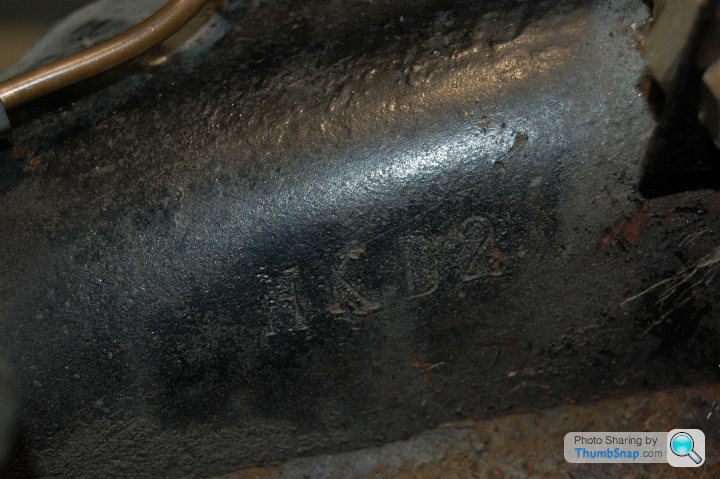
The chassis was in great condition and showed no evidence of collision damage, which was a relief. It still had the body number chalked on the cross member above the rear axle. Luckily that chalk number matched the body number in the factory records! As you would expect, the chassis had plenty of surface corrosion, but nothing serious. This is a testament to its sturdy construction as no real rust protection was applied by the factory, just a quick 'once over' with an underseal type product called 'Blaxon'. It was obvious from the areas that were completely bare that the quick waft of Blaxon was applied once the body was in place.

Here's the body number...not easy to read!

And the chassis number, much more clearly defined
As mentioned before, taking the body off the chassis was likely to reveal a whole new list of jobs and necessitate the cleaning up of some areas hidden from view.

The body had benefitted from significant welding whilst in Geoff's hands, so was structually sound. However, some of the welding was a bit 'agricultural'.
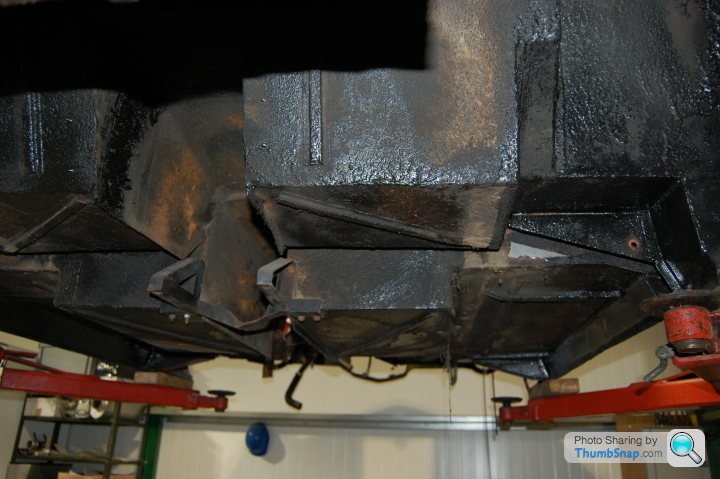
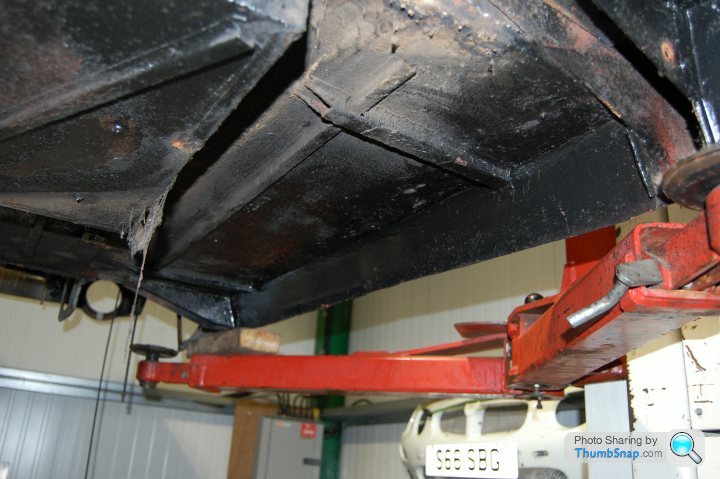
And some bits didn't appear to be welded at all...
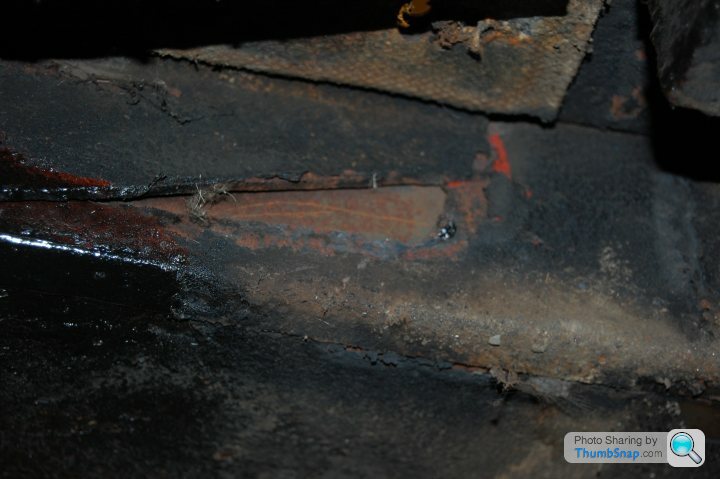
So the car was now back in pieces and we had the chance to compare what we had found with what we had included in our cost calculations. At this stage it didn't look too bad. There were a couple of areas that would require some welding, but that was about it.
What could possibly go wrong?!
Actually, as someone who had funded other restorations I wasn't quite as naive as I'm making out. I knew costs would likely escalate and timescales lengthen. I also knew that once started there would be no going back; bailing out part way through would be a road to financial disaster.
Very soon we were back to this...
Steve captured the actual moment the body and chassis parted company.
Taking the body off the chassis was a pivotal moment for a couple of reasons. Firstly, it would allow us to assess the real condition of the car (a bit of a risk) and secondly it would allow a more thorough restoration. If the answer to the first part wasn't as expected, the budget could be completely blown apart.
So what did we find?
For those not familiar with the construction of the HK500, it is an amazing feat of engineering. The chassis appears to be massively over engineered, with chassis rails made from large diameter tubes and substantial cross members which are beefily braced. It would look at home as part of a ship or maybe a small bridge! The body is made from a patchwork of small panels stitched together to create a whole. For instance, the front wings form a single unit with the front panel and windscreen scuttle. Even though there is a separate chassis, the floor of the body is a welded steel structure that is reminiscent of monocoque construction. Given this 'belt and braces' approach, the amazing thing is how little rigidity the complete car possesses.
The chassis was in great condition and showed no evidence of collision damage, which was a relief. It still had the body number chalked on the cross member above the rear axle. Luckily that chalk number matched the body number in the factory records! As you would expect, the chassis had plenty of surface corrosion, but nothing serious. This is a testament to its sturdy construction as no real rust protection was applied by the factory, just a quick 'once over' with an underseal type product called 'Blaxon'. It was obvious from the areas that were completely bare that the quick waft of Blaxon was applied once the body was in place.
Here's the body number...not easy to read!
And the chassis number, much more clearly defined
As mentioned before, taking the body off the chassis was likely to reveal a whole new list of jobs and necessitate the cleaning up of some areas hidden from view.
The body had benefitted from significant welding whilst in Geoff's hands, so was structually sound. However, some of the welding was a bit 'agricultural'.
And some bits didn't appear to be welded at all...
So the car was now back in pieces and we had the chance to compare what we had found with what we had included in our cost calculations. At this stage it didn't look too bad. There were a couple of areas that would require some welding, but that was about it.
Edited by theadman on Monday 21st November 22:18
Sorry for the lack of updates.
I've been visiting my daughter who lives in New Zealand. We haven't seen each other for over three years, thanks to Covid. Social media channels really help to bridge the distance, but it was only when we met at Auckland airport that I realised how much I had missed simply spending time together.
Cars might be a fascination and a consuming hobby, but the NZ trip really brought home that there are much more important things in life!
Anyway, if jet lag kicks in, the next installment might be at 3am tomorrow morning!
A brief recap for anyone not wanting to trawl the previous 7 pages.
In 1999 I bought the car thinking it would take six months to get back on the road.
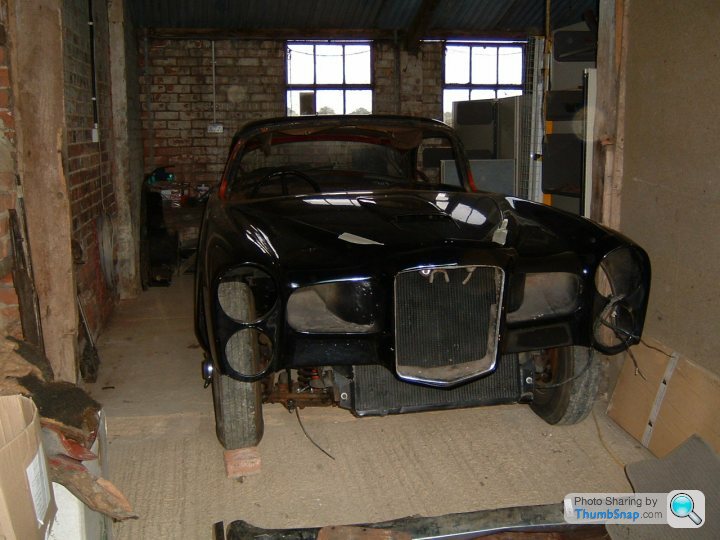
It took a bit longer...by 2007 it could move under its own steam, but was a long way from a visit to the MOT station.
The next year it was back to this...
So...let's pick up the story here.
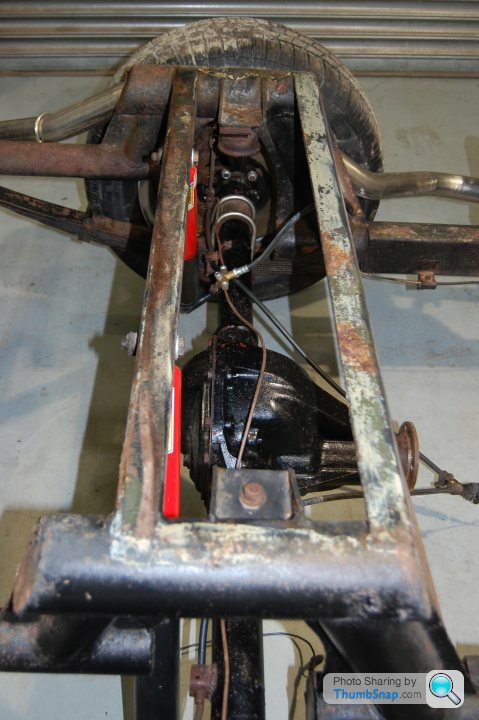
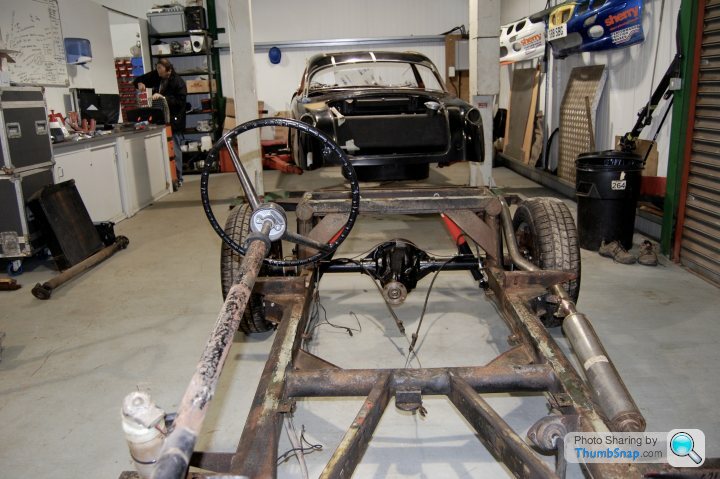
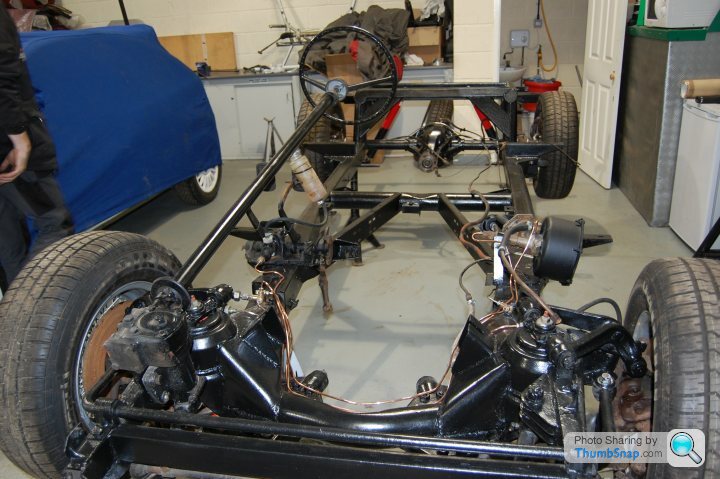
By the end of 2008 the chassis was beginning to resemble how it was when it left the factory in 1958, 50 years earlier. At that time it was given no real rust protection apart from a quick blow over with a product called 'Blaxon' that was an inferior version of the modern day 'Schultz' stone chip. It was clear that this had not been applied thoroughly as all the upper surfaces of the chassis were really patchy with areas of bare metal. Thank goodness the chassis sections are of a pretty heavy gauge because the body was insulated from the chassis by long pieces of webbing that could have been custom made to soak up and then trap moisture. You can see these lying across the chassis just behind the front crossmember in the photo below.
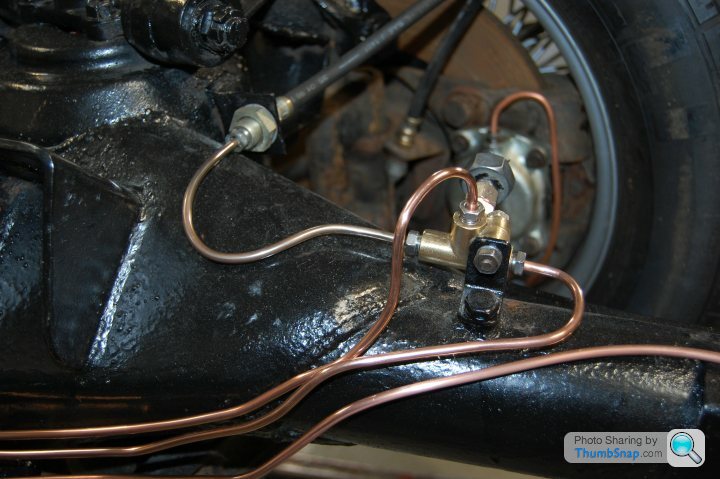
Having rebuilt the brakes at each corner early on in the restoration, it made sense to renew all the brake lines now they were completely exposed. Whilst the result is entirely functional, I was hoping for visual perfection as well and the wavy lines aren't really to the standard I was aiming for. However, I think they are fairly true to the factory original specification. They might now be out of sight, but they aren't out of mind!
As you can see, the chassis wasn't completely stripped of all components as most of these had already been rebuilt in the intervening years and my plan wasn't for a completely concours car, as having had an E-Type rebuilt to that standard a few years earlier I ended up being afraid to use it. Therefore, it was agreed that the best finish we could achieve would be to hand paint the chassis with chassis enamel. This would protect it and vastly improve the under car appearance. Several coats were duly applied and the end result was pretty good.
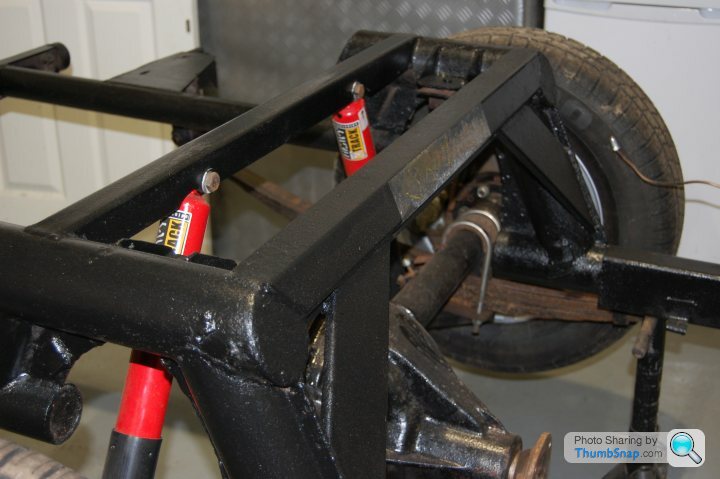
The factory chalk numbering was left, as it seemed a shame to paint over it.
Sorting the chassis out and raising the bar in terms of the complete restoration led us to re-evaluate all other aspects of the project.
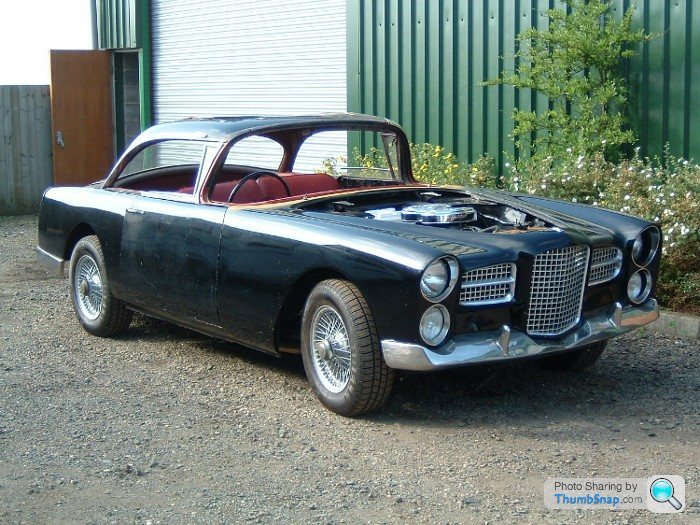
The body was always going to require a respray. It was suffering from head to toe micro-blistering and the paint was rubbish anyway. However, it was now becoming much more important to find someone willing to work to high standards without breaking the bank. This ruled out the top names as those I talked to were wanting upwards of £20,000 before they even saw the car. And this was over ten years ago!
All the work completed earlier in the restoration had been done by people who were known in their field, so the quality was good. I didn't feel the need to re-address any of the work so far.
The engine had been rebuilt according to the previous owner, so I wasn't expecting any issues on that front.
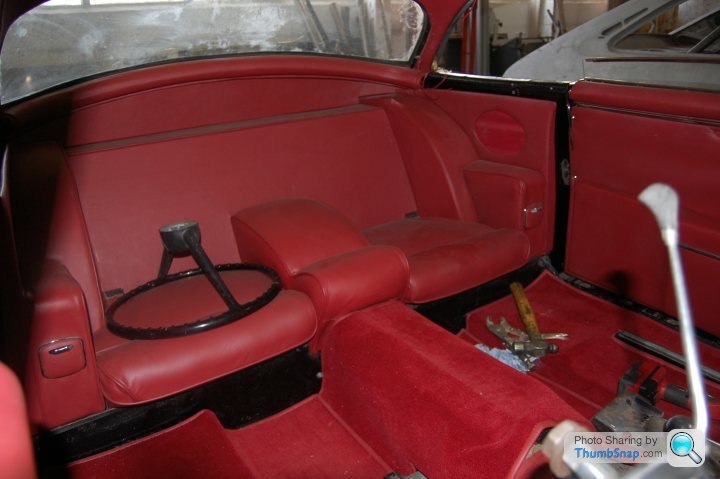
Whilst the seats and door cards had been retrimmed to a high standard, most of the rest of the interior trim was missing. As it would need to be remade anyway upping the game would have no impact in this area. The dashboard was now looking good, so there was no impact here either. One worry was actually keeping the retrimmed seats safe and in good condition until they were required.
That left the glass and the exterior trim. The condition of both could only be described as average, at best. The bigger challenge was the trim. Facel's principal business was the manufacture of stainless steel items for a range of industries. Given this expertise, it was only natural for them to make all the brightwork for their cars from stainless rather than chrome. Stainless is very hard and therefore difficult to refinish...it requires significant polishing to bring the shine back and any marks or scratches are hard to remove. After enquiring around a number of the chrome finishers and polishers I realised they wouldn't all be willing to take the Facel brightwork on as a project. But, if I attempted to bring the trim back to an acceptable level myself (which had been the original plan) I knew I was going to fall well short of the standard now required.
As the brightwork might prove to be one of the most difficult issues to solve, I set about researching this in 2009. By September, having talked to all the polishers and platers present at the Beaulieu Autojumble it became clear that the main contender was Derby Plating, with Castle Polishing and Plating the only real alternative. With all the brightwork clanking around in the back of my then current company car I set off to visit both of them in a single round trip. Derby Plating discounted themselves on two fronts; a real lack of enthusiasm for tackling stainless steel and price (which might have been a result of the former). Castle Polishing and Plating couldn't have been more different. 'Stainless steel...it's more difficult, but no problem, it's what we do.' The quoted price reflected that attitude as well, so I left everything with them and awaited their call.
A couple of months later the parts were ready for collection. Sadly, again I didn't think to take pictures as a before and after contrast would have been interesting. The difference was stark! Over the years the Facel had obviously been in a few tight squeezes and so the stainless strips that run above the sills were quite badly dented and scraped. Whilst not perfect, they now looked closer to factory fresh. This was the first trial fit simply to sort out the door alignment...
The car has a number of stainless finishers all the way round the tops and bottoms of the windows. On one side these had all been damaged by someone using a sandblaster close to the car sometime in the 1980s, so they were all pitted. This had all been polished out, but we later found that the polishing process had relieved the curves in the metal, making them really difficult to refit to the car.
In the meantime the hunt was on to find someone suitable to tackle the micro-blistering and repaint the car, but more on that next time.
In 1999 I bought the car thinking it would take six months to get back on the road.
It took a bit longer...by 2007 it could move under its own steam, but was a long way from a visit to the MOT station.
The next year it was back to this...
So...let's pick up the story here.
By the end of 2008 the chassis was beginning to resemble how it was when it left the factory in 1958, 50 years earlier. At that time it was given no real rust protection apart from a quick blow over with a product called 'Blaxon' that was an inferior version of the modern day 'Schultz' stone chip. It was clear that this had not been applied thoroughly as all the upper surfaces of the chassis were really patchy with areas of bare metal. Thank goodness the chassis sections are of a pretty heavy gauge because the body was insulated from the chassis by long pieces of webbing that could have been custom made to soak up and then trap moisture. You can see these lying across the chassis just behind the front crossmember in the photo below.
Having rebuilt the brakes at each corner early on in the restoration, it made sense to renew all the brake lines now they were completely exposed. Whilst the result is entirely functional, I was hoping for visual perfection as well and the wavy lines aren't really to the standard I was aiming for. However, I think they are fairly true to the factory original specification. They might now be out of sight, but they aren't out of mind!
As you can see, the chassis wasn't completely stripped of all components as most of these had already been rebuilt in the intervening years and my plan wasn't for a completely concours car, as having had an E-Type rebuilt to that standard a few years earlier I ended up being afraid to use it. Therefore, it was agreed that the best finish we could achieve would be to hand paint the chassis with chassis enamel. This would protect it and vastly improve the under car appearance. Several coats were duly applied and the end result was pretty good.
The factory chalk numbering was left, as it seemed a shame to paint over it.
Sorting the chassis out and raising the bar in terms of the complete restoration led us to re-evaluate all other aspects of the project.
The body was always going to require a respray. It was suffering from head to toe micro-blistering and the paint was rubbish anyway. However, it was now becoming much more important to find someone willing to work to high standards without breaking the bank. This ruled out the top names as those I talked to were wanting upwards of £20,000 before they even saw the car. And this was over ten years ago!
All the work completed earlier in the restoration had been done by people who were known in their field, so the quality was good. I didn't feel the need to re-address any of the work so far.
The engine had been rebuilt according to the previous owner, so I wasn't expecting any issues on that front.
Whilst the seats and door cards had been retrimmed to a high standard, most of the rest of the interior trim was missing. As it would need to be remade anyway upping the game would have no impact in this area. The dashboard was now looking good, so there was no impact here either. One worry was actually keeping the retrimmed seats safe and in good condition until they were required.
That left the glass and the exterior trim. The condition of both could only be described as average, at best. The bigger challenge was the trim. Facel's principal business was the manufacture of stainless steel items for a range of industries. Given this expertise, it was only natural for them to make all the brightwork for their cars from stainless rather than chrome. Stainless is very hard and therefore difficult to refinish...it requires significant polishing to bring the shine back and any marks or scratches are hard to remove. After enquiring around a number of the chrome finishers and polishers I realised they wouldn't all be willing to take the Facel brightwork on as a project. But, if I attempted to bring the trim back to an acceptable level myself (which had been the original plan) I knew I was going to fall well short of the standard now required.
As the brightwork might prove to be one of the most difficult issues to solve, I set about researching this in 2009. By September, having talked to all the polishers and platers present at the Beaulieu Autojumble it became clear that the main contender was Derby Plating, with Castle Polishing and Plating the only real alternative. With all the brightwork clanking around in the back of my then current company car I set off to visit both of them in a single round trip. Derby Plating discounted themselves on two fronts; a real lack of enthusiasm for tackling stainless steel and price (which might have been a result of the former). Castle Polishing and Plating couldn't have been more different. 'Stainless steel...it's more difficult, but no problem, it's what we do.' The quoted price reflected that attitude as well, so I left everything with them and awaited their call.
A couple of months later the parts were ready for collection. Sadly, again I didn't think to take pictures as a before and after contrast would have been interesting. The difference was stark! Over the years the Facel had obviously been in a few tight squeezes and so the stainless strips that run above the sills were quite badly dented and scraped. Whilst not perfect, they now looked closer to factory fresh. This was the first trial fit simply to sort out the door alignment...
The car has a number of stainless finishers all the way round the tops and bottoms of the windows. On one side these had all been damaged by someone using a sandblaster close to the car sometime in the 1980s, so they were all pitted. This had all been polished out, but we later found that the polishing process had relieved the curves in the metal, making them really difficult to refit to the car.
In the meantime the hunt was on to find someone suitable to tackle the micro-blistering and repaint the car, but more on that next time.
Mercdriver, thanks for the tip about straight brake pipes. Some of the ones in the pictures were reworked later anyway, as I decided a dual circuit system would be a lot safer, given the car's performance potential, weight and virtually non existent handbrake. Having two wheels slowing you down would be a lot better than none in the event of a system failure!
Thanks for the most recent supportive comments.
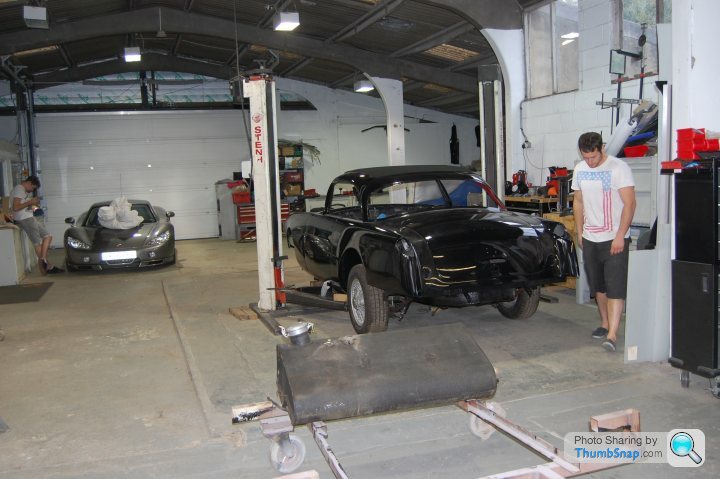
Work on the car has started again, so, just maybe, the end is in sight? A photo from Tuesday...
In the meantime, back to the story...
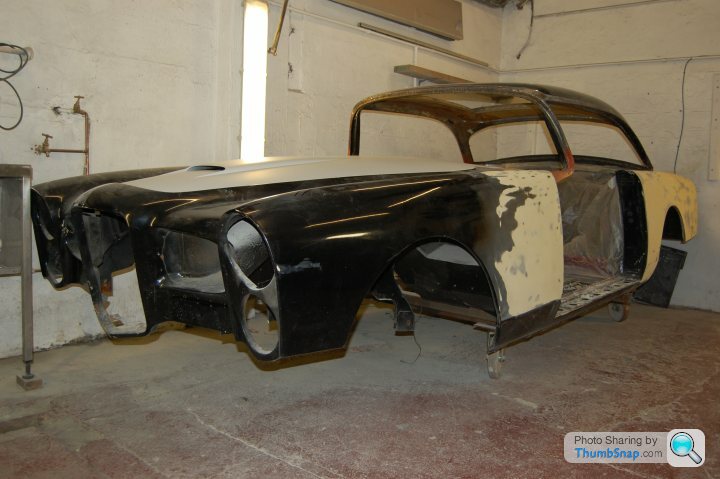
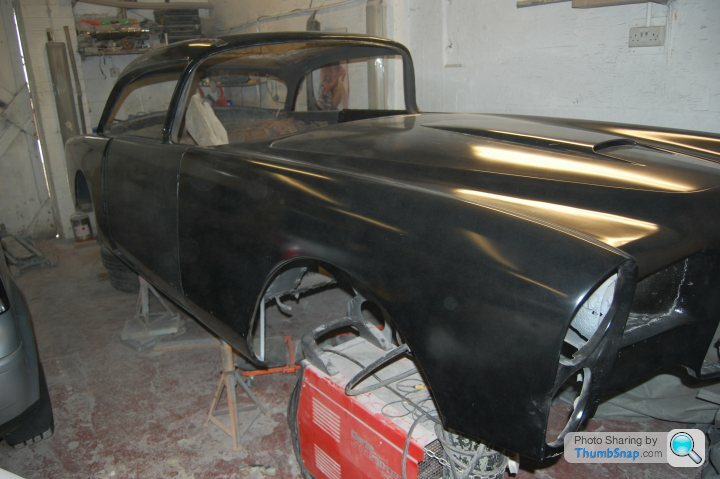
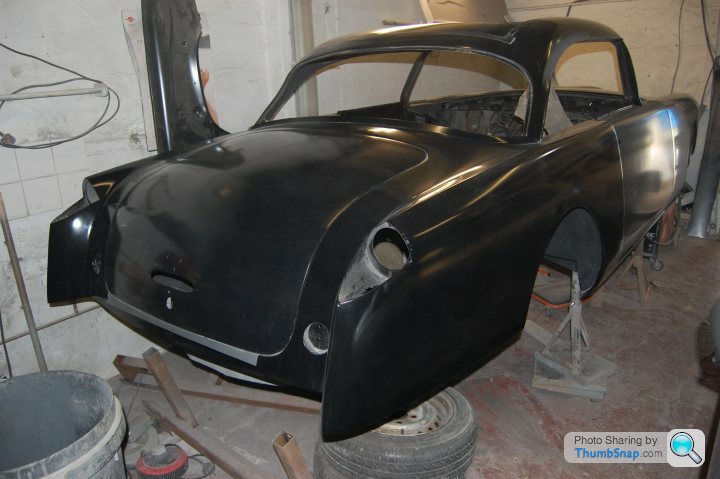
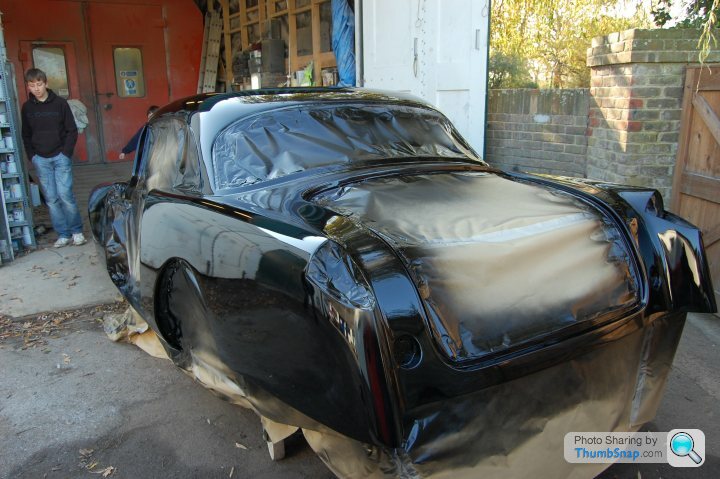
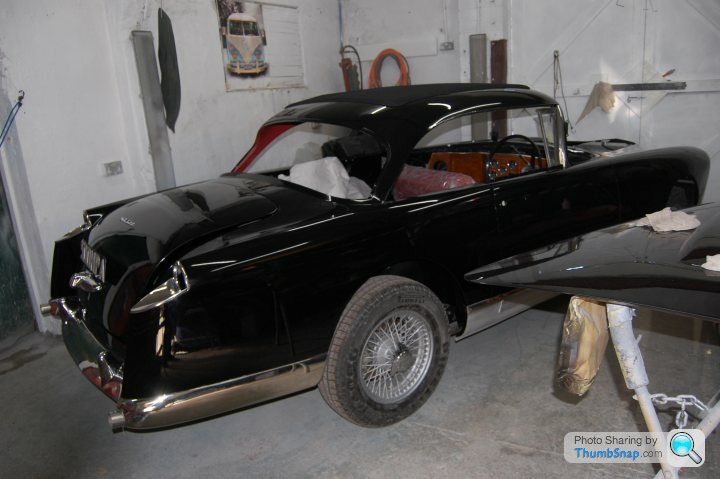
Having decided to 'do the job properly' and taken the car apart, the hunt was on for someone to complete the bodywork and then paint the car back in its original black.
John, the same friend who had put me on to the car originally back in 1999 had been following progress with interest. This was quite amazing, given that ten years had elapsed...he MUST have been interested!! John is pretty involved in the classic car scene, occasionally buying and selling cars and collecting 1950s Fords along the way. He and I had also judged the odd concours event together and also had connections through our respective jobs. John would often attend car events and it was at one such show that he came across a Capri that had had the most impressive respray in its original black. As you will probably know, spraying black is quite a challenge as it shows every blemish and imperfection. Both the preparation and the application need to be spot on for a pristine finish.
The Capri was so good that John approached the owner and started a conversation. It turned out that the owner's son had resprayed the car for him. John duly obtained contact details and then contacted me, saying he might have found the right person for the Facel.
A conversation with Gary and a trip down to Hayling Island where he was based was all it took for me to agree. Like many real diamonds, Gary's workshop didn't provide any clue to the quality of work being carried out. He was interested from the off. Much of his work was for insurance companies where quick turn around at an acceptable quality was the key to success. The idea of another car to showcase what he was actually capable of, where quality was the key and time was almost immaterial really appealed to him. He had done his father's Capri and a number of air cooled Volkswagens, but had never tried his hand at something more exotic. Everything he said filled me with confidence and so Steve built a jig for the body and sent it down to the south coast.
Gary and I debated whether to have the car dipped or not at some length. Back then, dipping was seen as the best way to go and as my car was more or less a bare shell it would have been very little effort to prepare the car.
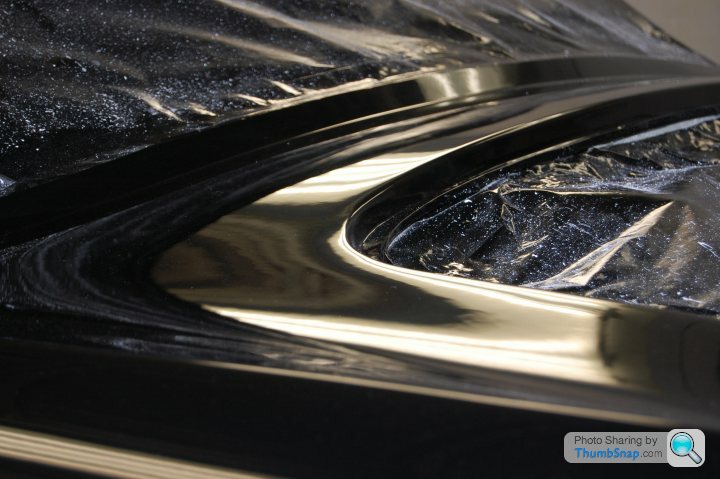
The big factor in dipping's favour was that all the ugly secrets of the shell would be instantly revealed and Gary would then have a solid basis from which to start. I was quite in favour of going this route for several reasons. Firstly, it was obvious that the car's shape was attributable to a significant use of filler skim rather than the underlying metalwork. Secondly, the car had a bad case of 'measles' - it was badly microblistered on every part of the bodywork. This suggested that there was moisture under the paint and with the presence of all that filler I was concerned that the moisture might also be present between the metal and the skim coat. Dipping would instantly remove the filler and chase any moisture away.
To my surprise Gary wasn't keen. I didn't understand it...dipping was the new miracle cure for rust and new companies were springing up all over the place offering the service as an almost 'must do' in any restoration. Gary was worried that if the Facel was to be a 'keeper' the chemical process of dipping might cause problems in the future. He really was ahead of the game...I now know a number of people who had cars dipped as part of a rebuild that are now suffering consequencies years later as the acid leaches out of nooks and crannies to play havoc with shiny paint.
I'm not saying dipping is bad per se, but time has shown that the process lives or dies by the thoroughness of the neutralising process after dipping has taken place.
So, we didn't go down that route (and the paint is still fantastic ten years after application which is quite a result given the epic microblistering Gary had to cure).
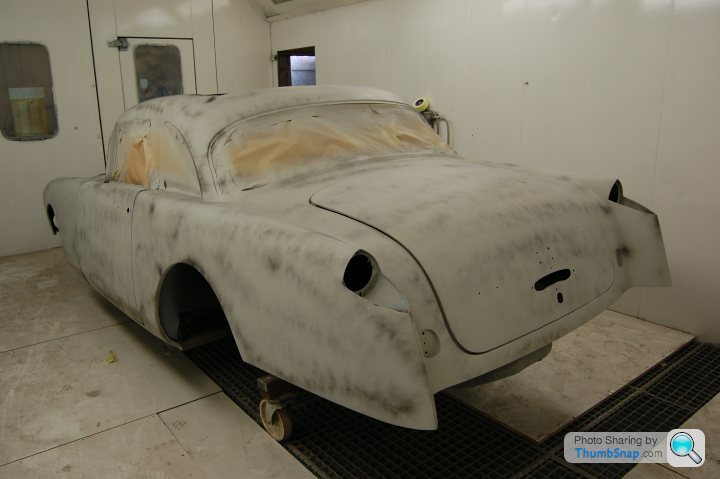
Gary set about stripping the bodywork a panel at a time. The previous photo shows the progress, starting from the back of the car. All went well, with plenty of skim coming off the car down both sides. Most of the bottom 18 inches of the car had needed patching or repair panels. This work had been done by the previous owner at his bodyshop. By reworking what was there Gary managed to drastically reduce the reliance on building up the shape with filler.
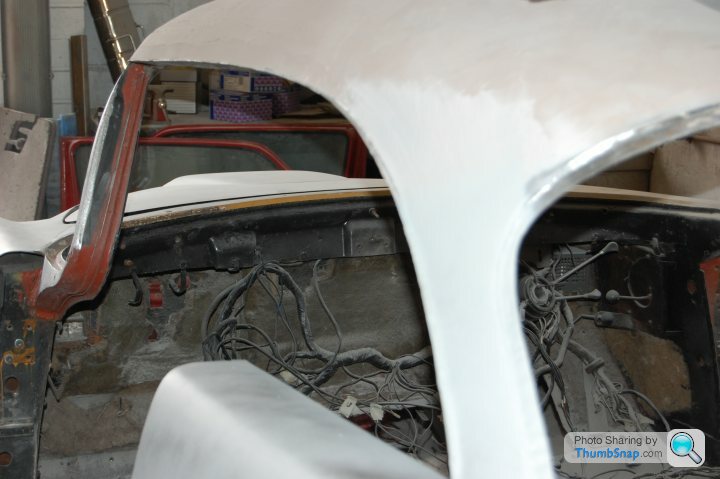
The main issue Gary came across was that the whole of the panel between the base of the windscreen and the trailing edge of the bonnet was riddled with rust that had just been filled over. Whilst this was not insurmountable it did cause a particular problem. Windscreen fitment is known to be a headache on the HK500, not helped by the dogleg 'A' pillars nor the lack of body rigidity. The rotten panel meant that Gary had to remake the whole length of the lip at the base of the windscreen. If the curvature was wrong, the windscreen wouldn't fit, or would crack once fitted. I spent many a sleepless night worrying about this as Gary had had little original metal in the way of a template to recreate this area.
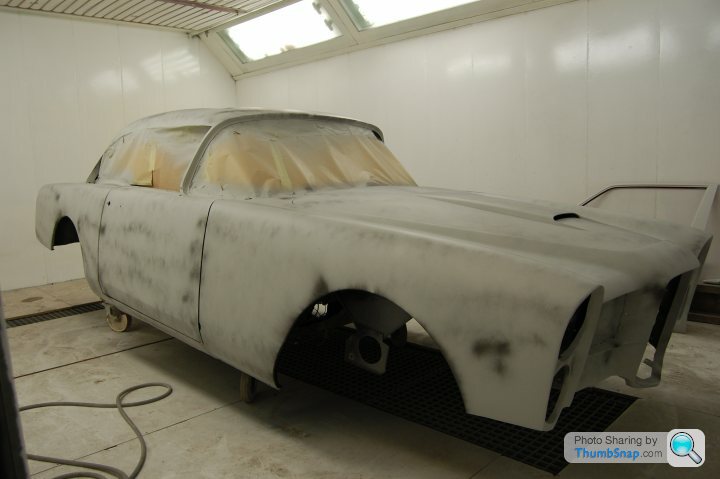
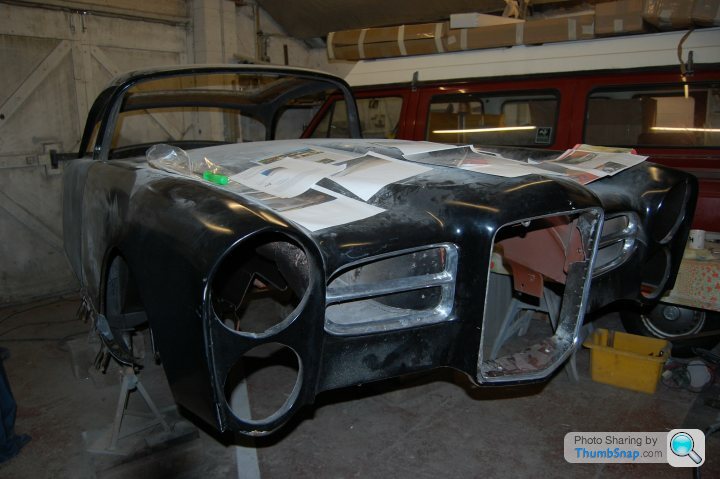
The rest of the bodywork was pretty straightforward, but very time consuming. The whole front of the car was only approximately the same shape as when it left the factory. At least we had the original grilles and surrounds. As it was, these didn't fit very well at all. Gary had to spend time using the brightwork as his template and adjust the body to fit.
The roof was also a bit of a nightmare as Gary had to reshape it, again removing layers of skimmed filler.

During the reworking of the front of the car. You would never have guessed it was so far out, but offering up the bumpers gave the game away.
Reworking around the windscreen...the main area was the base of the screen, but the 'A' pillars required attention too.
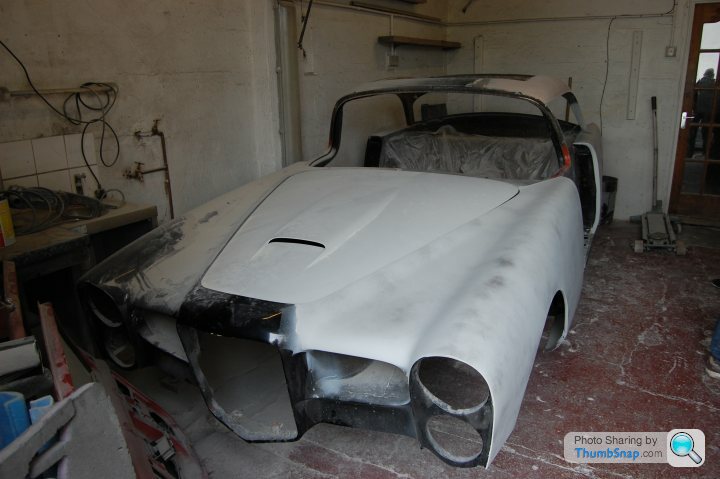
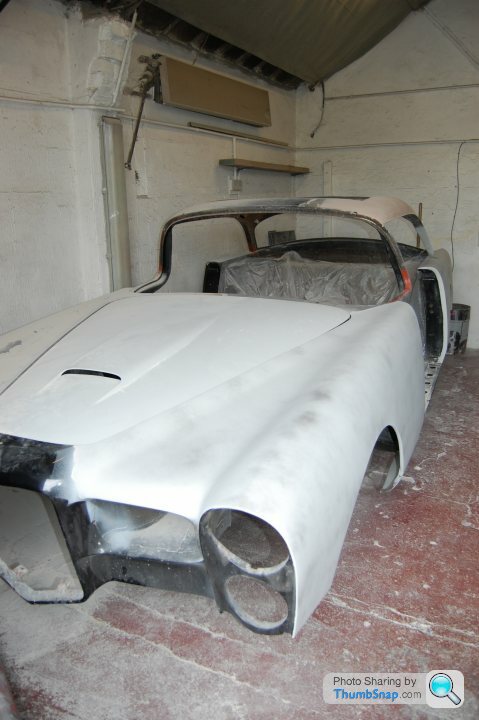
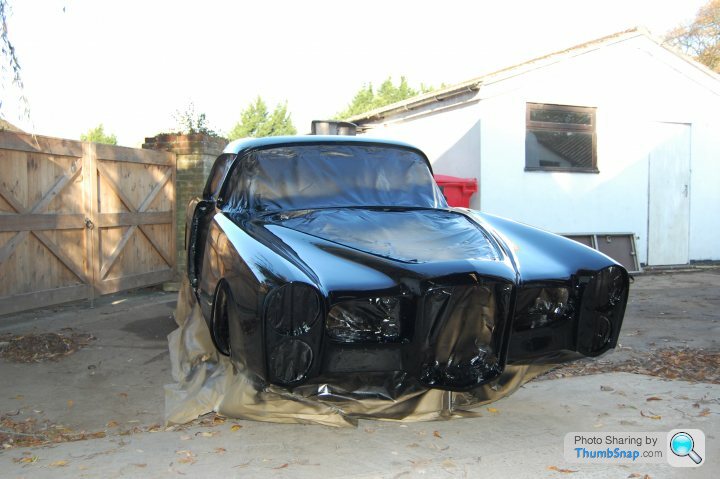
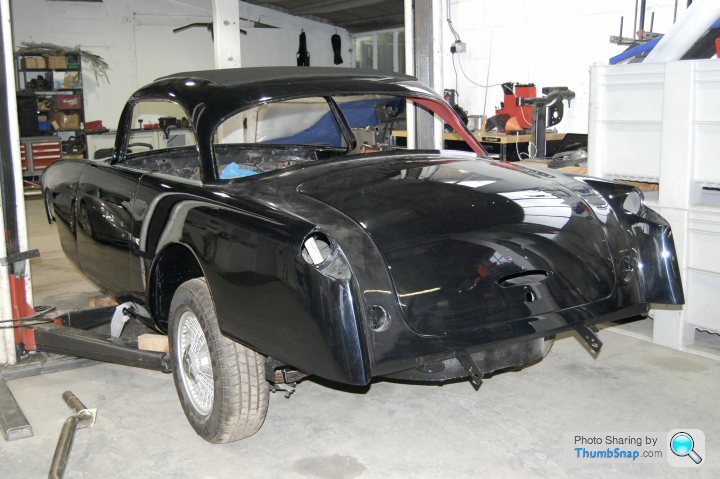
Finally, the car was ready for painting.
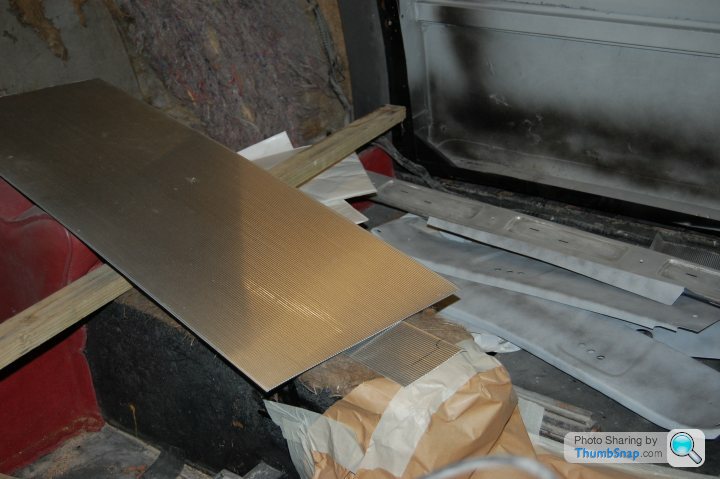
Before the final coats the side trims were cut to shape and trial fitted. This was another job where it had to be right first time as there was only just enough of the aluminium trim.
The front grilles and rear lights were also fitted to ensure there were no issues.
Gary surveys the work that has taken him over a year so far (between other jobs).

And then it was time for the final coats to be applied, rubbed down and polished. This was the point when I knew I had made the right decision to go with Gary...

Finally, it was time to fit the front grilles and rear lights to check alignment...but they would have to come off the car again later.


So, finally the body and chassis were both brought back to the standard I was aiming for; excellent, but not necessarily concours. All that was required now was to put the car back together!
Work on the car has started again, so, just maybe, the end is in sight? A photo from Tuesday...
In the meantime, back to the story...
Having decided to 'do the job properly' and taken the car apart, the hunt was on for someone to complete the bodywork and then paint the car back in its original black.
John, the same friend who had put me on to the car originally back in 1999 had been following progress with interest. This was quite amazing, given that ten years had elapsed...he MUST have been interested!! John is pretty involved in the classic car scene, occasionally buying and selling cars and collecting 1950s Fords along the way. He and I had also judged the odd concours event together and also had connections through our respective jobs. John would often attend car events and it was at one such show that he came across a Capri that had had the most impressive respray in its original black. As you will probably know, spraying black is quite a challenge as it shows every blemish and imperfection. Both the preparation and the application need to be spot on for a pristine finish.
The Capri was so good that John approached the owner and started a conversation. It turned out that the owner's son had resprayed the car for him. John duly obtained contact details and then contacted me, saying he might have found the right person for the Facel.
A conversation with Gary and a trip down to Hayling Island where he was based was all it took for me to agree. Like many real diamonds, Gary's workshop didn't provide any clue to the quality of work being carried out. He was interested from the off. Much of his work was for insurance companies where quick turn around at an acceptable quality was the key to success. The idea of another car to showcase what he was actually capable of, where quality was the key and time was almost immaterial really appealed to him. He had done his father's Capri and a number of air cooled Volkswagens, but had never tried his hand at something more exotic. Everything he said filled me with confidence and so Steve built a jig for the body and sent it down to the south coast.
Gary and I debated whether to have the car dipped or not at some length. Back then, dipping was seen as the best way to go and as my car was more or less a bare shell it would have been very little effort to prepare the car.
The big factor in dipping's favour was that all the ugly secrets of the shell would be instantly revealed and Gary would then have a solid basis from which to start. I was quite in favour of going this route for several reasons. Firstly, it was obvious that the car's shape was attributable to a significant use of filler skim rather than the underlying metalwork. Secondly, the car had a bad case of 'measles' - it was badly microblistered on every part of the bodywork. This suggested that there was moisture under the paint and with the presence of all that filler I was concerned that the moisture might also be present between the metal and the skim coat. Dipping would instantly remove the filler and chase any moisture away.
To my surprise Gary wasn't keen. I didn't understand it...dipping was the new miracle cure for rust and new companies were springing up all over the place offering the service as an almost 'must do' in any restoration. Gary was worried that if the Facel was to be a 'keeper' the chemical process of dipping might cause problems in the future. He really was ahead of the game...I now know a number of people who had cars dipped as part of a rebuild that are now suffering consequencies years later as the acid leaches out of nooks and crannies to play havoc with shiny paint.
I'm not saying dipping is bad per se, but time has shown that the process lives or dies by the thoroughness of the neutralising process after dipping has taken place.
So, we didn't go down that route (and the paint is still fantastic ten years after application which is quite a result given the epic microblistering Gary had to cure).
Gary set about stripping the bodywork a panel at a time. The previous photo shows the progress, starting from the back of the car. All went well, with plenty of skim coming off the car down both sides. Most of the bottom 18 inches of the car had needed patching or repair panels. This work had been done by the previous owner at his bodyshop. By reworking what was there Gary managed to drastically reduce the reliance on building up the shape with filler.
The main issue Gary came across was that the whole of the panel between the base of the windscreen and the trailing edge of the bonnet was riddled with rust that had just been filled over. Whilst this was not insurmountable it did cause a particular problem. Windscreen fitment is known to be a headache on the HK500, not helped by the dogleg 'A' pillars nor the lack of body rigidity. The rotten panel meant that Gary had to remake the whole length of the lip at the base of the windscreen. If the curvature was wrong, the windscreen wouldn't fit, or would crack once fitted. I spent many a sleepless night worrying about this as Gary had had little original metal in the way of a template to recreate this area.
The rest of the bodywork was pretty straightforward, but very time consuming. The whole front of the car was only approximately the same shape as when it left the factory. At least we had the original grilles and surrounds. As it was, these didn't fit very well at all. Gary had to spend time using the brightwork as his template and adjust the body to fit.
The roof was also a bit of a nightmare as Gary had to reshape it, again removing layers of skimmed filler.
During the reworking of the front of the car. You would never have guessed it was so far out, but offering up the bumpers gave the game away.
Reworking around the windscreen...the main area was the base of the screen, but the 'A' pillars required attention too.
Finally, the car was ready for painting.
Before the final coats the side trims were cut to shape and trial fitted. This was another job where it had to be right first time as there was only just enough of the aluminium trim.
The front grilles and rear lights were also fitted to ensure there were no issues.
Gary surveys the work that has taken him over a year so far (between other jobs).
And then it was time for the final coats to be applied, rubbed down and polished. This was the point when I knew I had made the right decision to go with Gary...
Finally, it was time to fit the front grilles and rear lights to check alignment...but they would have to come off the car again later.
So, finally the body and chassis were both brought back to the standard I was aiming for; excellent, but not necessarily concours. All that was required now was to put the car back together!
Williamp, at the risk of winning a parrot, it is pure black.
The interesting point though, is what black should it be as there are numerous shades. When I worked at Ford early in my career, the interior designers used to obsess about whether the hard plastics should be 'warm black' which was at the brown end of the spectrum or 'cool black' which was verging on dark grey.
Trying to find the exact shade as used by Facel in the late 1950s proved impossible. My first port of call was the French Facel forum on forum-auto (www.forum-auto.com) as this is the biggest online collective of Facel knowledge. No-one there seemed to know a RAL code for Facel black.
A bit more research revealed a possible reason why. The RAL colour standard used across Europe today dates from 1961, so 1950s paint shades would have been defined by the less precise codes devised in the 1940s. These were not commonly used outside Germany and the chances of a French company voluntarily adopting a German system at that point in time were probably nil.
So, without a precise code to nail down the colour, we looked at an area on the bulkhead, behind the dashboard that was probably the original paint. It was definitely at the warm end of the spectrum, so we searched the 1950s colour charts of Ford, Vauxhall and BMC to find a close match. In the end, we opted for Ford black from the period.
To obtain the best finish and to ensure the paint stood the test of time we used modern two pack rather than recreating the original cellulose.
So, a long answer to what might not have been a question at all!
So, on with the story...
It was now time to try and retrieve all the various bits of the Facel back to Brackley so the build up could commence. Given the amount of time that had elapsed since embarking on the project I couldn't help thinking the car was fighting me every step of the way!
Sure enough, this soon became evident! It was with some excitement that I went down to the workshop in early 2012 to see the finished bodywork, freshly returned from Prep N Paint. To my horror I was informed there had been some damage to the car whilst it was being transported. The 'rather silly person' who had picked it up had insisted that the doors, boot and bonnet be hung on the car prior to loading. Gary had packaged everything so each item could be loaded separately, with the idea that the opening panels would then be fitted in Brackley. Gary duly attached the panels having been given an assurance they would all be padded and tied in place.
By the time the car arrived the doors, bonnet and boot had all chattered against their openings chipping the paint in multiple places. To say I was rather annoyed is an understatement. Gary's position was that he had prepared the car for transportation the same way that he had done many times before and had fitted the panels against his better judgement. The delivery company, subcontracted through Steve simply ran a mile. It was obvious the only way to get them on the hook would be through the small claims court.
It took 18 months to reach a resolution, with Steve, Gary me all contributing to the rectification which Gary eventually carried out.
In the meantime work on the car progressed.
The body was placed on the chassis a number of times as different types and lengths of coachbuilder's webbing were tried with the aim of replicating the original material. Whilst it might act as a water trap, the webbing fulfills an important role of insulating the body from the chassis and providing a small amount of flex between the two. In an age of ever strengthening monocoque bodies it seems odd to need to build in some flex, but it is required to allow the body and chassis the smallest amount of fidget as with different forces being applied, they don't move as one piece.
At the same time the gaping hole in the roof was finally filled in. As purchased, the car had a Webasto ash frame in the roof, but no sliding mechanism or fabric cover. By 2012 the Webasto type folding roof scene was on its knees. In the 1970s there seemed to be a Britax, Webasto or Golde dealer in every reasonably sized town. In the 1980s many of these specialists moved on to fitting tilting, glass cassette sunroofs and from that point onwards the skills required to service or repair folding roofs began to decline as people moved on to other jobs or retired.
Having looked to see if Fulfords in south London were still operating (the people who fitted Webastos for Intercontinental Cars, the UK Facel importer) and then tried to contact the London Sunroof Centre (who appeared to be the Webasto UK agents at the time) I eventually came across Peter Harvey Sunroofs in Kent. It seemed that Peter was the only person actively taking on Webasto work in southern England.
Peter couldn't have been more helpful although his initial rather brusque manner hid this well! Having sent copious pictures of the car and fairly detailed dimensions he had a good idea of what was needed. However, so as not to take any chances he diverted via Brackley on his way back from a trip up north and saw the car for himself.
He then made all the parts required and travelled up to the car to fit the roof. The one piece he couldn't get hold of was the wind deflector which is really needed for open top motoring. He agreed to post it on once it arrived. About four years later a random package arrived on my doorstep, addressed to my previous house. Luckily, it is just down the road and the new occupants dropped it over. To be honest I'd given up hope of obtaining the deflector from Peter, but that was what was in the parcel!
Overall, he provided a great service and his workmanship was first rate. It is a great shame that he has now retired. Surely there is enough work for someone to step in and provide this sort of service today? The situation is complicated by the fact that Webasto have now stopped making parts for their sunroofs which isn't particularly helpful!
This is the best picture I have from the time with the sunroof newly fitted.
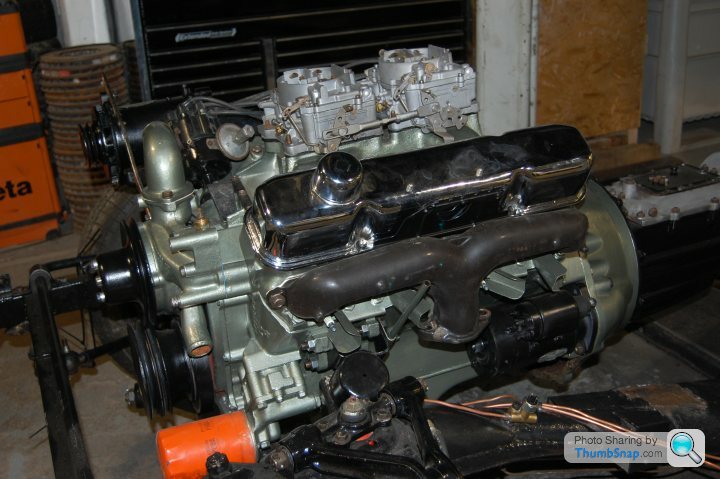
Work was also progressing with the chassis. Taking the engine out gave us the opportunity to replace the core plugs and remove the rather garish red paint from the block. Again, it was back to the Facel pages of Forum-Auto to try and understand what colour the block had been originally. And once again, there was no definitive answer. Nearly everyone refreshing their engine compartments paints their block black. This did not sit comfortably with me. You see, I had done the initial stripping of the block and there were no traces of black at all. In fact the original paint colour seemed to be a light metallic green, traces of which I found in numerous places. So more research was required.
Delving into the murky depths of the internet revealed the complicated world of Mopar 'crate' engines...the new engines sold against a part number, in a crate. This was not the only complication. It soon became apparent the Facel themselves didn't really know what engines were turning up from Chrysler. For instance, part way through the production of the Facel II, Chrysler started sending 413 cu in engines in place of the 383 cu in units that had been carry over from the last HK500s. It took a few cars before Facel noticed the change (to be fair, there were few, if any external cues).
As an early HK500 my car was fitted with the 361 cu in motor that preceded the ubiquitous 383 used in later Facels and then the Jensen CV8 and Interceptor. It this state of tune, with twin four barrel Carter carbs it was fitted to the De Soto Adventurer. Pictures of restored De Soto Adventurers from 1958 show the engine block to be a silver green, not too dissimilar to the colour used by BMC on Austin Healey 3000s.
So, whilst the internet came up with no record of crate engines being supplied in this colour, I decided to go with what I had found on the block itself and had the engine painted in Austin Healey green. Whilst this is too green, it is closer than any general application engine paint I could find.
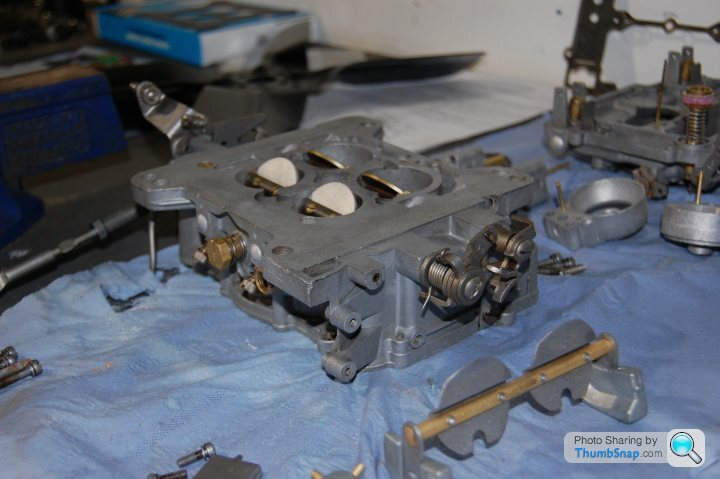
At the same time attention turned to the fuel system. The carbs were stripped, soda blasted and rebuilt.
The fuel tank was cleaned and prepped with new fuel lines.

The front suspension was rebushed and the trunnions replaced (that was a job and a half)! Sorry the picture is on its side!
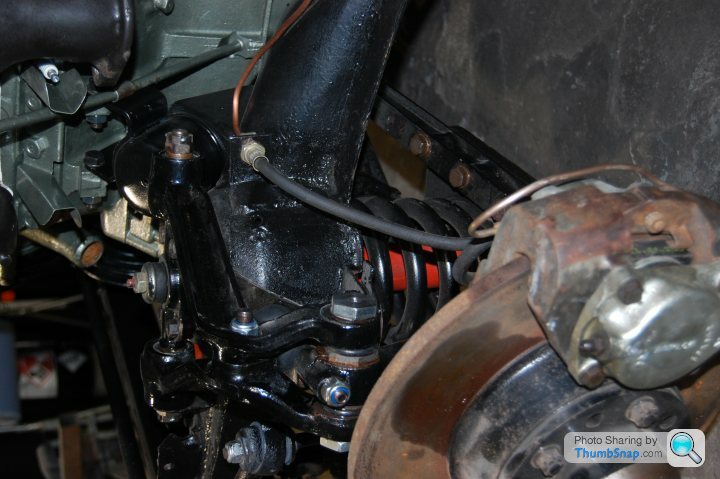
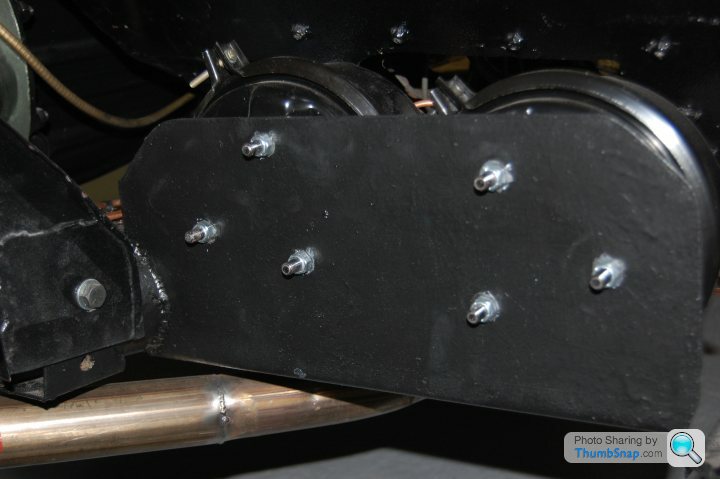
Then we started researching whether anyone else had converted their car to dual circuit brakes. It had been done before using either twin MGB servos or ones from an XJ6. We went with the latter which were duly fitted and plumbed in. It could be that we need to calibrate the system once the car is up and running, but I feel this modification provides a real safety benefit.
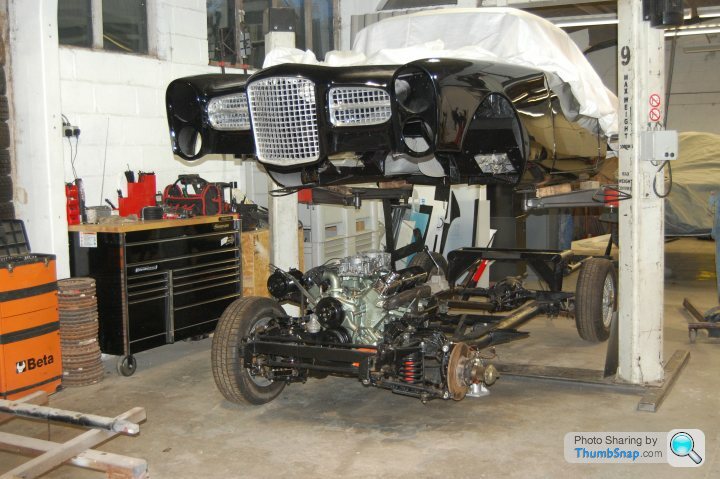
It was finally time to reunite the body with the chassis...
It was now time to try and retrieve all the various bits of the Facel back to Brackley so the build up could commence. Given the amount of time that had elapsed since embarking on the project I couldn't help thinking the car was fighting me every step of the way!
Sure enough, this soon became evident! It was with some excitement that I went down to the workshop in early 2012 to see the finished bodywork, freshly returned from Prep N Paint. To my horror I was informed there had been some damage to the car whilst it was being transported. The 'rather silly person' who had picked it up had insisted that the doors, boot and bonnet be hung on the car prior to loading. Gary had packaged everything so each item could be loaded separately, with the idea that the opening panels would then be fitted in Brackley. Gary duly attached the panels having been given an assurance they would all be padded and tied in place.
By the time the car arrived the doors, bonnet and boot had all chattered against their openings chipping the paint in multiple places. To say I was rather annoyed is an understatement. Gary's position was that he had prepared the car for transportation the same way that he had done many times before and had fitted the panels against his better judgement. The delivery company, subcontracted through Steve simply ran a mile. It was obvious the only way to get them on the hook would be through the small claims court.
It took 18 months to reach a resolution, with Steve, Gary me all contributing to the rectification which Gary eventually carried out.
In the meantime work on the car progressed.
The body was placed on the chassis a number of times as different types and lengths of coachbuilder's webbing were tried with the aim of replicating the original material. Whilst it might act as a water trap, the webbing fulfills an important role of insulating the body from the chassis and providing a small amount of flex between the two. In an age of ever strengthening monocoque bodies it seems odd to need to build in some flex, but it is required to allow the body and chassis the smallest amount of fidget as with different forces being applied, they don't move as one piece.
At the same time the gaping hole in the roof was finally filled in. As purchased, the car had a Webasto ash frame in the roof, but no sliding mechanism or fabric cover. By 2012 the Webasto type folding roof scene was on its knees. In the 1970s there seemed to be a Britax, Webasto or Golde dealer in every reasonably sized town. In the 1980s many of these specialists moved on to fitting tilting, glass cassette sunroofs and from that point onwards the skills required to service or repair folding roofs began to decline as people moved on to other jobs or retired.
Having looked to see if Fulfords in south London were still operating (the people who fitted Webastos for Intercontinental Cars, the UK Facel importer) and then tried to contact the London Sunroof Centre (who appeared to be the Webasto UK agents at the time) I eventually came across Peter Harvey Sunroofs in Kent. It seemed that Peter was the only person actively taking on Webasto work in southern England.
Peter couldn't have been more helpful although his initial rather brusque manner hid this well! Having sent copious pictures of the car and fairly detailed dimensions he had a good idea of what was needed. However, so as not to take any chances he diverted via Brackley on his way back from a trip up north and saw the car for himself.
He then made all the parts required and travelled up to the car to fit the roof. The one piece he couldn't get hold of was the wind deflector which is really needed for open top motoring. He agreed to post it on once it arrived. About four years later a random package arrived on my doorstep, addressed to my previous house. Luckily, it is just down the road and the new occupants dropped it over. To be honest I'd given up hope of obtaining the deflector from Peter, but that was what was in the parcel!
Overall, he provided a great service and his workmanship was first rate. It is a great shame that he has now retired. Surely there is enough work for someone to step in and provide this sort of service today? The situation is complicated by the fact that Webasto have now stopped making parts for their sunroofs which isn't particularly helpful!
This is the best picture I have from the time with the sunroof newly fitted.
Work was also progressing with the chassis. Taking the engine out gave us the opportunity to replace the core plugs and remove the rather garish red paint from the block. Again, it was back to the Facel pages of Forum-Auto to try and understand what colour the block had been originally. And once again, there was no definitive answer. Nearly everyone refreshing their engine compartments paints their block black. This did not sit comfortably with me. You see, I had done the initial stripping of the block and there were no traces of black at all. In fact the original paint colour seemed to be a light metallic green, traces of which I found in numerous places. So more research was required.
Delving into the murky depths of the internet revealed the complicated world of Mopar 'crate' engines...the new engines sold against a part number, in a crate. This was not the only complication. It soon became apparent the Facel themselves didn't really know what engines were turning up from Chrysler. For instance, part way through the production of the Facel II, Chrysler started sending 413 cu in engines in place of the 383 cu in units that had been carry over from the last HK500s. It took a few cars before Facel noticed the change (to be fair, there were few, if any external cues).
As an early HK500 my car was fitted with the 361 cu in motor that preceded the ubiquitous 383 used in later Facels and then the Jensen CV8 and Interceptor. It this state of tune, with twin four barrel Carter carbs it was fitted to the De Soto Adventurer. Pictures of restored De Soto Adventurers from 1958 show the engine block to be a silver green, not too dissimilar to the colour used by BMC on Austin Healey 3000s.
So, whilst the internet came up with no record of crate engines being supplied in this colour, I decided to go with what I had found on the block itself and had the engine painted in Austin Healey green. Whilst this is too green, it is closer than any general application engine paint I could find.
At the same time attention turned to the fuel system. The carbs were stripped, soda blasted and rebuilt.
The fuel tank was cleaned and prepped with new fuel lines.
The front suspension was rebushed and the trunnions replaced (that was a job and a half)! Sorry the picture is on its side!
Then we started researching whether anyone else had converted their car to dual circuit brakes. It had been done before using either twin MGB servos or ones from an XJ6. We went with the latter which were duly fitted and plumbed in. It could be that we need to calibrate the system once the car is up and running, but I feel this modification provides a real safety benefit.
It was finally time to reunite the body with the chassis...
Mercdriver and RDMcG, thanks for the comments.
Perhaps I should point out again that I'm compressing 23 years into these posts. To my mind it was more like 'glacial progress' rather than 'great progress', but thanks for all the positivity being shown!!
To give you an idea of the chronology, the body went back onto the chassis in November 2012, so 13 years after I bought the car.
As you will deduce, it hasn't been plain sailing over the last 10 years as the car still isn't finished!
Maybe 2023 will be the year it finally happens? As it was taken off the road in December1973 (although it was briefly taxed in 1976), December this year will be 50 years since it was last on the road. I've missed a number of deadlines with the car, particularly the school proms of both my children. I don't want to miss this one!
Time for the next chapter!
Before progressing further it might be worth a bit more detail about work to the engine. When I purchased the car in 1999, Geoff, the previous owner said that he had had the engine rebuilt, but had mislaid the invoice. Given the rather chaotic nature of his business, this was no surprise!
The first time the engine actually ran in my ownership was in August 2007, eight years after purchasing the car. At that point it ran without smoking and had good oil pressure. This was the only time I have driven the car...for about 30 yards! So, when we took the car apart in 2008 we assumed the engine internals were in good shape.
Apart from stripping back all the paint on the engine we took the opportunity to carry out some preventative maintenance. New core plugs were fitted along with a replacement water pump. All the galleries were inspected and were found to be pretty clean, even though there was some evidence of the car being run at some stage without antifreeze. New hoses were also purchased. As mentioned previously, the carbs were soda blasted, stripped and fitted with new seals and gaskets.
At the same time, the throttle linkage was re-engineered. At some stage in the past there had obviously been a problem and the linkage had been cobbled together. After a lot of searching I managed to find the correct parts on ebay in the US. Given that Carter carbs are as common in America as SUs are over here, the amount of time this took was somewhat surprising. However, persistence paid off...

There was an additional issue with the choke...there wasn't one! Clearly there were mounting points for an auto choke, but it had long gone! Again, searching the internet pulled up some interesting information and some really worthwhile contacts. I contacted a chap called Steve at carbs.net in the US (where else!). His website was a treasure trove of carb information. By checking the numbers on my carbs (2652S for the front and 2653S for the rear) against Steve's data, it confirmed my engine would have been fitted to a De Soto Adventurer. This fitted in with the paint colour on the block and also with the information in the Palawan Press Facel book.
In the end carbs.net couldn't come up with the correct choke parts but Steve put us in touch with another supplier and we took it from there.
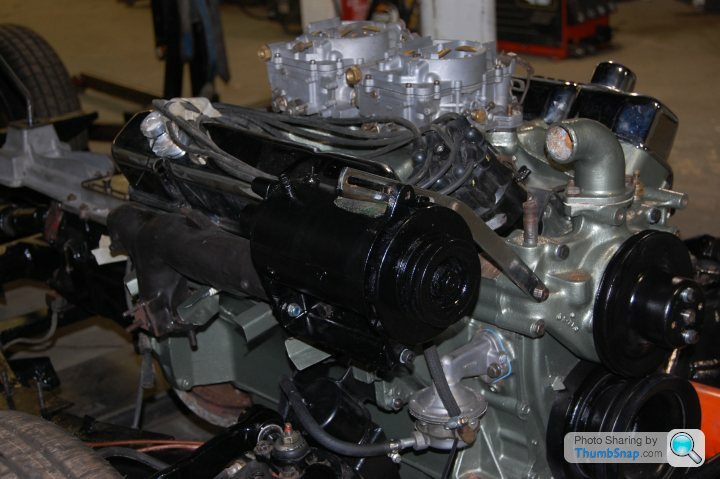
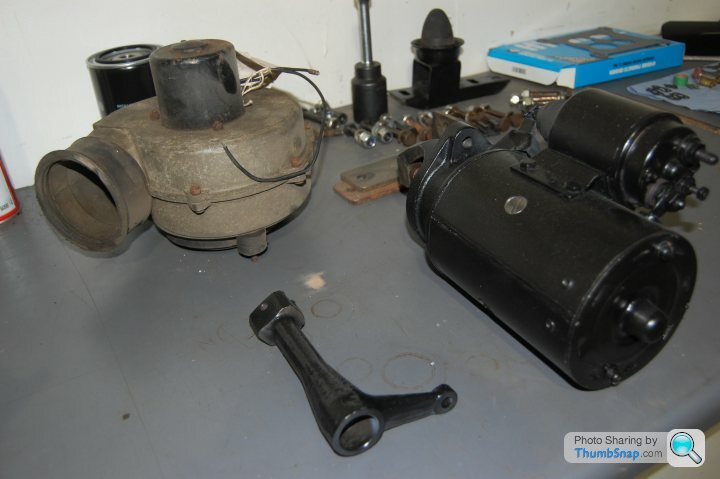
The starter motor was also checked over and spruced up, as it would have been foolish to miss the opportunity with the engine out.
In the early 2000s I was given the contact details of someone in the Cotswolds who had owned an HK500 for many years. It shared garage space with a lovely Ferrari 330GTC...what a magnificent pair! A friend and I went to visit to take reference pictures for various aspects of my restoration. Having access to complete cars is so valuable and can save costly mistakes. Over the years, several Facel owners have given me access to their cars which has been very helpful.
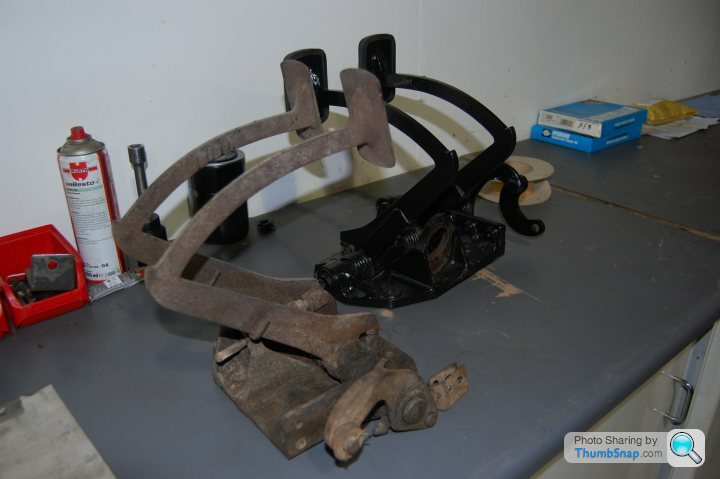
Sadly, in this instance the owner's health was failing and he knew he would be selling the Facel before too long. On that basis he generously gave me a number of HK500 bits and pieces that were lying around in the garage, in case they might be of use. One of those was an old pedal box which yielded parts that enabled the renovation of mine.
Sadly, Charlie is long gone, but it is people like him that make the classic car scene such a wonderful thing. It is amazing how this common interest can quickly form a bond between people who hardly know each other.
Once the body was permanently attached to the chassis it began to feel as if I owned a car again, rather than a collection of bits that seemed to be spread across a number of counties. Slowly parts were were attached to the car.
The front grilles can be a real headache. The bodywork was hand built at the factory, so each car is unique in a way that mass production cars are not. My understanding is that all the trim parts were individually fitted to each car and originally bore the body number of that car. It was clear that my car no longer had all of its original trim, so when the body went off to be repaired and painted I sent the bright work (grille, bumpers and side trim) down to Gary. That way, he had a reference point when making the final adjustments to all the apertures. It might have been the opposite way round to the way in which the car was built, but it worked. I was relieved to find that the trim fitted really well!
Attention then turned to the interior. The rear seat cushions fit into their own individual wells either side of the transmission tunnel just ahead of the rear axle. Poking around in one of these I found some pretty agricultural welding that was part of the original body restoration that had taken place before I bought the car. Somehow, we had all missed it, but now the car interior metalwork had been tidied up and painted, it stuck out like a sore thumb! Luckily, it was in a hidden area which could be easily masked from the rest of the car, so Steve was able to tidy it up without much trouble. However, everything like this extends the time line and adds cost!
Having overcome that setback, it was time to concentrate on the interior.
Whilst picking up a Chinese take away in Brackley a friend of mine had idly looked at the notice board where local trades people could put their cards to advertise their businesses. He saw one for a classic car trimmer and immediately thought of the Facel.
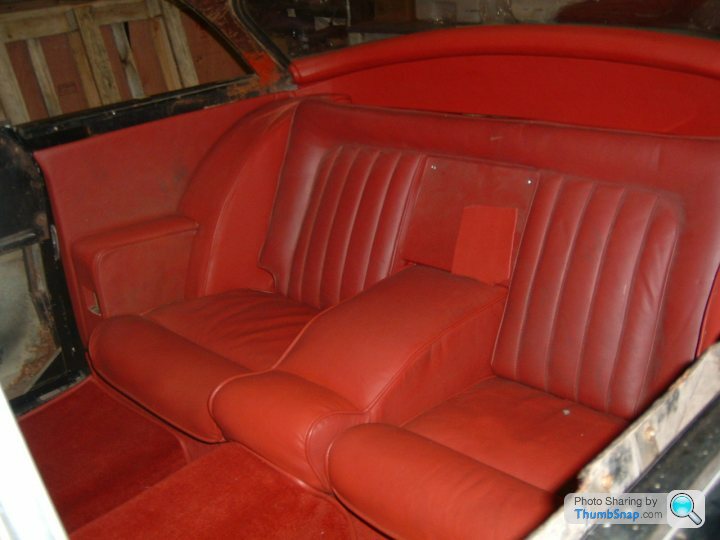
As it happened, I had had the leather seats and interior panels renovated very early on by Leather Restorations, as the owner was due to retire. The rest of the interior trim (some trim panels, the centre console and carpets) still needed completing. The car trimmer turned out to be a Polish chap living locally, called Rafel. What a find he was! He provided excellent quality at a very reasonable price, provided you were in no rush. During the day he trimmed coach seats for a local company. In the evenings, he did what he really loved...bespoke trimming to a much higher level for classic cars and hot rods.
Over the course of a few months Rafel created a new carpet set (the old carpets I'd retrieved from Geoff's mezzanine floor turned out to be from a Maserati 3500 GT, so were useless as a pattern!) along with all the other leather items that were required. He even managed to source another matching hide, which was no mean feat.
As everything was going pretty well, it was obviously time for the next set back!
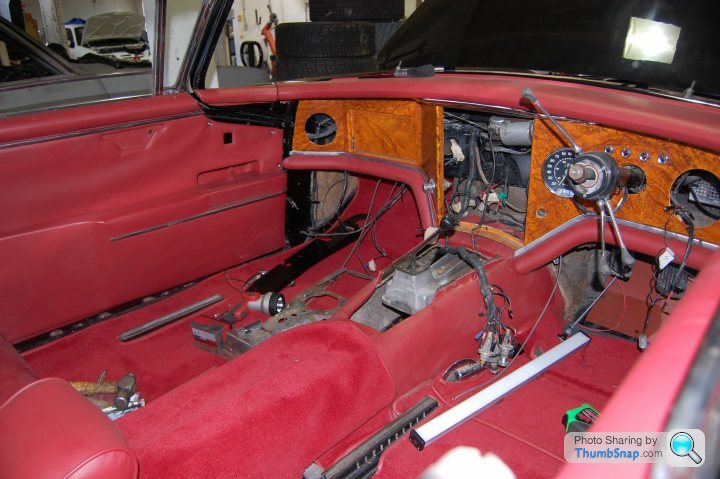
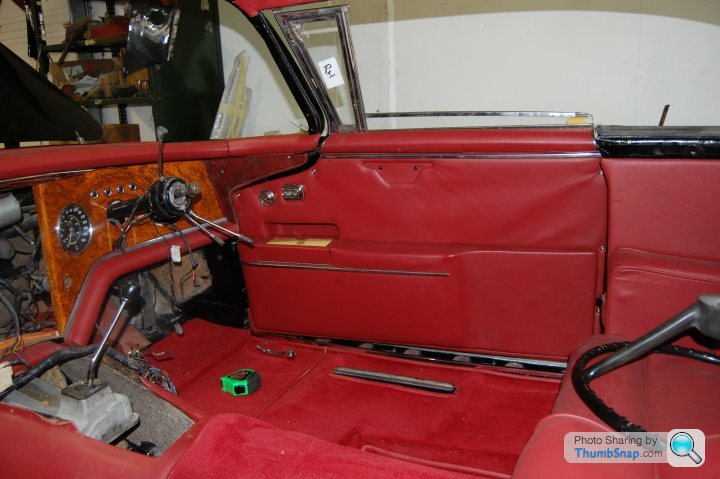
The transmission cover and centre console had been trial fitted several times, with minor adjustments to make it fit better. All the while, the central part of the dashboard had been out of the car to allow fitting up all the parts that sit behind the rest of the dash...things like the heater, fan motor and wiper mechanism. When it came to fitting it back in place, it simply wouldn't go; it seemed to have grown half an inch longer whilst out of the car! So, I could have either the centre console leather trim panel or the centre of the dashboard, but not both at the same time! To say Steve was perplexed was an understatement!

You can see in this picture that the bottom of the dashboard is hard up against the top of the transmission cover...there's a trim panel that surrounds the gear lever and carries a central ash tray that should slide in between the two. The second issue was that there wasn't enough depth for the bottom of the ash tray to clear the transmission cover, so it was sitting proud.
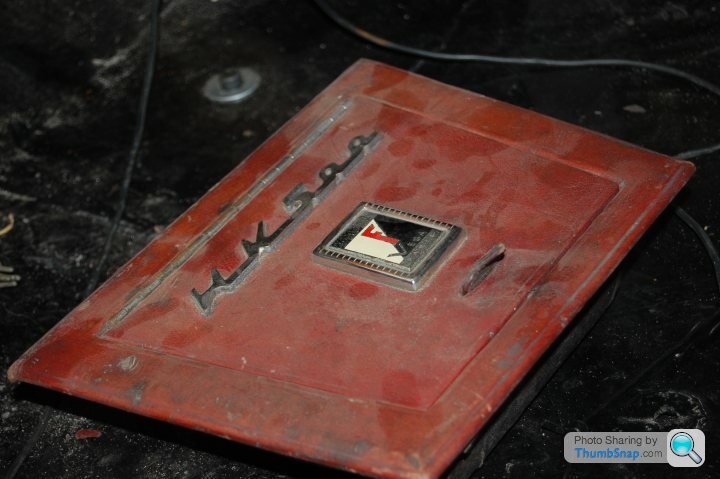
The ash tray is quite a large, swanky affair, so you couldn't exactly do without it! Here it is before it was retrimmed.
Setbacks like this do damage in two ways. Firstly, it saps your energy and this seems to be exponential the more times you have another go at it! Secondly, it has a financial impact. Going round in circles costs money!
Whilst mulling over the mystery of the growing dashboard, Steve started to trial fit the myriad of stainless trim pieces that surround the windows. All this was now very shiny, having been polished by Castle Chrome. It was also very sharp and stiff, so extreme care was needed to avoid damaging the paintwork. Just to add to the jeopardy, it was like playing 'Tetris'...trying to make all the various bits fit together was a nightmare.
At about this time a deal was struck to fix the paintwork damaged whilst the car body was being transported back from the paintshop. So, the whole car was dispatched back to Hayling Island for the remedial work to take place.
This gave Steve a break and a bit of thinking time to ponder the dashboard problem.
I'm going to have a break too...it's dinner time and a glass of Chianti beckons!
Before progressing further it might be worth a bit more detail about work to the engine. When I purchased the car in 1999, Geoff, the previous owner said that he had had the engine rebuilt, but had mislaid the invoice. Given the rather chaotic nature of his business, this was no surprise!
The first time the engine actually ran in my ownership was in August 2007, eight years after purchasing the car. At that point it ran without smoking and had good oil pressure. This was the only time I have driven the car...for about 30 yards! So, when we took the car apart in 2008 we assumed the engine internals were in good shape.
Apart from stripping back all the paint on the engine we took the opportunity to carry out some preventative maintenance. New core plugs were fitted along with a replacement water pump. All the galleries were inspected and were found to be pretty clean, even though there was some evidence of the car being run at some stage without antifreeze. New hoses were also purchased. As mentioned previously, the carbs were soda blasted, stripped and fitted with new seals and gaskets.
At the same time, the throttle linkage was re-engineered. At some stage in the past there had obviously been a problem and the linkage had been cobbled together. After a lot of searching I managed to find the correct parts on ebay in the US. Given that Carter carbs are as common in America as SUs are over here, the amount of time this took was somewhat surprising. However, persistence paid off...
There was an additional issue with the choke...there wasn't one! Clearly there were mounting points for an auto choke, but it had long gone! Again, searching the internet pulled up some interesting information and some really worthwhile contacts. I contacted a chap called Steve at carbs.net in the US (where else!). His website was a treasure trove of carb information. By checking the numbers on my carbs (2652S for the front and 2653S for the rear) against Steve's data, it confirmed my engine would have been fitted to a De Soto Adventurer. This fitted in with the paint colour on the block and also with the information in the Palawan Press Facel book.
In the end carbs.net couldn't come up with the correct choke parts but Steve put us in touch with another supplier and we took it from there.
The starter motor was also checked over and spruced up, as it would have been foolish to miss the opportunity with the engine out.
In the early 2000s I was given the contact details of someone in the Cotswolds who had owned an HK500 for many years. It shared garage space with a lovely Ferrari 330GTC...what a magnificent pair! A friend and I went to visit to take reference pictures for various aspects of my restoration. Having access to complete cars is so valuable and can save costly mistakes. Over the years, several Facel owners have given me access to their cars which has been very helpful.
Sadly, in this instance the owner's health was failing and he knew he would be selling the Facel before too long. On that basis he generously gave me a number of HK500 bits and pieces that were lying around in the garage, in case they might be of use. One of those was an old pedal box which yielded parts that enabled the renovation of mine.
Sadly, Charlie is long gone, but it is people like him that make the classic car scene such a wonderful thing. It is amazing how this common interest can quickly form a bond between people who hardly know each other.
Once the body was permanently attached to the chassis it began to feel as if I owned a car again, rather than a collection of bits that seemed to be spread across a number of counties. Slowly parts were were attached to the car.
The front grilles can be a real headache. The bodywork was hand built at the factory, so each car is unique in a way that mass production cars are not. My understanding is that all the trim parts were individually fitted to each car and originally bore the body number of that car. It was clear that my car no longer had all of its original trim, so when the body went off to be repaired and painted I sent the bright work (grille, bumpers and side trim) down to Gary. That way, he had a reference point when making the final adjustments to all the apertures. It might have been the opposite way round to the way in which the car was built, but it worked. I was relieved to find that the trim fitted really well!
Attention then turned to the interior. The rear seat cushions fit into their own individual wells either side of the transmission tunnel just ahead of the rear axle. Poking around in one of these I found some pretty agricultural welding that was part of the original body restoration that had taken place before I bought the car. Somehow, we had all missed it, but now the car interior metalwork had been tidied up and painted, it stuck out like a sore thumb! Luckily, it was in a hidden area which could be easily masked from the rest of the car, so Steve was able to tidy it up without much trouble. However, everything like this extends the time line and adds cost!
Having overcome that setback, it was time to concentrate on the interior.
Whilst picking up a Chinese take away in Brackley a friend of mine had idly looked at the notice board where local trades people could put their cards to advertise their businesses. He saw one for a classic car trimmer and immediately thought of the Facel.
As it happened, I had had the leather seats and interior panels renovated very early on by Leather Restorations, as the owner was due to retire. The rest of the interior trim (some trim panels, the centre console and carpets) still needed completing. The car trimmer turned out to be a Polish chap living locally, called Rafel. What a find he was! He provided excellent quality at a very reasonable price, provided you were in no rush. During the day he trimmed coach seats for a local company. In the evenings, he did what he really loved...bespoke trimming to a much higher level for classic cars and hot rods.
Over the course of a few months Rafel created a new carpet set (the old carpets I'd retrieved from Geoff's mezzanine floor turned out to be from a Maserati 3500 GT, so were useless as a pattern!) along with all the other leather items that were required. He even managed to source another matching hide, which was no mean feat.
As everything was going pretty well, it was obviously time for the next set back!
The transmission cover and centre console had been trial fitted several times, with minor adjustments to make it fit better. All the while, the central part of the dashboard had been out of the car to allow fitting up all the parts that sit behind the rest of the dash...things like the heater, fan motor and wiper mechanism. When it came to fitting it back in place, it simply wouldn't go; it seemed to have grown half an inch longer whilst out of the car! So, I could have either the centre console leather trim panel or the centre of the dashboard, but not both at the same time! To say Steve was perplexed was an understatement!
You can see in this picture that the bottom of the dashboard is hard up against the top of the transmission cover...there's a trim panel that surrounds the gear lever and carries a central ash tray that should slide in between the two. The second issue was that there wasn't enough depth for the bottom of the ash tray to clear the transmission cover, so it was sitting proud.
The ash tray is quite a large, swanky affair, so you couldn't exactly do without it! Here it is before it was retrimmed.
Setbacks like this do damage in two ways. Firstly, it saps your energy and this seems to be exponential the more times you have another go at it! Secondly, it has a financial impact. Going round in circles costs money!
Whilst mulling over the mystery of the growing dashboard, Steve started to trial fit the myriad of stainless trim pieces that surround the windows. All this was now very shiny, having been polished by Castle Chrome. It was also very sharp and stiff, so extreme care was needed to avoid damaging the paintwork. Just to add to the jeopardy, it was like playing 'Tetris'...trying to make all the various bits fit together was a nightmare.
At about this time a deal was struck to fix the paintwork damaged whilst the car body was being transported back from the paintshop. So, the whole car was dispatched back to Hayling Island for the remedial work to take place.
This gave Steve a break and a bit of thinking time to ponder the dashboard problem.
I'm going to have a break too...it's dinner time and a glass of Chianti beckons!
RDMcG said:
It had a record player installed!. this thing would play one 45rmp record at a time.
Not exactly iTunes.
The first time I came across an in car record player was at the Volkswagen museum in Wolfsburg. They had a '59 Cadillac Eldorado convertible with one that slid out from under the dash.Not exactly iTunes.
Presumably you could only use it when parked, unless you were on a very straight, bump free road?!
Rumdoodle said:
Look, you're clearly not serious about this project. You should sell it to me before it escalates.
I fear that 23 years and still not finished says I'm not as serious about it as I could have been! However, there is only so much you can do whilst earning enough money to pay the cheques that have accompanied this project!Believe me, there are some days when I would snap your hand off

Spinakerr said:
Rumdoodle said:
Look, you're clearly not serious about this project. You should sell it to me before it escalates.
This really made me chuckle having caught up on some of the recent pages!Truly iconic car, wonderful to see all the careful work restoring it.
Thanks also for the positive comment...it really is a labour of love.
Who'd have thought we would be on the verge of 10 pages with something as old and left field as a Facel Vega!
You've got to love the depth of interest that lurks on this site...Alvis Stalwart, Rolls 20/25, Citroen SM and loads of other mad things like the McLaren Caddy and V8 2CV.
Thank you everyone for your interest in this long term saga; I'm genuinely surprised
You've got to love the depth of interest that lurks on this site...Alvis Stalwart, Rolls 20/25, Citroen SM and loads of other mad things like the McLaren Caddy and V8 2CV.
Thank you everyone for your interest in this long term saga; I'm genuinely surprised
So, on with the story...
Just before the car went back to Hayling Island to have the paint damage repaired, Steve managed to start the car briefly to check the engine's vital signs. The biggest issue was a radiator that wasn't keen on keeping water on the inside!
So, before the car was dispatched the radiator came out and was sent off for a quote to re-core it. Cooling on all V8 Facels has become somewhat marginal over time. I'm sure they must have been fine when new as they were used as everyday cars in some pretty hot places, but the inevitable silting up and corroding of water galleries in the block together with a reduction in radiator efficiency over time does a big V8 in a confined space no favours at all. Other owners had warned me that this might be a potential problem.
The Facel ll was worse than the HK500. A design flaw in the radiator allows much of the water returning from the engine to flow straight back without going through the core at all! Apparenty, this can be fixed by installing a baffle that forces the coolant to flow through the core rather than around it, but the cooling is still said to be a bit marginal.
In the case of the HK, there is very little fan shrouding so overheating issues can occur when stationary or in slow traffic. When the quote for a re-core came back it was more than half the cost of having a bespoke aluminium radiator made locally by one of the F1 suppliers. On that basis, I went for broke and ordered a high efficiency aluminium one in the hope of preventing any cooling issues further down the line.
This was manufactured whilst the car was away, using the original radiator as a template.
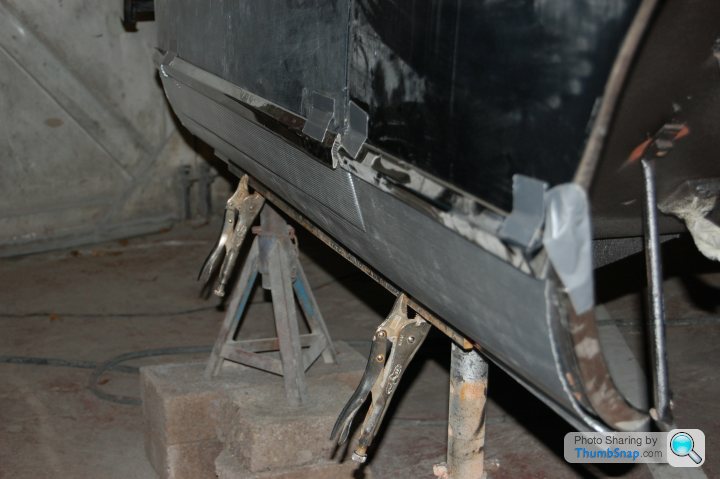
Seeing that the car was going back to Gary, it made sense for him to fit the doors, boot and bonnet. As part of this process he would also fit the finned aluminium sill covers, which he had already cut to shape and trial fitted. The covers are a potential corrosion problem both from the standpoint of retaining any water that penetrates between the trim and the bodywork and because of the possibility of electrolytic reaction between the aluminium trim and the steel body.
Having taken advice from others I decided that coating the bodywork and the back of the trim panels with Waxoyl was probably the best option as it would repel any water whilst not solidifying. Of course, anything is better than the way the car left the factory, as they did absolutely nothing in this regard. I'm not quite sure what will happen to the Waxoyl if the car is left all day in strong summer sunshine, but I guess I'll find out in due course! How hard can it be to remove half a litre of the stuff from your driveway?! (Yeah, I know, it's a right pain!)
A few weeks later and it was off back down to the south coast to see the results.
Fitting the sill trims isn't easy as you want the door gaps as tight as possible, but the trim needs to be bent around the bottom of the door, so there needs to be enough clearance to accommodate that. As you can see (sorry for the sideways picture...I've just spent 15 minutes trying to figure out how to rotate it) the door fits pretty well and the stainless trim lines up down the side of the car. The finishers that fit to the wheel arches and along the base of the sill are not in place in the photo.
Gary's work to repair the damaged paint was terrific. As I'd hoped, you would never know.
Pretty soon the car was back with Steve, this time having been transported without incident.
The next few months were consumed in sourcing and then fitting all the door, bonnet and boot seals, many of which are unique to the HK500. As you will immediately guess, the fact that there were only 500 or so cars in the first place and not all of them have survived will mean demand for these seals is very limited. Ultra low volume production means prices are not for the faint hearted. A complete set of seals, including windows was around €1700+VAT last time I looked, several years ago. That's a lot of money for an assortment of squishy rubber, but it just reflects the production cost per unit.
The thing is, I know that these parts are mainly sourced through UK suppliers. I spent hours on the web going through the catalogues of the various companies checking to see if the profiles used on the Facel were common to any other cars. I'll save anyone else the time...many of the rubber profiles seem to be unique. So, hats off to Amicale Facel Holland for remanufacturing these parts in tiny numbers. Without them it would be so much more difficult to bring a Facel back from the dead.
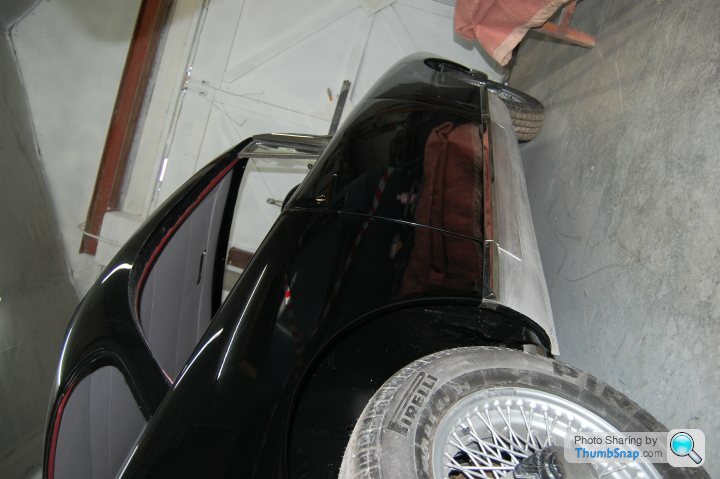
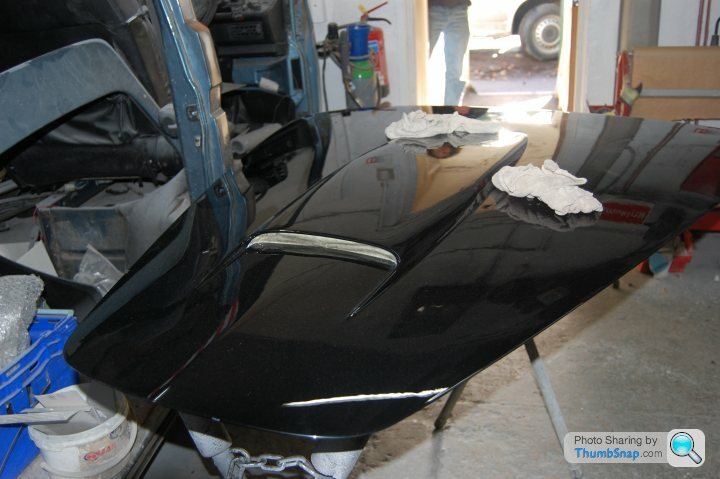
At this time we also tried to resolve the issue of the rear lights. Cars destined for the USA had different rear lights from those going to Europe and the rest of the world. This is the European set up, with the distinctive inserts that light up a letter 'V' for Vega at night. (Sorry, I've given up with the sideways nonsense!)
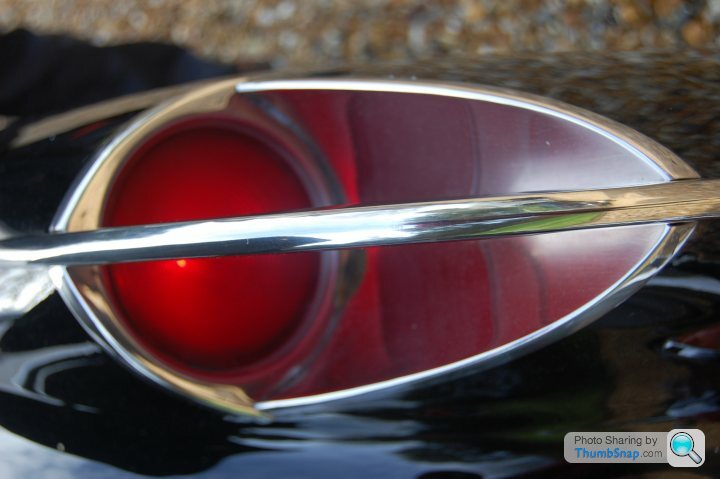
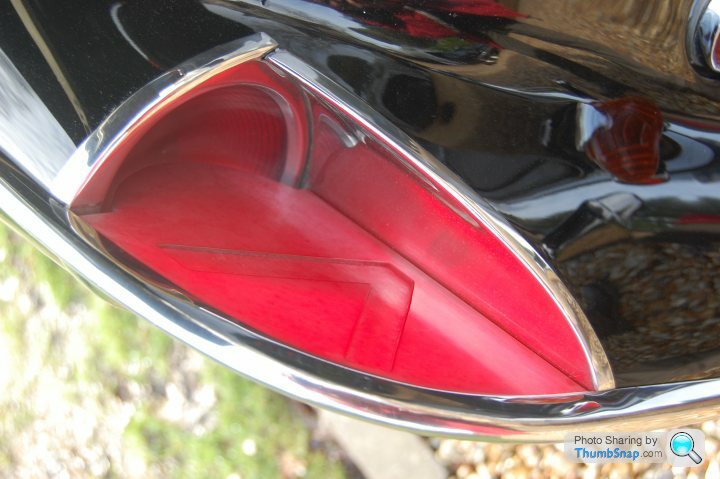
My car was missing both the red perspex 'V' pieces and the stainless trim that runs along the edge of the rear wing to hold them in place. After years of searching Ian Webb, who had been involved with Facels for years let me know that he had the parts and would sell them to me at a reasonable price. To say I bit his hand off is an understatement, as my car was originally supplied with Euro lights, but they had gone missing years ago (and were probably still on that mezzanine floor in Kettering)!
The American lights do without the 'V's, but have a much more ornate lens sourced from a 1957 Chrysler Imperial. Typical of Facel, these lights were one year only and on one model only, so trying to get hold of them now isn't easy. Mine came all the way from Australia via Ebay!
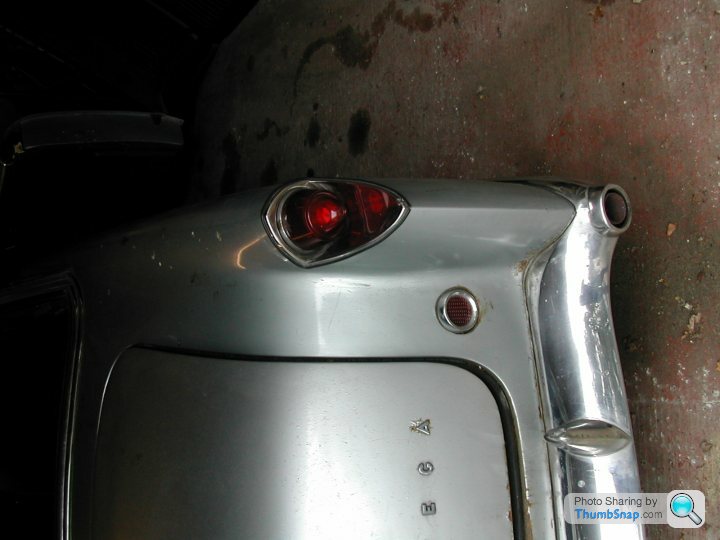
To complicate matters the stainless rear light trims that hold the lenses in place are different for American and Euro cars. Those for Europe have two cut outs at each end to accept the edges of the trim running over the wing, the American ones don't.
By now I had amassed a complete pair of the American and European lights. My plan had been to go 'American' as I thought I'd never find the rear wing trims necessary for the European lights. The (easy) decision was taken to go the European route and Steve set about making them fit.
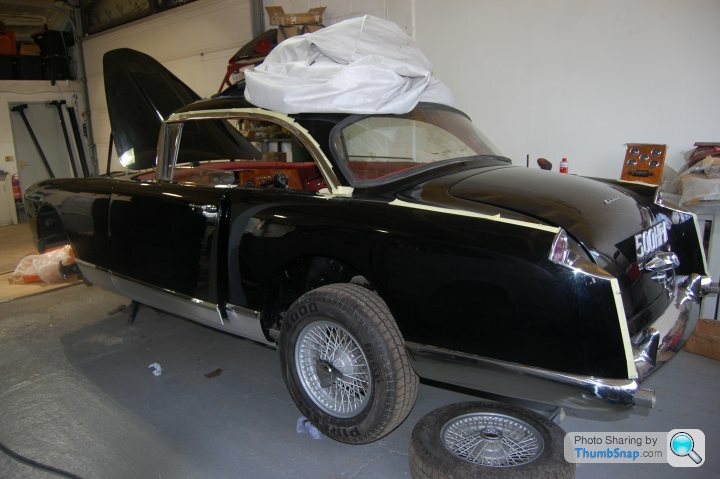
In the meantime battle with the dashboard was resumed! Apart from the mysterious growing centre section it was putting up a fight on a number of fronts. The wiper motor positioning is very tight and the long metal levers that activate the wipers themselves have a mind of their own. It is almost impossible to set them up so that they don't rub against something. I'm sure part of the problem is that there is inevitably some play in all the joints.
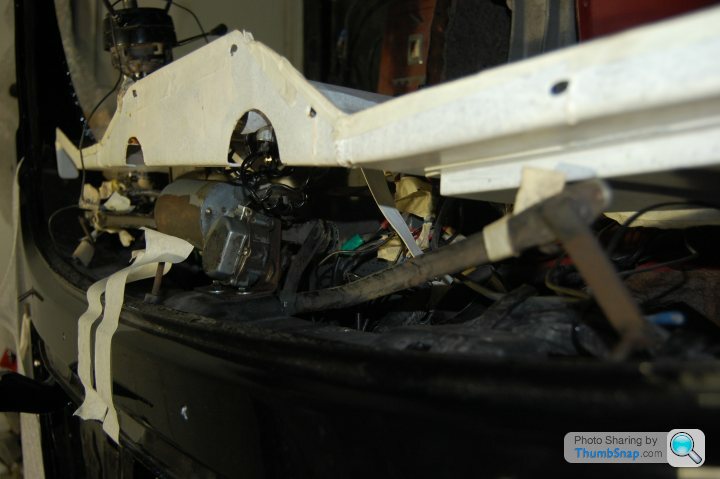
The back of the ammeter is perilously close to other metal parts behind the dash and I'm told shorting of ammeters is one of the most common causes of electrical fires in older cars. I didn't want to take any chances in that area!
Finally, the rev counter was insistent on trying to run backwards, which had Steve perplexed. As it was Beaulieu Autojumble time of year, I set off down south to try and find someone on one of the stands that might have a suitable gearbox to change the direction of the drive off the back of the dynamo. Although I found a couple of parts that would do the job, they were from 1930s cars and were really too big to fit in the available space, so I came home empty handed (well, empty handed in that regard...I bought a load of other stuff I didn't need, as is usually the case with Beaulieu)!
With all these issues mounting up, I think Steve was beginning to think he was never going to get the car over the finishing line, simply because he didn't have the specialist Facel knowledge needed from this point on. I was also coming to the same conclusion, so Steve and I agreed the car needed to go to someone who had wrestled with Facels before.
As you can imagine, these people are the human equivalent of hen's teeth.
Right back at the beginning of the project, Hans Ruhe of Amicale Facel Holland had offered to completely restore my car for me for the princely sum of £20,000. With hindsight, that would have been the bargain of the century, but at the time it seemed like an awful lot of money! Hans had since teamed up with another restoration company called Classic Job and between them they are the 'go to' people for all things Facel, from the supply of small parts right through to complete restorations. In many ways, they were the obvious choice.
There were a couple of other people I'd come across in the UK who had worked on, or were working on Facels. The common theme in feedback from others was that they were all glacially slow, so it could be a case of out of the frying pan, into the fire.
And then there was Ian Webb.
I'd got to know Ian quite well over the years. He hadn't just worked on the odd Facel, he'd restored a number of them and at one time, it was pretty much all he did. He'd been out of the picture for some years working for a luxury boat manufacturer, but had returned and set up his own restoration business. At the time I contacted him, he already had two Facels on the go.
So, after a couple of conversations Ian agreed to take my car on and get it finished. On 13th December 2016 the car was packed into Steve's transporter and taken down to Ian's business in Cornwall.
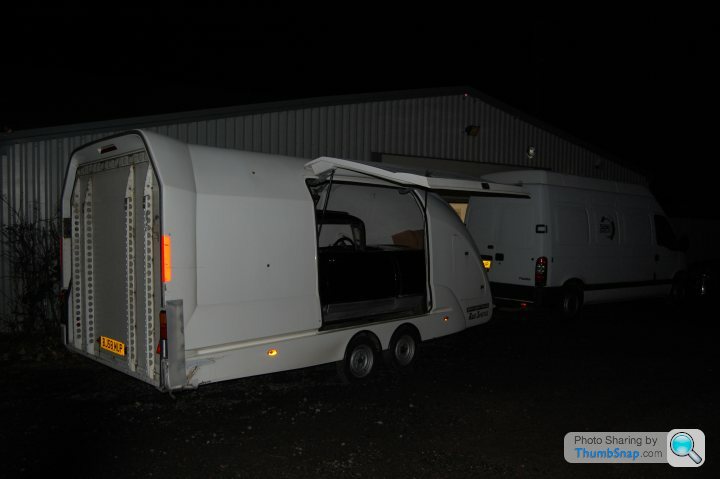
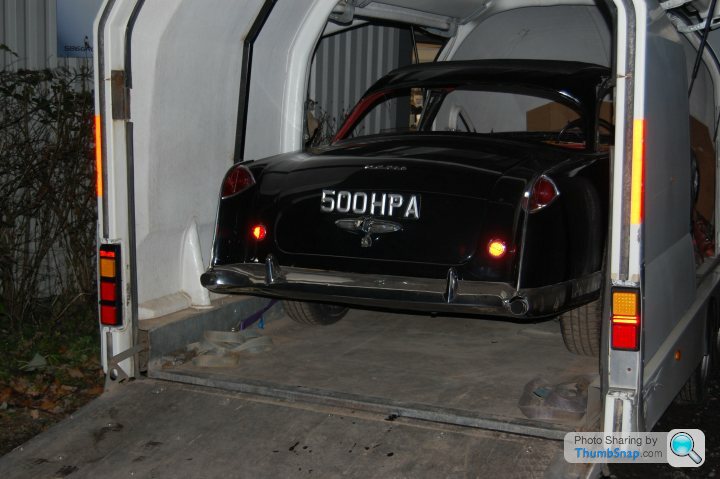
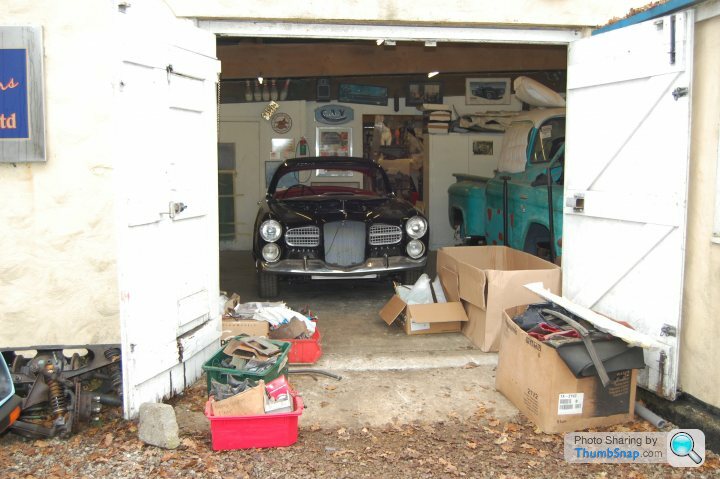
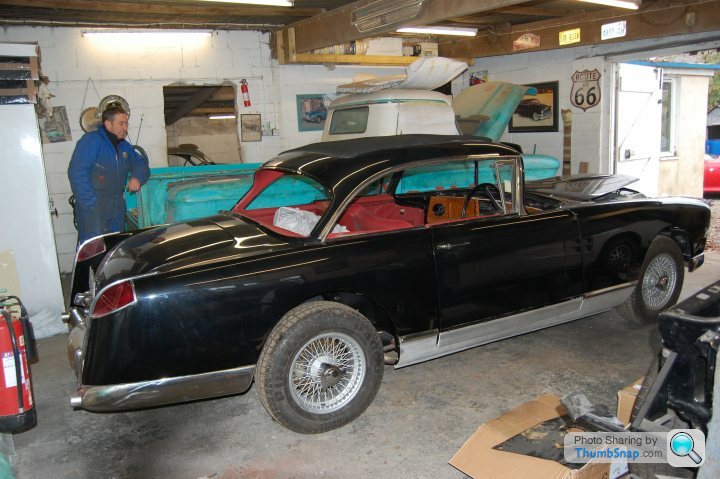
Ian had agreed over the phone that a timescale of six months for completion was realistic, so I was in high spirits as 2016 turned into 2017.
Having specific knowledge of a make of car is so valuable. On the day we took the car down I mentioned the rev counter problem to Ian. After about five minutes searching in the various boxes of bits that accompanied the car he came back with a small metal piece in his hand...the gearbox for the rev counter drive. It had been there all along, we just didn't know what we were looking for.
But, I was also aware of a potential issue. Handing over a partly finished car could be leaving myself wide open to a lot of reworking of things that were already 'fixed'. Time would tell.
Just before the car went back to Hayling Island to have the paint damage repaired, Steve managed to start the car briefly to check the engine's vital signs. The biggest issue was a radiator that wasn't keen on keeping water on the inside!
So, before the car was dispatched the radiator came out and was sent off for a quote to re-core it. Cooling on all V8 Facels has become somewhat marginal over time. I'm sure they must have been fine when new as they were used as everyday cars in some pretty hot places, but the inevitable silting up and corroding of water galleries in the block together with a reduction in radiator efficiency over time does a big V8 in a confined space no favours at all. Other owners had warned me that this might be a potential problem.
The Facel ll was worse than the HK500. A design flaw in the radiator allows much of the water returning from the engine to flow straight back without going through the core at all! Apparenty, this can be fixed by installing a baffle that forces the coolant to flow through the core rather than around it, but the cooling is still said to be a bit marginal.
In the case of the HK, there is very little fan shrouding so overheating issues can occur when stationary or in slow traffic. When the quote for a re-core came back it was more than half the cost of having a bespoke aluminium radiator made locally by one of the F1 suppliers. On that basis, I went for broke and ordered a high efficiency aluminium one in the hope of preventing any cooling issues further down the line.
This was manufactured whilst the car was away, using the original radiator as a template.
Seeing that the car was going back to Gary, it made sense for him to fit the doors, boot and bonnet. As part of this process he would also fit the finned aluminium sill covers, which he had already cut to shape and trial fitted. The covers are a potential corrosion problem both from the standpoint of retaining any water that penetrates between the trim and the bodywork and because of the possibility of electrolytic reaction between the aluminium trim and the steel body.
Having taken advice from others I decided that coating the bodywork and the back of the trim panels with Waxoyl was probably the best option as it would repel any water whilst not solidifying. Of course, anything is better than the way the car left the factory, as they did absolutely nothing in this regard. I'm not quite sure what will happen to the Waxoyl if the car is left all day in strong summer sunshine, but I guess I'll find out in due course! How hard can it be to remove half a litre of the stuff from your driveway?! (Yeah, I know, it's a right pain!)
A few weeks later and it was off back down to the south coast to see the results.
Fitting the sill trims isn't easy as you want the door gaps as tight as possible, but the trim needs to be bent around the bottom of the door, so there needs to be enough clearance to accommodate that. As you can see (sorry for the sideways picture...I've just spent 15 minutes trying to figure out how to rotate it) the door fits pretty well and the stainless trim lines up down the side of the car. The finishers that fit to the wheel arches and along the base of the sill are not in place in the photo.
Gary's work to repair the damaged paint was terrific. As I'd hoped, you would never know.
Pretty soon the car was back with Steve, this time having been transported without incident.
The next few months were consumed in sourcing and then fitting all the door, bonnet and boot seals, many of which are unique to the HK500. As you will immediately guess, the fact that there were only 500 or so cars in the first place and not all of them have survived will mean demand for these seals is very limited. Ultra low volume production means prices are not for the faint hearted. A complete set of seals, including windows was around €1700+VAT last time I looked, several years ago. That's a lot of money for an assortment of squishy rubber, but it just reflects the production cost per unit.
The thing is, I know that these parts are mainly sourced through UK suppliers. I spent hours on the web going through the catalogues of the various companies checking to see if the profiles used on the Facel were common to any other cars. I'll save anyone else the time...many of the rubber profiles seem to be unique. So, hats off to Amicale Facel Holland for remanufacturing these parts in tiny numbers. Without them it would be so much more difficult to bring a Facel back from the dead.
At this time we also tried to resolve the issue of the rear lights. Cars destined for the USA had different rear lights from those going to Europe and the rest of the world. This is the European set up, with the distinctive inserts that light up a letter 'V' for Vega at night. (Sorry, I've given up with the sideways nonsense!)
My car was missing both the red perspex 'V' pieces and the stainless trim that runs along the edge of the rear wing to hold them in place. After years of searching Ian Webb, who had been involved with Facels for years let me know that he had the parts and would sell them to me at a reasonable price. To say I bit his hand off is an understatement, as my car was originally supplied with Euro lights, but they had gone missing years ago (and were probably still on that mezzanine floor in Kettering)!
The American lights do without the 'V's, but have a much more ornate lens sourced from a 1957 Chrysler Imperial. Typical of Facel, these lights were one year only and on one model only, so trying to get hold of them now isn't easy. Mine came all the way from Australia via Ebay!
To complicate matters the stainless rear light trims that hold the lenses in place are different for American and Euro cars. Those for Europe have two cut outs at each end to accept the edges of the trim running over the wing, the American ones don't.
By now I had amassed a complete pair of the American and European lights. My plan had been to go 'American' as I thought I'd never find the rear wing trims necessary for the European lights. The (easy) decision was taken to go the European route and Steve set about making them fit.
In the meantime battle with the dashboard was resumed! Apart from the mysterious growing centre section it was putting up a fight on a number of fronts. The wiper motor positioning is very tight and the long metal levers that activate the wipers themselves have a mind of their own. It is almost impossible to set them up so that they don't rub against something. I'm sure part of the problem is that there is inevitably some play in all the joints.
The back of the ammeter is perilously close to other metal parts behind the dash and I'm told shorting of ammeters is one of the most common causes of electrical fires in older cars. I didn't want to take any chances in that area!
Finally, the rev counter was insistent on trying to run backwards, which had Steve perplexed. As it was Beaulieu Autojumble time of year, I set off down south to try and find someone on one of the stands that might have a suitable gearbox to change the direction of the drive off the back of the dynamo. Although I found a couple of parts that would do the job, they were from 1930s cars and were really too big to fit in the available space, so I came home empty handed (well, empty handed in that regard...I bought a load of other stuff I didn't need, as is usually the case with Beaulieu)!
With all these issues mounting up, I think Steve was beginning to think he was never going to get the car over the finishing line, simply because he didn't have the specialist Facel knowledge needed from this point on. I was also coming to the same conclusion, so Steve and I agreed the car needed to go to someone who had wrestled with Facels before.
As you can imagine, these people are the human equivalent of hen's teeth.
Right back at the beginning of the project, Hans Ruhe of Amicale Facel Holland had offered to completely restore my car for me for the princely sum of £20,000. With hindsight, that would have been the bargain of the century, but at the time it seemed like an awful lot of money! Hans had since teamed up with another restoration company called Classic Job and between them they are the 'go to' people for all things Facel, from the supply of small parts right through to complete restorations. In many ways, they were the obvious choice.
There were a couple of other people I'd come across in the UK who had worked on, or were working on Facels. The common theme in feedback from others was that they were all glacially slow, so it could be a case of out of the frying pan, into the fire.
And then there was Ian Webb.
I'd got to know Ian quite well over the years. He hadn't just worked on the odd Facel, he'd restored a number of them and at one time, it was pretty much all he did. He'd been out of the picture for some years working for a luxury boat manufacturer, but had returned and set up his own restoration business. At the time I contacted him, he already had two Facels on the go.
So, after a couple of conversations Ian agreed to take my car on and get it finished. On 13th December 2016 the car was packed into Steve's transporter and taken down to Ian's business in Cornwall.
Ian had agreed over the phone that a timescale of six months for completion was realistic, so I was in high spirits as 2016 turned into 2017.
Having specific knowledge of a make of car is so valuable. On the day we took the car down I mentioned the rev counter problem to Ian. After about five minutes searching in the various boxes of bits that accompanied the car he came back with a small metal piece in his hand...the gearbox for the rev counter drive. It had been there all along, we just didn't know what we were looking for.
But, I was also aware of a potential issue. Handing over a partly finished car could be leaving myself wide open to a lot of reworking of things that were already 'fixed'. Time would tell.
Green2JZWagon said:
Just wanted to join the chorus and say how much i enjoyed reading this entire epic, at times agonizing but altogether glorious thread, you are doing something very special here. What a car!
Heres those pictures rotated to be portrait
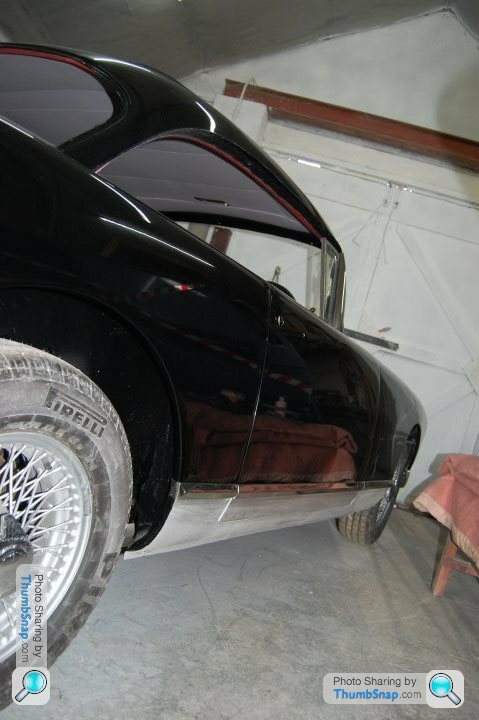
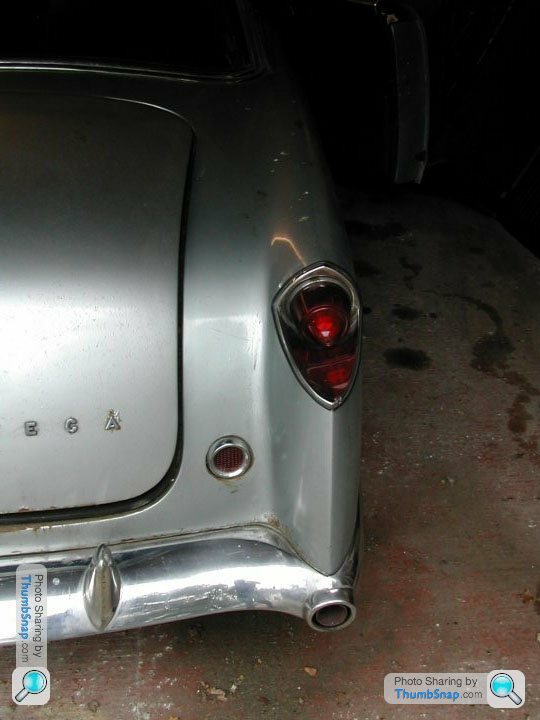
How did you do that!???Heres those pictures rotated to be portrait
Edited by Green2JZWagon on Thursday 23 February 18:18
Edited by Green2JZWagon on Thursday 23 February 18:18
...and thanks for the kind words, it's much appreciated.
AW111 said:
theadman said:
williamp said:
This is getting exciting!!!
Please don't get too excited...there's another six years to go yet It took six months to get the car finished to perfection, and you've spent the subsequent 5 1/2 years happily driving it?
Gassing Station | Readers' Cars | Top of Page | What's New | My Stuff