[Project Post] Citroen AX SPORT 16v [lots of pics]
Discussion


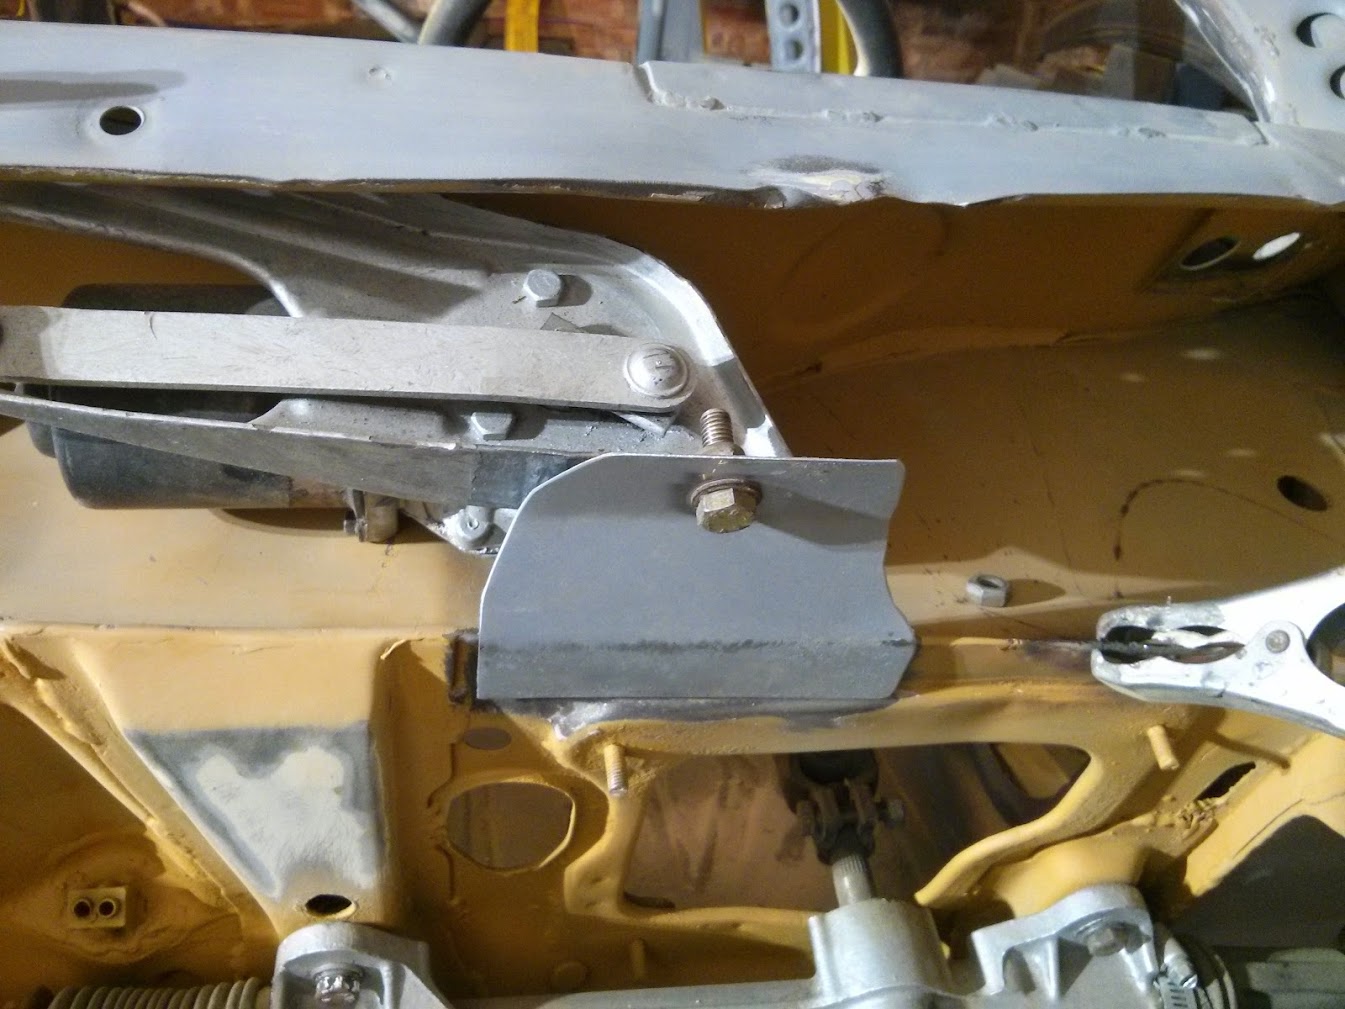
They're actually from Citroen. I can't remember the part numbers off the top of my head but they are about 9 quid each. Bargain! There are outer plates too which weld to the outer side of inhaler wing to the end of the kidney plate. I believe they re much more money though.
EDIT:
Here's the part numbers buddy

EDIT:
Here's the part numbers buddy
Edited by Jessop on Tuesday 26th November 11:15

Jessop said:
They're actually from Citroen. I can't remember the part numbers off the top of my head but they are about 9 quid each. Bargain! There are outer plates too which weld to the outer side of inhaler wing to the end of the kidney plate. I believe they re much more money though.
EDIT:
Here's the part numbers buddy
Thanks for that. Might have to look some up for the Saxo!EDIT:
Here's the part numbers buddy
Edited by Jessop on Tuesday 26th November 11:15
Been away for the best part of 3 weeks but had a few hours in the unit today to do a bit. Made a start fixing the rusty bits discovered after stripping the underseal away.

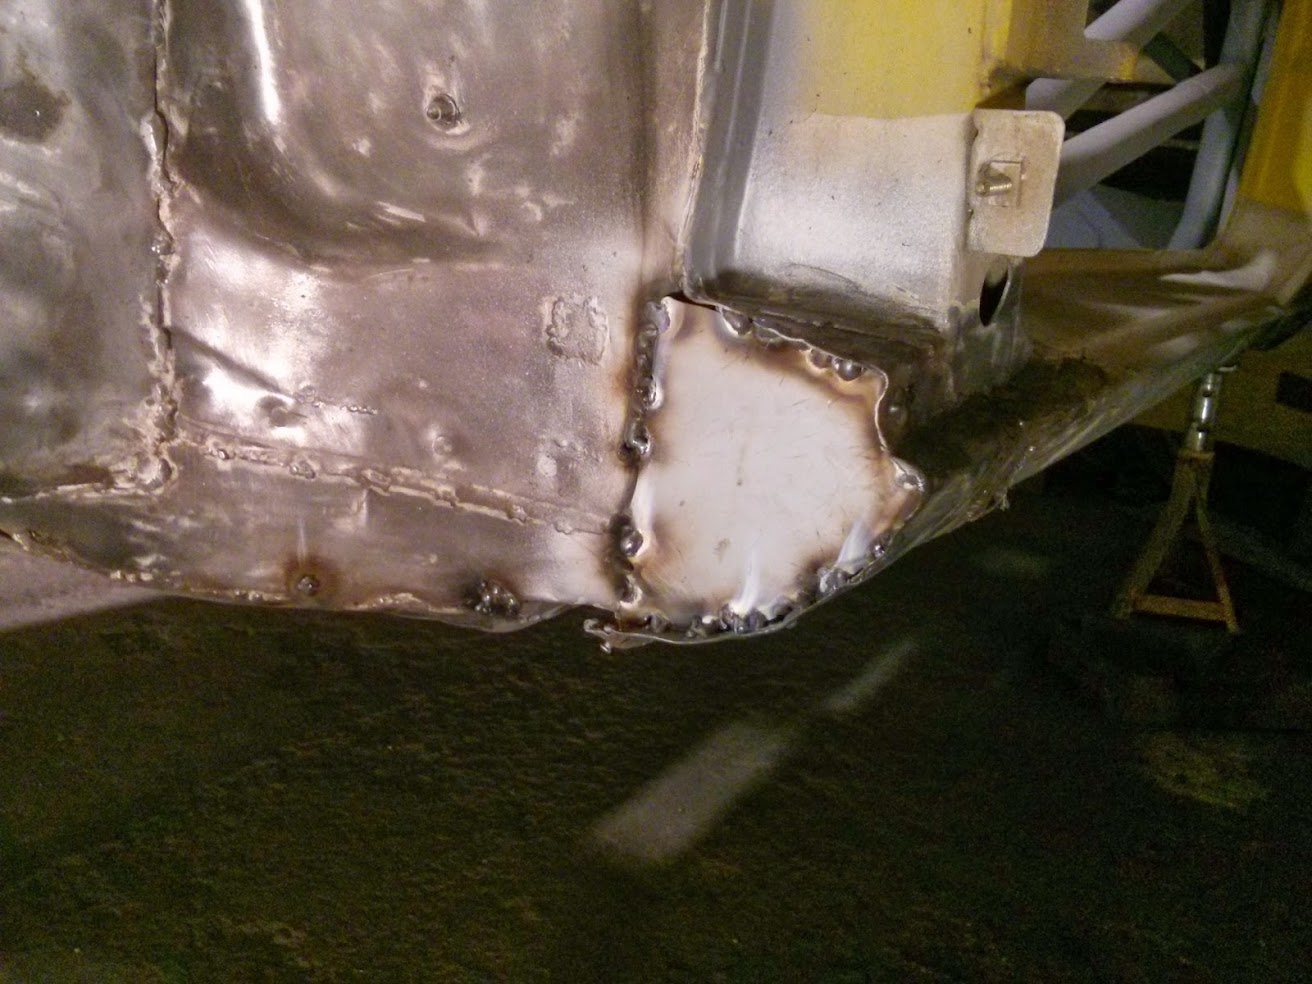

Patched the two holes visible from the inside through the offside sill too. Pics above give you the idea.
Functional
Will go over with seam seal once ive got some zinc primer on it.
Will hopefully get the welding finished off Thursday when i'm next down there.
Patched the two holes visible from the inside through the offside sill too. Pics above give you the idea.
Functional
Will go over with seam seal once ive got some zinc primer on it.
Will hopefully get the welding finished off Thursday when i'm next down there.
Another few hours in there today, managed to finish welding a few more random holes up and get the kidney plate strengthening bits in. Need to ideally make sure there's a good bit of seam seal and underseal on to prevent any water getting behind them in future.
Stripped the sill's back and mostly finished the rear arches. Absolute nightmare they are. grinding upside down, cant get it into the corners etc. It looks okay though might have to leave some of the original stone chip on and remove all the waxoyl with thinners and go over it with the new stuff.
I've managed to source a new unit too, 5 minutes from home so have much, much more regular access & updates. It's currently an hour drive away (each way) so only get chance to get down there on my days off as it stands.
Cannot wait to see it with some fresh paint on it and bring it back home.
Loading the car up with boxes of bits to bring home to the new unit (brakes, manifold, satchshift, fuel system, gauges etc) has me excited for bolting it together !!
I wonder if Santa will bring me a GTX2860 this year :/
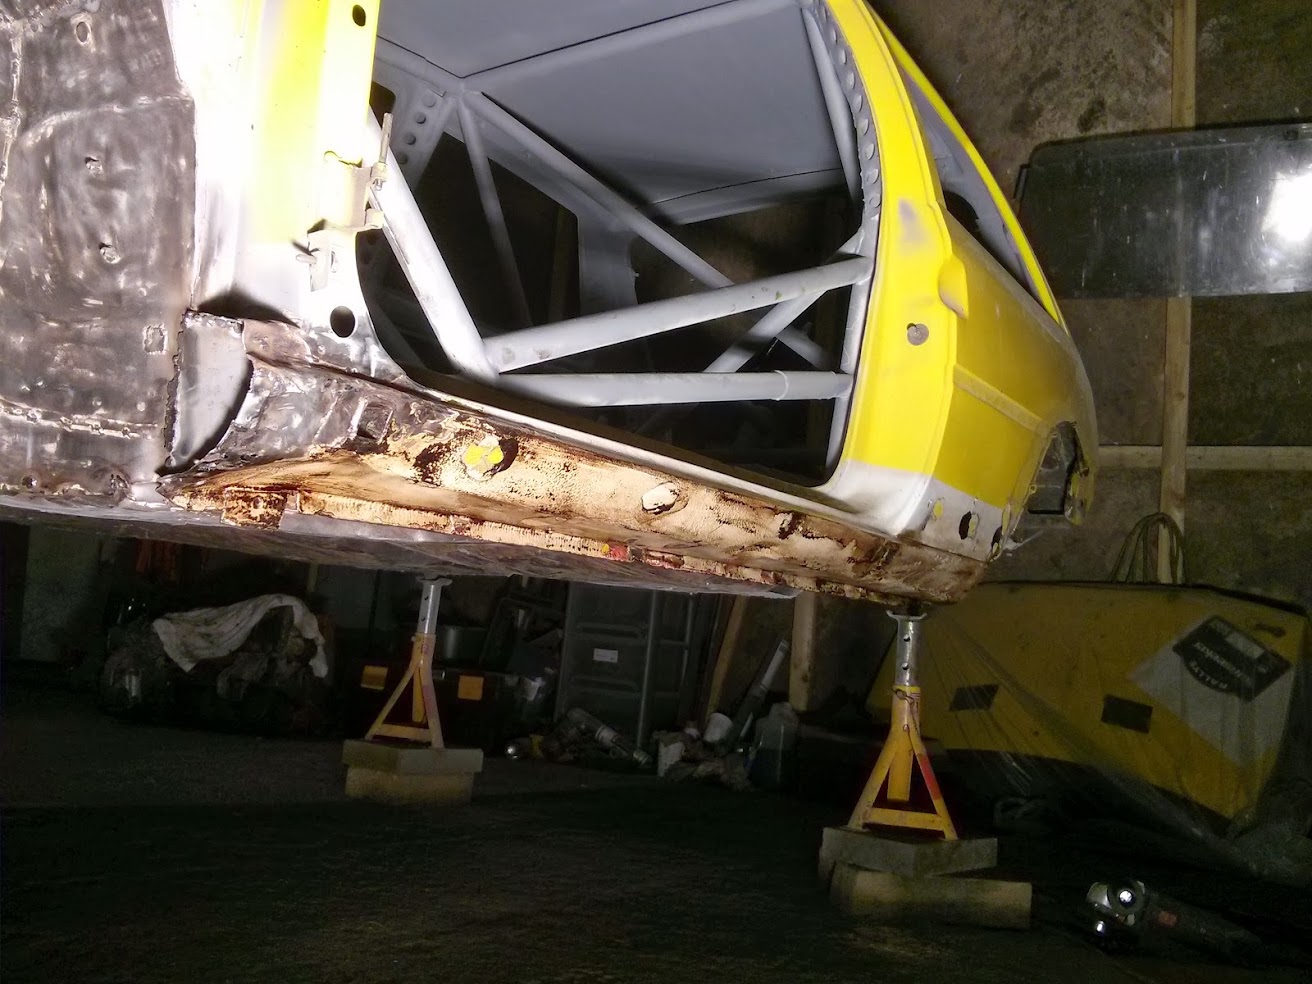
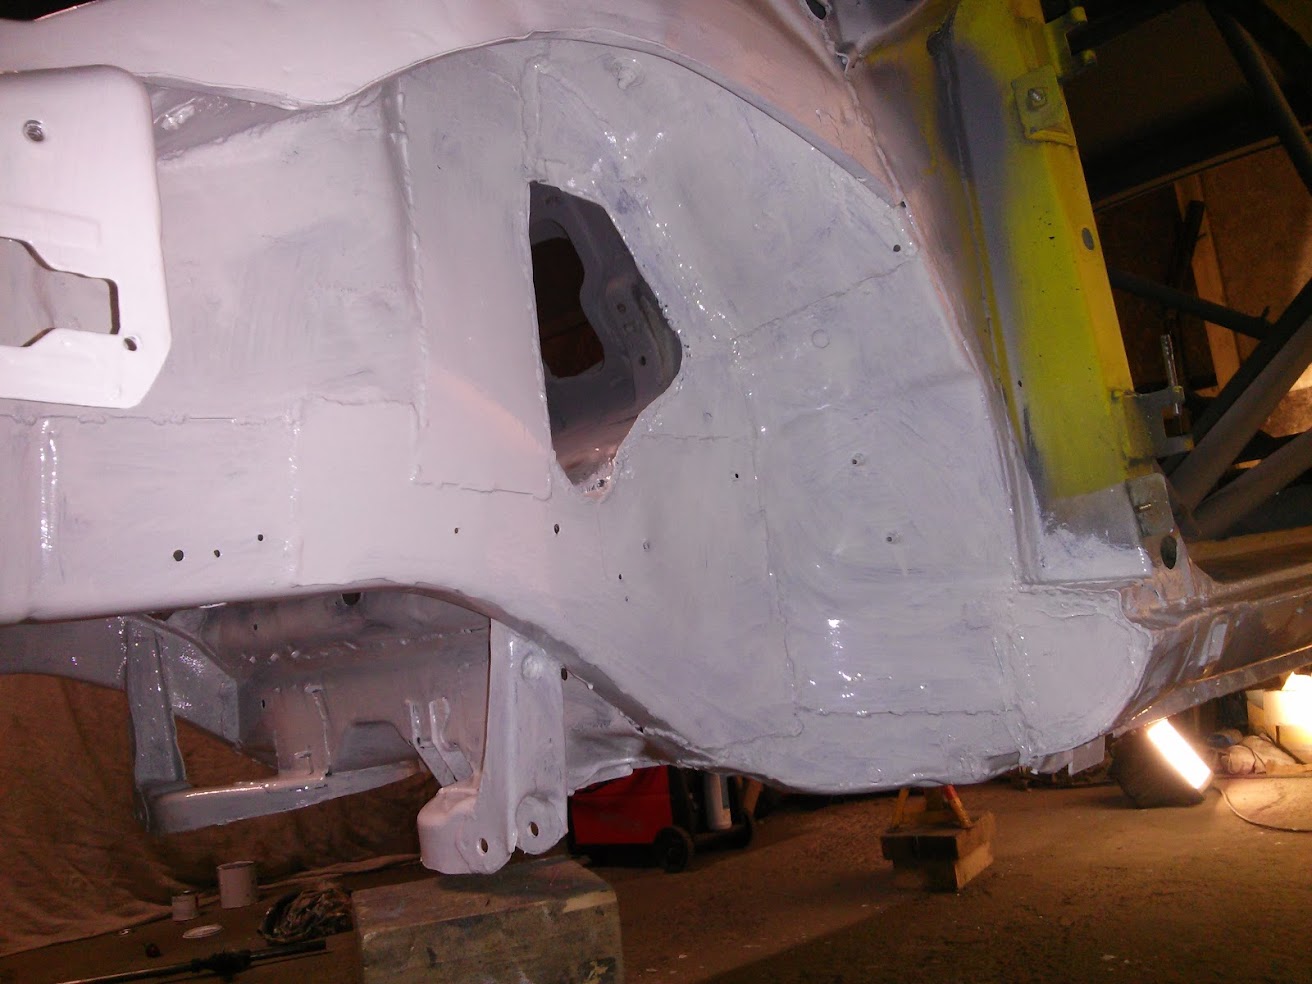
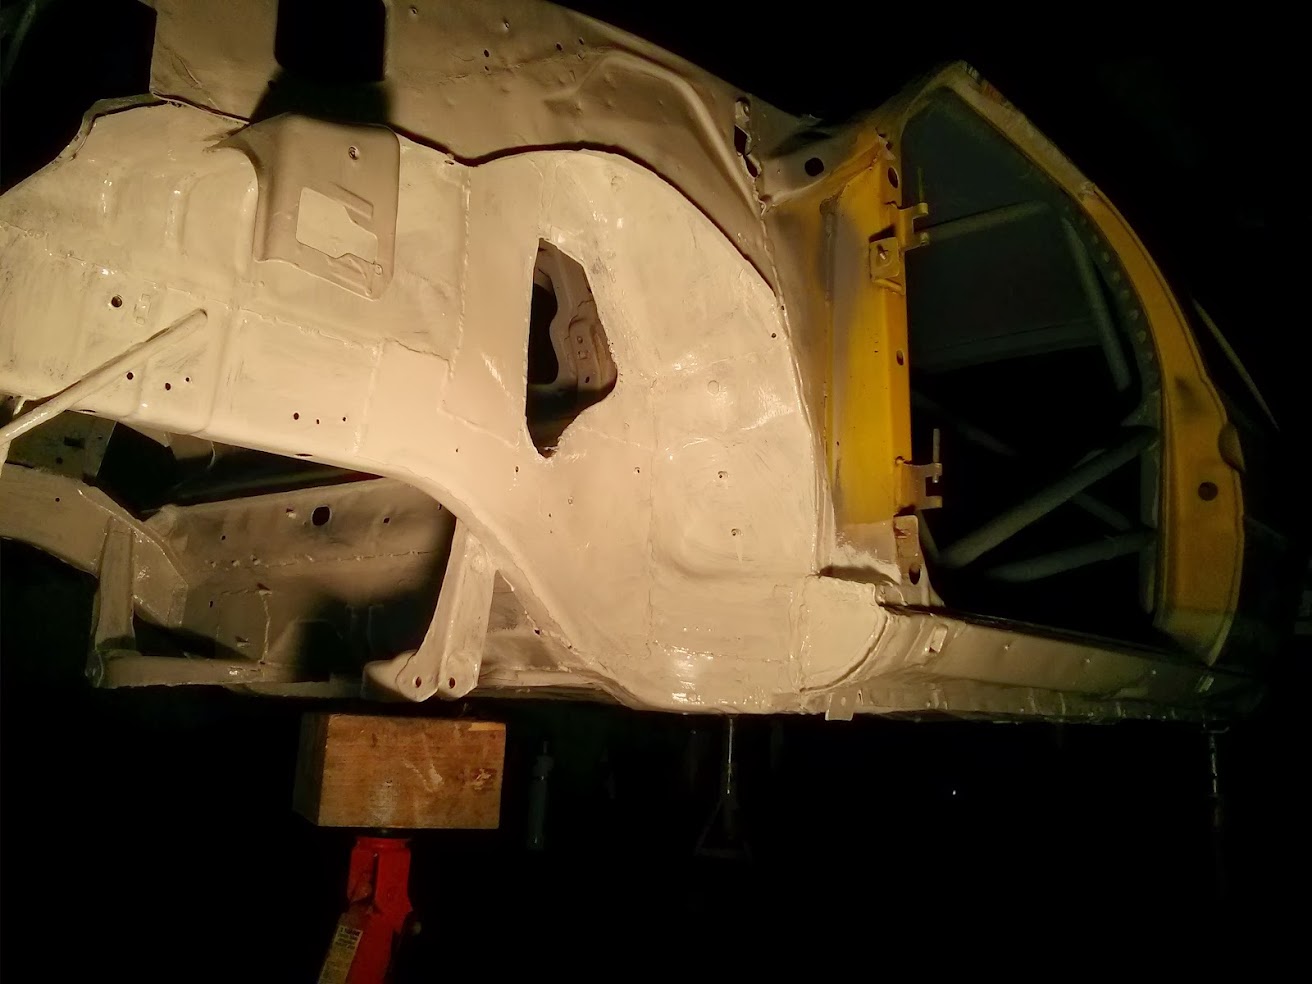
Stripped the back to bare metal again. the middle bit where it dip's down above the fuel tank wasnt back to metal previously so i'm sorta glad i did it. the paint under it was pretty horrible and in parts wasnt providing a good surface for primer to stick to.

Have also cut out the slam panel so the turbo, intercooler, rad etc will have space. Plus the manifold fouled the slam panel anyway, Will knock up a bar across of some sort once i know where things need to mount to, shouldn't be difficult and only require touch up with paint after.

First coat of Bilt Hamber epoxy mastic paint on too, runs pretty easily I thought and still shows the grey primer under it so will require another coat of two no doubt. Took a while so by time i'd finished i went over a bit again which was mostly set and looked much better, nice shiny white!
Bilt hamber reccomended using some stone chip on top of this for high impact areas such as arches so if you guys have any reccomendations that would be welcome.. Preferably white so i don't have to paint over with the gun after!

Off for 3 days this coming weekend, really hoping to get a bit done. It's just a pain in the arse waiting for paint to cure, Can't do much while it's setting!
Rather motivating seeing it in colour now though, I think i'm going to break down when the 2K goes on...!
Have also cut out the slam panel so the turbo, intercooler, rad etc will have space. Plus the manifold fouled the slam panel anyway, Will knock up a bar across of some sort once i know where things need to mount to, shouldn't be difficult and only require touch up with paint after.
First coat of Bilt Hamber epoxy mastic paint on too, runs pretty easily I thought and still shows the grey primer under it so will require another coat of two no doubt. Took a while so by time i'd finished i went over a bit again which was mostly set and looked much better, nice shiny white!
Bilt hamber reccomended using some stone chip on top of this for high impact areas such as arches so if you guys have any reccomendations that would be welcome.. Preferably white so i don't have to paint over with the gun after!
Off for 3 days this coming weekend, really hoping to get a bit done. It's just a pain in the arse waiting for paint to cure, Can't do much while it's setting!
Rather motivating seeing it in colour now though, I think i'm going to break down when the 2K goes on...!

Got a second coat of paint on it yesterday.
Went down there today to try do some more prep on the engine bay but underestimated length of time its taken for some small bits of filler and seam seal to set dissapointing really but we'll see how it looks tomorrow.
Prep really is not where i'd like it to be, with a few areas in the engine bay in the scuttle panel area where the cage comes through the bulkhead i can't easily get to to flat off, and on a few places on the inner wings. 'It's a track car though.. ' i keep telling myself
Anyway some pics of the Epoxy Mastic on. I've emailed Bilt Hamber seeking advice on a stone chip recommendation for the arches, so we'll stick a pin in any further work there for now.
[img]https://lh3.googleusercontent.com/-UPVdlVH2IWs/UtHZWCIEhGI/AAAAAAAAG0o/VQc60gYrceM/w1313-h985-no/IMG_20140110_202837.jpg/img]


IF i'm 'content' with the prep and i can mask it off tomorrow i may be confident enough to try using the gun to lay on some primer & shiny white 2K paint down.. (hopefully not too steep of a learning curve!)
Went down there today to try do some more prep on the engine bay but underestimated length of time its taken for some small bits of filler and seam seal to set
dissapointing really but we'll see how it looks tomorrow. Prep really is not where i'd like it to be, with a few areas in the engine bay in the scuttle panel area where the cage comes through the bulkhead i can't easily get to to flat off, and on a few places on the inner wings. 'It's a track car though.. ' i keep telling myself
Anyway some pics of the Epoxy Mastic on. I've emailed Bilt Hamber seeking advice on a stone chip recommendation for the arches, so we'll stick a pin in any further work there for now.
[img]https://lh3.googleusercontent.com/-UPVdlVH2IWs/UtHZWCIEhGI/AAAAAAAAG0o/VQc60gYrceM/w1313-h985-no/IMG_20140110_202837.jpg/img]
IF i'm 'content' with the prep and i can mask it off tomorrow i may be confident enough to try using the gun to lay on some primer & shiny white 2K paint down.. (hopefully not too steep of a learning curve!)
About time I updated this again. Slow progress with moving to a new unit which is closer to home (last one was an hours drive each way!) and doing lots of things wrong with paint prep, thus having to do them all over again. Huge learning curve - wish I could observe how the pro's do this stuff so I can take pointers but hey.. I'll get there. #DIY
While looking at where i'd mask up just paint the interior and engine bay I decided to do the full car.. Flaky/cracked paint in door shuts etc and peeling paint in one or two other places were a big driver here..
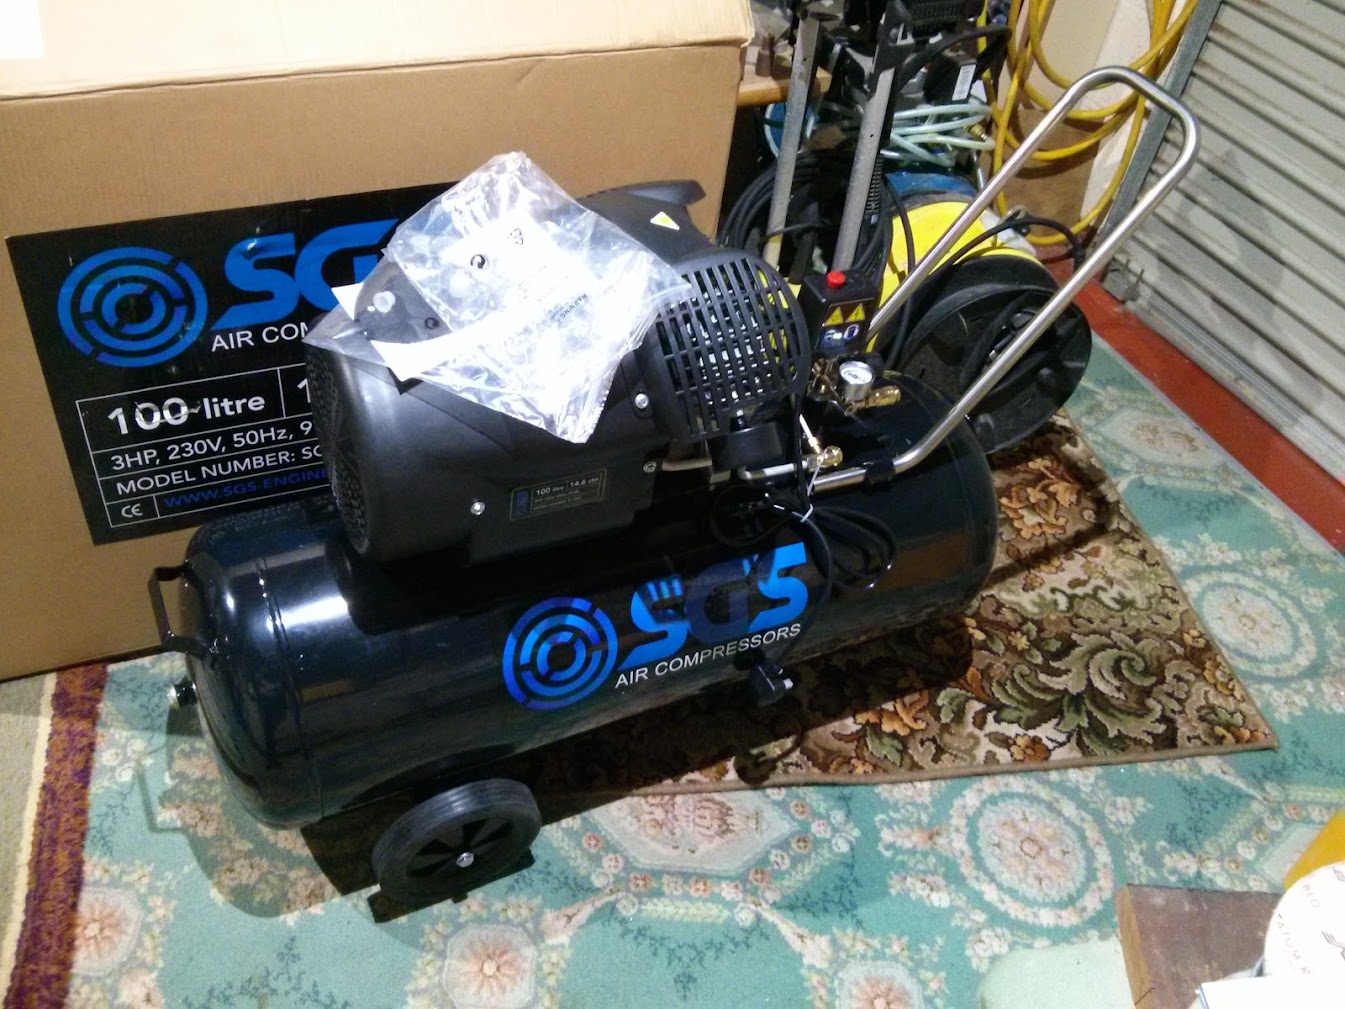
Pictures do a lot of the talking, but ended up hand sanding most of the exterior where needed with 80/180/240/320 git instead of just using a wire wheel where the paint was loose, stripping back to bare metal and feathering at an edge - just to find i could still see the old levels of paint must to my disappointment. Looking at a few video's online and ended up borrowing a compressor, which wasn't really big enough for an air DA that i purchased to help speed the job up. Ended up ordering my own 100L 14.7CFM effort which does the job fine - and leaves me confident i'll be able to paint okay too without running out of air too soon!
Once i had this gear things were much quicker but it took a while to get to this point as I mentioned (lots of wasted time doing things by hand!! - live and learn!)
New toys..


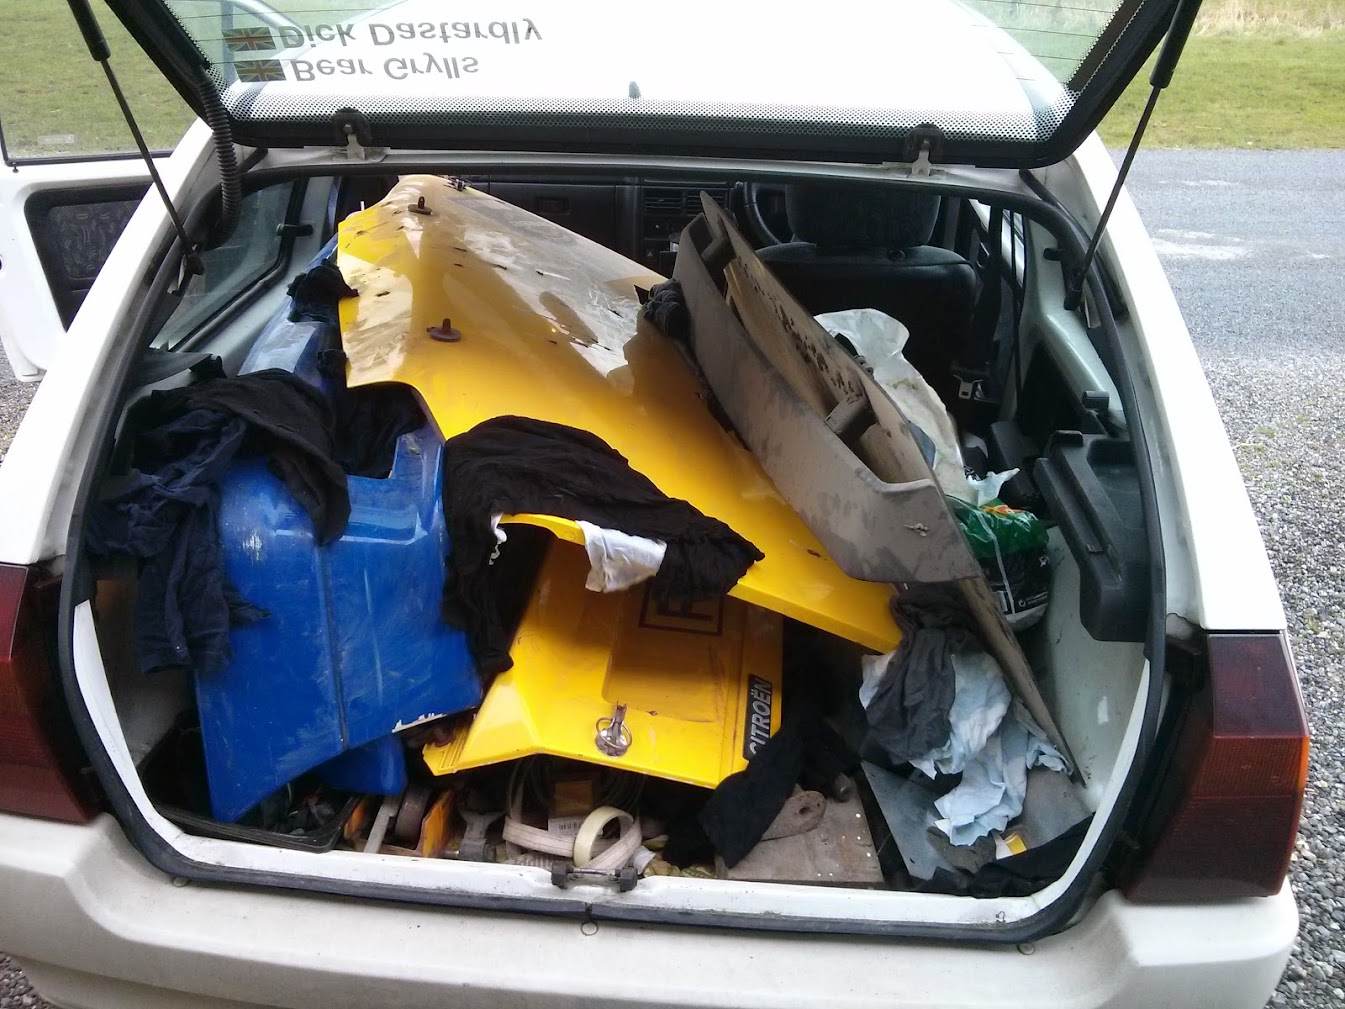
I needed to move an AX worth of parts back home too.. who said AX's couldn't be practical ?


New home
Here's some 'prep' shots anyway..
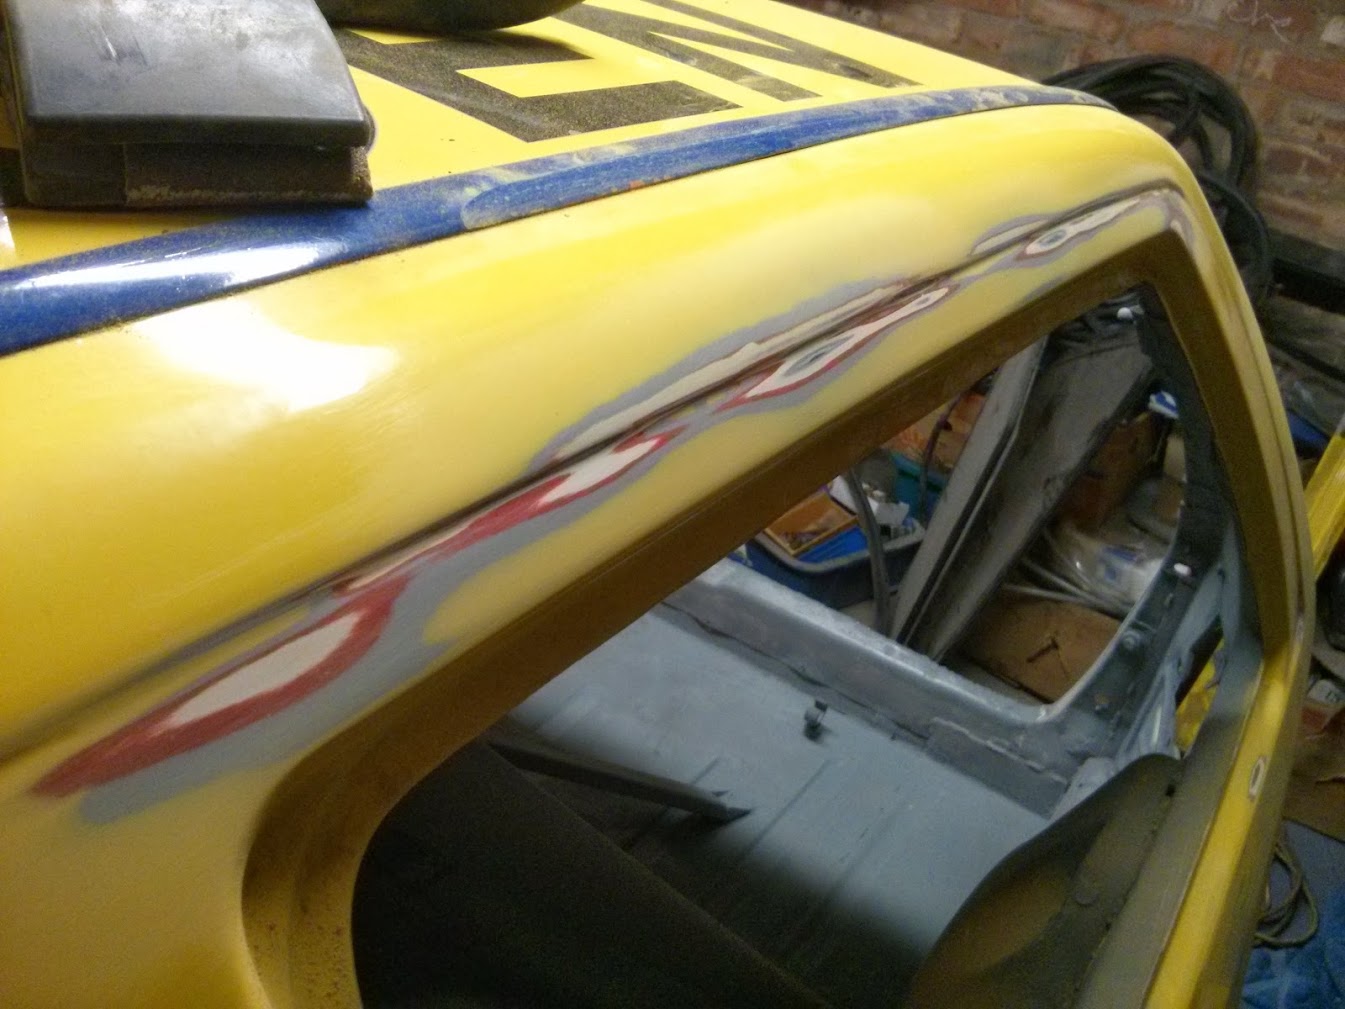
Some not ideal paint here, runs from the previous job and cracked paint in the door shut..


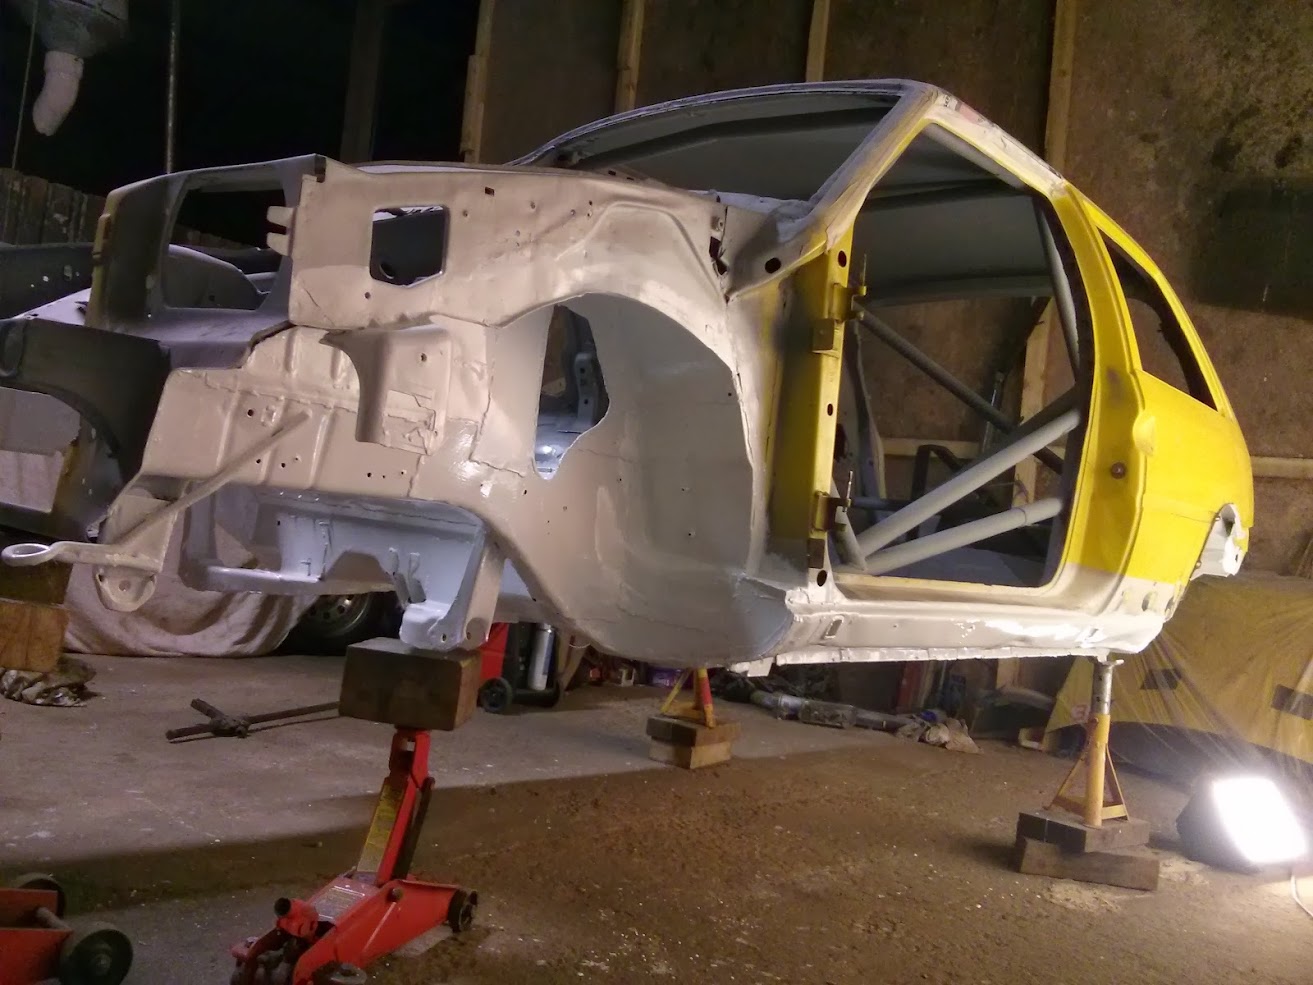
I welded, smoothed and skimmed over these holes that were previously used to mount some brackets that i guess hold the windscreen in place in event of a roll or something?

Got carried away and smoothed the cage as best i could too..

Went a little crazy..

Sorted the panels out.. Still awaiting the bodykit/bumpers/rear bootlid (hopefully picking them up soon!)


Got bored of sanding and moved onto some other bits..
Got carried away cutting the scuttle panel out and forgot about the wiper so had to make a new mount for it, welded it in after,,
Cut a proper circle for my satchshift..


Got the new brackets etc in place, mock fitted the box in situ and made sure it all worked. got the 'BE' style shift arm fitted too.. "Feeling good, billy ray!"

Pre-primer shot.. (least i can cycle to the garage now instead of driving an hour there!)

Had a right fart on with the High build primer which reccomended a 2.0 - 2.2mm tip on the spray gun. I only had a 1.5mm but thought i'd give it a go anyway. Paint was very orange peeley but Im going to flat it back anyway so live and learn. Burned off a lot of paint in the process. I don't think i mixed it well enough either as the tin had very, thick paint which wouldnt be out of place at the local ice cream shop!
Invested in a 1.8mm tipped gun and put a small bit of thinners in the mix and seemed better - Don't think i am running enough PSI to the gun though and it's again come out very orange peeley so will need to flat it back (dry 320 blocksand i'm thinking..) then DA 500 -> 600 before gloss..
At least it's mixed properly now though with this second tin of primer.. (This is am expensive learning curve!!)


Please bare in mind I've never done this before - but I'm learning as I'm going!
(i now have a bonnet i can practice on with correct PSI & gun settings before attempting to try the final 2k gloss coat!)
While looking at where i'd mask up just paint the interior and engine bay I decided to do the full car.. Flaky/cracked paint in door shuts etc and peeling paint in one or two other places were a big driver here..
Pictures do a lot of the talking, but ended up hand sanding most of the exterior where needed with 80/180/240/320 git instead of just using a wire wheel where the paint was loose, stripping back to bare metal and feathering at an edge - just to find i could still see the old levels of paint must to my disappointment. Looking at a few video's online and ended up borrowing a compressor, which wasn't really big enough for an air DA that i purchased to help speed the job up. Ended up ordering my own 100L 14.7CFM effort which does the job fine - and leaves me confident i'll be able to paint okay too without running out of air too soon!
Once i had this gear things were much quicker but it took a while to get to this point as I mentioned (lots of wasted time doing things by hand!! - live and learn!)
New toys..
I needed to move an AX worth of parts back home too.. who said AX's couldn't be practical ?
New home
Here's some 'prep' shots anyway..
Some not ideal paint here, runs from the previous job and cracked paint in the door shut..
I welded, smoothed and skimmed over these holes that were previously used to mount some brackets that i guess hold the windscreen in place in event of a roll or something?
Got carried away and smoothed the cage as best i could too..
Went a little crazy..
Sorted the panels out.. Still awaiting the bodykit/bumpers/rear bootlid (hopefully picking them up soon!)
Got bored of sanding and moved onto some other bits..
Got carried away cutting the scuttle panel out and forgot about the wiper so had to make a new mount for it, welded it in after,,
Cut a proper circle for my satchshift..
Got the new brackets etc in place, mock fitted the box in situ and made sure it all worked. got the 'BE' style shift arm fitted too.. "Feeling good, billy ray!"
Pre-primer shot.. (least i can cycle to the garage now instead of driving an hour there!)
Had a right fart on with the High build primer which reccomended a 2.0 - 2.2mm tip on the spray gun. I only had a 1.5mm but thought i'd give it a go anyway. Paint was very orange peeley but Im going to flat it back anyway so live and learn. Burned off a lot of paint in the process. I don't think i mixed it well enough either as the tin had very, thick paint which wouldnt be out of place at the local ice cream shop!
Invested in a 1.8mm tipped gun and put a small bit of thinners in the mix and seemed better - Don't think i am running enough PSI to the gun though and it's again come out very orange peeley so will need to flat it back (dry 320 blocksand i'm thinking..) then DA 500 -> 600 before gloss..
At least it's mixed properly now though with this second tin of primer.. (This is am expensive learning curve!!)
Please bare in mind I've never done this before - but I'm learning as I'm going!
(i now have a bonnet i can practice on with correct PSI & gun settings before attempting to try the final 2k gloss coat!)
Picked up some bits the weekend. Needed a new bootlid and bonnet as the old one had daft bonnet vents and the bootlid was cracked. The rest of the kit & bumpers will serve as great spares though.
Also picked up a McNally EGT / Boost gauge which should help keep an eye things, at least during mapping etc. Undecided on if i want to leave it in all the time as my manifold has the boss welded on, pre-turbo. If it fails it could get expensive...

Lots of sanding/prep tomorrow though....
Also picked up a McNally EGT / Boost gauge which should help keep an eye things, at least during mapping etc. Undecided on if i want to leave it in all the time as my manifold has the boss welded on, pre-turbo. If it fails it could get expensive...
Lots of sanding/prep tomorrow though....
Yeah, shameless AX enthusiast still here i'm afraid Garret! Had this one long enough now i just need to see it 'done' and enjoy it - it's about time!
Funnily enough an absolutely immaculate AX GT has just appeared round the corner from me too - must have snapped it up for a healthy 2.5k (spotted it for sale a few weeks ago). I must not be the only one locally!
Anyhow..
Ran over the roof today with the DA (dry 240 grit) to remove all the 'ripple' effect in the paint and flat it all back.. was hoping that my initial prep was good enough before putting the high build on, or at least flatting the high build would fill any imperfections. Turns out with the guide coat i'll need to fill & skim over a few low spots.
Will flat the filled bits back and knock up a foot long block and 320 grit over it all when i'm next down there. Also discovered a patch of loose paint on one of the door gaps/sills that i've had to grind back to bare and skim over - be fine now but surprised didn't notice it before. hey ho
See the difference in the ripple effect on the bottom of the paint where the guide coat it vs nice smooth white finish after a few minutes on the DA ?

Full roof skimmed over, a few high spots that have cut through to the original paint/primer and more importantly a few noticeable low points at the front just above the windscreen - see the 'dark' areas ? They'll soon be nice & flat -- I hope this is all worth it!! =]

Funnily enough an absolutely immaculate AX GT has just appeared round the corner from me too - must have snapped it up for a healthy 2.5k (spotted it for sale a few weeks ago). I must not be the only one locally!
Anyhow..
Ran over the roof today with the DA (dry 240 grit) to remove all the 'ripple' effect in the paint and flat it all back.. was hoping that my initial prep was good enough before putting the high build on, or at least flatting the high build would fill any imperfections. Turns out with the guide coat i'll need to fill & skim over a few low spots.
Will flat the filled bits back and knock up a foot long block and 320 grit over it all when i'm next down there. Also discovered a patch of loose paint on one of the door gaps/sills that i've had to grind back to bare and skim over - be fine now but surprised didn't notice it before. hey ho
See the difference in the ripple effect on the bottom of the paint where the guide coat it vs nice smooth white finish after a few minutes on the DA ?
Full roof skimmed over, a few high spots that have cut through to the original paint/primer and more importantly a few noticeable low points at the front just above the windscreen - see the 'dark' areas ? They'll soon be nice & flat -- I hope this is all worth it!! =]
Quick update from this afternoon. Got annoyed with not being able to get a decent flat finish with the little hand block i had before so I coughed up and bought some proper kit for the job. Various block sizes (1 small, 1 medium, 1 long, 1 curved inferface pad and a corner sanding pad) should do the trick.
Invested in some proper Mirka Abranet velcro pads to use which are really good - no clogging them up! definitely worth the money. I've opted to use 180grit to do the shaping and i'll go over with the 240/320 on the DA with an interface pad before priming. See where i am there but at least i know the panels will be flat now !!!

Using some proper guide coat (much better than old paint!) I've had to sand through the primer in quite a few places to get it flat but needs must.


[img]https://lh3.googleusercontent.com/-2ZuN1biCHWg/Uz2U95vkA9I/AAAAAAAAHBw/rsE39rJ1HlE/w1345-h1009-no/IMG_20140403_160736.jpg/img]


Have managed to get a fair bit done in just a few hours this afternoon so hopeful by Sunday evening will have all the outside of the car done, the doors front wings, bonnet and bootlid prepped too.
New bootlid i've got has the rear glass still bonded to it.. I'm torn between keeping this or fitting my polycarb rear window which is incredibly flexy and will be hellish for flapping about at 100+ i'd imagine.. (Suppose i do still have lots of windscreen bond should i need to re-fit the rear window.. assuming i get get it off in one piece!
Invested in some proper Mirka Abranet velcro pads to use which are really good - no clogging them up! definitely worth the money. I've opted to use 180grit to do the shaping and i'll go over with the 240/320 on the DA with an interface pad before priming. See where i am there but at least i know the panels will be flat now !!!
Using some proper guide coat (much better than old paint!) I've had to sand through the primer in quite a few places to get it flat but needs must.
[img]https://lh3.googleusercontent.com/-2ZuN1biCHWg/Uz2U95vkA9I/AAAAAAAAHBw/rsE39rJ1HlE/w1345-h1009-no/IMG_20140403_160736.jpg/img]
Have managed to get a fair bit done in just a few hours this afternoon so hopeful by Sunday evening will have all the outside of the car done, the doors front wings, bonnet and bootlid prepped too.
New bootlid i've got has the rear glass still bonded to it.. I'm torn between keeping this or fitting my polycarb rear window which is incredibly flexy and will be hellish for flapping about at 100+ i'd imagine.. (Suppose i do still have lots of windscreen bond should i need to re-fit the rear window.. assuming i get get it off in one piece!
Gassing Station | Readers' Cars | Top of Page | What's New | My Stuff