Engine rebuild
Discussion


4321go said:
And talking of sound........
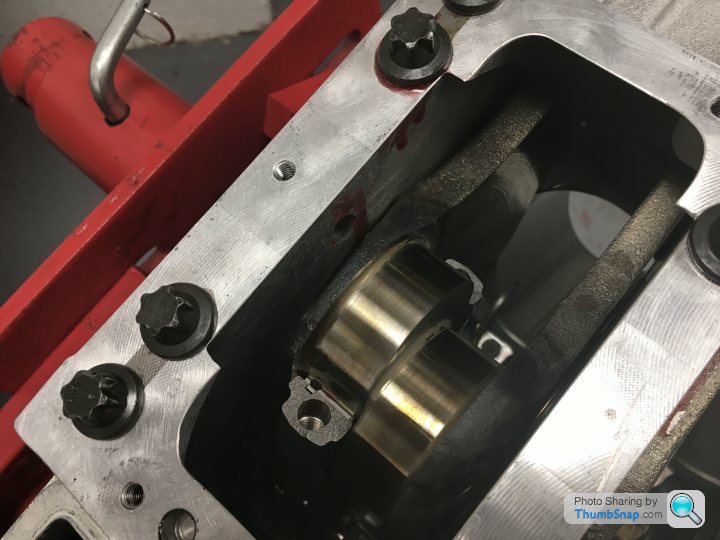
It’s often noted that the 5.0 litre Gallardo engine is one of the best sounding out there. It’s generally agreed that it’s much better sounding than the replacement 5.2 litre LP-series engines. And that’s down to the crank. On any V engine, two con rods sit together on a journal between a pair of crank webs. On the later engine, that journal is a straight one; the pairs of con rods sit side-by-side. But on the earlier engines, the journals are staggered. Which subtly alters the firing angle and hence the sound of the engine. As ever, much easier to illustrate with photos:
My crank, with the staggered journals between the webs (and note crystalline face of one of those fractured rods going into place):
And a later 5.2 engine, with straight journals:
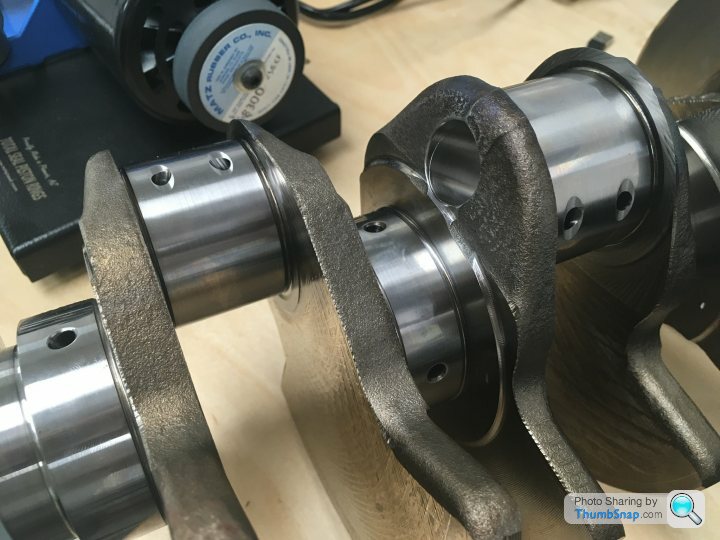
So the 5.2 is a flat plane V10.It’s often noted that the 5.0 litre Gallardo engine is one of the best sounding out there. It’s generally agreed that it’s much better sounding than the replacement 5.2 litre LP-series engines. And that’s down to the crank. On any V engine, two con rods sit together on a journal between a pair of crank webs. On the later engine, that journal is a straight one; the pairs of con rods sit side-by-side. But on the earlier engines, the journals are staggered. Which subtly alters the firing angle and hence the sound of the engine. As ever, much easier to illustrate with photos:
My crank, with the staggered journals between the webs (and note crystalline face of one of those fractured rods going into place):
And a later 5.2 engine, with straight journals:
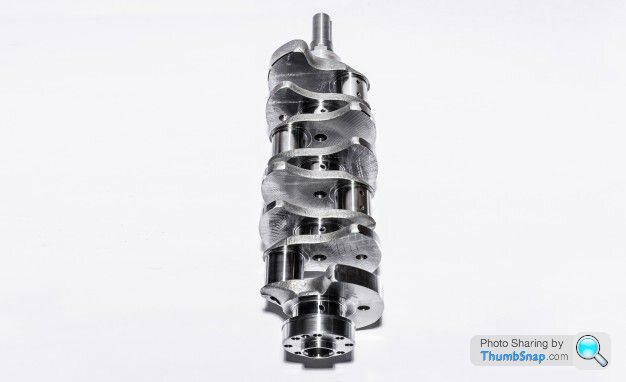
Neither engine has a flat-plane crank. A flat-plane crank has the crank throws at 180°, like this, from the Shelby GT350
The split crankpins of the 5.0 results in an even firing order, one cylinder firing every 72° of crank rotation.
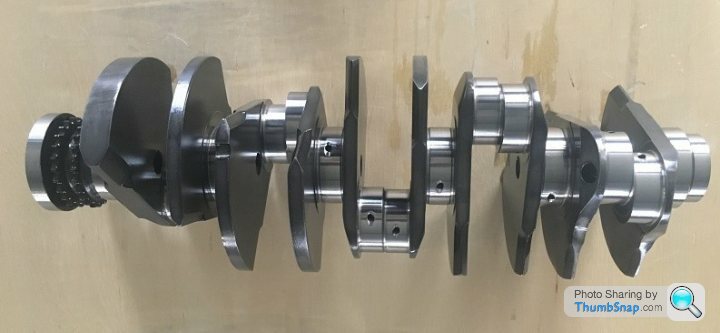
The shared crankpins of the 5.2 apparently results in an uneven firing order, every 54° or 90°.
Apparently.
The split crankpins of the 5.0 results in an even firing order, one cylinder firing every 72° of crank rotation.
The shared crankpins of the 5.2 apparently results in an uneven firing order, every 54° or 90°.
Apparently.

Thank you for showing an interest!
I’d love to say “Yes!” but, er.......... “No!”
The engine IS now complete. As in... “Today”! Ancillaries will go on soon. The oil pump has been stripped, inspected and rebuilt (a relief as a new one is circa £4000!). We need to source a new aircon pump. The rear anti-roll bar and exhaust tip grills are away being powder coated, which I think are the last pieces needing this.
I’ll write a piece on the cylinder head work soon (new valve guides, new valve seats recut with 3 angle valve seating rather than 2, new aftermarket valves with Inconel exhaust valves rather than sodium-filled stainless steel, ported inlet and exhaust tracts). I need to tap Ricky up for some photos he took whilst he was doing the work.
But.....
The gearbox is now also in pieces!! I’ve always shifted around a bolshie second gear. It was always usable, but not great. And as Ricky seems to have as many dismantled ‘boxes on site as engines, it made sense to have mine inspected now.
Seems that I could possibly get away with just replacing the 1/2 synchro rings. But to do it right, second gear needs replacing too. And, although I’ve never experienced any problems with third, Ricky showed me the incipient wear on the third-gear wheel and the 3/4 synchro rings. It’d go the same way as second eventually, so we’re replacing them too. And of course, the ‘box is unique to the pre-LP cars and the internals can’t be replaced with the cheaper Audi parts from the later ‘boxes.
So, for those that like them, there’ll be many more updates and photos to come.
Bugger!
I sympathise with your bugger; I'm sure you hadn't been planning on asking Santa to drop a transmission in your stocking and equally sure you didn't want to pay for it.
TIniest silver cloud there - it's bloody generous of you to share the progress and info in such detail and a lot of people are enjoying reading it.
TIniest silver cloud there - it's bloody generous of you to share the progress and info in such detail and a lot of people are enjoying reading it.
I had the pleasure of seeing this engine being worked on by Ricky when I was over there a couple of weeks ago. His attention to detail is phenominal and I've seen kitchens less clean than his engine build room. Keep the updates coming please 4321go, as you don't come across many as interesting as this on PH.
4321go said:
Thank you for showing an interest!
I’d love to say “Yes!” but, er.......... “No!”
The engine IS now complete. As in... “Today”! Ancillaries will go on soon. The oil pump has been stripped, inspected and rebuilt (a relief as a new one is circa £4000!). We need to source a new aircon pump. The rear anti-roll bar and exhaust tip grills are away being powder coated, which I think are the last pieces needing this.
I’ll write a piece on the cylinder head work soon (new valve guides, new valve seats recut with 3 angle valve seating rather than 2, new aftermarket valves with Inconel exhaust valves rather than sodium-filled stainless steel, ported inlet and exhaust tracts). I need to tap Ricky up for some photos he took whilst he was doing the work.
But.....
The gearbox is now also in pieces!! I’ve always shifted around a bolshie second gear. It was always usable, but not great. And as Ricky seems to have as many dismantled ‘boxes on site as engines, it made sense to have mine inspected now.
Seems that I could possibly get away with just replacing the 1/2 synchro rings. But to do it right, second gear needs replacing too. And, although I’ve never experienced any problems with third, Ricky showed me the incipient wear on the third-gear wheel and the 3/4 synchro rings. It’d go the same way as second eventually, so we’re replacing them too. And of course, the ‘box is unique to the pre-LP cars and the internals can’t be replaced with the cheaper Audi parts from the later ‘boxes.
So, for those that like them, there’ll be many more updates and photos to come.
Bugger!
You've got to wonder how many more years you'd have got out of it though!I’d love to say “Yes!” but, er.......... “No!”
The engine IS now complete. As in... “Today”! Ancillaries will go on soon. The oil pump has been stripped, inspected and rebuilt (a relief as a new one is circa £4000!). We need to source a new aircon pump. The rear anti-roll bar and exhaust tip grills are away being powder coated, which I think are the last pieces needing this.
I’ll write a piece on the cylinder head work soon (new valve guides, new valve seats recut with 3 angle valve seating rather than 2, new aftermarket valves with Inconel exhaust valves rather than sodium-filled stainless steel, ported inlet and exhaust tracts). I need to tap Ricky up for some photos he took whilst he was doing the work.
But.....
The gearbox is now also in pieces!! I’ve always shifted around a bolshie second gear. It was always usable, but not great. And as Ricky seems to have as many dismantled ‘boxes on site as engines, it made sense to have mine inspected now.
Seems that I could possibly get away with just replacing the 1/2 synchro rings. But to do it right, second gear needs replacing too. And, although I’ve never experienced any problems with third, Ricky showed me the incipient wear on the third-gear wheel and the 3/4 synchro rings. It’d go the same way as second eventually, so we’re replacing them too. And of course, the ‘box is unique to the pre-LP cars and the internals can’t be replaced with the cheaper Audi parts from the later ‘boxes.
So, for those that like them, there’ll be many more updates and photos to come.
Bugger!
But anyway it'll be perfect once done
Anyway who cares about that - how is the Focus doing?


I’ll start with my apologies for not having updated this thread for so long. Sorry!
Where were we? Ah yes! Cylinder heads.
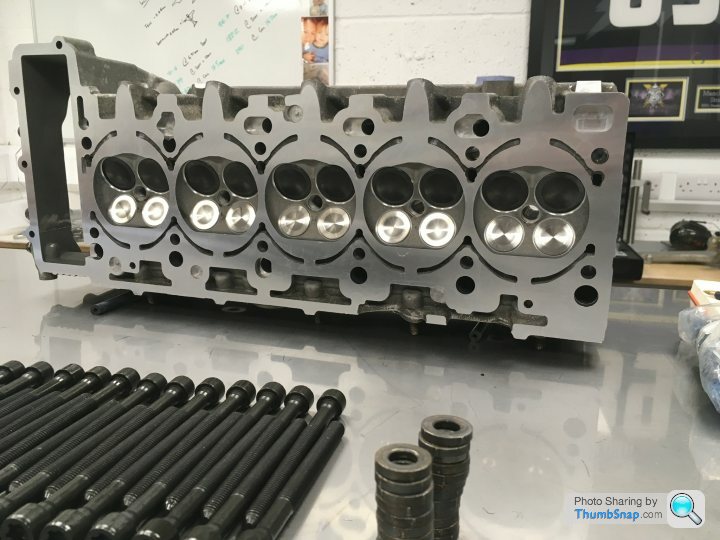
I suppose we could have just bolted the heads straight back onto the refinished block. But, after 14 years and 106,000 miles, there was certainly enough wear evident to justify their rebuild. Again, any mistakes in the following are my own! It went something like this:
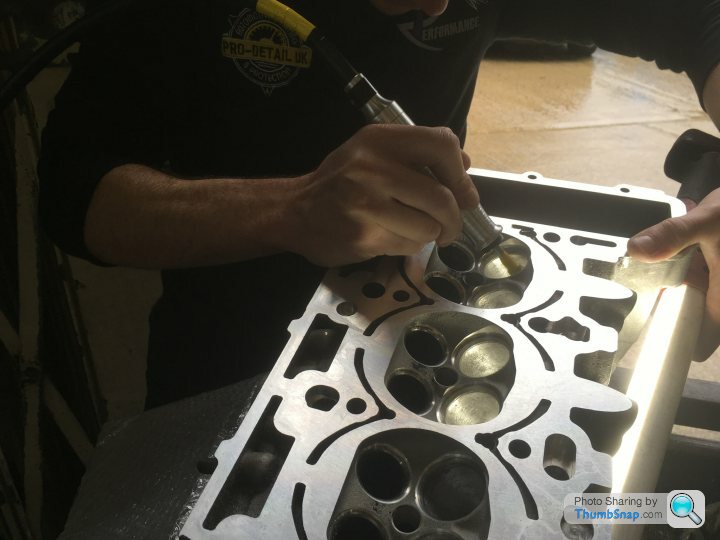
The worn valve guides and seats were pressed or reamed out of the alloy heads before being replaced with new, unworn items. I’ve made that sound very simple and I know that it isn’t. I’d love to be able to tell you exactly how the process went. Were the old valve seats simply drifted out from behind (there’s a lip, accessible from the inlet and exhaust tracts that allows this, but risks damaging the head), maybe after having heated the head in an oven? Or were the old seats reamed away until all that was left simply fell out? Both are possible methods. But all of the machining of the heads was carried out by the same (extremely competent and reputable!) engine machine shop that “did” the block, so I was blind to the process.
Next, the new valve seats were cut to shape. This is critical! The valves MUST seat perfectly. At 7000rpm, the valves are slamming back onto their seats 60 times PER SECOND. If the seats aren’t perfectly positioned and cut then the valve’s head will flex on the stem and metal fatigue will see the valve break in very little time. The shape of the finished valve seat is also very important. The gasses transition from (inlet) or to (exhaust) a linear flow through the narrow gap between the valve and the seat.
The ideal is a radius cut, the seat being cut to a curved profile, exactly matching the radius of the curve of the transition of the valve from stem to head. However, this is only used in racing applications as the seats subsequently wear at a very fast rate. (No, I don’t know why! It seams counterintuitive to me?) The factory cut the seats at two angles, which isn’t bad. The seats in my engine have been cut at three angles, which will greatly improve the gas flow both into and out of the cylinders. The valves actually seat on the middle of the three angled cuts. The more narrow this land, the more power that you’ll potentially be able to generate, but also the quicker the wear of the seat. In race-engine terms, the 1.1mm central land of my valve seats is apparently huge! But this is a road car and requires decent longevity.
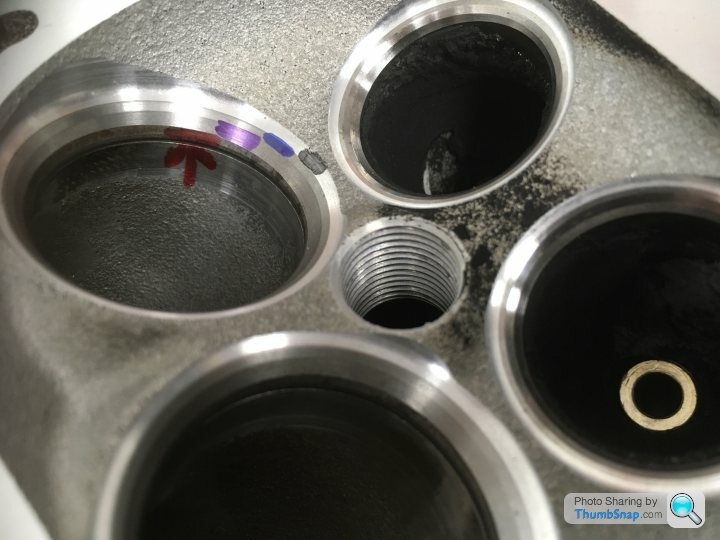
The following photographs show the refinished heads as Ricky received them back from the machine shop, and before he did any subsequent work on them. The marked-up valve seat is an inlet. The black, blue and purple Sharpie marks delineate the three angles cut into the valve seat. The blue line is the 1.1mm wide land that the valve actually seats onto. Note also the nasty (red) step and the sand cast finish of the inlet tract. The exhaust tract is exactly the same under its coat of soot!

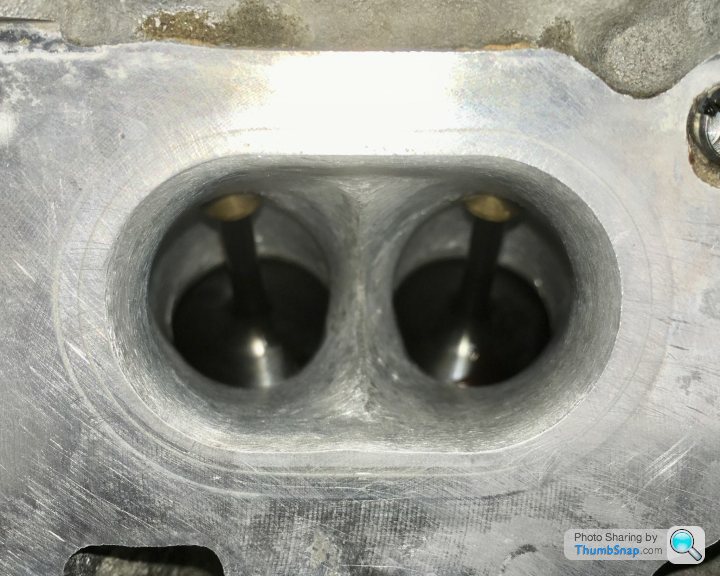
With the re-machined heads back in-house, Ricky ported both the inlet and exhaust tracts. The factory undertake no porting work whatsoever, the tracts retaining the exact shape and sand-cast finish that they left the foundry with.
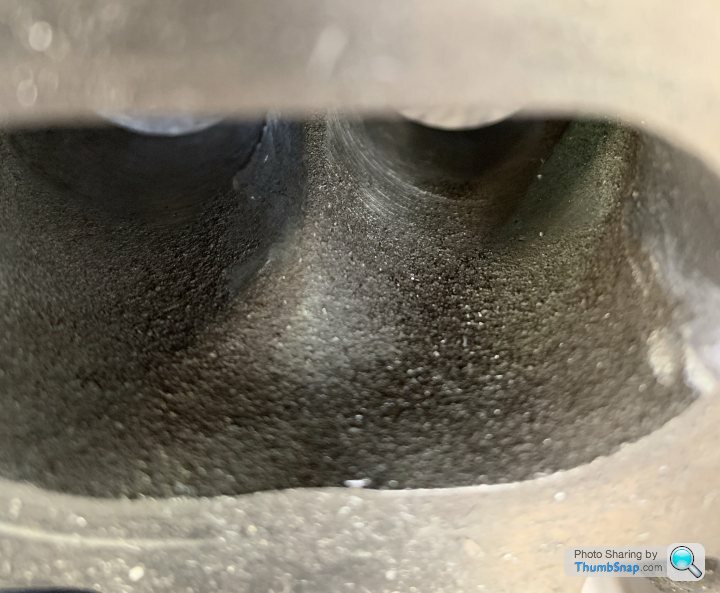
With rotary porting files, Ricky removed a sizeable amount of metal from the inlet tracts’ walls, making a straighter line from plenum to valve (and hence, hopefully a more linear flow). He also “knife-edged” the previously rather blunt and sloppy (slopie?) part of the casting where each inlet tract bifurcates to accommodate the two inlet valves.
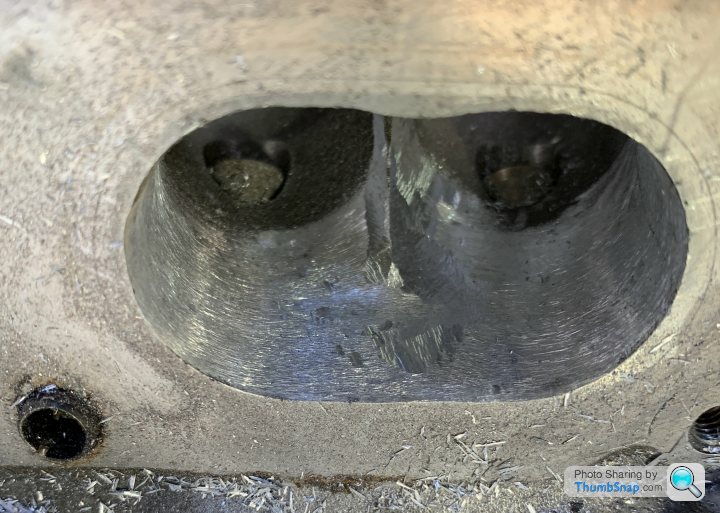
(Neither of the last two photos show the final finish!)
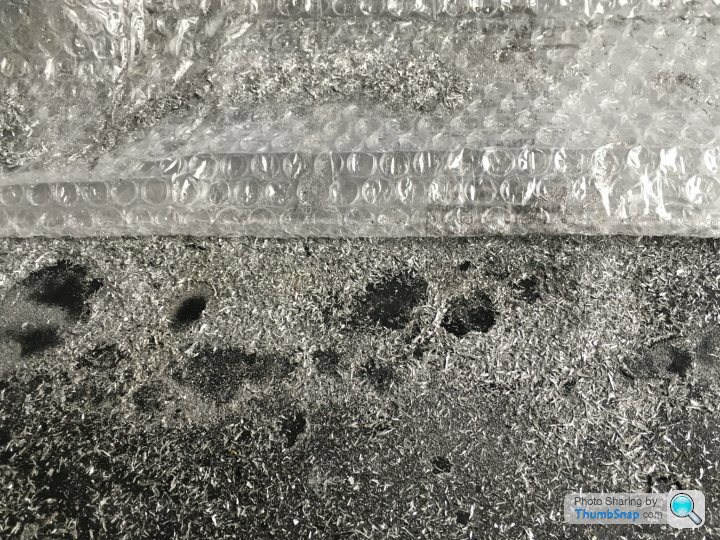
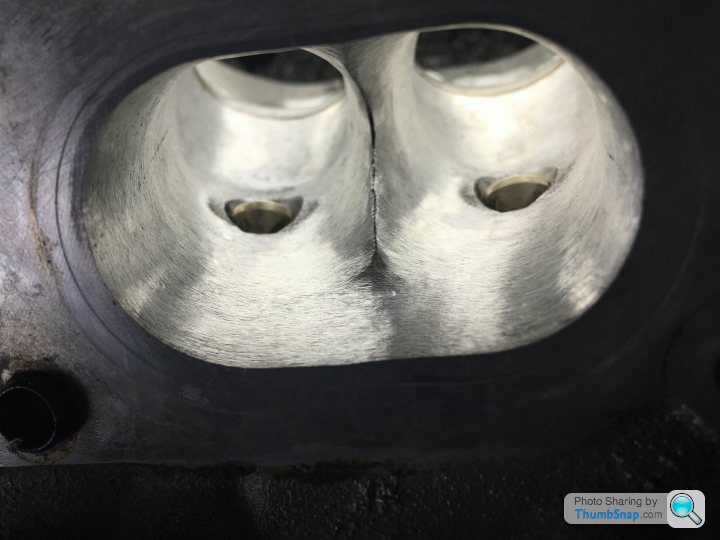
The exhaust tracts required the removal of less metal, but there was scope for the improvement of the gas flows there too. Finally, he surface-finished the tracts to a level resembling brushed aluminium, a massive improvement over the original, sand-cast finish.
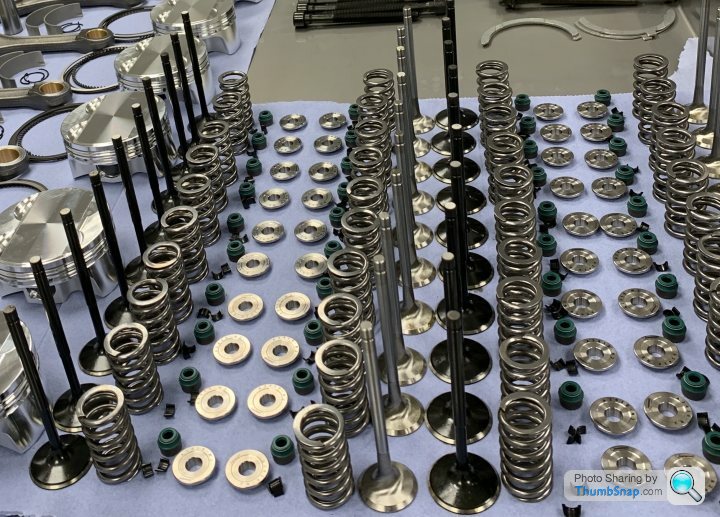
Machined and ported (and after MANY passes through he parts washer!) the heads were reassembled. The entire valve train is a kit from Supertech in California ( supertechperformance.com ). This is because a modern racing supplier is able to supply much improved items for a similar price to the twenty-year-old tech of the OEM. The inlet valves are similar to OE, being simple stainless steel valves, but the final “Black Nitride” coating results in a much smoother valve, again improving gas flow. The stock exhaust valves are stainless steel and sodium-filled for heat dissipation. The Supertech exhaust valves are also sodium filled, but the valve itself is forged from Inconel (a nickel alloy), resulting in a much lighter valve. The Supertech kit also includes titanium collets (again, for lightness; important when the valves are reciprocating at over 60Hz) and updated valve springs (providing more positive control of the valves over the OE springs).
The rebuilt heads were then reattached to the block and torqued down. As this is a normally aspirated engine, stock head bolts were used, there being no need to use the updated bolts that Ricky would use in a forced induction application.
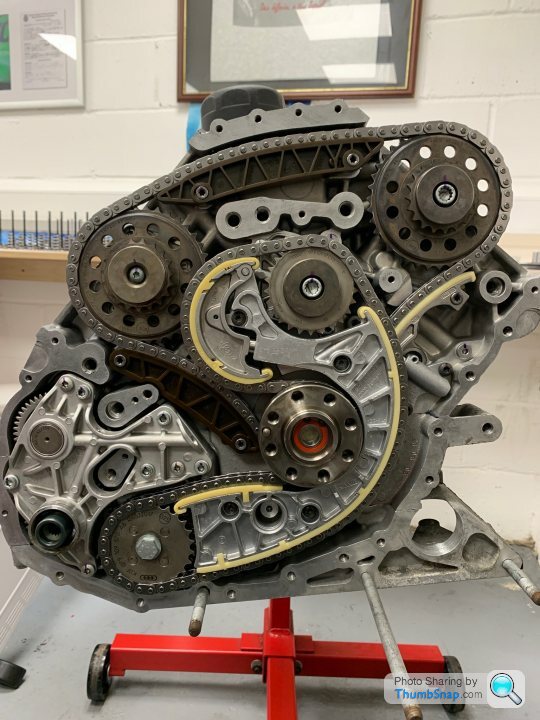
The stock camshafts were then reinstalled, followed by new timing chains and chain guides and tensioners.
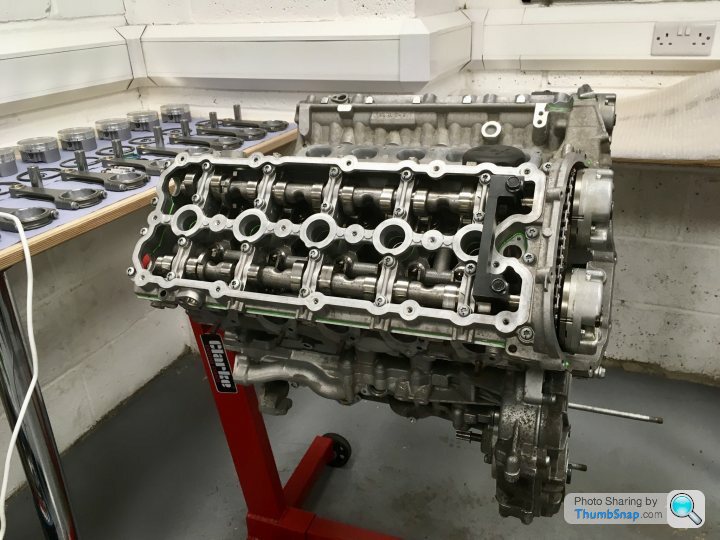
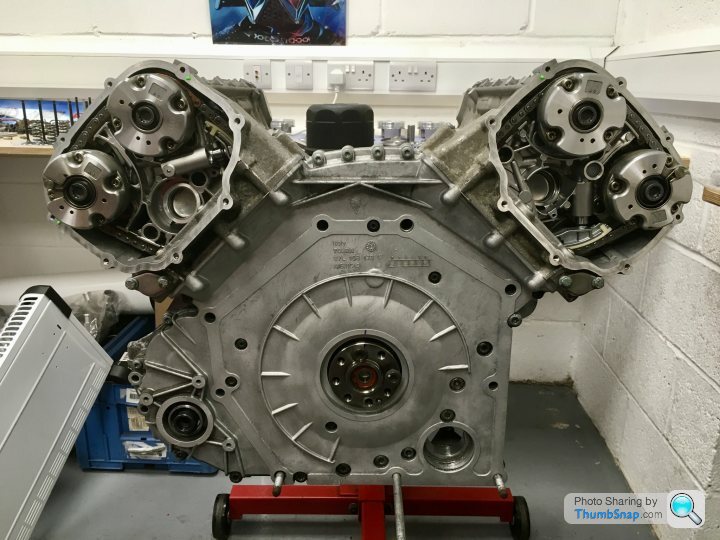
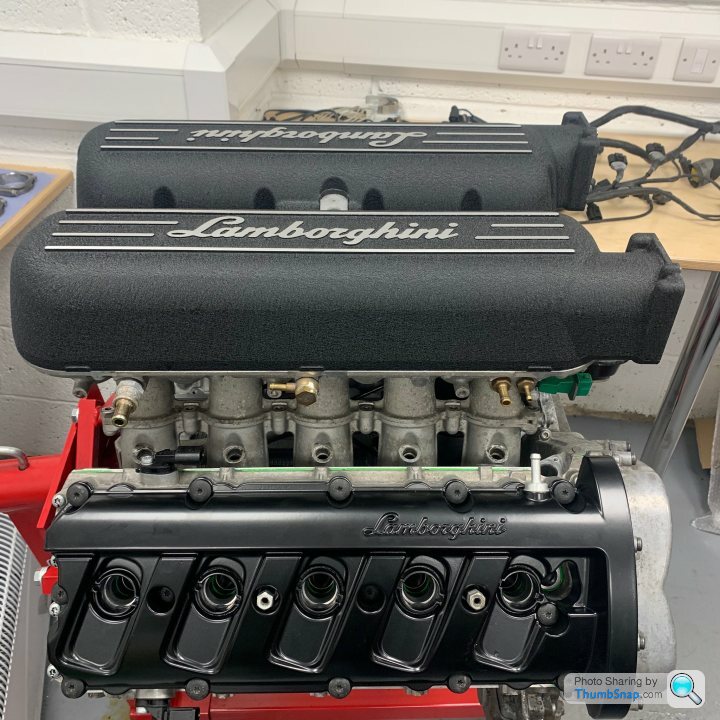
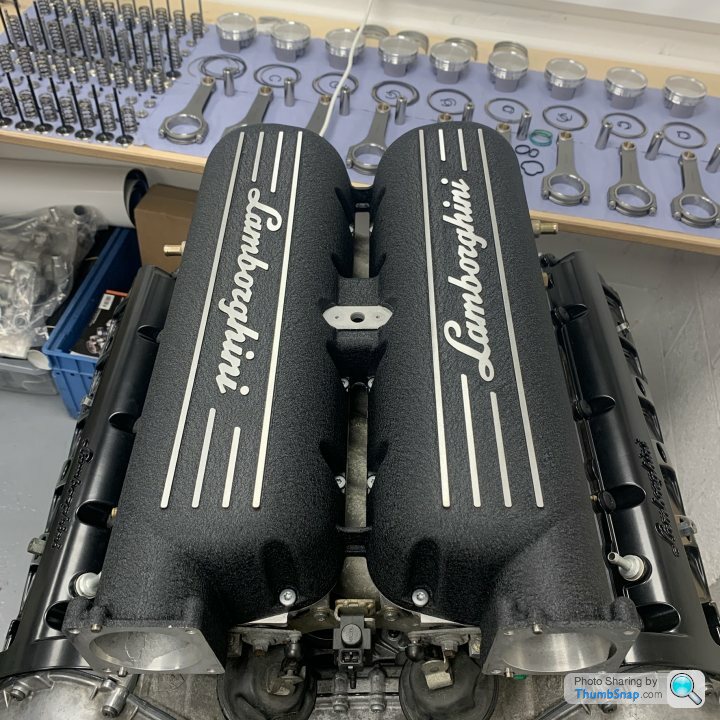
Finally, the intake plenum/throttle body unit was mounted in the vee and the basic engine was closed up with its refinished (powder coated) cam covers and plenum cover.
Hoorah!!
Next.......... Engine ancillaries.
Where were we? Ah yes! Cylinder heads.
I suppose we could have just bolted the heads straight back onto the refinished block. But, after 14 years and 106,000 miles, there was certainly enough wear evident to justify their rebuild. Again, any mistakes in the following are my own! It went something like this:
The worn valve guides and seats were pressed or reamed out of the alloy heads before being replaced with new, unworn items. I’ve made that sound very simple and I know that it isn’t. I’d love to be able to tell you exactly how the process went. Were the old valve seats simply drifted out from behind (there’s a lip, accessible from the inlet and exhaust tracts that allows this, but risks damaging the head), maybe after having heated the head in an oven? Or were the old seats reamed away until all that was left simply fell out? Both are possible methods. But all of the machining of the heads was carried out by the same (extremely competent and reputable!) engine machine shop that “did” the block, so I was blind to the process.
Next, the new valve seats were cut to shape. This is critical! The valves MUST seat perfectly. At 7000rpm, the valves are slamming back onto their seats 60 times PER SECOND. If the seats aren’t perfectly positioned and cut then the valve’s head will flex on the stem and metal fatigue will see the valve break in very little time. The shape of the finished valve seat is also very important. The gasses transition from (inlet) or to (exhaust) a linear flow through the narrow gap between the valve and the seat.
The ideal is a radius cut, the seat being cut to a curved profile, exactly matching the radius of the curve of the transition of the valve from stem to head. However, this is only used in racing applications as the seats subsequently wear at a very fast rate. (No, I don’t know why! It seams counterintuitive to me?) The factory cut the seats at two angles, which isn’t bad. The seats in my engine have been cut at three angles, which will greatly improve the gas flow both into and out of the cylinders. The valves actually seat on the middle of the three angled cuts. The more narrow this land, the more power that you’ll potentially be able to generate, but also the quicker the wear of the seat. In race-engine terms, the 1.1mm central land of my valve seats is apparently huge! But this is a road car and requires decent longevity.
The following photographs show the refinished heads as Ricky received them back from the machine shop, and before he did any subsequent work on them. The marked-up valve seat is an inlet. The black, blue and purple Sharpie marks delineate the three angles cut into the valve seat. The blue line is the 1.1mm wide land that the valve actually seats onto. Note also the nasty (red) step and the sand cast finish of the inlet tract. The exhaust tract is exactly the same under its coat of soot!
With the re-machined heads back in-house, Ricky ported both the inlet and exhaust tracts. The factory undertake no porting work whatsoever, the tracts retaining the exact shape and sand-cast finish that they left the foundry with.
With rotary porting files, Ricky removed a sizeable amount of metal from the inlet tracts’ walls, making a straighter line from plenum to valve (and hence, hopefully a more linear flow). He also “knife-edged” the previously rather blunt and sloppy (slopie?) part of the casting where each inlet tract bifurcates to accommodate the two inlet valves.
(Neither of the last two photos show the final finish!)
The exhaust tracts required the removal of less metal, but there was scope for the improvement of the gas flows there too. Finally, he surface-finished the tracts to a level resembling brushed aluminium, a massive improvement over the original, sand-cast finish.
Machined and ported (and after MANY passes through he parts washer!) the heads were reassembled. The entire valve train is a kit from Supertech in California ( supertechperformance.com ). This is because a modern racing supplier is able to supply much improved items for a similar price to the twenty-year-old tech of the OEM. The inlet valves are similar to OE, being simple stainless steel valves, but the final “Black Nitride” coating results in a much smoother valve, again improving gas flow. The stock exhaust valves are stainless steel and sodium-filled for heat dissipation. The Supertech exhaust valves are also sodium filled, but the valve itself is forged from Inconel (a nickel alloy), resulting in a much lighter valve. The Supertech kit also includes titanium collets (again, for lightness; important when the valves are reciprocating at over 60Hz) and updated valve springs (providing more positive control of the valves over the OE springs).
The rebuilt heads were then reattached to the block and torqued down. As this is a normally aspirated engine, stock head bolts were used, there being no need to use the updated bolts that Ricky would use in a forced induction application.
The stock camshafts were then reinstalled, followed by new timing chains and chain guides and tensioners.
Finally, the intake plenum/throttle body unit was mounted in the vee and the basic engine was closed up with its refinished (powder coated) cam covers and plenum cover.
Hoorah!!
Next.......... Engine ancillaries.
Gassing Station | Supercar General | Top of Page | What's New | My Stuff