2.0 TFSI Cam Chain DIY Guide
Discussion


Just putting this in here incase the forum it is on gets pulled for some reason.
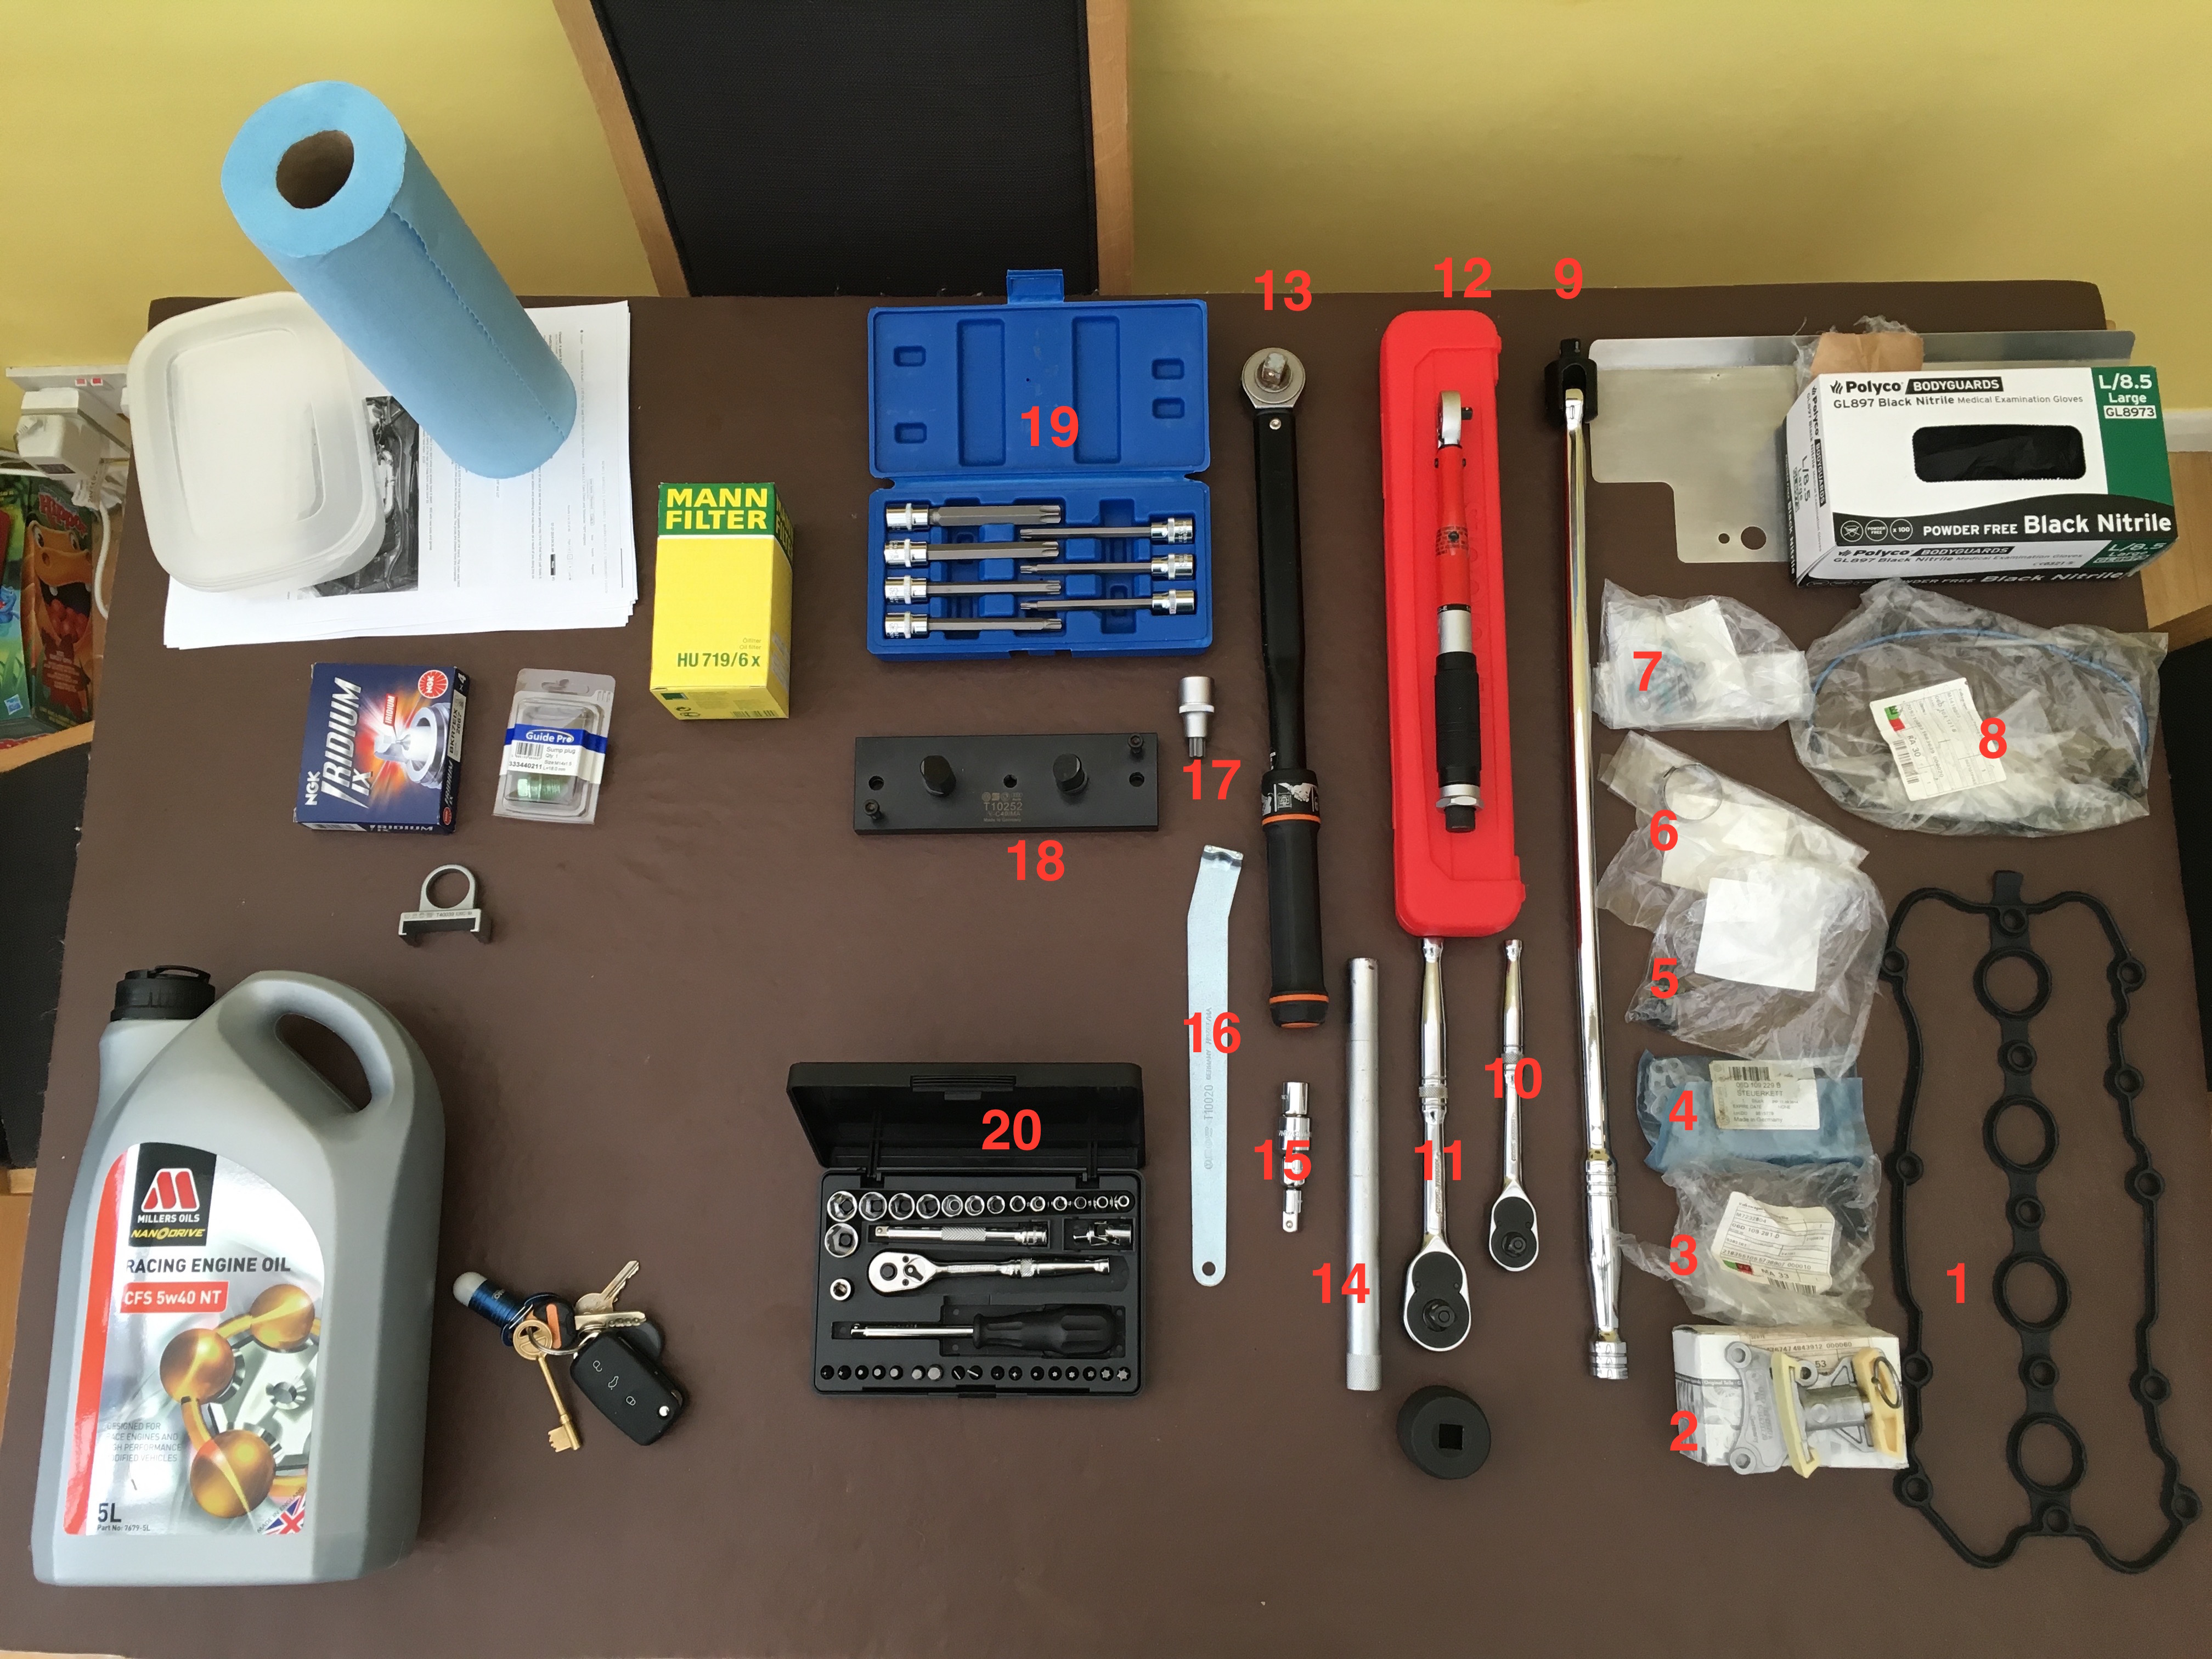
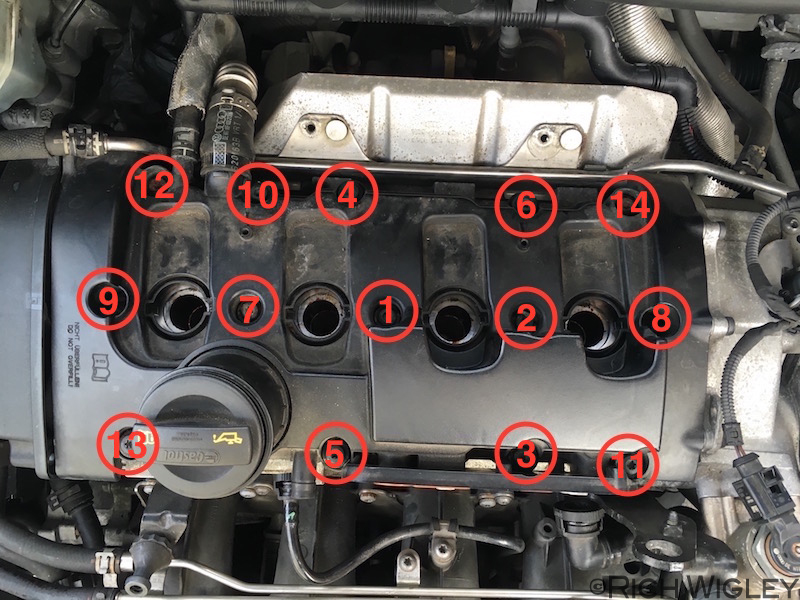
1. Cam Cover Gasket [color=red]06F 103 483 D[/color]
2. Tensioner[color=red] 06F 109 217 A[/color]
3. Adjuster Bolt [color=red]06D 109 281 D[/color]
4. Cam Chain [color=red]06D 109 229 B[/color]
5. Tensioner Bolts N 101 963 03 (optional) x3
6. Rear PCV Clamp [color=red]N 904 096 01[/color] OR. 30mm jubilee clip
7. Cam Chain Cover Bolts N 101 243 08 (Optional) x7
8. Cam Chain Cover Gasket [color=red]06D 103 121 B[/color]
9. 600mm 1/2" Breaker Bar
10. 3/8" Ratchet
11. 1/2" Ratchet
12. Low Range Torque Wrench
13. 1/2" Torque Wrench
14. 16mm Spark Plug Socket
15. 1/4-3/8-1/2" Adapters
16. VW Tool [color=red]T10020[/color]
17. VW Tool [color=red]T40080[/color]
18. VW Tool [color=red]T10252[/color]
19. 3/8" Long Torx bits
20. 1/4" Socket Set
Extra tools not shown.... Pliers, Mole grips, flat blade screwdriver. [u]M5 multispline[/u]
Other bits in pic are for an oil change, which I will do after the chain is done.
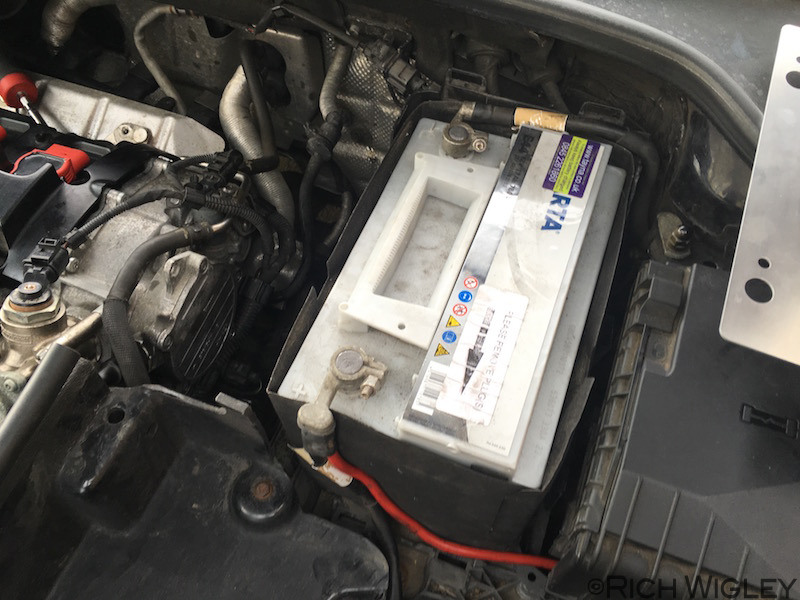
Should look something like this to begin with. I will skip the removal of the intake as everyone has a different setup. If you have the OEM box, google how to remove it

REMOVING THE BATTERY
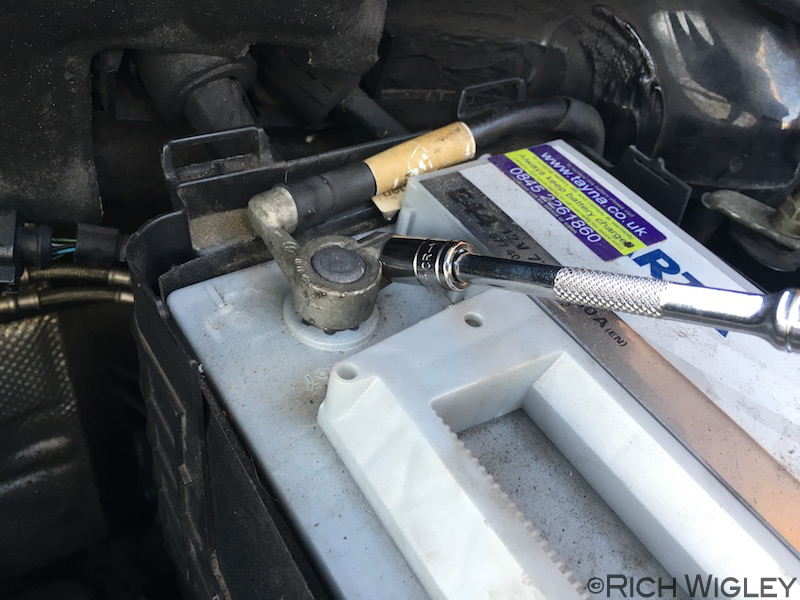
10mm socket or spanner. Do the neg. first then the pos.
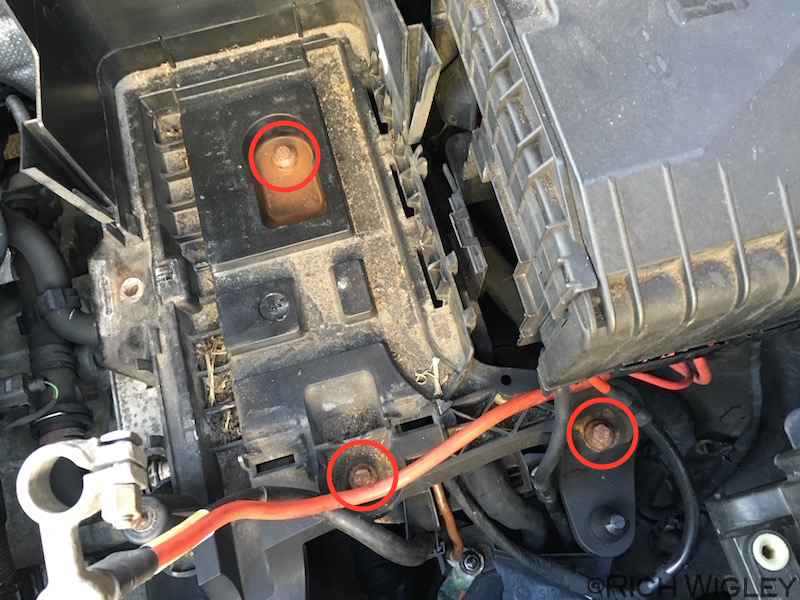
Remove the 13mm retaining bolt/plate

Remove the plastic cover on the front of the battery and then the battery can be pulled out
Remove the 3x 10mm bolts holding the battery tray in.
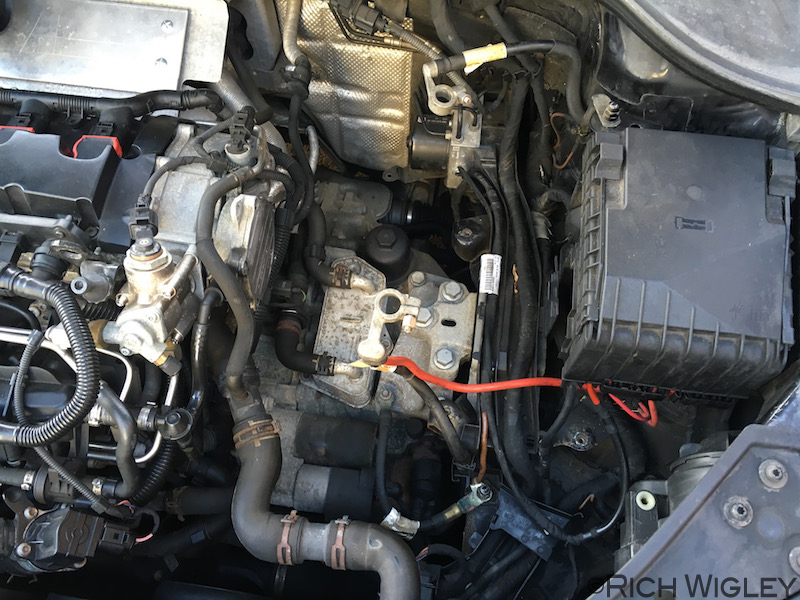
Should look like this now
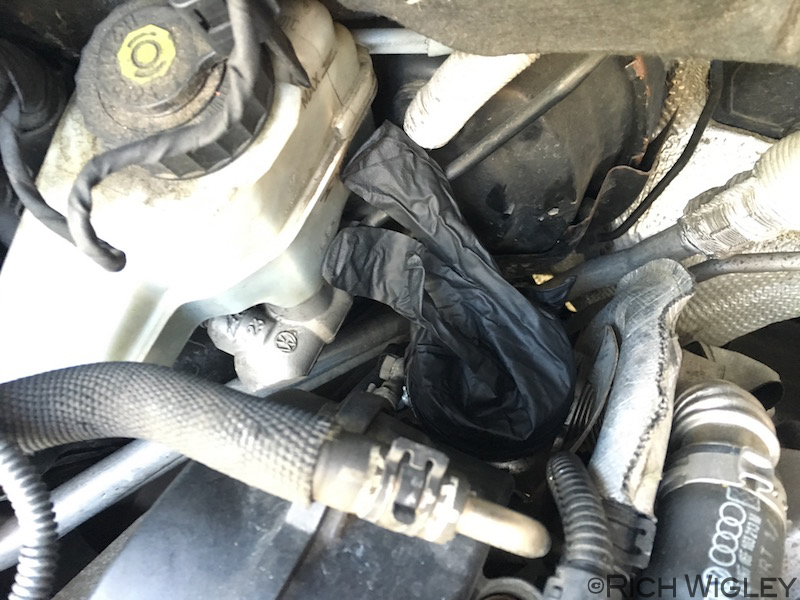
Always put something over the turbo inlet to stop crap falling in.
REMOVING THE COILPACK LOOM AND COILPACKS
Use a flat blade screwdriver to unclip the connectors. BE VERY CARFUL WITH THE CLIPS, THEY BREAK EASILY
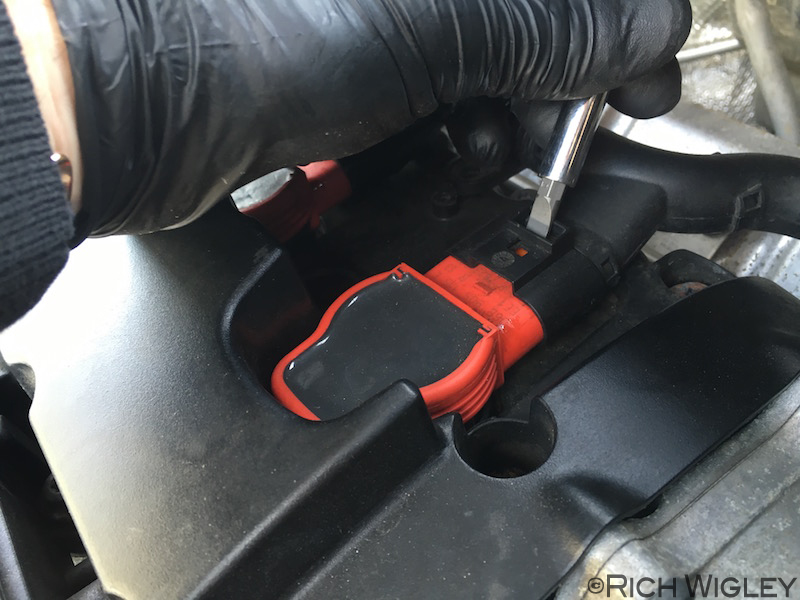
Remove the coils. You can number them if you are OCD. No real need though
REMOVING THE FRONT PCV
Undo the 4x T25 torx screws. And remove the front corrugated plastic pipe that links the PCV to the intake manifold
Remove the rightmost pipe on the PCV. Squeeze the 2 tabs on either side of the connector (marked in the pic)
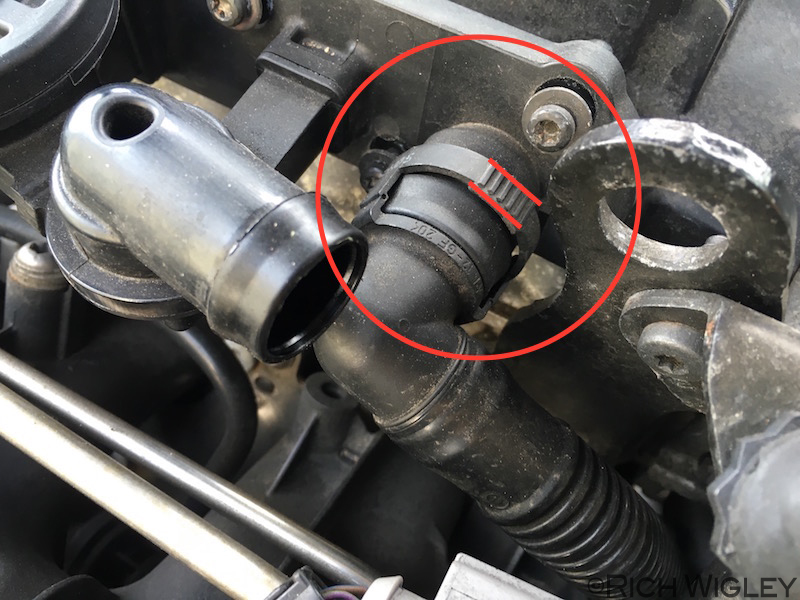
Should look like this.
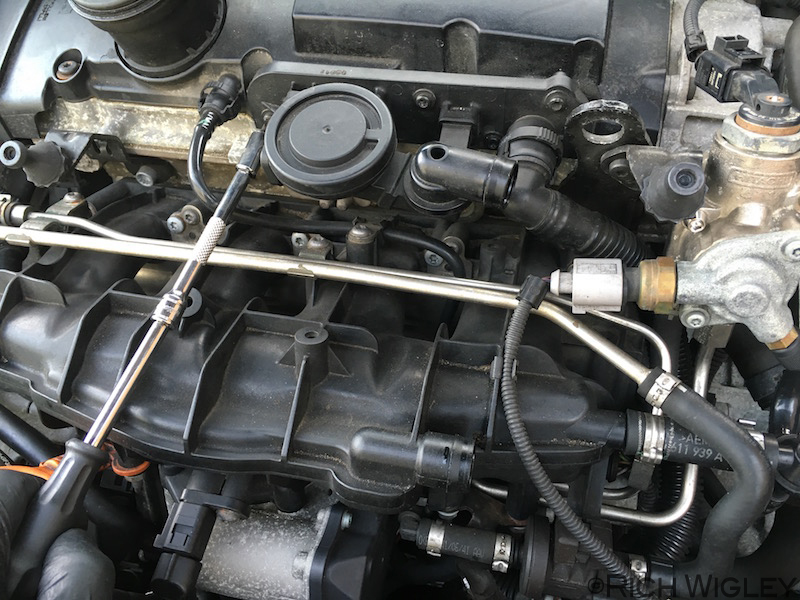
Remove the thin pipe in the centre of the cam cover. Squeeze either side as before.
REMOVING THE CAM COVER
All T30 Torx. Start with 2x on the left side over the cambelt
Remove the 14x T30 bolts on top of the cam cover.
Now... this bits a bit tricky, because you have to remove the 2 rear PCV hoses. I started by using a thin flat blade screwdriver to get under them and break the seal. I also used a pair of pliers very carefully around the thinner pipe to twist it. You should be able to get the thinner pipe off. I am not going to lie, this bit was a pain in the ass. Just perceiver and you'll get it off.
Remove the large pipe clamp by inserting a flat blade screw driver into the hole and twisting.
Leave the fat pipe on for now.
Lets break the cam cover seal. Best way to do this is kneel infront of the car and place both hands (as marked below) on the edge of the cover and slowly but firmly push up and away. Just be carful not to snap the neck off the filler pipe.
Once you've broken the seal you should be able to lift up the cover, this should help you release that rear fat PCV pipe by twisting and jiggling it.... again... this bit is a pain.
Once you have done that, its a good idea to spend a bit of time cleaning up the mating surface as it will be quite oily and will be dirty especially on the front edge.
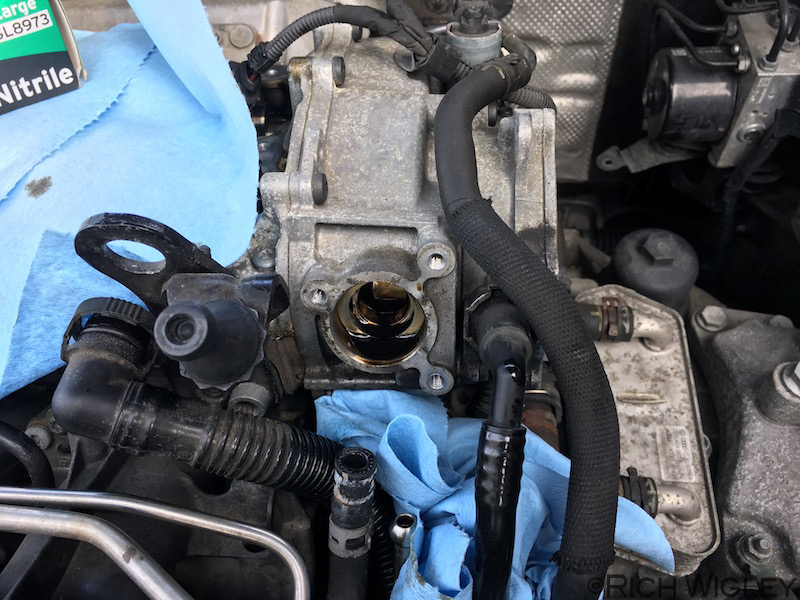
REMOVING THE HPFP
This is well documented online, so will keep this short
Link to thread to show you how.
http://www.mk5golfgti.co.uk/forum/index.php/topic,...
You'll need a T30 torx screwdriver and a 13mm spanner.
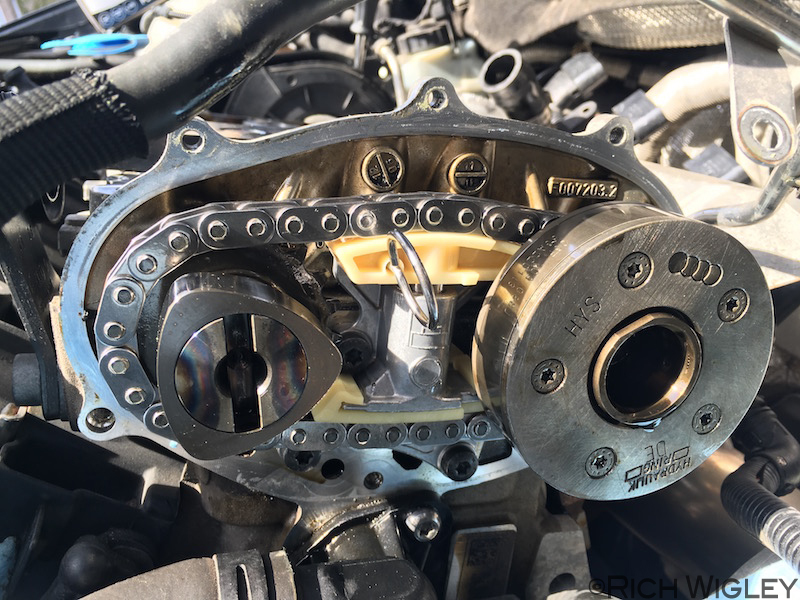
REMOVING THE CAM CHAIN COVER
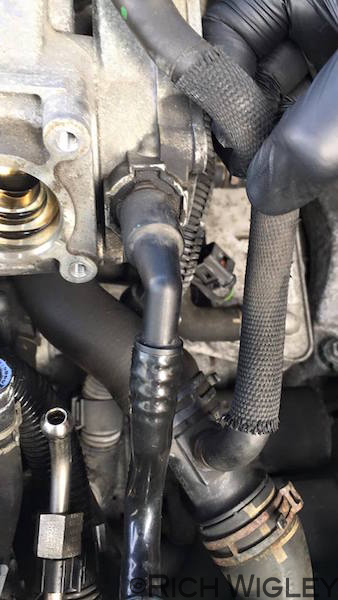
Begin by removing the bracket for the coolant line. M5 multispline is required here.

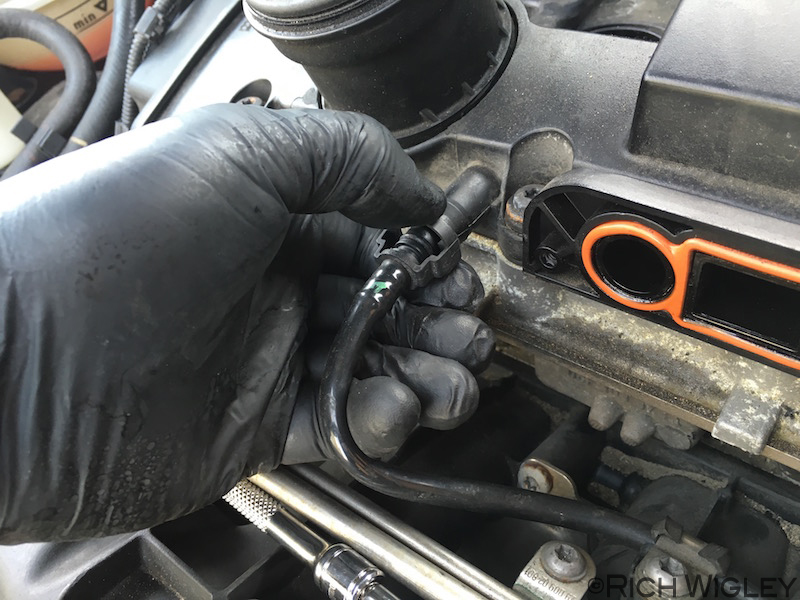
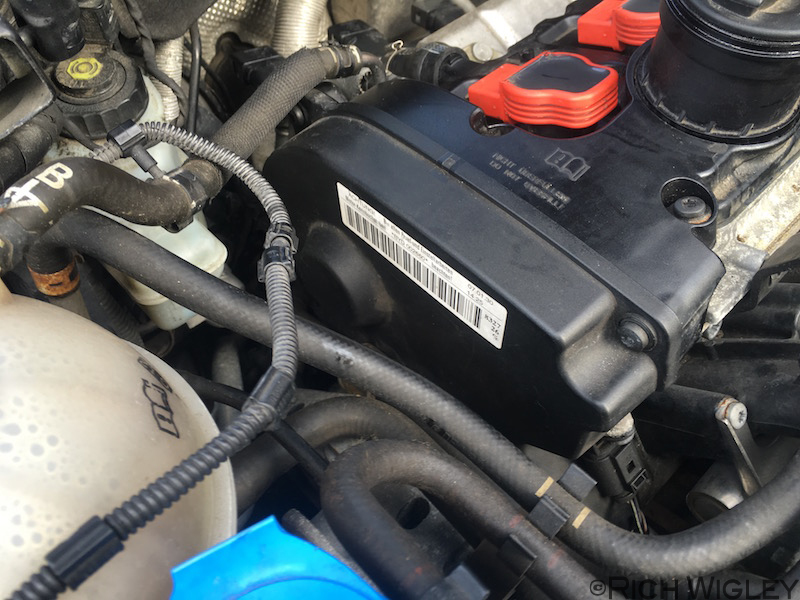
Remove the connector for the N205 cam adjuster valve. Also unclip the clips for the fat loom that runs beneath the cover

Pull off the vacuum connector on the front of the cover. This is quite stubborn but it will pull straight off.

Remove the bracket from below the cover. T30 Torx
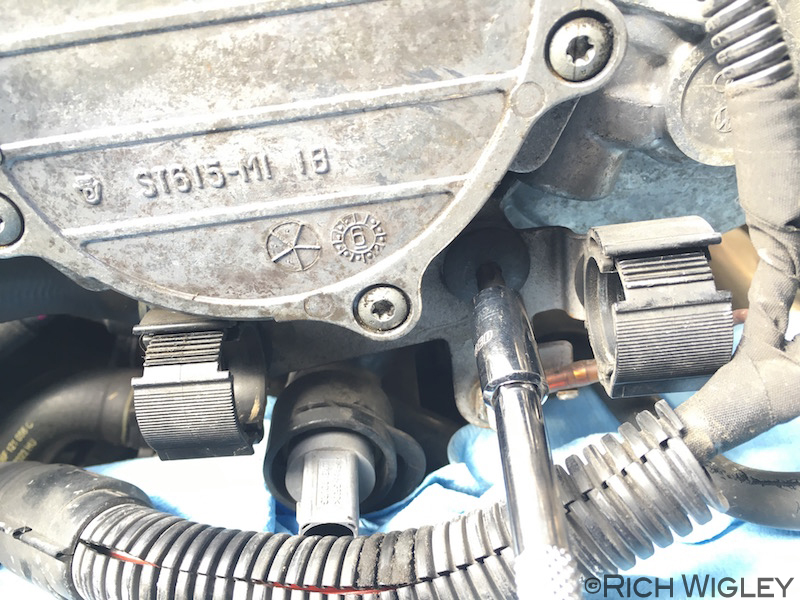
Undo the 7x T30 torx bolts holding on the cam chain cover. All bolts are black. Do not undo the silver bolt at the bottom by accident.
Note. You will need the 100mm torx bits [color=red]ITEM NUMBER 19 [/color]at the start of the post, you will not manage the lower bolt without these
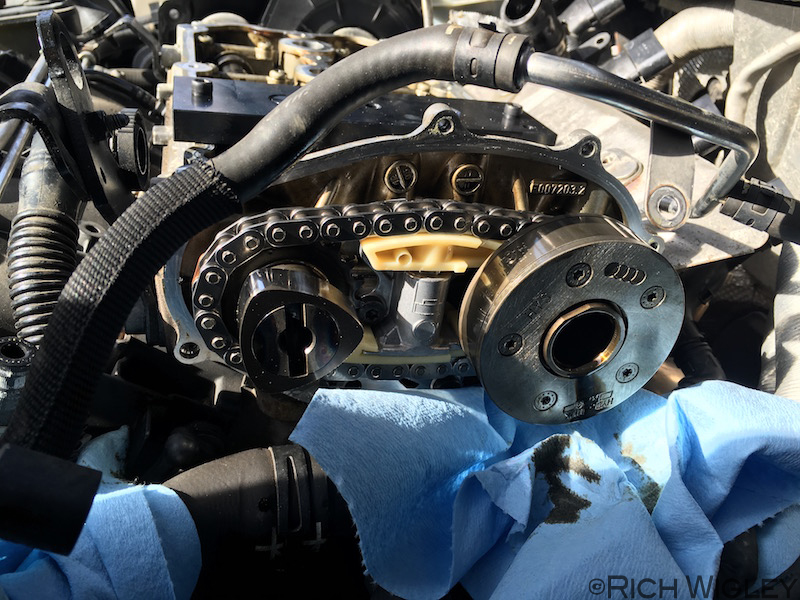
Before we remove the cover its important to move the coolant line clear of the N205 valve. Gently bend the metal pipe upwards.
Place lots of towels down below the cover, this bit can be quite messy and its good to prevent oil spilling all over the gearbox housing.
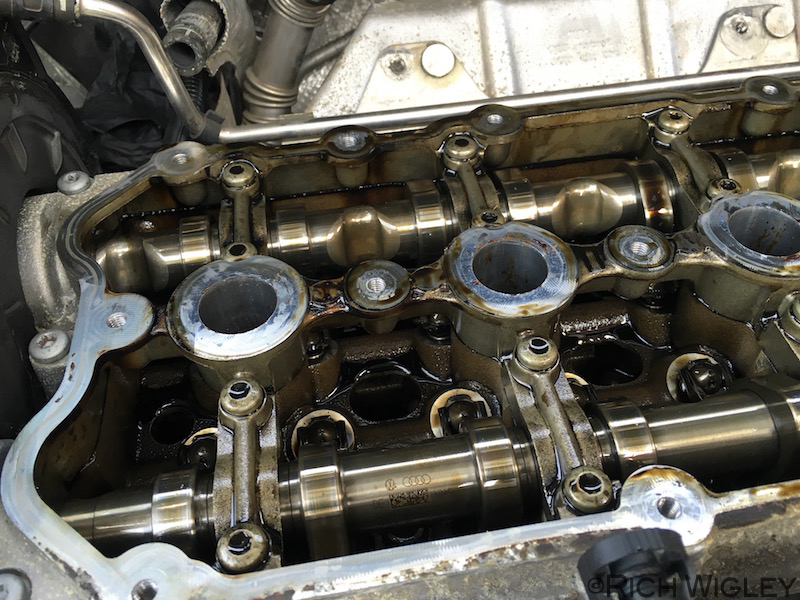
The cam cover can now be carefully removed, pull it off as straight as possible.
Stand back and admire how well you have done.
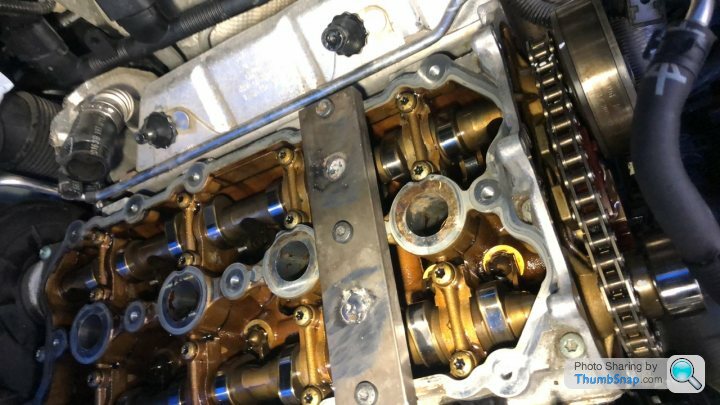
LOCKING THE CAMS
Its a good idea to remove the plugs. Youll need a long 16mm spark plug socket.

Its a good idea to cover the cam area just to stop any dirt getting into that area.
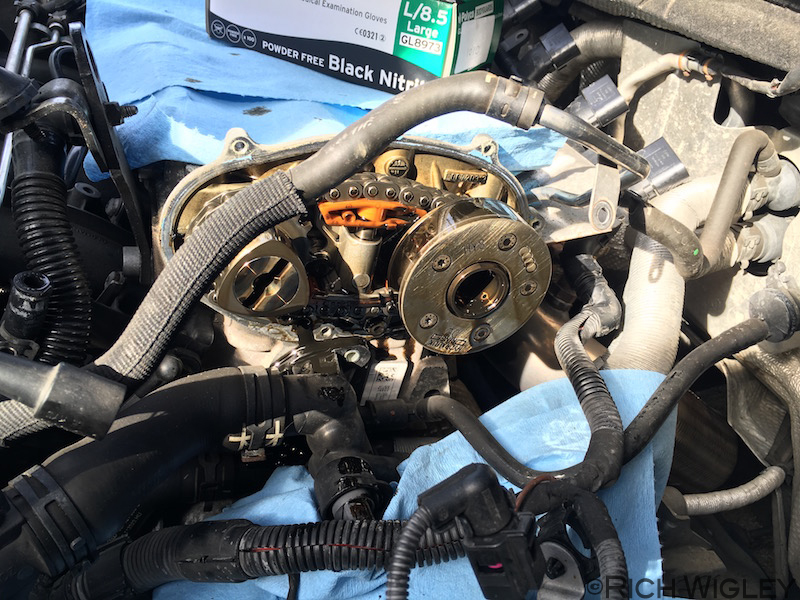
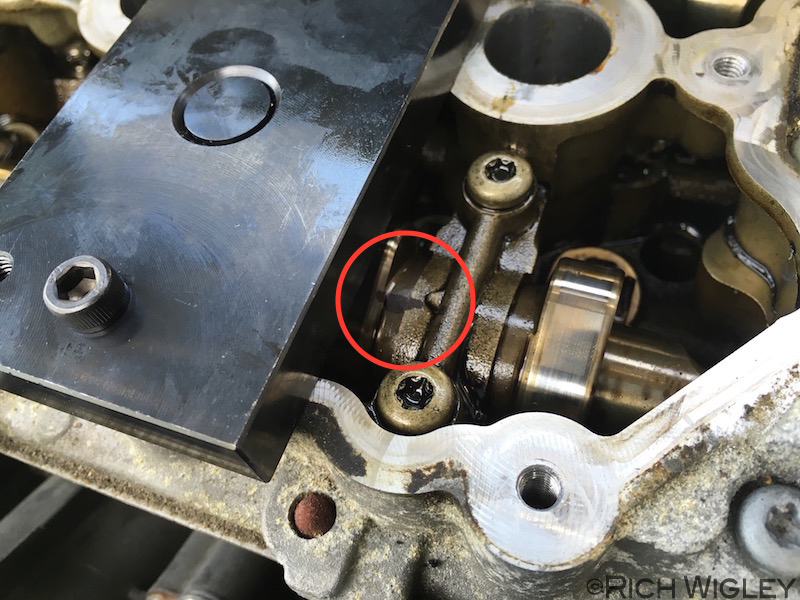
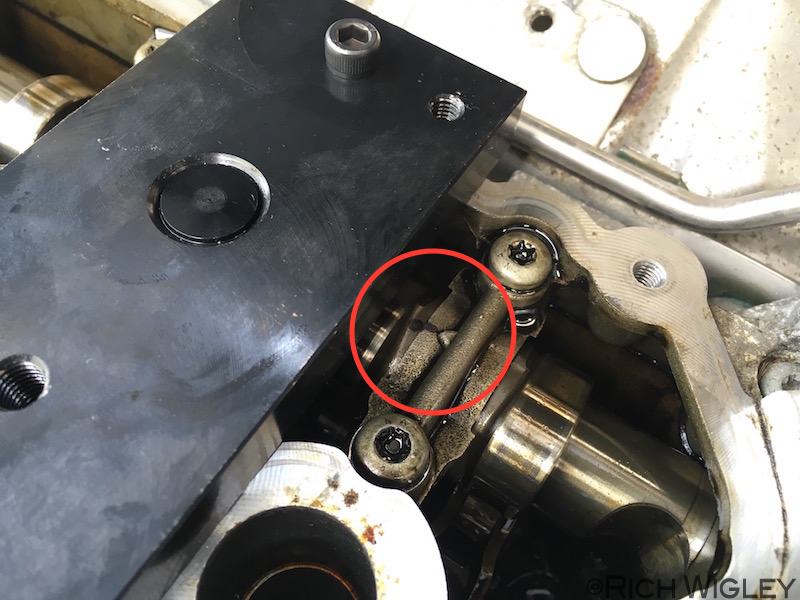
Insert the tool T10020 into the intake cam lobe and rotate it until the notches on both cams are facing each other, the locking tool should slot in.
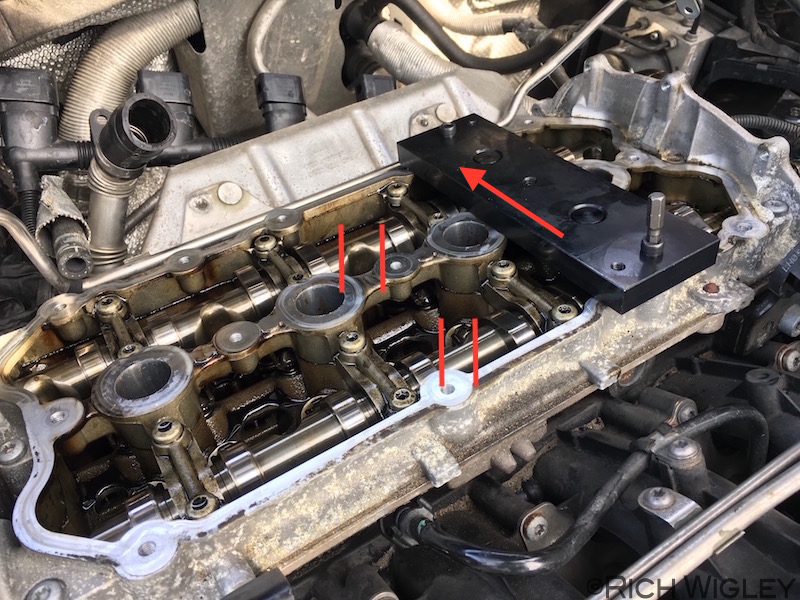
Now, the locking tool is a bit sh*t and there will be some play as it doesnt fit tightly between the cams. What I did was slide the locker as far back towards the exhaust cam as possible and tighten the two bolts up to 7 ftlbs
Just for extra peace of mind its worth marking the cams with a permanent marker pen. This gives you peace of mind that you have put the chain back on correctly. Mark directly on the cam, and on the cam cap right next to each other as show below. There are helpful little arrows to assist you with this.
REMOVING THE ADJUSTER AND CHAIN
OK... this is the bit you have been dreading. I woke up in cold sweats thinking about this part.
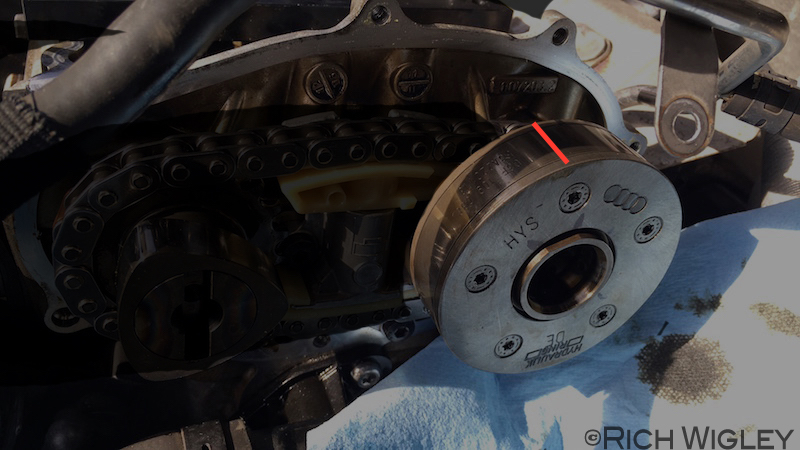
Remove the tensioner pin off the new tensioner and place it in the same hole on the old one, just to stop it exploding (see pic below)
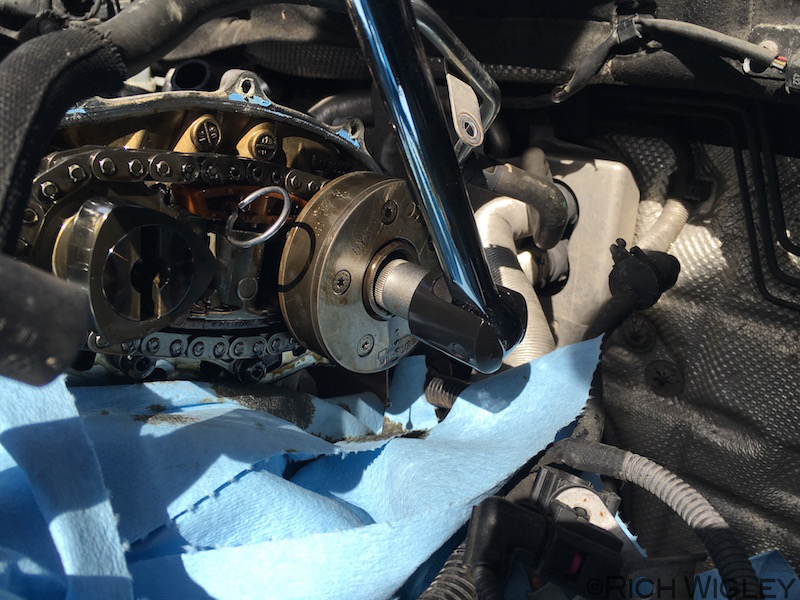
Using the tool T40080 and a long (~600mm) 1/2" breaker bar its time to crack the adjuster bolt. You WILL need a long bar, a normal 1/2" ratchet will not be sufficient.
This will make one hell of a noise when it moves and it will require to you use a lot of force. With your right palm keep the tool in the adjuster bolt (I grabbed around the adjuster with my fingers) and with your left hand smoothly pull.... HARD!!! No sudden jerks.
You will notice that when you pull to undo the bolt the cams will very slightly move. This is why we marked them earlier. You can see that the cams have slightly moved, but no panic as they have moved the same amount.
At this point I suggest you have a break.... Once you get here you have broken the back of the job, all the hard/worrying stuff has been done.
Continuing undoing the adjuster bolt by hand with tool T10020 and remove it.
Pull off the adjuster and the chain should come off with it, just be a bit carful here so you dont damage any teeth or the adjuster (its expensive)
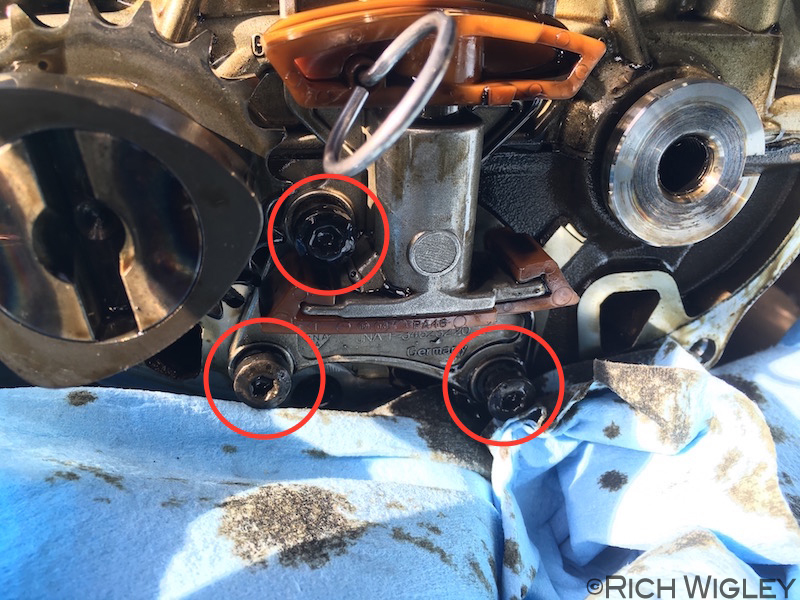
Now you can undo the 3x T30 torx bolts that hold on the tensioner.
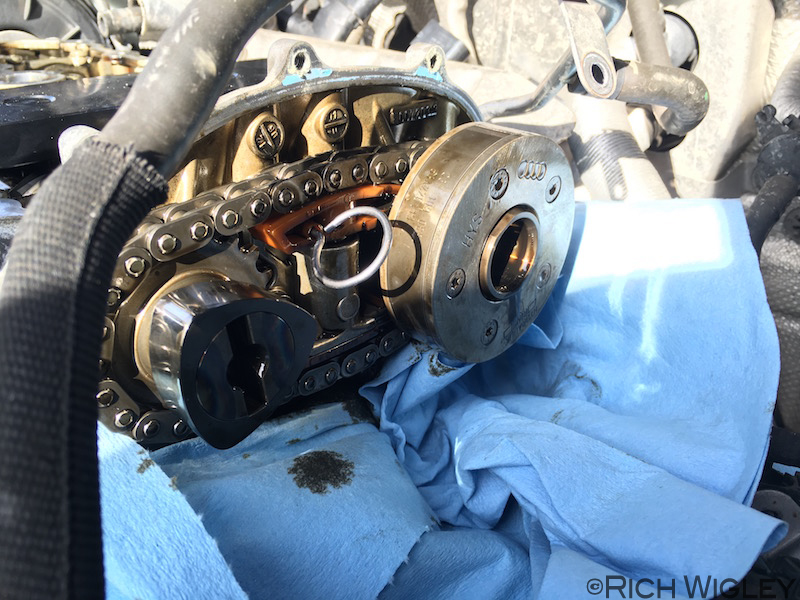
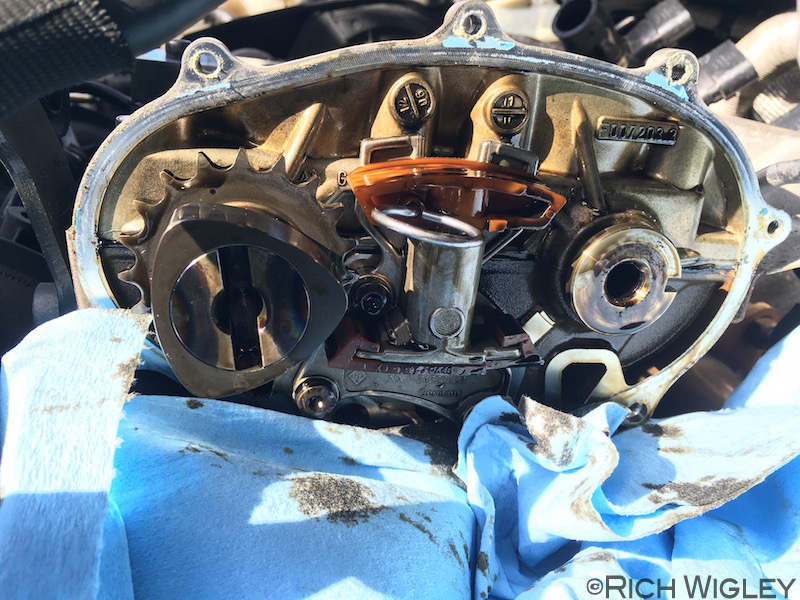
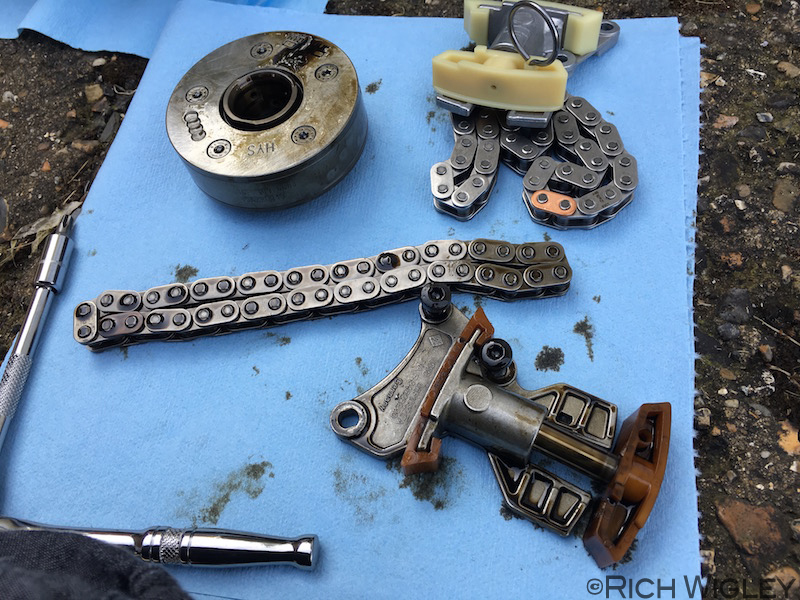
Old vs New
REPLACING THE TENSIONER AND CHAIN
Bolt on the new tenstioner, and torque to 7 ftlbs (I used new bolts)
Its a good idea to give the adjuster locating hole/surface a clean. Also clean up the mating surface of the cam chain seal/gasket. Failure to do this could result in leaks.
You can see that there is a notch in the adjuster mating surface, the adjuster can only go on one way. Before we put the chain on its a good idea to offer up the adjuster and mark on the top of the adjuster with a pen so you can use this as a reference when fitting it back with the chain.
Loop the chain onto the adjuster and carefully place the other end of the chain over the intake gear. This is where the mark will come in handy as you will be able to see very quickly if you have the chain on the right link or not. It took me a few goes to get this right. You might need to very slightly rotate the intake cam clockwise to enable the adjuster to slot in correctly. Just be patient.
[color=red]YOU CANNOT GET THIS BIT WRONG.... IF YOU DO, YOU WILL CAUSE CATASTROPHIC ENGINE DAMAGE. IF YOU ARE NOT SURE THEN DO NOT CONTINUE UNTIL YOU CAN GET A SECOND OPINION ON THIS[/color]
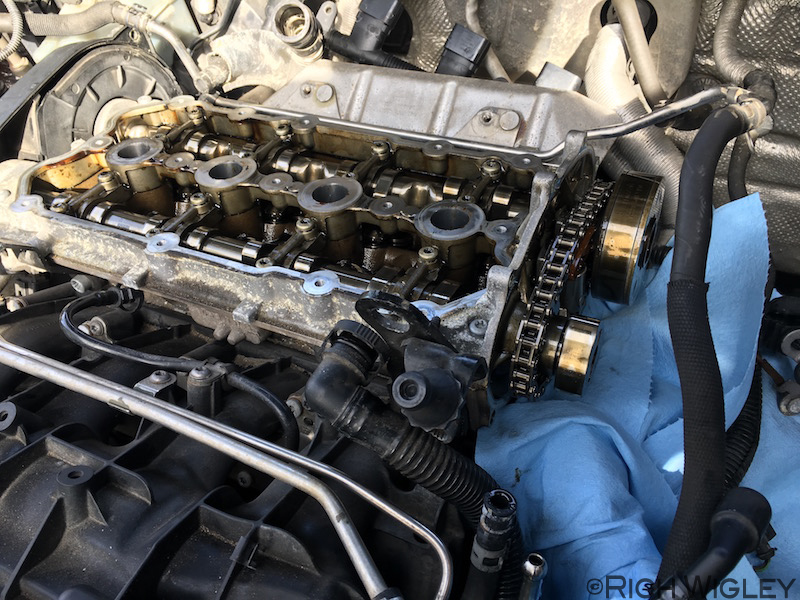
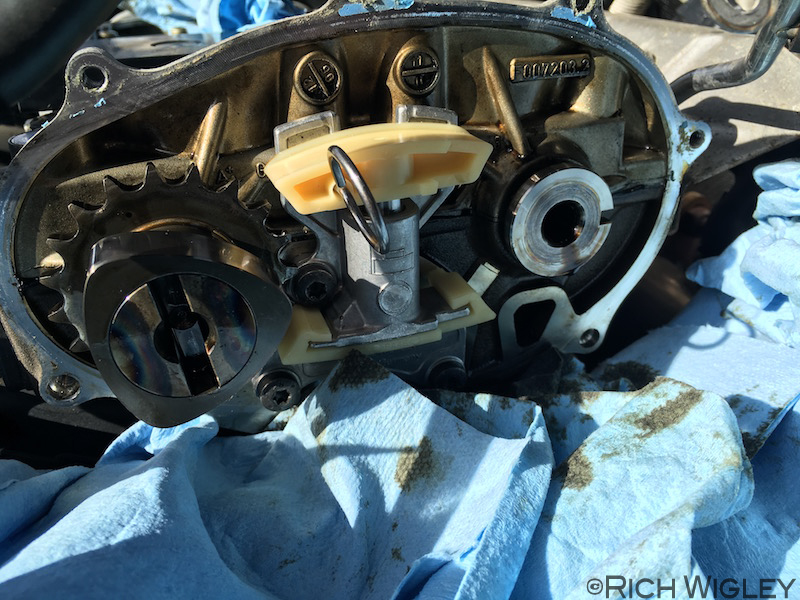
Once the new chain is on it should look something like this.
You can now remove the locking pin from the tensioner.
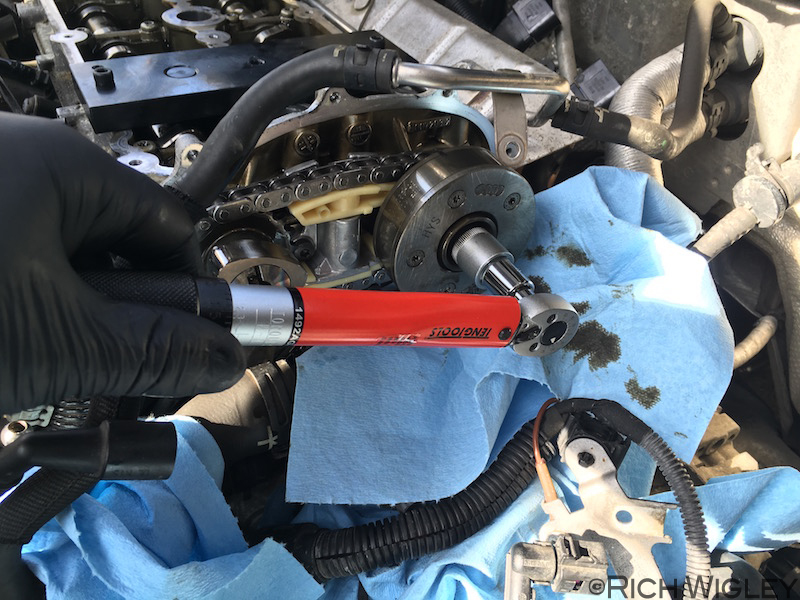
Insert the new adjuster bolt and tighten. This is a 2 stage tightening process.
STAGE 1
Tighten to 15 ftlbs using a torque wrench.
STAGE 2
Next is to put 1/8th turn on the bolt.[u] If you have an angle gauge then use it to tighten to 1/8th turn (45º) and skip this bit, if you don't have one then keep reading. [/u]
Put the T40080 tool on your breaker bar. and have it in a position so that it can be rotated. I.E. not so high that you cannot tighten the bolt.
With the tool in the adjuster bolt, mark the tool and the adjuster with a marker pen. Marked 'A' below.
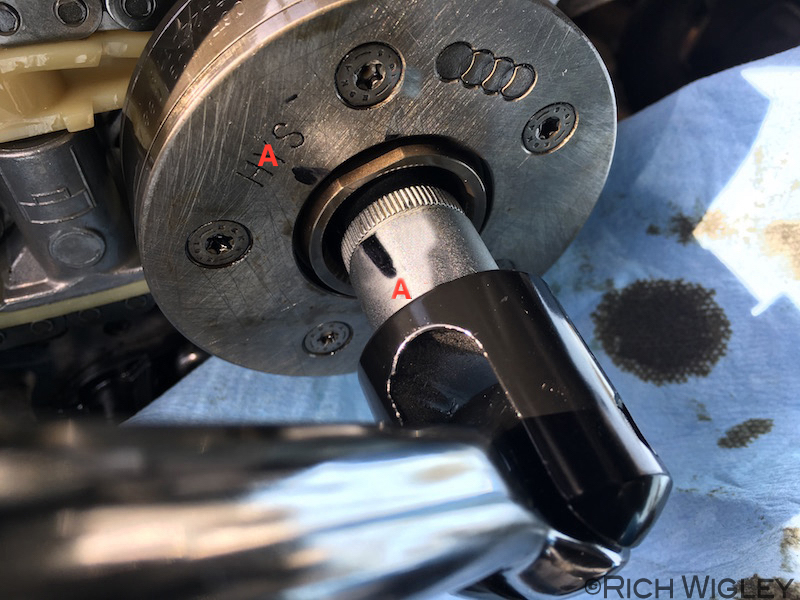
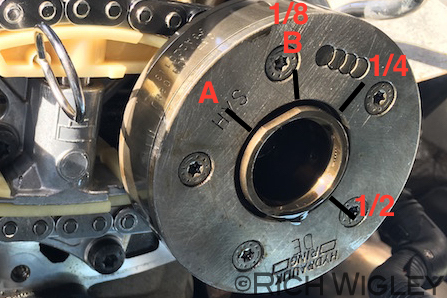
Remove the tool. Using the mark 'A' on the adjuster, make another mark opposite at 180º (marked 1/2). Half that and mark again at 90º marked 1/4). Half that again and mark at 45º (marked 1/8). This is mark 'B' below.
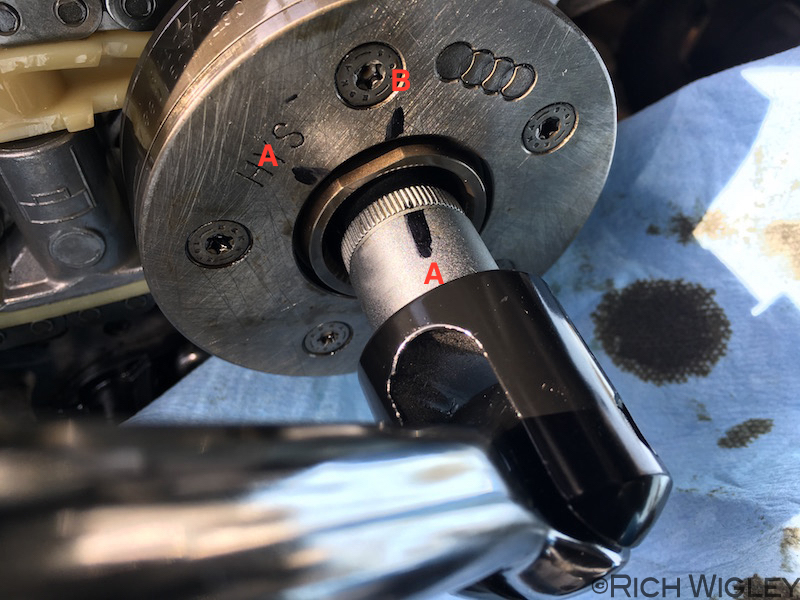
Replace the tool and breaker bar so that 'A' on the tool aligns with 'A' on the adjuster. Keep one hand on the socket to ensure it doesnt pop off or move. With one firm movement tighten the bolt until the line on the tool matches up with line 'B' on the adjuster like below
At this stage its a good idea to now check those marks you made on the cam shafts to check that you are timed up correctly. They do move about a bit, but it should be very very obvious if you have it wrong. Again, if you are not sure, take some pics and ask someone.
REASEMBLY
Replace the gasket on the cam chain cover and replace the cover.
Be very carful not to damage anything. Replace the 7 bolts and torque up to 7 ftlbs

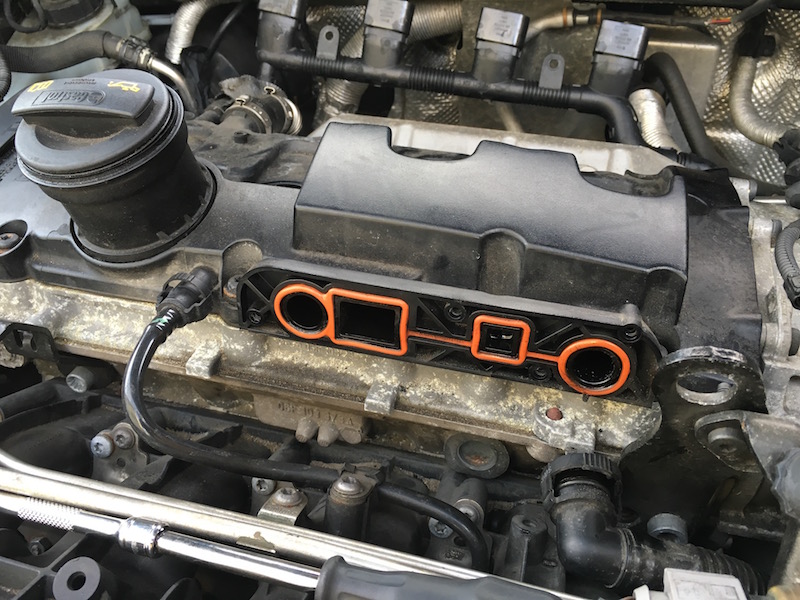
Replace the bracket under the cover and clip the loom back in place.
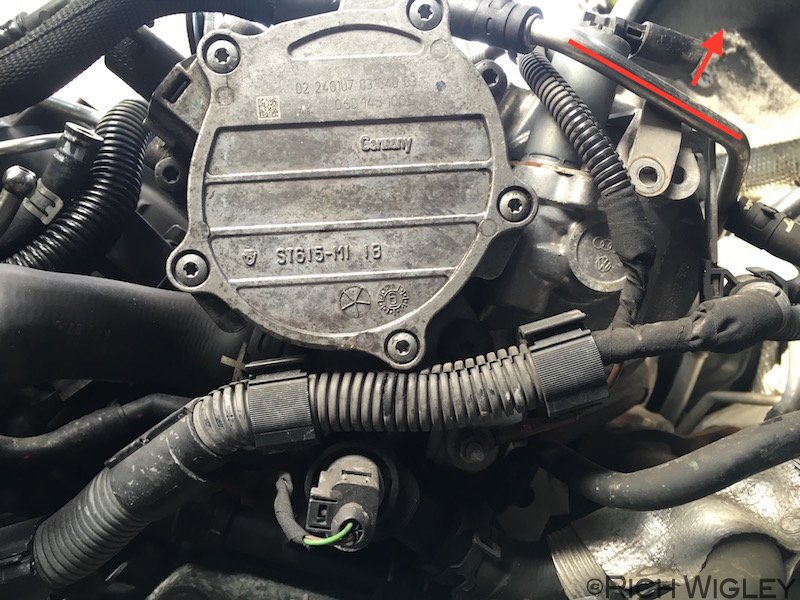
Clip the connector back onto the N205 valve

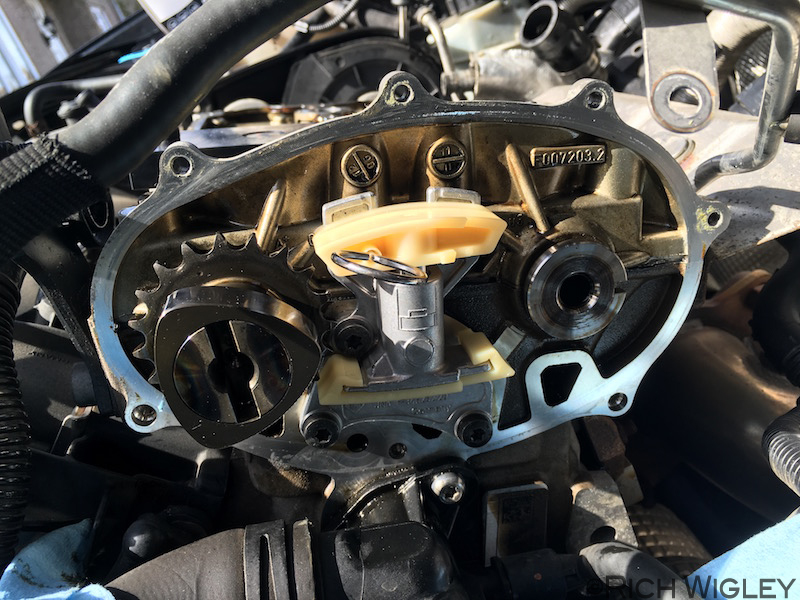
[u]NOTE[/u], the photo above shows an error in the black oval. The plastic loom should run under the metal hard line, not over as in the photo below. The time to sort this out is now.
Replace the cam cover
Remove the old gasket from the cam cover and replace it with a new one. Flip the cam cover over and place on top of the cams. Its a bit tricky as the new gasket will tend to fall off, be patient. Once youve got the cover on, spend a bit of time making sure the the gasket it properly located and sat flat.
Begin to bolt down the cover, just to finger tight.

Double check the gasket.
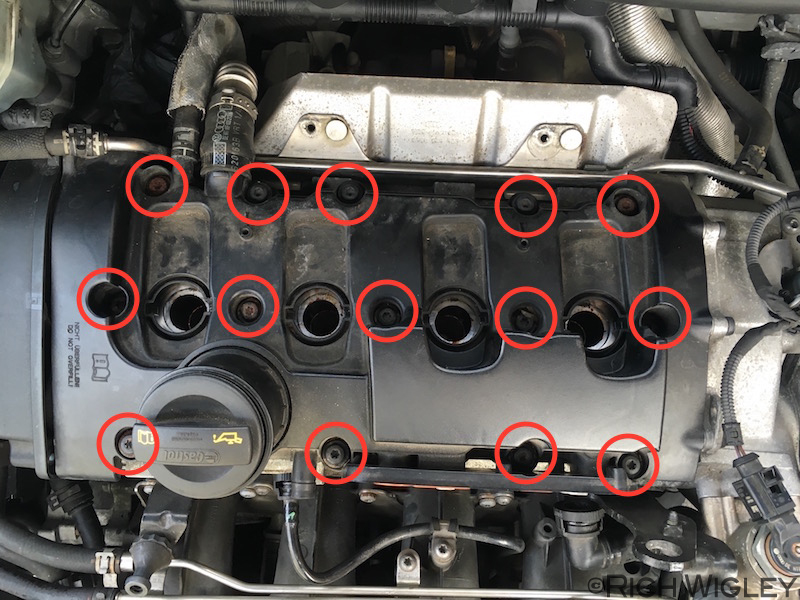
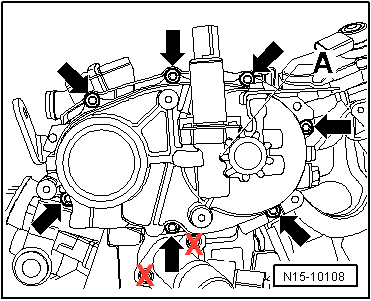
Now torque the bolts up to 7 ftlbs following the sequence below.
Remember the 2 bolts for the cambelt cover... again 7 ftlbs
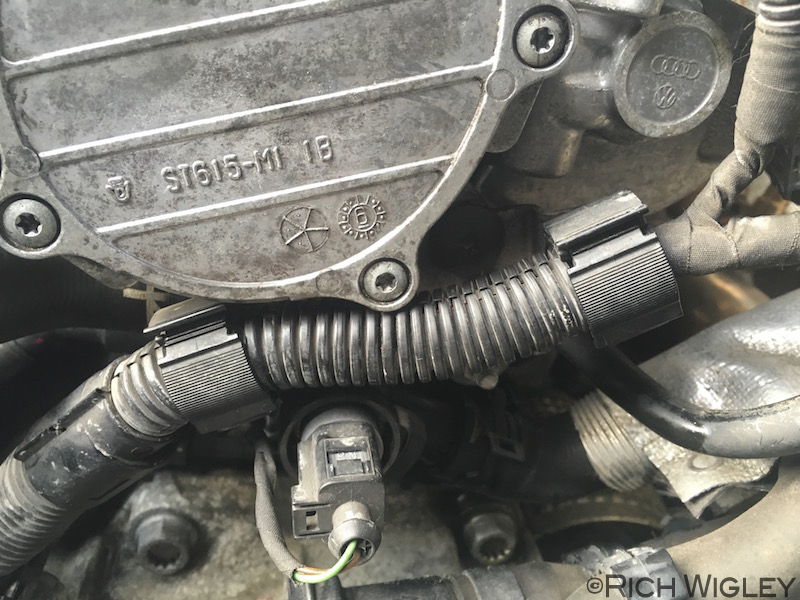
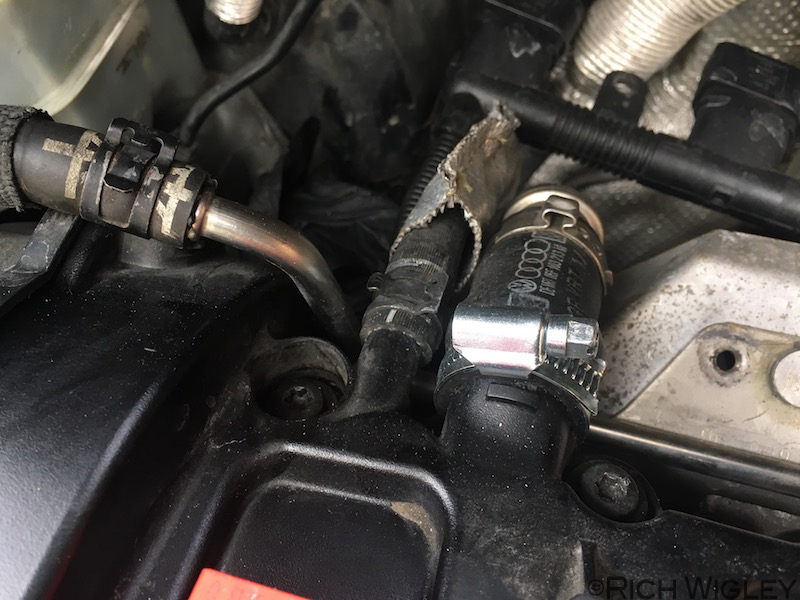
Replace the 2 rear PCV pipes.
The fat one is a pig to get back on but it will go back on. I used a jubilee clip to replace the OEM clip.
Replace the front PCV
Remember the smaller hose in the middle of the cam cover.

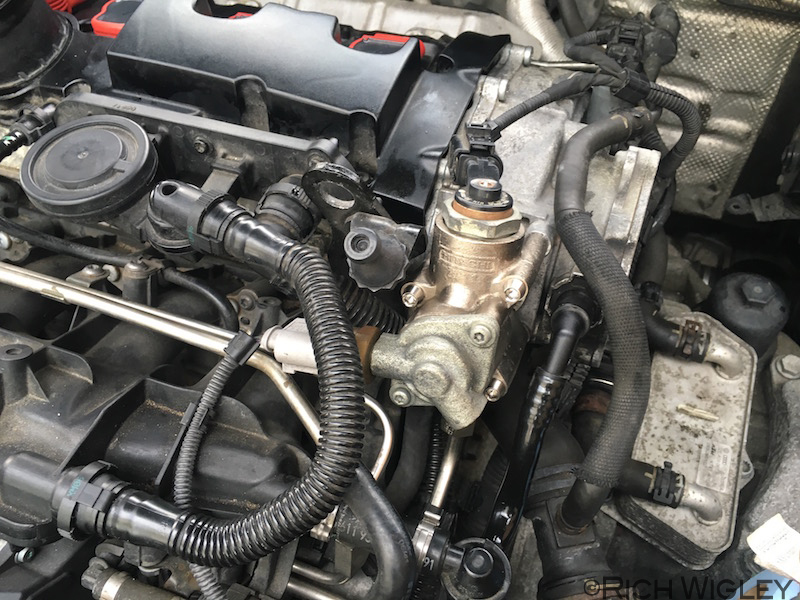
Replace the HPFP. Remembering to reconnect all lines and connectors.
At this stage its worth spending a bit of time with some brake cleaner and towels cleaning under the cam chain cover as you will have spilt oil on the gearbox casing. This is also good practice to monitor for any future oil leaks.
Replace the Battery
Replace your Airbox... or Intake system.
Double check that all electrical connectors are connected and the fuel lines are secure on the HPFP.
[color=red][u]NOW.... time to take a brave pill and fire the f*cker up!!!!!![/u][/color]
[color=blue][u]Quick access torque specs....[/u]
Cam Adjuster Bolt -------------- Stage 1= 15 ftlbs Stage 2= 1/8 turn
Cam Chain Tensioner Bolt ------ 7 ftlbs
Cam Cover Bolts ----------------- 7 ftlbs
Cam Chain Cover ---------------- 7 ftlbs
HPFP Bolts ------------------------ 7 ftlbs
[/color]
Basically... If in boubt.... 7 ftlbs! :signLOL:
Good luck!!!!
Rich
1. Cam Cover Gasket [color=red]06F 103 483 D[/color]
2. Tensioner[color=red] 06F 109 217 A[/color]
3. Adjuster Bolt [color=red]06D 109 281 D[/color]
4. Cam Chain [color=red]06D 109 229 B[/color]
5. Tensioner Bolts N 101 963 03 (optional) x3
6. Rear PCV Clamp [color=red]N 904 096 01[/color] OR. 30mm jubilee clip
7. Cam Chain Cover Bolts N 101 243 08 (Optional) x7
8. Cam Chain Cover Gasket [color=red]06D 103 121 B[/color]
9. 600mm 1/2" Breaker Bar
10. 3/8" Ratchet
11. 1/2" Ratchet
12. Low Range Torque Wrench
13. 1/2" Torque Wrench
14. 16mm Spark Plug Socket
15. 1/4-3/8-1/2" Adapters
16. VW Tool [color=red]T10020[/color]
17. VW Tool [color=red]T40080[/color]
18. VW Tool [color=red]T10252[/color]
19. 3/8" Long Torx bits
20. 1/4" Socket Set
Extra tools not shown.... Pliers, Mole grips, flat blade screwdriver. [u]M5 multispline[/u]
Other bits in pic are for an oil change, which I will do after the chain is done.
Should look something like this to begin with. I will skip the removal of the intake as everyone has a different setup. If you have the OEM box, google how to remove it
REMOVING THE BATTERY
10mm socket or spanner. Do the neg. first then the pos.
Remove the 13mm retaining bolt/plate
Remove the plastic cover on the front of the battery and then the battery can be pulled out
Remove the 3x 10mm bolts holding the battery tray in.
Should look like this now
Always put something over the turbo inlet to stop crap falling in.
REMOVING THE COILPACK LOOM AND COILPACKS
Use a flat blade screwdriver to unclip the connectors. BE VERY CARFUL WITH THE CLIPS, THEY BREAK EASILY
Remove the coils. You can number them if you are OCD. No real need though
REMOVING THE FRONT PCV
Undo the 4x T25 torx screws. And remove the front corrugated plastic pipe that links the PCV to the intake manifold
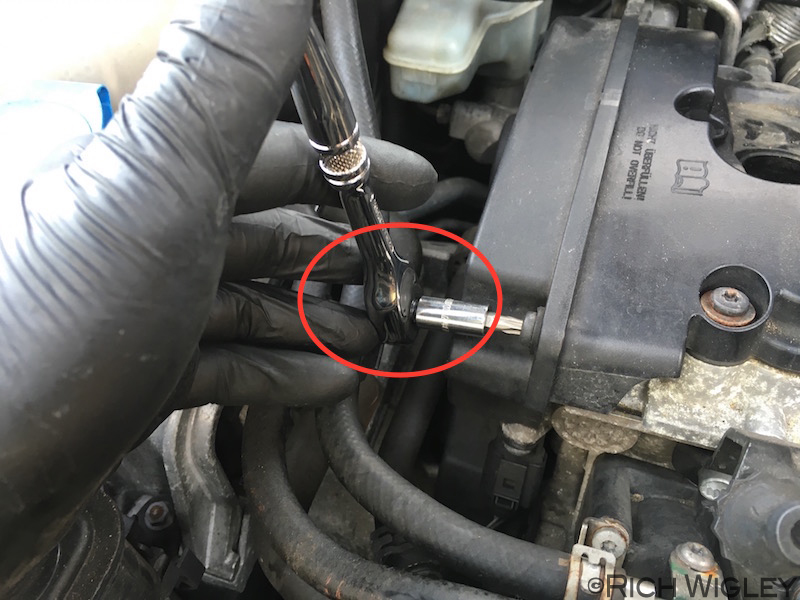
Remove the rightmost pipe on the PCV. Squeeze the 2 tabs on either side of the connector (marked in the pic)
Should look like this.
Remove the thin pipe in the centre of the cam cover. Squeeze either side as before.
REMOVING THE CAM COVER
All T30 Torx. Start with 2x on the left side over the cambelt
Remove the 14x T30 bolts on top of the cam cover.
Now... this bits a bit tricky, because you have to remove the 2 rear PCV hoses. I started by using a thin flat blade screwdriver to get under them and break the seal. I also used a pair of pliers very carefully around the thinner pipe to twist it. You should be able to get the thinner pipe off. I am not going to lie, this bit was a pain in the ass. Just perceiver and you'll get it off.
Remove the large pipe clamp by inserting a flat blade screw driver into the hole and twisting.
Leave the fat pipe on for now.
Lets break the cam cover seal. Best way to do this is kneel infront of the car and place both hands (as marked below) on the edge of the cover and slowly but firmly push up and away. Just be carful not to snap the neck off the filler pipe.
Once you've broken the seal you should be able to lift up the cover, this should help you release that rear fat PCV pipe by twisting and jiggling it.... again... this bit is a pain.
Once you have done that, its a good idea to spend a bit of time cleaning up the mating surface as it will be quite oily and will be dirty especially on the front edge.
REMOVING THE HPFP
This is well documented online, so will keep this short
Link to thread to show you how.
http://www.mk5golfgti.co.uk/forum/index.php/topic,...
You'll need a T30 torx screwdriver and a 13mm spanner.
REMOVING THE CAM CHAIN COVER
Begin by removing the bracket for the coolant line. M5 multispline is required here.
Remove the connector for the N205 cam adjuster valve. Also unclip the clips for the fat loom that runs beneath the cover
Pull off the vacuum connector on the front of the cover. This is quite stubborn but it will pull straight off.
Remove the bracket from below the cover. T30 Torx
Undo the 7x T30 torx bolts holding on the cam chain cover. All bolts are black. Do not undo the silver bolt at the bottom by accident.
Note. You will need the 100mm torx bits [color=red]ITEM NUMBER 19 [/color]at the start of the post, you will not manage the lower bolt without these
Before we remove the cover its important to move the coolant line clear of the N205 valve. Gently bend the metal pipe upwards.
Place lots of towels down below the cover, this bit can be quite messy and its good to prevent oil spilling all over the gearbox housing.
The cam cover can now be carefully removed, pull it off as straight as possible.
Stand back and admire how well you have done.
LOCKING THE CAMS
Its a good idea to remove the plugs. Youll need a long 16mm spark plug socket.
Its a good idea to cover the cam area just to stop any dirt getting into that area.
Insert the tool T10020 into the intake cam lobe and rotate it until the notches on both cams are facing each other, the locking tool should slot in.
Now, the locking tool is a bit sh*t and there will be some play as it doesnt fit tightly between the cams. What I did was slide the locker as far back towards the exhaust cam as possible and tighten the two bolts up to 7 ftlbs
Just for extra peace of mind its worth marking the cams with a permanent marker pen. This gives you peace of mind that you have put the chain back on correctly. Mark directly on the cam, and on the cam cap right next to each other as show below. There are helpful little arrows to assist you with this.
REMOVING THE ADJUSTER AND CHAIN
OK... this is the bit you have been dreading. I woke up in cold sweats thinking about this part.
Remove the tensioner pin off the new tensioner and place it in the same hole on the old one, just to stop it exploding (see pic below)
Using the tool T40080 and a long (~600mm) 1/2" breaker bar its time to crack the adjuster bolt. You WILL need a long bar, a normal 1/2" ratchet will not be sufficient.
This will make one hell of a noise when it moves and it will require to you use a lot of force. With your right palm keep the tool in the adjuster bolt (I grabbed around the adjuster with my fingers) and with your left hand smoothly pull.... HARD!!! No sudden jerks.
You will notice that when you pull to undo the bolt the cams will very slightly move. This is why we marked them earlier. You can see that the cams have slightly moved, but no panic as they have moved the same amount.
At this point I suggest you have a break.... Once you get here you have broken the back of the job, all the hard/worrying stuff has been done.
Continuing undoing the adjuster bolt by hand with tool T10020 and remove it.
Pull off the adjuster and the chain should come off with it, just be a bit carful here so you dont damage any teeth or the adjuster (its expensive)
Now you can undo the 3x T30 torx bolts that hold on the tensioner.
Old vs New
REPLACING THE TENSIONER AND CHAIN
Bolt on the new tenstioner, and torque to 7 ftlbs (I used new bolts)
Its a good idea to give the adjuster locating hole/surface a clean. Also clean up the mating surface of the cam chain seal/gasket. Failure to do this could result in leaks.
You can see that there is a notch in the adjuster mating surface, the adjuster can only go on one way. Before we put the chain on its a good idea to offer up the adjuster and mark on the top of the adjuster with a pen so you can use this as a reference when fitting it back with the chain.
Loop the chain onto the adjuster and carefully place the other end of the chain over the intake gear. This is where the mark will come in handy as you will be able to see very quickly if you have the chain on the right link or not. It took me a few goes to get this right. You might need to very slightly rotate the intake cam clockwise to enable the adjuster to slot in correctly. Just be patient.
[color=red]YOU CANNOT GET THIS BIT WRONG.... IF YOU DO, YOU WILL CAUSE CATASTROPHIC ENGINE DAMAGE. IF YOU ARE NOT SURE THEN DO NOT CONTINUE UNTIL YOU CAN GET A SECOND OPINION ON THIS[/color]
Once the new chain is on it should look something like this.
You can now remove the locking pin from the tensioner.
Insert the new adjuster bolt and tighten. This is a 2 stage tightening process.
STAGE 1
Tighten to 15 ftlbs using a torque wrench.
STAGE 2
Next is to put 1/8th turn on the bolt.[u] If you have an angle gauge then use it to tighten to 1/8th turn (45º) and skip this bit, if you don't have one then keep reading. [/u]
Put the T40080 tool on your breaker bar. and have it in a position so that it can be rotated. I.E. not so high that you cannot tighten the bolt.
With the tool in the adjuster bolt, mark the tool and the adjuster with a marker pen. Marked 'A' below.
Remove the tool. Using the mark 'A' on the adjuster, make another mark opposite at 180º (marked 1/2). Half that and mark again at 90º marked 1/4). Half that again and mark at 45º (marked 1/8). This is mark 'B' below.
Replace the tool and breaker bar so that 'A' on the tool aligns with 'A' on the adjuster. Keep one hand on the socket to ensure it doesnt pop off or move. With one firm movement tighten the bolt until the line on the tool matches up with line 'B' on the adjuster like below
At this stage its a good idea to now check those marks you made on the cam shafts to check that you are timed up correctly. They do move about a bit, but it should be very very obvious if you have it wrong. Again, if you are not sure, take some pics and ask someone.
REASEMBLY
Replace the gasket on the cam chain cover and replace the cover.
Be very carful not to damage anything. Replace the 7 bolts and torque up to 7 ftlbs
Replace the bracket under the cover and clip the loom back in place.
Clip the connector back onto the N205 valve
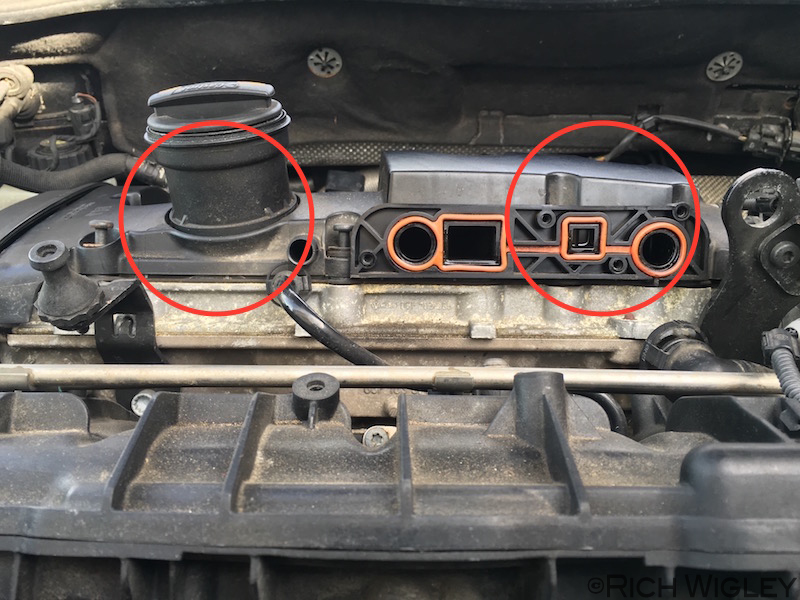
[u]NOTE[/u], the photo above shows an error in the black oval. The plastic loom should run under the metal hard line, not over as in the photo below. The time to sort this out is now.
Replace the cam cover
Remove the old gasket from the cam cover and replace it with a new one. Flip the cam cover over and place on top of the cams. Its a bit tricky as the new gasket will tend to fall off, be patient. Once youve got the cover on, spend a bit of time making sure the the gasket it properly located and sat flat.
Begin to bolt down the cover, just to finger tight.
Double check the gasket.
Now torque the bolts up to 7 ftlbs following the sequence below.
Remember the 2 bolts for the cambelt cover... again 7 ftlbs
Replace the 2 rear PCV pipes.
The fat one is a pig to get back on but it will go back on. I used a jubilee clip to replace the OEM clip.
Replace the front PCV
Remember the smaller hose in the middle of the cam cover.
Replace the HPFP. Remembering to reconnect all lines and connectors.
At this stage its worth spending a bit of time with some brake cleaner and towels cleaning under the cam chain cover as you will have spilt oil on the gearbox casing. This is also good practice to monitor for any future oil leaks.
Replace the Battery
Replace your Airbox... or Intake system.
Double check that all electrical connectors are connected and the fuel lines are secure on the HPFP.
[color=red][u]NOW.... time to take a brave pill and fire the f*cker up!!!!!![/u][/color]
[color=blue][u]Quick access torque specs....[/u]
Cam Adjuster Bolt -------------- Stage 1= 15 ftlbs Stage 2= 1/8 turn
Cam Chain Tensioner Bolt ------ 7 ftlbs
Cam Cover Bolts ----------------- 7 ftlbs
Cam Chain Cover ---------------- 7 ftlbs
HPFP Bolts ------------------------ 7 ftlbs
[/color]
Basically... If in boubt.... 7 ftlbs! :signLOL:
Good luck!!!!
Rich
Hello.
Great write, very inspirational! I have been debating about doing this for months but think I actually may give it a go now.
Only question I have is where did you buy or get her tools.. I am really struggling to find good tools. I see plenty on ebay/amazon but they have varying reviews and don't trust them. I am mainly referring to the 3 VW specific tools.
a link would be great?
cheers!
Just wanted to personally thank "braketester" for his excellent - 2.0 TFSI Cam Chain DIY Guide - I needed to renew my cam adjuster hub, timing chain and tensioner on my Audi 2.0T fsi (AXX Engine Code). I found his Walkthrough/Tutorial very professional and easy to follow and I would not have or could not have tackled the job without it.
jimmymcjimmy123 said:
Just wanted to personally thank "braketester" for his excellent - 2.0 TFSI Cam Chain DIY Guide - I needed to renew my cam adjuster hub, timing chain and tensioner on my Audi 2.0T fsi (AXX Engine Code). I found his Walkthrough/Tutorial very professional and easy to follow and I would not have or could not have tackled the job without it.
No problem. Glad it helped you. Also writing a thanks for this write up.
I had bought the cheap holding tool off eBay, the one with the small screws that hold the large pins in, the tool just folded when trying to undo the bolt, so I got the welder out and run some weld round the pins, and the tool worked perfectly, and was fixed in 5 minutes.
So maybe for someone else, even if you don’t have a welder but have the tool with the two tiny screws in the top, just take it to someone with a welder and it’ll be fine, it doesn’t even need to look pretty as mine didn’t, I’m sure most would do it for beer tokens as it’s not a difficult job.
Excuse the welding, I’m still learning and I was in the least ideal situation, outside in the rain, on the floor with gas less wire.

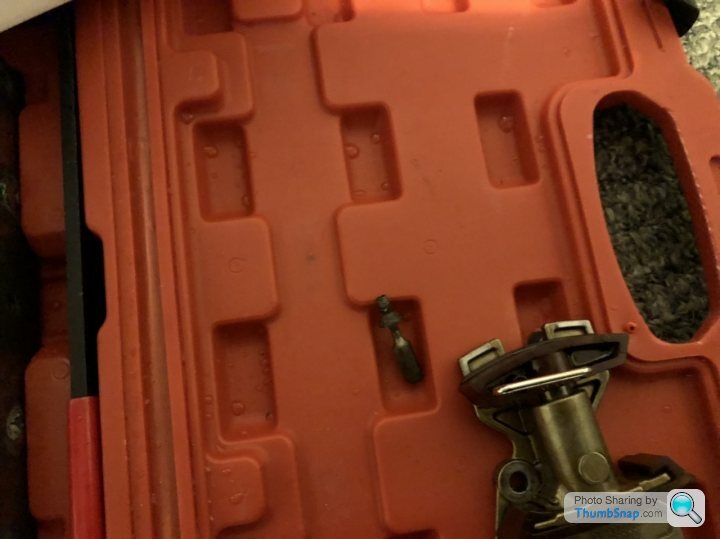
This is the tiny little screw that is supposed to take all that force undoing the bolt.
Modded tool in place, the welding doesn’t get in the way.
I had bought the cheap holding tool off eBay, the one with the small screws that hold the large pins in, the tool just folded when trying to undo the bolt, so I got the welder out and run some weld round the pins, and the tool worked perfectly, and was fixed in 5 minutes.
So maybe for someone else, even if you don’t have a welder but have the tool with the two tiny screws in the top, just take it to someone with a welder and it’ll be fine, it doesn’t even need to look pretty as mine didn’t, I’m sure most would do it for beer tokens as it’s not a difficult job.
Excuse the welding, I’m still learning and I was in the least ideal situation, outside in the rain, on the floor with gas less wire.
This is the tiny little screw that is supposed to take all that force undoing the bolt.
Modded tool in place, the welding doesn’t get in the way.
First of all, thanks thebraketester for an excellent guide. Just finished my change of the chain. Ran into some trouble and wanted to share my experience from ripping the the poly bolt. My Poly was really sitting there. Made a special support ring to make sure the T40080 tool would stay centered in the VVT... but i ripped it anyway. Now i was in a really s tty situation. Drilled a 9.5 mm hole 4mm down in the broken ploy bolt (cover the inside of the VVT to prevent metal getting into it). Gave it a number of hard strokes (read on VWVortex that it could release some of the grip). Heated up the bolt to the level that the oil started to smoke and took a Torcs 55 (width 11mm) and managed to drive it into the 9.5 mm hole. Now it was really sitting there and managed to get it out with a normal wrench. So, with that fresh in mind i would have done it different today. Hitting it hard, heat it up and not used the breaker bar but a normal wrench to prevent using too much force for the poly bolt . Cheers and thanks again!
tty situation. Drilled a 9.5 mm hole 4mm down in the broken ploy bolt (cover the inside of the VVT to prevent metal getting into it). Gave it a number of hard strokes (read on VWVortex that it could release some of the grip). Heated up the bolt to the level that the oil started to smoke and took a Torcs 55 (width 11mm) and managed to drive it into the 9.5 mm hole. Now it was really sitting there and managed to get it out with a normal wrench. So, with that fresh in mind i would have done it different today. Hitting it hard, heat it up and not used the breaker bar but a normal wrench to prevent using too much force for the poly bolt . Cheers and thanks again!One of my mates has a BWA with a terrible rattle. Been diagnosed as tappets (I know they use a roller-rocker type assembly).
He's trying to get me to do this at the same time.
How much of a pain in the arse is it?
Plenty of experience doing stuff on TDIs, so the generic VAG stuff is fine, just never been inside the head of a TFSI.
He's trying to get me to do this at the same time.
How much of a pain in the arse is it?
Plenty of experience doing stuff on TDIs, so the generic VAG stuff is fine, just never been inside the head of a TFSI.
Gassing Station | Engines & Drivetrain | Top of Page | What's New | My Stuff