E91 Straight Six Bearding
Discussion


Jakg said:
I wouldn't buy a repaired set of wheels, and like you have struggled to find a straight set of 216's!
But my RenaultSport Megane had a welded wheel when I bought it and it was fine the whole time I had the car.
There’s a set on eBay which have already been welded, and then a set that state 1 small crack but no photos - and I’ve messaged the seller with no response!But my RenaultSport Megane had a welded wheel when I bought it and it was fine the whole time I had the car.
Other option is listed as no damages - which is where I’ll probably go. And if they crack, I’ll get Lepsons to fix them.
Last time we had some new tyres fitted to ours (17" wheels), the tyre fitter managed to crack one of them. They told us that with the older BMW wheels (from around the time they first started fitting run-flats) - its quite common for damage to be caused when removing/fitting tyres - because run-flats require more force to get them on or off the rim (newer wheels have apparently been redesigned).
They paid to have the wheel welded - but I'm now cautious about having tyres fitted
They paid to have the wheel welded - but I'm now cautious about having tyres fitted
I've been tracing a hesitation when pulling, which I've narrowed down to one coil pack (read codes, swapped coil pack between cylinders, re read codes.)
Is it worth replacing the spark plugs when replacing the coil? They are approx 4 1/2 yrs/18k miles old so not due, but is a spark plug likely to have caused the coil to fail?
Is it worth replacing the spark plugs when replacing the coil? They are approx 4 1/2 yrs/18k miles old so not due, but is a spark plug likely to have caused the coil to fail?
RECr said:
I've been tracing a hesitation when pulling, which I've narrowed down to one coil pack (read codes, swapped coil pack between cylinders, re read codes.)
Is it worth replacing the spark plugs when replacing the coil? They are approx 4 1/2 yrs/18k miles old so not due, but is a spark plug likely to have caused the coil to fail?
I’d leave the plug. Is it worth replacing the spark plugs when replacing the coil? They are approx 4 1/2 yrs/18k miles old so not due, but is a spark plug likely to have caused the coil to fail?
 If the misfire returns after changing the coil then I'll suspect the plugs. Happily the fact that the misfire moved with the coil pack hopefully rules out the injectors for now.
 Check your DME! I sound like a stuck record, but I had a misfire that moved with the coils being swapped around. Did them all and a week later it was back to being a t t. Ultimately, after things got much much worse, it was found that the DME was having a "deep bath". New one required.
t. Ultimately, after things got much much worse, it was found that the DME was having a "deep bath". New one required.christhreadgill said:
There’s a set on eBay which have already been welded, and then a set that state 1 small crack but no photos - and I’ve messaged the seller with no response!
Other option is listed as no damages - which is where I’ll probably go. And if they crack, I’ll get Lepsons to fix them.
There’s a crack and weld free set on the FB E9x Owners Group in Hertfordshire if you’re still looking. Other option is listed as no damages - which is where I’ll probably go. And if they crack, I’ll get Lepsons to fix them.
Hi All,
My E90 330i (on 108k miles) threw a 'High engine Loads may Damage Catalytic Converter' message on iDrive this morning. When scanning for codes, I got:
29D1 Combustion misfires, cylinder 5.
Is the above an easy fix at home? If so, what parts do I require?
Or should I take it to the garage to get fixed?
Swervin_Mervin said:
Check your DME! I sound like a stuck record, but I had a misfire that moved with the coils being swapped around. Did them all and a week later it was back to being a tt. Ultimately, after things got much much worse, it was found that the DME was having a "deep bath". New one required.
t. Ultimately, after things got much much worse, it was found that the DME was having a "deep bath". New one required.RECr said:
I think I remember reading about that on this thread a couple of years ago. For that reason I try to clear out the drain hole underneath the e-box well when I have the nsf wheel off. (The drain hole is just a fold in the seam, so won't take much to block it.
Might have been my thread on my previous E91...copied and pasted from the thread said:
So, where were we?

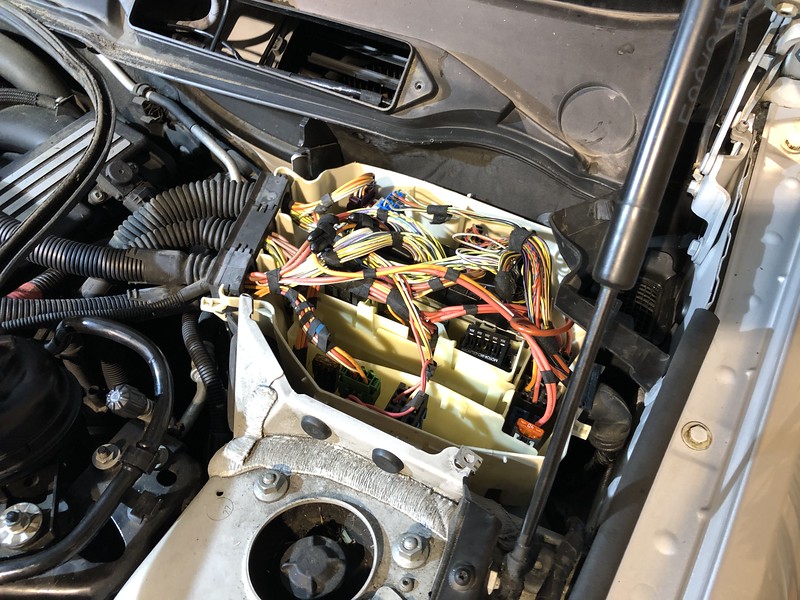
Ah yes, tackling '2E77 Ignition, Votage Supply' that resulted in me being towed home by the AA. Whilst the AA guy tackled the car it became apparent that the source of the issue was from the plethora of fuses and relays in the fuse box situated in the engine bay, as pictured above. He checked several fuses and relays but after 90 minutes gave up and relayed me to my choice of garage or home. I contacted a garage that specialises in BMW's first but they couldn't squeeze me in until the end of December. However, upon hearing that it was electrical/diagnostic work required they recommended a fella who happened to operate only a couple of miles from my address so I booked in with him for the following Monday and left the car parked up at home until then.
http://www.gfmdiagnostics.co.uk - absolutely delighted with the service. GFD is a proper nice chap who certainly knows what he is doing. By the end of Monday he had belled me up explaining that the ECU (aka the DME) had been waterlogged and needed replaced. He had already priced up a replacement but supplied me with part numbers knowing I'd want to hunt for a cheaper option.

Here's the offending item. It slots into the aforementioned fuse/relay box like a slice of toast which explains the water damage on the lower portion. The diagnostics fella said there was visible water at the bottom of the box containing all the fuses and relays but when he removed this unit loads of water came trickling out from inside it. Not good. Even worse was finding out that BMW would like approximately £1100 for a replacement.
Thankfully, I found a newly listed secondhand unit unit on eBay for for £180 and paid about the same again for my old one to be copied and cloned to this new unit by GFD. This involves all sorts of electronic trickery such as altering VIN and mileage information on the replacement unit but I am delighted to report that it all worked a treat. The eBay seller was an absolute gent and accommodated me by posting it via next day special delivery.
Here's the replacement against the waterlogged item:


The car has had no issues in this department since I got it back and I am delighted to have all-in paid say a third of the price BMW want for a new unit and that isn't factoring in labour costs for fitting and coding... I dread to think. Other options from a reputable independent in London was £550 for a refurbished unit which would still require fitting and coding by GDF!
I'm delighted to have resolved this fairly cheaply in the end and with the car back before the weekend, I was able to fetch my latest treat to myself with the money saved. An additional Halfords Advanced tool chest to go on top of my roll cab!

So, that brings us on approach to this weekend past. I got the car back on Friday morning but if you live in the central belt of Scotland you will know all about the atrocious snow/sleet/rain situation we had for a few days. Mindful that I had other issues to attend to and that I hadn't resolved the water issues damaging the previous ECU/DME unit, I arranged to use my brother's unit to work on the car under shelter for Saturday before the water issues cropped up again.
The plan for this session was to trace and tackle the water issues affecting the DME, replace the valve cover gasket, oil filter housing gasket and the oil cooler gasket. It was going to be a long shift and I popped round for 4pm armed with coffee and disappointing SCO v IRE rugby results.

Can you tell my brother is a welder? This fact comes in very handy later...
Knowing we had plenty to do I got stuck into removing various panels and bits to provide as much space in the engine bay as possible whilst my brother finished up a couple of welding jobs. Knowing I was in for the long haul I fired up Audible and took my time cleaning all the bits I removed as I went along.

So here's a top down view of the fuse box which the ECU/DME resides in:

Worryingly, I could see a significant amount of water had pooled up inside the box already following the heavy rain only 48 hours prior. I didn't want to move too much too soon but set about removing as much water as possible with the hose and trigger from a spare spray bottle I had in the car.

I thought this was quite clever! It took a solid 10 minutes of pumping to remove most of the water I could reach which helped me realise that there was even more water elsewhere in this area that was compounding the problem. Once I felt I had removed all the water I could I felt confident enough to lift and remove all the components safely.

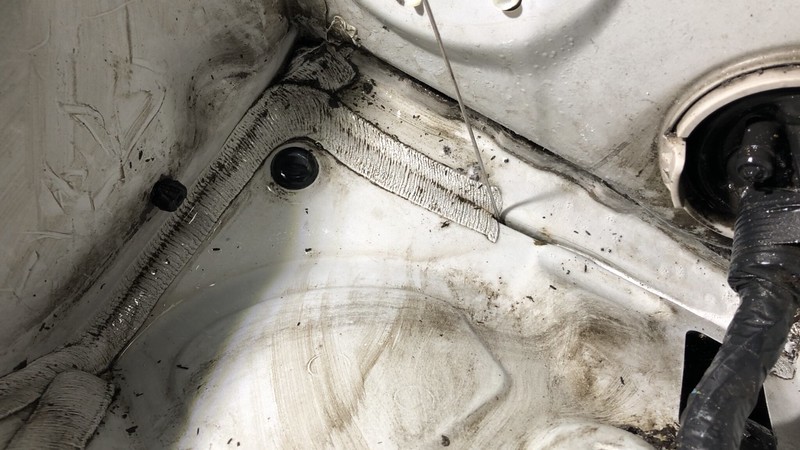
Hopefully you can see in this next image the water remaining after I had removed approximately a litre of water from the fuse box already. You can see a sort of tide mark up the sides and the clean squiggle lines are from where the hose of my trigger was striking the bottom during the removal process. I have also circled what appeared to be a drain hole for the fuse box which was clearly not draining...

With plenty of space to operate, it was time to remove and investigate further. As with everything else, this was going to be cleaned thoroughly before reinstallation. This is the underside of the fuse box in the following images:


A sort of plastic grommet clips into this drain hole, look at the state of it!

It took me a lot longer than I'd like to admit to clean this out but assisted with my trusty pick, I well and truly gutted out all the crap and clipped it back in. I don't anticipate any more issues with this now but I'll be paying close attention in future, regardless! Looking clean when I reinstalled it towards the end of this garage session though!

However, that wasn't the end of my issues with water here! The fuse box resides in a cavity behind the front passenger wheel arch/suspension turret:

Upon removal I discovered another alarming amount of water. I've tried to use a bit of blue roll to indicate the volume here:

The small white plastic bit is just the filter from the end of the hose of the spray bottle trigger I had been using to remove water but just check out the amount of crap down there clearly blocking wherever the water is meant to drain from. At this stage I knew exactly where it was all coming from just not where the blockage was.

The above is an image of the drainage channels/gutters below the corner of the windscreen that we all often find leaves and other types of detritus in. The mesh cover had previously been found full of crap but the secondary channels that lead down into the fuse box and the area underneath were just full of what can only be described at this stage as organic sludge. Again, as with everything removed, this was all cleaned inside and out prior to refitting to prevent similar issues in the future.
It took a fair amount of water removal, wonder wipes and blue roll to clean this cavity beneath the box and figure out why water wasn't draining. I couldn't see any obviously plastic grommets, even ones that were missing but in the process of scraping out very fine areas of sludge with some wire I discovered a very slim channel - as indicated by said wire in the next image:
That's it. That's bloody it. My brother handed me another piece of wire about 1.5m long and with significant poking and scraping I was able to clear the channel completely, eventually poking through until I was tapping the engine undertray below the car. What a relief but also, what a disappointment. The channel must only be 2-3mm wide and 40-50mm long which makes it easy to understand how over time blockages can occur. In my opinion, this is poor design by BMW.
With that issue finally resolved and thorough measures of preventative cleaning carried out I set about reinstalling the fuse box and associated fuses, relays and the ECU/DME unit. This was a tad premature as I would need to shift some of this again whilst tackling the second job of the session which was the valve cover gasket.
Time to whip out my other Halfords Advanced purchase! This is actually my mate's kit that I purchased with a trade card for him but having transferred my kit to the roll cab and chest I had no option but to plunder his! :lol:

For the very amateur mechanic like myself, these things are worth their weight in gold!
So, on to replacing the valve cover gasket after discovering some oil in the ignition coil chambers of cylinder 3 and 4 previously. This is probably the most complex task I've ever undertaken on a car and I was glad for my brother's assistance at this stage as there was a lot of issues to navigate. The car is so bloody low for starters so we had to take it in turns bending over and working on it to give our backs some relief!

For the most part I relied on this useful guide: How To Replace The Valve Cover Gasket On A BMW N51/N52N (328i, X3, X5, & More)
This took us several hours with plenty of breaks and deliberation. We didn't actually put everything back together and get away until 5.30am. As such I didn't take too many photos along the way of things like the replacement parts and so on but I'm extremely satisfied and chuffed to have carried this job out with success.
It basically requires the removal of various covers and panels to get to the valve cover which is when you unscrew all the bolts holding it in place. There was visible leakage around some areas which indicated clearly this job was required. It was also clear that at some point in time someone has been carrying out work in this department as we found one bolt at the rear of the engine was barely hand tight whilst another bolt was found to be previously over-torqued and sheared completely. As seen when held up against a new bolt...

Nonetheless, we plodded on until we ran into difficulties removing the valvetronic motor located on the top of the valve cover. You need a 4mm hex key/socket to unwind the motor whilst you undo three tore bolts situated at 3, 6 and 9 o'clock if you were looking at it side on. The bolt underneath, in the 6 o'clock position is very difficult to get at and we found that the torx socket piece we were using had too large a profile, preventing adequate access to the bolt in question. In steps my useful brother, remember when I said he was a welder...
First of all, he grabbed a similar socket piece from his own toolkit and welded it to his workbench to hold it in situ:


Then it was out with the grinder to the socket piece in half and utilise the thinner portion:

This was then welded on to a spare extension bar before being ground down further to reduce the profile and provide us with the tool we needed to finish removing the valvetronic motor!
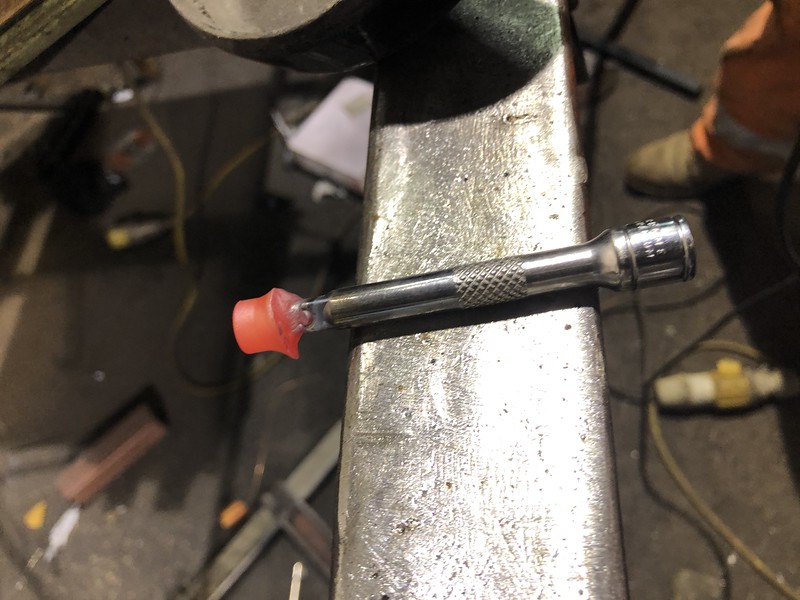
Bear in mind that it was about 1am Sunday morning so we couldn't nip out to Halfords or similar for this...

Removing the valve cover after this stage was an absolute pig and we twisted up the old gasket during the process. In the following image you will see some hazards such as the ignition wiring is present. We set about disconnecting and clearing all of this out the way before fitting the new gasket. With it being so tricky to remove we were under no illusion that reinstallation of the cover would be easy. We only had one gasket set to hand so I'm glad we took the time to properly disconnect and shift everything (which is beyond the instructions provided in the link previously) to avoid damaging it.

With it pushing past a 12 hour session in the workshop and the temperature dropping outside we decided to call it a day once the valve cover and everything was reinstalled. Unfortunately, we snapped a head bolt when my torque wrench failed so I need to get an extractor set and sort that out ASAP. I'm planning on tackling this soon alongside the oil filter housing and cooler gaskets that we didn't get around to.
Overall, I'm really really pleased to have gotten through this batch of issues/work and achieved successful outcomes. I'm not afraid to admit at the onset of all this I felt like a gallon of petrol and a zippo were my best solutions but I'm glad I persevered. The previous owner saw a couple of instagram posts I had made whilst documenting what I was up to and reached out to me. On the day of sale he thought the car had a starting issue. We've determined that this was likely very early signs of the waterlogged ECU/DME failing and he has very kindly insisted that he will pay for the replacement. This is very kind of him and I'm blown away by the gesture. It really has made the whole process feel that little bit more satisfactory and worthwhile. I didn't for one second think he had knowingly sold the car with issues but it's great to encounter a genuine and honest seller in a world of colourful private car sales.


With all that said, my Sunday was spent sleeping then treating myself to a cracking breakfast and even tastier beer! Well deserved I would say!
Thanks for reading if you managed to get this far. :thumb:
Ah yes, tackling '2E77 Ignition, Votage Supply' that resulted in me being towed home by the AA. Whilst the AA guy tackled the car it became apparent that the source of the issue was from the plethora of fuses and relays in the fuse box situated in the engine bay, as pictured above. He checked several fuses and relays but after 90 minutes gave up and relayed me to my choice of garage or home. I contacted a garage that specialises in BMW's first but they couldn't squeeze me in until the end of December. However, upon hearing that it was electrical/diagnostic work required they recommended a fella who happened to operate only a couple of miles from my address so I booked in with him for the following Monday and left the car parked up at home until then.
http://www.gfmdiagnostics.co.uk - absolutely delighted with the service. GFD is a proper nice chap who certainly knows what he is doing. By the end of Monday he had belled me up explaining that the ECU (aka the DME) had been waterlogged and needed replaced. He had already priced up a replacement but supplied me with part numbers knowing I'd want to hunt for a cheaper option.
Here's the offending item. It slots into the aforementioned fuse/relay box like a slice of toast which explains the water damage on the lower portion. The diagnostics fella said there was visible water at the bottom of the box containing all the fuses and relays but when he removed this unit loads of water came trickling out from inside it. Not good. Even worse was finding out that BMW would like approximately £1100 for a replacement.
Thankfully, I found a newly listed secondhand unit unit on eBay for for £180 and paid about the same again for my old one to be copied and cloned to this new unit by GFD. This involves all sorts of electronic trickery such as altering VIN and mileage information on the replacement unit but I am delighted to report that it all worked a treat. The eBay seller was an absolute gent and accommodated me by posting it via next day special delivery.
Here's the replacement against the waterlogged item:
The car has had no issues in this department since I got it back and I am delighted to have all-in paid say a third of the price BMW want for a new unit and that isn't factoring in labour costs for fitting and coding... I dread to think. Other options from a reputable independent in London was £550 for a refurbished unit which would still require fitting and coding by GDF!
I'm delighted to have resolved this fairly cheaply in the end and with the car back before the weekend, I was able to fetch my latest treat to myself with the money saved. An additional Halfords Advanced tool chest to go on top of my roll cab!
So, that brings us on approach to this weekend past. I got the car back on Friday morning but if you live in the central belt of Scotland you will know all about the atrocious snow/sleet/rain situation we had for a few days. Mindful that I had other issues to attend to and that I hadn't resolved the water issues damaging the previous ECU/DME unit, I arranged to use my brother's unit to work on the car under shelter for Saturday before the water issues cropped up again.
The plan for this session was to trace and tackle the water issues affecting the DME, replace the valve cover gasket, oil filter housing gasket and the oil cooler gasket. It was going to be a long shift and I popped round for 4pm armed with coffee and disappointing SCO v IRE rugby results.
Can you tell my brother is a welder? This fact comes in very handy later...
Knowing we had plenty to do I got stuck into removing various panels and bits to provide as much space in the engine bay as possible whilst my brother finished up a couple of welding jobs. Knowing I was in for the long haul I fired up Audible and took my time cleaning all the bits I removed as I went along.
So here's a top down view of the fuse box which the ECU/DME resides in:
Worryingly, I could see a significant amount of water had pooled up inside the box already following the heavy rain only 48 hours prior. I didn't want to move too much too soon but set about removing as much water as possible with the hose and trigger from a spare spray bottle I had in the car.
I thought this was quite clever! It took a solid 10 minutes of pumping to remove most of the water I could reach which helped me realise that there was even more water elsewhere in this area that was compounding the problem. Once I felt I had removed all the water I could I felt confident enough to lift and remove all the components safely.
Hopefully you can see in this next image the water remaining after I had removed approximately a litre of water from the fuse box already. You can see a sort of tide mark up the sides and the clean squiggle lines are from where the hose of my trigger was striking the bottom during the removal process. I have also circled what appeared to be a drain hole for the fuse box which was clearly not draining...
With plenty of space to operate, it was time to remove and investigate further. As with everything else, this was going to be cleaned thoroughly before reinstallation. This is the underside of the fuse box in the following images:
A sort of plastic grommet clips into this drain hole, look at the state of it!
It took me a lot longer than I'd like to admit to clean this out but assisted with my trusty pick, I well and truly gutted out all the crap and clipped it back in. I don't anticipate any more issues with this now but I'll be paying close attention in future, regardless! Looking clean when I reinstalled it towards the end of this garage session though!
However, that wasn't the end of my issues with water here! The fuse box resides in a cavity behind the front passenger wheel arch/suspension turret:
Upon removal I discovered another alarming amount of water. I've tried to use a bit of blue roll to indicate the volume here:
The small white plastic bit is just the filter from the end of the hose of the spray bottle trigger I had been using to remove water but just check out the amount of crap down there clearly blocking wherever the water is meant to drain from. At this stage I knew exactly where it was all coming from just not where the blockage was.
The above is an image of the drainage channels/gutters below the corner of the windscreen that we all often find leaves and other types of detritus in. The mesh cover had previously been found full of crap but the secondary channels that lead down into the fuse box and the area underneath were just full of what can only be described at this stage as organic sludge. Again, as with everything removed, this was all cleaned inside and out prior to refitting to prevent similar issues in the future.
It took a fair amount of water removal, wonder wipes and blue roll to clean this cavity beneath the box and figure out why water wasn't draining. I couldn't see any obviously plastic grommets, even ones that were missing but in the process of scraping out very fine areas of sludge with some wire I discovered a very slim channel - as indicated by said wire in the next image:
That's it. That's bloody it.
My brother handed me another piece of wire about 1.5m long and with significant poking and scraping I was able to clear the channel completely, eventually poking through until I was tapping the engine undertray below the car. What a relief but also, what a disappointment. The channel must only be 2-3mm wide and 40-50mm long which makes it easy to understand how over time blockages can occur. In my opinion, this is poor design by BMW.With that issue finally resolved and thorough measures of preventative cleaning carried out I set about reinstalling the fuse box and associated fuses, relays and the ECU/DME unit. This was a tad premature as I would need to shift some of this again whilst tackling the second job of the session which was the valve cover gasket.
Time to whip out my other Halfords Advanced purchase! This is actually my mate's kit that I purchased with a trade card for him but having transferred my kit to the roll cab and chest I had no option but to plunder his! :lol:
For the very amateur mechanic like myself, these things are worth their weight in gold!
So, on to replacing the valve cover gasket after discovering some oil in the ignition coil chambers of cylinder 3 and 4 previously. This is probably the most complex task I've ever undertaken on a car and I was glad for my brother's assistance at this stage as there was a lot of issues to navigate. The car is so bloody low for starters so we had to take it in turns bending over and working on it to give our backs some relief!
For the most part I relied on this useful guide: How To Replace The Valve Cover Gasket On A BMW N51/N52N (328i, X3, X5, & More)
This took us several hours with plenty of breaks and deliberation. We didn't actually put everything back together and get away until 5.30am. As such I didn't take too many photos along the way of things like the replacement parts and so on but I'm extremely satisfied and chuffed to have carried this job out with success.
It basically requires the removal of various covers and panels to get to the valve cover which is when you unscrew all the bolts holding it in place. There was visible leakage around some areas which indicated clearly this job was required. It was also clear that at some point in time someone has been carrying out work in this department as we found one bolt at the rear of the engine was barely hand tight whilst another bolt was found to be previously over-torqued and sheared completely. As seen when held up against a new bolt...
Nonetheless, we plodded on until we ran into difficulties removing the valvetronic motor located on the top of the valve cover. You need a 4mm hex key/socket to unwind the motor whilst you undo three tore bolts situated at 3, 6 and 9 o'clock if you were looking at it side on. The bolt underneath, in the 6 o'clock position is very difficult to get at and we found that the torx socket piece we were using had too large a profile, preventing adequate access to the bolt in question. In steps my useful brother, remember when I said he was a welder...
First of all, he grabbed a similar socket piece from his own toolkit and welded it to his workbench to hold it in situ:
Then it was out with the grinder to the socket piece in half and utilise the thinner portion:
This was then welded on to a spare extension bar before being ground down further to reduce the profile and provide us with the tool we needed to finish removing the valvetronic motor!
Bear in mind that it was about 1am Sunday morning so we couldn't nip out to Halfords or similar for this...
Removing the valve cover after this stage was an absolute pig and we twisted up the old gasket during the process. In the following image you will see some hazards such as the ignition wiring is present. We set about disconnecting and clearing all of this out the way before fitting the new gasket. With it being so tricky to remove we were under no illusion that reinstallation of the cover would be easy. We only had one gasket set to hand so I'm glad we took the time to properly disconnect and shift everything (which is beyond the instructions provided in the link previously) to avoid damaging it.
With it pushing past a 12 hour session in the workshop and the temperature dropping outside we decided to call it a day once the valve cover and everything was reinstalled. Unfortunately, we snapped a head bolt when my torque wrench failed so I need to get an extractor set and sort that out ASAP. I'm planning on tackling this soon alongside the oil filter housing and cooler gaskets that we didn't get around to.
Overall, I'm really really pleased to have gotten through this batch of issues/work and achieved successful outcomes. I'm not afraid to admit at the onset of all this I felt like a gallon of petrol and a zippo were my best solutions but I'm glad I persevered. The previous owner saw a couple of instagram posts I had made whilst documenting what I was up to and reached out to me. On the day of sale he thought the car had a starting issue. We've determined that this was likely very early signs of the waterlogged ECU/DME failing and he has very kindly insisted that he will pay for the replacement. This is very kind of him and I'm blown away by the gesture. It really has made the whole process feel that little bit more satisfactory and worthwhile. I didn't for one second think he had knowingly sold the car with issues but it's great to encounter a genuine and honest seller in a world of colourful private car sales.
With all that said, my Sunday was spent sleeping then treating myself to a cracking breakfast and even tastier beer! Well deserved I would say!
Thanks for reading if you managed to get this far. :thumb:
More detailed than my post in this thread, that I think must have been 2019 at some point. This reminds me that I need to take mine out and have a check underneath to ensure it's all clear. I need to get the arch liners out again as I have new front fogs to fit and a load of new liner screws and clips, so I might try and see if I can check the drain channel from underneath, rather than via the DME.
The DME box had also warped on mine and the garage think that was a bigger factor, and that the box wasn't sealing properly. I'd had issues right back to when I first bought it in 2012, of the occasional hesitation when under heavy load from a standstill, or when gonig up hills. It took 7 years of not being able to find a fault before it eventually got bad enough to really mess the car up - we're talking cutting out when turning - the final straw being when it did it as I came around a roundabout on a NSL dual-carriageway and was just about to exit on to the next section of d/c. That was real squeaky bum time.
The DME box had also warped on mine and the garage think that was a bigger factor, and that the box wasn't sealing properly. I'd had issues right back to when I first bought it in 2012, of the occasional hesitation when under heavy load from a standstill, or when gonig up hills. It took 7 years of not being able to find a fault before it eventually got bad enough to really mess the car up - we're talking cutting out when turning - the final straw being when it did it as I came around a roundabout on a NSL dual-carriageway and was just about to exit on to the next section of d/c. That was real squeaky bum time.
A bit of advice for e9x owners regarding the draining of the water in the dme compartment.
The drain channel as has been noted is nothing more than a small gap between panels, i would recommend removing the drain bung / grommet to the left side of the drain channel.
Once removed the dme compartment will drain onto the top of the wheel arch liner, there is no chance of water or spray getting up into the compartment from the bottom unless you are missing an arch liner.
This is one of the first things I did on my e91.
I should really check my drains looking at the biblical rain outside!
I need to get the alignment sorted on my car as I can tell it's not quite right. Before I do that, I was thinking of replacing the rear control arms as I had an advisory for the rear upper on both sides. I'm not looking to upgrade to M3 parts so will likely just buy the OE spec TRW arms from Autodoc. Which ones do people usually replace? There are about 4 on each side, although at least one on the bottom seems a bit pointless to replace as there are no bushes or ball joints in the arm.
I need to get the alignment sorted on my car as I can tell it's not quite right. Before I do that, I was thinking of replacing the rear control arms as I had an advisory for the rear upper on both sides. I'm not looking to upgrade to M3 parts so will likely just buy the OE spec TRW arms from Autodoc. Which ones do people usually replace? There are about 4 on each side, although at least one on the bottom seems a bit pointless to replace as there are no bushes or ball joints in the arm.
pmorg4 said:
I should really check my drains looking at the biblical rain outside!
I need to get the alignment sorted on my car as I can tell it's not quite right. Before I do that, I was thinking of replacing the rear control arms as I had an advisory for the rear upper on both sides. I'm not looking to upgrade to M3 parts so will likely just buy the OE spec TRW arms from Autodoc. Which ones do people usually replace? There are about 4 on each side, although at least one on the bottom seems a bit pointless to replace as there are no bushes or ball joints in the arm.
Re the rear arms, BMW do value line kits which are quite good value.I need to get the alignment sorted on my car as I can tell it's not quite right. Before I do that, I was thinking of replacing the rear control arms as I had an advisory for the rear upper on both sides. I'm not looking to upgrade to M3 parts so will likely just buy the OE spec TRW arms from Autodoc. Which ones do people usually replace? There are about 4 on each side, although at least one on the bottom seems a bit pointless to replace as there are no bushes or ball joints in the arm.
I should really check my drains looking at the biblical rain outside!
I need to get the alignment sorted on my car as I can tell it's not quite right. Before I do that, I was thinking of replacing the rear control arms as I had an advisory for the rear upper on both sides. I'm not looking to upgrade to M3 parts so will likely just buy the OE spec TRW arms from Autodoc. Which ones do people usually replace? There are about 4 on each side, although at least one on the bottom seems a bit pointless to replace as there are no bushes or ball joints in the arm.
I need to get the alignment sorted on my car as I can tell it's not quite right. Before I do that, I was thinking of replacing the rear control arms as I had an advisory for the rear upper on both sides. I'm not looking to upgrade to M3 parts so will likely just buy the OE spec TRW arms from Autodoc. Which ones do people usually replace? There are about 4 on each side, although at least one on the bottom seems a bit pointless to replace as there are no bushes or ball joints in the arm.
helix402 said:
pmorg4 said:
I should really check my drains looking at the biblical rain outside!
I need to get the alignment sorted on my car as I can tell it's not quite right. Before I do that, I was thinking of replacing the rear control arms as I had an advisory for the rear upper on both sides. I'm not looking to upgrade to M3 parts so will likely just buy the OE spec TRW arms from Autodoc. Which ones do people usually replace? There are about 4 on each side, although at least one on the bottom seems a bit pointless to replace as there are no bushes or ball joints in the arm.
Re the rear arms, BMW do value line kits which are quite good value.I need to get the alignment sorted on my car as I can tell it's not quite right. Before I do that, I was thinking of replacing the rear control arms as I had an advisory for the rear upper on both sides. I'm not looking to upgrade to M3 parts so will likely just buy the OE spec TRW arms from Autodoc. Which ones do people usually replace? There are about 4 on each side, although at least one on the bottom seems a bit pointless to replace as there are no bushes or ball joints in the arm.
Any tips on calibrating the power fold function of the side mirrors? There are videos on YouTube that show the mirrors sat in completely the wrong position when folded)unfolded... but ours isn't that far wrong. The passenger side mirror seems to be sat just a few degrees of rotation out of place when unfolded. Just enough that when the mirror glass is fully adjusted inwards, you can't see the side of the car when sat in the driver's seat. If you move the mirror housing by hand, you can get it in to the right position, but not "locked" in place.
It's there a calibration method, or is it likely to be damaged mechanism?
Thanks!
It's there a calibration method, or is it likely to be damaged mechanism?
Thanks!
Gassing Station | BMW General | Top of Page | What's New | My Stuff