MGB V8 Conversion
Discussion


task said:
I have too many cars really! I'm thinking about selling my MGB GT V8 once it's on the road...
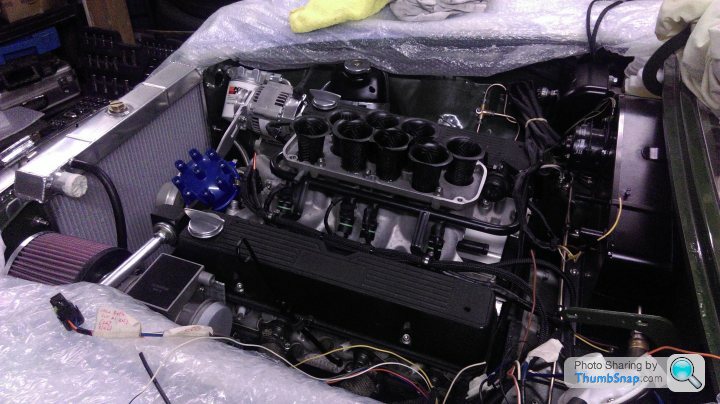
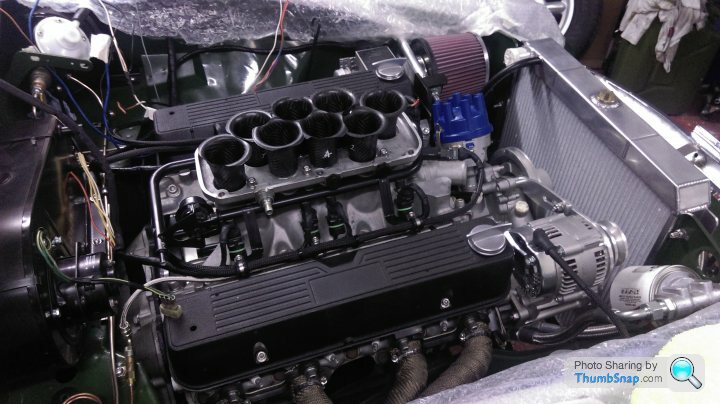
That engine's looking great, is the braided pipe running up the side of the O/S rocker cover for the oil pressure gauge? If so, where did that come from?
If selling the V8 you'll have plenty of folk wanting to buy. There are always folk looking for good V8's. Re' braided pipe, bought this from Clive Wheatley with the remote oil cooler kit, it's much longer than the originals so the capillary joint needs to be relocated or why not get one made up by a hydraulic Co'...it's a simple st/st braided pipe. Or may be run this on the lower side of the engine and it will fit to original capillary joint.That engine's looking great, is the braided pipe running up the side of the O/S rocker cover for the oil pressure gauge? If so, where did that come from?
see http://mgv8.homestead.com/v8con.html
Andrew,
Remember that, when looking for another distributor, I accidentally bought an engine?
Well, that 's the one I'm picking up next week.
Rebuilt Land Rover Discovery 3.5 engine, increased compression, flowed heads, EFI cam, Edelbrock 1403 on JWR manifold, new distributor with RPI ARP Amplifier, ARP mains studs and a Cloyes roller timing chain set. The engine has about 10.000 miles on it, so should be nicely run in.
Result: 186hp at 4800 rpm (flywheel, 143 at the wheels) when the carb and timing were tweaked at Airey Tuning. Assumption is that more hp can be released with another cam but I'll just enjoy the oozes of torque as it is for now.
Can't wait really
Mind you, I assume the engine in your MG will be leagues ahead in power delivery...
Church of Noise said:
Andrew,
Remember that, when looking for another distributor, I accidentally bought an engine?
Well, that 's the one I'm picking up next week.
Rebuilt Land Rover Discovery 3.5 engine, increased compression, flowed heads, EFI cam, Edelbrock 1403 on JWR manifold, new distributor with RPI ARP Amplifier, ARP mains studs and a Cloyes roller timing chain set. The engine has about 10.000 miles on it, so should be nicely run in.
Result: 186hp at 4800 rpm (flywheel, 143 at the wheels) when the carb and timing were tweaked at Airey Tuning. Assumption is that more hp can be released with another cam but I'll just enjoy the oozes of torque as it is for now.
Can't wait really
Mind you, I assume the engine in your MG will be leagues ahead in power delivery...
That will be a very nice, solid, engine. RPI amplifier, ARP studs, Cloyes et al is the way to go and without it being too powerful it will be a great all-rounder which, with original suspension set up, will be very nice to drive.Remember that, when looking for another distributor, I accidentally bought an engine?
Well, that 's the one I'm picking up next week.
Rebuilt Land Rover Discovery 3.5 engine, increased compression, flowed heads, EFI cam, Edelbrock 1403 on JWR manifold, new distributor with RPI ARP Amplifier, ARP mains studs and a Cloyes roller timing chain set. The engine has about 10.000 miles on it, so should be nicely run in.
Result: 186hp at 4800 rpm (flywheel, 143 at the wheels) when the carb and timing were tweaked at Airey Tuning. Assumption is that more hp can be released with another cam but I'll just enjoy the oozes of torque as it is for now.
Can't wait really
Mind you, I assume the engine in your MG will be leagues ahead in power delivery...
The TVR engine I've fitted is not an all-out fire breathing unit. TVR quoted 250bhp which, frankly, was just marketing hype. Realistically, they produced 225bhp on a good day. I've completed some simple redesign/mods which will take it up to 245-250bhp and having had other period cars with this much grunt will be more than enough.
If you're anywhere near West Berks next week feel free to pop in for a cuppa'.
Here's a quick project update and the first of 2015; so Happy New Year to All!
Since last posting it seems like a mass of small fiddly bits have been taking up too much time...brake and clutch lines are now all in, the wiring is nearly finished...famous last words[!], dynamat is installed and the body mods and load spreader plates for the roll hoop are done.
Have had some major hand mod'ing to the so-called SuperSports exhaust system 90deg down pipes as their near final fit was bloody awful...here I needed to use the Japanese technique of over sleeving the pipe, out with the MAP gas, heat the downpipe until glowing orange[!!] and gently ease the pipe using my my body weight to reshape...I don't have a hydraulic mandrel bender and was desperate not to get any creases within the pipe...here's the Old Yoshimura technique to show you what I got up to...https://www.youtube.com/watch?v=v8mMQbEkr8w Go slowly and it works beautifully
Today, have been installing the ECU under dash and rewired the injection system and the majority of ECU sensors...
v8250 said:
Here's a quick project update and the first of 2015; so Happy New Year to All!
Since last posting it seems like a mass of small fiddly bits have been taking up too much time...brake and clutch lines are now all in, the wiring is nearly finished...famous last words[!], dynamat is installed and the body mods and load spreader plates for the roll hoop are done.
Have had some major hand mod'ing to the so-called SuperSports exhaust system 90deg down pipes as their near final fit was bloody awful...here I needed to use the Japanese technique of over sleeving the pipe, out with the MAP gas, heat the downpipe until glowing orange[!!] and gently ease the pipe using my my body weight to reshape...I don't have a hydraulic mandrel bender and was desperate not to get any creases within the pipe...here's the Old Yoshimura technique to show you what I got up to...https://www.youtube.com/watch?v=v8mMQbEkr8w Go slowly and it works beautifully
Today, have been installing the ECU under dash and rewired the injection system and the majority of ECU sensors...
Why did you lag your exhaust manifolds and not ceramic coat them? It isn't good for the steel.Since last posting it seems like a mass of small fiddly bits have been taking up too much time...brake and clutch lines are now all in, the wiring is nearly finished...famous last words[!], dynamat is installed and the body mods and load spreader plates for the roll hoop are done.
Have had some major hand mod'ing to the so-called SuperSports exhaust system 90deg down pipes as their near final fit was bloody awful...here I needed to use the Japanese technique of over sleeving the pipe, out with the MAP gas, heat the downpipe until glowing orange[!!] and gently ease the pipe using my my body weight to reshape...I don't have a hydraulic mandrel bender and was desperate not to get any creases within the pipe...here's the Old Yoshimura technique to show you what I got up to...https://www.youtube.com/watch?v=v8mMQbEkr8w Go slowly and it works beautifully
Today, have been installing the ECU under dash and rewired the injection system and the majority of ECU sensors...
Also have you run then down the side of the motor rather than through the inner guards, RV8 style?
NBTBRV8 said:
Why did you lag your exhaust manifolds and not ceramic coat them? It isn't good for the steel.
Also have you run then down the side of the motor rather than through the inner guards, RV8 style?
You're absolutely right...but as they're high quality and thick stainless I'm not concerned. I've carefully selected an exhaust wrap material that does not cause the inherent problems seen with older style fibre glass type exhaust wrapping. As per previous post the manifolds exit through the inner wings as per RV8's.Also have you run then down the side of the motor rather than through the inner guards, RV8 style?
Re' ceramic coating. There's ceramic coating, and there's ceramic coating. In the UK there's really only one company that knows how to ceramic coat correctly and with proper ceramic mix. This would cost £800 to do my two manifolds. £800 better off spent elsewhere on the project...like 2 full sets of tyres...as I know I'm going to need them

Some very interesting reading on this, a route I may go down with mine... one day. Until then it's a bit more serious reconstructive surgery. 
As I'm dreaming of the day when things will finally come together, a couple of quick questions - I'm keen to get as good a finish as you have re the raptor, what did you use to clean all the underside and what primer did you use? The results look superb in the pictures.
Ta
As I'm dreaming of the day when things will finally come together, a couple of quick questions - I'm keen to get as good a finish as you have re the raptor, what did you use to clean all the underside and what primer did you use? The results look superb in the pictures.
Ta
SPT28 said:
I'm keen to get as good a finish as you have re the raptor, what did you use to clean all the underside and what primer did you use? The results look superb in the pictures. Ta
You need to be a brave man to do this job. Completely strip the car's underside, then carefully use a combination of heat gun and scraper, and white spirit and industrial tissue to wipe off. The trick is to not rush this job. Take your time knowing it will takes months to do it properly. Also, unless taking back to bare metal, you don't want to damage the original Abingdon primer.Once all the waxoyl, stone ship et al was removed I let the underside breath for a good week to remove any traces of white spirit. In fact, I used the heat gun around the seems and box sections to ensure zero white spirit left. Next, Hydrate80...this wasn't exactly necessary...but I wanted something to penetrate the original primer and provide a tough layer for the new primer; hand painted the whole underside with Hydrate80.
Next up, two 'light' coats of BiltHamber's highbuild primer. This is very easy to apply and get excellent coverage. You don't want too thick a coating with a highbuild, keep the primer moving and work methodically. There's no need to flatten back as the top coat is Raptor.
Next, Raptor. I have to say this really is a superb product both in application and finish. However, if you are completing this yourself you must think very carefully as to your PPE and full flow ventilation. It contains isocyanates which will kill you if not used properly; seriously. That means full PPE on even before you open the tins for mixing. For spraying I bought an Apollo 1200 HVLP system, they're great little systems and can be bought ready to go from a number suppliers; eBay's your friend...
Good luck on the project.
PS how are you going to raise and rotate your B? I'm selling my rotisserie, as it's done its job superbly. PM me if interested
Edited by v8250 on Wednesday 4th February 07:16
Many thanks for the reply and detailed information, very much appreciated.
You certainly do need to be brave! As a brief bit of background my project, which seems to be sponsored by the phrase "while I'm at it", has turned into a full blown affair after starting off looking to replace a cracked leaf spring... I then decided to remove the fuel tank and spotted the first horror...

...caused by bad welding when fitting a tow bar. Since then several brave pills have been swallowed and a lot of bad metal removed and replaced! Unfortunately I've had to go back to bare metal, hence the original question. What you see below is the very slow progress so far albeit with the discovery of some solid metal for a change! I too have treated this with hydrate 80 (great stuff!), good to hear you thought the same, and am slowly working my way round the underside.

Unfortunately progress has not been helped by some very bad repairs (read serious bodges!) in the past so being methodical is key... thanks for pointer on bilthamber primer, precisely what I'm after.
Your comment about Raptor is an excellent one and is something I am all too aware of. As much as I'd like to do the painting myself, I suspect I will bottle it and subcontract to a good friend who has all the gear, he'll also do the main paint job as well... he is the main painter at a well known establishment for extremely expensive e-types so knows his stuff - with those skills on hand I figured why bother myself!
Your offer is a kind one but unfortunately as below - I already have one. Would never be able to do what I'm doing any other way. As soon as it's free of the MG it's then needed for my other halfs project, both of which we're trying to get finished for our wedding this September - nothing like added pressure! I fear it will be more one or none at this rate!

Should really start a thread on both of them...
You certainly do need to be brave! As a brief bit of background my project, which seems to be sponsored by the phrase "while I'm at it", has turned into a full blown affair after starting off looking to replace a cracked leaf spring... I then decided to remove the fuel tank and spotted the first horror...
...caused by bad welding when fitting a tow bar. Since then several brave pills have been swallowed and a lot of bad metal removed and replaced! Unfortunately I've had to go back to bare metal, hence the original question. What you see below is the very slow progress so far albeit with the discovery of some solid metal for a change! I too have treated this with hydrate 80 (great stuff!), good to hear you thought the same, and am slowly working my way round the underside.
Unfortunately progress has not been helped by some very bad repairs (read serious bodges!) in the past so being methodical is key... thanks for pointer on bilthamber primer, precisely what I'm after.
Your comment about Raptor is an excellent one and is something I am all too aware of. As much as I'd like to do the painting myself, I suspect I will bottle it and subcontract to a good friend who has all the gear, he'll also do the main paint job as well... he is the main painter at a well known establishment for extremely expensive e-types so knows his stuff - with those skills on hand I figured why bother myself!
Your offer is a kind one but unfortunately as below - I already have one. Would never be able to do what I'm doing any other way. As soon as it's free of the MG it's then needed for my other halfs project, both of which we're trying to get finished for our wedding this September - nothing like added pressure! I fear it will be more one or none at this rate!
Should really start a thread on both of them...
Crikey SPT, that's some serious, and good, work going on there. Looks like a classic BGT project. Are you going to keep the four pot or convert to V8 whilst car's at this stage of project? It'd be very easy to drop in a 3.5 on carbs at this stage...even if an earlier car...you've even screwed the gearbox cross-member screws into the two most rearward captive nuts in prep' for a V8 handling gearbox  Definitely start your own rebuild thread...they're great for others to see, get ideas from et al.
Definitely start your own rebuild thread...they're great for others to see, get ideas from et al.It is some serious surgery but the outcome will be worth it in the end - I hope!!
I would dearly love to go down the V8 route but to be completely honest wouldn't know where to start nor what modifications would be needed to the existing shell etc. I'm straining the grey matter enough sorting the bodywork as it is!
The car is a '69 so the one-off crossover year in terms of trim etc., all of which I'm intending to keep as close to original if possible. That is not to say I won't be making some subtle modifications; a friend has offered to make me up a removable crossmember so the gearbox can be easily accessed in future, there will be a few more tweaks for 'easy living' such as an electric washer pump in an original push-pump housing.
My current thinking is that I'm best sticking to the 4 pot and then moving to a V8 in time once I've pooled the parts/knowledge, however it would also make sense to make the jump now, especially as the current engine isn't matching to the car and so there is no sentimental value - can you tell i'm still undecided!
Well spotted on the cross member screws, just relocated for cleaning purposes but perhaps it's a sign...
I shall stop hi-jacking this thread now, back to your project please!
Hi-jack all you like...converting to a V8 can be very easy...or do what I've done and it's a long project. For good bed time reading buy this book, it covers all the basics.
http://www.veloce.co.uk/shop/products/productDetai...
A carb'd engine 150-200bhp is relatively straight forward, and EFi unit 200bhp+ is less so and requires some very careful spec'ing.
http://www.veloce.co.uk/shop/products/productDetai...
A carb'd engine 150-200bhp is relatively straight forward, and EFi unit 200bhp+ is less so and requires some very careful spec'ing.
There's a cheap manifold and carbs on eBay as we speak Sam. http://pages.ebay.com/link/?nav=item.view&id=3...
SPT28 said:
Not helping!
I think if I do go down this route it'll be as per this thread, an accumulation before the jump. I already have a contact for prospective engine supplier so may investigate that first.
You'd be better off with SU's. Don't put Solex carbs on the V8, they're a much poorer cousin and are far less effective/tuneable. In fact, if you choose carbs go with an Edelbrock or Holley; there's one for every occasion.I think if I do go down this route it'll be as per this thread, an accumulation before the jump. I already have a contact for prospective engine supplier so may investigate that first.
Bit of a thread resurrection...
Andrew, did you ever find that bonnet you were after? how is the car?
Following on from your sage advice above and stumbling across a 3.9 V8 with all ancillaries for a sensible sum... I've taken the plunge. So you may now get plagued by a few questions
As a couple of starters while I'm still on body restoration - how have you routed your headers? are they through the wings or tight to the block? If the former do you have the templates of where to cut the holes?
Will get round to starting a build thread at some point as things are now progressing again after a busy year.
cheers
Sam
SPT28 said:
Bit of a thread resurrection...
Andrew, did you ever find that bonnet you were after? how is the car?
Following on from your sage advice above and stumbling across a 3.9 V8 with all ancillaries for a sensible sum... I've taken the plunge. So you may now get plagued by a few questions
As a couple of starters while I'm still on body restoration - how have you routed your headers? are they through the wings or tight to the block? If the former do you have the templates of where to cut the holes?
Will get round to starting a build thread at some point as things are now progressing again after a busy year.
cheers
Sam
Hi Sam..."how's the car?" coming along sloooooooooooooooooooooooooooooooooooooooooowly, but getting there. I've fallen foul of being an old fart with the project and changing/tweaking too many things and each takes an age to complete; but it is getting there. Managed to find a very good original steel MGC bonnet, if you can do the same the fit will be right and save a lot of time faffing around with GRP bonnets.Andrew, did you ever find that bonnet you were after? how is the car?
Following on from your sage advice above and stumbling across a 3.9 V8 with all ancillaries for a sensible sum... I've taken the plunge. So you may now get plagued by a few questions
As a couple of starters while I'm still on body restoration - how have you routed your headers? are they through the wings or tight to the block? If the former do you have the templates of where to cut the holes?
Will get round to starting a build thread at some point as things are now progressing again after a busy year.
cheers
Sam
Do not use block hugger manifolds as they kill engine performance. Talk to Chris at BMH Witney and he'll arrange to send proper wing strengtheners to you + there's no need for templates, simply use the wing strengthener to mark out where the holes need to be cut. Then, you need to decide if you want single or twin exhaust pipes. If twin, there's a lot more work to do on 1. re-positioning the tank, 2. choosing the right exhaust system as one does not exist off the shelf, unless keeping a live back end and then it's the MGOC kit which sounds bloody awful unless fitted with a proprietary balance bar..., 3. I've fitted a flexible st/st balance bar on mine for a 'balanced' sound, 4. you'll need to re-think the routing of wiring and fuel lines and the exhaust system mounting locations + hanging system if going for a twin + rework of the O/S rear valence exit point to match the N/S +++
You're in Kent, I'm in West Berks...you're very welcome to pay a visit sometime...feel free to pm me. A+
Edited by v8250 on Friday 20th November 14:49
Gassing Station | MG | Top of Page | What's New | My Stuff