Citroen door mirror woe's
Discussion


sixor8 said:
Well then they could have said Lotus, Jaguar XJ220, Venturi or Aston Martin who all used the same Citroen CX mirrors. 
Or Renault, Mega-Aixam...There is the first part of an article in the last "Auto-Rétro" magazine where the designer of those mirrors is explaining the story. Initially, the hard black plastic part at the rear was supposed to be a flexible bellow holding the glass to improve the aero. But they were running out of time having difficulties to make it work, so they kept the aspect.

Griffo400 said:
Hi 4rn0.
Could you email me please.
Hi just picked up my Chimaera and think that I could have the old wing mirror problem. Could you email me please.
Excuse the post, but couldn’t seem to get your email address?
Do you still do these, if so at what cost and does a “set” mean one or two wing mirror fixings?
Zeb74 said:
Or Renault, Mega-Aixam...
There is the first part of an article in the last "Auto-Rétro" magazine where the designer of those mirrors is explaining the story. Initially, the hard black plastic part at the rear was supposed to be a flexible bellow holding the glass to improve the aero. But they were running out of time having difficulties to make it work, so they kept the aspect.
Have you got a link to this article and is it in English !!!There is the first part of an article in the last "Auto-Rétro" magazine where the designer of those mirrors is explaining the story. Initially, the hard black plastic part at the rear was supposed to be a flexible bellow holding the glass to improve the aero. But they were running out of time having difficulties to make it work, so they kept the aspect.
Hi All,
Well after a long wait I now have another batch of these kits available.
To save you looking back through the post, the kit is still £50 inc UK p&p and it is for both doors
So if you want to solve your mirror fitting problems please drop me a line.
Brian.
Well after a long wait I now have another batch of these kits available.
To save you looking back through the post, the kit is still £50 inc UK p&p and it is for both doors
So if you want to solve your mirror fitting problems please drop me a line.
Brian.
Edited by Griffo400 on Thursday 21st November 13:59
Message for Keeling 54.
Thanks for your enquiry.
I’ve have replied to your email but my reply is returned by the postmaster as undeliverable.
I have also tried to contact you through this site but am unable to for similar reasons.
Could you amend your email address and contact me again please.
Cheers. Brian.
Thanks for your enquiry.
I’ve have replied to your email but my reply is returned by the postmaster as undeliverable.
I have also tried to contact you through this site but am unable to for similar reasons.
Could you amend your email address and contact me again please.
Cheers. Brian.

I recently suffered a droopy mirror having bought the kit several years ago and it prompted me to finally fit it.
I'd been put off by the talk of having to access through the speaker and associated trouble with that, I guess I was lucky and was able to remove mine from the outside.
I did have trouble removing the mirror glass as it had been stuck on very low so I wasn't able to see the tab to move that releases it. If you're doing this it's the tab in the 2nd picture circled red it needs to be pushed to the side. I used a plastic trim tool so as not to scratch the paint but my initial removal I had to use a hair dryer to warm the glass which released the adhesive and allowed me to pry it off with a trim tool. 2 small spade connectors then held connect for the heated element.

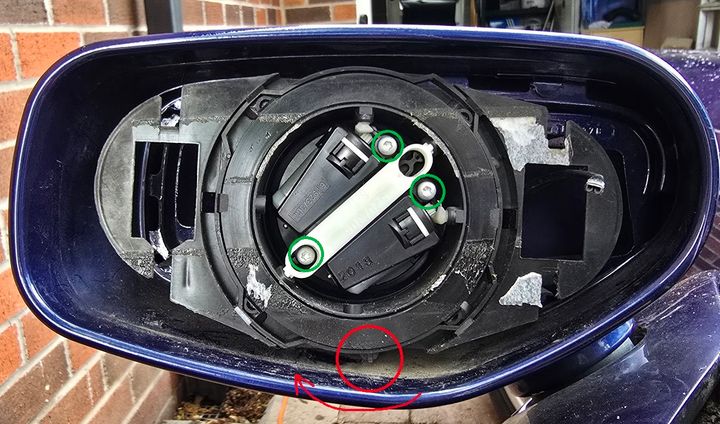
Following the glass removal you remove the 3 torx screws circled green to remove the motor assembly and then you can access 3 further screws which hold the rear of the mirror housing in place. Once I could see into the mirror base I was able to use a large screw driver to rotate the base of the assembly to unscrew it from the door.
After removing the large connector from the motor assembly I used a pin tool to depress the tabs on the spade connectors to remove them from the plastic plug.
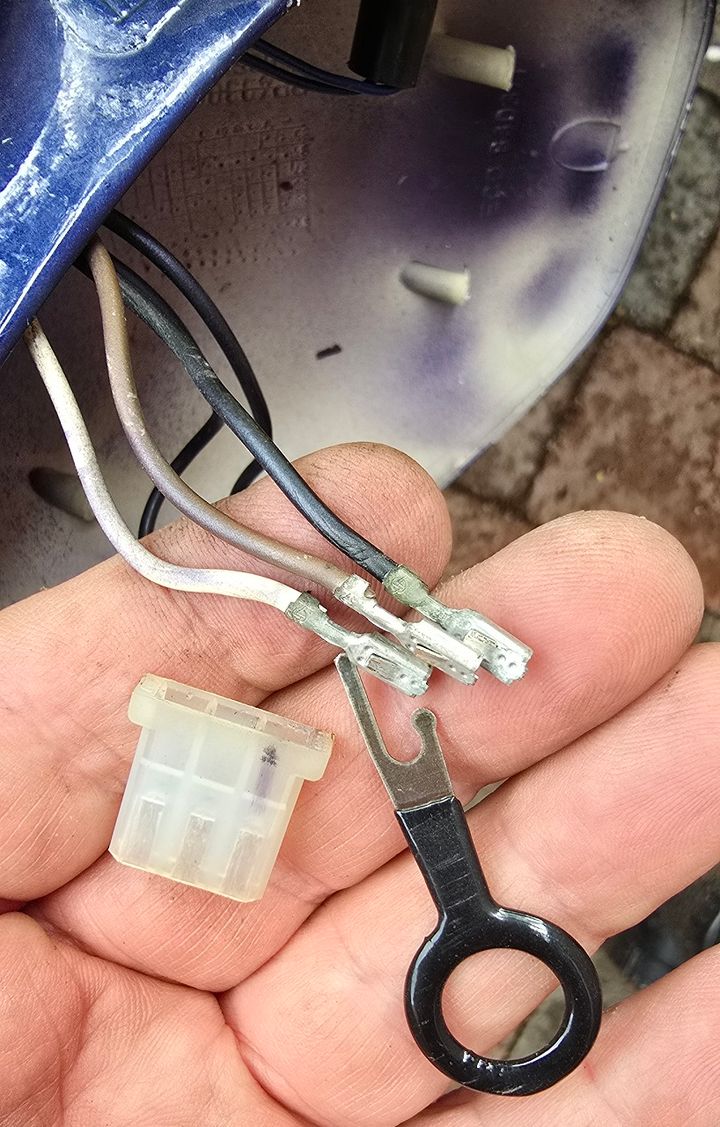
Unfortunately the push button for the door release doesn't appear to have any connectors you can release so I had to snip them here they are snipped close to the button with new spades added. This proved quite fiddly to connect on re assembly but I'm not sure it would have been any easier cutting them anywhere else.
Here's the collection of wires through the new mount, you can see the door opening buttons don't have a load of spare wire (blue wires with shiny spades) which is why they're fiddly to re assemble I may add an extra length to the drivers side when I do that.

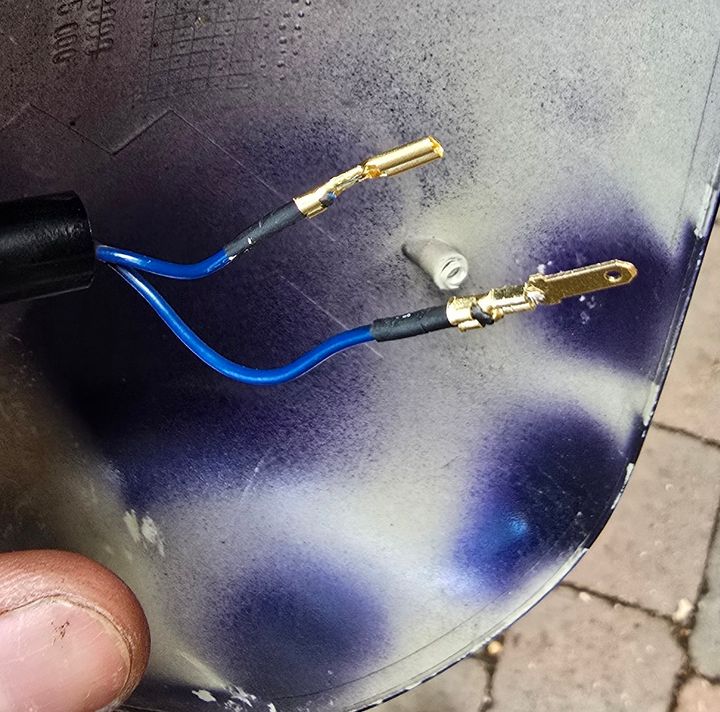
I added heat shrink to prevent the new connectors from shorting and give them a little extra protection.
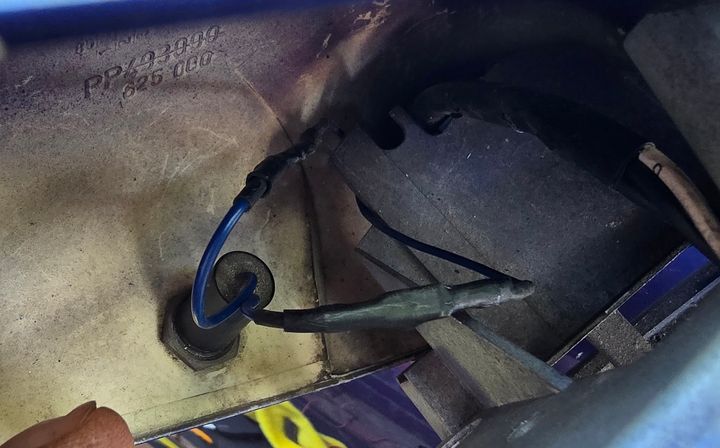
I'd bought some silicone reducing connectors to add to cover the gap but it was too thick to use so just went with the original plastic part.
I'd been put off by the talk of having to access through the speaker and associated trouble with that, I guess I was lucky and was able to remove mine from the outside.
I did have trouble removing the mirror glass as it had been stuck on very low so I wasn't able to see the tab to move that releases it. If you're doing this it's the tab in the 2nd picture circled red it needs to be pushed to the side. I used a plastic trim tool so as not to scratch the paint but my initial removal I had to use a hair dryer to warm the glass which released the adhesive and allowed me to pry it off with a trim tool. 2 small spade connectors then held connect for the heated element.
Following the glass removal you remove the 3 torx screws circled green to remove the motor assembly and then you can access 3 further screws which hold the rear of the mirror housing in place. Once I could see into the mirror base I was able to use a large screw driver to rotate the base of the assembly to unscrew it from the door.
After removing the large connector from the motor assembly I used a pin tool to depress the tabs on the spade connectors to remove them from the plastic plug.
Unfortunately the push button for the door release doesn't appear to have any connectors you can release so I had to snip them here they are snipped close to the button with new spades added. This proved quite fiddly to connect on re assembly but I'm not sure it would have been any easier cutting them anywhere else.
Here's the collection of wires through the new mount, you can see the door opening buttons don't have a load of spare wire (blue wires with shiny spades) which is why they're fiddly to re assemble I may add an extra length to the drivers side when I do that.
I added heat shrink to prevent the new connectors from shorting and give them a little extra protection.
I'd bought some silicone reducing connectors to add to cover the gap but it was too thick to use so just went with the original plastic part.
RedS3c said:
Hi Brian, I see I m about 8 years behind the times but if you have any more of these mirror mounting sets left, I would love to purchase a set from you,
Best regards, David
Hi David,Best regards, David
I’ve tried to mail you but you haven’t enabled emails through Pistonheads.
Could you email me please and I’ll send you further details.
Click on my Griffo400 and you’ll be taken to my page then use the “email me” in the top right to send me a message.
Brian.
Edited by Griffo400 on Friday 27th June 14:47
 It's remounting the speaker that I find as tricky as anything else in there.
Hi Indigochim,
Yes you have had them awhile, I stopped putting four holes in some time ago but I think quite a few people bought the kit and put it on the TVR shelf as a roundtuit job.
Thanks for putting this breakdown on here and hopefully it will help others. I m glad you didn t resort to cutting the wires.
How did you get the mirror off the post, were you able to undo the grub screw it or did you have to tap the post round with a mallet and bar once you had dismantled the mirror body?
Edited by Griffo400 on Friday 27th June 14:08
I was able to unscrew the bracket from the door by putting a large screwdriver through the mirror housing pushing the base round then unscrewing the whole lot I could then dismantle all the parts off that car. I'd watched a YouTube of someone doing the same where they had a broken toadstool and so was just removing the broken base. So did pretty much the same the grub screw must still have been grabbing into the original base.
Gassing Station | Griffith | Top of Page | What's New | My Stuff