Torque wrench settings
Discussion


Just building back up the E93A Ford side valve engine in my 1933 MG (long story!!)
I have a head bolt tightening sequence, but no idea of torque settings..
Must have done this with a spanner and guessed when I was young and foolish, and i'm sure it was originally done by feel to and educated arm..
Any suggestions?
(These engines were used a lot in "specials" in the 50s and 60s (Yes, Really!!)so it's sort of a PistonHead question!!
Mark
No idea I'm afarid, but you can try and work it out yourself. Manual calcs for this are very complicated, but I'd imagine this site gives a pretty good idea.
http://www.futek.com/boltcalc.aspx
http://www.futek.com/boltcalc.aspx
PHaviator said:
...(These engines were used a lot in "specials" in the 50s and 60s (Yes, Really!!)so it's sort of a PistonHead question!!
Mark
My first car was a E93A derived special which I built when I was 16.......not surprising then that I can't remember the torque settings...sorry.Mark
Steve
Thnaks for the help..
It was on the Small Ford Spares website after all
"help" referred to help with the job, NOT help with the website
(as they politely pointed out to me!!)
what a muppet!!
Oh well, too knackered after horrendous On Call yesterday, so Telly and Dirty Beer tonight!!
Mark
PS answwer is 30-35Ft/lbs (I'd guessed 35, but you just never know do you (particulaly on 60 year old studs!!)
30-35 ft lbs sounds very low even for a small engine. It will always be a function of the stud size and material spec. Spec for head studs is usually grade 8 imperial or its equivalent grade 10.9 metric - both about 150,000 psi. If the studs are 3/8" which is a common size then I'd expect to use about 45 ft lbs. I can't believe they're smaller than that. 5/16" would be too small for a head stud and anyway would only take about 25-30 ft lbs which also doesn't fit your figures.
Maybe if the studs are 3/8" grade 5 which is only about 120,000 psi then torque would be 35 ft lbs or just over but grade 5 is not usually used in such an application.
Maybe if the studs are 3/8" grade 5 which is only about 120,000 psi then torque would be 35 ft lbs or just over but grade 5 is not usually used in such an application.
Torque Settings for Ford E93A cylinder head.
I am presently engaged in doing-up an Aveling Barford 3point road roller. It was originally powered with a Ford 8Hp industrial version of the early Anglia motor but has been repowered with an E93A motor made by Sterling metals of Coventry (of "Electron" magnesium alloy casting fame.)
Sadly this machine was parked in the river and left there to mature for several years.
I am just now putting this motor, reworked of course, back together and I have the torque setting, but not the tightening sequence, from the supplier of the gaskets.
It comes from another supplier and my supplier has passed it on to me. The instructions are very detailed and involve a lot of steps.
I do not guarantee this information but as one who has many years of technical and professional experience it reads to me as making complete sense.so here goes.
Apparently the issue with the E93A motor is lack of cylinder head RETENTION. In effect this limits the torque that the head nuts can take irrespective of the head stud diameter i this case 35lb/ft. But...But...Read On!
Because of its structure and thickness the composite gasket (a sandwich of insulating sheet covered both sides with thin annealed copper,)
has considerable give. one result is that the maximum permissible warping of the head is a generous 1/32th". The downside is that because of the considerable amount it can be compressed, it is not sufficient to torque down the head in one operation. This is exacerbated by the replacement material for the asbestos used when these engines were new.
The following procedure would yield the most durable and satisfactory results.
First coat the new gasket. "Hylomar" and Coppercoat spray" are good products but anything with lubricating and sealing properties will work to some extent, but shellac is better to avoid because of the future work it creates.
Make sure your torque wrench calibration is accurate. High means breakages and low means blown-out gaskets.
Follow the sequence when torqueing down no matter what!
Set your torque wrench to 10 lb/ft. and go over the sequence twice. Next set your wrench to 20lb/ft. and repeat doubling the round . then again for 30lb/ft. and finally 35lb/ft.
At this point the engine is not ready for the cooling system to be filled because the head will loosen off as the gasket settles and it must be given time to sit while this happens. Ideally the engine should sit for 24 hours but if you have a customer to satisfy the time can be cut back to 12 hours. (the more temperature change the less time this takes)
Nowt reset your torque wrench to 20lb/ft. and go through the sequence twice again. Start at 20 then 30 then 35lb/ft. twice at each setting.
Allow the engine to settle for a further 12 hours (you might get away with 6 if your customer is chasing you so it might be better to explain right from the beginning.) and again, go through the sequence twice at each setting.
IIf the nuts require any tightening at all, you must leave the engine to settle for a further 6 to 12 hours and recheck again.
Keep repeating this process as many times as it takes until there is no movement in the nuts at all when you check with the torque wrench.
Only once you have reached this point, should the engine be filled with coolant, started, and run up to full working temperature.
It is best that this is done under load but only a moderate load. (Heavy loading or no loading both are damaging to reworked cylinders but in the case of a valve-grind care with the loading is not so crucial.) After it has come up to temperature and been held there for at least 5minutes,
Shut off and allow the motor to cool completely. Only when it is dead cold, retighten the head nuts starting at 20lb/ft. and observing the sequence twice at each setting.. Allow to settle and check again. If there is any tightening movement at 35lb/ft. allow further settling time and repeat as above.
Head nut tension should be checked after 2 to 4 weeks and thereafter no more frequently than every year.
NOW as I do not have a diagram of the tightening sequence would you be so good as to post up your one.
Thanks
Tim.tech
Nice to see this & such attention to detail - I had a Ford sidevalve in my Morgan F super - I found this on 'Rod's & Sod's ' website
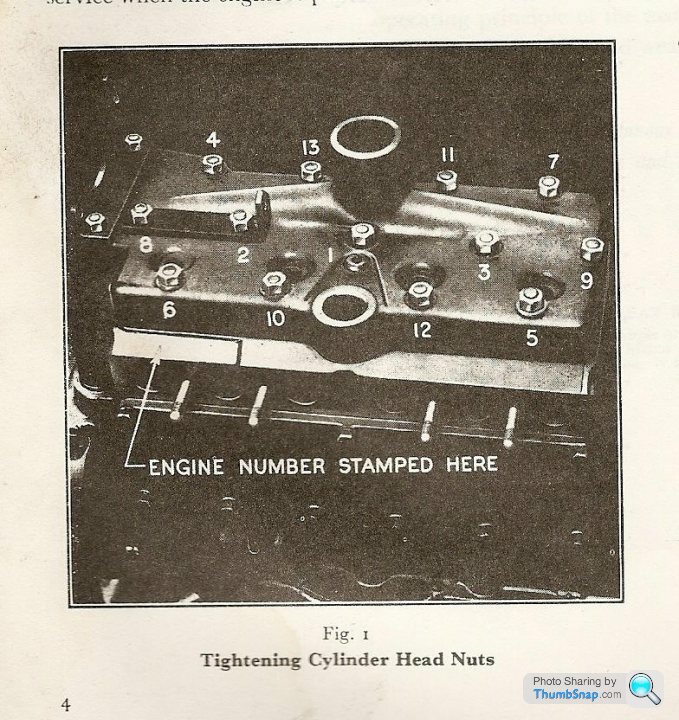
Hope that looks like yours. The sort of spiral pattern would be similar on most sidevalves.
This was also on the site - torque data for tightening cylinder head nuts:
8hp and 10hp -30 to 35 lb./ft.- 40 to 47 Nm
100E - 65 to 70 lb./ft - 88 to 94 Nm
105E/123E - 65 to 70 lb./ft- 88 to 94 Nm
Hope that looks like yours. The sort of spiral pattern would be similar on most sidevalves.
This was also on the site - torque data for tightening cylinder head nuts:
8hp and 10hp -30 to 35 lb./ft.- 40 to 47 Nm
100E - 65 to 70 lb./ft - 88 to 94 Nm
105E/123E - 65 to 70 lb./ft- 88 to 94 Nm
Thankyou for the picture, it is exactly like my engine.
The info on torque settings compared with the 100E motor comes as no surprise to me. The head stud sizes on both motors are the same, the limiting factor being the strength of the casting. if you exceed the 35lb/ft there is usually no immediate indication that anything is amiss. it may take a month or two when going up a steep hill with the motor working hard and heating more than usual, (It could even take a year or so,) that you would hear a muffled kind of bone-breaking type of crack. The block surrounding one of the studs has broken out.
I've heard of this on ford motors and have seen it on many occasions on 1930's Hillman Minx's back in the 1960's when nobody valued these cars. So many "Mechanics Bootlaces" couldn't believe the torque settings were so low or didn't use a torque wrench at all. they would say things like
"They didn't have torque wrenches back then." or perhaps "these were designed to be tightened down Armstrong tight." whatever that might mean; or something like, "Ah they were built well back then."
I'm from New Zealand and we have a reputation for doing our own work as well as thinking we understand so our scrap metal dealers' yards are full of broken machines the owners 'saved money' by fixing themselves. Of course it was never the owners ignorance that was to blame for the failure: it must have been the 'bad design to start with.'
Yes, the studs and nuts can take lots more than 35lb/ft. but the blocks can not.
I hope that is useful and thanks again
Tim mech.

The object of torque setting is to have a uniform pull on the studs. Measuring it this way is essentially an indirect method. The surfaces rubbing upon each other introduce an inconsistency that varies with the finish on the contacting surfaces. Thus a bolt/stud of a given diameter, pitch, and thread profile with a polished dry surface will turn at a lower torque, than an identical one that has a sand-blasted dry surface. That is, for the same longitudinal pull on the bolt/stud. The use of a lubricant reduces the variation considerably and allows for the torque setting to be a uniform and an accurate gauge of the longitudinal pull on the bolt/stud.
The argument against lubrication is based on the case where nuts (or bolts for that matter,) may work loose. in those situations the risk will remain, lubricated or not. One of the many forms of locking devices will solve this quite adequately.
Bear in mind that with the "Nylock" Family of devices, (whether the locking fibre is actually Nylon, or some other material,) when used in an application that is not completely dry of oil, water, or any other solvent, be careful to ensure that the locking fibre will not be damaged or loose it's locking properties when the solvent comes into contact. In the case of water or water solutions, it is also important to ensure that any chosen locking device does not retain the liquid and promote corrosion. .
For Example, sea water will penetrate genuine 'Nylon' and seriously corrode steel but some other plastics are impervious. Many locking nuts that have these alternatives are sold under the name 'Nylock,' so one must do one's homework first.
Gassing Station | Engines & Drivetrain | Top of Page | What's New | My Stuff