tipo 184 build diary
Discussion


i have been looking at the tipo build you tube channel and thought i would have a go at it, looks quite easy to do (famous last words)
BACKGROUND
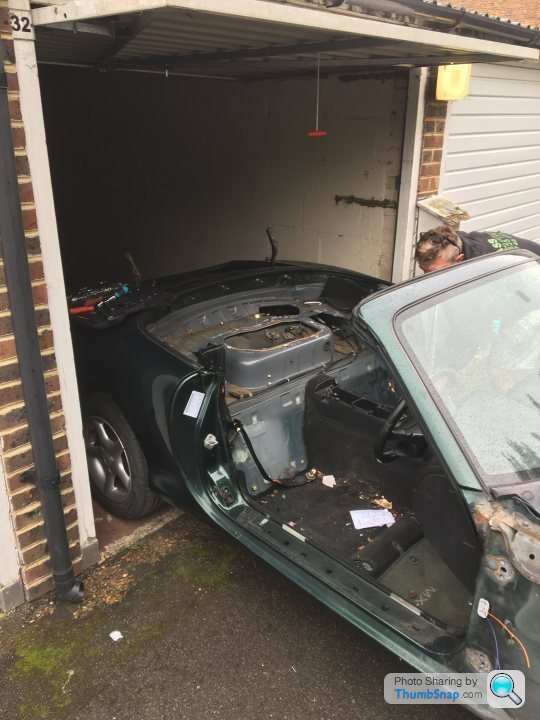
To start the car build i would need somewhere to do it , i don’t have access to a garage or any off road areas to do it so before i look at buying a car i would need to source a garage that’s not to far from my home.
garages are like gold dust around where i am, if you do find one then it’s quite expensive or to far from me.
In my job i do some decorating work for my local council, mainly for the childrens care department
where they give a young person who’s can’t stay in the care home as they have now turned 16-17 a one bedroom place for one year, after the first year, if they can cope they get a permanent home
9 times out of 10 they don’t cope and go off the rails and complete wreck the places, i have to then renovate them back to normal for the next youth
So i get to go to one flat thats within walking distance from my place, and it has a garage !
I asked the manager who i work with if they are giving the garage to the youth and they said they never do as they only fill it with junk or there friends use it for all sorts of activities
i offered to decorate the flat for exchange for a years use of the garage and maybe an agreement for the following year , she said yes
so garage has been secured, now to find a mazda mx5 car
BACKGROUND
To start the car build i would need somewhere to do it , i don’t have access to a garage or any off road areas to do it so before i look at buying a car i would need to source a garage that’s not to far from my home.
garages are like gold dust around where i am, if you do find one then it’s quite expensive or to far from me.
In my job i do some decorating work for my local council, mainly for the childrens care department
where they give a young person who’s can’t stay in the care home as they have now turned 16-17 a one bedroom place for one year, after the first year, if they can cope they get a permanent home
9 times out of 10 they don’t cope and go off the rails and complete wreck the places, i have to then renovate them back to normal for the next youth
So i get to go to one flat thats within walking distance from my place, and it has a garage !
I asked the manager who i work with if they are giving the garage to the youth and they said they never do as they only fill it with junk or there friends use it for all sorts of activities
i offered to decorate the flat for exchange for a years use of the garage and maybe an agreement for the following year , she said yes
so garage has been secured, now to find a mazda mx5 car
THE DONER CAR
typically when your not really looking there are loads of mazda’s about, once your ready to buy they all dry up!
the perimeters for the doner car is quite narrow , it has to be
1.8 litre MX-5 Mk2 (NB)
produced between 1998 and 2001 (without the VVT engine)
and with a 5 speed gearbox.
now there’s plenty of 1.6’s, and 1.8 vvt engines,or 6 speed ones but there not right,
My budget was around £ 1,000
going on auto trader and ebay bring up ones that are to expensive or they are mot failures
i didn’t want to buy an mot failure as i didn’t want to hire a trailer and i wanted to know iam getting a car that drives first as a good base car
Found a few but after checking the mot history’s on them, nothing but red fails repeatedly,
mainly rust but loads of other areas which would be time consuming and expensive to sort out
i wanted a strong engine and gear box first and foremost
so after two weeks looking, nothing about , i remembered gumtree,
haven’t been on gumtree for years, logged on and there was a mx5 within 5 miles from my home,
fresh mot with no advisory’s and within budget
called and arranged to see it .
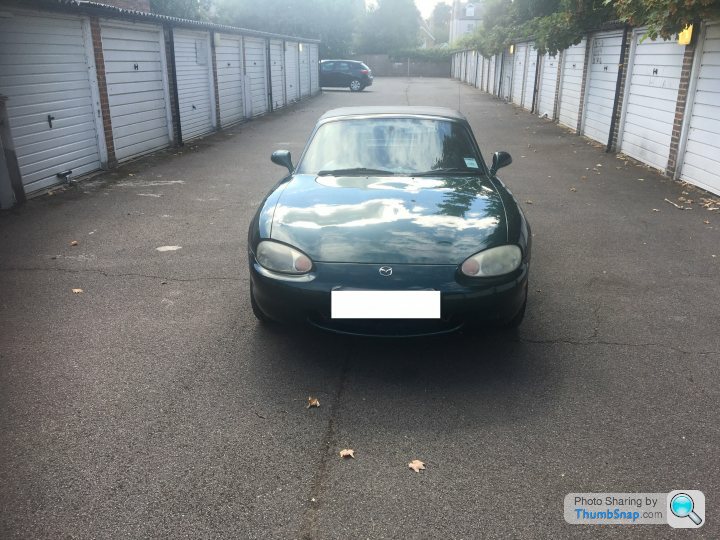
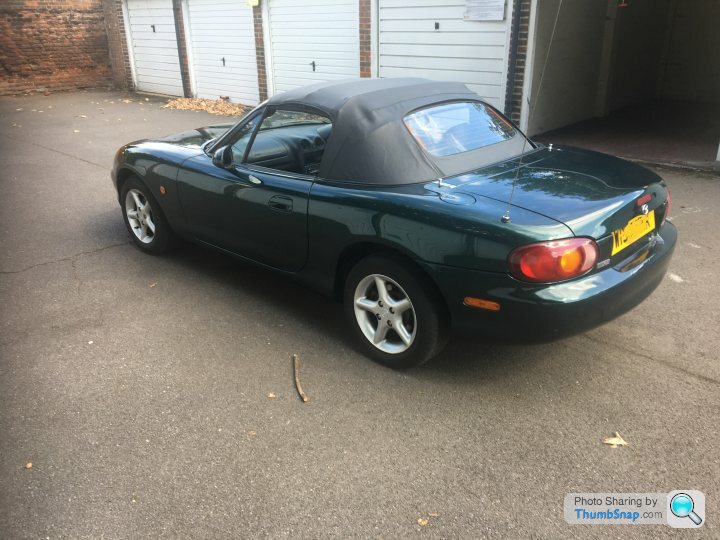
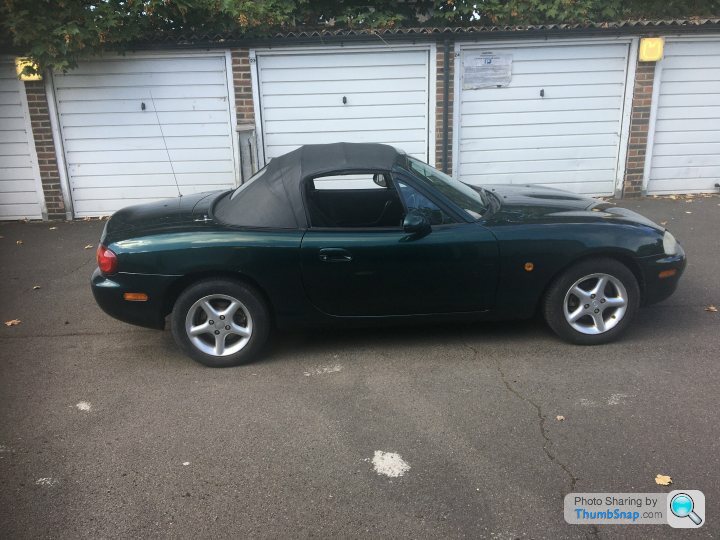
turns out he was a mx5 enthusiast who had three of them,
this was his daily drive but due to ulez he has to let it go and had got the mark 3 to replace it
mot history only had a couple of failures over the years ,mainly tyres and the rear number plate light bulbs but amazingly no rust advisories !
i told him i was looking for a project car to work on with my son ( which is true, he’s 8 )
i didn’t have to heart to tell him i was going to butcher the car down to the engine and gear box only as he was really keen on telling me all the aftermarket mx5 parts i could do to it to improve it
a deal was done and i drove it home
typically when your not really looking there are loads of mazda’s about, once your ready to buy they all dry up!
the perimeters for the doner car is quite narrow , it has to be
1.8 litre MX-5 Mk2 (NB)
produced between 1998 and 2001 (without the VVT engine)
and with a 5 speed gearbox.
now there’s plenty of 1.6’s, and 1.8 vvt engines,or 6 speed ones but there not right,
My budget was around £ 1,000
going on auto trader and ebay bring up ones that are to expensive or they are mot failures
i didn’t want to buy an mot failure as i didn’t want to hire a trailer and i wanted to know iam getting a car that drives first as a good base car
Found a few but after checking the mot history’s on them, nothing but red fails repeatedly,
mainly rust but loads of other areas which would be time consuming and expensive to sort out
i wanted a strong engine and gear box first and foremost
so after two weeks looking, nothing about , i remembered gumtree,
haven’t been on gumtree for years, logged on and there was a mx5 within 5 miles from my home,
fresh mot with no advisory’s and within budget
called and arranged to see it .
turns out he was a mx5 enthusiast who had three of them,
this was his daily drive but due to ulez he has to let it go and had got the mark 3 to replace it
mot history only had a couple of failures over the years ,mainly tyres and the rear number plate light bulbs but amazingly no rust advisories !
i told him i was looking for a project car to work on with my son ( which is true, he’s 8 )
i didn’t have to heart to tell him i was going to butcher the car down to the engine and gear box only as he was really keen on telling me all the aftermarket mx5 parts i could do to it to improve it
a deal was done and i drove it home
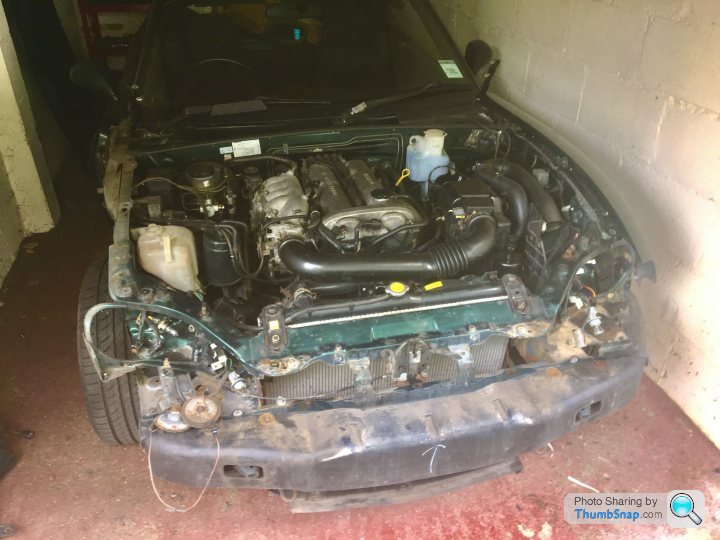
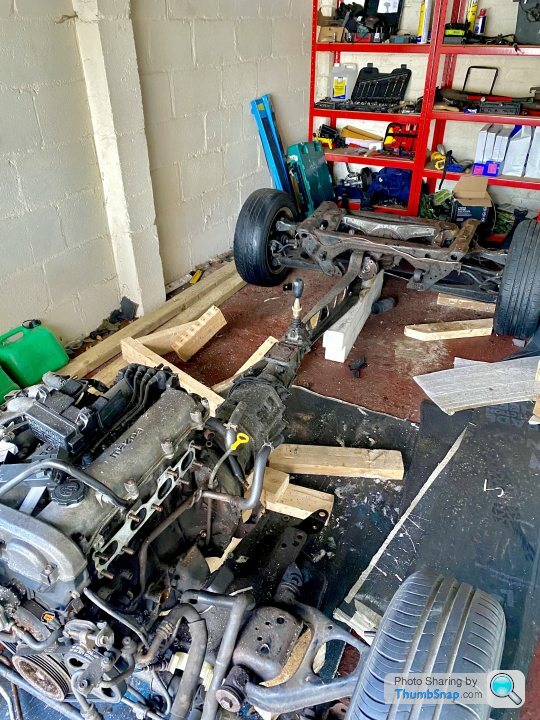
time working on the car - 2 hrs
i work 6 days a week and with family life as well i can only work on the car when i can , this isn’t going to be a quick build, sorry .
but with keen enthusiasm i managed to do two hours, would of done more but i had to pick up my boy from school and there’s no toilets near as i needed a pee
my plan was to take the easy stuff first , so bonnet, boot , etc,
i was also spraying everything with penetrating fluid in advance so it would help later on
i was also undoing any nut or bolt i could get to or see, probably stuff that didn’t need to come off , but if i could i would.
also in a single garage with not much side access you have to work smart
doors off also , had two wires going into the doors that i couldn’t find where they went to , so i just cut them off, everything on the doors doesn’t get used so the wires weren’t needed, i’ll chase them back to the replay or loom when i do the electrics on the tipo.
stripping out electrics 3 hrs
there are so many clips and plastic fittings holding the electrics on to the car, have to take my time on this as you need the loom intact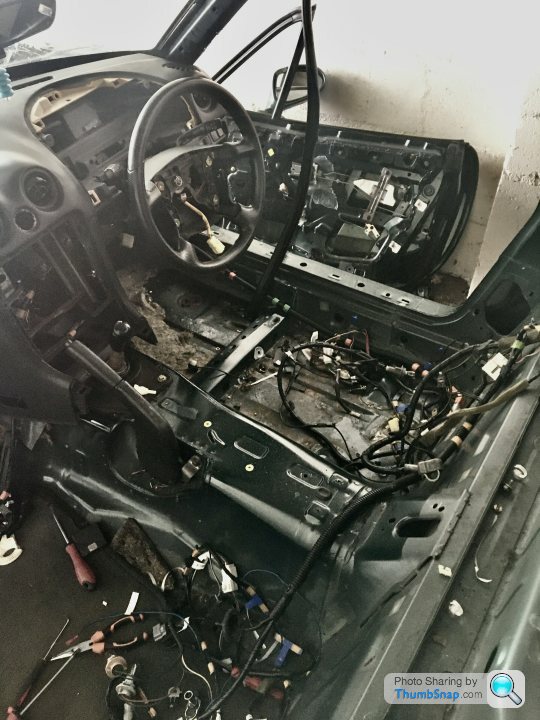
downloaded a electrical plan of the engine bay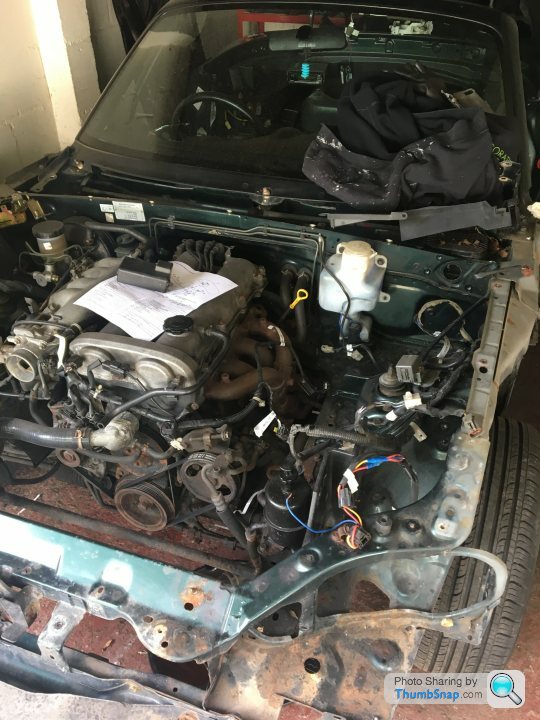
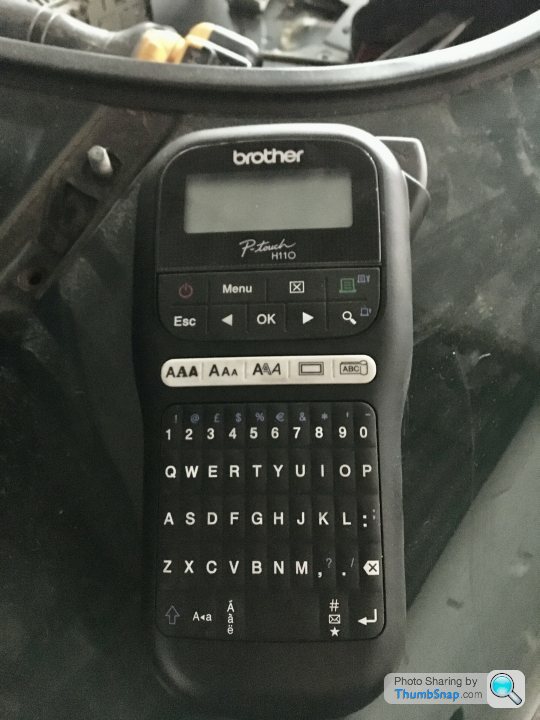
the best thing i bought was a label maker, so i could label every plug and connector
stripping out electrics 3 hrs
there are so many clips and plastic fittings holding the electrics on to the car, have to take my time on this as you need the loom intact
downloaded a electrical plan of the engine bay
the best thing i bought was a label maker, so i could label every plug and connector
dash removal 1hr
done this on my own but two hand would of been better
loads of hidden and fiddley bolts and clips, when you think you’ve got everything undone something is holding it on,
watched a youtube video that says dropping the steering column helps with the dash removal , so i took it all off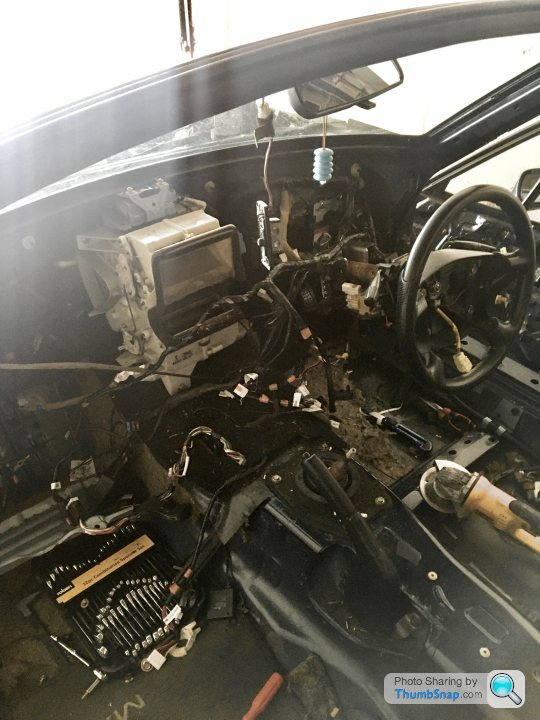
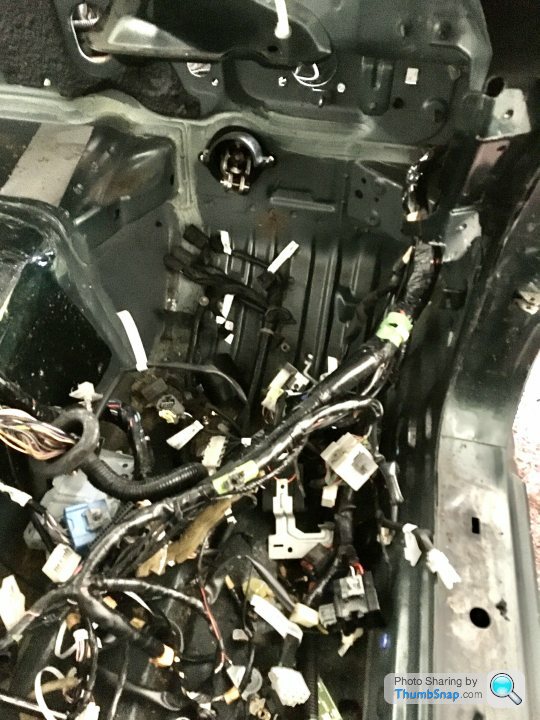
once the dash is out you can feed all the loom to the drivers side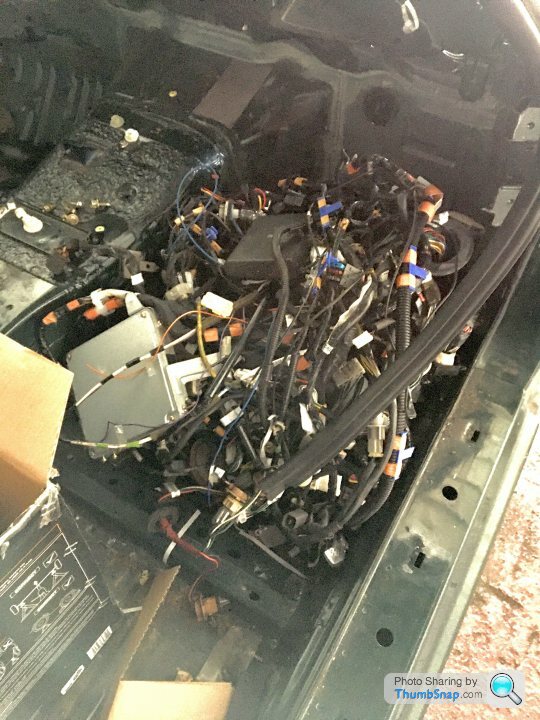
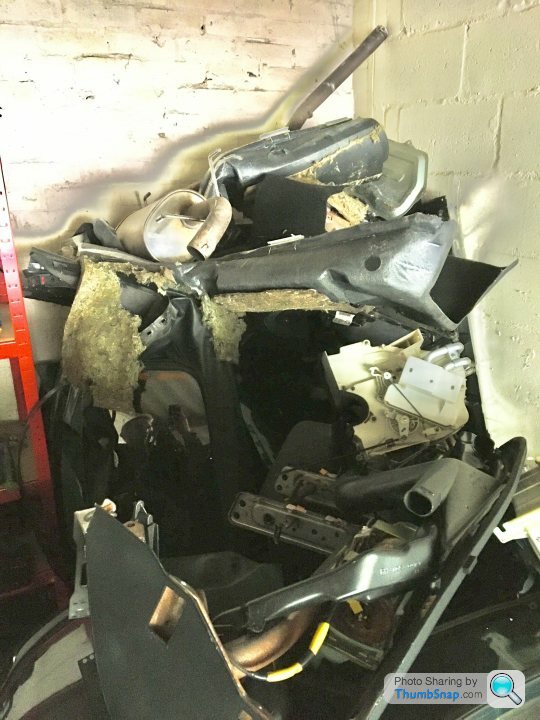
big pile of electrics
[url][img]
done this on my own but two hand would of been better
loads of hidden and fiddley bolts and clips, when you think you’ve got everything undone something is holding it on,
watched a youtube video that says dropping the steering column helps with the dash removal , so i took it all off
once the dash is out you can feed all the loom to the drivers side
big pile of electrics
[url][img]Edited by tricky360 on Friday 14th October 14:50
Edited by tricky360 on Friday 14th October 14:51
3 hrs this week
got rained off from work this week so had time to do some work on the car
jacked it up and got underneath to undo all the bits that need taking off,
handbrake cables were easy but i didn’t have google’s or glasses on so got rust particles in my eye
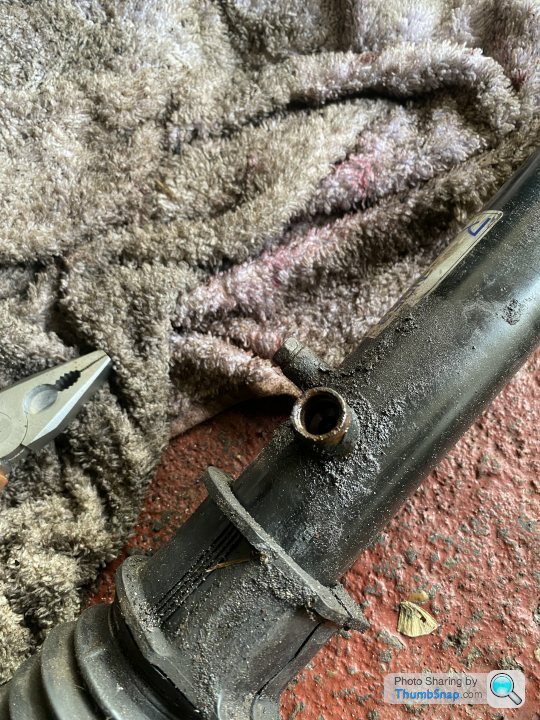
undone the fuel pump and hoses, they are just jubilee clips so again easy to take off.
cut the brake hoses as iam getting braided new ones.
then tried to take off the big bolts that keep the body connected to the chassis
there 6 on the rear , 4 came off easy with the driver i bought from lidl, £ 45 for a drill with long sockets .the other 2 took bloody ages to do.
loads of penetrating spray , a breaker bar and two of us undoing it, it would do half a turn then bind
this took about 1 hr !
front there’s 4 bolts ,again drill got two off no problem, 2 via breaker bar with a scaffold pole on the end to get leverage,again ages and now both of us are knackered
the body is now loose , just got to undo the shocks then the body will be free.
undone the shocks but something was still holding the body on, forgot to remove the brake pipe at the rear and the anti roll bar at the front !
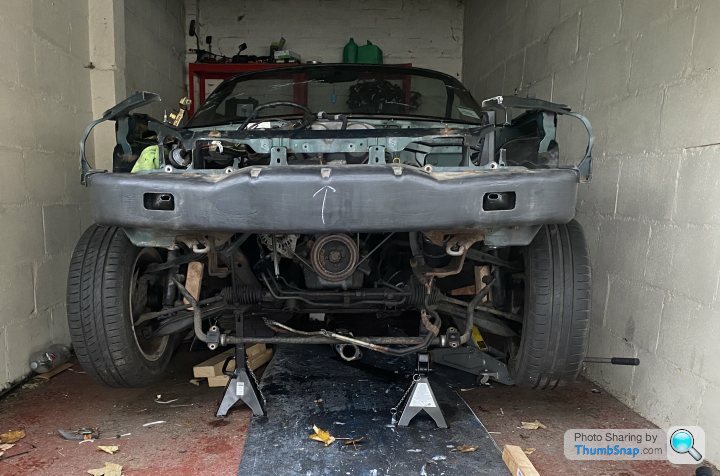
body now free , so jacked up the body to release the chassis but i’ll have to make something to hold it in the air while i arrange for a scrap guy to collect .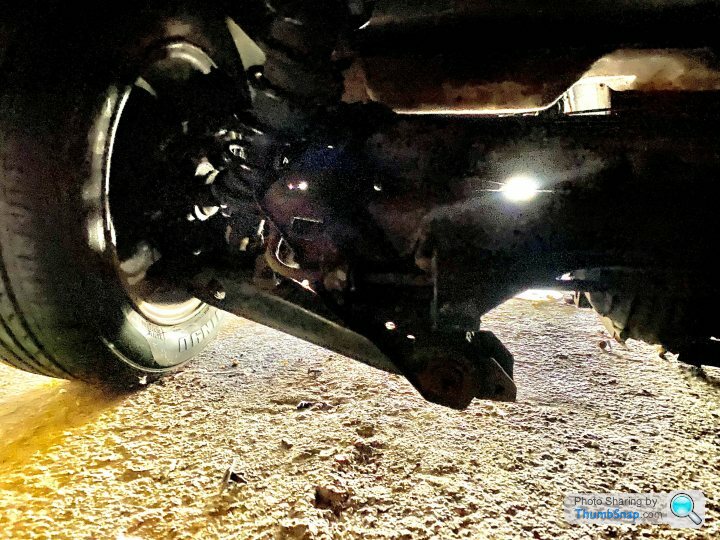
i’ll get a better picture of the rear subframe this week

got rained off from work this week so had time to do some work on the car
jacked it up and got underneath to undo all the bits that need taking off,
handbrake cables were easy but i didn’t have google’s or glasses on so got rust particles in my eye
undone the fuel pump and hoses, they are just jubilee clips so again easy to take off.
cut the brake hoses as iam getting braided new ones.
then tried to take off the big bolts that keep the body connected to the chassis
there 6 on the rear , 4 came off easy with the driver i bought from lidl, £ 45 for a drill with long sockets .the other 2 took bloody ages to do.
loads of penetrating spray , a breaker bar and two of us undoing it, it would do half a turn then bind
this took about 1 hr !
front there’s 4 bolts ,again drill got two off no problem, 2 via breaker bar with a scaffold pole on the end to get leverage,again ages and now both of us are knackered
the body is now loose , just got to undo the shocks then the body will be free.
undone the shocks but something was still holding the body on, forgot to remove the brake pipe at the rear and the anti roll bar at the front !
body now free , so jacked up the body to release the chassis but i’ll have to make something to hold it in the air while i arrange for a scrap guy to collect .
i’ll get a better picture of the rear subframe this week
3 hrs this week
made a couple of mistakes this week trying to move thing forward and left me with more work to do.
took off the shocks and springs which was easy enough, got the car up on to metal table saw horses which collapsed to one side . fortunately i had made up some wood blocks under the body so it sits on those and leans against the wall of the garage
which led me to the problem of getting the body out of the garage so the scrap man can take it .
i can’t roll the car forward as the body isn’t attached to the running gear and if i drop it down onto the body again i don’t have any room between the wheels so it won’t roll.
with the garage door open reduced the area i could get the body out so i had to cut the windscreen off.
went to the local diy shop to get a battery powered reciprocating saw ( dewalt one £179 plus the big battery that goes with it. another £ 120)
but the sales man talked me into buying a £20 angle grinding disc that he said would cut through the metal with ease
which it did !
plus it cut the car in half also!
so now it can be lifted out with two people instead of four and loaded into the truck.
i also took off the prop shaft , with 3 bolts coming off easy and one really stubborn one which was rounding off , which eventually came off but i’ll have to replace that bolt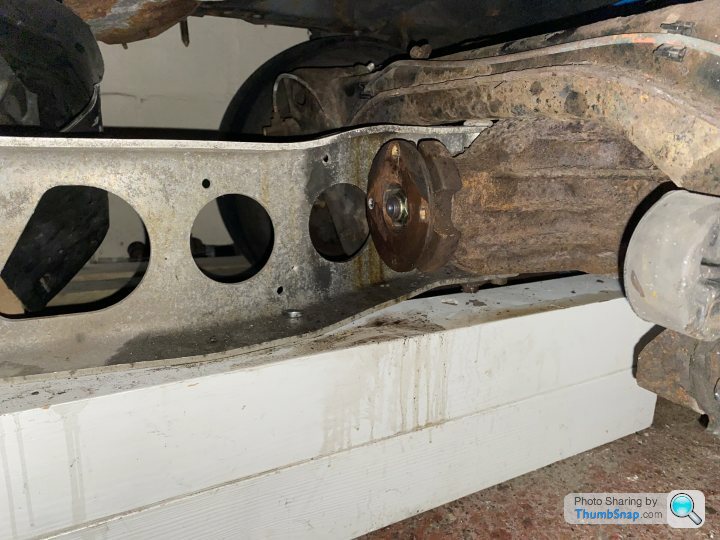
prop shaft off
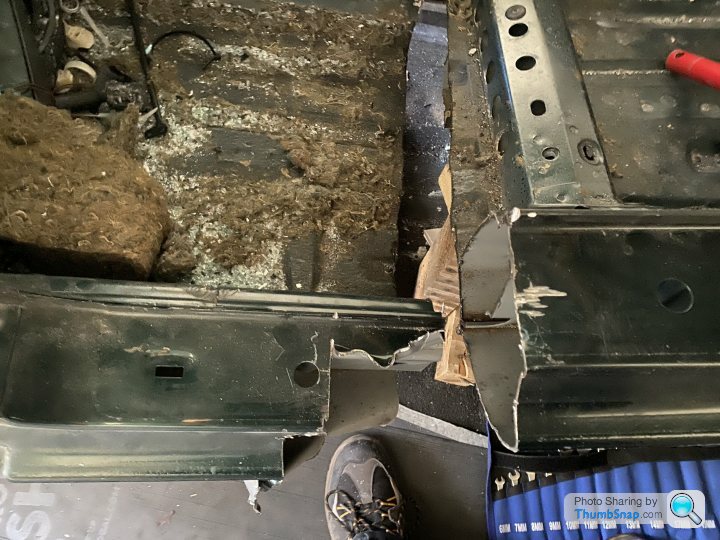
cut in half
windscreen off
body at a high point

exhaust off
front bottoming out a bit after the body off ,which stops it rolling
engine completely free of body
made a couple of mistakes this week trying to move thing forward and left me with more work to do.
took off the shocks and springs which was easy enough, got the car up on to metal table saw horses which collapsed to one side . fortunately i had made up some wood blocks under the body so it sits on those and leans against the wall of the garage
which led me to the problem of getting the body out of the garage so the scrap man can take it .
i can’t roll the car forward as the body isn’t attached to the running gear and if i drop it down onto the body again i don’t have any room between the wheels so it won’t roll.
with the garage door open reduced the area i could get the body out so i had to cut the windscreen off.
went to the local diy shop to get a battery powered reciprocating saw ( dewalt one £179 plus the big battery that goes with it. another £ 120)
but the sales man talked me into buying a £20 angle grinding disc that he said would cut through the metal with ease
which it did !
plus it cut the car in half also!
so now it can be lifted out with two people instead of four and loaded into the truck.
i also took off the prop shaft , with 3 bolts coming off easy and one really stubborn one which was rounding off , which eventually came off but i’ll have to replace that bolt
prop shaft off
cut in half
windscreen off
body at a high point
exhaust off
front bottoming out a bit after the body off ,which stops it rolling
engine completely free of body
1 hr
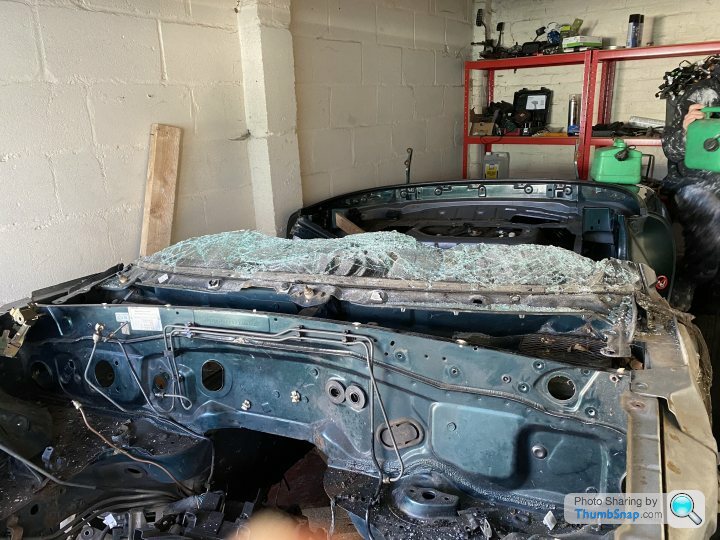
body gone!
got my friend who does rubbish clearing to clear his truck and 4 of us lifted the two halfs of the body on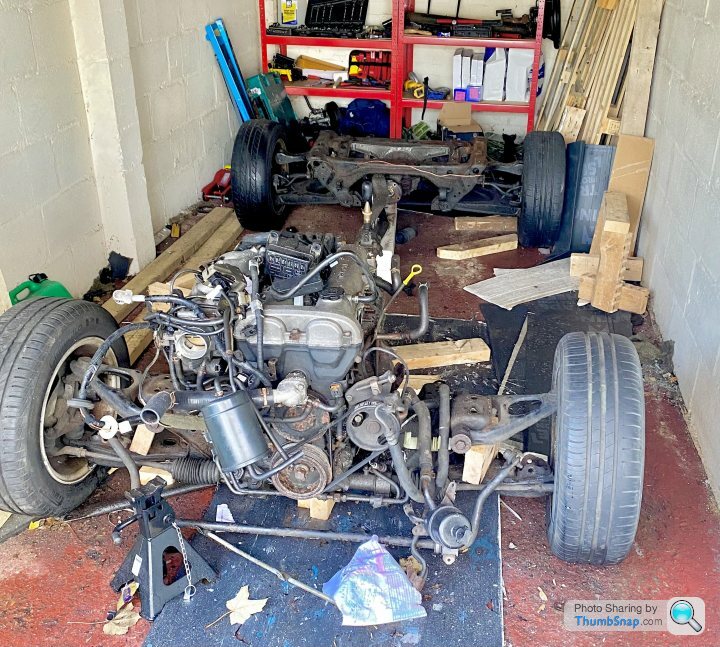
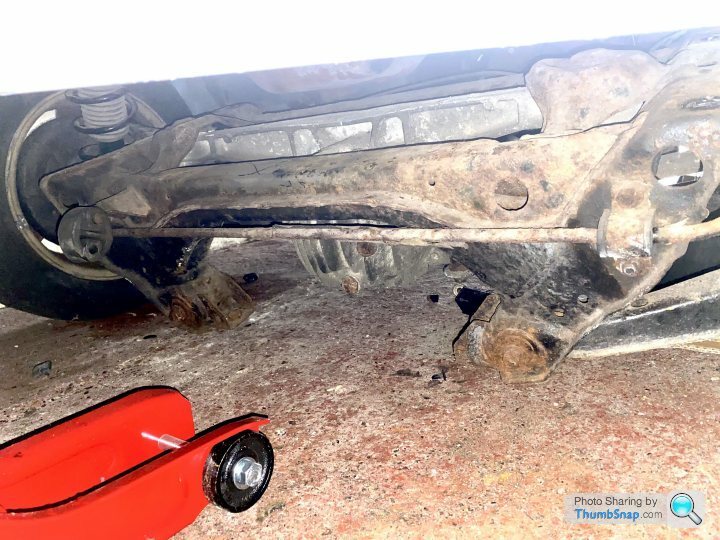
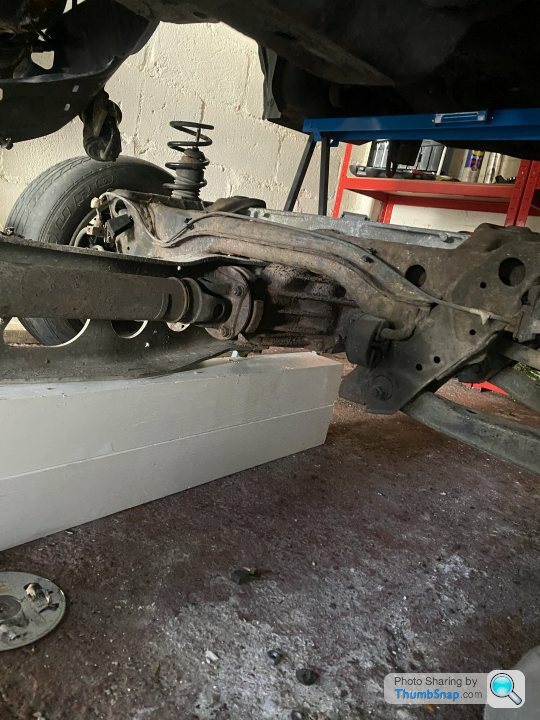
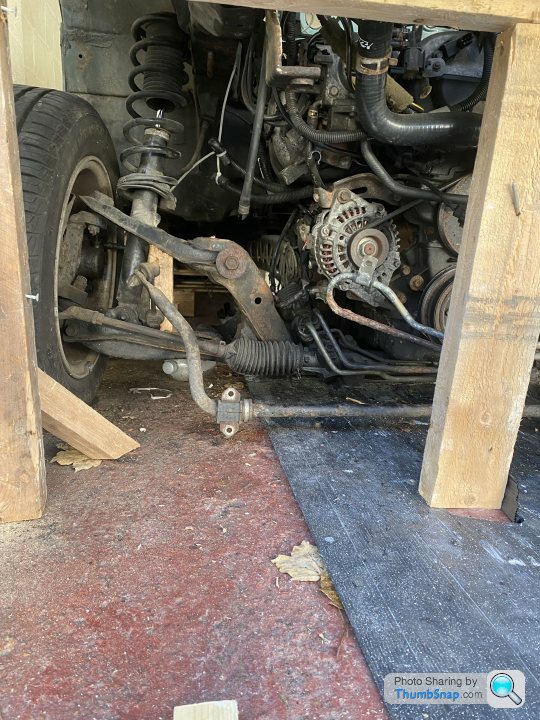
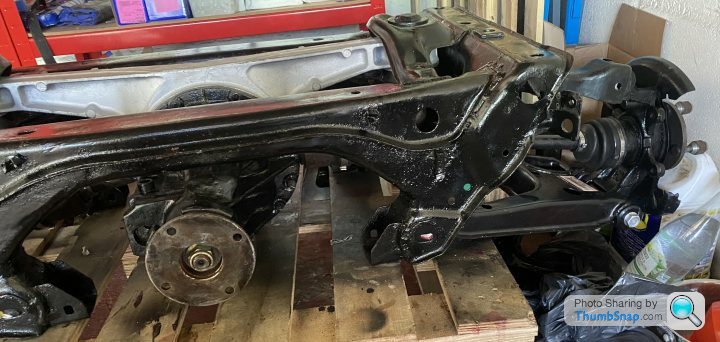
iam going to concentrate on the rear subframe first, get that complete, then move onto the front
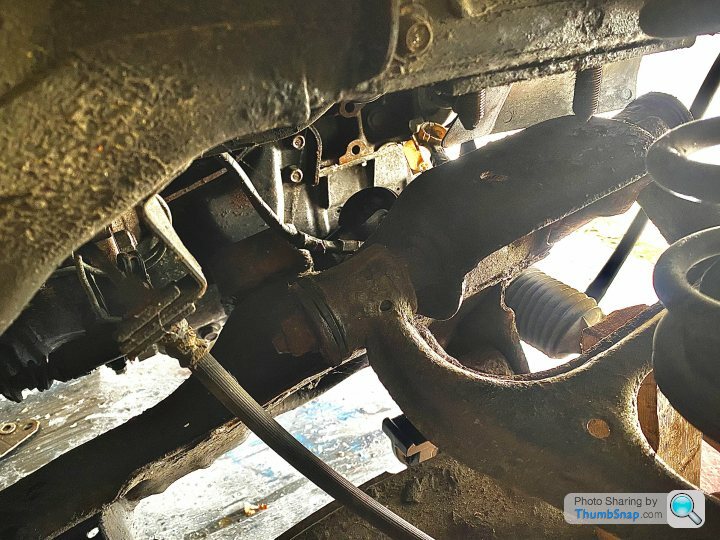
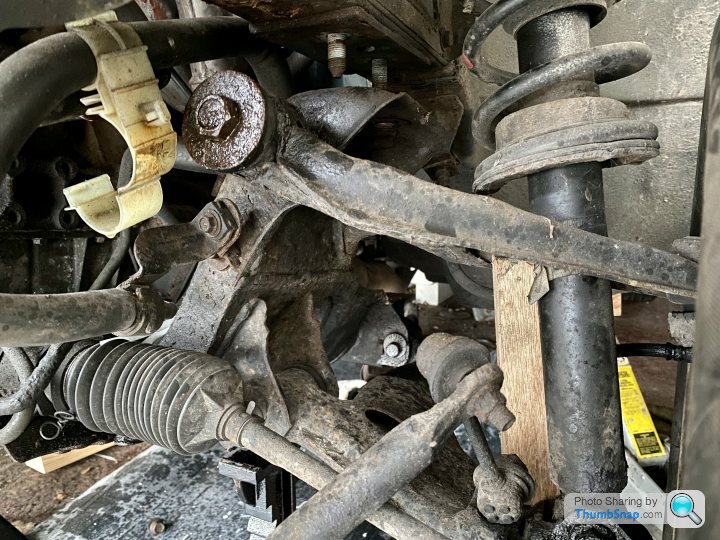
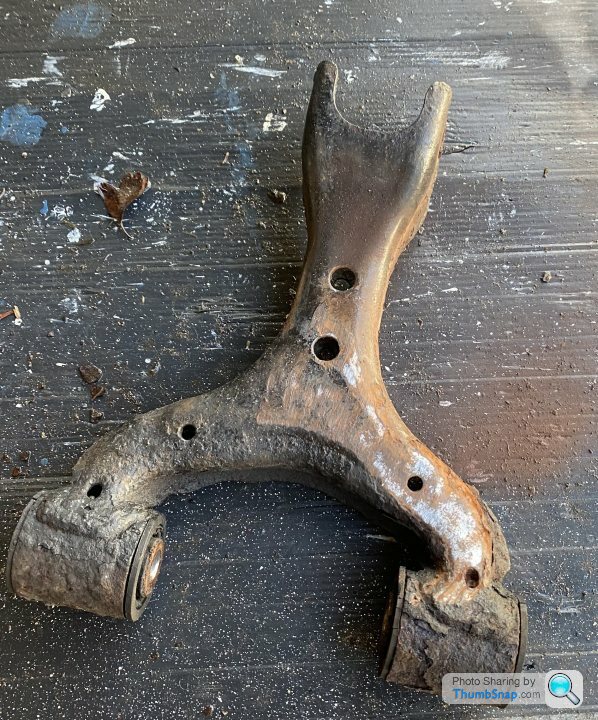
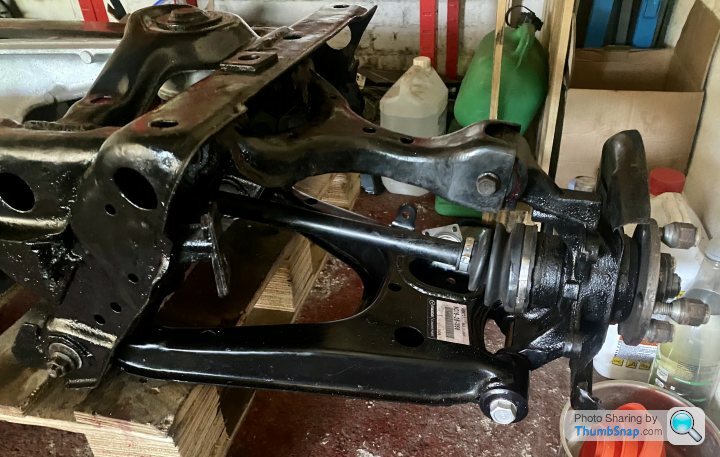
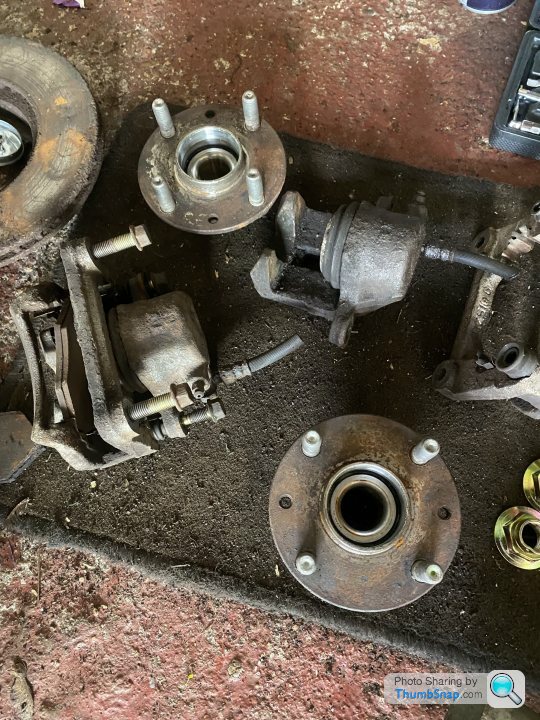
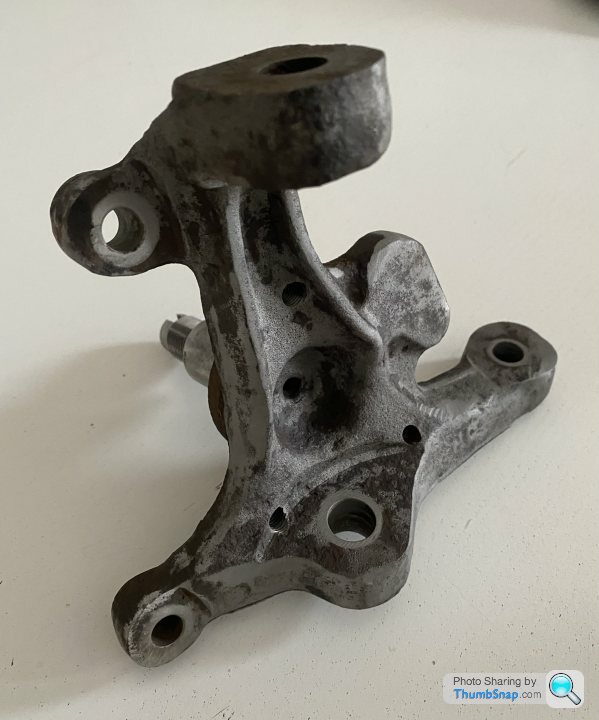
took off wheels and undid rear brakes and rotors
took off the suspension top arm ,which came out quite easy
next was to clean off the rust and paint off the top arm,
got the grinder on it with a corse 40 grade sanding disc
made light work of it but i run out of battery charge so will do some more this week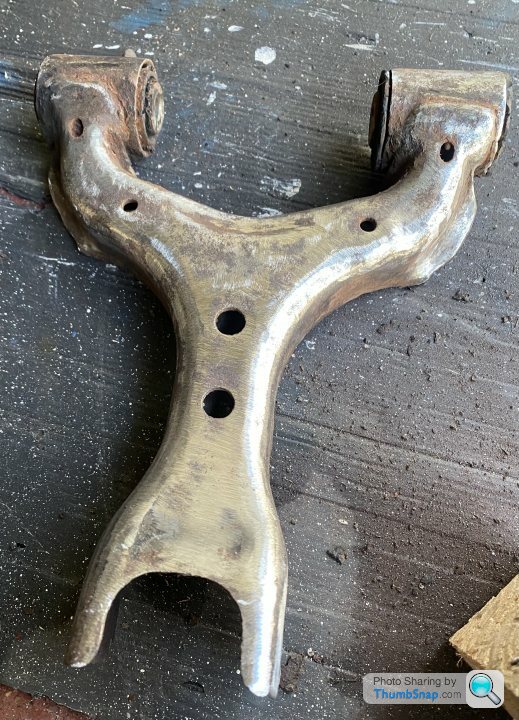
body gone!
got my friend who does rubbish clearing to clear his truck and 4 of us lifted the two halfs of the body on
iam going to concentrate on the rear subframe first, get that complete, then move onto the front
took off wheels and undid rear brakes and rotors
took off the suspension top arm ,which came out quite easy
next was to clean off the rust and paint off the top arm,
got the grinder on it with a corse 40 grade sanding disc
made light work of it but i run out of battery charge so will do some more this week
2hrs
treated myself to a big dewalt battery 18v 6ah xr flex , it can do 2 hrs non stop
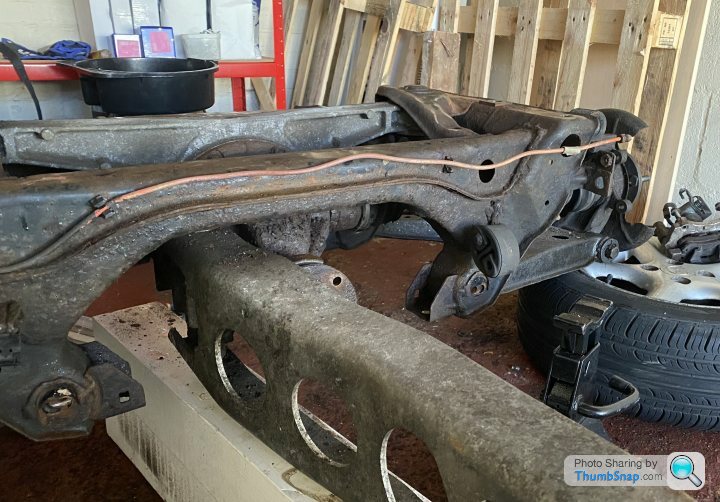
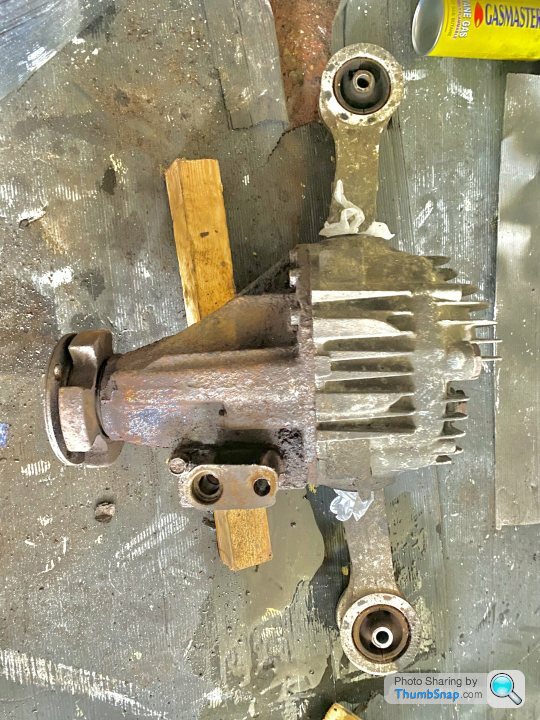
so today i got off the differential from the sub frame which was only two small nuts and one big nut both sides, i sheared off two of the smaller bolts so i’ll have to tack weld it in place once my new differential bushes arrive
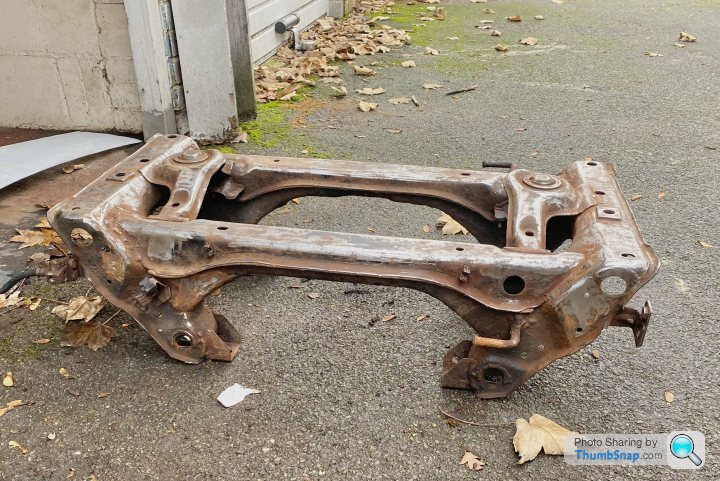
started to grind down the rust on the subframe
next job was to remove the ladder frame off the diff, this was causing me a headache as it was loose side to side but wouldn’t budge, had to watch a you tube video on how to remove it,
you have to put back the bolts half way , then bash them with a club hammer, the mushroom bolts pop out the top and then i bent the frame sideways and the last one snaps off
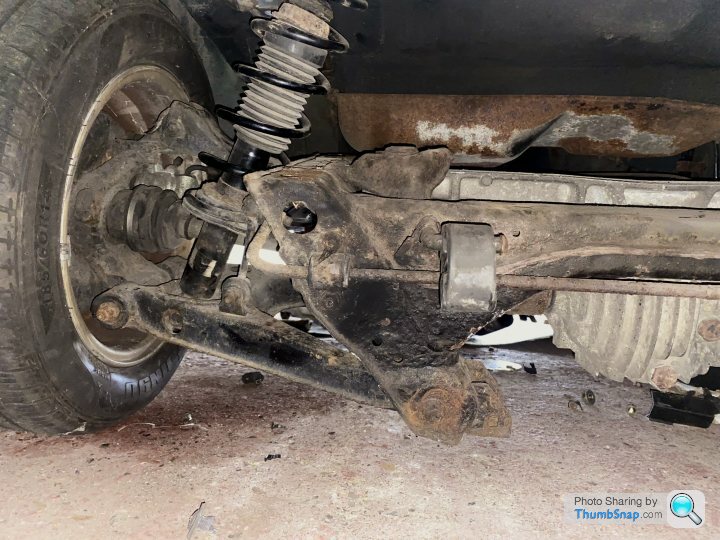
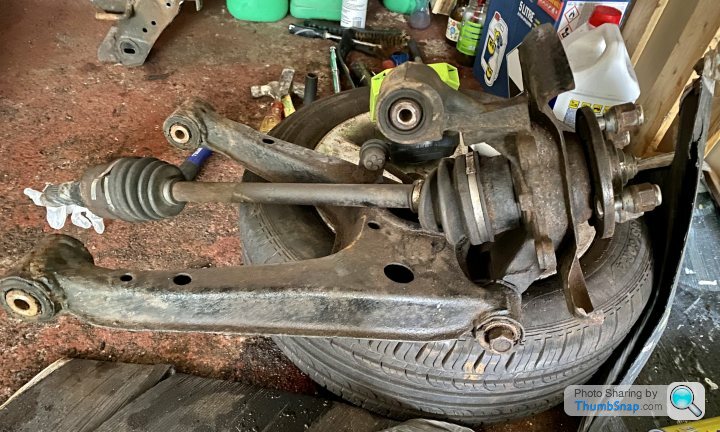
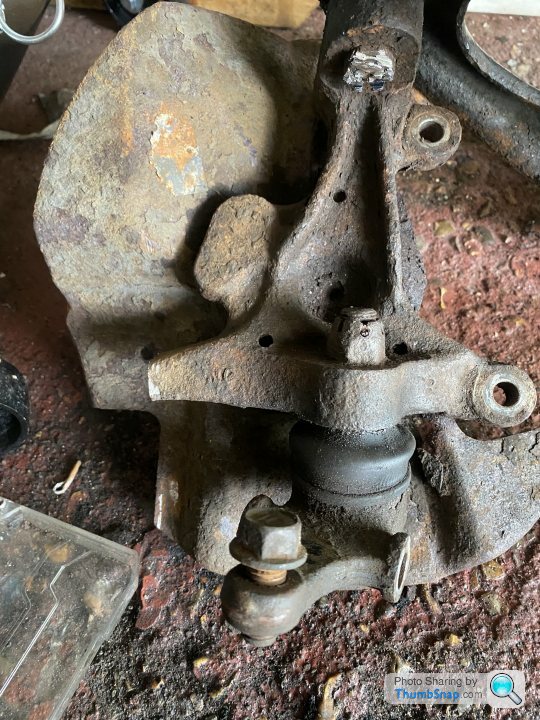
removed axles which pry off the diff, iam trying to undo the big bolt that goes through the lower wishbone, but this is well stuck on both drivers side and passenger’s.
will have to maybe cut the wishbone , i’ve bought new lower arms anyway
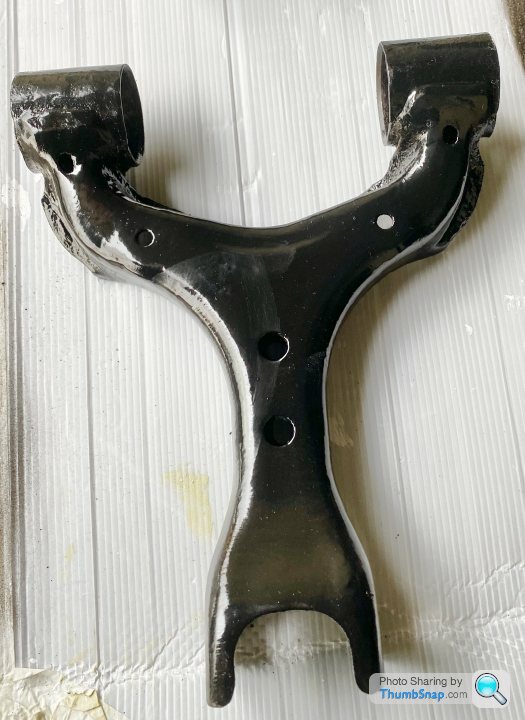
rust treated the top arms and then painted them with hammerite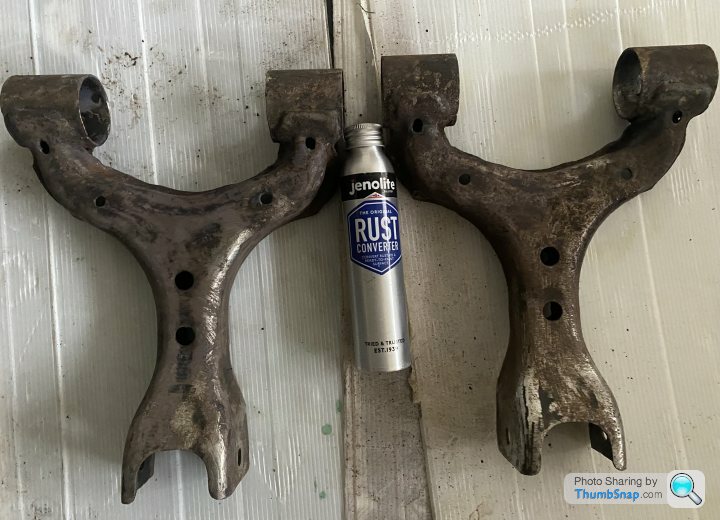
next was grinding off the rust from the diff, then treating it with rust converter, this takes 3 hrs to dry so i will paint it tomorrow
treated myself to a big dewalt battery 18v 6ah xr flex , it can do 2 hrs non stop
so today i got off the differential from the sub frame which was only two small nuts and one big nut both sides, i sheared off two of the smaller bolts so i’ll have to tack weld it in place once my new differential bushes arrive
started to grind down the rust on the subframe
next job was to remove the ladder frame off the diff, this was causing me a headache as it was loose side to side but wouldn’t budge, had to watch a you tube video on how to remove it,
you have to put back the bolts half way , then bash them with a club hammer, the mushroom bolts pop out the top and then i bent the frame sideways and the last one snaps off
removed axles which pry off the diff, iam trying to undo the big bolt that goes through the lower wishbone, but this is well stuck on both drivers side and passenger’s.
will have to maybe cut the wishbone , i’ve bought new lower arms anyway
rust treated the top arms and then painted them with hammerite
next was grinding off the rust from the diff, then treating it with rust converter, this takes 3 hrs to dry so i will paint it tomorrow
2 .5 hrs
got the bushes out of the differential with an cordless sds drill, you have to drill out the rubber mount then fold in the metal ,it’s in two half’s so once one side is folded in then they drop out, still takes about 10mins a side to do
then i sanded everything down and sprayed the differential with very high temperature aluminium paint , the black on the front part
i carried on grinding down the rusty subframe,which i’ll continue with tomorrow as my battery’s died
also got out two more bushes from the rear suspension arms with fire , my plumbing flame gun and a bolster and screwdriver gets them out
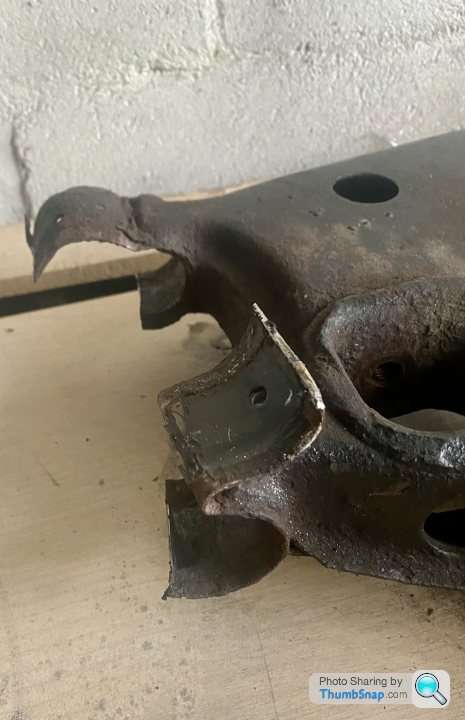
i also had to cut the suspension arms to get the bolt out, it was solid which is common,
i’ll take some photos tomorrow of that
got the bushes out of the differential with an cordless sds drill, you have to drill out the rubber mount then fold in the metal ,it’s in two half’s so once one side is folded in then they drop out, still takes about 10mins a side to do
then i sanded everything down and sprayed the differential with very high temperature aluminium paint , the black on the front part
i carried on grinding down the rusty subframe,which i’ll continue with tomorrow as my battery’s died
also got out two more bushes from the rear suspension arms with fire , my plumbing flame gun and a bolster and screwdriver gets them out
i also had to cut the suspension arms to get the bolt out, it was solid which is common,
i’ll take some photos tomorrow of that
2.5 hrs
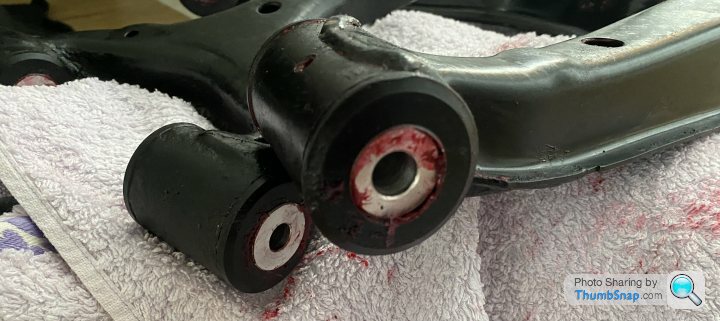
got the differential bushes fitted today, upgraded ones, i managed to hammer in one to about half way then it wouldn’t budge so i went to my local garage who’s got a press, they done both in 2 mins
sanded down both brake knuckles and brake dust plate and rust converter ed them ready for tomorrow to paint,
picture of the old differential rubber in half
here’s the suspension i had to cut to get the bushes and bolt out
there’s no build manual to take the car apart , it’s just common sense and keeping all the bits what’s needed for the tipo
i haven’t ordered my kit yet, i don’t have the room in a single garage to store it until i’ve got everything stripped and refurbished
iam based in twickenham
4 hrs
done some work at home on the suspension
got new sports bushes to fit, these were hard to do ,
first the instructions were very vague , each bushing has a different location so instead of numbering them or doing a picture diagram, it was just written in broken english so had to work out what goes where
i had to soak them in boiling hot water to soften them first ,then applied the grease
had a hand clamp that helped squeeze the bushings in first then the metal inserts were put in with a metal threaded bar method which was a lot easier
look up jazda on you tube for his method
the grease is bright red ,not blood !
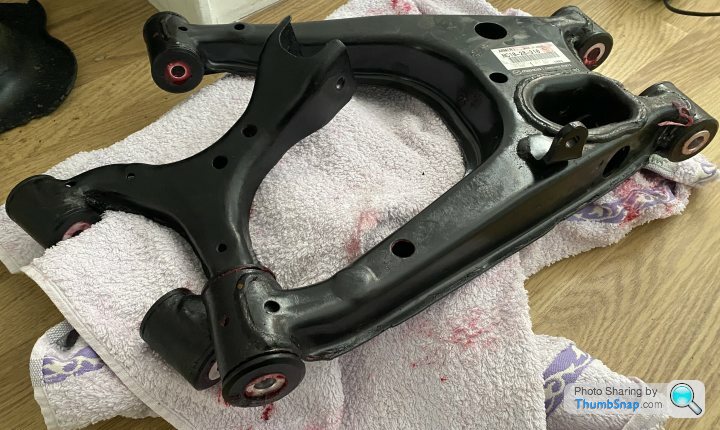
next was to paint the subframe
4 coats of hammerite black
then i painted up the rear knuckles
so monday or tuesday i’ll put the rear all back together,
i’ve ordered a engine hoist for tuesday/wednesday so i can then start on the front subframe
done some work at home on the suspension
got new sports bushes to fit, these were hard to do ,
first the instructions were very vague , each bushing has a different location so instead of numbering them or doing a picture diagram, it was just written in broken english so had to work out what goes where
i had to soak them in boiling hot water to soften them first ,then applied the grease
had a hand clamp that helped squeeze the bushings in first then the metal inserts were put in with a metal threaded bar method which was a lot easier
look up jazda on you tube for his method
the grease is bright red ,not blood !
next was to paint the subframe
4 coats of hammerite black
then i painted up the rear knuckles
so monday or tuesday i’ll put the rear all back together,
i’ve ordered a engine hoist for tuesday/wednesday so i can then start on the front subframe
2 hrs
no work on the car since last update, as it’s been too cold to go to the garage! and my work has picked up this last month so that has to come first.
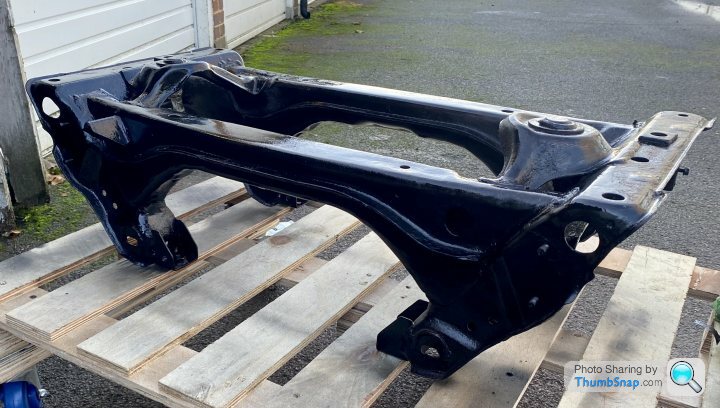
had a couple of hours spare today so went to fit up the rear subframe
new differential seals fitted and put in the axles and new suspension arms

nearly completed subframe, just got to put in one more bushing on the top suspension arm that i forgot to do at home
got my engine hoist to put together now ,and then i can start on the front subframe and take the engine and gearbox off and put it to one side
no work on the car since last update, as it’s been too cold to go to the garage! and my work has picked up this last month so that has to come first.
had a couple of hours spare today so went to fit up the rear subframe
new differential seals fitted and put in the axles and new suspension arms
nearly completed subframe, just got to put in one more bushing on the top suspension arm that i forgot to do at home
got my engine hoist to put together now ,and then i can start on the front subframe and take the engine and gearbox off and put it to one side
Edited by tricky360 on Thursday 16th February 09:09
Edited by tricky360 on Thursday 16th February 09:10
2.5 hrs
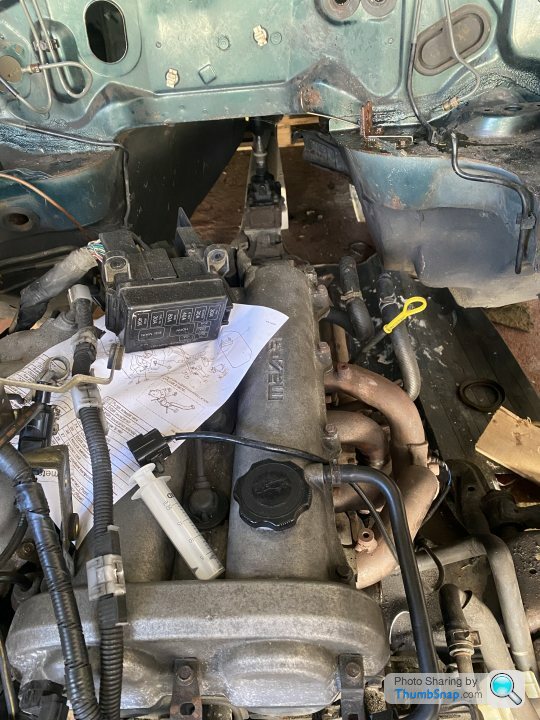
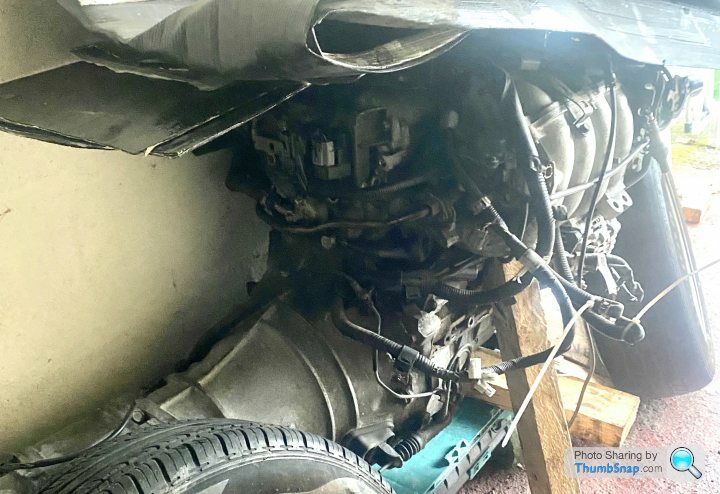
managed to get to the garage on friday to take off the engine from the front frame
had to put together my engine hoist first, then get some long enough chains
engine came off really easy and put it on a trolly to the side of the garage
i’ll work on the engine later on in the build
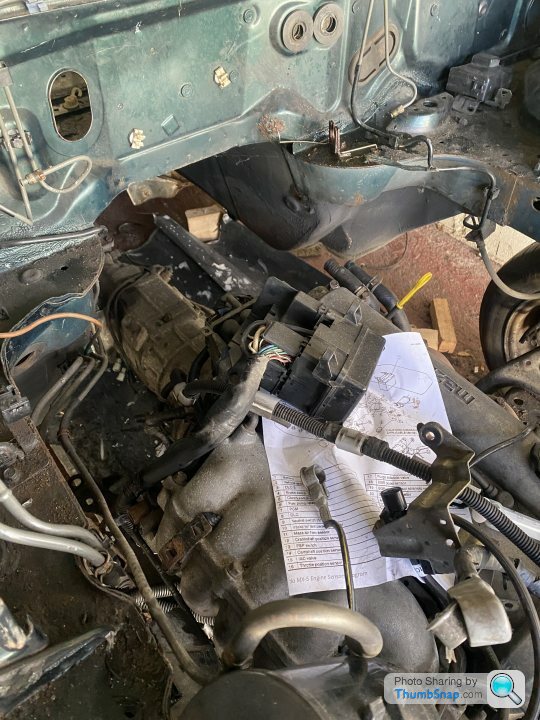
next was to take off the front wheels and strip down the front
looking at the build video, it looks like i don’t need any of the power steering system so this week i’ll strip that off and start grinding down the frame and getting it painted up
then it’s time to buy the kit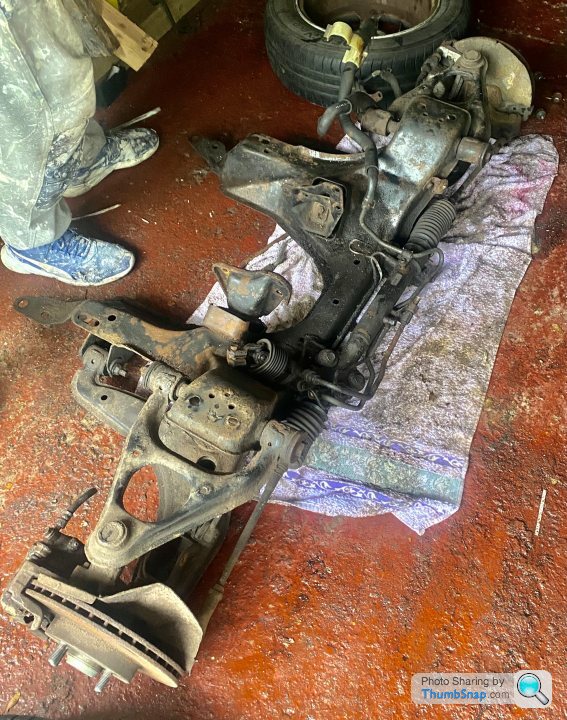
managed to get to the garage on friday to take off the engine from the front frame
had to put together my engine hoist first, then get some long enough chains
engine came off really easy and put it on a trolly to the side of the garage
i’ll work on the engine later on in the build
next was to take off the front wheels and strip down the front
looking at the build video, it looks like i don’t need any of the power steering system so this week i’ll strip that off and start grinding down the frame and getting it painted up
then it’s time to buy the kit
Edited by tricky360 on Monday 20th March 19:53
Edited by tricky360 on Monday 20th March 19:54
update time!
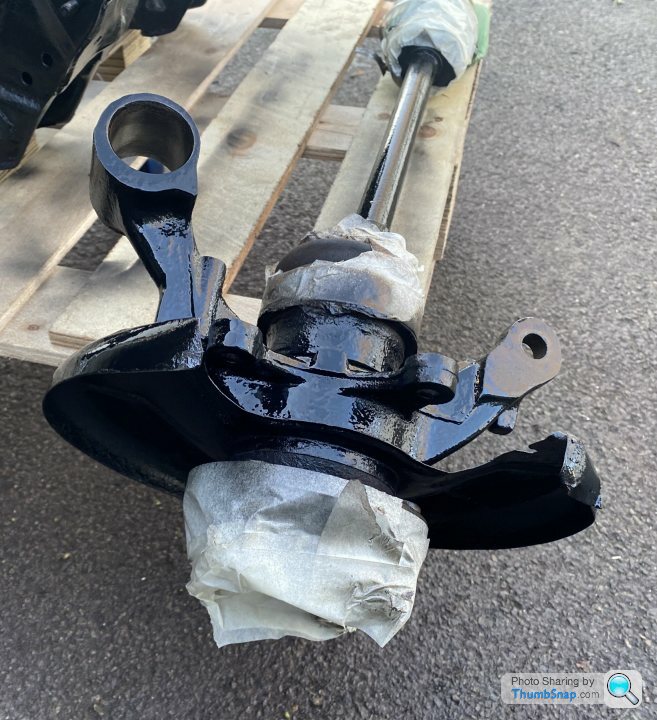
brakes striped down
been ages since i did anything to the car which i will explain later why!

snapped off one of the bolts holding on the brake dust overs
so took the hub to my local garage i use all the time and they removed the snapped bolt and sand blasted the hub for me for free
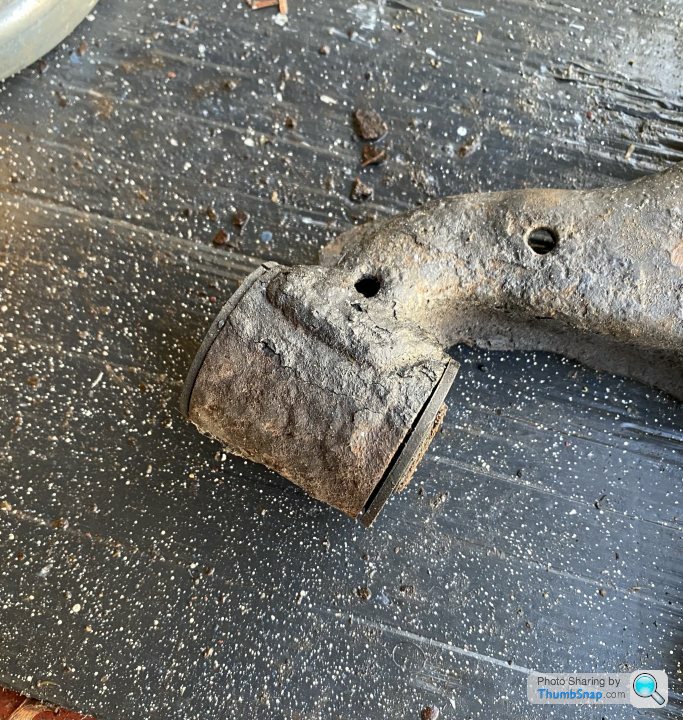
with me rushing to finish and get as much done as possible, i cut the wrong part off the knuckle 😤
brakes striped down
been ages since i did anything to the car which i will explain later why!
snapped off one of the bolts holding on the brake dust overs
so took the hub to my local garage i use all the time and they removed the snapped bolt and sand blasted the hub for me for free
with me rushing to finish and get as much done as possible, i cut the wrong part off the knuckle 😤
steering rack piping taken off
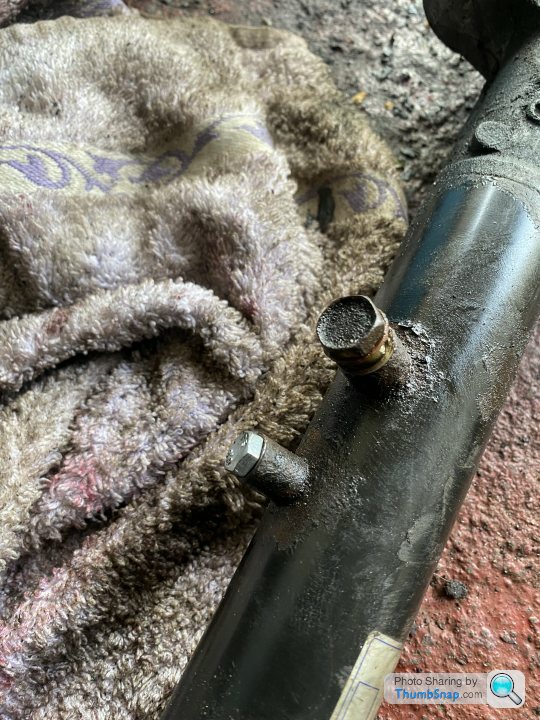
had to find some nuts to block up the holes left from the removed pipe work
next was to finish grinding down the front subframe which was going smoothly until i decided to do one last bit, i took off my safety glasses just to hit one last section and a bit of metal /rust shot into my eye
thought it would come out with a rub and a wash but i turned out to be stuck in my lens!
after two days of feeling i had hay fever in one side of my face with streaming watery eye , runny nose and a burning itch in my eye
i went to the hospital
they got it out and said it would take 2-3 days to heal
after one week of the same symptoms i had to go to an emergency eye hospital up london and it turns out some small fragments were still in the eye and had reacted to the natural salt in your tears and had made a rust ring in the eye
they got the last bits out and has taken 2 weeks to heal properly.
so i’ve learnt my lesson, always wear the safety gear from now on
Gassing Station | Kit Cars | Top of Page | What's New | My Stuff