Instructions to change fuel maps on 14CUX Griffith, Chimaera
Discussion


Following on from Colin and Dan’s huge effort to develop RoverGauge and with their guidance I’ve managed to change the fuel map on my precat Griffith. You don’t have to be a computer programmer or a Lucas/Bosch engineer, but as its not straightforward you do have to be computer savvy and meticulous with data entry.
To alter the fuel map you’ll need to buy the following hardware and a few spare EPROM chips so you can keep your original chip as a backup.
1 - TOP853 USB universal programmer, I bought mine off ebay for about £30.
2 - A few EPROM (M27C256) chips to experiment with, about £5 each on ebay.
3 - Ultra Violet (UV) light EPROM eraser on ebay for about £10.
4 - RoverGauge cable, email blitzracing (Mark), mine from him is very robust.
Optional
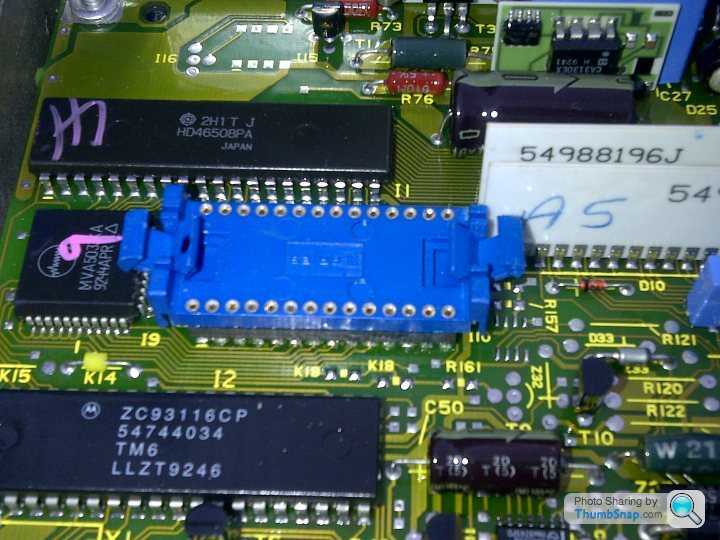
5 - Lock/Eject IC Socket with 28 pins, makes removing PROM’s safer & quicker, See picture below.
Colin and Dan have helped me come up with the following procedure, it may not suit everyone but it works for me.
1. Save PROM image via RoverGauge
In RoverGauge select ‘Save the PROM’ from the file menu, I called the file RGimage.bin.
(I save the image though RoverGauge as most EPROM chips are 32K which is large enough to hold two copies of the code & data but only have one copy in the second half, and some other chips have two copies. RoverGauge guarantees to save the correct code & data in a 16K file as required later on)
While in RoverGauge make a note of your fuel map and the fuel adjustment factor that is displayed just above the fuel map, I find it useful to save a screen shot of RoverGauge.
2. Amending the fuel Map
To amend the map I use my universal programmer software as follows, but you may have your own preferred editor.
Select chip type 27C128 EPROM & open your RGimage.bin, (Yes, I select 27C128 only while making changes to the image). Then look for your fuel map at the following offsets
For older tunes Map 1: $023F, Map 2: $0351, Map 3: $0463, Map 4: $0575, Map 5: $0687
For newer tunes: Map 1: $0267, Map 2: $0379, Map 3: $048B, Map 4: $059D, Map 5: $06AF
For Further information on the maps and the adjustment factor please see cmb (Colin) email half way down page 10 on the ‘Graphics interface for the 14CUX’ at
http://www.pistonheads.com/gassing/topic.asp?h=0&a...
It’s worth a read as Colin explains the maps, fuel adjustment factor and the location of the base idle speed.
Once you have found and changed your fuel map save your changes, I called the file mods.bin
3. Reset the checksum to 1, Stops the checksum error code
Technically you should reset the checksum to 1 every time you make a change to the chip and therefore I’m going to suggest you do. However I don’t always especially when I’m experimenting with a quick change. I’ve proved the checksum error is NOT the code of death but merely an indication that your tune chip has been altered. I would certainly reset the checksum to 1 once I’ve finished testing my alterations.
To set the checksum to 1 you need to run a program called jacksum on one copy of the code and data in a 16K file which is why I suggest saving the image at the start with RoverGauge.
a. Check mods.bin is still 16,384 bytes long.
b. Download and Install jacksum from http://www.jonelo.de/java/jacksum/
c. Run jacksum from the command line as follows “jacksum -a sum8 mods.bin”, it requires Java runtime that you’ll probably already have installed.
d. Now the trick is to change the first byte in mods.bin so jacksum returns a checksum of 1, you can use Colin’s formula or logical trial and error. If you use trial & error make notes as you guess and you’ll soon see how it works.
4. Duplicate the image
If you remember from step one the code/data is duplicated on the chip so run the following from the command line to duplicate the code/data image:-
copy /b mods.bin+mods.bin mods2.bin
5. Write changes to EPROM chip
Restart your EPROM programmer software, select chip type 27C256, open mods2.bin and select write to chip. Afterwards, it’s worth running the verify option.
6. Install the updated chip into the ECU
I’ll let you google how to physically swap the EPROM tune chips.
Conclusion
Should you have any questions or suggestions to simplify this procedure please do not hesitate to contact me and I’ll do my best, but please remember I’m not the brains behind this project, just the Monkey trying to document Colin and Dan’s instructions. I’m sorry, I can’t offer any advice on individual fuel maps so you’ll have to experiment for yourself on the rolling road or test drive while running RoverGauge data logger.
Finally please keep your original chip in a safe place as a fallback and always work on spare EPROM chips, I can’t be held responsible for any undesirable side effects.
I realise this is not straightforward but at least now ‘where there’s a will, there is a way’.
Good Luck, Steve Sprint
To alter the fuel map you’ll need to buy the following hardware and a few spare EPROM chips so you can keep your original chip as a backup.
1 - TOP853 USB universal programmer, I bought mine off ebay for about £30.
2 - A few EPROM (M27C256) chips to experiment with, about £5 each on ebay.
3 - Ultra Violet (UV) light EPROM eraser on ebay for about £10.
4 - RoverGauge cable, email blitzracing (Mark), mine from him is very robust.
Optional
5 - Lock/Eject IC Socket with 28 pins, makes removing PROM’s safer & quicker, See picture below.
Colin and Dan have helped me come up with the following procedure, it may not suit everyone but it works for me.
1. Save PROM image via RoverGauge
In RoverGauge select ‘Save the PROM’ from the file menu, I called the file RGimage.bin.
(I save the image though RoverGauge as most EPROM chips are 32K which is large enough to hold two copies of the code & data but only have one copy in the second half, and some other chips have two copies. RoverGauge guarantees to save the correct code & data in a 16K file as required later on)
While in RoverGauge make a note of your fuel map and the fuel adjustment factor that is displayed just above the fuel map, I find it useful to save a screen shot of RoverGauge.
2. Amending the fuel Map
To amend the map I use my universal programmer software as follows, but you may have your own preferred editor.
Select chip type 27C128 EPROM & open your RGimage.bin, (Yes, I select 27C128 only while making changes to the image). Then look for your fuel map at the following offsets
For older tunes Map 1: $023F, Map 2: $0351, Map 3: $0463, Map 4: $0575, Map 5: $0687
For newer tunes: Map 1: $0267, Map 2: $0379, Map 3: $048B, Map 4: $059D, Map 5: $06AF
For Further information on the maps and the adjustment factor please see cmb (Colin) email half way down page 10 on the ‘Graphics interface for the 14CUX’ at
http://www.pistonheads.com/gassing/topic.asp?h=0&a...
It’s worth a read as Colin explains the maps, fuel adjustment factor and the location of the base idle speed.
Once you have found and changed your fuel map save your changes, I called the file mods.bin
3. Reset the checksum to 1, Stops the checksum error code
Technically you should reset the checksum to 1 every time you make a change to the chip and therefore I’m going to suggest you do. However I don’t always especially when I’m experimenting with a quick change. I’ve proved the checksum error is NOT the code of death but merely an indication that your tune chip has been altered. I would certainly reset the checksum to 1 once I’ve finished testing my alterations.
To set the checksum to 1 you need to run a program called jacksum on one copy of the code and data in a 16K file which is why I suggest saving the image at the start with RoverGauge.
a. Check mods.bin is still 16,384 bytes long.
b. Download and Install jacksum from http://www.jonelo.de/java/jacksum/
c. Run jacksum from the command line as follows “jacksum -a sum8 mods.bin”, it requires Java runtime that you’ll probably already have installed.
d. Now the trick is to change the first byte in mods.bin so jacksum returns a checksum of 1, you can use Colin’s formula or logical trial and error. If you use trial & error make notes as you guess and you’ll soon see how it works.
4. Duplicate the image
If you remember from step one the code/data is duplicated on the chip so run the following from the command line to duplicate the code/data image:-
copy /b mods.bin+mods.bin mods2.bin
5. Write changes to EPROM chip
Restart your EPROM programmer software, select chip type 27C256, open mods2.bin and select write to chip. Afterwards, it’s worth running the verify option.
6. Install the updated chip into the ECU
I’ll let you google how to physically swap the EPROM tune chips.
Conclusion
Should you have any questions or suggestions to simplify this procedure please do not hesitate to contact me and I’ll do my best, but please remember I’m not the brains behind this project, just the Monkey trying to document Colin and Dan’s instructions. I’m sorry, I can’t offer any advice on individual fuel maps so you’ll have to experiment for yourself on the rolling road or test drive while running RoverGauge data logger.
Finally please keep your original chip in a safe place as a fallback and always work on spare EPROM chips, I can’t be held responsible for any undesirable side effects.
I realise this is not straightforward but at least now ‘where there’s a will, there is a way’.
Good Luck, Steve Sprint
Edited by stevesprint on Thursday 29th August 23:38
My instructions and the RoverGauge boy’s info are all free for all to use but will not suit everyone as it’s complicated.
I agree, engine tuning requires specialised knowledge, experience and a rolling road and therefore best left to the professionals, so that counts me out. The more people ending up charging to do the same job will increase competition and that’s good for the consumer.
If the home mechanic does ends up with detrimental effects, as I did when I reduced the fuelling too much, you just pop your original chip back in.
Cheers, Steve Sprint
I wouldn’t suggest anyone, a professional or a home mechanic, change their fueling without proper testing. For example, an engine running too lean will run hotter as the fuel helps with cooling and secondly their is a higher chance of pre-ignition and that’s destructive.
I enjoy solving puzzles and the 14CUX has been more fun than a Rubixs cube.
Cheers, Steve
I enjoy solving puzzles and the 14CUX has been more fun than a Rubixs cube.
Cheers, Steve
Kabaman - Very cleaver and well done, I love the recalibrated dials and the icon.
The lack of target idle is a known issue with early EPROM revisions and Colin said he would look into it one day. All I know is the base idle speed is held in the same location for both revision, at $0176 and $0177 on the EPROM, which is mapped to C176 and C177 in RAM. If you knew the calculation you could temporary display the base idle speed. Maybe worth asking Colin for help on the RoverGauge thread at
http://www.pistonheads.com/gassing/topic.asp?h=0&a...
Steve
Curiosity got the better of me over the weekend so I copied my fuel map and idle speed into a 1994 Land Rover EPROM. As I don’t have a gas analyser I don’t have the full story but after a light duty 20 minute drive the noticeable good points are as follows:
1. Smoother when feathering the throttle at slow speeds
2. Holds idle up slightly while coasting and then drops down each time I stop. Is this a temporary feature while the ECU is leaning?
3. I didn’t notice the smell of fumes as much, but that might be wishful thinking as my mind was on other things.
The only bad points are I had to be careful not to stall while warming up and more serious the overrun was much much quieter and that’s unacceptable in a TVR.
I guess it’s these operating characteristics that makes Mark Adams Tornado chip really shine as he can cherry pick the best features. Maybe I’ll have to experiment with the Tuneable accelerator & the coolant temperature tables next to see if it helps.
Please don’t try this at home as Mark Adams is a professional electronics engineer who has tuned over 2000 Rover V8s and I’m just a big kid who likes to experiment and learn about my toys.
Edited by stevesprint on Wednesday 4th September 00:19
kabaman said:
This is really interesting. I've been mucking about with the RoverGauge source code to custimise it for my Griff with silly things like the TVR icon :-)
How accurate is the RoverGauge speedo, I ask as I've fitted a T5 to my precat with a different speedo sensor set-up to the 500's and my RoverGauge reads 60 when I'm only doing 40, surprisingly this doesn’t cause any driving issues.The one advantage of the LT77 gearbox in the precats is the speedo in RoverGauge should work correctly unlike a Griff 500 with a T5.
Thanks, Steve
danbourassa said:
Steve, can you describe the setup? Does it use the crown wheel on the nose of the diff?
It's the Caerbont EMP-34-1 sensor on the left and I've reduce the teeth on the wheel down to 4. 16 teeth use to throw the ECU into error and 8 teeth use to hit the ECU road speed limiter. 3.5 teeth would be spot on but without RoverGauge I wouldn't even know it was over reading. This winter I plan to add the correct inline resister, in fact do you know what the resistance should be.???The sensor on the right is for my speed sensing electric PAS that I have finally perfected. Light for parking and manual above 30mph. I’ve always enjoyed a good challenge.
danbourassa said:
I didn't know there was an inline resistor. Colin and I did a little experimenting with the road speed input a few month ago. I think we determined that pulse amplitude was not important.
On a John Eales ECU plug wiring diagram I received 13 years ago the road speed sensor reed switch is protected by a diode. More recently I’ve noticed the following on the ACT website about 1/3 down the page.“The signal should go up and down between 0-2.0 Volts and 10.5-13.0 Volts, changing every 4-5 metres. This signal is 8000 pulses per mile”.
“The reed switch is mounted on a simple circuit board in series with a 120 Ohm resistor”.
http://www.actproducts.co.uk/2011/lucas-14cux-fuel...
So I don’t know what is correct, or maybe it should have both !!!
A fun night in with an Ostrich
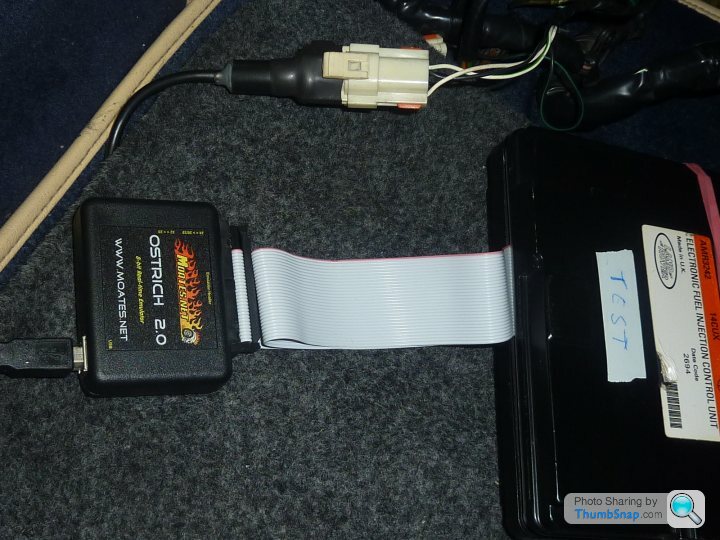
With the engine running I copied a complete image with a weaker map to the Ostrich and the idle dropped for a moment, RoverGauge displayed the updated map after disconnecting and reconnecting. I then copied my standard map back to the Ostrich and the idle picked up for a moment and again RoverGauge displayed the changes after disconnection and reconnecting.
With the engine running I copied a complete image with a weaker map to the Ostrich and the idle dropped for a moment, RoverGauge displayed the updated map after disconnecting and reconnecting. I then copied my standard map back to the Ostrich and the idle picked up for a moment and again RoverGauge displayed the changes after disconnection and reconnecting.
Further to my science experience on an Ostrich last night, and to answer an email, I must clarify I was updating the whole prom image in one hit via emutility. I reduced every value in map 2 and the ajdustment factor down by 10 in hex just to prove updates take immediate effect and yes they do!!!
The moment of truth comes next, will an individual map entry updated via TunerProRT also have an immediate effect? Do we need to correct the checkksum in real time? Stay tuned for the next instalment, Dun! Dun!! Dunnn!!!
The moment of truth comes next, will an individual map entry updated via TunerProRT also have an immediate effect? Do we need to correct the checkksum in real time? Stay tuned for the next instalment, Dun! Dun!! Dunnn!!!
robertf03 said:
Have you had any problems changing ROMS on the fly? (i.e. does it throw a checksum error?)
NO, it didn’t throw a checksum error on the fly when I switched maps at idle and my second map did have a checksum error, I guess that’s a useful test in itself. I'll do some further testing to see when the checksum is tested. It would be good for TuneProRT to correct the checksum on the fly and ready for copying to EPROM. At least the checksum error has no ill effect on a running engine and therefore could be corrected afterwards ready for copying to EPROM. Please note I have edited this message, sorry.
Edited by stevesprint on Tuesday 10th September 18:42
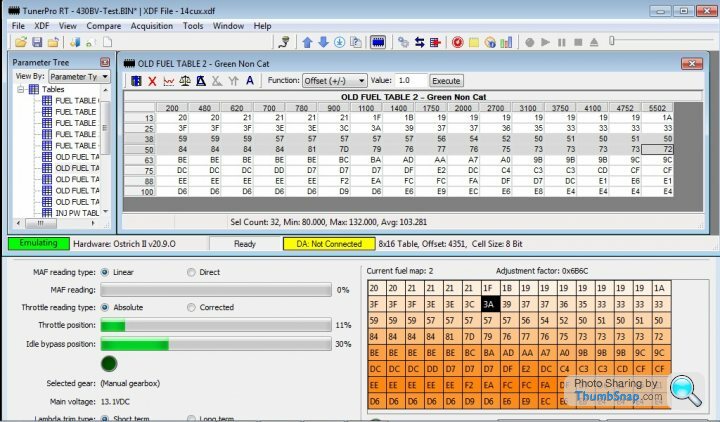
YES !!! - I’ve re-mapped my 14CUX in Real-Time!!! - Have I made 14CUX history???
Before – Watch the bottom line of the map
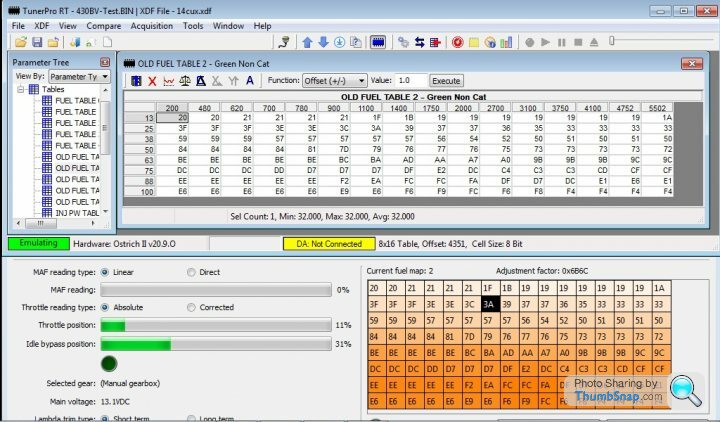
After – RoverGauge displays the amended map without turning off the engine.
I must thank Robert for his TunerPro defination file, Spitfire4v8 for the loan of his Ostrich, Colin/Dan for cracking the secret addresses in the black box and Mark for his Lambda box and tech support.
This wouldn’t have happened without all the different skills from around the world pulling in the same direction. I’m going to crack open a beer.
CHEERS!!! Steve (re-mapper) Sprint
P.S. Although we now have a workable solution we still need to add tuning features to TunerPro and simplify the checksum.
Before – Watch the bottom line of the map
After – RoverGauge displays the amended map without turning off the engine.
I must thank Robert for his TunerPro defination file, Spitfire4v8 for the loan of his Ostrich, Colin/Dan for cracking the secret addresses in the black box and Mark for his Lambda box and tech support.
This wouldn’t have happened without all the different skills from around the world pulling in the same direction. I’m going to crack open a beer.
CHEERS!!! Steve (re-mapper) Sprint
P.S. Although we now have a workable solution we still need to add tuning features to TunerPro and simplify the checksum.
danbourassa said:
The only way to run open loop is by selecting an open loop map (1, 2 or 3). If it's a NAS vehicle, it will be a little more difficult (there may be a software lock value and a missing connection). If you have cats installed, I wouldn't even attempt to run open loop. Mark makes a good point about optimizing in a localized way, if it can be done. Also, even closed loop maps run open above a certain RPM, so you may have some freedom there. Other than than, as Mark also mentioned, the goal should just be to keep the trim centered.
Dan/Colin/Robert/DaveP/Mark/anyoneMark and Joolz’s (spitfire4v8) discussion has thrown my mind into overdrive and as a result I thought it might be useful to bounce some ideas around to see what the options are: -
1. Would it be possible to add an option to RoverGauge to temporarily speed up the long-term lambda cycle?
2. Would it be possible to add a lambda long term trim reset button to RoverGauge.
3. What other parameters does the 14CUX learn, e.g. stepper position??
4. Could you add an option to RoverGauge to refresh the fuel map displayed (I had to disconnect and reconnect each time)
5. If I really wanted to turn off the lambdas, I realise the risks, is there any reason why I couldn’t copy the cat map 5 to a non-cat map 2 and change the map resister accordingly, does it run the same main code? I understand not for NAS vehicle?
6. Would it be possible to add an option to RoverGauge to switch maps, on second thoughts that could be very very risky in the wrong hands but anyway would it be possible?
7. How can Lambda sensors work on a TVR when they are down wind of the precats?
8. Do rolling roads normally map cars with the lambdas functioning?
Sorry I’m throwing a lot of questions into the air, I just want to get some options bouncing around to see what goes over the fence and what sticks.
Thank you in anticipation.
Cheers Steve
P.S. This reminds me why I bought a pre-cat Griff
Thanks everyone for answering my random questions. I've been busy testing my PreCat Griff with a white tune resistor and my non cat fuel map copied to map 5 and with the Lambda's disconnected. Within 25 seconds the short term trims shot to 100% on the right. After a further 2 minutes they reset to the centre/center but this time moved one at a time to 100% and produced lambda errors, first the right then the lefts. Although my car stayed on fuel map 5 with the lambdas errors it drove surprisingly well. I still think their are too many unknowns and risks with disconnecting the lambdas. For example does the code compensate for the missing lambda sensors? Are the throttle direction tables different? Mark it would be interesting to hear how well your car drives with the same test.
1. I love this forum; you ask one question and get three very different and very valid answers. Spitfire as you tune the later TVRs from the lambda trims and a wide band sensor it’s time you try the same technique on the 14CUX after a reset. Now I've seen the trims work I guess you could tune on the short term plus a wide band sensor before the long trim kicks in.
2. Yes please, it will make Spitfire's life easier.
3. That's interesting, so it learns lambda trims plus minimum idle motor position. Shame it doesn't learn max idle motor position for given engine temperatures.
4. Sorry Colin, I didn't mean constantly, I was thinking more of a refresh button near the map.
5. Thanks, that’s what I would expect. A long time ago someone told me TVR didn't bother copying the cat fuel maps and code to the Precat ECU’s but your comments and my test above proves that wrong. My Griffith's 4.3 cat fuel map looked like a standard 3.9 Land Rover cat map and certainly wasn't blank.
6. That makes sense especially when I've seen the map number change mid flight when changing the tune resistor. Maybe it's for the best as in the wrong hands could be risky and I'm sure most people in the 14CUX business would have a collection of tune resistors.
Keep up the good work chaps & Cheers
Steve
Mark
Have you seen this little tool, it removes the pain from fixing the checksum. It's just what we need and it works a treat, Thanks Workshop15 Ltd.
http://www.pistonheads.com/gassing/topic.asp?h=0&a...
Enjoy, Steve
Have you seen this little tool, it removes the pain from fixing the checksum. It's just what we need and it works a treat, Thanks Workshop15 Ltd.
http://www.pistonheads.com/gassing/topic.asp?h=0&a...
Enjoy, Steve
Dan/Colin
As Mark has lambdas probes with no cats is their any point him copying map 5 to map 2 to turn the lambdas off to see if the results are similar. I’m thinking it could be a way to temporary run in open loop while tuning or is their different tables like the start up enrichment, throttle and temperature for each map.
I’ll have to fit some lambdas probes this winter so I can help with the testing.
Steve
Robert
You’ve made great progress with Tunerpro and added extra tables, scalars and checksum.dll. I can confirm TunerPro is now updating both images but checksum.dll only corrects both images the first time round. On the second save it only corrects 7FEB and doesn’t make any difference if you are emulating or not. Sorry busy weekend but I hope to get out and play with data tracing this week.
Cheers Steve
Gassing Station | Griffith | Top of Page | What's New | My Stuff