1.2 TSI EPC Error (P334a)
Discussion


Hi All,
Odd one this, haven't been able to find much info on it either. The car sometimes starts with the EPC light on accompanied by a "Stop Start Error" message on the MFD and goes into uber limp mode (25mph is an acheivement). Once it was also accompanied by the check engine light too, although this cleared itself after a few runs. VCDS recorded this (which is also why I knew it would be safe to carry on driving):
1 Fault Found:
10478 - Charge Pressure Control Actuator
P334A 00 [173] - Electrical Malfunction
MIL ON - Confirmed - Tested Since Memory Clear
Freeze Frame:
Fault Status: 00000001
Fault Priority: 2
Fault Frequency: 5
Mileage: 73898 km
Date: 2016.01.07
Time: 10:17:20
I did have to unplug this actuator when I changed the air filter for better access not long before I got this error but I've checked it's in properly a fair few times and have also cleaned it with contact cleaner for good measure. So it's either I've some how managed to disturb the loom into the plug (unlikely I'd have thought), or it's just a coincidence.
I'm pretty sure it isn't due any software updates as it looks to have the actuator shim that was fitted during the 2012 recall. The really wierd part though is the car runs totally fine as long as it starts ok without the light..
Anyone else had this before? Is it new actuator or dare I say it, new turbo time?
Thanks in advance!
FIX FOR P334A ISSUE…
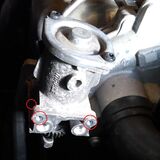
Having had a couple of 1.2 TSI cars that have demonstrated this fault and investigated further, it seems there’s a design flaw with the turbo actuators on this engine (located just to the right of the exhaust heatshield and mounted on the turbo). The internal position sensor’s plastic slides wear out and this extra slop allows the moving part of the sensor to become jammed at a self-locking angle to the fixed housing. To remedy this:
1. Purchase a 5 lobe security star drive set from Screwfix for about £20 to enable you to undo the 3 anti-tamper screws on the actuator. You'll also need some plastic grease (brake calliper grease will be fine) and spray on lube (must be high temperature & plastic compatible such as silicone or PTFE based - metal lubes may kill the plastics!!).
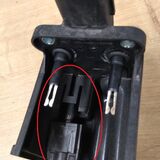
2. Undo the electrical connector on the actuator by pushing down on the jack whilst gently lifting the tab on the right (fingernails work best if you have them long enough but be careful as these connectors are notorious for becoming brittle and snapping. If this happens you’ll need a small zip tie to hold the connector together when you’re finished). When you see the clip release you can then lift off the jack.
3. Undo the 3 anti-tamper screws (receiving holes circled in picture in picture - two at the top and one slightly hidden at the bottom towards the front of the car) being careful not to drop them.
4. Separate the two main halves of the actuator by sliding the black plastic housing to the right. It has runners to keep everything aligned so you'll need to slide it a good distance before it's fully separated but there should be room in the engine bay to do so.
5. Using a small flathead screwdriver, lift the retaining tab up from the top of the position sensor (circled in image) and the moving part of the sensor should now spring away from the housing but still be retained by the spring.
6. Use your plastic compatible grease to lubricate the slides on either side of both the moving parts and housing of the sensor being very careful not to stress & deform the spring. Also grease the boss the spring sits on and then re-clip the moving part back into the housing.
7. Use your plastic compatible grease to lubricate the teeth on all the gears on the other half of the actuator (i.e. the sub-assembly remaining mounted on the car). Ask a friend to hold a small mirror and a torch and spray your plastic compatible lube around the metal slide and spring parts to the left of the gears as you won’t be able to get grease on there with it still being mounted in the car due to access.
8. Ensure the motor connector o-rings are clean and use your plastic compatible grease to lube them.
9. For good measure you can use some battery terminal grease on the motor connector prongs to ensure good conductivity.
10. Reassemble the actuator and reconnect the electrical jack.
11. Turn you ignition on full (no need to start engine) and check whether the actuator is making a high pitched tone. If it is, disconnect and reconnect the jack a few times until this stops to reset the motor.
12. Clear your fault codes as the car should now be fixed.
13. Enjoy not having to pay for a new turbo to be fitted which is the default procedure for this fault at a main dealer.
It should be noted this error is different to the closely related P334B error code which reflects a mechanical problem with the turbo bypass valve becoming obstructed.
Having had a couple of 1.2 TSI cars that have demonstrated this fault and investigated further, it seems there’s a design flaw with the turbo actuators on this engine (located just to the right of the exhaust heatshield and mounted on the turbo). The internal position sensor’s plastic slides wear out and this extra slop allows the moving part of the sensor to become jammed at a self-locking angle to the fixed housing. To remedy this:
1. Purchase a 5 lobe security star drive set from Screwfix for about £20 to enable you to undo the 3 anti-tamper screws on the actuator. You'll also need some plastic grease (brake calliper grease will be fine) and spray on lube (must be high temperature & plastic compatible such as silicone or PTFE based - metal lubes may kill the plastics!!).
2. Undo the electrical connector on the actuator by pushing down on the jack whilst gently lifting the tab on the right (fingernails work best if you have them long enough but be careful as these connectors are notorious for becoming brittle and snapping. If this happens you’ll need a small zip tie to hold the connector together when you’re finished). When you see the clip release you can then lift off the jack.
3. Undo the 3 anti-tamper screws (receiving holes circled in picture in picture - two at the top and one slightly hidden at the bottom towards the front of the car) being careful not to drop them.
4. Separate the two main halves of the actuator by sliding the black plastic housing to the right. It has runners to keep everything aligned so you'll need to slide it a good distance before it's fully separated but there should be room in the engine bay to do so.
5. Using a small flathead screwdriver, lift the retaining tab up from the top of the position sensor (circled in image) and the moving part of the sensor should now spring away from the housing but still be retained by the spring.
6. Use your plastic compatible grease to lubricate the slides on either side of both the moving parts and housing of the sensor being very careful not to stress & deform the spring. Also grease the boss the spring sits on and then re-clip the moving part back into the housing.
7. Use your plastic compatible grease to lubricate the teeth on all the gears on the other half of the actuator (i.e. the sub-assembly remaining mounted on the car). Ask a friend to hold a small mirror and a torch and spray your plastic compatible lube around the metal slide and spring parts to the left of the gears as you won’t be able to get grease on there with it still being mounted in the car due to access.
8. Ensure the motor connector o-rings are clean and use your plastic compatible grease to lube them.
9. For good measure you can use some battery terminal grease on the motor connector prongs to ensure good conductivity.
10. Reassemble the actuator and reconnect the electrical jack.
11. Turn you ignition on full (no need to start engine) and check whether the actuator is making a high pitched tone. If it is, disconnect and reconnect the jack a few times until this stops to reset the motor.
12. Clear your fault codes as the car should now be fixed.
13. Enjoy not having to pay for a new turbo to be fitted which is the default procedure for this fault at a main dealer.
It should be noted this error is different to the closely related P334B error code which reflects a mechanical problem with the turbo bypass valve becoming obstructed.
thanks for posting this solution, you just helped us out here in Australia
my wife's VW polo was in limp mode one morning - i fixed it briefly with wd40 then had to rescue her again. used a multi-purpose lube and no errors a week since. cheers mate, you win good guys of the internet award
my wife's VW polo was in limp mode one morning - i fixed it briefly with wd40 then had to rescue her again. used a multi-purpose lube and no errors a week since. cheers mate, you win good guys of the internet award
VeeFource said:
FIX FOR P334A ISSUE…
Having had a couple of 1.2 TSI cars that have demonstrated this fault and investigated further, it seems there’s a design flaw with the turbo actuators on this engine (located just to the right of the exhaust heatshield and mounted on the turbo). The internal position sensor’s plastic slides wear out and this extra slop allows the moving part of the sensor to become jammed at a self-locking angle to the fixed housing. To remedy this:
1. Purchase a 5 lobe security star drive set from Screwfix for about £20 to enable you to undo the 3 anti-tamper screws on the actuator. You'll also need some plastic grease (brake calliper grease will be fine) and spray on lube (must be high temperature & plastic compatible such as silicone or PTFE based - metal lubes may kill the plastics!!).
2. Undo the electrical connector on the actuator by pushing down on the jack whilst gently lifting the tab on the right (fingernails work best if you have them long enough but be careful as these connectors are notorious for becoming brittle and snapping. If this happens you’ll need a small zip tie to hold the connector together when you’re finished). When you see the clip release you can then lift off the jack.
3. Undo the 3 anti-tamper screws (receiving holes circled in picture in picture - two at the top and one slightly hidden at the bottom towards the front of the car) being careful not to drop them.
4. Separate the two main halves of the actuator by sliding the black plastic housing to the right. It has runners to keep everything aligned so you'll need to slide it a good distance before it's fully separated but there should be room in the engine bay to do so.
5. Using a small flathead screwdriver, lift the retaining tab up from the top of the position sensor (circled in image) and the moving part of the sensor should now spring away from the housing but still be retained by the spring.
6. Use your plastic compatible grease to lubricate the slides on either side of both the moving parts and housing of the sensor being very careful not to stress & deform the spring. Also grease the boss the spring sits on and then re-clip the moving part back into the housing.
7. Use your plastic compatible grease to lubricate the teeth on all the gears on the other half of the actuator (i.e. the sub-assembly remaining mounted on the car). Ask a friend to hold a small mirror and a torch and spray your plastic compatible lube around the metal slide and spring parts to the left of the gears as you won’t be able to get grease on there with it still being mounted in the car due to access.
8. Ensure the motor connector o-rings are clean and use your plastic compatible grease to lube them.
9. For good measure you can use some battery terminal grease on the motor connector prongs to ensure good conductivity.
10. Reassemble the actuator and reconnect the electrical jack.
11. Turn you ignition on full (no need to start engine) and check whether the actuator is making a high pitched tone. If it is, disconnect and reconnect the jack a few times until this stops to reset the motor.
12. Clear your fault codes as the car should now be fixed.
13. Enjoy not having to pay for a new turbo to be fitted which is the default procedure for this fault at a main dealer.
It should be noted this error is different to the closely related P334B error code which reflects a mechanical problem with the turbo bypass valve becoming obstructed.
Excellent post, thank you very much for this Having had a couple of 1.2 TSI cars that have demonstrated this fault and investigated further, it seems there’s a design flaw with the turbo actuators on this engine (located just to the right of the exhaust heatshield and mounted on the turbo). The internal position sensor’s plastic slides wear out and this extra slop allows the moving part of the sensor to become jammed at a self-locking angle to the fixed housing. To remedy this:
1. Purchase a 5 lobe security star drive set from Screwfix for about £20 to enable you to undo the 3 anti-tamper screws on the actuator. You'll also need some plastic grease (brake calliper grease will be fine) and spray on lube (must be high temperature & plastic compatible such as silicone or PTFE based - metal lubes may kill the plastics!!).
2. Undo the electrical connector on the actuator by pushing down on the jack whilst gently lifting the tab on the right (fingernails work best if you have them long enough but be careful as these connectors are notorious for becoming brittle and snapping. If this happens you’ll need a small zip tie to hold the connector together when you’re finished). When you see the clip release you can then lift off the jack.
3. Undo the 3 anti-tamper screws (receiving holes circled in picture in picture - two at the top and one slightly hidden at the bottom towards the front of the car) being careful not to drop them.
4. Separate the two main halves of the actuator by sliding the black plastic housing to the right. It has runners to keep everything aligned so you'll need to slide it a good distance before it's fully separated but there should be room in the engine bay to do so.
5. Using a small flathead screwdriver, lift the retaining tab up from the top of the position sensor (circled in image) and the moving part of the sensor should now spring away from the housing but still be retained by the spring.
6. Use your plastic compatible grease to lubricate the slides on either side of both the moving parts and housing of the sensor being very careful not to stress & deform the spring. Also grease the boss the spring sits on and then re-clip the moving part back into the housing.
7. Use your plastic compatible grease to lubricate the teeth on all the gears on the other half of the actuator (i.e. the sub-assembly remaining mounted on the car). Ask a friend to hold a small mirror and a torch and spray your plastic compatible lube around the metal slide and spring parts to the left of the gears as you won’t be able to get grease on there with it still being mounted in the car due to access.
8. Ensure the motor connector o-rings are clean and use your plastic compatible grease to lube them.
9. For good measure you can use some battery terminal grease on the motor connector prongs to ensure good conductivity.
10. Reassemble the actuator and reconnect the electrical jack.
11. Turn you ignition on full (no need to start engine) and check whether the actuator is making a high pitched tone. If it is, disconnect and reconnect the jack a few times until this stops to reset the motor.
12. Clear your fault codes as the car should now be fixed.
13. Enjoy not having to pay for a new turbo to be fitted which is the default procedure for this fault at a main dealer.
It should be noted this error is different to the closely related P334B error code which reflects a mechanical problem with the turbo bypass valve becoming obstructed.
My wife's 1.2tsi Ibiza fr gave this code and was intermittently showing the EPC light. Since following the procedure it hasn't missed a beat so hopefully it's all sorted.
Thanks again,
Kirk
I have been having the same issue for the past 2 yrs. When the weather gets cold, the EPC error pops up when restarting the car after driving a few kms. And never when the car has stood overnight. So as suggested by VeeFource, I ordered a 5 point torx and opened up the actuator housing and found these
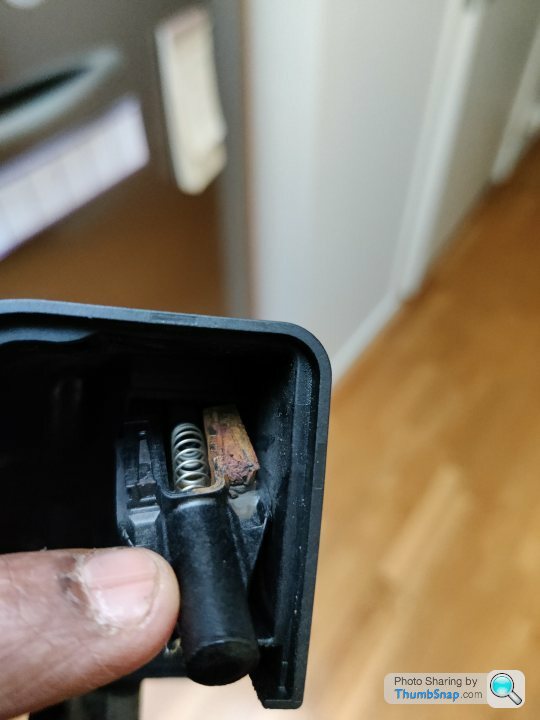
I dont understand how a plastic slider can rust. Or is there a metal conductor lining that is used to measure the position of the wastegate?
I didnt have the courage the remove the rust completely without knowing how it looks new. So I just scrapped away excess rust and applied silicon grease on the sliders & gears and put it back. Ive cleared the fault code and now I am keeping my fingers crossed that this solves the problem.
Thank you VeeFource!! 🙏🙏🙏
Sorry to be thick but I can't see where the third retaining screw is. Car is a 2013 Ibiza 1.2 TSi. I undid the two at the front but couldn't get the black plastic part off. Got the P334a error out of the blue and now its showing the P334b error as well. Is it just as easy to replace the whole actuator, I've seen them advertised for about £100.
Hi
Looks like I am going to have to perform this operation too on my wifes car!
Thanks for these very clear step by step instructions
I dont have any of the kit needed so will need to shop, can you advise if the following will be suitable, I really dont want to go to the effort and make a rookie error!
plastic grease (brake calliper grease will be fine) -
https://www.screwfix.com/p/wd-40-specialist-white-...
spray on lube -
https://www.screwfix.com/p/wd-40-dry-ptfe-lubrican...
Any help gratefully received.
thanks
Doug
Hey, I had this same error on my Seat Toledo 2015. One day last week the EPC light lit up and my car went in limp mode. I drove a few kilometers home and started the car again and it has been ok since, no EPC light. We're going on a longer holiday road trip in a few weeks so I want to fix the problem 'cause I don't want my car to leave us on the road somewhere farther from home.
So my 1st question is: is the EPC light and the fault code going to reappear if I'll perform this fix? I.e. Does the car know if the actuator has been tampered with? I don't have an OBD or VCDS reader myself so I'll have to pay for clearing the code, that's why I ask. And of course if the error is on, the car will be in limp mode again.
And the 2nd question: Is CRC Braklube Pro (link below) a suitable plastic lube for this operation? I already bought silicon based spray lube but I have yet to buy the "stickier" stuff mentioned in the instructions.
https://www.etra.fi/en/crc-braklube-pro-100g-10340...
Cheers from Finland!
Edited by seat_toledo on Wednesday 30th June 11:09
Bumping the thread to thank Veefource & others for the detailed guide & pictures relating to this fault.
Unfortunately it's not fixed the issue on a 2015 1.2 TSI in a Yeti.
I refitted the sensor all cleaned & lubed up. There wasn't much wear visible but the sliding plastic part was a bit wobbly /had lots of play in the channel it sits in, & did feel like it could have been binding up.
Started car, reset the codes & it seemed to test drive perfectly. However the P334A00 code comes back immediately when the car is restarted.
It almost feels like the actuator is failing some sort of ignition/power on test, if that is a thing?
I used a generic bluetooth OBD2 adapter & the Carly app to read/erase the codes.
There were some other codes present, including the below, & some relating to headlamp washer relay, but I can't really find much related information on them so don't think they point towards any other potential cause:
P01BF Function limitation due to voltage to high
P038B Intervention load management
Does anyone have any ideas?
I feel a bit out of my comfort zone with this, being used to working on 20+ year old cars where parts fail & don't work, until they do, & am getting a bit concerned i'll just have to take it to a garage & be into 'start replacing parts until it's fixed' territory.
I sorted this issue for near £0 & thought i'd update incase anyone else finds this thread with a google search (as I did).
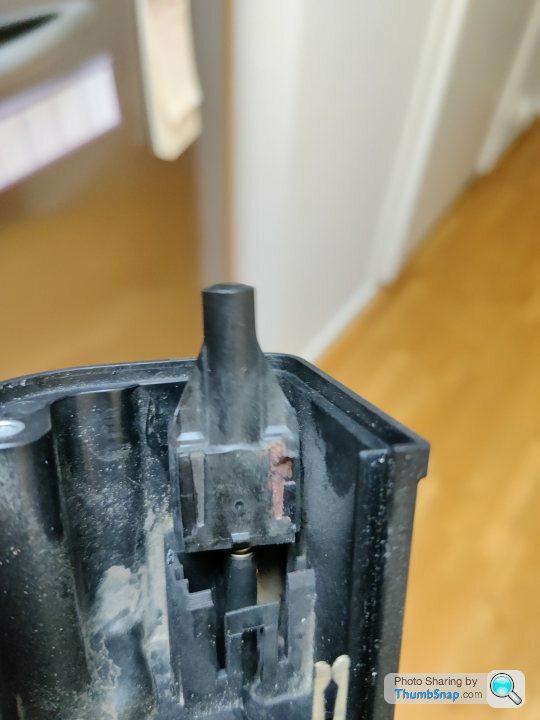
The sensor is pretty basic - it's a hall effect sensor with the magnet on the piece of plastic that moves.
The issue with mine was that the combination of the 'slop' within the sliding plastic part & the offset 'wear'/flat spot on the dome end that contacts the metal push rod from the turbo, had clearly combined together to cause the signal to be just outside an acceptable range for the ECU.
Simple fix - use epoxy (I used JB Weld) to build the dome material back up & file into shape so it is close to original.
I drilled a small 1mm hole in the end to help physically locate the epoxy, then just put a blob on the end, contained within the wear mark, then filed to the dome shape once dry. I left it slightly proud of where it would have been originally to account for the additional wear slop in the sliding mechanism.
I also polished the sliding surfaces with 1000grit wet & dry so it was smooth.
Worked perfectly.
Gassing Station | Audi, Seat, Skoda & VW | Top of Page | What's New | My Stuff