Frequently Asked Questions
This Wiki is intended as a help to both existing and new owners of the modern Astons - Gaydon cars plus the car that saved the marque from bankruptcy - the DB7. Feel free to add relevant items yourself, but please keep it as a Wiki not a discussion forum. For feedback on the Wiki please add them to the FAQ Sticky discussion thread.
All independents / garages / paint correction companies have been recommended by Aston owners. Please don't just add your own company. You will just be deleted!
|
Please fill in if you have any recommendations (use the same formatting as below with the '||' separators so that it forms part of the table and please insert in alphabetical order)
Please fill in if you have any recommendations
Self healing film is an excellent investment IMO. GTechniq protection also worth looking at, although do not expect beading and sheeting if using the platinum product.
Thanks to Paddy328 (Francis- Emerald Detailing) on here for the following guide, all work is his! Took him ages to put together. Ignore the bit at the beginning re OCD - those that know why it had to be done that way, will understand.
See this thread:
http://www.pistonheads.com/gassing/topic.asp?h=0&a...
The synthetic suede used on the interior is called Alcantara. The manufacturers cleaning details are here
http://www.alcantara.com/#/en/menu/the_material/ma...
Apart from calling the dealer there are other ways of determining the paint code for your Aston Martin
1)All Aston Martin - Go to the Dupont site at www.dupontrefinish.eu You dont need to sign in, just go to the Colour Retrieval section and put Aston Martin in as the search, that brings up the AM colour pages.
2)V8 Vantage - Lift the bonnet and remove the large cover plate at the front of the engine bay, the one with the little AM inspection plaque on it. You can then see a cross-member at the front running across the car with a white label on it; the paint code is shown on there.
UPDATE (Courtesy of Retman) - there is an easier way to find the paint name in a V8 Vantage. Remove the cover for the nav DVD player on the upper left hand side of the boot. There should be a sticker just above the DVD player with the name of the paint colour on it.
Some people have had problems pairing the 4 / 5 iPhone, especially on early cars, but will work:-
Put the iphone Bluetooth into search mode.
Tell the car - Pair phone
Car tells you to put phone into search mode and then type 1 2 3 4 as the bluetooth code.
Phone will see the car - will list as Aston Martin. Put code in
It will then fail! Car says pairing failed.
But you now have the iphone recognising the Aston Martin bluetooth, so on the phone, select "Aston Martin" on the bluetooth menu. It will bring up the boxes to put in the passcode. Put in 1 2 3 4, but do NOT press pair on the phone yet.
Tell the car - pair phone. Then immediatley press the Pair button (top right) on the phone.
Should then pair straght away.
Checked and phone is always then recognised on startup
To raise the wipers to vertical. Press numeral buttons 8 & 9 together and at the same time turn the ignition key to position 2. Remove key. To return wipers to the stowed position turn Ignition key to position 2. Press 2 & 6 and insert the ECU for newer cars.
"Aerotwin" blades now available for "old" DB9: pls see http://www.pistonheads.com/gassing/topic.asp?h=0&a...
The (in)famous Fuse 22 - supplies the power to the vacuum solenoid to keep the exhaust bypass valves open, so that the exhaust tone is kept constant from 1500 revs to 3000 revs. So the first thing you need to do after picking up your new Aston is remove the fuse to release the full aural effect at all revs. It will not damage your car in anyway. There have been reports of a few cars of the exhaust valves seizing through not being used. May be worth occasionally putting the fuse back in.
Its easy to remove, but there is more than one Fuse22 on the car DONT remove the one in the engine bay as the car will not start.
Video guide for the Vantage here http://www.youtube.com/watch?v=OyF82sj6TYc&fea...
https://www.youtube.com/watch?v=kOURMp0UpCY
Is now Fuse 3 in the Rapide & Fuse 15 on +MY11 Vantages, +MY12.25 Virage and DB9, Note the Gen 4 Vanquish fuse can not be removed as it is shared by other components.
A 3-way exhaust switch may be installed to provide 3 options:
1) Exhaust valve behaviour governed by driving mode (Normal / Sport)
2) Exhaust valve permanently open
3) Exhaust valve permanently close
Guide on page 3: https://www.pistonheads.com/gassing/topic.asp?h=0&...
No its not under the bonnet / in the engine bay, no its not in the boot to aid weight distribution, its inside the car behind the drivers seat (UK)! So if you get a flat battery youre not easily going to charge it from there.
There is a jump point under the bonnet connect the red crocodile clip to the positive + point, it,s black and rectangular has a hinged lid with a red cross on it, as you look at the engine bay stood at the front it is in the front left hand corner, connect the negative connection to any suitable point on the engine which is metal, Turn on the charger.
Battery Removal V8Vantage
http://www.pistonheads.com/gassing/topic.asp?t=965...
https://aston1936.com/2016/05/21/obdii-p-codes-on-...
See this thread:
http://www.pistonheads.com/gassing/topic.asp?t=994...
An easy guide to changing the rear lights:
http://www.pistonheads.com/gassing/topic.asp?h=0&a...
Excellent thread from dbs2000 on how to separate, dry out and reseal your rear lights rather than just paying out for new ones.
https://www.pistonheads.com/gassing/topic.asp?h=0&...
Steve Campbell has been used by quite a few PHers and also does work for a number of the AM specialist garages. A perfectionist and a big saving over buying new. Lights are stripped, repaired and re-sealed. Rears can be polished to pretty much as new, for a small extra charge. Fronts fail on the indicator or DRLs and these can be fixed, saving a fortune over buying new.
Ideal if you don't have the confidence to put your own lights in the oven.
Steve Campbell: campbells.electronicrepair@gmail.com 07917840156
An easy to follow guide here:
http://www.pistonheads.com/gassing/topic.asp?h=0&a...
After a low or flat battery resetting the windows may be required, the tell-tale sign is when a door is opened the window drops slightly an on closing the door the window does not return to the closed position,
1. Sitting in the car with the ignition switch turned on with all doors closed, press and hold the electric window switch in the down position, once the window is fully down keep the button pressed for a further 5 seconds, you may hear a click as the window position is relearned,
2. now send the window fully up again when the window reaches the top continue to hold the button for a further 5 seconds again a click may be heard,
3. repeat the above procedure for the other window
- If this doesn't work a 'hard' reset can be carried out on the appropriate window module by removing the power. Further info on the reset for the Vantage is here
If your windows are stuck after a low battery and won’t wind down as above you can do a hard reset by pulling the fuses. On a DB9 or DBS the two fuses are no’s 83 and 84 which are in the fuse box under the passenger footwell. Behind an aluminium plate which is held on with Torx head screws.
Occasionally the seats need resetting, which is disconcerting as you need to move all the way up all the way towards the dash, the back all the way towards the dash- everything up and forward. Dont panic thinking you will make it worse / un-drivable (seat too far forward), it does work.
(AMi I is as fitted to pre-Vanquish waterfall models i.e. up to and including MY15)
Two system supplied Standard (160W) and Premium (700W). If viewing a car its easy to tell what is fitted just turn it on and if it says Premium Audio its not the standard one! The differences between the two systems are:-
(AMi II is as fitted to the Vanquish waterfall models for the first year i.e. MY16
and AMi III was fitted to the final years of production i.e. MY17 and MY18)
There is a separate thread with lots of information and tips relating to the setup and use of AMi III, most of which relates to AMi II also.
AMi III Setup Tips
Nothing major - clutch on V8Vantage especially can smell / wear out. But depends more on use / abuse:-
http://www.pistonheads.com/gassing/topic.asp?h=0&a...
A member posted a very useful DIY guide on clutch replacement for the V8 Vantage:
http://clivechedzey.wix.com/aston#!clutch-change-2...
V8 Vantage:
Sportshift 1 (ASM1) Whilst generally good and liked by owners with it they do need a clutch learn occasionally to get the best / smoothest gear change
From cold and with the air conditioning turned off, foot on brake and start car, hold brake for 10 secs or so until you hear the clutch 'click'. Switch off and then repeat the process 3 or 4 times. The immediate difference is how much smoother it became at slow speeds, for instance manoeuvring in tight spaces in now a lot easier than when it would lurch forward before.
see this thread:-
http://www.pistonheads.com/gassing/topic.asp?h=0&a...
Sportshift 2 (ASM2) - is a 7 speed updated version fitted to the Vantage S, there is no creep mode and no need to do "learns" it also has hill assist
Sport Shift Hints and tips!
Check out this thread and ask for the guide, it covers ASM1 & 2.
https://www.pistonheads.com/gassing/topic.asp?h=0&...
Dreaded "Fault No Gear Change Possible" message that leaves you stranded
It might just be a blown fuse, a 30A one for the hydraulic pump, number 8 in the boot fuse box.
Check this thread for more info:
https://www.pistonheads.com/gassing/topic.asp?h=0&...
Service interval is 10,000 miles / annual.
Cost will depend on dealer location obviously central London dealers will charge more as their overheads are higher but as a guide (cost including oil and standard service parts):
Main Dealers - 750-1200. Always worth negotiating though! Try supplying your own oil as well to get the cost down
Independent ~450
Tyres
Rears - 220 each, every 10-15K miles
Fronts - 170 each every 20-25K miles
Pads/discs - 1000 fitted front
Clutch - 2K you may get lucky 40-50K miles or 10K miles...depends how the car has been driven
Thanks to Jockman, this DMS schedule is indicative of work done at various service intervals
---

---
Pads - Are Pagids. Available from non Aston dealers in the correct type
http://www.pistonheads.co.uk/gassing/topic.asp?h=0...
Alternate pad upgrade are Ferodo DS2500 compound-much less dust than Pagids but tend to squeek. Part numbers FERFCP1348H-Rear (Seat Cupra Leon), FERFRP3067H-Front (Imprezza ST1 98>). A small mod is required to the back plate if you wish to retain the wear sensors.
How to swap rear pads here
https://www.pistonheads.com/gassing/topic.asp?h=0&...
Theres only one way of saying this its s t! Early models were DVD based (its in the boot, left hand side, hidden behind a removable panel or under the left back seat) and didn't even provide full postcode search but can do so with updated discs.
Later models 2009 on are hard disc based, marginally better, have full postcode search but nowhere near the standard of a standalone TomTom / Garmin etc. It's an optional extra, but has been speced in most cars.
Updated software for DVD-equipped car is named "RTI 2012.1 - Europe (MMM/P2001)" (Volvo Part Number: 13 577 34 - three DVD's) and for HDD-equipped for 2009+ cars is named "RTI 2013.1 - Europe (MMM+)" (Volvo Part Number: 31396119 - two DVD's).
Post MY12.25 had Garmin SD Card based GV54 systems. Nav update SD cards available direct from Garmin as NT Navigator maps.
The kit is called the Boot Ingress Mod Kit and the tailgate flipseal (you need two at 6.79 each) part number is:
6G33-25902-AA
Total cost was 33.58 fitted
See this helpful wiki on how to change it, very easy:
https://www.pistonheads.com/gassing/topic.asp?h=0&...
See this thread:
http://www.pistonheads.com/gassing/topic.asp?h=0&a...
and, for up to date part numbers
http://www.pistonheads.com/gassing/topic.asp?h=0&a...
This thread also has tons on info, and even an how-to for ditching the old and very expensive Smartire sensors for newer ones:
https://www.pistonheads.com/gassing/topic.asp?h=0&...
See this thread:
http://www.pistonheads.com/gassing/topic.asp?h=0&a...
See this thread:
http://www.pistonheads.com/gassing/topic.asp?h=0&a...
See this thread for a fix for an unusual squeak/rattle that took my dealer 18 months to track down and cure:
http://www.pistonheads.com/gassing/topic.asp?h=0&a...
More links to rattle solution threads:
https://www.pistonheads.com/gassing/topic.asp?h=0&...
Another useful squeaks & rattles thread:
https://www.pistonheads.com/gassing/topic.asp?h=0&...
Available via the official AM Android/iOS app, free some room in the glovebox!
https://www.pistonheads.com/gassing/topic.asp?h=0&...
Normal Ride Height
2 x 37.5kg in front seats (37.5kg in each seat) plus a full fuel tank.
Ride height is measured from the centre of the road wheel, vertically, up to the road wheel arch.
Check tyre pressures before checking road wheel alignment.
Front & Rear Ride Height mm (15mm) mm (15mm)
Check vehicle geometry in the following order:
1 Caster Angle
2 Camber Angle
3 Toe
Adjustments to caster, camber and toe settings may impact each other. After checking / adjusting each setting, minor adjustments to caster, camber and toe may have to be made to reach the correct set up for the vehicle.
Both LH and RH Toe need to be adjusted when adjusting caster and camber.
Lower Suspension Arm front bush to the Subframe 115 Nm
Lower Suspension Arm rear bush to the Subframe 185 Nm
DB9/DBS
Tighten every second nut until all five nuts are tightened. Tighten all wheel nuts in two stages.
1. To 80 Nm (60 lb. / ft) in one continuous movement.
2. To 135 Nm (100 lb. / ft.) in one continuous movement. Note: DB9.2 is 180 Nm (133 lb./ft.)
V8V/V12V
Wheel Nut Torque
Tighten every second nut until all five nuts are tightened. Tighten all wheel nuts in two stages.
1. To 70 Nm (52 lb. / ft.) in one continuous movement.
2. To 180 Nm (133 lb. / ft.) in one continuous movement.
For those of you that want to remove / change the door cappings on the DB9, a step by step instruction
https://www.divinatech.com/v/vspfiles/manuals/dbs_...
A step by step guide on removing/replacing side strakes on a DB9. To be honest. Vantages aren't much different!
https://www.divinatech.com/v/vspfiles/manuals/DB9_...
http://www.pistonheads.com/gassing/topic.asp?h=0&a...
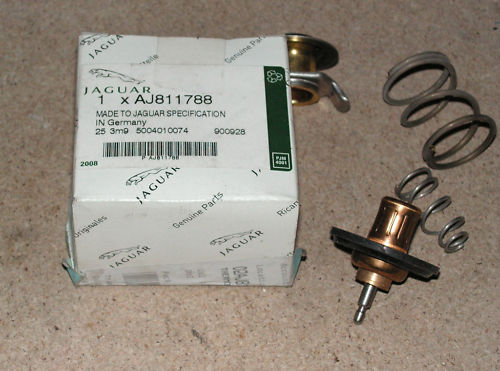
V8 Vantage Thermostat Replacement
After about 4 years (age related not mileage) the rubber diaphragm fails within the thermostat mechanism which results in the thermostat staying open and temperature gauge only getting to the 1/4 mark instead of the normal 1/2 way position.
It is a relatively easy and inexpensive fix - this is how I did it...........
I used the Jag part which is substantially cheaper than the AM part and is identical.
The thermostat I used is for XJ naturally aspirated from (V) H17519 / XK naturally aspirated from (V) B23158 part number AJ811788.
You may find a better/quicker way - the first thing you need is the patience of a saint and the hands of a gynecologist and buy a magnet on a stick!
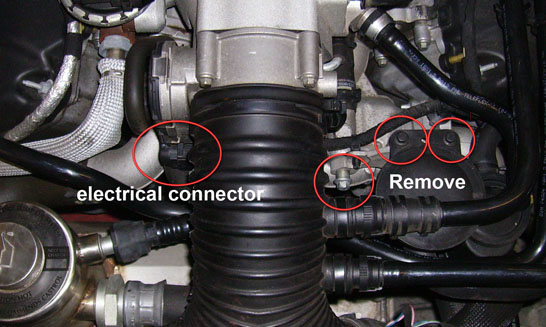
As I could not find a drain point on the coolant system I put a large shallow (1" deep) catch tray under the car - you may want to remove the undertray (I didn't)
As you look at the engine undo the electrical connector under and to the left of the throttle body.
undo the two the two (8mm spanner size) bolts that hold the black plastic cylindrical oil separator from the alloy bracket pull upwards about an 1" or so to release and twist on the pipes until out of the way.
Remove the two (8mm spanner size) nuts holding the bracket onto the thermostat housing - this is where you need the aforementioned dexterous hands or a magnet on a stick - you will drop them - I did!
Remove the (10mm spanner size) bolt at the font of the engine holding the bracket to the engine.
Now for the tricky bit - on my car the stud (nearest the head) was about a 1/16" too long to allow removal of the bracket (it would not clear the head) - I overcame this by using a die-grinder and a small ball-tip - I had to grind about half way down the plain shaft try not to go as far as the thread (I have heard that not everyone has had this problem) - pull the bracket clear.
Once you have overcome that, remove the two studs (13mm spanner size) and then the (8mm spanner size) bolt (this is a bit of a b*st*r*d) - pull thermostat housing off and hope you put the catch tray in the right place - about 1 to 2 liters of anti-freeze will come out.
Swing the housing/pipe clear so you can easily (relatively) access the thermostat
You then remove the thermostat by pressing down with your Arnie Shwarzenegger fingers, twisting at the same time - it's fairly obvious and not that bad really, resist the use of screwdrivers etc. the pin may be stuck into the housing at the pipe end pull it out and don't drop it down the pipe.
Make sure the rubber seal in the housing is ok, this is not a Jag part and there is no problem re-using the original provided it's intact and not twisted.
Re-assembly is just the reverse of the above procedure but getting the nut back onto the stud holding the bracket (the one you may have to grind) was a real bind - jam a rag underneath so if you drop it, it doesn't trap itself in an awkward or dangerous place. Use a dab of thread-lok on any bolts/nuts.
I reused the anti-freeze I caught, if you have to top up make sure you have the correct stuff - O.A.T. spec. Check for leaks, start her up - again check for leaks.
If you have all the tools to hand and armed with this info you should do it in about an hour and for less than 50.
Disclaimer - I am not an AM mechanic - this is for reference only - if you lose your fingers, sanity etc - don't blame me.

Changing internal bulbs for LEDs.
http://www.pistonheads.com/gassing/topic.asp?h=0&a...
Information shamelessly 'stolen' from the AMOC site Buyers Guide:-
Information to follow - feel free to add information
Information to follow - feel free to add information
IER in Letchworth for Headlamp LED repairs Speak to Matt in the office 01462 671001
http://www.ieruk.com/
All independents / garages / paint correction companies have been recommended by Aston owners. Please don't just add your own company. You will just be deleted!
|
All Astons
Independent Garages
Please fill in if you have any recommendations (use the same formatting as below with the '||' separators so that it forms part of the table and please insert in alphabetical order)
| AHM | 01252 845717 | www.astonmartincare.co.uk | Hampshire |
| AJ Tech - Aston and Jaguar specialist | 01626 903404 | www.ajtech.co.uk | Unit 2, Anchor Buildings, Battle Rd, Heathfield, Devon, TQ12 6RY |
| AM Performance | 01625 618007 | www.amperformance.co.uk | Macclesfield, Cheshire |
| Aston Installations | 01684 276752 - 07827663000 | https://astoninstallations.com/ | Unit E1 Green Lane Business Park, Green Lane, Tewkesbury GL20 8SJ |
| Aston Service Dorset Ltd | 01202 574727 | www.astonservicedorset.com | Wimborne, Dorset |
| Aston Workshop | 01207 233525 | www.aston.co.uk | Red Row, Stanley, Beamish DH9 0RW |
| Bamford Rose | 01608 663 514 | www.bamfordrose.com | Shipston-on-Stour, Warwickshire |
| Chicane Classics | 0118 932 6973 | https://chicane.am/ | Bramshill, Hook |
| Chiltern Aston | 01442 833 177 | www.chilternaston.co.uk | Hemel Hempstead |
| David Appleby Engineering | 01823 663139 | www.davidapplebyengineering.com | Wellington, Somerset |
| Desmond Smail | 01234 240636 | www.djsmail.co.uk | Newport Pagnell/Milton Keynes |
| Dovehouse | 01933 354144 | www.dovehousecars.com | Rushden, Northants |
| Fisher Performance Aston Martin and Prestige Cars Specialist | 01299 251444 | www.fisherperformance.co.uk | Droitwich WR9 0FF |
| J H PEARCE & CO | 01276 859087 | www.jhpearce.com | Chobham GU24 8HU |
| Martin's Aston Services | 01236 316 022 | www.martinsastonservices.co.uk | ,Kilsyth, G65 9JX |
| McGurk Performance Cars | 01926 691000 | www.mcgurk.com | Kineton,Warwickshire |
| Nicholas Mee | 020 8741 8822 | www.nicholasmee.co.uk | Hatfield, Hertfordshire |
| Phoenix | 07539 585066 | www.phoenix-am.co.uk | Basingstoke |
| Pugsley and Lewis | 020 8776 5577 | www.pugsleyandlewis.com | Kings Hall Works, Kings Hall Road, Beckenham, Kent, BR3 1LN |
| Quantum Works Ltd | 01622 431177 | www.quantumworksltd.com | 20-22, The Alders Estate, Seven Mile Lane, Mereworth, Kent, ME18 5JG |
| Rikki Cann | 01702 291818 | www.rikkicann.com | Essex |
| Stonies Ltd | 01622 716542 | Burnt Ash Road, Aylesford, Kent, ME20 7XB | |
| Trinity Engineering | 01932 862040 | www.trinityastonmartin.co.uk | Cobham, Surrey |
| Vantage Engineering | 01403 289722 | www.vantage-engineering.co.uk | West Sussex |
Shield/film installers and detailing
Please fill in if you have any recommendations
| Name | Phone Number | Website | Location |
|---|---|---|---|
| Cheshire Auto Detailing | 01565 751288 | cheshireautodetailing.com | North West |
| Elite Detailing and Protection | 07933 379333 | www.elitedetailing.co.uk | Central London & Birmingham |
| Emerald Detailing | 07909 541048 | www.emerald-detailing.com | Warwickshire / Mobile / UK |
| GlossmyRide | 07305 725302 | https://en-gb.facebook.com/glossmyride/ | Wellingborough |
| Invisifilm | 0161 929 9971 | http://www.invisifilm.co.uk/ | North West/Altrincham |
| Off Your Marks | 07881 934788 | www.offyourmarks.com | North West |
| Paintshield | 01733 390777 | www.paintshield.co.uk | Peterborough |
| Polished Perfection Detailing and ppf applications | 01752 874200 | www.polishedperfection.co.uk | Valley Rd Plymouth Devon |
| Reflections Detailing ask for Richard | 0800 0433 055 | www.reflections-detailing.co.uk | West Midlands |
| White Details | 07706 566622 | www.whitedetails.co.uk | East Midlands |
Self healing film is an excellent investment IMO. GTechniq protection also worth looking at, although do not expect beading and sheeting if using the platinum product.
Cleaning
Thanks to Paddy328 (Francis- Emerald Detailing) on here for the following guide, all work is his! Took him ages to put together. Ignore the bit at the beginning re OCD - those that know why it had to be done that way, will understand.
See this thread:
http://www.pistonheads.com/gassing/topic.asp?h=0&a...
The synthetic suede used on the interior is called Alcantara. The manufacturers cleaning details are here
http://www.alcantara.com/#/en/menu/the_material/ma...
Paint Codes
Apart from calling the dealer there are other ways of determining the paint code for your Aston Martin
1)All Aston Martin - Go to the Dupont site at www.dupontrefinish.eu You dont need to sign in, just go to the Colour Retrieval section and put Aston Martin in as the search, that brings up the AM colour pages.
2)V8 Vantage - Lift the bonnet and remove the large cover plate at the front of the engine bay, the one with the little AM inspection plaque on it. You can then see a cross-member at the front running across the car with a white label on it; the paint code is shown on there.
UPDATE (Courtesy of Retman) - there is an easier way to find the paint name in a V8 Vantage. Remove the cover for the nav DVD player on the upper left hand side of the boot. There should be a sticker just above the DVD player with the name of the paint colour on it.
DBS / DB9 / V8 Vantage / V12 Vantage / Virage
iPhone and Bluetooth
Some people have had problems pairing the 4 / 5 iPhone, especially on early cars, but will work:-
Put the iphone Bluetooth into search mode.
Tell the car - Pair phone
Car tells you to put phone into search mode and then type 1 2 3 4 as the bluetooth code.
Phone will see the car - will list as Aston Martin. Put code in
It will then fail! Car says pairing failed.
But you now have the iphone recognising the Aston Martin bluetooth, so on the phone, select "Aston Martin" on the bluetooth menu. It will bring up the boxes to put in the passcode. Put in 1 2 3 4, but do NOT press pair on the phone yet.
Tell the car - pair phone. Then immediatley press the Pair button (top right) on the phone.
Should then pair straght away.
Checked and phone is always then recognised on startup
Windscreen wiper change
To raise the wipers to vertical. Press numeral buttons 8 & 9 together and at the same time turn the ignition key to position 2. Remove key. To return wipers to the stowed position turn Ignition key to position 2. Press 2 & 6 and insert the ECU for newer cars.
"Aerotwin" blades now available for "old" DB9: pls see http://www.pistonheads.com/gassing/topic.asp?h=0&a...
Fuse22
The (in)famous Fuse 22 - supplies the power to the vacuum solenoid to keep the exhaust bypass valves open, so that the exhaust tone is kept constant from 1500 revs to 3000 revs. So the first thing you need to do after picking up your new Aston is remove the fuse to release the full aural effect at all revs. It will not damage your car in anyway. There have been reports of a few cars of the exhaust valves seizing through not being used. May be worth occasionally putting the fuse back in.
Its easy to remove, but there is more than one Fuse22 on the car DONT remove the one in the engine bay as the car will not start.
Video guide for the Vantage here http://www.youtube.com/watch?v=OyF82sj6TYc&fea...
https://www.youtube.com/watch?v=kOURMp0UpCY
Is now Fuse 3 in the Rapide & Fuse 15 on +MY11 Vantages, +MY12.25 Virage and DB9, Note the Gen 4 Vanquish fuse can not be removed as it is shared by other components.
3-Way Exhaust Switch
A 3-way exhaust switch may be installed to provide 3 options:
1) Exhaust valve behaviour governed by driving mode (Normal / Sport)
2) Exhaust valve permanently open
3) Exhaust valve permanently close
Guide on page 3: https://www.pistonheads.com/gassing/topic.asp?h=0&...
Battery Charging / Location
No its not under the bonnet / in the engine bay, no its not in the boot to aid weight distribution, its inside the car behind the drivers seat (UK)! So if you get a flat battery youre not easily going to charge it from there.
There is a jump point under the bonnet connect the red crocodile clip to the positive + point, it,s black and rectangular has a hinged lid with a red cross on it, as you look at the engine bay stood at the front it is in the front left hand corner, connect the negative connection to any suitable point on the engine which is metal, Turn on the charger.
Battery Removal V8Vantage
http://www.pistonheads.com/gassing/topic.asp?t=965...
List of P/error codes
https://aston1936.com/2016/05/21/obdii-p-codes-on-...
Numberplate Plinth Removal
See this thread:
http://www.pistonheads.com/gassing/topic.asp?t=994...
Changing rear lights on a DB9 or V8V coupe
An easy guide to changing the rear lights:
http://www.pistonheads.com/gassing/topic.asp?h=0&a...
Rear lights - how to separate & reseal
Excellent thread from dbs2000 on how to separate, dry out and reseal your rear lights rather than just paying out for new ones.
https://www.pistonheads.com/gassing/topic.asp?h=0&...
Front & rear light repair - Vantage, Rapide, DB9
Steve Campbell has been used by quite a few PHers and also does work for a number of the AM specialist garages. A perfectionist and a big saving over buying new. Lights are stripped, repaired and re-sealed. Rears can be polished to pretty much as new, for a small extra charge. Fronts fail on the indicator or DRLs and these can be fixed, saving a fortune over buying new.
Ideal if you don't have the confidence to put your own lights in the oven.
Steve Campbell: campbells.electronicrepair@gmail.com 07917840156
Removing steering wheel
An easy to follow guide here:
http://www.pistonheads.com/gassing/topic.asp?h=0&a...
Window / Seat Resets
After a low or flat battery resetting the windows may be required, the tell-tale sign is when a door is opened the window drops slightly an on closing the door the window does not return to the closed position,
1. Sitting in the car with the ignition switch turned on with all doors closed, press and hold the electric window switch in the down position, once the window is fully down keep the button pressed for a further 5 seconds, you may hear a click as the window position is relearned,
2. now send the window fully up again when the window reaches the top continue to hold the button for a further 5 seconds again a click may be heard,
3. repeat the above procedure for the other window
- If this doesn't work a 'hard' reset can be carried out on the appropriate window module by removing the power. Further info on the reset for the Vantage is here
If your windows are stuck after a low battery and won’t wind down as above you can do a hard reset by pulling the fuses. On a DB9 or DBS the two fuses are no’s 83 and 84 which are in the fuse box under the passenger footwell. Behind an aluminium plate which is held on with Torx head screws.
Occasionally the seats need resetting, which is disconcerting as you need to move all the way up all the way towards the dash, the back all the way towards the dash- everything up and forward. Dont panic thinking you will make it worse / un-drivable (seat too far forward), it does work.
Audio System (AMi I)
(AMi I is as fitted to pre-Vanquish waterfall models i.e. up to and including MY15)
Two system supplied Standard (160W) and Premium (700W). If viewing a car its easy to tell what is fitted just turn it on and if it says Premium Audio its not the standard one! The differences between the two systems are:-
- Door mounted speakers upgraded to 100W
- Two additional rear environment 100W speakers added (each with mid-range and tweeter units)
- Additional 100W centre-fill speaker
- Subwoofer speaker upgraded to 200W
- Dolby Pro-Logic II
- Total power output of 700W
| Surround | Dolby Pro Logic ON |
| Auto Vol | Low |
| Equaliser | Setting |
|---|---|
| 60 | 0 |
| 200 | -2 |
| 1k | -1 |
| 3k | +1 |
| 12k | +2 |
| Set Up | Setting |
|---|---|
| Bass | +2 |
| Treble | +1 |
| Fader | +1 to rear |
| Balance | 0 |
| Sub | +2 or +3 ( choose to your taste) |
| Centre | -3 |
| Surround | +6 |
Audio System (AMi II and AMi III)
(AMi II is as fitted to the Vanquish waterfall models for the first year i.e. MY16
and AMi III was fitted to the final years of production i.e. MY17 and MY18)
There is a separate thread with lots of information and tips relating to the setup and use of AMi III, most of which relates to AMi II also.
AMi III Setup Tips
Gearbox / Clutch Issues
Nothing major - clutch on V8Vantage especially can smell / wear out. But depends more on use / abuse:-
http://www.pistonheads.com/gassing/topic.asp?h=0&a...
A member posted a very useful DIY guide on clutch replacement for the V8 Vantage:
http://clivechedzey.wix.com/aston#!clutch-change-2...
V8 Vantage:
Sportshift 1 (ASM1) Whilst generally good and liked by owners with it they do need a clutch learn occasionally to get the best / smoothest gear change
From cold and with the air conditioning turned off, foot on brake and start car, hold brake for 10 secs or so until you hear the clutch 'click'. Switch off and then repeat the process 3 or 4 times. The immediate difference is how much smoother it became at slow speeds, for instance manoeuvring in tight spaces in now a lot easier than when it would lurch forward before.
see this thread:-
http://www.pistonheads.com/gassing/topic.asp?h=0&a...
Sportshift 2 (ASM2) - is a 7 speed updated version fitted to the Vantage S, there is no creep mode and no need to do "learns" it also has hill assist
Sport Shift Hints and tips!
Check out this thread and ask for the guide, it covers ASM1 & 2.
https://www.pistonheads.com/gassing/topic.asp?h=0&...
Dreaded "Fault No Gear Change Possible" message that leaves you stranded
It might just be a blown fuse, a 30A one for the hydraulic pump, number 8 in the boot fuse box.
Check this thread for more info:
https://www.pistonheads.com/gassing/topic.asp?h=0&...
Service Interval / Cost
Service interval is 10,000 miles / annual.
Cost will depend on dealer location obviously central London dealers will charge more as their overheads are higher but as a guide (cost including oil and standard service parts):
Main Dealers - 750-1200. Always worth negotiating though! Try supplying your own oil as well to get the cost down
Independent ~450
Tyres
Rears - 220 each, every 10-15K miles
Fronts - 170 each every 20-25K miles
Pads/discs - 1000 fitted front
Clutch - 2K you may get lucky 40-50K miles or 10K miles...depends how the car has been driven
Thanks to Jockman, this DMS schedule is indicative of work done at various service intervals
---
---
Pads / Discs
Pads - Are Pagids. Available from non Aston dealers in the correct type
http://www.pistonheads.co.uk/gassing/topic.asp?h=0...
Alternate pad upgrade are Ferodo DS2500 compound-much less dust than Pagids but tend to squeek. Part numbers FERFCP1348H-Rear (Seat Cupra Leon), FERFRP3067H-Front (Imprezza ST1 98>). A small mod is required to the back plate if you wish to retain the wear sensors.
How to swap rear pads here
https://www.pistonheads.com/gassing/topic.asp?h=0&...
Satellite Navigation
Theres only one way of saying this its s
t! Early models were DVD based (its in the boot, left hand side, hidden behind a removable panel or under the left back seat) and didn't even provide full postcode search but can do so with updated discs. Later models 2009 on are hard disc based, marginally better, have full postcode search but nowhere near the standard of a standalone TomTom / Garmin etc. It's an optional extra, but has been speced in most cars.
Updated software for DVD-equipped car is named "RTI 2012.1 - Europe (MMM/P2001)" (Volvo Part Number: 13 577 34 - three DVD's) and for HDD-equipped for 2009+ cars is named "RTI 2013.1 - Europe (MMM+)" (Volvo Part Number: 31396119 - two DVD's).
Post MY12.25 had Garmin SD Card based GV54 systems. Nav update SD cards available direct from Garmin as NT Navigator maps.
Factory fix to stop rainwater going into boot when opening Vantage tailgate
The kit is called the Boot Ingress Mod Kit and the tailgate flipseal (you need two at 6.79 each) part number is:
6G33-25902-AA
Total cost was 33.58 fitted
External temperature sensor replacement
See this helpful wiki on how to change it, very easy:
https://www.pistonheads.com/gassing/topic.asp?h=0&...
TPMS valve replacements
See this thread:
http://www.pistonheads.com/gassing/topic.asp?h=0&a...
and, for up to date part numbers
http://www.pistonheads.com/gassing/topic.asp?h=0&a...
This thread also has tons on info, and even an how-to for ditching the old and very expensive Smartire sensors for newer ones:
https://www.pistonheads.com/gassing/topic.asp?h=0&...
Throttle body cleaning guide
See this thread:
http://www.pistonheads.com/gassing/topic.asp?h=0&a...
Interior squeaks & rattles / Ski slope removal / Sat Nav rattles
See this thread:
http://www.pistonheads.com/gassing/topic.asp?h=0&a...
See this thread for a fix for an unusual squeak/rattle that took my dealer 18 months to track down and cure:
http://www.pistonheads.com/gassing/topic.asp?h=0&a...
More links to rattle solution threads:
https://www.pistonheads.com/gassing/topic.asp?h=0&...
Another useful squeaks & rattles thread:
https://www.pistonheads.com/gassing/topic.asp?h=0&...
Owners' manual in PDF
Available via the official AM Android/iOS app, free some room in the glovebox!
https://www.pistonheads.com/gassing/topic.asp?h=0&...
Alignment Info Factory Specification
| Item | Front | Rear |
|---|---|---|
| Toe (individual) | 3 (2) | 10 (+5/-0) |
| Total Toe | 6 (4) | 20 (+10/-0) |
| Camber | -30 (5) | -105 (-1 45) (5) |
| Cross Camber | 0 (10) | 0 (10) |
| Castor | 5 (+0.5/-0.25) | N/A |
| Cross Castor | 0 (0.25) | N/A |
| KPI | 11/22 | N/A |
Normal Ride Height
2 x 37.5kg in front seats (37.5kg in each seat) plus a full fuel tank.
Ride height is measured from the centre of the road wheel, vertically, up to the road wheel arch.
Check tyre pressures before checking road wheel alignment.
Front & Rear Ride Height mm (15mm) mm (15mm)
Check vehicle geometry in the following order:
1 Caster Angle
2 Camber Angle
3 Toe
Adjustments to caster, camber and toe settings may impact each other. After checking / adjusting each setting, minor adjustments to caster, camber and toe may have to be made to reach the correct set up for the vehicle.
Both LH and RH Toe need to be adjusted when adjusting caster and camber.
Lower Suspension Arm front bush to the Subframe 115 Nm
Lower Suspension Arm rear bush to the Subframe 185 Nm
Wheel Nut Torque
DB9/DBS
Tighten every second nut until all five nuts are tightened. Tighten all wheel nuts in two stages.
1. To 80 Nm (60 lb. / ft) in one continuous movement.
2. To 135 Nm (100 lb. / ft.) in one continuous movement. Note: DB9.2 is 180 Nm (133 lb./ft.)
V8V/V12V
Wheel Nut Torque
Tighten every second nut until all five nuts are tightened. Tighten all wheel nuts in two stages.
1. To 70 Nm (52 lb. / ft.) in one continuous movement.
2. To 180 Nm (133 lb. / ft.) in one continuous movement.
DB9 Door Cap Removal
For those of you that want to remove / change the door cappings on the DB9, a step by step instruction
https://www.divinatech.com/v/vspfiles/manuals/dbs_...
DB9 side strake Removal
A step by step guide on removing/replacing side strakes on a DB9. To be honest. Vantages aren't much different!
https://www.divinatech.com/v/vspfiles/manuals/DB9_...
Dashboard Panel Removal
http://www.pistonheads.com/gassing/topic.asp?h=0&a...
V8 Vantage Thermostat Replacement
After about 4 years (age related not mileage) the rubber diaphragm fails within the thermostat mechanism which results in the thermostat staying open and temperature gauge only getting to the 1/4 mark instead of the normal 1/2 way position.
It is a relatively easy and inexpensive fix - this is how I did it...........
I used the Jag part which is substantially cheaper than the AM part and is identical.
The thermostat I used is for XJ naturally aspirated from (V) H17519 / XK naturally aspirated from (V) B23158 part number AJ811788.
You may find a better/quicker way - the first thing you need is the patience of a saint and the hands of a gynecologist
and buy a magnet on a stick!As I could not find a drain point on the coolant system I put a large shallow (1" deep) catch tray under the car - you may want to remove the undertray (I didn't)
As you look at the engine undo the electrical connector under and to the left of the throttle body.
undo the two the two (8mm spanner size) bolts that hold the black plastic cylindrical oil separator from the alloy bracket pull upwards about an 1" or so to release and twist on the pipes until out of the way.
Remove the two (8mm spanner size) nuts holding the bracket onto the thermostat housing - this is where you need the aforementioned dexterous hands or a magnet on a stick - you will drop them - I did!
Remove the (10mm spanner size) bolt at the font of the engine holding the bracket to the engine.
Now for the tricky bit - on my car the stud (nearest the head) was about a 1/16" too long to allow removal of the bracket (it would not clear the head) - I overcame this by using a die-grinder and a small ball-tip - I had to grind about half way down the plain shaft try not to go as far as the thread (I have heard that not everyone has had this problem) - pull the bracket clear.
Once you have overcome that, remove the two studs (13mm spanner size) and then the (8mm spanner size) bolt (this is a bit of a b*st*r*d) - pull thermostat housing off and hope you put the catch tray in the right place - about 1 to 2 liters of anti-freeze will come out.
Swing the housing/pipe clear so you can easily (relatively) access the thermostat
You then remove the thermostat by pressing down with your Arnie Shwarzenegger fingers, twisting at the same time - it's fairly obvious and not that bad really, resist the use of screwdrivers etc. the pin may be stuck into the housing at the pipe end pull it out and don't drop it down the pipe.
Make sure the rubber seal in the housing is ok, this is not a Jag part and there is no problem re-using the original provided it's intact and not twisted.
Re-assembly is just the reverse of the above procedure but getting the nut back onto the stud holding the bracket (the one you may have to grind) was a real bind - jam a rag underneath so if you drop it, it doesn't trap itself in an awkward or dangerous place. Use a dab of thread-lok on any bolts/nuts.
I reused the anti-freeze I caught, if you have to top up make sure you have the correct stuff - O.A.T. spec. Check for leaks, start her up - again check for leaks.
If you have all the tools to hand and armed with this info you should do it in about an hour and for less than 50.
Disclaimer - I am not an AM mechanic - this is for reference only - if you lose your fingers, sanity etc - don't blame me.
Light Bulb Change
Changing internal bulbs for LEDs.
http://www.pistonheads.com/gassing/topic.asp?h=0&a...
Vanquish
Information shamelessly 'stolen' from the AMOC site Buyers Guide:-
Mechanical Checks
- Regular AM approved service schedule
- Check underbelly pans for signs of corrosion in attachment bolts
- See if transmission sensors have been upgraded to Hall effect update
- Check brake caliper paint for fading/peeling due to wheel cleaners
- Plug access - ?Compression test on cylinders
- Brake disk assembly bobbin worn ones rattle
- Ignition Coil replacement susceptible to failure
- Brake disc & pads front and rear check for warping
- Tyre Age and Wear
- ASM controller version and upgrades
- Oil leak from ASM/ rear axle propshaft seal prone to leakage
- Check general oil leaks transmission/ASM fluid
- Check steel cross-members for any sign of corrosion
- Look for any warning lights when driving particularly gearbox fault
- Check heater and Aircon units work properly extremes of temperature
- Check for signs or corrosion around window edges
- Check headlight plastic for signs of clouding or etching
- Check chrome areas for any sign of lifting
- Check panel gaps for any sign of previous damage or malalignment
- Observe front splitter for speed ramp and stone chip damage bound to be present but to what degree
- Wheels observe for any kerb damage
- Check headlight and windscreen wiper sensor functioning properly
Items that should be accompanying the car
- key fobs x 2 also aluminium case spare key fob comes in
- owner's manual
- radio manual
- mobile phone manual (if mobile phone fitted)
- umbrella
- First aid kit
- Owners Manual inc Service Schedule
- Quick Reference Guide
- Spare Bulb Kit
- Carpet mat for the boot
- Towing Eye
- Tyre inflator kit x 2 (Hoults)
- Fire Extinguisher
- Notepad
- Maglite Glovebox Torch
- Lamy Pen (you can buy a replacement without the AM logo from Lamy)
- Leatherman Sideclip multitool
- Tyre pressure gauge
- Car cover (was an extra)
- Battery Conditioner
- Radio code card usually with the owners manual
- SatNav CD
- CD Autochanger Magazine
DB7
Information to follow - feel free to add information
Classic Astons
Information to follow - feel free to add information
Headlamp LED Light repairs
IER in Letchworth for Headlamp LED repairs Speak to Matt in the office 01462 671001
http://www.ieruk.com/